
en Original Instructions – surface-restoration grinders 3
fr Notice d'utilisation d'origine - ponceuse de rénovation 16
es Manual de instrucciones original - Amoladoras de saneamiento 30
Read all instructions before using
Lire toutes les instructions avant de démarrer les travaux.
Lea y comprende todas las instrucciones antes de usar.
RG 130 ECI
Festool GmbH
Wertstraße 20
73240 Wendlingen
Germany
www.festoolusa.com
10480136_D / 2023-01-09

1-5
1-10
1-2 1-6
1-7
1-8
1-9
1-12
1-11
1-13
1-3 1-4
1-1
1

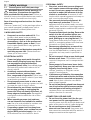
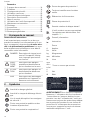
Contents
1 About this manual....................................... 3
2 Symbols.......................................................3
3 Safety warnings...........................................4
4 Intended use................................................8
5 Technical data............................................. 8
6 Functional description................................ 8
7 Commissioning........................................... 8
8 Working with the electric power tool........12
9 Service and maintenance..........................12
10 Storage...................................................... 13
11 Accessories............................................... 13
12 Environment..............................................14
13 General information..................................14
1 About this manual
Save these instructions
It is important for you to read and understand
this manual. The information it contains relates
to protecting your safety and preventing prob
lems. The symbols below are used to help you
recognize this information.
DANGER Description of imminent
hazard and failure to avoid
hazard will result in death.
WARN
ING
Description of hazard and
possible resulting injures
or death.
CAUTION Description of hazard and
possible resulting injuries.
NOTICE Description of possible
damage of the device or its
surroundings.
2 Symbols
Warning of general danger
Warning of electric shock
Read the operating instructions and
safety instructions.
Wear protective goggles and ear pro
tection.
Wear a dust mask.
Wear protective gloves.
Always operate with two hands.
Pull out the mains plug
Safety class II
Direction of rotation of the grinding
wheel
Tool contains a chip which stores data.
See section 13.1
Tip or advice
Handling instruction
" Inch
A Ampere
dBm Decibel-milliwatts
Hz Hertz
kg Kilogram
MHz Megahertz
mm Millimeter
lb. Pound
rpm
min-1 Revolutions per minute
V Volt
W Watt
WARNING
To reduce the risk of injury, user must read and
understand instruction manual. Always use proper
guards when grinding and wear eye protection.
Use only accessories rated at least equal to the
maximum speed marked on the tool.
ADVERTENCIA
Para reducir el riesgo de accidentes, el usario debe
leer y entender el manual del usario. Utilice siempre
los protectores apropiados durante el esmerilado,
así como protección para los ojos. Utilice solo
accesorios.
AVERTISSEMENT
Pour réduire le risque de blessures,
l´utilisateur doit lire le manuel
d´instructions et s´assurer de bien
le comprendre. Utilisez toujours les
protecteurs appropriés pendant
----------------------------------------------------------
le meulage et veillez porter
une protection oculaire. Utilisez
uniquement les accessoires
convenant au moins la vitesse
maximale inscrite sur l´outil.
WARNING To reduce the risk of injury, user
must read and understand instruction man
ual. Always use proper guards when grinding
and wear eye protection. Use only accessories
rated at least equal to the maximum speed
marked on the tool.
English
3

3 Safety warnings
3.1 General power tool safety warnings
WARNING! Read all safety warnings, in
structions, illustrations and specifica
tions provided with this power tool. Failure to
follow all instructions listed below may result in
electric shock, fire and/or serious injury.
Save all warnings and instructions for future
reference.
The term "power tool" in the warnings refers to
your mains-operated (corded) power tool or
battery-operated (cordless) power tool.
1 WORK AREA SAFETY
a. Keep work area clean and well lit. Clut
tered or dark areas invite accidents.
b. Do not operate power tools in explosive
atmospheres, such as in the presence of
flammable liquids, gases or dust. Power
tools create sparks which may ignite the
dust or fumes.
c. Keep children and bystanders away while
operating a power tool. Distractions can
cause you to lose control.
2 ELECTRICAL SAFETY
a. Power tool plugs must match the outlet.
Never modify the plug in any way. Do not
use any adapter plugs with earthed
(grounded) power tools. Unmodified plugs
and matching outlets will reduce risk of
electric shock.
b. Avoid body contact with earthed or
grounded surfaces, such as pipes, radia
tors, ranges and refrigerators. There is an
increased risk of electric shock if your body
is earthed or grounded.
c. Do not expose power tools to rain or wet
conditions. Water entering a power tool will
increase the risk of electric shock.
d. Do not abuse the cord. Never use the cord
for carrying, pulling or unplugging the
power tool. Keep cord away from heat, oil,
sharp edges or moving parts. Damaged or
entangled cords increase the risk of elec
tric shock.
e. When operating a power tool outdoors,
use an extension cord suitable for outdoor
use. Use of a cord suitable for outdoor use
reduces the risk of electric shock.
f. If operating a power tool in a damp loca
tion is unavoidable, use a residual current
device (RCD) protected supply. Use of an
RCD reduces the risk of electric shock.
3 PERSONAL SAFETY
a. Stay alert, watch what you are doing and
use common sense when operating a pow
er tool. Do not use a power tool while you
are tired or under the influence of drugs,
alcohol or medication. A moment of inat
tention while operating power tools may re
sult in serious personal injury.
b. Use personal protective equipment. Al
ways wear eye protection. Protective
equipment such as a dust mask, non-skid
safety shoes, hard hat or hearing protection
used for appropriate conditions will reduce
personal injuries.
c. Prevent unintentional starting. Ensure the
switch is in the off-position before con
necting to power source and/or battery
pack, picking up or carrying the tool. Car
rying power tools with your finger on the
switch or energising power tools that have
the switch on invites accidents.
d. Remove any adjusting key or wrench be
fore turning the power tool on. A wrench
or a key left attached to a rotating part of
the power tool may result in personal in
jury.
e. Do not overreach. Keep proper footing and
balance at all times. This enables better
control of the power tool in unexpected sit
uations.
f. Dress properly. Do not wear loose cloth
ing or jewellery. Keep your hair and cloth
ing away from moving parts. Loose
clothes, jewellery or long hair can be
caught in moving parts.
g. If devices are provided for the connection
of dust extraction and collection facilities,
ensure these are connected and properly
used. Use of dust collection can reduce
dust-related hazards.
h. Do not let familiarity gained from frequent
use of tools allow you to become compla
cent and ignore tool safety principles. A
careless action can cause severe injury
within a fraction of a second.
4 POWER TOOL USE AND CARE
a. Do not force the power tool. Use the cor
rect power tool for your application. The
correct power tool will do the job better and
safer at the rate for which it was designed.
b. Do not use the power tool if the switch
does not turn it on and off. Any power tool
that cannot be controlled with the switch is
dangerous and must be repaired.
English
4

c. Disconnect the plug from the power
source and/or remove the battery pack, if
detachable, from the power tool before
making any adjustments, changing acces
sories, or storing power tools. Such pre
ventive safety measures reduce the risk of
starting the power tool accidentally.
d. Store idle power tools out of the reach of
children and do not allow persons unfami
liar with the power tool or these instruc
tions to operate the power tool. Power
tools are dangerous in the hands of un
trained users.
e. Maintain power tools and accessories.
Check for misalignment or binding of mov
ing parts, breakage of parts and any other
condition that may affect the power tool’s
operation. If damaged, have the power
tool repaired before use. Many accidents
are caused by poorly maintained power
tools.
f. Keep cutting tools sharp and clean. Prop
erly maintained cutting tools with sharp
cutting edges are less likely to bind and are
easier to control.
g. Use the power tool, accessories and tool
bits etc. in accordance with these instruc
tions, taking into account the working con
ditions and the work to be performed. Use
of the power tool for operations different
from those intended could result in a haz
ardous situation.
h. Keep handles and grasping surfaces dry,
clean and free from oil and grease. Slip
pery handles and grasping surfaces do not
allow for safe handling and control of the
tool in unexpected situations.
5 SERVICE
a. Have your power tool repaired by qualified
specialists only and always use original
spare parts. This ensures that the safety of
the power tool is maintained.
b. Only use original parts for repairs and
maintenance. The use of incompatible ac
cessories or spare parts can result in elec
tric shocks or other injuries.
3.2 Safety instructions for grinding
–This power tool is intended to function as a
grinder. Read all safety warnings, instruc
tions, illustrations and specifications pro
vided with this power tool. Failure to fol
low all instructions listed below may result
in electric shock, fire and/or serious injury.
–Operations such as sanding, wire brush
ing, polishing, hole cutting or cutting-off
are not to be performed with this power
tool. Operations for which the power tool
was not designed may create a hazard and
cause personal injury.
–Do not convert this power tool to operate
in a way which is not specifically designed
and specified by the tool manufacturer.
Such a conversion may result in a loss of
control and cause serious personal injury
–Do not use accessories which are not spe
cifically designed and specified by the tool
manufacturer. Just because the accessory
can be attached to your power tool, it does
not assure safe operation.
–The rated speed of the accessory must be
at least equal to the maximum speed
marked on the power tool. Accessories
running faster than their rated speed can
break and fly apart.
–The outside diameter and the thickness of
your accessory must be within the capaci
ty rating of your power tool. Incorrectly
sized accessories cannot be adequately
guarded or controlled.
–The dimensions of the accessory mounting
must fit the dimensions of the mounting
hardware of the power tool. Accessories
that do not match the mounting hardware
of the power tool will run out of balance, vi
brate excessively and may cause loss of
control.
–Do not use a damaged accessory. Before
each use inspect the accessory such as
abrasive wheels for chips and cracks,
backing pad for cracks, tear or excess
wear, wire brush for loose or cracked
wires. If power tool or accessory is drop
ped, inspect for damage or install an un
damaged accessory. After inspecting and
installing an accessory, position yourself
and bystanders away from the plane of the
rotating accessory and run the power tool
at maximum no‑load speed for one mi
nute. Damaged accessories will normally
break apart during this test time.
–Wear personal protective equipment. De
pending on application, use face shield,
safety goggles or safety glasses. As ap
propriate, wear dust mask, hearing pro
tectors, gloves and workshop apron capa
ble of stopping small abrasive or work
piece fragments. The eye protection must
English
5

be capable of stopping flying debris gener
ated by various operations . The dust mask
or respirator must be capable of filtrating
particles generated by your operation. Pro
longed exposure to high intensity noise may
cause hearing loss.
–Keep bystanders a safe distance away
from work area. Anyone entering the work
area must wear personal protective
equipment. Fragments of workpiece or of a
broken accessory may fly away and cause
injury beyond immediate area of operation.
–Hold the power tool by insulated gripping
surfaces only, when performing an opera
tion where the cutting accessory may con
tact hidden wiring or its own cord. Cutting
accessory contacting a "live" wire may
make exposed metal parts of the power
tool "live" and could give the operator an
electric shock.
–Position the cord clear of the spinning ac
cessory. If you lose control, the cord may
be cut or snagged and your hand or arm
may be pulled into the spinning accessory.
–Never lay the power tool down until the
accessory has come to a complete stop.
The spinning accessory may grab the sur
face and pull the power tool out of your
control.
–Do not run the power tool while carrying it
at your side. Accidental contact with the
spinning accessory could snag your cloth
ing, pulling the accessory into your body.
–Regularly clean the power tool’s air vents.
The motor’s fan will draw the dust inside
the housing and excessive accumulation of
powdered metal may cause electrical haz
ards.
–Do not operate the power tool near flam
mable materials. Sparks could ignite these
materials.
–Do not use accessories that require liquid
coolants. Using water or other liquid cool
ants may result in electrocution or shock.
Kickback and Related Warnings
Kickback is a sudden reaction to a pinched or
snagged rotating wheel, backing pad, brush or
any other accessory. Pinching or snagging
causes rapid stalling of the rotating accessory
which in turn causes the uncontrolled power
tool to be forced in the direction opposite of the
accessory’s rotation at the point of the binding.
For example, if an abrasive wheel is snagged or
pinched by the workpiece, the edge of the wheel
that is entering into the pinch point can dig into
the surface of the material causing the wheel to
climb out or kick out. The wheel may either
jump toward or away from the operator, de
pending on direction of the wheel’s movement
at the point of pinching. Abrasive wheels may
also break under these conditions.
Kickback is the result of power tool misuse
and/or incorrect operating procedures or con
ditions and can be avoided by taking proper
precautions as given below.
–Maintain a firm grip with both hands on
the power tool and position your body and
arms to allow you to resist kickback
forces. Always use auxiliary handle, if
provided, for maximum control over kick
back or torque reaction during start-up.
The operator can control torque reactions
or kickback forces, if proper precautions
are taken.
–Never place your hand near the rotating
accessory. Accessory may kickback over
your hand.
–Do not position your body in the area
where power tool will move if kickback oc
curs. Kickback will propel the tool in direc
tion opposite to the wheel’s movement at
the point of snagging.
–Use special care when working corners,
sharp edges etc. Avoid bouncing and snag
ging the accessory. Corners, sharp edges
or bouncing have a tendency to snag the ro
tating accessory and cause loss of control
or kickback.
–Do not attach a saw chain woodcarving
blade, segmented diamond wheel with a
peripheral gap greater than 10 mm or
toothed saw blade. Such blades create fre
quent kickback and loss of control.
Additional safety instructions for grinding
Safety warnings specific for grinding
–Use only wheel types that are specified for
your power tool and the specific guard de
signed for the selected wheel. Wheels for
which the power tool was not designed
cannot be adequately guarded and are un
safe.
–The grinding surface of centre depressed
wheels must be mounted below the plane
of the guard lip. An improperly mounted
wheel that projects through the plane of
English
6

the guard lip cannot be adequately protect
ed.
–The guard must be securely attached to
the power tool and positioned for maxi
mum safety, so the least amount of wheel
is exposed towards the operator. The
guard helps to protect the operator from
broken wheel fragments, accidental con
tact with wheel and sparks that could ignite
clothing.
–Wheels must be used only for specified
applications. For example: do not grind
with the side of cut-off wheel. Abrasive
cut-off wheels are intended for peripheral
grinding, side forces applied to these
wheels may cause them to shatter.
–Always use undamaged wheel flanges that
are of correct size and shape for your se
lected wheel. Proper wheel flanges sup
port the wheel thus reducing the possibility
of wheel breakage. Flanges for cut-off
wheels may be different from grinding
wheel flanges.
–When using dual purpose wheels always
use the correct guard for the application
being performed. Failure to use the cor
rect guard may not provide the desired lev
el of guarding, which could lead to serious
injury.
3.3 Further safety instructions
–
Wear suitable personal protective equip
ment: Ear protection, safety goggles, a dust
mask for work that generates dust.
–Harmful/toxic dust may be produced dur
ing your work (e.g. paint containing lead,
certain types of wood and metal). Only
qualified persons are permitted to handle
materials containing asbestos. Aontact
with or inhalation of this dust may pose a
risk for the operating personnel or persons
in the vicinity. Comply with the safety regu
lations that apply in your country.
– Wear suitable breathing protection to pro
tect your health. In enclosed spaces, en
sure that there is sufficient ventilation and
connect a mobile dust extractor.
– The power tool is not approved for opera
tion in moist and wet environments, in rain,
fog and snow or in potentially explosive at
mospheres.
– Never perform work while standing on lad
ders.
–Check the power tool, mains plug and the
mains power cable regularly to avoid haz
ards and have them replaced by an au
thorised after-sales service workshop if
they become damaged. A fault on the
mains plug or mains power cable can lead
to electric shocks.
– Replace defective, worn or vibrating inser
tion tools.
– Always guide the power cable from the tool
to the rear. Never pull hard on the power
cable and never place it on or guide it over
any sharp edges.
– Check to make sure the material to be
processed does not contain any electrical,
water or gas lines – there is a risk of acci
dent.
– Only guide the power tool towards the
workpiece when it is switched on.
– Do not sand over metal objects, nails or
screws.
3.4 Safety warnings for sanding tools
– Sanding tools are fragile, which is why you
must be extremely careful when handling
them. The use of damaged, incorrectly
clamped or inserted sanding tools is dan
gerous and can cause serious injuries.
– Ensure that the sanding tools are not ex
posed to any mechanical damage or harm
ful environmental conditions during stor
age.
– Handle and transport sanding tools with
care.
– Pay attention to the information on the la
bel or the sanding tool itself, as well as us
age restrictions, safety warnings or other
instructions. If any points are unclear when
choosing sanding tools, the user must con
tact the manufacturer for information be
fore using the tool.
– Sanding discs must be fitted in accordance
with section 7.4.
– Only experienced staff are permitted to fit
sanding tools.
English
7

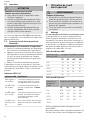
3.5 Health hazard by dust
WARNING! various dust created by pow
er sanding, sawing, grinding, drilling and
other construction activities contains chemicals
known (to the State of California) to cause can
cer, birth defects or other reproductive harm.
Some examples of these chemicals are:
– lead from lead-based paints,
– crystalline silica from bricks and cement
and other masonry products, and
– arsenic and chromium from chemically
treated lumber.
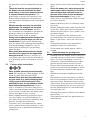
The risk from these expo
sures varies, depending on
how often you do this type of
work. To reduce your expo
sure to these chemicals:
work in a well ventilated
area, and work with approved safety equipment,
such as dust masks that are specially designed
to filter out microscopic particles. Wash hands
after handling.
WARNING
TO REDUCE THE RISK OF INJURY, USER
MUST READ INSTRUCTION MANUAL.
4 Intended use
The power tool is intended for surface sanding
on concrete surfaces, sanding off formwork
transitions and removing plaster, paint, adhe
sive residue, coatings or rust and for cleaning
concrete and wooden surfaces.
The power tool is designed for use with special
sanding discs recommended by the manufac
turer (see section 7.4) and must not be used
with composite sanding discs.
The power tool must only be used for dry sand
ing of large surfaces with a powerful mobile
dust extractor.
The user is liable for improper or non-in
tended use.
5 Technical data
Surface-restoration
grinders
RG 130 ECI
Power 120 V~
Frequency 60 Hz
Rated current 13 A
Speed (no-load) 2200-6500 min-1
Surface-restoration
grinders
RG 130 ECI
Sanding disc diameter 5 1/8" (130 mm)
Dust extraction connec
tion
1 7/16" (36 mm)
Frequency 2402 MHz-2480 MHz
Equivalent Isotropically
Radiated Power (EIRP)
< 10 dBm
Weight as per EPTA
procedure 01:2014
7.7 lb (3.5 kg)
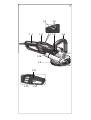
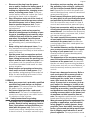
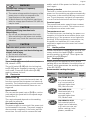
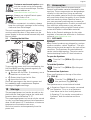
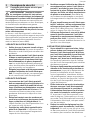
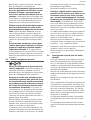
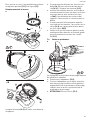
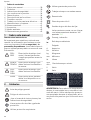
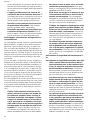
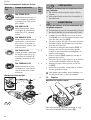
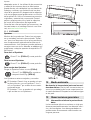
6 Functional description
[1-1] Handle
[1-2] Speed control
[1-3] Bluetooth® button
[1-4] LED indicator
[1-5] Handle screw
[1-6] Auxiliary handle
[1-7] Spindle lock
[1-8] Tilting brush segment
[1-9] Brush
[1-10] Extraction attachment
[1-11] Locking button
[1-12] On/off switch
[1-13] Lint filter
The pictures for the functional description are
at the beginning of the instruction manual.
7 Commissioning
WARNING
Risk of injury, electric shock
► Always disconnect the mains plug from the
socket before performing any work on the
machine.
English
8

WARNING
Unauthorised voltage or frequency.
Risk of accidents
► The mains voltage and the frequency of the
power source must correspond to the
specifications on the name plate.
► In North America, only Festool machines
with the voltage specifications 120 V/60 Hz
may be used.
CAUTION
Breaking and flying insertion tools
Risk of injury
► Do not use any damaged insertion tools.
After switching on the power tool and be
fore each use, check the insertion tools for
vibration.
CAUTION
Materials which produce a lot of dust
Damage to the power tool due to the ingress
of dust, risk of injury
► Do not work overhead.
► Always work with a lint filter.
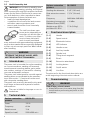
7.1 Switch on/off
The switch [1-12] is an on/off switch (press =
ON, release = OFF).
The on/off switch [1-12] with the locking but
ton [1-11] can be engaged to operate in contin
uous mode. Press the on/off switch [1-12]
again to release the lock.
7.2 Electronics
Smooth start-up
The electronically controlled smooth start-up
function ensures that the power tool starts up
smoothly. The limited starting current ensures
that even standard household fuses are not
triggered.
Speed control
You can use the speed control [1-2] to continu
ously adjust the speed within the speed range
(see section 5).
The required speed depends on the sanding
disc and the material.
Overload safety device
The power supply is restricted if the power tool
is overloaded to extremes. The power supply is
disconnected completely if the motor jams for
some time. You will need to remove the load
and/or switch off the power tool before you can
use it again.
Restart protection
The built-in restart protection prevents the
power tool from starting up again automatically
if the power is disconnected during continuous
use. To put the power tool back into operation,
it must first be switched off and then on again.
Constant speed
The preselected motor speed is kept constant
through electronic control. This ensures a uni
form speed even when under load.
Temperature cut-out
To avoid the motor overheating, the power con
sumption is limited at an excessive motor tem
perature (e.g. if the pressure is too high while
working). If the temperature continues to rise,
the power tool switches off. It can only be
switched on again once the motor has cooled
sufficiently.
7.3 Handle position
Loosen the handle screw [1-5] as much as nec
essary and set the handle [1-6] to a suitable
working position by tilting it. Then tighten the
handle screw [1-5] again.
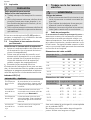
7.4 Sanding discs
Depending on the application area, various
sanding discs are available. Use solely discs of
Festool, which guarantees the sanding output
of the RG 130 ECI.
Recommended sanding disc types
Sanding
disc
Field of application Speed
range
DIA STONE-D130
Very hard materials,
e.g. concrete with a
strength higher than
C20, cast concrete
6
DIA HARD-D130
Hard materials, e.g.
concrete with a
strength higher than
C10, hard screed
6
DIA ABRASIV-D130
Soft materials with a
higher level of abrasion,
e.g. fresh concrete, ad
hesive coatings, hard
plaster, sandstone
6
English
9

Sanding
disc
Field of application Speed
range
DIA PAINT-D130
Large and thick layers
of paint or varnish, e.g.
on floorboards, wooden
façades and doors
4–6
DIA THERMO-D130
Tough and thermoelas
tic materials, e.g. pro
tective coatings, elastic
adhesives
5–6
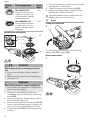
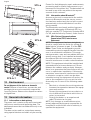
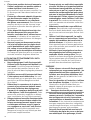
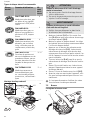
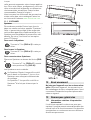
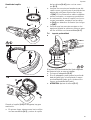
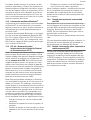
Mounting the sanding disc
2-1
2-2
2-4
2-5
2-6
2-3
2
CAUTION
Risk of injury from hot and sharp insertion
tool
► Do not use any blunt or faulty insertion
tools.
► Wear protective gloves when handling an
insertion tool.
WARNING
Risk of injury from the fragile sanding tool
► Ensure that the sanding tool's expiry date
has not been exceeded.
► Clean the flange [2-1] and fastening
nut [2-4] as well as sanding disc fastening
areas [2-2].
► Mount sanding disc. Flange fitting must fit
the sanding disc aperture.
► Press in the spindle blocking plunger [2-3].
Press in the blocking plunger only when de
vice is switched off and spindle not active.
► Turn the spindle [2-6] until blocking plung
er fits in.
► Screw the fastening nut by fitting it from the
sanding disc on the spindle.
► Fasten the fastening nut with key [2-5].
► Before starting the device, make sure the
sanding disc rotates smoothly.
The intermediate layers supplied with the
sanding discs are not required.
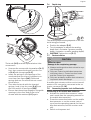
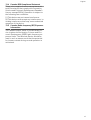
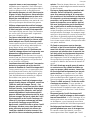
7.5 Brush
Lifting the front brush
3-1
3
For wall lifting, it is possible to lift the lifting
segment [3-1] (see figure [3]).
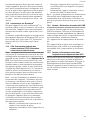
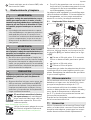
Brush replacement
4-2
4-1
4-3 4-4
4
English
10

4A
4B
The brush [4-2] must be replaced when it be
comes worn.
► Unscrew the screws with the washers [4-1]
first, then remove the brush from the cov
er [4-4] with the springs [4-3].
► Insert the springs in the openings of the
new brush and turn them clockwise to se
cure them (see figure [4A]). Deflected
springs that are not vertical do not consti
tute a failure.
► Then take the brush with the inserted
springs, hook it into the cover [4-4] from
the front and tilt it (see figure [4B]).
► Ensure that the springs engage in the guide
openings in the cover and screw in the
screws with the washers [4-1] again.
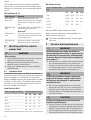
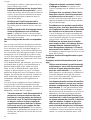
7.6 Depth stop
5
5-2
5-1
The sanding depth setting depends on the ma
terial being processed.
► Position the adapter [5-2].
► Turn the adapter to adjust the sanding
depth (anti-clockwise = greater sanding
depth, clockwise = smaller sanding depth).
►CAUTION! Tighten the nut [5-1].
7.7 Dust extraction
CAUTION
Hazardous dust
Damage to the respiratory passage
► Always working with a dust extraction sys
tem connected.
► Only use Festool mobile dust extractors
with dust class L, Festool suction hoses
and the Festool pre-separator.
► Only use antistatic mobile dust extractors
to prevent static discharge.
A mobile dust extractor with a suction hose di
ameter of 36 mm can be connected at the ex
tractor connector [1-10].
7.8 Connecting a power tool via Bluetooth®
Connecting to the mobile dust extractor
► Activate the mobile dust extractor's auto
matic mode (see the operating manual for
the mobile dust extractor).
► Press the connection button on the mobile
dust extractor or on the remote control
once (see the operating manual for the mo
bile dust extractor/retrofit receiver mod
ule).
► Switch on the power tool.
English
11

The mobile dust extractor starts up and the
power tool is connected until the mobile dust
extractor or the power tool is manually switch
ed off.
LED indicator [1-4]
LED indicator Meaning
LED flashes
blue once. After being switched on, the
power tool searches for a mobile
dust extractor ready for connec
tion.
LED lights up
blue. The power tool is connected to a
mobile dust extractor via
Bluetooth®.
LED flashes
red. The power tool has overheated.
Continue working without a load
on the power tool.
LED lights up
red. Electronics failure. Contact an
authorised service workshop.
8 Working with the electric
power tool
WARNING
Risk of injury
► Only guide the power tool into the material
when it is switched on (running).
► Always secure the workpiece in such a
manner that it cannot move.
► Keep your hands away from the rotating
sanding tools.
8.1 Extension Cord
If an extension cord is required, it must have
sufficient cross-section to prevent an excessive
drop in voltage or overheating. An excessive
drop in voltage reduces the output and can lead
to failure of the motor. The table below shows
you the correct cord diameter as a function of
the cord length for this tool.
Cord Size in A.W.G
Tool`s Ampere Rating Cord Length in Feet
25 50 100 150
3-6 18 16 16 14
6-8 18 16 14 12
8-10 18 16 14 12
10-12 16 16 14 12
12-16 14 12 - -
Wire Sizes in mm2
Tool`s Ampere Rat
ing
Cord Length in Meters
15 30 60 120
3-6 0.75 0.75 1.5 2.5
6-8 0.75 1.0 2.5 4.0
8-10 0.75 1.0 2.5 4.0
10-12 1.0 2.5 4.0 -
12-16 - - - -
Use only NRTL listed extension cords.
Never use two extension cords together. In
stead, use one long one.
The lower the AWG number, the stronger
the cord.
9 Service and maintenance
WARNING
Any maintenance or repair work that re
quires opening of the motor or gear housing
should only be carried out by an authorised
Customer Service Centre (name supplied by
your dealer)!
► Maintenance or repair work carried out by
an unauthorised person can lead to the
wrong connection of the power cord or oth
er components, which in turn can lead to
accidents with serious consequences.
WARNING
To prevent accidents, always remove the
plug from the power supply socket before
carrying out any changes or maintenance
work on the tool!
► Do not use compressed air to clean the
electrical tool! Do not try to clean parts in
side the tool in this way, as you could let
foreign objects in through the openings of
the tool housing.
CAUTION
Certain cleaning agents and solvents are
harmful to plastic parts.
► Some of these include, but are not limited
to: Gasoline, Acetone, Methyl Ethyl Ketone
(MEK), Carbonyl Chloride, cleaning solu
tions containing Chlorine, Ammonia, and
household cleaners containing Ammonia.
English
12

Customer service and repairs must
only be carried out by the manufac
turer or service workshops. Find the
nearest address at:
www.festoolusa.com/service
Always use original Festool spare
parts. Order no. at:
www.festoolusa.com/service
EKAT
1
235
4
► To ensure constant air circulation, always
keep the cooling air openings in the housing
clean and free of blockages.
The tool is equipped with special self-discon
necting carbon brushes. If they wear out, the
power supply is disconnected automatically and
the tool stops.
9.1 Cleaning the lint filter
6
6-1
To prevent the power tool from overheating, the
lint filter [6-1] must be cleaned regularly on
both sides (see figure [6]).
► Remove the lint filter. If necessary, use a
screwdriver as a lever tool.
► Extract dust from the lint filter.
► Insert the lint filter.
Check all warnings on the electric power tool
for readability and completeness. Replace
missing or illegible warnings.
10 Storage
The packaged power tool can be stored in a dry
place without heating as long as the inside tem
perature does not fall below -5 °C.
The unpackaged power tool must only be stored
in a dry, enclosed space where the temperature
does not fall below +5 °C and where no extreme
temperature fluctuations can occur.
Store the insertion tools separately from the
power tool.
11 Accessories
Use only original Festool accessories and
Festool consumable material intended for this
machine. These components are designed spe
cifically for this machine. Using accessories
and consumable material from other suppliers
will most likely affect the quality of your results
and limit warranty claims. Machine wear or
your own personal workload may increase de
pending on the application. Protect yourself and
your machine, and preserve your warranty
claims by always using original Festool acces
sories and Festool consumable material!
Refer to the Festool catalogue for the order
numbers of accessories and tools or find them
online at www.festoolusa.com.
11.1 SYSTAINER
Systainer
Many Festool products are shipped in a unique
system container, called "Systainer". This pro
vides protection and storage for the tool and ac
cessories. The Systainers are stackable and
can be interlocked together. They also can be
interlocked atop Festool CT dust extractors.
To open the Systainer
Turn the T-loc [SYS-b-1] to this posi
tion.
To lock the Systainer
Turn the T-loc [SYS-b-1] to this posi
tion.
To connect two Systainers
Place one Systainer on the top of the other
(Fig. [SYS-a]).
Turn the T-loc [SYS-b-1] to one of
this positions (Fig. [SYS-b]).
The Systainers are connected and locked.
A Systainer Classic Line can be connected
to a Systainer T-Loc or to a Systainer3
from below via its four locking devices.
A Systainer T-Loc can be connected to a
Systainer3 both from below and from
above.
English
13

SYS-a
SYS-b-1
SYS-b
open
lock
connect
connect
T-loc
12 Environment
Do not dispose of the device as domestic
waste! Dispose of machines, accessories and
packaging at an environmentally responsible
recycling centre. Observe the respective nation
al regulations.
13 General information
13.1 Information on data privacy
The power tool contains a chip which automati
cally stores machine and operating data. The
data saved cannot be traced back directly to an
individual.
The data can be read in a contactless manner
using special devices and shall only be used by
Festool for fault diagnosis, repair and warranty
processing and for quality improvement or en
hancement of the power tool. The data shall not
be used in any other way without the express
consent of the customer.
13.2 Information about Bluetooth®
As soon as the tool is connected to the mobile
device via Bluetooth® and the secure connec
tion has been authorised, the tool will connect
automatically to the mobile device from this
point onwards.
The Bluetooth® word mark and the logos are
registered trademarks of Bluetooth SIG, Inc.;
they are used by TTS Tooltechnic Systems AG &
Co. KG, and therefore by Festool, under licence.
13.3 USA: Federal Communications
Commission (FCC) Interference
Statement
NOTE: This equipment has been tested and
found to comply with the limits for a Class B
digital device, pursuant to part 15 of the FCC
Rules. These limits are designed to provide
reasonable protection against harmful interfer
ence in a residential installation. This equip
ment generates, uses and can radiate radio fre
quency energy and, if not installed and used in
accordance with the instructions, may cause
harmful interference to radio communications.
NOTE: This equipment should be installed and
operated with a minimum distance of 10 mm
between the radiator and your body. However,
there is no guarantee that interference will not
occur in a particular installation. If this equip
ment does cause harmful interference to radio
or television reception, which can be deter
mined by turning the equipment off and on, the
user is encouraged to try to correct the inter
ference by one or more of the following meas
ures:
– Reorient or relocate the receiving antenna.
– Increase the separation between the equip
ment and receiver.
– Connect the equipment into an outlet on a
circuit different from that to which the re
ceiver is connected.
– Consult the dealer or an experienced
radio/TV technician for help.
NOTE: Any changes or modifications not ex
pressly approved by the party responsible for
compliance could void the user's authority to
operate the equipment.
English
14

13.4 Canada: RSS Compliance Statement
This device contains licence-exempt transmit
ter(s)/receiver(s) that comply with Innovation,
Science and Economic Development Canada’s
licence-exempt RSS(s). Operation is subject to
the following two conditions:
(1) This device may not cause interference.
(2) This device must accept any interference, in
cluding interference that may cause undesired
operation of the device.
13.5 Canada: Radio frequency (RF) Exposure
Information
The radiated output power of the Wireless De
vice is below the Innovation, Science and Eco
nomic Development (ISED) radio frequency ex
posure limits. The Wireless Device should be
used in such a manner such that the potential
for human contact during normal operation is
minimized.
English
15

Sommaire
1 À propos de ce manuel..............................16
2 Symboles................................................... 16
3 Consignes de sécurité...............................17
4 Utilisation conforme..................................22
5 Caractéristiques techniques.....................22
6 Description fonctionnelle..........................22
7 Mise en service..........................................23
8 Utilisation de l'outil électroportatif...........26
9 Maintenance et entretien..........................27
10 Stockage....................................................27
11 Accessoires............................................... 27
12 Environnement..........................................28
13 Remarques générales...............................28
1 À propos de ce manuel
Conservez ces instructions
Il est important pour vous de lire et de com
prendre ce manuel. Les informations qu'il con
tient, se rapporte à la protection de votre sécu
rité et de prévention des problèmes. Les sym
boles suivants sont utilisés pour vous aider à
reconnaître cette information.
DANGER Description du risque immi
nent et l'incapacité à éviter
tout risque qui peut entraî
ner la mort.
AVER
TISSE
MENT
Description des dangers
possibles et des blessures
qui en résultent ou la mort.
ATTEN
TION
Description des dangers et
des éventuelles blessures
qui en résultent.
AVIS Description des dommages
potentiels sur l'appareil ou
dans son environnement.
2 Symboles
Avertit d'un danger général
Avertit d'un risque de décharge électri
que
Lire le mode d'emploi et les consignes
de sécurité !
Porter une protection auditive et des
lunettes de protection !
Porter une protection respiratoire !
Porter des gants de protection !
Toujours travailler avec les deux
mains.
Débrancher la fiche secteur
Classe de protection II
Sens de rotation du disque abrasif
L'outil contient une puce permettant
l'enregistrement des données. Voir
chapitre 13.1
Conseil, information
Instruction
" Pouce
A Ampère
Hz Hertz
kg Kilogramme
mm Millimètre
lb. Livre
rpm
min-1
tr/mi
n
Tours ou course par minute
V Volt
W Watt
WARNING
To reduce the risk of injury, user must read and
understand instruction manual. Always use proper
guards when grinding and wear eye protection.
Use only accessories rated at least equal to the
maximum speed marked on the tool.
ADVERTENCIA
Para reducir el riesgo de accidentes, el usario debe
leer y entender el manual del usario. Utilice siempre
los protectores apropiados durante el esmerilado,
así como protección para los ojos. Utilice solo
accesorios.
AVERTISSEMENT
Pour réduire le risque de blessures,
l´utilisateur doit lire le manuel
d´instructions et s´assurer de bien
le comprendre. Utilisez toujours les
protecteurs appropriés pendant
----------------------------------------------------------
le meulage et veillez porter
une protection oculaire. Utilisez
uniquement les accessoires
convenant au moins la vitesse
maximale inscrite sur l´outil.
AVERTISSEMENT Pour réduire le risque de
blessures, l´utilisateur doit lire le manuel d
´instructions et s´assurer de bien le com
prendre. Lors de l´utilisation de l´outil, mu
nissez-vous toujours des protections adéqua
tes et portez les lunettes ou une visière de
protection. N´utilisez que des accessoires
conçus pour supporter au moins la vitesse
maximale indiquée sur l´outil.
Français
16

3 Consignes de sécurité
3.1 Consignes générales de sécurité pour
outils électroportatifs
AVERTISSEMENT ! Veuillez lire toutes
les consignes de sécurité, instructions,
illustrations et caractéristiques techniques qui
accompagnent le présent outil électroportatif.
Des négligences relatives aux instructions sui
vantes peuvent occasionner un choc électrique,
un incendie et/ou des blessures graves.
Conserver l'ensemble des consignes de sécu
rité et des instructions afin de pouvoir les con
sulter ultérieurement.
Le terme « outil électroportatif » utilisé dans
les consignes de sécurité se rapporte aux outils
électroportatifs fonctionnant sur secteur (avec
câble) et aux outils électroportatifs fonction
nant sur batterie (sans câble).
1 SÉCURITÉ DU POSTE DE TRAVAIL
a. Veillez à ce que la zone de travail soit pro
pre et bien éclairée. Un poste de travail en
désordre ou mal éclairé peut entraîner des
accidents.
b. Ne vous servez pas de l'outil électroporta
tif dans un environnement où il y a un ris
que d'explosion dû à la présence de liqui
des inflammables, de gaz ou de poussiè
res. Les outils électroportatifs peuvent gé
nérer des étincelles susceptibles d'enflam
mer la poussière ou les vapeurs.
c. Éloignez les enfants et d'autres personnes
pendant l'utilisation de l'outil électropor
tatif. Si vous êtes distrait, vous pouvez per
dre le contrôle de l'outil électroportatif.
2 SÉCURITÉ ÉLECTRIQUE
a. Le connecteur de l'outil électroportatif
doit correspondre à la prise électrique. Le
connecteur ne doit être modifié d'aucune
façon. N'utilisez pas d'adaptateur avec des
outils électroportatifs mis à la terre. Des
connecteurs intacts et des prises corres
pondantes diminuent le risque d'un choc
électrique.
b. Évitez tout contact avec des surfaces mi
ses à la terre telles que des tuyaux, chauf
fages, cuisinières et réfrigérateurs. Un
risque élevé de choc électrique existe si vo
tre corps est relié à la terre.
c. Protégez les outils électroportatifs de la
pluie et de l'humidité. L'infiltration d'eau
dans un outil électroportatif augmente le
risque de choc électrique.
d. Ne détournez pas l'utilisation du câble de
raccordement pour porter l'outil électro
portatif, l'accrocher ou pour tirer le con
necteur de la prise. Éloignez le câble de la
chaleur, de l'huile, de bords tranchants ou
de pièces en mouvement. Des câbles de
raccordement endommagés ou enchevê
trés augmentent le risque de choc électri
que.
e. Si vous travaillez avec un outil électropor
tatif à l'extérieur, utilisez uniquement des
rallonges prévues pour l'extérieur. L'utili
sation d'un câble prévu pour l'extérieur di
minue le risque d'un choc électrique.
f. Utilisez un disjoncteur à courant de défaut
quand le fonctionnement de l'outil élec
troportatif en environnement humide ne
peut pas être évité. L'utilisation d'un dis
joncteur à courant de défaut diminue le ris
que d'un choc électrique.
3 SÉCURITÉ DES PERSONNES
a. Soyez attentif à ce que vous faites, faites
preuve de bon sens lorsque vous travail
lez avec l'outil électroportatif. N'utilisez
pas l'outil électroportatif si vous êtes fati
gué ou si vous êtes sous l'influence de
drogues, de l'alcool ou de médicaments.
Un moment d'inattention lors de l'utilisa
tion de l'outil électroportatif peut entraîner
des blessures graves.
b. Portez un équipement de protection indi
viduelle et des lunettes de protection en
permanence. Le port d'un équipement de
protection individuelle tel que masque
contre la poussière, chaussures de sécu
rité antidérapantes, casque ou protection
auditive, en fonction du type et de l'utilisa
tion de l'outil électroportatif, diminue le
risque de blessures.
c. Évitez toute mise en service involontaire.
Assurez-vous que l'outil électroportatif
est déconnecté avant de le raccorder à
l'alimentation électrique et/ou à la batte
rie, avant de le soulever ou de le porter.
Si, en portant l'outil électroportatif, vous
avez le doigt sur l'interrupteur ou si vous
raccordez l'outil électroportatif connecté à
l'alimentation électrique, cela peut entraî
ner des accidents.
d. Retirez les outils de réglage ou les clés
anglaises avant de connecter l'outil élec
troportatif. Un outil ou une clé qui se trou
ve dans une partie de l'outil électroportatif
en rotation peut entraîner des blessures.
Français
17

e. Évitez toute position de travail anormale.
Veillez à maintenir une position stable et
un bon équilibre à tout moment. Vous
pourrez ainsi à tout moment contrôler l'ou
til électroportatif dans des situations inat
tendues.
f. Portez des vêtements adaptés. Ne portez
pas de vêtements amples ou de bijoux.
Éloignez vos cheveux et vos vêtements
des pièces en mouvement. Des vêtements
amples, des bijoux ou des cheveux longs
pourraient se prendre dans les pièces en
mouvement.
g. Si des dispositifs d'aspiration et de récu
pération des poussières peuvent être
montés, raccordez-les et utilisez-les cor
rectement. L'utilisation d'une aspiration
des poussières peut diminuer les dangers
dus aux poussières.
h. Ne vous croyez pas faussement en sécu
rité et n'enfreignez pas les règles de sé
curité destinées aux outils électroporta
tifs, même si vous maîtrisez l'outil élec
troportatif après de multiples utilisations.
Un manque d'attention peut en un quart de
seconde entraîner de graves blessures.
4 UTILISATION ET TRAITEMENT DE L'OUTIL
ÉLECTROPORTATIF
a. Ne surchargez pas l'outil électroportatif.
Utilisez l'outil électroportatif destiné à vo
tre travail. L'outil électroportatif adapté
vous permet de travailler mieux et avec
plus de sécurité dans la plage de puissance
indiquée.
b. N'utilisez aucun outil électroportatif dont
l'interrupteur serait défectueux. Un outil
électroportatif qui ne peut plus être mis en
marche ou arrêté est dangereux et doit
être réparé.
c. Débranchez le connecteur de la prise de
courant et/ou retirez une batterie amovi
ble avant d'effectuer des réglages sur
l'appareil, de remplacer des pièces d'outil
ou de déposer l'outil électroportatif. Cette
mesure de précaution empêche un démar
rage involontaire de l'outil électroportatif.
d. Rangez toujours les outils électroportatifs
inutilisés hors de portée des enfants. Ne
laissez aucune personne à laquelle vous
ne faites pas confiance ou qui n'a pas lu
ces consignes se servir de l'outil électro
portatif. Les outils électroportatifs sont
dangereux lorsqu'ils sont utilisés par des
personnes inexpérimentées.
e. Prenez soin de vos outils électroportatifs
et outils. Vérifiez que les parties mobiles
fonctionnent sans problème, qu'elles ne
coincent pas et qu'il n'y a pas de parties
cassées ou endommagées qui pourraient
entraver le bon fonctionnement de l'outil
électroportatif. Faites réparer les parties
endommagées avant d'utiliser l'outil élec
troportatif. De nombreux accidents sont
dus à un mauvais entretien des outils élec
troportatifs.
f. Maintenez les outils de coupe affûtés et
propres. Des outils de coupe entretenus
avec soin dotés de bords de coupe affûtés
se coincent moins et sont plus faciles à uti
liser.
g. Utilisez l'outil électroportatif, les outils,
etc. en respectant ces instructions. Tenez
compte des conditions de travail et de la
tâche à effectuer. L'utilisation des outils
électroportatifs pour d'autres applications
que celles prévues peut entraîner des situ
ations dangereuses.
h. Veillez à ce que les poignées et surfaces
des poignées soient sèches, propres et
exemptes d'huile ou de graisse. Des poi
gnées et surfaces de poignées glissantes
ne permettent pas une utilisation en toute
sécurité ni un contrôle de l'outil électro
portatif dans des situations imprévues.
5 SERVICE
a. Faites réparer votre outil électroportatif
uniquement par un personnel qualifié ; les
réparations doivent être uniquement ef
fectuées avec des pièces détachées d'ori
gine, afin de garantir la fiabilité de l'outil
électroportatif.
b. Pour la réparation et l'entretien, n'utilisez
que des pièces d'origine. L'utilisation d'ac
cessoires ou de pièces détachées non
adaptés risque de provoquer une électro
cution ou des blessures.
3.2 Consignes de sécurité pour le ponçage
–Cet outil électroportatif doit être utilisé
comme ponceuse. Veuillez lire l'ensemble
des consignes de sécurité, instructions,
représentations et données fournies avec
la machine. Si les instructions suivantes ne
sont pas respectées dans leur intégralité,
une décharge électrique, un incendie et/ou
des blessures graves sont possibles.
–Cet outil électroportatif ne convient ni à
l'utilisation de papier de verre ou de bros
ses métalliques ni au polissage, à la dé
Français
18

coupe de trous ou au tronçonnage. Toute
utilisation pour laquelle l'outil électropor
tatif n'est pas conçu peut provoquer des si
tuations dangereuses et des blessures.
–Ne transformez pas cet outil électroporta
tif pour le faire fonctionner d'une manière
qui n'a pas été explicitement prévue et in
diquée par son fabricant. Une telle trans
formation peut entraîner une perte de con
trôle et provoquer des blessures graves
–Utilisez uniquement des outils d'usinage
spécialement prévus et recommandés par
le fabricant pour cet outil électroportatif.
Le simple fait de pouvoir fixer l'accessoire
sur votre outil électroportatif ne garantit
pas une utilisation sûre.
–La vitesse admissible de l'outil d'usinage
doit être au moins égale à la vitesse maxi
male indiquée sur l'outil électroportatif.
Les accessoires dont la vitesse de rotation
est supérieure à la valeur admissible ris
quent de se briser ou d'être projetés.
–Le diamètre extérieur et l'épaisseur de
l'outil d'usinage doivent correspondre aux
dimensions indiquées pour votre outil
électroportatif. Si les accessoires ne pré
sentent pas les dimensions appropriées, il
est impossible de garantir une protection
et un contrôle suffisants.
–Les dimensions de fixation de l'accessoire
doivent correspondre à celles des élé
ments de fixation de l'outil électroportatif.
Les accessoires qui ne correspondent pas
aux éléments de fixation de l'outil électro
portatif présentent un déséquilibre, génè
rent des vibrations excessives et risquent
d'entraîner une perte de contrôle.
–Ne montez pas d'outils d'usinage endom
magés. Avant chaque utilisation, contrôlez
l'état des outils d'usinage. Par ex. : les
disques abrasifs ne doivent pas être ébré
chés ou fissurés, les plateaux de ponçage
ne doivent pas être fissurés, usés ou for
tement dégradés et les brosses métalli
ques ne doivent pas présenter de fils arra
chés ou rompus. En cas de chute de l'outil
électroportatif ou de l'outil d'usinage, vé
rifiez qu'il n'est pas endommagé ou mon
tez un outil d'usinage en parfait état.
Après avoir contrôlé et mis en place l'outil
d'usinage, décalez-vous, ainsi que toute
autre personne présente, du niveau de
l'outil en rotation et laissez tourner l'ap
pareil à la vitesse maximale pendant une
minute. Dans la plupart des cas, les outils
d'usinage endommagés se cassent avant la
fin de cet essai.
–Portez un équipement de protection indi
viduelle. Selon l'utilisation, munissez-
vous d'un masque intégral, d'une protec
tion oculaire ou de lunettes de protection.
Si nécessaire, portez un masque contre la
poussière, une protection auditive, des
gants de protection ou un tablier spécial
qui vous protègent des particules abrasi
ves et particules de matériau de petite
taille. Protégez vos yeux des projections de
corps étrangers survenant lors de différen
tes opérations d'usinage. Le masque respi
ratoire ou de protection contre la poussière
doit filtrer la poussière générée pendant
l'utilisation. Si vous êtes exposé longtemps
à un niveau sonore élevé, vous pouvez subir
une perte auditive.
–Si d'autres personnes sont présentes,
veillez à ce qu'elles se tiennent suffisam
ment loin de votre zone de travail. Toute
personne qui pénètre dans la zone de tra
vail doit porter un équipement de protec
tion individuelle. Des éclats de pièce ou
des fragments d'outil d'usinage peuvent
être projetés et provoquer des blessures, y
compris en dehors de la zone de travail di
recte.
–Si l'outil d'usinage monté pourrait entrer
en contact avec des câbles invisibles ou
avec son propre câble secteur, tenez l'ou
til électroportatif uniquement par les poi
gnées isolées. Le contact avec un câble
sous tension peut également mettre des
pièces métalliques de l'appareil sous ten
sion et provoquer une décharge électrique.
–Tenez le câble secteur à l'écart des outils
d'usinage en rotation. Si vous perdez le
contrôle de l'appareil, le câble secteur peut
être sectionné ou happé et votre main ou
votre bras risque de toucher l'outil d'usina
ge en rotation.
–Ne posez jamais l'outil électroportatif
avant que l'outil d'usinage ne soit complè
tement immobilisé. L'outil d'usinage en ro
tation peut entrer en contact avec la surfa
ce de dépose, ce qui risque de vous faire
perdre le contrôle de l'outil électroportatif.
–Ne faites pas fonctionner l'outil électro
portatif pendant que vous le transportez.
En cas de contact accidentel, vos vête
ments pourraient être happés par l'outil
Français
19

d'usinage en rotation, lequel pourrait s'en
foncer dans votre corps.
–Nettoyez régulièrement les fentes d'aéra
tion de votre outil électroportatif. Le venti
lateur du moteur attire la poussière dans le
carter, et une forte accumulation de pous
sière métallique peut engendrer des ris
ques électriques.
–N'utilisez pas l'outil électroportatif à
proximité de matières inflammables. Des
étincelles peuvent mettre le feu à ces ma
tières.
–N'utilisez pas d'outils d'usinage qui néces
sitent un liquide pour leur refroidisse
ment. L'utilisation d'eau ou d'autres liqui
des de refroidissement peut provoquer une
décharge électrique.
Recul et consignes de sécurité correspondan
tes
Le recul est une réaction soudaine provoquée
par un outil d'usinage qui se bloque ou se coin
ce en tournant, par ex. un disque abrasif, un
plateau de ponçage, une brosse métallique etc.
Le coincement ou le blocage provoque un arrêt
brusque de l'outil d'usinage en rotation. Ainsi,
un outil électroportatif incontrôlé sera projeté
dans le sens inverse de rotation de l'outil d'usi
nage au point de blocage.
Si un disque abrasif, par exemple, se coince ou
se bloque dans la pièce, il est possible que le
bord du disque déjà inséré reste accroché.
Dans ce cas, le disque abrasif risque de se
rompre ou de provoquer un recul. Le disque
abrasif se dirige alors vers l'utilisateur ou s'en
éloigne, en fonction de son sens de rotation au
point de blocage. Dans ce genre de situation,
les disques abrasifs peuvent également se
rompre.
Un recul est la conséquence d'une utilisation
incorrecte de l'outil électroportatif et/ou de
conditions de travail inappropriées. Il peut être
évité en prenant des mesures de précaution
adéquates, comme décrit ci-après.
–Tenez fermement l'outil électroportatif et
placez votre corps et vos bras dans une
position qui vous permettra de résister à
la force de recul. Si l'outil électroportatif
en dispose, utilisez toujours la poignée
supplémentaire pour maîtriser au mieux
la force de recul ou les couples de réac
tion pendant l'accélération. Des mesures
de précaution adéquates permettent à l'uti
lisateur de maîtriser les forces de recul et
de réaction.
–N'approchez jamais vos mains d'outils
d'usinage en rotation. En cas de recul,
l'outil d'usinage peut se déplacer sur votre
main.
–Protégez-vous en restant à l'écart de la
zone dans laquelle l'outil électroportatif
se déplacera en cas de recul. Le recul en
traîne l'outil électroportatif dans le sens
opposé au déplacement du disque abrasif
au point de blocage.
–Procédez avec une prudence particulière
dans les coins, au niveau des arêtes vives,
etc. Empêchez les outils d'usinage montés
de rebondir sur la pièce et de se coincer.
L'outil d'usinage en rotation a tendance à
se bloquer dans les coins, sur les arêtes vi
ves ou quand il rebondit, ce qui provoque
une perte de contrôle ou un recul.
–N'utilisez pas de lame de scie à chaîne
pour couper du bois, ni de disque de tron
çonnage diamant segmenté doté d'un
écart de segments supérieur à 10 mm ni
de lame de scie à denture. Ce type d'outils
d'usinage provoque souvent un recul et une
perte de contrôle.
Consignes de sécurité supplémentaires pour
le ponçage
Consignes de sécurité spéciales pour le pon
çage
–Utilisez exclusivement les outils abrasifs
autorisés pour votre outil électroportatif
ainsi que le capot de protection conçu
pour ces outils abrasifs. Il n'est pas pos
sible d'assurer une protection suffisante si
les outils abrasifs n'ont pas été conçus
pour l'outil électroportatif. Ces derniers
provoquent donc des dangers.
–Les disques abrasifs courbes doivent être
montés de manière à ce que leur surface
abrasive ne dépasse pas du bord du capot
de protection. Il n'est pas possible d'assu
rer une protection suffisante si le disque
abrasif est monté de manière incorrecte et
dépasse du bord du capot de protection.
–Le capot de protection doit être fixé cor
rectement sur l'outil électroportatif. Pour
un niveau maximal de sécurité, il doit être
réglé de manière à réduire le plus pos
sible la partie de l'outil abrasif directe
ment accessible dirigée vers l'utilisateur.
Le capot de protection contribue à protéger
l'utilisateur contre la projection de frag
ments, un contact accidentel avec l'outil
Français
20
La page est en cours de chargement...
La page est en cours de chargement...
La page est en cours de chargement...
La page est en cours de chargement...
La page est en cours de chargement...
La page est en cours de chargement...
La page est en cours de chargement...
La page est en cours de chargement...
La page est en cours de chargement...
La page est en cours de chargement...
La page est en cours de chargement...
La page est en cours de chargement...
La page est en cours de chargement...
La page est en cours de chargement...
La page est en cours de chargement...
La page est en cours de chargement...
La page est en cours de chargement...
La page est en cours de chargement...
La page est en cours de chargement...
La page est en cours de chargement...
La page est en cours de chargement...
La page est en cours de chargement...
La page est en cours de chargement...
-
 1
1
-
 2
2
-
 3
3
-
 4
4
-
 5
5
-
 6
6
-
 7
7
-
 8
8
-
 9
9
-
 10
10
-
 11
11
-
 12
12
-
 13
13
-
 14
14
-
 15
15
-
 16
16
-
 17
17
-
 18
18
-
 19
19
-
 20
20
-
 21
21
-
 22
22
-
 23
23
-
 24
24
-
 25
25
-
 26
26
-
 27
27
-
 28
28
-
 29
29
-
 30
30
-
 31
31
-
 32
32
-
 33
33
-
 34
34
-
 35
35
-
 36
36
-
 37
37
-
 38
38
-
 39
39
-
 40
40
-
 41
41
-
 42
42
-
 43
43


dans d''autres langues
- English: Festool RG 130 ECI User manual
- español: Festool RG 130 ECI Manual de usuario
Documents connexes
-
Festool RG 130 ECI Surface Restoration Grindres Manuel utilisateur
-
-
-
-
Festool ETS EC 150/5 EQ-Plus Mode d'emploi
-
-
-
-
-