
en Original operating manual - Mobile dust extractors 6
fr Notice d’utilisation d’origine - Aspirateurs mobile 16
es Manual de instrucciones original - Sistemas móviles de aspiración 27
Read all instructions before using
Lire toutes les instructions avant de démarrer les travaux.
Lea y comprende todas las instrucciones antes de usar.
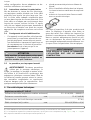
CT 36 E AC
Festool GmbH
Wertstraße 20
73240 Wendlingen
Germany
www.festoolusa.com
717084_001


AC
AC
AC
0
max
P L A N E X
AC
1-4
1-1
1-3
1-2
1-5
1-6
1-7
1-10
2-1
2-2
2-3
1-12
1-11
1-13
1-9
1-8
1
2


Contents
1 Symbols............................................... 6
2 About this manual............................... 6
3 Safety instructions.............................. 6
4 Technical data..................................... 8
5 Functional description........................ 8
6 Intended use........................................8
7 Operation.............................................9
8 Settings..............................................10
9 Working............................................. 11
10 Filter.................................................. 12
11 After finishing work...........................14
12 Service and maintenance..................14
13 Accessories....................................... 15
14 Disposal.............................................15
1 Symbols
Symbol Significance
Warning of general danger
Risk of electric shock
Read operating instructions and
safety notices!
Wear a dust mask.
Tip or advice
Handling instruction
W watt
h hour
min minutes
s seconds
kg kilograms
Pa pascal
dB decibel
V volts
A amperes
Hz hertz
~ a.c. alternating current
d.c. direct current
n
0
no load speed
Class II construction
rpm
min
-1
revolutions per minute
Symbol Significance
’’ inch
lbs. pound
diameter
2 About this manual
Save these instructions
It is important for you to read and understand
this
manual. The information it contains relates
to protecting your safety and preventing prob
lems. The symbols below are used to help you
recognize this information.
DANGER Description of imminent haz
ard
and failure to avoid haz
ard will result in death.
WARNINGDescription of hazard and
possible
resulting injures or
death.
CAUTION Description of hazard and
possible resulting injuries.
NOTICE Statement including nature
of hazard and possible result.
HINT Indicates information, notes,
or
tips for improving your
success using the tool.
3 Safety instructions
3.1 IMPORTANT SAFETY INSTRUCTIONS
When using an electrical appliance, basis pre
cautions
should always be followed, including
the following:
READ ALL INSTRUCTIONS
BEFORE USING THIS DUST EXTRACTOR:
WARNING - To reduce the risk of fire,
electric shock, or injury:
– Do not leave the dust extractor when plug
ged in. Unplug from outlet when not in use
and before servicing.
– Use indoors only.
– Do not allow to be used as a toy. Close at
tention is necessary when used by or near
children.
– Use only as describes in this manual. Use
only manufacturer's recommended attach
ments.
– Do not use with damaged cord or plug. If
the dust extractor is not working as it
should, has been dropped, damaged, left
English
6

outdoors, or dropped into water, return it to
a service center.
– Do not pull or carry by cord, use cord as a
handle, close a door on cord, or pull cord
around sharp edges or corners. Do not run
dust extractor over cord. Keep cord away
from heated surfaces.
– Do not unplug by pulling on cord. To un
plug, grasp the plug, not the cord.
– Do not handle plug or dust extractor with
wet hands.
– Do not put any object into openings. Do not
use with any opening blocked; keep free of
dust, lint, hair, and anything that may re
duce air flow.
– Keep hair, loose clothing, fingers, and all
parts of body away from openings and mov
ing parts.
– Turn off all controls before unplugging.
– Use extra care when cleaning on stairs.
– Do not use to pick up flammable or com
bustible liquids, such as gasoline, or use in
areas where they may be present.
– Connect to a properly grounded outlet only.
See Grounding instructions.
– Do not pick up anything that is burning or
smoking, such as cigarettes, matches, or
hot ashes, hot chips or particles, sparks.
– Do not use without dust bag and/or filters
in place.
SAVE THESE INSTRUCTIONS
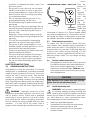
3.2 GROUNDING INSTRUCTIONS
This appliance must be grounded. If it should
malfunction
or breakdown, grounding provides
a path of least resistance for electric current to
reduce the risk of electric shock. This vacuum
cleaner is equipped with a cord having an
equipment-grounding conductor and grounding
plug. The plug must be inserted into a appropri
ate outlet that is properly installed and ground
ed in accordance with all local codes and ordi
nances.
WARNING - Improper connection of the
equipment
grounding conductor can result in a
risk of electric shock. Check with a qualified
electrician or service person if you are in doubt
as to whether the outlet is properly grounded.
Do not modify the plug provided with the dust
extractor - if it will not fit the outlet, have a
proper outlet installed by a qualified electrician.
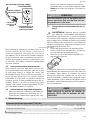
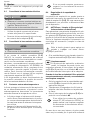
This ap
pliance
is
for use
on a
nominal
120-V cir
cuit and
has a
ground
ing at
tachment
plug that
looks like
the plug
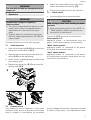
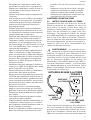
illustrated in sketch A in Figure beside. Make
sure that the appliance is connected to an out
let having the same configuration as the plug.
No adaptor should be used with this appliance.
GROUNDED
OU
TLET BOX
GROUNDED
PIN
GROUNDED
OUTLET
GROUNDING METHODS - SKETCH A
3.3 Polarization Instructions
To reduce the risk of electric shock, this vac
uum
cleaner has a polarized plug (one blade is
wider than the other). This plug will fit in a po
larized outlet only one way. If the plug does not
fit fully in the outlet, reverse the plug. If it still
does not fit, contact a qualified electrician to in
stall the proper outlet. Do not change the plug
in any way.
3.4 Further safety instructions
– This appliance must not be used by persons
(including children) with reduced physical,
sensory or mental capabilities, or lack of
experience and knowledge. Children
need
to be supervised to ensure they do not play
with the appliance.
CAUTION
This machine is for indoor use only.This ma
chine shall be stored indoors only.
3.5 Health hazard by dust
WARNING! Various dust created by pow
er
sanding, sawing, grinding, drilling and
other construction activities contains chemicals
known (to the State of California) to cause can
cer, birth defects or other reproductive harm.
Some examples of these chemicals are:
• lead from lead-based paints,
• crystalline silica from bricks and cement
and other masonry products, and
• arsenic and chromium from chemically
treated lumber.
English
7

The risk from these exposures varies, depend
ing
on how often you do this type of work. To re
duce your exposure to these chemicals: work in
a well ventilated area, and work with approved
safety equipment, such as dust masks that are
specially
designed to filter out microscopic par
ticles. Wash hands after handling.
WARNING
TO REDUCE THE RISK OF INJURY, USER
MUST READ INSTRUCTION MANUAL.
4 Technical data
Dust extractor CT 36 E AC
Power consumption (dust extractor only)
2.9 - 8.3 A (350 - 1000 W)
[1]
.)
Total connected load max. 12 A (1440 W)
Max. rating of connected Power Tool
3.7 A
[2].)
Volume flow (air), turbine max. 234 m³/h (8264 cu.ft./h)
Vacuum, turbine max. 24000 Pa
Filter surface 6318 cm² (979.3 sq.in.)
Suction hose (diameter x length) 36 mm x 3.5 m (1-7/16" x 11.5’)
Protection type IP X4
Sound pressure level as per IEC 60704-2-1 71 dB(A)
Container capacity CT 36 E AC 36 l (9.5 gal.)
Dimensions L x W x H CT 36 E AC 630 x 365 x 596 mm (24.8 in. x 14.4 in. x 23.4
in.)
Weight CT 36 E AC 15.2 kg (33.5 lbs)
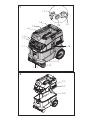
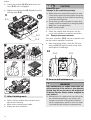
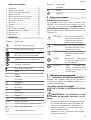
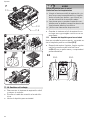
5 Functional description
The pictures for the functional description are
on
a fold-out page at the beginning of the in
struction manual. When reading of the manual
you can fold out this page for having always an
overview of the machine.
Accessories shown or described are sometimes
not included in the scope of delivery.
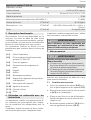
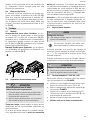
[1-1]
Intake opening
[1-2]
Module slot
[1-3]
Appliance socket
[1-4]
Hose store
[1-5]
Handle
[1-6]
SysDoc
[1-7]
Automatic cleaning
[1-8]
Suction power adjuster
[1-9]
Switch
[1-10]
Locking clip
[1-11]
Dust container
[1-13]
Brake
6 Intended use
The dust extractor is designed for use as speci
fied
for the aspiration and evacuation of non-
noxious dusts, dirt, sand, shavings etc..
The dust extractor is designed as specified for
vacuuming water.
The dust extractor is designed for household,
commercial or both use.
[1] ) 8.3 A (1000 W) is the medium value for different operation conditions, a maximum power consumption of 10 A (1200 W) is possible.
[2] ) When the suction power adjuster [1-7] is adjusted to the lowest suction power (see page Page 10, chapter - 8.4 ) the maximal rating of a
connected power tool can be 9.1 Amps.
English
8

WARNING
The user will be liable for damage due to im
proper use.
7 Operation
WARNING
Unauthorised voltage or frequency!
Risk of accident
► The mains voltage and the frequency of the
power source must correspond with the
specifications on the machine's name
plate.
► In North America, only Festool machines
with the voltage specifications 120 V/60 Hz
may be used.
Consider the pictures on the fold-out page.
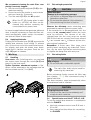
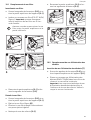
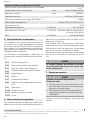
7.1 Initial operation
► Open the locking clips [2-2]
and remove the
top section of the machine [2-1].
► Remove the accessories from the dust con
tainer [2-3] and the packaging!
► Insert a filter or disposal bag in the dirt trap
(see chapter and ).
► Replace the top section [2-1] and close the
locking clips [2-2].
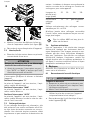
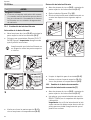
3
► Attach the cable holder to the rear of the
mobile dust extractor (see Fig. [3]).
► Connect the suction hose to the machine.
7.2 Switch on/off
► Insert the plug into an earthed socket.
CAUTION
Risk of injury from tools starting up unex
pectedly
► Before setting the switch to the "AUTO" or
"MAN" position, make sure that the con
nected tool is switched off.
The switch
[1-9] serves as an on/off switch.
Switch position "0"
Appliance socket
is disconnected from the
power, mobile dust extractor is switched off.
"MAN" switch position
Appliance socket is connected to the power,
the mobile dust extractor starts.
"Auto" switch position
Appliance socket is connected to the power,
the
mobile dust extractor starts when the con
nected tool is switched on.
7.3 Extension Cord
If an extension cord is required, it must have
sufficient
cross-section to prevent an excessive
drop in voltage or overheating. An excessive
drop in voltage reduces the output and can lead
to failure of the motor. The table below shows
English
9

you the correct cord diameter as a function of
the cord length for this tool.
Total Exten
sion Cord
Lenght (feet)
25 50 100 150
Cable size
(AWG)
14 12 not recommend
ed
Use only U.L. and CSA listed extension cords.
Never use two extension cords together. In
stead, use one long one.
The lower the AWG number, the
stronger the cord.
7.4 The antistatic system
Friction inside the extraction hose causes static
electricity
to develop during extraction. Operat
ing personnel may receive unpleasant electric
shocks while working. The mobile dust extrac
tor is fitted with an antistatic system as stand
ard to discharge any static electricity that may
develop. However, always use the enclosed an
tistatic extraction hose.
8 Settings
Consider the pictures on the fold-out page.
8.1 Connecting electric power tools
WARNING
Risk of injury
► Observe the maximum appliance socket
connected load (see chapter "Technical da
ta")
► Switch off the electric power tool.
– Always use the socket on the machine for
the purpose specified!
► Connect the electric power tool to the appli
ance socket
[1-3].
8.2 Connecting pneumatic tools
WARNING
Risk of injury
► Switch off the air tool.
If the compressed air module [1-2] (496141) is
installed,
the automatic switch-on function of
the mobile dust extractor also works in combi
nation with pneumatic tools.
We also recommend installing the VE service
unit
(495886). The service unit filters and lubri
cates the compressed air and enables an ad
justment of the air pressure. An IAS adapter
(454757) is available to connect Festool pneu
matic tools to the IAS system.
The operating pressure of the tool must be
6 bar for the automatic switch-on unit to func
tion correctly.
8.3 Temperature cut-out
A temperature cut-out switches the mobile dust
extractor off when it reaches a critical tempera
ture to prevent overheating.
► A temperature cut-out switches the mobile
dust extractor off when it reaches a critical
temperature to prevent overheating.
► Switch off the mobile dust extractor, allow
to cool for about 5 minutes then switch on
again.
Not possible to switch on: contact
Festool service workshop.
8.4 Adjusting the suction power
You can use the suction power adjuster [1-8]
to
adapt the machine suction power to different
applications.
8.5 AUTO
Clean - Cleaning the main filter
(only versions with AutoClean)
To maintain a constant suction power when ex
tracting
fine dust, you can adjust the frequency
of the automatic [1-7] cleaning system in infin
ite
variables using the rotary knob. Always use
the automatic cleaning system in combination
with a disposal bag (in line with dust class 'M'
requirements).
Before performing wet extraction tasks
or working with a filter bag, set the [1-7]
rotary knob to position 0.
► Set the automatic cleaning function to the
highest setting when [1-7] extracting large
quantities of dust.
Manual cleaning
If the suction power decreases, cleaning
can be started manually by turning the
switch [1-9]
to the AC symbol positioned on ei
ther side of the switch.
English
10

We recommend cleaning the main filter com
pletely if severely clogged:
► Set the suction power adjuster [1-8] to the
maximum setting.
► Cover the end of the nozzle or suction hose
with your hand for 10 seconds.
► Turn the switch
[1-9] to the AC symbol.
When the CT-VS closing slide is used
(order
no.: 497926), the filter can be
cleaned fully without removing the
connected electric power tools.
In intensive applications that generate adherent
dust,
it may be necessary to clean the filter ele
ment mechanically under certain circumstan
ces (extract). Wear a dust mask!
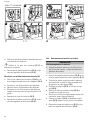
8.6 Applying the brake
Folding out the brake lever [1-13]
prevents the
mobile dust extractor from rolling. To achieve
this, lift the front end of the mobile dust extrac
tor slightly and push the brake lever down
wards until it latches into place. Push the lev
er [1-12]
again to release.
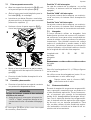
9 Working
9.1 Handling
Hose store: after finisching work, you can feed
the suction hose through the recess [4-2]
and
place it in the hose store.
SysDoc Systainer attachment system: a Sys
tainer
can be attached to the storeage area via
the four slides ore the T-Loc [4-1]
.
4
C
TM 36 E
AC
3/$1
(
;
CTM 36 E AC
4-1 4-1
4-2
9.2 Extracting dry materials
CAUTION
Hazardous dust
Damage to the respiratory passage
► Use a filter or disposal bag when extracting
hazardous materials!
► Do not use the machine if the volumetric
flow monitoring function is inactive.
Observe the following when extracting dust
generated by operating electric power tools:
If the exhaust air is discharged back into the
room,
the air renewal rate L within the room
must
be sufficient. The volume of air dis
charged back into the room must not exceed
50% of the fresh air volume flow (room volume
V
R
x air renewal rate L
W
). Observe all the rele
vant regional regulations.
Remember: A moist main filter clogs more
quickly when extracting dry materials. There
fore, dry the main filter before extracting dust
or replace the damp filter with a dry one.
9.3 Extracting fluids
WARNING
Risk of injury
► Do not evacuate combustible liquids!
The main filter shall only be used for
extracting dry materials.
Before extracting fluids, remove the filter bag
(see chapter 10.1 ). We recommend using a
special wet filter.
The dust extractor stops automatically when
the maximum level is reached.
CAUTION
Escaping foam and fluids
► Switch off the machine immediately and
empty the dust container.
9.4 Special features of the CT 36 E AC- LHS
To use the mobile dust extractor in combination
with the
PLANEX:
► Use kink-resistant suction hose D 36 mm x
3.5 m-AS.
► Use a special suction sleeve for connecting
the PLANEX
.
English
11

► Use closing slide CT-VS between the intake
opening [1-1] and suction hose.
► Attach the tool holder.
► Always use with a disposal bag!
10 Filter
WARNING
Risk of injury
► During the following procedure, take care
not to raise dust more than is unavoidable.
Moisten the main filter with a water spray
before removing it.
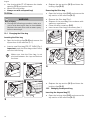
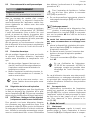
10.1 Changing the filter bag
Inserting the filter bag
► Open the locking clips [2-2]
and remove the
top section of the machine [2-1].
► Insert a new filter bag (FIS-CT 26/36) (Fig. ).
Important:
push the filter bag socket firmly
onto the inlet fitting.
Make sure that the filter bag is not
pinched
between the top and bottom
sections.
1
2
3
5
► Replace the top section [2-1] and close the
locking clips [2-2].
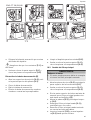
Removing the filter bag
► Open the locking clips [2-2] and remove the
top section of the machine [2-1].
► Remove the filter bag (Fig. ).
► Dispose of the used bag in accordance with
statutory regulations.
► Clean the dust container [2-3].
► Insert a new filter bag if necessary (see ).
6
1
2
3
► Replace the top section [2-1]
and close the
locking clips [2-2].
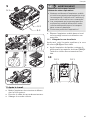
10.2 Changing the disposal bag
Inserting the disposal bag [7]
► Open the locking clips [2-2]
and remove the
top section of the machine [2-1].
English
12

1
2
3
7
ENS-CT 26/36/48
7-1
► Insert a new disposal bag (ENS-CT26/36) on
the inlet nozzle of the container and lock in
position.
Important:
The lateral openings on the dis
posal bag must be positioned inside the
container. Make sure that the bolt engages.
► Place the disposal bag over the edge of the
container.
Make sure that the contacts [7-1] are
free.
► Replace the top section [2-1]
and close the
locking clips [2-2].
Removing the disposal bag [8]
► Open the locking clips [2-2] and remove the
top section of the machine [2-1]
.
1
2
3
8
► Close the disposal bag.
► Remove the disposal bag.
► Dispose of the used disposal bag in accord
ance with statutory regulations.
► Clean the dust container [2-3].
► Replace the top section [2-1] and close the
locking clips
[2-2].
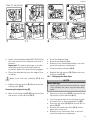
10.3 Changing the main filter
NOTE
Motor damage
► Never operate the extractor without a main
filter fitted as the motor may become dam
aged.
► Open the locking clips [2-2]
and remove the
top section of the machine [2-1].
► Turn the top section of the machine so that
the main filter is facing upwards (Fig.[9]).
► Fold over the lever [9-3] and remove the re
tainer [9-2]
.
► Remove the used main filter [9-1]
and re
place with a new one.
► Dispose of the used main filter in accord
ance with statutory regulations.
English
13

► Insert the retainer [9-2] and fold over the
lever [9-3] until it engages.
► Replace the top section [2-1]
and close the
locking clips
[2-2].
9-1
9-3
9
9-2
1
2
3
5
4
HF-CT26/36/48
11 After finishing work
► Switch off the mobile dust extractor and
disconnect the plug.
► Wind up the mains power cable.
► Empty the dust container.
CAUTION
Hazardous dust
Damage to the respiratory passage
► Wipe down the mobile dust extractor and
clean all accessories thoroughly using the
extractor (inside and out) before removing
from the working area.
► Parts that you were not able to clean thor
oughly must be sealed in an airtight plastic
bag prior to transportation.
► Wear a dust mask!
► Place the mobile dust extractor in a dry
room inaccessible to unauthorised users.
11.1 Emptying the dust container
The dust container [2-3] can be emptied once
the top section has been removed.
► After extracting fluids, clean the fill level
sensors [10-1] regularly with a soft cloth
and inspect for damage.
10-1 10-1
10
12 Service and maintenance
WARNING
Any maintenance or repair work that re
quires
opening of the motor or gear housing
should only be carried out by an authorised
Customer Service Centre (name supplied by
your dealer)!
► Maintenance or repair work carried out by
an unauthorised person can lead to the
wrong connection of the power leads or
other components, which in turn can lead
to accidents with serious consequences.
English
14

WARNING
To prevent accidents, always remove the
plug
from the power supply socket before
carrying out any maintenance or repair work
on the tool!
► Do not use compressed air to clean the
electrical tool! Do not try to clean parts in
side the tool in this way, as you could let
foreign objects in through the openings of
the tool housing.
A dust test must be performed at least once a
year
by the manufacturer or an instructed per
son. This test may include checks to determine
whether the filter is damaged, the machine is
sealed properly and the monitoring features
are functioning correctly.
During maintenance and repair work, all com
ponents that cannot be cleaned satisfactorily
must be replaced. The old components must be
sealed in impermeable plastic bags prior to dis
posal in compliance with applicable regulations
for this type of waste.
Customer service and repair only through
manufacturer
or service workshops: Please
find the nearest address at: www.festoolu
sa.com/service
EKAT
1
2
3
5
4
Use only original Festool spare parts! Order No.
at: www.festoolusa.com/service
13 Accessories
Use only original Festool accessories and Fes
tool
consumable material intended for this ma
chine because these components are designed
specifically for the machine. Using accessories
and consumable material from other suppliers
will most likely affect the quality of your work
ing results and limit any warranty claims. Ma
chine wear or your own personal workload may
increase depending on the application. Protect
yourself and your machine, and preserve your
warranty claims by always using original Fes
tool accessories and Festool consumable mate
rial!
The accessory and tool order number can be
found
in the Festool catalog or on the Internet
under www.festoolusa.com.
14 Disposal
Do not throw the power tool in your household
waste!! Dispose of machines, accessories and
packaging at an environmentally responsible
recycling centre. Observe the valid national
regulations.
English
15

Sommaire
1 Symboles........................................... 16
2 À propos de ce manuel......................16
3 Consignes de sécurité.......................16
4 Caractéristiques techniques.............18
5 Description fonctionnelle..................19
6 Utilisation en conformité avec les ins
tructions............................................ 19
7 Mise en service..................................19
8 Réglages............................................20
9 Mode de travail..................................21
10 Filtre.................................................. 22
11 Après le travail.................................. 25
12 Entretien et maintenance..................26
13 Accessoires....................................... 26
14 Recyclage.......................................... 26
1 Symboles
Symbole Signification
Avertissement de danger
Avertissement contre le risque
d'électrocution
Notice d'utilisation, lire les consi
gnes de sécurité !
Porter une protection respiratoire !
Astuce, information
Consignes opératoires
W watt
h heure
min minute
s seconde
kg kilogramme
Pa pascal
dB décibel
V volt
A ampère
Hz hertz
~ a.c. tension alternative
d.c. courant continu
n
0
Vitesse de rotation à vide
Class II conception
Symbole Signification
.../min
min
-1
tours ou course par minute
’’ pouce
lbs. livre
Diamètre
2 À propos de ce manuel
Conservez ces instructions
Il est important pour vous de lire et de com
prendre
ce manuel. Les informations qu'il con
tient, se rapporte à la protection de votre sécu
rité
et de prévention des problèmes. Les sym
boles suivants sont utilisés pour vous aider à
reconnaître cette information.
DANGER Description du risque
imminent
et l'incapa
cité à éviter tout ris
que qui peut entraîner
la mort.
AVERTISSEMENTDescription des dan
gers
possibles et des
blessures qui en ré
sultent ou la mort.
ATTENTION Description des dan
gers
et des éventuel
les blessures qui en
résultent.
AVIS Déclaration incluant
le
type de danger et
conséquences possi
bles.
CONSEIL Indique des informa
tions,
des notes ou
des conseils pour
améliorer votre suc
cès en utilisant l'outil.
3 Consignes de sécurité
3.1 Importantes consignes de sécurité
Lors de l'utilisation d'un outil électrique, res
pectez
les mesures fondamentales de précau
tion, y compris les points suivants :
LISEZ TOUTES LES INSTRUCTIONS
AVANT D'UTILISER LE PRESENT ASPIRATEUR:
AVERTISSEMENT - Afin de minimiser les
risques
d'incendie, de choc électrique et de
blessures
:
Français
16

– Ne laissez pas l'aspirateur mobile sans
surveillance lorsque celui-ci est branché.
Débranchez l'aspirateur mobile si vous ne
l'utilisez pas et avant de procéder à sa
maintenance.
– Utilisez l’aspirateur mobile uniquement à
l'intérieur.
– N'autorisez pas une utilisation de l'aspira
teur mobile en tant que jouet. Soyez parti
culièrement attentif lorsque l'aspirateur
mobile est utilisé par des enfants ou à
proximité d'enfants.
– Utilisez l'aspirateur mobile uniquement
conformément aux explications de la noti
ce. Utilisez exclusivement les accessoires
recommandés par le fabricant.
– N'utilisez pas l'aspirateur mobile avec un
câble ou une fiche mâle endommagé. Si
l'aspirateur mobile ne fonctionne pas nor
malement, s'il est tombé par terre, s'il a
été endommagé, s'il a été laissé à l'air libre
ou s'il est tombé dans l'eau, renvoyez-le à
un atelier de réparation.
– Ne tirez ou ne portez pas l'appareil par le
câble, n'utilisez pas le câble comme poi
gnée, ne coincez pas le câble dans des por
tes ou ne guidez pas le câble le long d'arê
tes vives. Ne roulez pas avec l'aspirateur
mobile sur le câble. Eloignez le câble de
surfaces chaudes.
– Ne débranchez pas l'aspirateur mobile en
tirant sur le câble. Pour débrancher, saisis
sez la fiche mâle, non le câble.
– Ne manipulez pas le câble ou l'aspirateur
mobile avec des mains mouillées.
– Ne placez aucun objet dans les ouvertures.
N'utilisez pas l'aspirateur mobile si les ou
vertures sont bouchées ; gardez les ouver
tures exemptes de poussière, de peluches,
de cheveux et autres objets, qui pourraient
diminuer le flux d'air.
– Gardez les cheveux, vêtements amples,
doigts et toutes les parties du corps éloi
gnés des ouvertures et des pièces mobiles.
– Coupez tout avant de débrancher l'aspira
teur mobile.
– Soyez particulièrement prudent lorsque
vous nettoyez des escaliers.
– N'aspirez pas de liquides inflammables et
explosibles, tels qu'essence, ou n'utilisez
pas l'aspirateur mobile dans des zones où
de tels liquides se trouvent.
– Branchez l'aspirateur mobile uniquement
dans une prise de courant avec terre ap
propriée. Voir les instructions de mise à la
terre.
– N'aspirez rien qui brûle ou fume, tels que
cigarettes, allumettes ou cendre chaude,
copeaux ou particules chauds, étincelles.
– N'utilisez pas l'aspirateur mobile sans sac
à poussières et/ou filtre en place.
CONSERVEZ CES INSTRUCTIONS
3.2 INSTRUCTIONS DE MISE A LA TERRE
Cet appareil doit être relié à la terre. En cas de
défaut
ou de panne de l'appareil, la mise à la
terre assure le chemin le plus direct (avec la
résistance la plus faible) pour le courant élec
trique, afin de minimiser le risque d'un choc
électrique. Cet aspirateur mobile est équipé
d'un câble possédant un conducteur de protec
tion et une fiche mâle de sécurité ("Schuko").
La fiche mâle doit être branchée dans une prise
de courant appropriée, qui est correctement in
stallée et mise à la terre, conformément aux
codes et ordonnances locaux.
AVERTISSEMENT - Un mauvais raccor
dement
du conducteur de protection peut
entraîner un risque de choc électrique. Si vous
n'êtes pas certain si la prise de courant est cor
rectement reliée à la terre, faites vérifier cela
par un électricien qualifié ou un chargé de
maintenance. Ne modifiez pas la fiche mâle li
vrée avec l'aspirateur mobile – si la fiche mâle
ne s'adapte pas dans la prise de courant, faites
dans ce cas installer une prise de courant ap
propriée par un électricien.
BOÎTE DE PRISE MISE
À
LA TERRE
BROCHE DE
MISE À
LA TERRE
PRISE MISE
À LA TERRE
MÉTHODES DE MISE À LA TERRE
- CROQUIS A
Cette machine est conçue pour être utilisée sur
un
circuit nominal de 120 volts, et possède une
prise de terre comme celle illustrée par le cro
quis A de l'illustration. Vérifiez que la prise du
câble est connectée à une prise murale ayant la
Français
17

même configuration. Aucun adaptateur ne de
vrait être utilisé avec cet machine.
3.3 Instructions relatives à la polarisation
Afin de diminuer le risque de choc électrique,
cet
aspirateur mobile possède une fiche mâle
polarisée (une broche est plus large que l'au
tre). La fiche mâle s'adapte uniquement dans
un sens dans la prise de courant polarisée. Si la
fiche mâle ne s'adapte pas correctement dans
la prise de courant, tournez la fiche. Si, après
cela, elle ne s'adapte toujours pas, demandez à
un électricien d'installer une prise de courant
appropriée. Ne remplacez en aucun cas la fiche
mâle.
3.4 Consignes de sécurité additionnelles
– Cet appareil ne doit pas être utilisé par des
personnes (y compris des enfants) aux ca
pacités physiques, sensorielles ou menta
les diminuées ou manquant d'expérience et
de connaissances. Il convient de surveiller
les enfants afin de s'assurer qu'ils ne
jouent pas avec l'appareil.
ATTENTION
Cette machine est uniquement prévue pour
l'utilisation à l'intérieur.Cette machine ne
peut être stockée qu'à l'intérieur.
3.5 La poussière, un risque pour la santé
AVERTISSEMENT! Certaines poussières
créées
par le ponçage mécanique, le
sciage, le meulage, le perçage et autres activi
tés reliées à la construction contiennent des
substances chimiques connues (dans l’État de
la Californie) comme pouvant causer le cancer,
des anomalies congénitales ou représenter
d’autres dangers pour la reproduction. Voici
quelques exemples de telles substances:
• plomb provenant de peintures à base de
plomb,
• silice cristallisée utilisée dans les briques,
le ciment et autres matériaux de maçonne
rie, et
• arsenic et chrome du bois d’oeuvre traité
avec un produit chimique.
Le risque d’exposition à de tels produits varie
selon
la fréquence à laquelle vous faites ce
genre de travail. Pour réduire les risques d’ex
position à ces substances chimiques : travaillez
dans un endroit adéquatement ventilé et utili
sez un équipement de sécurité approuvé, tel
que masques antipoussières spécialement con
çus pour filtrer les particules microscopiques.
AVERTISSEMENT
POUR RÉDUIRE LE RISQUE DE DOMMAGES,
L'UTILISATEUR
DOIT LIRE LE MANUEL
D'INSTRUCTION.
4 Caractéristiques techniques
Aspirateurs mobiles CT 36 E AC
Puissance absorbée (aspirateurs mobiles seulement)
2.9 - 8.3 A (350 - 1 000 W)
[3]
)
Puissance connectée totale max. 12 A (1 440 W)
Puissance max. de l’outil électrique connectée
3.7 A
[4])
Débit volumique (air), turbine max. 234 m³/h (8264 cu.ft./h)
[3] ) 8,3 A (1000 W) est la valuer moyenne de differentes conditions d'usage, une consommation de 10 A (1200 W) est possible.
[4] ) Si le dispositif de régulation de la puissance d’aspiration [1-7] est ajusté a la force d’aspiration (voir page Page 21, chap. 8 - 8.4 ) plus
basse, la puissance maximale de l’outil électrique connectée peut être 9,1 A.
Français
18

Aspirateurs mobiles CT 36 E AC
Dépression, turbine max. 24 000 Pa
Surface filtrante 6 318 cm² (979.3 sq.in.)
Tuyau d’aspiration D 36 mm x 3.5 m (1-7/16" x 11.5’)
Degré de protection IP X4
Niveau de pression acoustique selon IEC 60704-2-1 71 dB(A)
Volume de la cuve CT 36 E AC 36 l (9.5 gal.)
Dimensions L x l x h CT 36 E AC 630 x 365 x 596 mm (24.8 in. x 14.4 in. x
23.4 in.)
Poids CT 36 E AC 15.2 kg (33,5 lbs)
5 Description fonctionnelle
Des eléments fournis sont disponibles sur le
volet
qui se trouve au début de cette notice
d'utilisation. Vous pouvez ainsi déplier cette pa
ge et visualiser en permanence les différentes
parties de l'outil lorsque vous lisez la notice.
Les accessoires illustrés ou décrits ne sont
partiellement pas contenus dans le volume de
livraison.
[1-1]
Orifice d'aspiration
[1-2]
Fiche modulaire (module pneumati
que pour CT 36 E LE)
[1-3]
Prise de l'appareil
[1-4]
Compartiment de rangement du
tuyau
[1-5]
Poignée
[1-6]
SysDoc
[1-7]
Nettoyage automatique
[1-8]
Dispositif de régulation de la puissan
ce d’aspiration
[1-9]
Interrupteur de l'appareil
[1-10]
Agrafe de fermeture
[1-11]
Cuve de collecte
[1-13]
Frein
6 Utilisation en conformité avec les
instructions
Les aspirateurs mobiles sont appropriés de fa
çon
conforme aux prescriptions pour l'aspira
tion de poussières non dangereuses pour la
santé.
L'aspirateur mobile est prévu de façon confor
me aux prescriptions pour l'aspiration d'eau.
L'aspirateur mobile est approprié pour l’utilisa
tion à la maison, commerciale ou tous.
AVERTISSEMENT
Seul l’utilisateur est tenu responsable des
dommages
qui résulteraient d’une utilisa
tion non conforme aux prescriptions.
7 Mise en service
AVERTISSEMENT
Tension ou fréquence non admissible !
Risque d'accident
► La tension et la fréquence d'alimentation
électrique doivent être conformes aux indi
cations de la plaque signalétique.
► En Amérique du nord, utilisez uniquement
les outils Festool fonctionnant sous une
tension de 120 V/60 Hz.
Attention aux illustrations au début de la pré
sente notice d’utilisation.
7.1 Première mise en service
► Ouvrir les clapets de fermeture [2-2]
et re
tirer la partie supérieure de l'appareil [2-1]
.
► Retirez les accessoires de la cuve de collec
te [2-3]
et de l'emballage !
► Placez un sac filtre ou un sac d'élimination
des déchets dans la cuve de collecte (voir
chapitres et ).
► Remontez la partie supérieure [2-1] et fer
mez les agrafes de fermeture [2-2].
Français
19

3
► Montez l'enrouleur de câble sur la face ar
rière de l'aspirateur mobile (voir figure [3]
).
► Raccordez le tuyau d’aspiration à l'appareil.
7.2 Marche/Arrêt
► Brancher la fiche secteur dans une prise de
courant dotée d'une terre.
ATTENTION
Risques de blessures dus à un démarrage
incontrôlé des outils électriques
► Avant de commuter l'interrupteur en posi
tion "AUTO" ou "MAN", s'assurer que l'outil
électrique raccordé soit arrêté.
L'interrupteur [1-9]
sert à allumer et éteindre
l'appareil.
Position d'interrupteur "0"
La prise de l'appareil
est hors tension ; l'aspi
rateur mobile est désactivé.
Position d'interrupteur "MAN"
La prise de l'appareil est sous tension ; l'aspi
rateur mobile démarre.
Position d'interrupteur "AUTO"
La prise de l'appareil est sous tension ; l'aspi
rateur
mobile démarre lors de la mise en mar
che de l'outil raccordé.
7.3 Rallonge électrique
Si une rallonge électrique est nécessaire, elle
doit présenter une section suffisante afin d'évi
ter une chute de tension excessive ou une sur
chauffe. Une chute de tension excessive réduit
la puissance et peut entraîner la destruction du
moteur. Le tableau ci-dessous vous présente la
section
correcte de la rallonge en fonction de
sa longueur pour cette appareil.
Longueur to
tale de la ral
longe (pieds)
25 50 100 150
Section de la
rallonge
(AWG)
14 12 pas recomman
dé
Utilisez exclusivement des rallonges recom
mandées par U.L. et CSA.
N'utilisez jamais deux rallonges raccordées
l'une à l'autre, mais remplacez-les par une ral
longe plus longue.
Plus le calibre AWG est bas, plus le
câble est résistant.
7.4 Système antistatique
Lors de l'aspiration, il en résulte des charges
d'électricité
statique par frottement dans le
tuyau d’aspiration. Ces charges peuvent se ma
nifester par des chocs électriques désagréa
bles pour l'opérateur. Pour dériver ces charges
d'électricité statique, l'aspirateur mobile est
équipé de série avec un système antistatique. A
cet égard, il convient toutefois d'utiliser le tuyau
d’aspiration antistatique fourni.
8 Réglages
Attention aux illustrations au début de la pré
sente notice d’utilisation.
8.1 Raccordement d'un outil électrique
AVERTISSEMENT
Risques de blessures
► Respecter la valeur de raccordement max.
à la prise de l'appareil (voir chapitre Carac
téristiques techniques).
► Mettre l'outil électrique hors tension.
– Utiliser la prise de courant sur l'appareil
uniquement dans le but indiqué !
► Raccordement de l'outil électrique à la pri
se de l'appareil [1-3].
Français
20
La page est en cours de chargement...
La page est en cours de chargement...
La page est en cours de chargement...
La page est en cours de chargement...
La page est en cours de chargement...
La page est en cours de chargement...
La page est en cours de chargement...
La page est en cours de chargement...
La page est en cours de chargement...
La page est en cours de chargement...
La page est en cours de chargement...
La page est en cours de chargement...
La page est en cours de chargement...
La page est en cours de chargement...
La page est en cours de chargement...
La page est en cours de chargement...
La page est en cours de chargement...
-
 1
1
-
 2
2
-
 3
3
-
 4
4
-
 5
5
-
 6
6
-
 7
7
-
 8
8
-
 9
9
-
 10
10
-
 11
11
-
 12
12
-
 13
13
-
 14
14
-
 15
15
-
 16
16
-
 17
17
-
 18
18
-
 19
19
-
 20
20
-
 21
21
-
 22
22
-
 23
23
-
 24
24
-
 25
25
-
 26
26
-
 27
27
-
 28
28
-
 29
29
-
 30
30
-
 31
31
-
 32
32
-
 33
33
-
 34
34
-
 35
35
-
 36
36
-
 37
37


Festool CLEANTEX CT 36 E AC Original Operating Manual
- Taper
- Original Operating Manual
- Ce manuel convient également à
dans d''autres langues
- English: Festool CLEANTEX CT 36 E AC
- español: Festool CLEANTEX CT 36 E AC
Documents connexes
-
Festool CLEANTEX CTL 48 E Original Operating Manual
-
Festool CTH 26 E / a Mode d'emploi
-
-
-
-
-
-
-
Festool 202455 Mode d'emploi
-
Autres documents
-
Kärcher WD 5P Manuel utilisateur
-
 resistex Argos Tubular LED Mode d'emploi
-
resistex Residetect Manuel utilisateur
-
-
 resistex Markiz Outdoor Wall Lamp Manuel utilisateur
-
GYS PNEUMATIC ALUMINIUM DUST EXTRACTOR (ATEX) Le manuel du propriétaire
-
resistex Ydile Manuel utilisateur

