B343619412COM01PK
Do Not Return This Product!
Contact our customer service team for help rst
Call: 1-800-489-3351 (toll free)
Visit: www.ameriwoodhome.com
–Unit can p over causing severe injury or death.
–Anchor unit to stud in wall (if instructed to)
–Do not allow children climb on unit
–Put heavy items on lower shelves or drawers
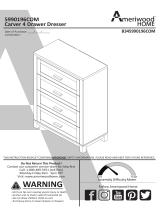
Westerleigh Accent Table Dove Gray
3619412COM
Date of Purchase: ____/____/_____
Lot Number:
THIS INSTRUCTION BOOKLET CONTAINS IMPORTANT SAFETY INFORMATION. PLEASE READ AND KEEP FOR FUTURE REFERENCE.
WARNING
Easy Tough
Assembly Diculty Meter
Follow Ameriwood Home
112023PK

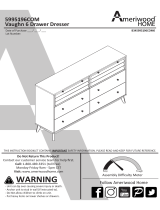
Helpful Hints
Contact Us!
Do NOT return this product!
Contact our friendly customer service team rst for help
PEOPLE NEEDED FOR ASSEMBLY: 2
2
ameriwoodhome.com
- Open your item in the area you plan to keep it for less heavy liing.
- Idenfy, sort and count the parts before aempng assembly.
- Lay all parts on smooth at surface.
- Compression Wood Dowels are tapped in with a hammer.
- Make sure to always face the point on the top of the Cam Lock towards
the outer edge.
- Do NOT use harsh chemicals or abrasive cleaners on this item.
- Never push, pull, or drag your furniture.
Visit ameriwoodhome.com
Call us!
1-800-489-3351

Before You Start
Cam Lock Fastening System
Before You Start
Cam Lock Fastening System
3
ameriwoodhome.com
P
P
P
P
P
This Cam Lock Fastening System will be used throughout the assembly process.
Read through each step carefully and follow the proper order
Separate and count all your parts and hardware
Give yourself enough room for the assembly process
Have the following tools: Phillips Head Screwdriver and Hammer
Cauon: If using a power drill or power screwdriver for screwing,
please be aware to slow down and stop when screw is ght.
Failure to do so may result in stripping the screw.
Quick
Tip
Assembly
1
3
2
4

4
ameriwoodhome.com
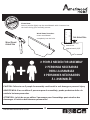
Please Note:
You may need to lightly tap the wood dowels with a hammer into
the holes during your assembly process.
Wood Dowel Inseron:
Insert wood dowel
completely into the hole.
CAUTION: Failure to use 2 people for assembly could result in unit damage or personal injury.
ADVERTENCIA: Si no se ulizan 2 personas para el ensamblaje, puede producirse daño a la
unidad o lesiones personales.
ATTENTION : Le fait de ne pas uliser 2 personnes pour l’assemblage peut entraîner des
dommages à l’unité ou des blessures personnelles.
Quick
Tip
Assembly
2 PEOPLE NEEDED FOR ASSEMBLY
2 PERSONAS NEcESARiAS
PARA LA ASAMBLEA
2 PERSONNES NécESSAiRES
à L’ASSEMBLéE
Wood Dowel
Actual Size Wood Dowel will
extend out
approximately 3/8”.
Not Actual Size

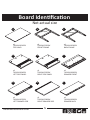
Board Iden ca on
Not actual size
5
ameriwoodhome.com
x1
T3619412010PK
TOP PANEL
x1
T3619412020PK
FRONT FRAME
x1
T3619412030PK
BACK FRAME
x1
T3619412040PK
LEFT SIDE PANEL
x1
T3619412050PK
RIGHT SIDE PANEL
x1
T3619412080PK
RIGHT DRAWER SIDE
x1
T3619412090PK
DRAWER BACK
x1
T3619412060PK
DRAWER FRONT
x1
T3619412070PK
LEFT DRAWER SIDE
Open Space Solid Panel
A
D
G
B
E
H
C
F
I

Board Iden ca on
Not actual size
6
ameriwoodhome.com
x1
T3619412100PK
DRAWER BOTTOM
x1
T3619412110PK
DRAWER SUPPORT
J K

Part List
Actual Size
7
ameriwoodhome.com
Hardware Bag Reference Number:
23619412COM0PK
x13
TPK0001
Cam Bolt
For any replacement hardware,
order using part # 23619412COM0PK
x8
TPK0004
DOWEL
M8 x 30
x9
TPK0008
CBS M4 x 38
x2
TPK0018
CBS M4 x 25
x4
TPK3005
PH SCREW
M4 X 20
x13
TPK0002
Cam Lock
15 x 9
1 2 3
65 7
x2
TPK0007
CBS M4 x 16
4

Part List
Not Actual Size
8
ameriwoodhome.com
x2
TPK3007
HANDLE
Hardware Bag Reference Number:
23619412COM0PK
8

9
ameriwoodhome.com
Proper orientaon of CAM LOCK
Step 1
x8
TPK0004
x11
TPK0002
2
2
2
2
2
2
2
3
3
Insert Cam Lock (2) x 11 and Dowel (3) x 8 to Drawer
Support (K), Le Side Panel (D) , and Right Side Panel (E).
E
D
K
(x8)(x11)

10
ameriwoodhome.com
Step 2
1
x4
TPK0001
1
Properly insert Cam Bolt (1) x4 to Top Panel (A), and fully ghten.
A
(x4)

11
ameriwoodhome.com
Proper orientaon of CAM LOCK
Step 3
Open Space
Solid Panel
x8
TPK0001
x2
TPK0002
B
C
2
Insert Cam Bolt (1) and Cam Lock (2) into Front
Frame (B) and Back Frame (C) as ilustrated.
2
1
1
(x2)(x8)

12
ameriwoodhome.com
Pro Tip: Second person recommended for ease of assembly on this step.
Aach Le Side Panel (D) and Right Side
Panel (E) to Back Frame (C) so that the
drawer slide wheels are at the opposite end.
Step 4
Solid Panel
E
LOCK
D
C

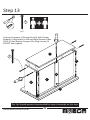
13
ameriwoodhome.com
Step 5
Open Space
LOCK
Aach Front Frame (B) to Le and Right Side
Panels (D) & (E), and ghten by turning cam
locks clockwise.
B
D
E
C
Pro Tip: Second person recommended for ease of assembly on this step.

14
ameriwoodhome.com
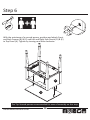
Step 6
LOCK
With the assistance of a second person, posion and aach Front
and Back Frames (B) & (C) and Le and Right Side Panels (D) & (E)
to Top Panel (A). Tighten by turning cam locks clockwise.
B
A
D
E
C
Pro Tip: Second person recommended for ease of assembly on this step.

15
ameriwoodhome.com
Step 7
Use two Screws (5) to connect Front Frame (B)
to Top Panel (A). Do not over-ghten.
x2
TPK0018
5
5
B
AD
E
C
(x2)

16
ameriwoodhome.com
Step 8
x2
TPK0007
A
D
E
B
4
4
With the assistance of a
second person, carefully
turn the unit upright.
Use Screws (4) to aach
the drawer slide on Le
and Right Side Panels (D) &
(E) to Front Frame (B).
Pro Tip: Second person recommended for ease of assembly on this step.
(x2)

17
ameriwoodhome.com
Step 9
x1
TPK0001
1
1
Properly insert Cam Bolt (1) into Drawer Front (F) and fully ghten.
F
(x1)

18
ameriwoodhome.com
Step 10
G
F
H
4
4
x4
TPK0008
Connect Le and Right Drawer Sides (G) & (H) to
Drawer Front (F) using Screws (4) as illustrated.
Do NOT over-ghten.
(x4)

19
ameriwoodhome.com
Step 11
Aach Drawer Support (K) to Drawer
Front (F) and ghten by turning cam
lock clockwise.
LOCK
K
G
F
H

20
ameriwoodhome.com
Step 12
Insert Drawer Boom (J) into the grooves
of Drawer Sides (G) & (H) and align with the
groove in Drawer Front (F).
K
J
G
F
H
Pro Tip: Second person recommended for ease of assembly on this step.
La page est en cours de chargement...
La page est en cours de chargement...
La page est en cours de chargement...
La page est en cours de chargement...
La page est en cours de chargement...
La page est en cours de chargement...
La page est en cours de chargement...
La page est en cours de chargement...
La page est en cours de chargement...
La page est en cours de chargement...
La page est en cours de chargement...
La page est en cours de chargement...
-
 1
1
-
 2
2
-
 3
3
-
 4
4
-
 5
5
-
 6
6
-
 7
7
-
 8
8
-
 9
9
-
 10
10
-
 11
11
-
 12
12
-
 13
13
-
 14
14
-
 15
15
-
 16
16
-
 17
17
-
 18
18
-
 19
19
-
 20
20
-
 21
21
-
 22
22
-
 23
23
-
 24
24
-
 25
25
-
 26
26
-
 27
27
-
 28
28
-
 29
29
-
 30
30
-
 31
31
-
 32
32


Dorel Home 3619412COM Assembly Manual
- Taper
- Assembly Manual
- Ce manuel convient également à
dans d''autres langues
- español: Dorel Home 3619412COM