Kichler Lighting 44116PN Manuel utilisateur
- Taper
- Manuel utilisateur

Date Issued: 10/02/17 IS-44116-CB
We’re here to help 866-558-5706
Hrs: M-F 9am to 5pm EST
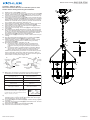
CAUTION – RISK OF SHOCK –
Disconnect Power at the main circuit breaker panel or main
fusebox before starting and during the installation.
►
►
3
2
11
10
4
5
6
7
8
9
13
12
15
14
1
16
17
19
12
18
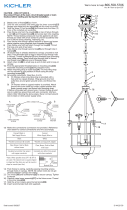
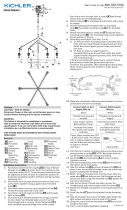
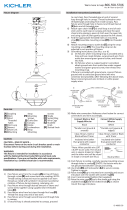
1) Rotatearmsofxture[16] as shown.
2) Take the arm assembly and lower onto the lower assembly[17]
angesandthreadthetwostems[18] into the lower assembly.
3) Take the three (3) ball knobs[19] and thread onto the three (3)
arms of the installed arm assembly.
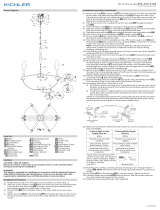
4) Passxturewirefromthecoupling[1]ontopofxturethrough
a stem[2]andthreadedtubes[3]andscrewstemintocoupling.
NOTE:Threadlockingcompoundmustbeappliedtoallstem
threadsasnotedwitharrowsymboltopreventaccidentalrota-
tionofxtureduringcleaning,relamping,etc.
5) Passxturewirethroughdesiredamountofstemsandscrew
stemstogetherusingsuppliedshortthreadedtubes[3].
6) Passxturewirefromlaststemthroughrstloop[4]. Thread
rstloopontoendoflaststem.
7) Passxturewirethroughsecondloop[5]andthroughholein
Canopy[6].
8) (Ifsecondloopisalreadyattachedtocanopy,proceedtonext
step).Passthreadedpipeatendofsecondloopthroughhole
incanopy.Threadlockwasher[7]ontothreadedpipeprotruding
frominsidecanopy.Passxturewirethroughholeinhexnut
andthreadhexnut[8]ontoendofthreadedpipe.
9) Attachchainlink[9]tosmallloopatendofstemandtoloopon
canopy.
10) Findtheappropriatethreadedholesonmountingstrap[12].
Assemblemountingscrews[13] into threaded holes.
11) Attachmountingstraptooutletbox[14].Themountingstrap
canbeadjustedtosuitpositionofxtureusingthestrap
mountingscrews[15].
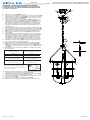
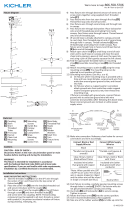
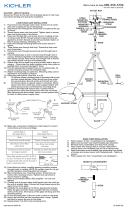
12)Groundinginstructions:(SeeIllus.AorB).
A) Onxtureswheremountingstrapisprovidedwitha
holeandtworaiseddimples.Wrapgroundwirefrom
outletboxaroundgreengroundscrew,andthreadinto
hole.
B) Onxtureswhereacuppedwasherisprovided.Attach
groundwirefromoutletboxundercuppedwasherand
greengroundscrew,andthreadintomountingstrap.
Ifxtureisprovidedwithgroundwire.Connectxtureground
wiretooutletboxgroundwirewithwireconnector.(Notpro-
vided.)Afterfollowingtheabovesteps.Neverconnectground
wiretoblackorwhitepowersupplywires.
13)Makewireconnections(connectorsnotprovided.)Reference
chartbelowforcorrectconnectionsandwireaccordingly.
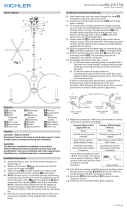
14)Pushxturetoceiling,carefullypassingmountingscrews
throughholesincanopy.NOTE:Becertainwiresdonotget
pinchedbetweencanopyandceiling.
15) Use knobs[10]andlockwashers[11]tosecurecanopy.Tighten
tosecure.
16) Carefullyraiselowerassembly[17]tothexturearms.Thread
intheinnertubes[18].
17) Holdthearmsinplaceusingtheballknobs[19].
18) Insertrecommendedbulb(notsupplied).
GREEN GROUND
SCREW
CUPPED
WASHER
OUTLET BOX
GROUND
FIXTURE
GROUND
DIMPLES
WIRE CONNECTOR
OUTLET BOX
GROUND
GREEN GROUND
SCREW
FIXTURE
GROUND
A
B
Connect Black or
Red Supply Wire to:
Connect
White Supply Wire to:
Black White
*Parallel cord (round & smooth) *Parallel cord (square & ridged)
Clear, Brown, Gold or Black
without tracer
Clear, Brown, Gold or Black
with tracer
Insulated wire (other than green)
with copper conductor
Insulated wire (other than green)
with silver conductor
*Note: When parallel wires (SPT I & SPT II)
are used. The neutral wire is square shaped
or ridged and the other wire will be round in
shape or smooth (see illus.)
Neutral Wire

Date Issued: 10/02/17 IS-44116-CB
INSTRUCTIONS
For Assembling and Installing Fixtures in Canada
Pour L’assemblage et L’installation Au Canada
Nous sommes là pour vous aider 866-558-5706
Heures : du lundi au vendredi, de 9h à 17h (heure de l’Est)
ATTENTION – RISQUE DE DÉCHARGES ÉLECTRIQUES -
Couper le courant au niveau du panneau du disjoncteur du
circuit principal ou de la boîte à fusibles principale avant de
procéder à l’installation.
1) Rotatearmsofxture[16] as shown.
2) Take the arm assembly and lower onto the lower assembly[17]
angesandthreadthetwostems[18] into the lower assembly.
3) Take the three (3) ball knobs[19] and thread onto the three (3)
arms of the installed arm assembly.
4) Passerleldexationdel’accouplement[1]au-dessusdu
luminaireàtraversunetige[2]etdestubesletés[3]etvisser
latigedansl’accouplement.REMARQUE:lecomposéde
verrouillagedeletagedoitêtreappliquéàtousleslsdela
tigecommeindiquéavecunsymboleéchépourempêcher
larotationaccidentelleduluminairependantlenettoyage,la
relamping,etc.
5) Passerleldexationàtraverslaquantitésouhaitéedetiges
etlavisdériveenutilisantdestubesàletagecourtfournis[3].
6) Passerleldexationdeladernièretigeàlapremièreboucle
[4].Enlezlapremièrebouclesurlandeladernièretige.
7) Passxturewirethroughsecondloop[5]andthroughholein
Canopy[6].
8) (Silasecondeboucleestdéjàattachéeàlacanopée,passez
àl’étapesuivante).Passerletuyauletéàlandudeuxième
troutraversantdanslecapot.Enlerledispositifdeverrouil-
lage[7]suruntuyauletéfaisantsaillieàpartirdelacano-
péeintérieure.Passezleldexationàtraversletroudans
l’hexagoneetenfoncezlel[8]surl’extrémitédutuyauleté.
9) Attachezleliendechaîne[9]àlapetiteboucleàlandela
tigeetfaitesunebouclesurlacanopée.
10)Trouvezlestroustaraudésappropriéssursangledexation
[12].Monterlesvisdemontagedanslestrousletés[13].
11)Attachezlasangledexationàlaboîtedesortie[14].Sangle
dexationpeutêtreajustéeenfonctiondelapositiondemon-
tage[15].
12)Connecterlesls.Seporterautableauci-dessouspourfaire
lesconnexions.
13)Poussezxationauplafond,enpassantsoigneusementlesvis
demontageàtraversdestrousdanslacanopée.
14) Utilisezlesboutonsdeverrouillage[10]etleslave-glaces[11]
poursécuriserlavoilure.Serrezpoursécuriser.
15) Carefullyraiselowerassembly[17]tothexturearms.Thread
intheinnertubes[18].
16) Holdthearmsinplaceusingtheballknobs[19].
17) Installerlaoulesampoulesrecommandées(nonfournies).
Connecter le fil noir ou
rouge de la boite
Connecter le fil blanc de la boîte
A Noir A Blanc
*Au cordon parallèle (rond et lisse)
*Au cordon parallele (à angles droits el strié)
Au bransparent, doré, marron, ou
noir sans fil distinctif
Au transparent, doré, marron, ou
noir avec un til distinctif
Fil isolé (sauf fil vert) avec
conducteur en cuivre
Fil isolé (sauf fil vert) avec
conducteur en argent
*Remarque: Avec emploi d’un fil paralléle
(SPT I et SPT II). Le fil neutre est á angles
droits ou strié et l’autre fil doit étre rond ou
lisse (Voir le schéma).
Fil Neutre
►
►
3
2
11
10
4
5
6
7
8
9
13
12
15
14
1
16
17
19
12
18
-
 1
1
-
 2
2


Kichler Lighting 44116PN Manuel utilisateur
- Taper
- Manuel utilisateur
dans d''autres langues
- English: Kichler Lighting 44116PN User manual
Documents connexes
-
 Kichler Lighting 44115PN Manuel utilisateur
-
 Kichler Lighting 44313PN Manuel utilisateur
-
 Kichler Lighting 44325VTG Manuel utilisateur
-
Kichler 43694CH Manuel utilisateur
-
 Kichler Lighting 52016CLP Manuel utilisateur
-
 Kichler Lighting 42592OZ Manuel utilisateur
-
 Kichler Lighting 52116BK Manuel utilisateur
-
-
 Kichler Lighting 49992GG Manuel utilisateur


