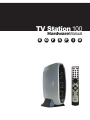
ADS Technologies PTV-360 Manuel utilisateur
- Catégorie
- Tuners TV d'ordinateur
- Taper
- Manuel utilisateur
Ce manuel convient également à

Hardware
Manual
TV Station 100
E
English
G
German
F
French
S
Spanish
P
Portuguese
I
Italian
D
Dutch

TV Station 100 Page 2

TV Station 100 Page 3
© 2005 ADS Technologies. All Rights Reserved
First Edition: February 2005
Microsoft, MS-DOS, Windows, Windows 95, Windows 98SE, Windows 2000, Windows ME and Windows XP are
registered trademarks of Microsoft Corporation.
IBM is a registered trademark of the International Business Machines, Inc.
ADS is a registered trademark of ADS Technologies Inc.
ADS Technologies (ADS) makes no warranty of any kind with regard to this material,
including but not limited to, the implied warranties of merchantability and fitness for a
particular purpose. The information furnished within this written document is for
information purposes only and is subject to change without notice. ADS Technologies assumes no responsibility or liability for any errors or inaccuracies
that may appear herein. ADS makes no commitment to update or to keep current information contained within this document. (rtt)
Table
of
Contents
of Contentsof
4
Product Overview
6
Installation Guide • Installationsanleitung für TV Station
100 • Guide d’installation du TV Station 100 • Guía de
instalación para TV Station 100 • Manual de instalação
do TV Station 100 • Guida all’installazione di TV Station
100 • Installatiehandleiding voor TV Station 100
30
Troubleshooting • Troubleshooting • Guide de dépannage
Resolución de problemas • Resolução de problemas
Localizzazione e retti ca dei problemi
Probleemoplossing

TV Station 100 Page 4
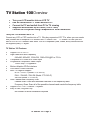
TV Station 100
Overview
•
Turn your LCD monitor into an LCD TV
•
Use as stand-alone TV Tuner without a PC
•
Connect to PC and switch from PC to TV viewing
•
Supports Resolutions up to SXGA (1280 x 1024)
•
Connect to a Projector using Component or VGA connectors
Turn your LCD monitor into a TV
Convert any LCD or CRT monitor into a TV. Why buy expensive LCD TV’s, when you can create
one yourself with a computer LCD monitor and TV Station 100? TV Station 100 lets you con-
nect to LCD or CRT monitors with either VGA or Component (Red, Green, Blue) connections for
the highest quality TV signal.
TV Station 100 Features
•
Support CATV / Air TV
•
High Resolution and Frequency
640x480, 800x600, 1024x768, 1280x1024 @60 or 75 Hz
•
Composite RCA Video or S-Video Input
•
Progressive Component Video Output
YPbPr 480p – Progressive
•
Motion-Adaptive 3D De-interlace
•
OSD Menu Control Interface
•
Multi-TV Regions Support
NTSC / NTSC-J (Model: PTV-360-N)
PAL-I / PAL-BG / PAL-DK (Model: PTV-360-P)
SECAM (Model: PTV-360-S)
•
Auto Channel and Frequency Scan
Channel Scan: Scan and remember channels in the frequency table
Frequency Scan: Scan all of the possible channels and create the frequency table
•
Support LCD / CRT / Plasma
/ Projector
•
Easy to Use, Plug and Play
No software or driver installation required

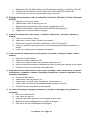
TV Station 100 Page 5
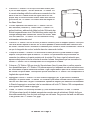
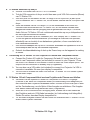
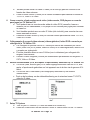
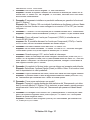
TV Station
100
Power
Source
Channel
Volume
DC
Audio
Out
Audio
In
A/V
Octopus
DIN - IN
YPbPr -
OUT
15-pin
D-SUB
VGA Out
Tuner
VGA In
6-pin DIN
Power
Source
Channel
Up/Down
Volume
Up/Down
DC
Audio In/Out
A/V Octopus
DIN - IN
A/V Octopus
DIN - IN
A/V Octopus
YPbPr - OUT
15-pin
D-SUB
15-pin
D-SUB
15-pin
VGA Out
VGA In
6-pin DIN
Tuner
Power
Mute
Number
Keys
Enter
Jump
Add/Delete Channel
Menu
Sleep
Display
Channel Up
Volume Up
Volume Down
Channel Down
PC/AV
Source
RGB/YPbPr
Default

TV Station 100 Page 6
Installation Guide
for
TV Station 100
for TV Station 100for
1.
Package contents:
a.
TV Station 100 unit
b.
6 ft. VGA to 8 pin Din cable
c.
6 ft. 3.5mm to 3.5mm Stereo link cable
d.
Custom A/V cable for Component Out and A/V inputs
e.
Remote Control
f.
Power Adapter
g.
User Guide
h.
Base Stand
i.
Batteries: 2 x AAA
Paketinhalt:
a.
TV Station 100-Gerät
b.
1,80 m VGA auf 8-Pin DIN-Kabel
c.
1,80 m 3,5 mm auf 3,5 mm Stereo-Verbindungskabel
d.
Spezial-A/V-Kabel für Component Out und A/V-Eingänge
e.
Fernbedienung
f.
Netzadapter
g.
Benutzerhandbuch
h.
Standfuß
i.
Batterien: 2 x AAA
Contenu :
a.
Boîtier TV Station 100
b.
Câble VGA/DIN 8 broches (1,80 m)
c.
Cordon jack stéréo 3,5 mm/jack stéréo 3,5 mm (1,80 m)
d.
Câble audio/vidéo spécial pour sortie composante et entrées audio/vidéo
e.
Télécommande
f.
Adaptateur secteur
g.
Guide de l’utilisateur
h.
Socle
i.
Piles : 2 x AAA (R3)
Contenidos del paquete:
a.
Unidad TV Station 100
b.
Cable VGA de 2 m a Din de 8 patillas
c.
Cable de enlace estéreo 3,5 mm a 3,5 mm de 2 m
d.
Cable A/V a medida para salida de componente y entradas A/V
e.
Mando a distancia
f.
Adaptador de potencia

TV Station 100 Page 7
g.
Guía de usuario
h.
Base
i.
2 x pilas: AAA
Conteúdo do pacote:
a.
Unidade do TV Station 100
b.
Cabo DIN VGA a 8 pinos de 1.8m
c.
Cabo de conexão estéreo 3.5mm a 3.5mm de 1.8m
d.
Cabo A/V para saída de componente e entradas A/V
e.
Controle remoto
f.
Adaptador de energia
g.
Manual do usuário
h.
Suporte base
i.
Pilhas: 2 x AAA
La confezione include:
a.
Unità TV Station 100
b.
Cavo Din 1,8m da VGA a 8 pin
c.
Cavo collegamento stereo 1,8m da 3,5mm a 3,5mm
d.
Speciale cavo A/V per Uscita componenti e ingressi A/V
e.
Telecomando
f.
Adattatore elettrico
g.
Guida dell’utente
h.
Stand di appoggio
i.
Batterie: 2 tipo AAA
Dit pakket bevat:
a.
Een TV Station 100 apparaat
b.
2 m lange VGA naar 8 pins Din kabel
c.
2 m lange 3,5/3,5 mm stereokabel
d.
Gewone A/V-kabel voor componentuitgangen en A/V-ingangen
e.
Afstandsbediening
f.
Stroomadapter
g.
Gebruikshandleiding
h.
Basis
i.
Batterijen: 2 x AAA

TV Station 100 Page 8
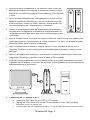
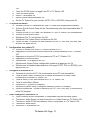
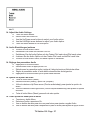
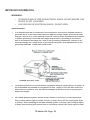
2.
Place the TV Station 100 on top of the Base Stand (item
h) for the best support. This will allow the TV Station 100
to remain standing while the cables are connected on the
back of the unit. Please follow the gure below for the
proper way to mount the Base Stand. Make sure that the
grooves on the TV Station 100 match with the tongue on
the Base Stand.
2.
Für den optimalen Halt setzen Sie TV Station 100 auf
den Standfuß (Lieferteil h). Damit bleibt TV Station 100
aufrecht
stehen, während die Kabel auf der Rückseite der
Einheit angeschlossen sind. Die Abbildung unten zeigt die
richtige Montage des Standfußes. Stellen Sie sicher, dass
Nut und Feder auf TV Station 100 und Standfuß richtig
miteinander verbunden sind.
2.
Placez le TV Station 100 sur le socle (h dans le con
tenu) pour un support optimal. Vous pou-
vez ainsi laisser reposer
le boîtier sur ce socle pendant le branchement des câbles au dos
du boîtier. Veuillez suivre l’illustration ci-dessous pour monter le socle correctement. Veillez à
ce que la languette du socle s’emboîte dans les rainures du boîtier.
2.
Coloque la unidad TV Station 100 encima de la base (artículo h) para obtener el mejor
soporte. Esto permitirá que la estación TV Station 100 permanezca de pie mientras se
conectan los cables en la parte posterior de la unidad. Por favor, siga la ilustración que
aparece abajo para la forma correcta de montar la base. Asegúrese que las ranuras en la
unidad TV Station 100 se corresponden con la lengüeta en la base.
2.
Coloque o TV Station 100 em cima do Suporte base (item h) para obter o melhor suporte.
Isso possibilitará que o TV Station 100 permaneça em pé enquanto os cabos estiverem sen-
do conectados na parte traseira da unidade. Siga a gura abaixo para ver a maneira correta
de montar o suporte base. Certi que-se que as ranhuras do TV Station 100 correspondem à
lingüeta do suporte base.
2.
Appoggiare l’unità TV Station 100 sullo Stand di appoggio (art. h) per avere il massimo
sostegno. In questo modo TV Station 100 rimarrà in posizione verticale mentre si collegano i
cavi sul retro dell’unità. Seguire l’illustrazione riportata di seguito per installare correttamente
lo Stand di appoggio e accertarsi che le scanalature sull’unità TV Station 100 corrispondano
alle linguette dello Stand di appoggio.
2.
Plaats TV Station 100 bovenop de basis (h) voor de beste stabiliteit. Zo kan TV Station
100 blijven staan terwijl de kabels aangesloten worden aan de achterkant. Bekijk de guur
hieronder aandachtig voor de juiste montage van de basis. Zorg ervoor de tand van de basis
in de groeven van TV Station 100 grijpt.

TV Station 100 Page 9
3.
Open the battery compartment of the Remote Control, insert the
batteries according to the diagram to operate the Remote Control.
Make sure you match the polarities to avoid damage to the Remote
Control.
3.
Öffnen Sie das Batteriefach der Fernbedienung und legen Sie die
Batterien gemäß der Abbildung ein, um die Fernbedienung in Be-
trieb zu nehmen. Stellen Sie sicher, dass die Polarität stimmt, um
eine Beschädigung der Fernbedienung zu vermeiden.
3.
Ouvrez le compartiment à piles de la télécommande et insérez-y
les piles selon le diagramme d’utilisation de la télécommande, en
respectant la polarité appropriée pour éviter d’endommager la télé-
commande.
3.
Abra el compartimiento de las pilas del mando a distancia, introduzca las pilas según el dia-
grama para poner en funcionamiento el mando a distancia. Por favor, compruebe las polari-
dades para evitar dañar el mando a distancia.
3.
Abra o compartimento de pilhas no controle remoto e insira as pilhas de acordo com o
diagrama. Certi que-se de corresponder as polaridades para evitar que o controle remoto
estrague.
3.
Aprire lo scomparto delle batterie sul Telecomando e inserire le batterie come indicato dal
diagramma. Rispettare e polarità a scanso di danni al Telecomando.
3.
Open het batterijcompartiment van de afstandsbediening en plaats de batterijen erin zoals
afgebeeld op het diagram. Zorg ervoor dat de polen correct geplaatst zijn om schade aan de
afstandsbediening te voorkomen.
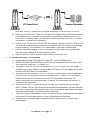
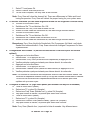
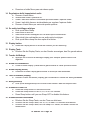
4.
Connecting the TV Station to a PC
a. Locate the VGA Cable for your CRT or LCD monitor.
b. Unplug the VGA connector from the PC and connect it to the VGA Out (Blue)
connector of the TV Station 100.
c. Connect the 8 pin Din connector of the 6 ft. VGA to 8 pin Din (item b) to the VGA In
DC
Audio
Out
Audio
In
A/V
Octopus
DIN - IN
YPbPr -
OUT
15-pin
D-SUB
VGA Out
Tuner
VGA In
6-pin DIN

TV Station 100 Page 10
connector of the TV Station 100, the other end will go to the VGA port of the PC.
d. Plug one end of the 6 ft. 3.5mm to 3.5 Stereo Link cable to the Audio Out connector
on the back of the TV Station 100, the other end should be connected to the Line
In of your PC’s Sound Card. You can also connect the Audio Out of the TV Station
100 directly to Powered PC Speakers.
e. Connect your TV Source to the RF (IEC for Europe) connector of the TV Station 100.
You can use a regular indoor antenna (TV reception may not be optimal depending
on your location), roof antenna or a Coaxial cable if you have Cable service.
f. Connect the power adapter to the DC connector on the back of the unit and then
plug the power adapter to a working power outlet.
g. Use the Remote Control or press Power button to start your unit.
4.
TV Station an einen PC anschließen
a.
Lokalisieren Sie das VGA-Kabel für Ihren CRT- oder LCD-Bildschirm.
b.
Stecken Sie den VGA-Anschluss vom PC ab und verbinden Sie ihn mit dem VGA
Out-Anschluss (blau) des TV Station 100.
c.
Verbinden Sie den 8-Pin DIN-Anschluss des
1,80 m VGA auf 8-Pin DIN Kabels
(Lieferteil b) mit dem VGA In-Anschluss des TV Station 100, das andere Ende wird
mit dem VGA-Port des PCs verbunden.
d.
Verbinden Sie ein Ende des
1,80 m 3,5 mm auf 3,5 mm Stereo-Verbindungskabels
mit dem Audio Out-Anschluss auf der Rückseite des TV Station 100, das andere
Ende wird mit dem Line In-Anschluss Ihrer PC-Soundkarte verbunden. Sie
können den Audio Out-Anschluss des TV Station 100 auch direkt mit aktiven PC-
Lautsprechern verbinden.
e.
Schließen Sie Ihre TV-Quelle an die RF-Buchse (in Europa an die IEC-Buchse)
des TV Station 100 an. Sie können eine normale Zimmer antenne (je nach Standort
kann der TV-Empfang nicht optimal sein), eine Dachantenne oder, wenn Sie einen
Kabelanschluss haben, ein Koaxial-Kabel verwenden.
f.
Schließen Sie den Netzadapter an die DC-Buchse auf der Rückseite des Gerätes an
und stecken Sie den Netzstecker in eine funktionierende Steckdose.
g.
Schalten Sie Ihr Gerät mit der Fernbedienung ein oder drücken Sie dazu den
Netzschalter.
DC
Audio
Out
Audio
In
A/V
Octopus
DIN - IN
YPbPr -
OUT
15-pin
D-SUB
VGAOut
Tuner
VGAIn
6-pin DIN
DC
Audio
Out
Audio
In
A/V
Octopus
DIN - IN
YPbPr -
OUT
15-pin
D-SUB
VGAOut
Tuner
VGAIn
6-pin DIN
PC Sound Card Powered Speakers
*
OR
*

TV Station 100 Page 11
4.
Branchement du TV Station 100 à un ordinateur PC
a.
Localisez le câble VGA de votre moniteur LCD ou cathodique.
b.
Débranchez le connecteur VGA du PC, et branchez-le au connecteur de sortie VGA
(bleu) du TV Station 100.
c.
Branchez le connecteur DIN 8 broches du câble VGA/DIN 8 broches fourni (b dans
le contenu) au connecteur d’entrée VGA du TV Station 100. L’autre extrémité du
câble doit être branchée au port VGA du PC.
d.
Branchez une extrémité du cordon jack stéréo 3,5 mm/jack stéréo 3,5 mm (fourni) au
connecteur de sortie audio situé au dos du boîtier TV Station 100, et branchez l’autre
dans l’entrée ligne de la carte son de votre PC. Vous pouvez également brancher la
sortie audio du TV Station 100 directement aux haut-parleurs du PC.
e.
Branchez votre source TV au connecteur RF (IEC en Europe) du TV Station 100.
Vous pouvez utiliser une antenne interne ordinaire (la réception risque de ne pas
être parfaite dans certains endroits), une antenne externe ou un câble coaxial si
vous avez la télé câblée.
f.
Branchez l’adaptateur secteur au connecteur CD situé au dos du boîtier, puis
branchez-le à une prise secteur alimentée.
g.
Mettez le boîtier sous tension à l’aide de la télécommande ou en appuyant sur la
touche de mise en marche.
4.
Conectar la unidad TV Station al PC
a.
Busque el cable VGA para el monitor CRT o LCD.
b.
Desenchufe la conexión VGA del PC y conéctela a la conexión Salida VGA (azul) de
la unidad TV Station 100.
c.
Conecte la conexión DIN de 8 patillas del cable VGA de 2 m al Din de 8 patillas
(artículo b) a la conexión entrada VGA de la unidad TV Station 100, el otro extremo
se conectará al puerto VGA del PC.
d.
Obture un extremo del cable de enlace estéreo 3,5 mm a 3,5 mm de 2 m a la
conexión salida de audio en la parte posterior de la unidad TV Station 100, el
otro extremo debe conectarse a la entrada de línea en la tarjeta de sonido del
PC. También puede conectar la salida de audio de la unidad TV Station 100
directamente a los altavoces del PC.
e.
Conecte la fuente de TV a la conexión RF (IEC para Europa) de la unidad TV
Station 100. Puede utilizar una antena interior regular (es posible que la recepción
de TV no sea óptima dependiendo de la ubicación), antena de tejado o cable coaxial
si tiene servicio de cable.
f.
Conecte el adaptador de potencia a la conexión de CC en la parte posterior de la
unidad y a continuación enchufe el adaptador de potencia a una toma de corriente
en funcionamiento.
g.
Utilice el mando a distancia o pulse el botón inicio para poner en marcha la unidad.

TV Station 100 Page 12
4.
Como conectar o TV Station ao computador
a.
Localize o cabo VGA no seu monitor CRT ou LCD.
b.
Desligue o conector VGA do computador e o conecte ao conector de saída VGA
(azul) do TV Station 100.
c.
Conecte o conector DIN de 8 pinos do DIN VGA a 8 pinos de 1.8m (item b) ao
conector de entrada VGA do TV Station 100 e coloque a outra extremidade na porta
VGA do computador.
d.
Conecte uma extremidade do cabo de conexão estéreo 3.5mm a 3.5mm de 1.8m
ao conector de saída de áudio na parte traseira do TV Station 100. Conecte a outra
extremidade à entrada de linha da placa de som do seu computador. Você também
poderá conectar a saída de áudio do TV Station 100 diretamente aos alto-falantes
ligados do computador.
e.
Conecte a sua fonte de TV ao conector RF (IEC se estiver na Europa) do TV
Station 100. Você poderá usar uma antena interna comum (a recepção de TV
poderá não ser ótima, dependendo da sua localização), antena externa ou um cabo
coaxial se tiver serviço de TV a cabo.
f.
Conecte o adaptador de energia elétrica ao conector DC na parte traseira da
unidade e ligue o adaptador de energia elétrica à uma saída de força.
g.
Use o controle remoto ou pressione o botão Power para iniciar a unidade.
4.
Collegamento di TV Station al PC
a.
Individuare il Cavo VGA per il monitor CRT o LCD usato.
b.
Disinserire il connettore VGA dal PC e inserirlo invece nella presa di uscita VGA
(VGA Out, colore blu) su TV Station 100.
c.
Ora collegare il connettore Din di 8 pin del cavo Din 1,8m da VGA a 8 pin (art. b) alla
presa di ingresso VGA (VGA In) su TV Station 100. L’altro capo del cavo andrà alla
porta VGA sul PC.
d.
Inserire un’estremità del cavo di collegamento stereo 1,8m da 3,5mm a 3,5mm nella
presa di uscita audio (Audio Out) sul retro di TV Station 100. L’altro capo del cavo
va collegato invece all’ingresso di linea (Line In) della scheda audio per PC usata. È
anche possibile collegare direttamente l’uscita audio di TV Station 100 direttamente
ai diffusori del PC accesi.
e.
A questo punto collegare la sorgente TV al connettore RF (IEC per l’Europa) di TV
Station 100. Si potrà utilizzare un’antenna standard per interni (anche se, a seconda
della particolare ubicazione, la ricezione TV potrebbe non essere ottimale), l’antenna
sul tetto oppure un cavo coassiale, se si riceve il servizio via cavo.
f.
Collegare l’adattatore elettrico al connettore a CC sul retro dell’unità, quindi inserire
l’adattatore in una presa elettrica funzionante.
g.
Usare il Telecomando, oppure premere il tasto di alimentazione (Power) per
accendere l’unità.

TV Station 100 Page 13
4.
TV Station aansluiten op een pc
a.
Zoek de VGA-kabel voor uw CRT- of LCD-scherm.
b.
Trek de VGA-connector uit de pc en sluit hem aan op de VGA Out-connector (Blauw)
van TV Station 100.
c.
Sluit de 8 pins Din connector van de 2 m lange VGA tot 8 pins Din (b) aan op de
VGA In-connector van TV Station 100, en het andere uiteinde aan de VGA-poort van
de pc.
d.
Steek het uiteinde van de 2 m lange 3,5/3,5 mm stereokabel in de Audio Out-
connector aan de achterkant van TV Station 100, en het andere uiteinde moet
aangesloten worden aan de lijningang van de geluidskaart van uw pc. U kunt de
Audio Out van TV Station 100 ook rechtstreeks aansluiten op uw pc-luidsprekers als
die een eigen stroomtoevoer hebben.
e.
Sluit uw tv-bron aan op de RF-connector (IEC voor Europa) van TV Station 100.
U kunt een gewone binnenhuisantenne (tv-ontvangst is misschien niet optimaal,
afhankelijk van uw locatie) of een dakantenne gebruiken, of een coax-kabel als u
over kabeltelevisie beschikt.
f.
Sluit de stroomadapter aan op de DC-connector achteraan het apparaat en sluit de
stroomadapter dan aan op een werkend stopcontact.
g.
Gebruik de afstandsbediening of druk op de Power-knop om het apparaat in werking
te stellen.
5.
Connecting the TV Station 100 to a Projector or Plasma with Component cables.
a.
Connect the Custom A/V cable for Component Out and A/V inputs (item d) if you
want to use Component cables (not included) to connect to your Projector. Press
the RGB/YPbPr button on the Remote Control to select the Video output option. The
output from this connection is already 480p (Progressive).
b.
You can also use a VGA cable (not included) to connect to a Projector if a VGA In
connector is available. Be sure your display is compatible.
c.
You will need to connect the Audio Out from the TV Station 100 to a Stereo System
for the audio output.
5.
TV Station 100 mit Component-Kabel an einen Projektor oder Plasma anschließen.
a.
Schließen Sie das Spezial-A/V-Kabel für Component Out und A/V- Eingänge
(Lieferteil d) an, wenn Sie Component-Kabel (im Lieferumfang nicht inbegriffen) für
den Anschluss des Projektors verwenden wollen. Drücken Sie die RGB/YpbPr-Taste
auf der Fernbedienung, um die Option Video-Ausgabe zu selektieren. Die Ausgabe
über diesen Anschluss erfolgt bereits als 480P (Progressive).
b.
Wenn ein VGA In-Anschluss zur Verfügung steht, können Sie für den Anschluss
des Projektors auch ein VGA-Kabel verwenden (im Lieferumfang nicht inbegriffen).
Stellen Sie sicher, dass das Display kompatibel ist.
c.
Für die Audio-Ausgabe müssen Sie den Audio Out-Anschluss des TV Station 100 mit
einem Stereo-System verbinden.

TV Station 100 Page 14
5.
Branchement du TV Station 100 à un projecteur ou écran plasma à l’aide des câbles
composante.
a.
Si vous souhaitez brancher des câbles composante (non fournis) à votre projecteur,
branchez le câble audio/vidéo spécial pour sortie composante et entrées audio/vidéo
fourni (d dans le contenu). Appuyez sur la touche RGB/YPbPr de la télécommande
pour sélectionner l’option de sortie vidéo. Cette sortie fournit déjà une résolution de
480 pixels (balayage progressif).
b.
Vous pouvez également utiliser un câble VGA (non fourni) pour brancher le boîtier à
un projecteur si ce dernier possède un connecteur d’entrée VGA. Véri ez que votre
af chage est compatible avec ce format.
c.
Vous devez brancher la sortie audio du TV Station 100 à un système stéréo pour la
sortie audio.
5.
Conecte la unidad TV Station 100 a un proyector o plasma con cables de
componentes.
a.
Conecte el cable personalizado A/V para salida de componente y entradas A/V
(artículo d) si desea utilizar los cables de componentes (no se incluyen) para
conectar el proyector. Pulse el botón RGB/YPbPr en el mando a distancia para
seleccionar la opción salida de vídeo. La salida de esta conexión ya es 480p
(Progresiva).
b.
También puede utilizar un cable VGA (no se incluye) para conectar a un proyector
si hay disponible una conexión entrada VGA. Asegúrese que la visualización es
compatible.
c.
Necesitará conectar salida de audio de la unidad TV Station 100 a un sistema
estéreo para la salida de audio.
5.
Como conectar o TV Station 100 a um projetor ou plasma com cabos de componente.
a.
Conecte o cabo A/V para saída de componente e entradas A/V (item d) se desejar
usar cabos de componente (não incluídos) para conectar ao seu projetor. Pressione
o botão RGB/YPbPr no controle remoto para selecionar a opção de saída de vídeo.
A saída deste componente já é 480p (Progressivo).
b.
Você também poderá usar um cabo VGA (não incluído) para conectar a um projetor,
caso um conector de entrada VGA esteja disponível. Certi que-se que o seu monitor
é compatível.
c.
Você precisará conectar a saída de áudio do TV Station 100 a um sistema estéreo
para a saída de áudio.
5.
Collegamento di TV Station 100 a un proiettore o a un TV plasma con cavi per Compo-
nenti
.
a.
Collegare lo speciale cavo A/V per uscita Componenti e ingressi A/V (art. d, non
in dotazione) per connettere l’unità al proiettore. Premere il tasto RGB/YPbPr
sul Telecomando per selezionare l’uscita video. Il segnale in uscita da questo
collegamento è già 480p (Progressivo).
b.
È anche possibile utilizzare un cavo VGA (non in dotazione) per collegarsi a un
proiettore, se non si dispone di connettori di ingresso VGA (VGA In). In questo caso,
accertare la compatibilità del display.

TV Station 100 Page 15
c.
Sarà necessario collegare l’uscita audio (Audio Out) da TV Station 100 ad un
impianto stereo, per ottenere l’uscita audio.
5.
Verbind TV Station 100 met een projector of een plasmascherm met componentkabels.
a.
Sluit de speciale A/V-kabel aan op de componentuitgang en de A/V-ingang (d) als u
componentkabels (niet inbegrepen) wilt gebruiken om het apparaat aan te sluiten op
een projector. Druk op de RGB/YpbPr-knop van de afstandsbediening om de optie
video-uitgang te selecteren. De uitvoer van deze verbinding is al 480p (progressief).
b.
U kunt ook een VGA-kabel (niet inbegrepen) gebruiken om een projector aan
te sluiten, als een VGA In-connector beschikbaar is. Zorg ervoor dat uw scherm
compatibel is.
c.
U zult de audio-uitgang van TV Station 100 moeten verbinden met een
stereosysteem voor de audio-uitgang.
6.
Connecting External Video Sources (VCR, DVD Players or Game Console) to the TV
Station 100.
a.
You can use the RCA (Red, White and Yellow) Video Out connectors from a VCR,
DVD player or a Game Console to plug to the Custom A/V Cable.
b.
You can also use an S-Video cable (not included) to connect to your External Video
Sources.
c.
Press the Source button on the Remote Control to toggle from TV/CATV, Video or
S-Video Source.
6.
Externe Videoquellen (VCR, DVD-Spieler oder Spielkonsole) an TV Station 100
anschließen.
a.
Sie können die RCA Video Out-Anschlüsse (rot, weiß und gelb) eines VCR, DVD-
Spielers oder einer Spielkonsole mit dem Spezial-A/V-Kabel verbinden.
b.
Für den Anschluss Ihrer externen Video-Quellen können Sie auch ein S-Video-Kabel
verwenden (im Lieferumfang nicht inbegriffen).
c. Drücken Sie die Source-Taste auf der Fernbedienung, um zwischen den TV/CATV-,
Video- und S-Video-Quellen umzuschalten.
6.
Branchement de sources vidéo externes (magnétoscope, lecteur DVD ou console de
jeu) au TV Station 100.
a.
Vous pouvez brancher les connecteurs de sortie vidéo RCA (Rouge, Blanc et Jaune)
d’un magnétoscope, d’un lecteur DVD ou d’une console de jeu au câble audio/vidéo
fourni.
b.
Vous pouvez également brancher un câble S-Video (non fourni) à vos sources vidéo
externes.
c.
Appuyez sur la touche Source de la télécommande pour sélectionner au choix TV/
CATV, Vidéo ou S-Video.
6.
Conectar fuentes de vídeo externas (Reproductores VCR, DVD o consolas de juego) a
la unidad TV Station 100.
a.
Puede utilizar las conexiones RCA (Roja, blanca y amarilla) salida de vídeo de
un reproductor VCR, DVD o una consola de juego para enchufarlas al cable A/V
personalizado.

TV Station 100 Page 16
b.
También puede utilizar un cable S-Video (no se incluye) para su conexión a las
fuentes de vídeo externas.
c.
Pulse el botón Source (Fuente) en el mando a distancia para cambiar la fuente de
TV/CATV, Vídeo o S-Vídeo.
6.
Como conectar a fontes externas de vídeo (videocassete, DVD players ou console
para jogos) ao TV Station 100.
a.
Você poderá usar os conectores de saída de vídeo RCA (vermelho, branco e
amarelo) de um videocassete, DVD player ou um console para jogos para conectar
ao cabo A/V.
b.
Você também poderá usar um cabo S-Vídeo (não incluído) para conectar às suas
fontes externas de vídeo.
c.
Pressione o botão Source (Fonte) no controle remoto para alternar entre TV/CATV,
Vídeo ou S-Vídeo.
6.
Collegamento di sorgenti video esterne (videoregistratori, lettori DVD o console per
videogiochi) a TV Station 100.
a.
Per collegare lo speciale cavo A/V, l’utente può servirsi dei connettori per uscita
video (Video Out) RCA (Rosso, Bianco e Giallo) di un videoregistratore, lettore DVD
o console per videogiochi.
b.
È inoltre possibile usare un cavo S-Video (non in dotazione) per collegarsi alle
sorgenti video esterne.
c.
Premere il tasto Sorgente (Source) sul telecomando per alternarsi fra sorgente TV/
CATV, Video o S-Video.
6.
Externe videobronnen (VCR, dvd-speler of spelconsole) aansluiten op TV Station 100.
a.
U kunt de (rode, witte en gele) RCA video-uitgangconnectoren van een VCR, dvd-
speler of spelconsole gebruiken om het apparaat aan te sluiten via de gewone A/V-
kabel.
b.
U kunt ook een S-videokabel (niet inbegrepen) aansluiten op uw externe
videobronnen.
c. Druk op de bronknop van de afstandsbediening om te wisselen tussen TV/CATV,
video en S-video.
7.
Setup TV System
a.
Turn on your PC Monitor (PC does not need to be turned on).
b.
Press the Power button on the Remote Control or Power button on the TV Station

TV Station 100 Page 17
100.
c.
Press the PC/AV button to toggle from PC to TV Station 100.
d.
Press the Menu button.
e.
Select TV and press Ok.
f.
Select System Setup and press Ok.
g.
Set the TV System for your location (NTSC, PAL or SECAM), then press Ok.
7.
TV-System einstellen
a.
Schalten Sie den PC-Bildschirm ein (der PC muss nicht eingeschaltet werden).
b.
Drücken Sie die Power-Taste auf der Fernbedienung oder den Netzschalter des TV
Station 100.
c.
Drücken Sie die PC/AV-Taste, um zwischen PC und TV Station 100 umzuschalten.
d.
Drücken Sie die Menü-Taste.
e.
Selektieren Sie TV und drücken Sie OK.
f.
Selektieren Sie System Setup und drücken Sie OK.
g.
Stellen Sie das TV-System für Ihren Standort ein (NTSC, PAL oder SECAM), und
drücken Sie dann auf OK.
7.
Con guration du système TV
a.
Allumez le moniteur de votre PC (inutile d’allumer le PC).
b.
Appuyez sur la touche de mise en marche de la télécommande ou du TV Station
100.
c.
Appuyez sur la touche PC/AV pour passer du PC au TV Station 100.
d.
Appuyez sur la touche Menu.
e.
Sélectionnez TV et appuyez sur Ok.
f.
Sélectionnez System Setup (con guration système) et appuyez sur Ok.
g.
Sélectionnez le standard approprié pour votre pays (NTSC, PAL ou SECAM), puis
appuyez sur Ok.
7.
Con gurar el sistema de TV
a.
Encienda el monitor del PC (No es necesario que el PC esté encendido).
b.
Pulse el botón Power (Potencia) en el mando a distancia o el botón Power
(Potencia) en la unidad TV Station 100
c.
Pulse el botón PC/AV para cambiar de PC a TV Station 100.
d.
Pulse el botón Menu (Menú).
e.
Seleccione TV y pulse Ok (Aceptar).
f.
Seleccione System Setup (Con gurar sistema) y pulse Ok (Aceptar).
g.
Ajuste el sistema de TV para su ubicación (NTSC, PAL o SECAM), a continuación
pulse Ok (Aceptar).
7.
Como con gurar o sistema de TV
a.
Ligue o monitor do seu computador (o computador não precisa estar ligado).
b.
Pressione o botão Power no controle remoto ou o botão Power no TV Station 100.
c.
Pressione o botão PC/AV para alternar entre o computador e o TV Station 100.
d.
Pressione o botão Menu.
e.
Selecione TV e pressione Ok.

TV Station 100 Page 18
f.
Selecione System Setup (Con guração do sistema) e pressione Ok.
g.
Con gure o sistema de TV para a sua localização (NTSC, PAL ou SECAM) e
pressione Ok.
7.
Impostazione del sistema TV
a.
Accendere il monitor del PC (non occorre accendere il computer)
b.
Premere il tasto di alimentazione (Power) sul Telecomando, oppure il tasto analogo
su TV Station 100.
c.
Premere il tasto PC/AV per alternarsi fra PC e TV Station 100.
d.
Ora premere il tasto Menu.
e.
Selezionare TV e premere Ok.
f.
Selezionare Imposta sistema (System Setup) e premere Ok.
g.
Impostare il sistema TV per la vostra zona (NTSC, PAL o SECAM), poi premere Ok.
7.
Instelling tv-systeem
a.
Schakel het scherm van uw pc in (pc hoeft niet ingeschakeld te zijn).
b.
Druk op de Power-knop van de afstandsbediening of op de Power-knop van TV
Station 100.
c.
Druk op de PC/AV-knop om te wisselen tussen pc en TV Station 100.
d.
Druk op de Menu-knop.
e.
Kies tv en druk ok.
f.
Kies Systeeminstelling en druk ok.
g.
Stel het tv-systeem in voor uw locatie (NTSC, PAL of SECAM) en druk dan ok.
8.
Set up TV Source
a.
Press the Menu button.
b.
Select TV and press Ok.
c.
Select TV Setup and press Ok.
d.
Set the type of TV feed you have: Air or Cable, then press Ok.
8.
TV-Quelle einrichten
a.
Drücken Sie die Menü-Taste.
b.
Selektieren Sie TV und drücken Sie OK.
c.
Selektieren Sie TV Setup und drücken Sie OK.
d. Stellen Sie die Art Ihrer TV-Einspeisung ein: Luft oder Kabel, und drücken Sie dann
auf OK.
8.
Con guration de la source TV
a.
Appuyez sur la touche Menu.

TV Station 100 Page 19
b.
Sélectionnez TV et appuyez sur Ok.
c.
Sélectionnez TV Setup (con guration TV) et appuyez sur Ok.
d.
Sélectionnez le mode TV approprié : Air ou Cable (TV hertzienne ou câblée), puis
appuyez sur Ok.
8.
Con gurar la fuente de TV
a.
Pulse el botón Menu (Menú).
b.
Seleccione TV y pulse Ok (Aceptar).
c.
Seleccione TV Setup (Con gurar TV) y pulse Ok (Aceptar).
d.
Ajuste el tipo de entrada de TV que tiene: Aire o Cable, a continuación pulse Ok
(Aceptar).
8.
Como con gurar a fonte de TV
a.
Pressione o botão Menu.
b.
Selecione TV e pressione Ok.
c.
Selecione TV Setup (Con guração de TV) e pressione Ok.
d.
De na o tipo que alimentação de TV que você possui: Ar ou cabo, e pressione Ok.
8.
Impostazione della sorgente TV.
a.
Premere il tasto Menu.
b.
Selezionare TV e premere Ok.
c.
Selezionare Imposta TV (TV Setup) e premere Ok.
d.
Ora impostare la tipologia del segnale TV (aereo o via cavo), quindi premere Ok.
8.
De tv-bron instellen
a.
Druk op de Menu-knop.
b.
Kies tv en druk ok.
c.
Kies tv-instellingen en druk ok.
d.
Stel het type van uw tv in: antenne of kabel, en druk vervolgens op ok.
9.
TV Channel Setup (follow these steps for the best result)
a.
Press the Menu button.
b.
Select TV and press Ok.
c.
Select Freq. Scan and press Ok.
d.
Let scan complete, this may take a few minutes.
e.
Press the Menu button.

TV Station 100 Page 20
f.
Select TV and press Ok.
g.
Select Channel Scan and press Ok.
h.
Let the scan complete, this may take a few minutes.
Note:
Freq. Scan will clear the channel list. There are differences in Cable and Local
tuning frequencies. Freq. Scan will detect the proper tuning for your system area.
9.
TV-Sender einstellen (für das beste Ergebnis führen Sie die folgenden Schritte durch)
a.
Drücken Sie die Menü-Taste.
b.
Selektieren Sie TV und drücken Sie OK.
c.
Selektieren Sie Freq. Scan und drücken Sie OK.
d.
Warten Sie das Ende des Suchlaufs ab, das kann einige Minuten dauern.
e.
Drücken Sie die Menü-Taste.
f.
Selektieren Sie TV und drücken Sie OK.
g.
Selektieren Sie Channel Scan und drücken Sie OK.
h.
Warten Sie das Ende des Suchlaufs ab, das kann einige Minuten dauern
Bemerkung:
Freq. Scan löscht die Senderliste. Die Frequenzen für Kabel- und lokale
Sender sind unterschiedlich. Freq. Scan erkennt die richtigen Frequenzen für Ihren
Systembereich.
9.
Con guration des chaînes TV (suivez les instructions ci-dessous pour un résultat
optimal)
a.
Appuyez sur la touche Menu.
b.
Sélectionnez TV et appuyez sur Ok.
c.
Sélectionnez Freq. Scan (recherche des fréquences) et appuyez sur Ok.
d.
Veuillez patienter quelques instants pour laisser aboutir la recherche.
e.
Appuyez sur la touche Menu.
f.
Sélectionnez TV et appuyez sur Ok.
g.
Sélectionnez Channel Scan (recherche des chaînes) et appuyez sur Ok.
h.
Veuillez patienter quelques instants pour laisser aboutir la recherche.
Nota :
La fonction de recherche des fréquences efface la liste des canaux établie. Les
numéros de fréquence diffèrent selon qu’il s’agit de chaînes hertziennes ou câblées.
La fonction de recherche des fréquences détectera le bon accord pour votre
système où que vous soyez.
9.
Con gurar el canal de TV (Siga estos pasos para obtener los mejores resultados)
a.
Pulse el botón Menu (Menú).
b.
Seleccione TV y pulse Ok (Aceptar).
c.
Seleccione Freq. Scan (Barrido frec.) y pulse Ok (Aceptar).
d.
Deje que nalice el barrido, es posible que tarde unos minutos.
e.
Pulse el botón Menu (Menú).
f.
Seleccione TV y pulse Ok (Aceptar).
g.
Seleccione Channel Scan (Barrido canal) y pulse Ok (Aceptar).
h.
Deje que nalice el barrido, es posible que tarde unos minutos.
Nota:
Freq. Scan (Barrido frec.) suprimirá la lista de canales. Hay diferencias en
La page est en cours de chargement...
La page est en cours de chargement...
La page est en cours de chargement...
La page est en cours de chargement...
La page est en cours de chargement...
La page est en cours de chargement...
La page est en cours de chargement...
La page est en cours de chargement...
La page est en cours de chargement...
La page est en cours de chargement...
La page est en cours de chargement...
La page est en cours de chargement...
La page est en cours de chargement...
La page est en cours de chargement...
La page est en cours de chargement...
La page est en cours de chargement...
La page est en cours de chargement...
La page est en cours de chargement...
La page est en cours de chargement...
La page est en cours de chargement...
La page est en cours de chargement...
La page est en cours de chargement...
-
 1
1
-
 2
2
-
 3
3
-
 4
4
-
 5
5
-
 6
6
-
 7
7
-
 8
8
-
 9
9
-
 10
10
-
 11
11
-
 12
12
-
 13
13
-
 14
14
-
 15
15
-
 16
16
-
 17
17
-
 18
18
-
 19
19
-
 20
20
-
 21
21
-
 22
22
-
 23
23
-
 24
24
-
 25
25
-
 26
26
-
 27
27
-
 28
28
-
 29
29
-
 30
30
-
 31
31
-
 32
32
-
 33
33
-
 34
34
-
 35
35
-
 36
36
-
 37
37
-
 38
38
-
 39
39
-
 40
40
-
 41
41
-
 42
42


ADS Technologies PTV-360 Manuel utilisateur
- Catégorie
- Tuners TV d'ordinateur
- Taper
- Manuel utilisateur
- Ce manuel convient également à
dans d''autres langues
- italiano: ADS Technologies PTV-360 Manuale utente
- English: ADS Technologies PTV-360 User manual
- español: ADS Technologies PTV-360 Manual de usuario
- Nederlands: ADS Technologies PTV-360 Handleiding
Documents connexes

Autres documents
-
Sanyo PLC-XE32 Le manuel du propriétaire
-
Acer AT3720, AT4220 Manuel utilisateur
-
Philips MCP9350I/31 Guide de démarrage rapide
-
Insignia NS-20LCD Mode d'emploi
-
DVDO iScan Pro Progressive Scan Display Interface Manuel utilisateur
-
Westinghouse TX-42F430S Manuel utilisateur
-
Haier HLC26B - 26" LCD TV (Spanish) Manual De Usuario
-
AudioSonic LE-247844 Le manuel du propriétaire
-
Sony VPL-PX21 Manuel utilisateur
-
Marmitek Octopus Manuel utilisateur