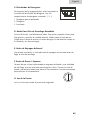
Haier HBF1055TVE Manuel utilisateur
- Catégorie
- Machines à laver
- Taper
- Manuel utilisateur

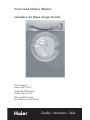
Front Load Clothes Washer
Lavadora de Ropa Carga Frontal
User Manual
Model # HBF1055TVE
Guide de l’Utilisateur
Modéle # HBF1055TVE
Manual del Usuario
Para Modelo de # HBF1055TVE
Quality
ß
Innovation
ß
Style

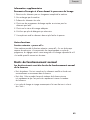
IMPORTANT SAFETY
INSTRUCTIONS
Warning – To reduce the risk of fire, electric shock, or injury
to persons when using your appliance, follow basic
precautions, including the following:
1. Read all instructions before using the appliance.
2. Use this appliance only for its intended purpose as described in this use and
care guide.
3. This appliance must be properly installed in accordance with the
installation instructions (see pages 7-11).
4. Replace immediately worn power cords and loose plugs/power outlets.
5. Before the appliance is removed from service or discarded, remove the door.
6. Do not operate your appliance in the presence of explosive fumes.
7. Do not wash articles that have been previously cleaned in, washed in,
soaked in, or spotted with gasoline, dry-cleaning solvents, or other flammable
or explosive substances, as they give off vapors that could ignite or explode.
8. Do not add gasoline, dry-cleaning solvents or other flammables or explosive
substances to the washer. These substances give off vapors that could ignite
or explode.
9. Do not reach into the appliance if the tub or agitator is moving.
10. Do not tamper with controls.
11. To reduce risk of injury do not allow children to play in or on the appliance.
Close supervision of children is necessary when the appliance is used
near children.
12. Do not install or store this appliance where it will be exposed to the weather.
13. Hydrogen gas may be produced if the water heater has not been used in
more then 2 weeks. This could be explosive and can explode under certain
circumstances. If this is the case, before using this appliance turn on all
the hot faucets and let the hot water run for a few minutes. This will let the
trapped hydrogen escape. During this process do not turn on an electric
appliance, smoke, light a match/lighter or use a flame to avoid an accident,
as hydrogen gas is flammable and can explode.
14. Do not repair or replace any part of the appliance or attempt any servicing
unless specifically recommended in the user-repair instructions that you
understand and have skills to carry out.
SAVE THESE INSTRUCTIONS
21
English

21
English
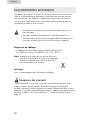
DANGER
Risk of child entrapment. Before you throw away your old
appliance, take off the door so that children may
not easily get trapped inside.
Thank you for purchasing our Haier
product. This easy-to-use manual
will guide you in getting the best
use of your washer.
Remember to record the model and
serial number. They are on a label
in back of the washer.
Model number
Serial number
Date of purchase
Staple your receipt to your manual. You will need it to obtain
warranty service.
This appliance must be grounded. In the event of malfunction or breakdown,
grounding will reduce the risk of electric shock by providing a path of least
resistance for electric current. This appliance is equipped with a cord having an
equipment-grounding conductor and a grounding plug. The plug must be plugged
into an appropriate outlet that is properly installed and grounded in accordance
with all local codes and ordinances.
Warning – Improper connections of the equipment-grounding conductor can
result in a risk of electric shock. Check with a qualified electrician or serviceman
if you are in doubt as to whether the appliance is properly grounded.
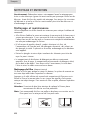
GROUNDING INSTRUCTIONS

X
This appliance must be grounded. In the event of an electrical short circuit,
grounding reduces the risk of electric shock by providing an escape wire for
the electric current. This appliance is equipped with a cord having a grounding
wire with a grounded plug. The plug must be inserted into an outlet that is
properly installed and grounded.
• Improper use of the plug can result in a risk of electric shock.
• Consult a qualified electrician or service person if the grounding
instructions are not completely understood or if doubt exists as to
whether the appliance is properly grounded.
Wiring Requirements:
• This appliance must be plugged into at least
15 AMP 120 VOLT, 60 HZ GROUNDED OUTLET.
Note: Where a standard two-prong outlet is
encountered, it is the personal responsibility
and obligation of the consumer to have
it replaced with a properly grounded
three-prong outlet.
Extension Cords:
We do not recommend that you use an extension cord.
Power Interruptions
Occasionally there may be power interruptions due to thunderstorms or other
causes. Remove the power cord from AC outlet when a power outage occurs.
When power has been restored re-plug power cord to AC outlet. If outage is for
a prolonged period, clean washer before using it again. For details see "other
functions" - "Power-Off memory function" Page 18.
3
English
ELECTRICAL CONNECTIONS

4
English
TABLE OF CONTENTS
SAFETY INSTRUCTIONS ................................................................. 1
GROUNDING INSTRUCTIONS ....................................................... 2
ELECTRICAL CONNECTING ............................................................. 3
PARTS AND FEATURES ................................................................... 5
Front ................................................................................................. 5
Back ................................................................................................. 6
INSTALLATION INSTRUCTIONS ..................................................... 7
Tools and Materials Required .............................................................. 7
Unpacking Your Washer .................................................................... 8
Installation .......................................................................................10
OPERATIONAL INSTRUCTIONS ................................................... 12
Control Panel ..................................................................................12
Program Selection ............................................................................ 14
Loading .......................................................................................... 16
Proper Use of Dispenser ...................................................................16
Washing Methods ............................................................................17
Normal Operating Sounds ................................................................ 18
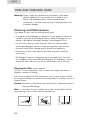
CARE AND CLEANING GUIDE .....................................................19
Cleaning and Maintenance ............................................................... 19
Moving and Vacationing .................................................................. 20
Storage of Your Washer ...................................................................20
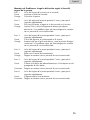
Troubleshooting .......................................................................... 21
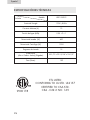
Technical Specification ................................................................ 23
Warranty .....................................................................................24

5
English
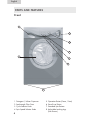
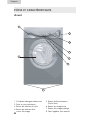
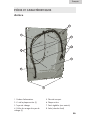
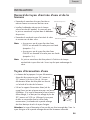
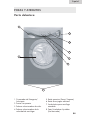
1. Detergent / Softner Dispenser
2. See-through Glass Door
3. Cycle Selector Knob
4. Spin Speed Selector Knob
5. Operation Button (Pause / Start)
6. Extra Rinse Button
7. Extended Spin Bottom
8. Adjustable Leveling Legs
(Not Shown)
3
4
2
Front
1
5
PARTS AND FEATURES
6
7
8

English
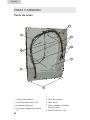
6
Back
PARTS AND FEATURES
1. Power Supply Cord
2. Back Plate Screw (3)
3. Drainage Hose
4. Drainage Hose Clip (3)
5. Transportation Bolt (3)
6. Back Plate
7. Adjustable Leveling Legs
(Not Shown)
8. Valve (Hot and Cold)
7
1
2
3
6
5
4
8

7
English
INSTALLATION INSTRUCTIONS
Tools and Materials Required
You will need to have the following tools
to help you in the installation of your washer:
• Scissors
• Standard Screwdriver
• Pliers
• Wrench
• Tape Measure
• Gloves
• Level
Accessories Supplied Quantity
1. Hot & Cold Water Inlet Hoses 2
2. Pressure Regulator 2
(Attached to Hot & Cold Water Inlet Hoses)
3. Flat Water Inlet Hose Washers 4
(Installed in each end of water inlet hoses)
4. Use & Care Guide (Not Shown) 1
5. Plastic Plugs to cover 3
transportation bolt holes
6. Goose Neck 1
1
3
4
5
6
USER MANUAL
2

English
8
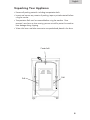
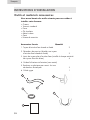
Unpacking Your Appliance
• Remove all packing materials including transportation bolts.
• Inspect and remove any remains of packing, tape or printed materials before
using the washer.
• Transportation Bolts must be removed before using the machine. Once
removed, save them so when moving you can reinstall to protect the machine
from damage during shipping.
• Water inlet hoses and other accessories are packed and placed in the drum.
Bolt
Bolt
Center bolt

9
English
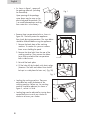
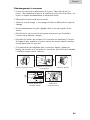
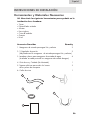
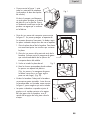
• As shown in figure1, remove all
the packing materials (including
the foam base).
Upon opening of the package,
water drops may be seen on the
plastic bag and the porthole. This
is a normal phenomenon resulting
from water tests in the factory.
• Remove three transportation bolts as shown in
figure 2A. The bolts protect the appliance
from shock during transportation. The steps below
should be followed before using the appliance:
1. Remove the back plate of the washing
machine. To remove this you must remove
three screws holding the panel.
2. Remove the three bolts from the rear of the
washing machine. Then remove the rubber
hose which are behind the transportation
bolts inside the unit.
3. Reinstall the back plate.
4. Fill the holes left by the bolts with plastic plugs.
(Attention: The bolts and rubber hose should
be kept in a safe place for later use.) (Fig. 2B)
• Leveling the washing machine: There are
adjustable feet under the bottom of the
washing machine. Before use, the washing
machine should be adjusted, as shown in
figure 3, so that it is level.
• Leveling legs can be adjusted by turning them
counterclockwise to raise your washer or
clockwise to lower your washer.
Fig. 1
Fig. 2
Fig. 3
Bolt
Back Plate
A
B

English
10
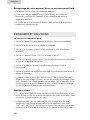
INSTALLATION
Connection of water inlet hose and
washing machine
• Connect the straight coupling of the inlet hose
to the water tap and make sure to tighten it.
• Install the pressure regulator to each inlet valves
of the unit. Make sure the flat rubber washer
is placed in the pressure regulator.
• Connect the elbow coupling of the inlet hose
to the valve and make sure to tighten it.
Note: • Please be sure that the COLD inlet hose is
connected with the valve for cold water
(marked with "C").
• Please be sure that the HOT inlet hose is
connected with the valve for hot water
(marked with "H").
Note: A flat rubber washer must be present inside each end of the inlet hoses.
Over tightening may cause damage to the valve.
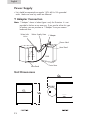
Water Drainage Hose
• The height of the pipe for the water drainage
hose should be between 2'6" to 3'3". The
water drain hose must be securely placed
on the clip on the back of the washing machine.
• Use the water drainage support (gooseneck)
supplied as an accessory for proper installation.
If the water drain hose needs to be extended,
it should not be extended more than 8'2".
(Longer extension will result in concurrent water
inflow and outflow.) The diameter of the extension
hose should be the same as the original hose.
Caution: Water drainage hose must not be immersed in water. The original and
extension hoses should be tightly connected.
.
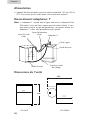
H
100cm
80cm
Pressure Regulator
Water Inlet Hoses
Pressure Regulator

11
English
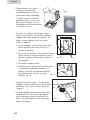
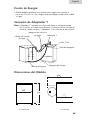
Power Supply
• Unit should be connected to a regular 120V~60 Hz 15A grounded
outlet. Make sure local city codes are followed.
Y Adapter Connection
Note: “Y Adapter” shown in below figure is only for illustration. It is not
provided in the box as an accessory. If you need to utilize this type
of hookup, you can purchase a “Y Adapter” from your nearest
hardware store.
Water Supply Hose
Hose Bend
Drain Hose
Goose Neck
Water Inlet
Hose Bend
SINK
Y Adapter
Unit Dimensions
Valves
22 13/16"

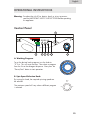
Control Panel
English
12
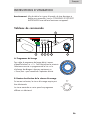
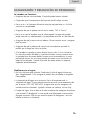
OPERATIONAL INSTRUCTIONS
A. Washing Program
To set the desired wash program, turn the knob to
“0” first. This will reset the timer. Then select a program
from the list on the detergent dispenser. Now press the
"Pause/Start" button to start operation.
B. Spin Speed Selection Knob
By turning this knob, the required spinning speed can
be selected.
The maximum speed will vary when a different program
is selected.
NO
MAX
MID
LOW
SPIN
NO
MAX
MID
LOW
SPIN
Warning - To reduce the risk of fire, electric shock, or injury to persons,
read the IMPORTANT SAFETY INSTRUCTIONS before operating
this appliance.
C D E F
B
AG

13
English
C. Detergent Distributor
Program descriptions are printed on the handle of the
detergent distributor. There are three detergent
compartments numbered 1, 2, 3.
1: Pre-washing detergent
2: Detergent
3: Softening agent
D. Extended Spin Button
Activate ths function by pressing this button. This option could be used for heavy
fabrics or special care items. Adding spin time will lead to removal of excess
water to shorten the dry cycle thus saving energy.
E. Extra Rinse Button
By pressing this button, an additional rinse operation will be activated before the
spin cycle is reached.
F. Pause/Start Button
After a program and spin speed are selected, press this button to begin wash.
During a wash cycle, press this button to pause operation. Press again to
resume operation.
G. Door Light
The light will illuminate when the door is locked.

English
14
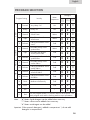
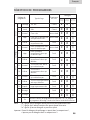
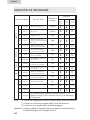
PROGRAM SELECTION
Nota: "Í" Means liquid detergent can be added when necessary.
"ô" Means softner can be added when necessary.
"–" Means no detergent can be added.
Important: When prewash detergent is added in compartment 1, do not add
detergent in compartment2.
Program Setting Laundry
Water
Temperature
Detergent
Comp.1
Prewash
Detergent
Comp. 2
Detergent
Comp. 3
Softner
Cotton
1 Prewash Very Heavy Soil Hot
Í Í ô
2 Heavy Heavy Soil Hot
– Í ô
3 Normal Soiled Cotton Warm
– Í ô
4 Light
Non-fade and medium
soiled cotton
Warm
– Í ô
5 Delicate
Fading and medium soiled
cotton
Cold
– Í ô
Synthetic
6 Normal
Non-fade heavily soiled
synthetic fiber
Warm
– Í ô
7 Light
Non-fade and medium
soiled synthetic fiber
Cold
– Í ô
8 Delicate
Fading and medium soiled
synthetic fiber
Cold
– Í ô
Wool
9 Normal
Non-fade heavily soiled
woolen fabrics
Cold
– Í ô
10 Delicate
Fading and Medium soiled
woolen fabrics
Cold
– Í ô
Silk
11 Normal
Non-fade heavily
soiled silk fabrics
Cold
– Í ô
12 Delicate
Fading and medium soiled
silk fabrics
Cold
– Í ô
13 Quick Medium-soiled laundry Cold
– Í ô
14 Rinse Cold
– – ô
15 Spin *
– – –
0 End
Turn the program knob at "0" position and turn off the power. The
wash program ends and the washing machine stops operatation.

15
English
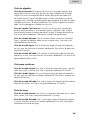
Cotton Cycle:
Pre-Wash Cycle: The purpose of this cycle is that if you want to pre-wash
heavily soiled clothes before the actual wash cycle begins. This cycle is
configured in such a manner that it will go through Normal, Light, Delicate wash
cycles time mode including rinse and spin cycles automatically to complete the
wash. The total time for this cycle is approximately 125 minutes when selected.
Do not use liquid detergent in this cycle.
Heavy Wash Cycle: This cycle is used for washing heavy duty items, such as
pants & other heavy clothes. Here water will be hot during the process to clean
clothes. The total time for this cycle is approximately 106 minutes long when
selected.
Normal Wash Cycle: This is used for work & play, household linens, normal
to lightly soiled and cotton clothes. This cycle is approximately 96 minutes.
Light Wash Cycle: This is used for a small load of lightly soiled items that
needs to be washed quickly. This cycle is approximately 90 minutes.
Delicate Wash Cycle: This is also used for small load of lightly soiled items
that needs to be washed quickly. This cycle is approximately 80 minutes.
Synthetics Cycle:
Normal Wash Cycle: This cycle is used for soiled permanent press, silks,
woolens, nylon and acrylic fabrics. This cycle is approximately 90 minutes.
Light Wash Cycle: This is used for a small load of lightly soiled items that
needs to be washed quickly. This cycle is approximately 80 minutes.
Delicate Wash Cycle: This cycle is same as quick wash cycle except the time
difference. This cycle is approximately 70 minutes.
Wool Cycle:
Normal Wash Cycle: This cycle is used for delicate fabrics that are often
washed by hand. This cycle is approximately 70 minutes.
Delicate Wash Cycle: This cycle is used for small loads of lightly soiled items
that need to be washed quickly. This cycle is approximately 60 minutes long.

English
16
Loading
• Load each item loosely.
• Seperate the white and colored clothes. Separate heavy clothes from
light clothes.
• Carefully check all pockets and cuffs for small items. They can easily slide into
the tub and damage the tub.
• Pre-treat all stains and heavily soiled areas for best results.
• Do not overload your washer.
• Close the door properly after loading clothes.
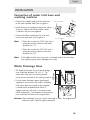
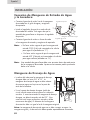
Proper Use of Dispenser
The detergent/softener dispenser is located on the upper left corner
of the washer. Open the dispenser by pulling it out. You will see that there
are three compartments.
1. Prewashing Detergent
2. Detergent
3. Softening Agent
Silk Cycle:
Normal Wash Cycle: This cycle is used for household linens and normal to
lightly soiled silk clothes. The total time for this cycle is approximately 60 minutes
long.
Delicate Wash Cycle: Use this cycle for lightly soiled and delicate silk clothes
that need washing. Total time for this cycle is approximately 50 minutes long.
Quick Cycle: This cycle is used for small loads of lightly soiled items. This cycle
is approximately 36 minutes long.
Note: If the Spin Cycle is at “OFF” position before starting a cycle, the machine
will automatically switch to drain and shut off.

English
17
WASHING METHODS
Washing Program Setting
To set the desired wash program, turn the knob to "0" first. This will reset the
timer. Then select a program from the list on the detergent dispenser. Now press
the "Pause/Start" button to start operation.
Caution: If you want to choose another program, first turn project knob to “0”,
then turn off the power. Now set the program knob to the
desired setting.
End
Wait 2-3 minutes after the washing process is finished. Open the door to take out
the laundry.
Caution: When the washing program finishes, the door lock light will blink.
Only then can the door be opened.
Proper Use of Fabric Softener:
• Pour liquid fabric softener into compartment as recommended by
the manufacturer.
• Do not exceed the level in the compartment to avoid overflow.
Warning: • Never pour fabric softener directly onto clothes because it will stain
your clothes or you may get spots on your clothes.
• Do not use powder form of softener into dispenser, or it will clog
up the dispenser. This dispenser is only designed for liquid form.
Proper Use of Detergent:
When pre-wash cycle is selected do not use liquid detergent.
Low-Sudsing detergent is recommended for front load style washers. This type of
detergent prevents damage to your washing machine, which may be caused by
excess amount of suds entering the condensing compartment.
Note: You can use less or more detergent depending on the size of the load,
water type in your area whether it is soft or hard and whether the clothes
are heavily soiled or lightly soiled. Besides the performance of the
washing machine, the quality of the detergent also effects the
washing result.

English
18
Additional Information
Energy and Water Saving During Wash Process
1. Collect clothes for one full wash load.
2. Do not overload the washing machine.
3. Prewash heavily soiled clothes.
4. Choose fast or minimal washing programs for lightly soiled clothes.
5. Choose a proper spin speed.
6. Do not use more detergent than required.
7. Softening agent makes clothes feel softer and easier to iron.
Other Functions
Power-off memory function:
This machine has a power-off memory function. In case of abrupt power failure or
if the power must be cut off during a program cycle, the present settings will be
saved, and operation will resume when the power is switched on again.
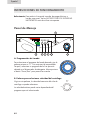
Normal Operating Sounds
The following sounds are normally heard during the
operation of the washer:
• Tumbling sounds: This is normal as the heavy wet clothes in the washer are
continuously being tossed around.
• Air rushing noise: This happens when the washer tub spins at a very high RPM.
• Wash and rinse cycles going on and off will also make clicking sounds.

19
English
Warning: Always unplug your appliance to avoid electric shock before
cleaning. Ignoring this warning may result in death or injury.
Before using cleaning products, always read and follow
manufacturer’s instructions and warnings to avoid personal injury
or product damage.
Cleaning and Maintenance
Use a damp or sudsy cloth for cleaning control panel.
• To avoid any kind of damage to cabinet finish, wipe appliance cabinet as
needed. If you spill liquid/powdered softener, bleach or detergent on the
cabinet, wipe cabinet immediately because it can damage the finish.
• Do not use any abrasive, harsh chemicals, ammonia, chlorine bleach,
concentrated detergent, solvents or metal scouring pads. Some of these
chemicals may dissolve, damage and/or discolor your appliance.
• Remove pins or other sharp objects from clothes to prevent scratching
interior parts.
• The Detergent Dispenser Compartment has a removable insert. Over time,
this compartment may accumulate dried detergent, dirt and debris. You must
remove the insert, then rinse in a sink or remove debris with a soft brush.
Cleaning the Filter (once a quarter)
This filter is used to trap buttons, coins, or other loose objects that may be
forgotten in pockets of clothing.
Press the lower edge of the filter compartment cover to open; Remove the filter
by turning counterclockwise; clean for any foreign objects. To replace reverse of
removal process.
Caution: Attention must be paid to ensure that the filter is replaced correctly to
avoid possible leakage.
Note: It is recommend to use a shallow pan or place a towel below the filter
when cleaning as there will be water being dispensed.
CARE AND CLEANING GUIDE
La page charge ...
La page charge ...
La page charge ...
La page charge ...
La page charge ...
La page charge ...
La page charge ...
La page charge ...
La page charge ...
La page charge ...
La page charge ...
La page charge ...
La page charge ...
La page charge ...
La page charge ...
La page charge ...
La page charge ...
La page charge ...
La page charge ...
La page charge ...
La page charge ...
La page charge ...
La page charge ...
La page charge ...
La page charge ...
La page charge ...
La page charge ...
La page charge ...
La page charge ...
La page charge ...
La page charge ...
La page charge ...
La page charge ...
La page charge ...
La page charge ...
La page charge ...
La page charge ...
La page charge ...
La page charge ...
La page charge ...
La page charge ...
La page charge ...
La page charge ...
La page charge ...
La page charge ...
La page charge ...
La page charge ...
La page charge ...
La page charge ...
La page charge ...
La page charge ...
La page charge ...
La page charge ...
La page charge ...
La page charge ...
La page charge ...
-
 1
1
-
 2
2
-
 3
3
-
 4
4
-
 5
5
-
 6
6
-
 7
7
-
 8
8
-
 9
9
-
 10
10
-
 11
11
-
 12
12
-
 13
13
-
 14
14
-
 15
15
-
 16
16
-
 17
17
-
 18
18
-
 19
19
-
 20
20
-
 21
21
-
 22
22
-
 23
23
-
 24
24
-
 25
25
-
 26
26
-
 27
27
-
 28
28
-
 29
29
-
 30
30
-
 31
31
-
 32
32
-
 33
33
-
 34
34
-
 35
35
-
 36
36
-
 37
37
-
 38
38
-
 39
39
-
 40
40
-
 41
41
-
 42
42
-
 43
43
-
 44
44
-
 45
45
-
 46
46
-
 47
47
-
 48
48
-
 49
49
-
 50
50
-
 51
51
-
 52
52
-
 53
53
-
 54
54
-
 55
55
-
 56
56
-
 57
57
-
 58
58
-
 59
59
-
 60
60
-
 61
61
-
 62
62
-
 63
63
-
 64
64
-
 65
65
-
 66
66
-
 67
67
-
 68
68
-
 69
69
-
 70
70
-
 71
71
-
 72
72
-
 73
73
-
 74
74
-
 75
75
-
 76
76


Haier HBF1055TVE Manuel utilisateur
- Catégorie
- Machines à laver
- Taper
- Manuel utilisateur
dans d''autres langues
- English: Haier HBF1055TVE User manual
- español: Haier HBF1055TVE Manual de usuario
Documents connexes
Autres documents
-
 Malber WD 1000 Mode d'emploi
-
LG WM3001HRA Le manuel du propriétaire
-
LG F14WM7TS1 Manuel utilisateur
-
Kenmore HE3t - Elite Steam 4.0 cu. Ft Manuel utilisateur
-
Samsung WF419AAW Manuel utilisateur
-
Maytag MHWE200X Series Manuel utilisateur
-
