
MALONE
R
MALONE
R
DownLoaderDownLoaderTM
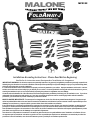
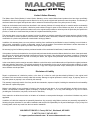
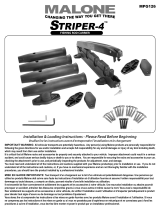
J-STYLE FOLDING KAYAK CARRIER
12’ Safety LinesJawz Universal Adapters Mounting BoltsKayak Carriers Load Straps T-Knobs
60mm
70mm
Installation & Loading Instructions - Please Read Before Beginning
Veuillez lire les instructions avant d’entreprendre l’installation et le chargement
1
3
2
. Insert Mounting Bolt through one hole of a Jawz adapter.
Insert washer and loosely apply a T-knob. See image 2.
. Faites passer le boulon de fixation dans l’un des trous
d’un adaptateur Jawz puis vissez légèrement un bouton
en ‘‘T’’ à la base du boulon. (Figure 2)
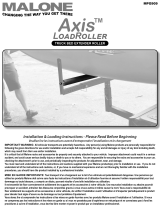
. Prior to installation, insert a bolt into the mounting holes in
the bottom of the carriers. Push upward to open the two
mounting hole covers located in the Base pads.
. Insert a Mounting Bolt into one mounting hole from the top
side. Rotate and close the mounting hole cover.
See image 1.
. Insérez un boulon de fixation dans l’un des trous hexagonaux
situés sur le côté supérieur du support.
(Figure 1)
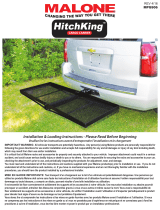
. Place the carrier onto the front cross bar with the boarding
ramp facing out. Swing the Jawz under the cross bar as
shown. See image 3.
. Placez le support sur la barre transversale avant, la rampe
de chargement vers l’extérieur. Faites passer l’adaptateur
Jawz sous la barre transversale, tel qu’indiqué. (Figure 3)
1
Mounting Bolt Washers
Base Pad
Covers
MPG132
IMPORTANT WARNING: All vehicular transports are potentially hazardous. Any person(s) using Malone products are personally responsible for
following the given directions for use and/or installation and accepts full responsibility for any and all damages or injury of any kind including death,
which may result from their use and/or installation.
It is critical that all Malone racks and accessories be properly and securely attached to your vehicle. Improper attachment could result in a serious
accident, and could cause serious bodily injury or death to you or to others. You are responsible for securing the racks and accessories to your car,
checking the attachment’s prior to use, and periodically inspecting the products for adjustment, wear, and damage.
You must read and understand all of the instructions and cautions supplied with your Malone products(s) prior to installation or use. If you do not
understand all of the instructions and cautions, or, if you have no mechanical experience and are not thoroughly familiar with the installation
procedures, you should have the product installed by a professional installer.
MISE EN GARDE IMPORTANTE: Tout transport d’un chargement sur le toit d’un véhicule est potentiellement dangereux. Une personne qui
utilise les produits Malone doit suivre sans faute les instructions d’installation et d’utilisation fournies et assume l’entière responsabilité pour tout
dommage ou toute blessure, y compris un décès, pouvant résulter d’une telle installation ou utilisation.
Il est essentiel de xer correctement et solidement les supports et les accessoires à votre véhicule. Une mauvaise installation ou attache pourrait
provoquer un accident, entraîner des blessures corporelles graves à vous et aux autres et même causer la mort. Vous avez la responsabilité de
xer solidement les supports et les accessoires à votre véhicule, de vérier l’installation avant l’utilisation et d’inspecter périodiquement le produit
pour déceler tout signe d’usure ou de dommage ou tout problème d’ajustement.
Vous devez lire et comprendre les instructions et les mises en garde fournies avec les produits Malone avant l’installation et l’utilisation. Si vous
ne comprenez pas les instructions et les mises en garde ou si vous ne possédez pas d’expérience en mécanique et ne connaissez pas à fond les
procédures à suivre d’installation, vous devriez faire monter et poser le produit par un installateur professionnel.
J - STYLE KAYAK CARRIER
F
OLDAWAY-J
TM

Important Note
Product Warranty & Registration Form
All information is condential and used exclusively by MALONE only.
MALONE
R
MALONE AUTO RACKS 81 County Rd. Ste 1, Westbrook, ME 04092
P: 207.774.9100 F: 207.615.0551
E: support@maloneautoracks.com W: www.maloneautoracks.com
Dear Customer,
Thank you for your purchase of a Malone Product.
In order to be eligible for the Malone Warranty program, we ask that you contact us online at the link provided
below: With-in 30 days of purchase. You can also mail this letter back to the address at the bottom.
• Online: https://maloneautoracks.com/product-registration.php
We will require the information below.
Here is the information collected:
First Name:
Last Name:
Address:
Address2:
City:
State:
Zip:
Country:
Email:
Phone:
Product Description/Name:
Product MPG#
Date Purchased:
Store Where Purchased:
Purchase Price:
Thank you for choosing Malone!

MALONE
R
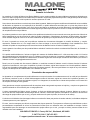
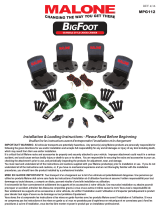
Safety Tie-Downs
2pcs
Load Straps
2pcs.
Kayak Carriers
2pcs.
60mm Bolts
8pcs.
80mm Bolts
8pcs.
T-Knobs
8pcs.
Mounting Brackets
4pcs.
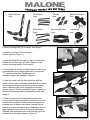
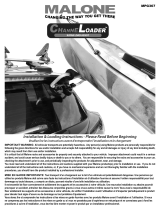
● Insert mounting bolts(2) into carrier. See image 1.
● Insérer les boulons (2) de montage
dans le support. (Figure 1)
● Insert Mounting Bolt through one hole of a mounting
bracket and loosely apply a T-knob. Repeat for the
second mounting bracket. See image 2.
● Faites passer le boulon de xation dans l’un des trous
d’un adaptateur puis vissez légèrement un bouton en
‘‘T’’ à la base du boulon. Répétez pour le
deuxième support de montage. (Figure 2)
● Place the carrier onto the front cross bar with the
forward section (with small foam pads) facing out. Swing
the mounting brackets under the cross bar as shown.
Insert a Mounting Bolt down through the mounting
adapter. Apply a T-knob and slightly tighten, Repeat for
the second mounting bracket and second carrier. See
image 3.
● Placez le support sur la barre transversale avant
avec le section avant (avec petits coussins en mousse)
tournée vers l’extérieur. Faites pivoter les supports de
montage sous la barre transversale, comme indiqué.
Insérez un boulon de xation dans l’adaptateur de mon-
tage. Appliquez un bouton en T et serrez légèrement.
Répétez cette procédure pour le deuxième support de
montage et le deuxième support.. (Figure 3)
1
2
3

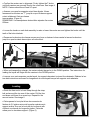
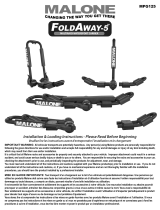
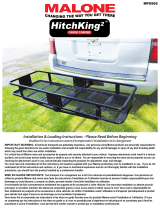
● Loosen the knobs on each hub assembly to raise or lower the center arm and tighten the knobs until the
teeth of the hubs interlock.
● Desserrez les boutons de chaque moyeu pour lever ou baisser le bras central et serrez les boutons
jusqu’à ce que les dents des moyeux se verrouillent.
● When not transporting a kayak, the carriers should always be in the DOWN position. The instructions for
loading the kayak will begin with the carriers in the DOWN position.
● Lorsque vous ne transportez pas de kayak, les supports devraient toujours être rabaissés. Débutez la lec-
ture des instructions entourant le chargement de votre kayak lorsque les supports sont rabaissés.
● Route the free end of a Load Strap through the strap
bail and around the top rear of the carrier. Pull the free
end down until there is an even loop. Repeat for the
second carrier. See image 5.
● Faites passer le bout plat d’une des courroies de
fixation de 3,6 mètres autour de la partie supérieure du
support arrière.Tirez sur le bout plat de la courroie afin
d’obtenir une boucle de longueurs égales. Faites de
même pour le deuxième support. (Figure 5)
5
● Confirm the carriers are in alignment. Firmly tighten the T-knobs
until both carriers are securely fixed to the cross bars. See image 4.
NOTE: Carriers should be at least 24” apart.
● Assurez-vous que les supports soient bien alignés. Vissez
fermement les boutons en ‘‘T’’ jusqu’à ce que les deux supports
soient solidement fixés aux barres
transversales. (Figure 4)
REMARQUE: Les transporteurs doivent être séparés d’au moins
609mm
4
24” min.
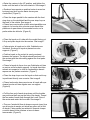
Loading

● Raise the carriers to the UP position, and tighten the
knobs until the teeth of the hubs interlock. See image 6.
● Soulevez les supports en position haute et serrez les
boutons jusqu’à ce que les dents des moyeux
s’emboîtent. (Figure 6)
● Place the straps parallel to the carriers with the front
strap loop on the windshield and the rear strap loop on
the back of the vehicle. See image 6.
● Placez les courroies afin qu’elles soient parallèles aux
supports. La boucle de la courroie avant devrait être
placée sur le pare-brise et la seconde boucle, sur la
partie arrière du véhicule. (Figure 6)
● Place the kayak on it’s side with the cockpit facing out.
Lift up and place kayak into the carriers. See image 7.
● Faites pivoter le kayak sur le côté, l’habitacle vers
l’extérieur. Soulevez le kayak et placez-le sur les
supports. (Figure 7)
● Position kayak so the cockpit is evenly centered
between the carriers. The kayak should lean back into
the carriers with the side resting against the front pads.
See image 7.
● Placez le kayak de façon à ce que l’habitacle soit bien
au centre, entre les deux supports. Le kayak étant bien
adossé aux supports, le côté de l’embarcation devrait
reposer sur les parties cousinées. (Figure 7)
● Place the strap loops over the kayak so that each loop
is positioned directly over a carrier. See image 8.
● Placez les boucles des courroies sur le kayak an que
chaque boucle soit bien alignée avec un support.
(Figure 8)
● Pull the free end of each strap down until the buckles
are positioned half way up the side of the kayak. Thread
the free ends of each strap through the Lower Tube of
the carrier and under the cross bar. See image 9.
● Tirez sur l’extrémité libre de chaque courroie jusqu’à ce
que la boucle de sangle soit située au milieu sur le côté
du kayak. Faites passer les extrémité libres de chaque
courrorie dans le tube inferieur et sous la barre
transversale. (Figure 9)
6
7
8
9

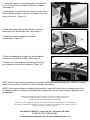
. Thread the free end of each strap back up and through
the buckles. Pull down to tighten.
See image 16.
. Tirez le bout plat de chacune des courroies vers le haut
afin de les faire passer dans la boucle, puis tirez vers le
bas afin de bien les serrer.
(Figure 16)
. Dress extra strap down and around the cross bars. Install
the bow & stern safety lines per attached instructions.
See image 17.
. Tirez le bout plat de chacune des courroies vers le haut
en les faisant glisser dans la boucle, puis tirez vers le bas
afin de bien les serrer. Attachez la courroie d’appoint aux
barres transversales. Attachez les filins de sécurité avant et
arrière en suivant les instructions fournies.
(Figure 17)
17
6
MALONE
R
Installation & Loading Instructions - MPG114MD DownLoader
Instructions - Installation et chargement
TM
Always check mounting hardware, load straps and safety tie-down lines for proper
and secure attachment before transport. Use of this product for any other
application other than kayak transport voids warranty.
Assurez-vous que les pièces de montage, les courroies de fixation et les filins de sécurité soient fixés
correctement lorsque vous transportez un kayak. L’utilisation de ce produit pour un usage autre que le
transport d’un kayak en annule la garantie.
16
MALONE AUTO RACKS, 81 County Road, Westbrook, Maine 04092
Phone: 207-774-9100 Fax: 207-615-0551
Website: www.maloneautoracks.com Email: technical@maloneautoracks.com
● Thread the free end of each strap back up through the
Lower Tube and into the buckles. Pull down to tighten.
See image 10.
● Faites passer l’extrémité libre de chaque courroie dans
le tube inférieur et dans les boucles de sangle. Tirez vers
le bas pour serrer. (Figure 10)
● Dress extra strap down and around the cross bars.
Install the bow & stern safety lines. See image 11.
● Attachez la courroie d’appoint aux barres
transversales. (Figure 11)
10
11
● When not transporting a kayak, the carriers should
always be in the DOWN position. See image 12.
● Lorsque vous ne transportez pas de kayak, les sup-
ports devraient toujours être rabaissés. (Figure 12)
12
NOTE: Bow and stern safety tie-downs are required for all Malone rooftop transport(s). Failure to correctly
install and use safety tie-down lines voids all warranty and liability.
NOTE: Il faut toujours utiliser des attaches de sécurité à l’avant et à l’arrière pour les transports sur le toit.
Le défaut d’installer et d’utiliser correctement des cordages de sécurité annule toutes les garanties et re-
sponsabilités.
MALONE AUTO RACKS 81 County Rd. Ste 1, Westbrook, ME 04092
P: 207.774.9100 F: 207.615.0551
E: support@maloneautoracks.com W: www.maloneautoracks.com

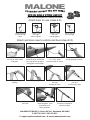
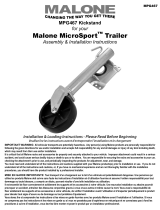
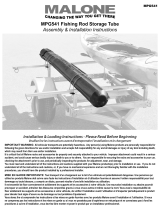
MPG306 BOW & STERN LINE KIT
MALONE
R
Thread free end
of cord through
hook.
Create a “left
over right”
knot & tighten.
Create a “right
over left”
knot & tighten.
Pull to test for
knot strength.
A B C D
Attach hook to rope (steps A-D)
Keeping the rope tight and
S-hook in place, thread the
free end up and through a
strong point on the kayak
F
Make a loop in the rope
12” to 14” away
from the kayak or canoe.
G
Attach and dress rope to vehicle and boat (steps E-O)
Attach S-hook to vehicle
tow ring or other sturdy
body part.
E
Bend the loop over leaving
a large opening as shown.
H
Opening
Pass the loop through the
opening.
I
Pull to create a tight knot.
JK
Thread the free end of
the rope
through the loop.
L
Pull the free end up until
the rope
is sufficiently tight.
M
Hold the rope secure with
one hand.
Form a knot with the free
end and tighten. Form
a second knot for
safety purposes.
N
The line should be tight
and secure. Repeat for
second tie-down.
O
MALONE AUTO RACKS, 81 County Road, Westbrook, Maine 04092
Phone: 207-774-9100 Fax: 207-615-0551
Website: www.maloneautoracks.com Email: technical@maloneautoracks.com
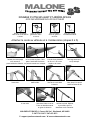
MPG306 BOW & STERN LINE KIT
NOTE: NOT REQUIRED ON TRAILER PACKAGES
MALONE AUTO RACKS 81 County Rd. Ste 1, Westbrook, ME 04092
P: 207.774.9100 F: 207.615.0551
E: support@maloneautoracks.com W: www.maloneautoracks.com

MALONE
R
Enfiler l’extrémité
libre de la corde dans le
crochet.
Faire un nœud «
gauche sur droit »
et serrer.
Faire un nœud «
droit sur gauche »
et serrer.
Tirer pour vérifier
la solidité du nœud.
A B C D
ENSEMBLE D’ATTACHES AVANT ET ARRIÈRE MPG306
En maintenant la corde serrée
et le crochet en place, faire
passe l’extrémité libre dans
un point d’attache sur le kayak.
F
Faire une boucle dans
la corde à une distance
de 30 cm à 35 cm du
kayak ou du canot.
G
Attacher la corde au véhicule et à l’embarcation (étapes E à O)
Fixer le crochet en S à
l’anneau de remorquage
ou à une autre
partie solide du véhicule.
E
Replier la boucle en faisant
une large ouverture,
tel qu’indiqué.
H
Ouverture
Introduire la boucle dans
l’ouverture.
I
Serrer pour faire un
nœud solide.
JK
Faire passer l’extrémité
libre de la corde dans
la boucle.
L
Tirer sur l’extrémité
libre jusqu’à ce que la
corde soit bien serrée.
M
Maintenir la corde serrée
d’une main.
Faire un nœud avec
l’extrémité libre et serrer.
Faire un deuxième nœud
en guise de sécurité.
N
La corde doit être bien
tendue et solide. Répéter
la procédure pour la
deuxième corde d’attache.
O
MALONE, 81 County Road, Westbrook, Maine USA 04092
Courriel : sales@maloneautoracks.com
Web: www.maloneautoracks.com
NOTE: PAS NÉCESSAIRE SUR LES COLIS TRAILER
MALONE AUTO RACKS 81 County Rd. Ste 1, Westbrook, ME 04092
P: 207.774.9100 F: 207.615.0551
E: support@maloneautoracks.com W: www.maloneautoracks.com

MALONE AUTO RACKS 81 County Rd. Ste 1, Westbrook, ME 04092
P: 207.774.9100 F: 207.615.0551
E: support@maloneautoracks.com W: www.maloneautoracks.com
Limited Lifetime Warranty
The Malone Auto Racks (Malone) Limited Lifetime Warranty covers certain Malone-brand products that have been specically
identied for inclusion in the program and is eective for as long as the original retail purchaser owns the product. This warranty is
terminated when the original retail purchaser sells or otherwise transfers the product to any other person or entity.
Subject to the limitations and exclusions described in this warranty, Malone will remedy defects in materials and/or workmanship
by repairing or replacing, at its option, a defective product without charge for parts or labor. Malone may elect, at its option, not to
repair or replace a defective product but rather issue to the original retail purchaser a refund equal to the purchase price paid for the
product, or credit to be used toward the purchase of a replacement Malone product.
This warranty does not cover, and no warranty is given for defects or problems caused by normal wear and tear, which includes,
but is not limited to, surface (aesthetic) metal corrosion, scratches, dents, deformities, accidents, unlawful vehicle operation, or any
modication of a product not performed or authorized in writing by Malone.
In addition, this warranty does not cover problems resulting from conditions beyond Malone’s control including, but not limited to,
theft, misuse, overloading, or failure to assemble, mount or use the product in accordance with Malone’s written instructions or
guidelines included with the product provided to the original retail purchaser.
No warranty is given for Malone products purchased outside of the continental United States, Canada and Mexico.
If the product is believed to be defective, the original retail purchaser should contact the Malone dealer from whom it was purchased,
who will give the original retail purchaser instructions on how to proceed. If the original retail purchaser is unable to contact the
Malone dealer, or the dealer is not able to remedy the defect, the original retail purchaser should contact Malone by email at
In the event that the product must be returned to Malone, a technician at the email address above will provide the original purchaser
with return shipping instructions. The original purchaser will be responsible for the cost of mailing the product to Malone. In order
to be eligible to receive any remedy under this warranty, a copy of the original purchase receipt, a description of the defect and a
return address must be provided.
Disclaimer of Liability
Repair or replacement of a defective product, or the issue of a refund or credit (as determined by Malone) is the original retail
purchaser’s sole and exclusive remedy under this warranty. Damage to original purchaser’s vehicle, cargo, or property, and/ or to
any other person or property is not covered by this warranty.
This warranty is expressly made in lieu of any and all other warranties, express or implied, including the warranties of merchantability
and tness of a particular purpose
Malone’s sole liability to any purchaser is limited to the remedy set forth above. In no event will Malone be liable for any direct,
indirect, consequential, incidental, special, exemplary, or punitive damages , or, for any other damages of any kind or nature
(including but not limited to, lost prots, lost income or lost sales).
Some states do not allow the exclusion or limitation of incidental or consequential damages, so the above limitations may not be
applicable.
In addition, all vehicular transports are potentially hazardous. Any person(s) using Malone products are personally responsible for
following the given directions for use and/or installation and accepts full responsibility for any and all damages or injury of any kind
including death, which may result from their use and/or installation.
MALONE
R

MALONE AUTO RACKS 81 County Rd. Ste 1, Westbrook, ME 04092
P: 207.774.9100 F: 207.615.0551
E: support@maloneautoracks.com W: www.maloneautoracks.com
MALONE
R
Garantie à vie limitée
La garantie à vie limitée de Malone Auto Racks (Malone) couvre certains produits de marque Malone expressément désignés pour
être inclus dans ce programme et est valide tant que l’acheteur original est propriétaire du produit. Cette garantie prend n lorsque
l’acheteur original vend ou cède le produit à une autre personne ou entité.
Sous réserve des restrictions et exclusions prévues dans la garantie, Malone corrigera toute défectuosité matérielle et/ou tout défaut
de fabrication en réparant ou en remplaçant, à sa discrétion, un produit défectueux sans frais pour ce qui est des pièces et de la
main-d’oeuvre. Malone peut décider, à son choix, de ne pas réparer ou remplacer un produit défectueux, mais plutôt d’accorder à
l’acheteur original un remboursement d’un montant égal au prix d’achat pour le produit ou encore un crédit pour l’achat d’un produit
de remplacement de marque Malone.
La présente garantie ne couvre pas les défauts et les problèmes résultant d’une usure normale et aucune garantie n’est oerte à cet
égard, notamment en cas de corrosion du métal en surface (esthétique), d’égratignures, de bosses, de déformations, d’accident,
d’une utilisation illégale du véhicule ou de toute modication du produit qui n’est pas eectuée ou autorisée par écrit par Malone.
En outre, la garantie ne couvre pas les problèmes résultant de circonstances échappant au contrôle de Malone, y compris,
notamment, résultant d’un vol, d’un usage abusif ou d’une surcharge ou encore d’un assemblage, d’une installation ou d’une
utilisation du produit ne respectant pas les instructions écrites de Malone fournies à l’achat à l’acheteur original.
Aucune garantie n’est oerte pour des produits Malone achetés à l’extérieur du territoire continental des États-Unis, du Canada ou
du Mexique.
Si le produit semble défectueux, l’acheteur original doit contacter le détaillant Malone où il a fait son achat et celui-ci lui fournira
des renseignements sur la démarche à suivre. Si l’acheteur original ne réussit pas à contacter le détaillant Malone ou encore si le
détaillant est incapable de remédier à la défectuosité, l’acheteur original doit communiquer directement avec Malone par courriel à
l’adresse suivante : [email protected].
Dans le cas où le produit doit être retourné à Malone, un technicien contacté à l’adresse courriel ci-dessus fournira à l’acheteur
original les instructions à suivre pour l’expédition du produit. L’acheteur original devra assumer les frais d’expédition à Malone.
Pour qu’une demande soit admissible aux termes de la présente garantie, il faut envoyer à Malone une copie du reçu de l’acheteur
original, une description de la défectuosité et une adresse de retour.
Exonération de responsabilité
La réparation ou le remplacement du produit défectueux ou encore la remise d’un remboursement ou d’un crédit (tel que déterminé
par Malone) constitue le seul et exclusif dédommagement oert à l’acheteur original aux termes de la présente garantie. Les
dommages causés au véhicule de l’acheteur original, à un chargement, à ses biens et/ou à toute autre personne ou tout autre bien
ne sont pas couverts par cette garantie.
Cette garantie est octroyée expressément an de remplacer toute autre garantie expresse ou implicite, y compris toute garantie de
qualité marchande ou de conformité pour un usage particulier.
L’unique responsabilité de Malone envers l’acheteur se limite aux dédommagements indiqués ci-dessus. Malone ne pourra en
aucun cas être tenu responsable des dommages directs, indirects, consécutifs, spéciaux, exemplaires ou punitifs ou de tout autre
dommage de quelque nature que ce soit (y compris notamment une perte de prots, de revenus ou de ventes).
L’exclusion ou la limitation des dommages indirects ou consécutifs n’étant pas permise à certains endroits, les limitations indiquées
ci-dessus peuvent ne pas s’appliquer.
En outre, tous les transports par véhicule comportent des risques potentiels. Toute personne utilisant un produit Malone est donc
personnellement responsable de suivre les instructions fournies pour son utilisation et/ou son installation et accepte l’entière
responsabilité pour tout dommage ou toute blessure de quelque nature que ce soit, y compris un décès, pouvant résulter de son
utilisation et/ou son installation.
-
 1
1
-
 2
2
-
 3
3
-
 4
4
-
 5
5
-
 6
6
-
 7
7
-
 8
8
-
 9
9
-
 10
10


Malone MPG462G2 Manuel utilisateur
- Taper
- Manuel utilisateur
dans d''autres langues
- English: Malone MPG462G2 User manual
Documents connexes
-
 Malone MPG125 Manuel utilisateur
-
 Malone MPG467 Manuel utilisateur
-
 Malone MPG126 Manuel utilisateur
-
 Malone BIGFOOT Installation & Loading Instructions
-
 Malone MPG905 Manuel utilisateur
-
 Malone MPG541 Manuel utilisateur
-
 Malone MPG909 Manuel utilisateur
-
 Malone MPG544 Manuel utilisateur
-
 Malone MPG906 Manuel utilisateur
-
 Malone MPG367 Manuel utilisateur


