Form No. 107078
Operating Instructions
for: 1512
655 Eisenhower Drive
Owatonna, MN 55060 USA
Phone: (507) 455-7000
Tech. Serv.: (800) 533-6127
Fax: (800) 955-8329
Order Entry: (800) 533-6127
Fax: (800) 283-8665
International Sales: (507) 455-7223
Fax: (507) 455-7063
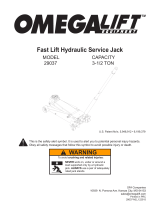
Hydraulic Floor Service Jack
Max. Capacity: 20 Tons
Application: Designed to lift a wide range of motor vehicles.
Sheet 1 of 2
Rev. C October 21, 2013 © Bosch Automotive Service Solutions LLC
Safety Precautions
WARNING : To prevent personal injury and damage to equipment,
• Read, understand, and follow all instructions, including ASME PALD Part 10 for service jacks.
- If the operator cannot read English, operating instructions and safety precautions must be read
and discussed in the operatorʼs native language.
- Si el operador no puede leer el inglés, las instrucciones de operación y las precauciones de
seguridad deberán leerse y comentarse en el idioma nativo del operador.
- Si lʼutilisateur ne peut lire lʼanglais, les instructions et les consignes de sécurité doivent lui être
expliquées dans sa langue maternelle.
• Before using the service jack to lift a vehicle, refer to the vehicle service manual to determine
recommended lifting surfaces on the vehicle chassis.
• Wear eye protection that meets ANSI Z87.1 and OSHA standards.
• Inspect the jack before each use; do not use the jack if itʼs damaged, altered, or in poor condition.
Take corrective action if any of the following conditions are found: cracked or damaged housing;
excessive wear, bending, or other damage; leaking hydraulic uid; scored or damaged piston rod;
loose hardware; modied or altered equipment.
• A load must never exceed the rated lifting capacity of the jack.
• Only use the jack on a hard, level surface.
• Use the jack for lifting purposes only. Stay clear of a lifted load. Place support stands under the axles before working
on the vehicle.
• Center the load on the jack saddle. Off-center loads can damage seals and cause jack failure. Lift only dead weight.
• Do not use blocks or other extenders between the saddle and the load being lifted. Do not modify the jack or use
adapters unless approved or supplied by OTC. Do not adjust the safety valve.
• Lower the jack slowly and carefully while watching the position of the jack saddle.
• Use only approved hydraulic uid (Mobil DTE #11 or equivalent). The use of alcohol, hydraulic brake uid, or
transmission oil could damage seals and result in jack failure.
Operating Instructions
1.Positionthejackunderthevehicleusingthemanufacturerʼsrecommendedliftingpointsonthechassis.
2. Close the release valve by shifting the control lever up and clockwise toward the upper notch. Pump the foot pedal to raise
the saddle to the contact point.
3. Check the placement of the jack; the load must be centered on the jack saddle. Important: Avoid wheel obstructions such
as gravel, tools, or uneven expansion joints. The jack must be free to roll forward 11 inches during lifting, and backward 11
inches during lowering. The load could become unstable, or even fall off the saddle, if the rolling movement of the jack is
impaired.
4. Finish lifting the vehicle by pumping the handle. Do not attempt to raise the jack beyond its travel stops.
5. Place approved support stands under the vehicle at points that will provide stable support. Before making repairs on the vehicle,
lower it onto the support stands by unhooking the control lever from the upper notch and lowering it to the lower notch.

Preventive Maintenance
Important: The greatest single cause of failure in hydraulic units is dirt. Keep the service jack clean and well lubricated
to prevent foreign matter from entering the system. If the jack has been exposed to rain, snow, sand, or grit, it must be cleaned
before it is used.
1. Store the jack in a well-protected area where it will not be exposed to corrosive vapors, abrasive dust, or any other harmful
elements.
2. Lubricate rotating and sliding parts at least once per month. Lubricate the air inlet on the jack using 1/2 oz. clean lubricating
oil; lack of oil may cause pump malfunction.
3.Greasethejackonceamonthusingagoodbearinggrease.(Therearegreasettingslocatedonthepivottubeofthelift
arm, the block on the rod end of the cylinder, and on all four wheels of the jack.)
4. Keep warning labels and instructional decals clean and readable. Use a mild soap solution to wash the external surfaces
of the jack.
5. Replace the oil in the reservoir at least once per year.
6. Inspect the jack before each use. Take corrective action if any of the following problems are found:
a. Cracked or damaged housing d. Scored or damaged piston rod
b. Excessive wear, bending, or other damage e. Loose hardware
c.Leakinghydraulicuid f.Modiedoralteredequipment
Troublesooting Guide
Repairproceduresmustbeperformedinadirt-freeenvironmentbyqualiedpersonnelwhoarefamiliarwiththisequipment.
CAUTION: All inspection, maintenance, and repair procedures must be performed when the jack is free of a load (not
in use).
Trouble Cause Solution
Failure to lift a load
Failure to hold a load
Reservoir leaks
Handle doesnʼt pump
a full stroke.
Will only partially
lift load
Jack will not lower
1. Low oil level
2. Release lever open.
3. Jack is overloaded.
1. Release lever opem.
1.Reservoirisoverlled.
1. Jack is air bound.
1. Low oil level.
1. Stuck release valve
1. Place jack on level surface. Lower lift arm completely. Remove
oil tank cover, and check oil level. Fluid should be visible and just
covering spring. If not, add high-grade hydraulic uid equivalent to
Mobil DTE #11 until oil level is within 1-1/4" below cap hole.
2. Close release lever.
3. Use equipment that has the correct capacity for the job.
1. Close release lever.
1. Drain some oil from reservoir.
1. Purge air from system: open release valve and rapidly operate
pump handle several times.
1. Place jack on level surface. Lower lift arm completely. Remove
oil tank cover, and check oil level. Fluid should be visible and just
covering spring. If not, add high-grade hydraulic uid equivalent to
Mobil DTE #11 until oil level is within 1-1/4" below cap hole.
1. Check control valve for dirt or foreign matter.
Operating Instructions Form No. 107078, sheet 1 of 2, back

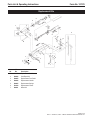
Replacement Kits
Sheet 2 of 2
Rev. C October 21, 2013 © Bosch Automotive Service Solutions LLC
Parts List & Operating Instructions Form No. 107078
Item Kit
No. No. Description
1 509833 Replacement Saddle
2 509834 Seal Repair Kit
3 509863 Replacement Foot Pedal
4 509832 Replacement Handle
5 509864 Replacement Springs
6 510290 Replacement Caster
7 509831 Wheel Kit
77
77
7
77
7
7
7
7
7
7
7
1
2
2
2
22222
2
2
2
2
2
2
2
2
2
3
4
5
5
6
6
6
-
 1
1
-
 2
2
-
 3
3