Airxcel MAXXAIR MINI 3700 Installation Instructions, Information And Operating Manual
- Taper
- Installation Instructions, Information And Operating Manual

INSTALLATION INSTRUCTIONS,
INFORMATION AND OPERATING GUIDE
FOR MAXXAIR MINI MODELS 3700, 3750
MAXXFAN MINI MODELS 3800, 3850
MAXXFAN MINI PLUS MODELS 3801, 3851
P/N: 10D03708Z
05-2019
READ AND SAVE THESE INSTRUCTIONS
NOTE: Refer to Installation Instructions, Information and Operation Guides regarding the model you
have purchased.
The MAXXAIR MINI / MAXXFAN MINI / MINI PLUS installs into a standard RV roof opening
of 14 by 14 inches.
To determine if your roof opening is correctly sized, simply remove the interior ceiling garnish trim ring
of your existing roof vent and measure the ceiling opening or verify the opening is large enough by
sliding the MAXXAIR MINI / MAXXFAN MINI / MINI PLUS sleeve into the opening.
The MAXXAIR MINI / MAXXFAN MINI / MINI PLUS is designed for a minimum roof thickness
of 1 inch to a maximum of 4 1/2 inches.
The MAXXFAN MINI / MINI PLUS requires a minimum 12 Volt DC, 2 amp service. Conrm
that the circuit you intend to use will accommodate the additional load. Circuit must be fused and use
appropriate gauge stranded wire for electrical connections.
WARNING! TO REDUCE THE RISK OF FIRE, ELECTRIC SHOCK, OR INJURY TO PERSONS, OBSERVE
THE FOLLOWING:
a) Use this unit only in the manner intended by AIRXCEL, INC. If you have questions, contact the manufacturer.
b) Before servicing or cleaning unit, switch power off at service panel and lock the service disconnecting means to
prevent power from being switched on accidentally. When the service disconnecting means cannot be locked,
securely fasten a prominent warning device, such as a tag, to the service panel.
CAUTION! FOR GENERAL VENTILATION USE ONLY. DO NOT USE TO EXHAUST HAZARDOUS OR
EXPLOSIVE MATERIALS AND VAPORS.
MAXXAIR
MAXXAIR MINI
MAXXFAN MINI, MAXXFAN MINI PLUS

WARNING! TO REDUCE THE RISK OF FIRE,
ELECTRIC SHOCK, OR INJURY TO PERSONS,
OBSERVE THE FOLLOWING:
a) Installation work and electrical wiring must be
done by qualied persons(s) in accordance with all
applicable codes and standards, including re-rated
construction.
STEP 1
MAXXAIR MINI and MAXXFAN MINI / MINI
PLUS require a 14” x 14” roof opening. If you are
replacing another type already installed, remove
the old existing roof vent. Remove all old roof
sealant for a minimum of 2” entirely around the
roof opening.
STEP 2
Measure the thickness of the roof opening and,
if necessary, mark and cut the height of the MINI
sleeve per the following table. NOTE: for curved
roofs measure the thickest part of the roof.
VEHICLE
ROOF
THICKNESS
CUT FROM
MAXXAIR
MINI MAXX
SLEEVE
LENGTH OF
SCREWS
(
4
)
4.0 – 4.5 inches
NONE
(use full length
sleeve)
4.5 inches
3.5 – 4.0 inches 0.5 inches 4.5 inches
3.0 – 3.5 inches 1.0 inches 3.5 inches
2.5 – 3.0 inches 1.5 inches 3.5 inches
2.0 – 2.5 inches 2.0 inches 2.5 inches
1.5 – 2.0 inches 2.5 inches 2.5 inches
1.0 – 1.5 inches
N/A, Sleeve not
used
1.5 inches
STEP 3
Prior to installing the MINI hood portion over the
roof opening, apply a continuous strip of BUTYL
tape or equivalent to the underside of the flange
in the area under the screw location dimples.
CAUTION! When installing only use a caulking/
sealant compatible with the ange (plastic product)
and the roof surface. DO NOT use materials
containing solvents such as or similar to Xylene,
Toluene, Methyl Ethyl Ketone (MEK), Acetate or
Acetone as they can damage the ange. Also,
Polysulde (Thiokol) type sealants must be avoided.
If in doubt, please contact the manufacturer of your
RV for further information.
STEP 4
Insert the hood into the roof opening with the
louvered section facing the rear of the vehicle
and centering the hood in the opening. Using
the twenty-eight (28) screws provided, attach the
flange to the roof at each dimple location along
the flange. Screw into the dimple to pierce the
flange, making sure not to overtighten the screws
to avoid cracking the flange.
STEP 5
After the hood has been installed, remove the
excess BUTYL caulk that may have squeezed
out. Using a sealer such as Dicor self-leveling
lap sealant or similar caulking, apply a daub over
every exposed screw head. In addition, apply a
bead (approximately 3/16” dia.) along the outside
edge of the flange all the way around the vent.
THIS COMPLETES THE ROOF TOP
PORTION OF THE INSTALLATION
NOTE: FOR INSTALLATION OF MAXXAIR
MINI 3700 & 3750 PLEASE SKIP TO STEP 8
CAUTION! Disconnect main vehicle power before
connecting 12 volt DC power to the MAXXFAN
MINI or MINI PLUS!
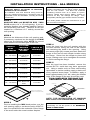
INSTALLATION INSTRUCTIONS - ALL MODELS
MARK & CUT OFF INDICATED
AMOUNT OF SLEEVE (SEE TABLE)
APPLY BUTYL TAPE
FRONT OF RV
APPLY SEALANT AROUND
PERIMETER OF FLANGE
REAR OF RV
INSTALL SCREWS (28) &
SEAL SCREW HEADS
2

3
STEP 6
Insert the 12 volt DC power supply wires into
the open hole in the side of the metal switch
bracket on the MAXXFAN MINI. Allowing 4 to
6 inches of wire inside the bracket, secure the
wires to the bracket with the supplied strain
relief bushing. Using the supplied wire nuts,
connect the Positive (+)12VDC supply wire to the
MAXXFAN MINI wire(s) marked “Pos. 12 VDC”
and the Negative (-)12VDC supply wire to the
MAXXFAN MINI wire marked “Neg. 12 VDC”.
STEP 7
Route supply wires to notch in the back of the
MAXXFAN MINI interior plate, place sleeve over
interior plate with supply wires routed through
hole formed between interior plate and sleeve.
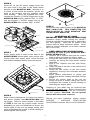
STEP 8
Raise interior plate/sleeve to ceiling and ensure
that sleeve meshes with MAXXFAN MINI roof
top flange. Refer to screw lengths in the table
of STEP 2 and use the proper length screws
depending on your roof thickness to secure the
interior plate to the roof top flange, taking care
not to overtighten the screws to avoid cracking or
deforming the interior plate.
STRAIN RELIEF BUSHING
12 VDC SUPPLY WIRES
FUSE HOLDER
WIRE NUTS
12 VDC SUPPLY WIRES
INTERIOR PLATE
SLEEVE
STEP 9
Reconnect main vehicle power to the MAXXFAN
MINI / MINI PLUS. THIS COMPLETES THE
INSTALLATION OF YOUR MAXXFAN
®
MINI
OR MAXXFAN
®
MINI PLUS.
OPERATION OF YOUR
MAXXFAN
®
MINI / MAXXFAN MINI PLUS
Operation simply entails turning the ON/OFF
switch to activate the exhaust fan or (optionally)
the LED lighting. Open the air baffle in the
interior plate to allow maximum airflow. Close
baffle to impede infiltration of air when exhaust
fan is not in use.
USER SERVICING INSTRUCTIONS
Replacing the fuse of your MAXXFAN MINI /
MAXXFAN MINI PLUS:
a. Remove the 4 screws that hold the interior
plate in place and lower the interior plate.
b. Locate the fuse holder and remove the fuse
carefully by turning the fuse holder counter
clockwise
c. Risk of fire. Replace the fuse with 5Amp,
125V fuse.
d. Place one end of the fuse in the male side of
the fuse holder.
e. Screw the two halves of the fuse holder
together by turning in the clockwise direction
until snug.
f. Raise interior plate/sleeve to ceiling and
ensure that sleeve meshes with MINI roof top
flange.
g. Secure the interior plate to the roof top
flange using the 4 screws, taking care not to
overtighten the screws to avoid cracking or
deforming the interior plate.
Cleaning of your MINI may be achieved with
mild soap and water only. Before removing the
screen for cleaning, ensure the fan is turned to
the OFF position. CAUTION: Do not operate
the fan with the screen removed.
Should you have questions, please contact
AIRXCEL / MAXXAIR VENTILATION
SOLUTIONS Customer Service at 316.832.4357.
SCREW (4)
INTERIOR PLATE

INSTRUCTIONS D’INSTALLATION,
INFORMATIONS ET GUIDE D’UTILISATION
POUR LES MODÈLES MAXXAIR MINI 3700, 3750
MAXXFAN MINI MODÈLES 3800, 3850
MAXXFAN MINI PLUS MODÈLES 3801, 3851
LIRE ET GARDER CES INSTRUCTIONS
REMARQUE : veuillez consulter les instructions d’installation, les informations et les
guides d’utilisation au sujet du modèle que vous avez acheté.
Le MAXXAIR MINI / MAXXFAN MINI / MINI PLUS s’installe dans une ouverture de toit
de VR standard de 35,6 cm x 35,6 cm.
Pour déterminer si l’ouverture du toit est de la bonne taille, retirez simplement la couronne
décorative au plafond intérieur de votre évent de toit et mesurez l’ouverture an de vérier
qu’elle est susamment large en y glissant le manchon du MAXXAIR MINI / MAXXFAN
MINI / MINI PLUS.
Le MAXXFAN MINI / MAXXFAN MINI PLUS est conçu pour une épaisseur minimale
du toit de 2,5 cm et maximale de 11,4 cm.
Le MAXXAIR MINI / MAXXFAN MINI / MINI PLUS nécessite un service minimal de
12 volts c.c., 2 A. Conrmez que le circuit que vous prévoyez utiliser peut prendre la
charge supplémentaire. Le circuit doit être muni d’un fusible et utiliser un l toronné de
calibre approprié pour les connexions électriques.
AVERTISSEMENT! POUR RÉDUIRE LE RISQUE D’INCENDIE, DE DÉCHARGE ÉLECTRIQUE OU DE
BLESSURES CORPORELLES, VEUILLEZ RESPECTER CE QUI SUIT :
a) Utilisez seulement cette unité selon la façon prévue par AIRXCEL, INC. Communiquez avec le fabricant pour
toute question.
b) Avant d’entretenir ou de nettoyer l’unité, coupez l’alimentation électrique au panneau d’entretien et verrouillez
le moyen de déconnexion pour entretien, afin d’empêcher que l’alimentation électrique soit activée
accidentellement. Lorsque le moyen de déconnexion pour entretien ne peut pas être verrouillé, fixez de façon
sûre un dispositif évident d’avertissement, comme une étiquette, au panneau d’entretien.
ATTENTION! POUR UTILISATION DE VENTILATION GÉNÉRALE SEULEMENT. NE PAS UTILISER POUR
ÉVACUER DES MATIÈRES OU DES VAPEURS DANGEREUSES OU EXPLOSIVES.
MAXXAIR
MAXXAIR MINI
MAXXFAN MINI, MAXXFAN MINI PLUS

AVERTISSEMENT! POUR RÉDUIRE
LE RISQUE D’INCENDIE, DE DÉCHARGE
ÉLECTRIQUE OU DE BLESSURES, VEUILLEZ
RESPECTER CE QUI SUIT :
a) Les travaux d’installation et de lage électrique
doivent être eectués par des personnes qualiées,
conformément aux codes et normes applicables, y
compris la construction classée résistante au feu.
ÉTAPE 1
MAXXAIR MINI and MAXXFAN MINI / MINI
PLUS exige une ouverture au toit de 35,6 cm x
35,6 cm. Si vous remplacez un autre type qui est
déjà installé, retirez l’ancien évent de toit. Retirez
tout vieux scellant de toit à une distance d’au moins
5,1 cm sur le pourtour complet de l’ouverture du toit.
ÉTAPE 2
Mesurez l’épaisseur de l’ouverture du toit
et, au besoin, marquez et coupez la hauteur
du manchon du MINI selon le tableau suivant.
REMARQUE : pour les toits courbés, mesurez la
partie la plus épaisse du toit.
ÉPAISSEUR
DU TOIT DU
VÉHICULE
COUPE DU
MANCHON
MAXXAIR
MINI MAXX
LONGUEUR
DES VIS
(
4
)
10,2 à 11,4 cm
AUCUN
(utilisez le manchon
à sa pleine longueur)
11,4 cm
8,9 à 11,4 cm 1,3 cm 11,4 cm
7,6 à 8,9 cm 2,5 cm 8,9 cm
6,4 à 7,6 cm 3,8 cm 8,9 cm
5,1 à 6,4 cm 5,1 cm 6,4 cm
3,8 à 5,1 cm 6,4 cm 6,4 cm
2,5 à 3,8 cm
S.O., manchon
non utilisé
3,8 cm
ÉTAPE 3
Avant l’installation de la hotte du MINI dans
l’ouverture du toit, appliquez une bande continue
de ruban BUTYL ou un équivalent sous la collerette,
dans la région sous les fossettes pour les vis.
ATTENTION! Lors de l’installation n’utilisez que du
calfeutrage/scellant qui est compatible avec la collerette
(produit de plastique) et la surface du toit. N’utilisez PAS des
matériaux contenant des solvants comme ou semblable au
xylène, toluène, méthyléthylcétone, à l’acétate ou l’acétone,
puisqu’ils peuvent endommager la collerette. Les scellants de
type polysulde (thiocol) doivent aussi être évités.
En cas d’incertitude, veuillez communiquer avec le fabricant
de votre VR pour de plus amples informations.
ÉTAPE 4
Insérez la hotte MINI dans l’ouverture du toit,
l’ouverture à lames vers l’arrière du véhicule, et
centrez la hotte dans l’ouverture. À l’aide des
vingt-huit (28) vis fournies, vissez la collerette au
toit à chaque fossette ronde le long de la collerette.
Vissez dans la fossette pour percer la collerette,
en vous assurant de ne pas trop serrer les vis afin
d’éviter de fissurer la collerette.
ÉTAPE 5
Lorsque le MINI est installé, retirez le surplus de
calfeutrage BUTYL qui peut s’être échappé. À l’aide
d’un scellant comme le scellant de recouvrement
autonivelant Dicor, ou un calfeutrage semblable,
couvrez chaque tête de vis exposée. De plus,
appliquez un cordon de scellant (environ 0,5 cm)
autour du bord extérieur de la collerette, sur le
contour complet de l’évent.
L’INSTALLATION SUR LA PARTIE
SUPÉRIEURE DU TOIT EST TERMINÉE
REMARQUE : POUR L’INSTALLATION DU
MAXXAIR MINI 3700 ET 3750, VEUILLEZ
SAUTER L’ÉTAPE 8.
ATTENTION! Débranchez l’alimentation
électrique principale du véhicule avant de connecter
l’alimentation de 12 volts c.c. au MAXXFAN MINI
et MAXXFAN MINI PLUS!
INSTRUCTIONS D’INSTALLATION : TOUS LES MODÈLES
MARQUEZ ET COUPEZ LA
QUANTITÉ INDIQUÉE DU
MANCHON (CONSULTEZ
LE TABLEAU)
APPLIQUEZ LE
RUBAN BUTYL
DEVANT DU VR
APPLIQUEZ LE SCELLANT
AUTOUR DU PÉRIMÈTRE
DE LA COLLERETTE
ARRIÈRE DU VR
INSTALLEZ LES VIS (28)
ET SCELLEZ LES TÊTES
DE VIS
2

3
ÉTAPE 6
Insérez les câbles d’alimentation électrique de
12 volts c.c. dans le trou ouvert sur le côté du
support de commutateur en métal sur le MAXXFAN
MINI. Laissant 10,2 à 15,2 cm de câble dans
le support, fixez les câbles au support à l’aide
de la bague antitraction incluse. À l’aide des
capuchons de connexion fournis, connectez le câble
d’alimentation 12 volts c.c. positif (+) aux câbles
du MAXXFAN MINI marqués « Pos. 12 VDC » et
les câbles d’alimentation 12 volts c.c. négatifs (-)
aux câbles du MAXXFAN MINI marqués « Neg.
12 VDC ».
ÉTAPE 7
Acheminez les câbles d’alimentation dans la coche à
l’arrière de la plaque intérieure du MAXXFAN MINI,
placez le manchon par-dessus la plaque intérieure,
avec les câbles d’alimentation acheminés dans le
trou formé entre la plaque intérieure et le manchon.
ÉTAPE 8
Soulevez la plaque intérieure/le manchon au plafond
et assurez-vous que le manchon s’insère dans la
collerette sur le toit du MAXXFAN MINI. Veuillez
vous reporter aux longueurs de vis sur le tableau de
L’ÉTAPE 2 et utilisez les vis de longueur appropriée,
selon l’épaisseur du toit afin de fixer la plaque
intérieure à la collerette du toit, en vous assurant de
ne pas trop serrer les vis afin d’éviter des fissures ou
déformations de la plaque intérieure.
BAGUE ANTITRACTION
CÂBLES D’ALIMENTATION
DE 12 VOLTS C.C.
PORTE-FUSIBLE
CAPUCHONS DE
CONNEXION
CÂBLES D’ALIMENTATION
DE 12 VOLTS C.C.
PLAQUE INTÉRIEURE
MANCHON
ÉTAPE 9
Rebranchez l’alimentation principale du véhicule
au MAXXFAN MINI / MINI PLUS.
L’INSTALLATION DE VOTRE MAXXFAN MINI ou
MAXXFAN MINI PLUS EST TERMINÉE.
FONCTIONNEMENT DE VOTRE MAXXAIR
MAXXFAN
®
MINI / MAXXFAN MINI PLUS
Le fonctionnement de votre MAXXFAN MINI
implique simplement l’utilisation de l’interrupteur
de MISE EN MARCHE/EN ARRÊT (ON/OFF) pour
activer le ventilateur de tirage ou (facultativement)
l’éclairage à DEL. Ouvrez le déflecteur de la plaque
intérieure pour permettre une circulation maximale
de l’air. Fermez le déflecteur pour empêcher
l’infiltration de l’air lorsque le ventilateur de tirage
n’est pas utilisé.
INSTRUCTIONS D’ENTRETIEN POUR
L’UTILISATEUR
Remplacer le fusible de votre MAXXFAN MINI /
MAXXFAN MINI PLUS:
a. Retirez les 4 vis qui tiennent la plaque intérieure
et abaisser la plaque intérieure.
b. Trouvez le porte-fusible et retirez prudemment
le fusible en tournant le porte-fusible dans le
sens antihoraire.
c. Risque d’incendie. Remplacez le fusible par un
fusible de 125 volts, 5 A.
d. Placez une extrémité du fusible dans le côté
mâle du porte-fusible.
e. Vissez ensemble les deux moitiés du porte-
fusible en tournant dans le sens horaire, jusqu’à
ce que ce soit serré.
f. Soulevez la plaque intérieure/le manchon au
plafond et assurez-vous que le manchon s’insère
dans la collerette sur le toit du MINI.
g. Fixez la plaque intérieure à la collerette du toit en
utilisant les 4 vis, en prenant soin de ne pas trop
serrer les vis afin d’éviter des fissures ou des
déformations de la plaque intérieure.
Vous pouvez nettoyer votre MINI à l’aide d’un savon
doux et de l’eau seulement. Avant de retirer l’écran
pour le nettoyage, assurez-vous que le ventilateur
est tourné vers la position OFF. CAUTION: Ne
faites pas fonctionner le ventilateur lorsque le
moustiquaire est retiré.
Pour toute question, veuillez communiquer avec
le service à la clientèle de AIRXCEL/MAXXAIR
VENTILATION SOLUTIONS au 316-832-4357.
VIS (4)
PLAQUE INTÉRIEURE

- THIS PAGE INTENTIONALLY LEFT BLANK -
- CETTE PAGE EST INTENTIONNELLEMENT BLANK-

For additional product information please visit www.AIRXCEL.com
3050 N. St. Francis St. • Wichita, KS 67219 • 316.832.3400
PLACE CONSUMER LABEL HERE
-
 1
1
-
 2
2
-
 3
3
-
 4
4
-
 5
5
-
 6
6
-
 7
7
-
 8
8


Airxcel MAXXAIR MINI 3700 Installation Instructions, Information And Operating Manual
- Taper
- Installation Instructions, Information And Operating Manual
dans d''autres langues
- English: Airxcel MAXXAIR MINI 3700
Autres documents
-
Norcold NX64/NX84 Series Guide d'installation
-
-
-
-
Dometic Fan-Tastic 4301 Mode d'emploi
-
-
-
-
Dometic 4301 Manuel utilisateur
-
Dometic 3300 Fan-Tastic Vent Fans Manuel utilisateur