Panasonic CQDP383U Mode d'emploi
- Catégorie
- Récepteurs multimédia de voiture
- Taper
- Mode d'emploi

≥ Please read these instructions carefully before using this product and save this manual for future use.
≥ Prière de lire ces instructions attentivement avant d’utiliser Ie produit et garder ce manuel pour l’utilisation ultérieure.
≥ Lea con atención estas instrucciones antes de utilizar el producto y guarde este manual para poderlo consultar en el futuro.
Removable Front Panel MP3 WMA CD Player/Receiver
with CD Changer Control
Récepteur/lecteur CD MP3 WMA avec panneau avant
amovible et contrôle de changeur CD
Reproductor de CD MP3 WMA/Receptor con Controlador
de Cambiador de Discos y Panel Frontal Removible
Operating Instructions
Manuel d
’instructions
Manual de instrucciones
CQ-DP383U
Panasonic Consumer
Electronics Company, Division
of Matsushita Electric
Corporation of America
One Panasonic Way, Secaucus,
New Jersey 07094
http://www.panasonic.com
Panasonic Sales Company.
Division of Matsushita Electric
of Puerto Rico, Inc. (“PSC”)
Ave. 65 de Infanteria, Km. 9.5
San Gabriel Industrial Park,
Carolina, Puerto Rico 00985
http://www.panasonic.com
Panasonic Canada Inc.
5770 Ambler Drive,
Mississauga, Ontario
L4W 2T3
http://www.panasonic.ca
YFM284C374ZA TAMACO1202-0 Printed in China
Imprimé en Chine
Impreso en China

E
N
G
L
I
S
H
CQ-DP383U CQ-DP383U
2 3
F
R
A
N
Ç
A
I
S
E
S
P
A
Ñ
O
L
Find the model number and serial number on either
the back or bottom of the unit. Please record them
in the space below and retain this booklet as a per-
manent record of your purchase to help with identi-
fication in case of theft.
MODEL NUMBER CQ-DP383U
SERIAL NUMBER
DATE PURCHASED
FROM
CAUTION:
THIS PRODUCT IS A CLASS I LASER PRODUCT.
USE OF CONTROLS OR ADJUSTMENTS OR
PERFORMANCE OF PROCEDURES OTHER THAN
THOSE SPECIFIED HEREIN MAY RESULT IN
HAZARDOUS RADIATION EXPOSURE.
DO NOT OPEN COVERS AND DO NOT REPAIR
YOURSELF. REFER SERVICING TO QUALIFIED
PERSONNEL.
WARNING:
TO REDUCE THE RISK OF FIRE OR ELECTRIC
SHOCK, DO NOT EXPOSE THIS PRODUCT TO
RAIN OR MOISTURE.
TO REDUCE THE RISK OF FIRE OR ELECTRIC
SHOCK, AND ANNOYING INTERFERENCE, USE
ONLY THE INCLUDED COMPONENTS.
Safety Information
NOTICE:
This product has a fluorescent lamp that con-
tains a small amount of mercury. It also con-
tains lead in some components. Disposal of
these materials may be regulated in your com-
munity due to environmental considerations.
For disposal or recycling information please
contact your local authorities, or the
Electronics Industries Alliance:
<http://www.eiae.org.>
The following applies only in the U.S.A.
Part 15 of the FCC Rules
FCC Warning:
Any unauthorized changes or modifications to
this equipment would void the user’s authority to
operate this device.
Il est recommandé de noter, dans l’espace prévu
ci-dessous, les numéros de modèle et de série
inscrits soit à l’arrière soit sous le fond de
l’appareil, et de conserver ce manuel comme
mémorandum de l’achat afin de permettre
l’identification de l’appareil en cas de vol.
NUMÉRO DE MODÈLE CQ-DP383U
NUMÉRO DE SÉRIE
DATE DE L’ACHAT
VENDEUR
Busque el número del modelo y el número de serie
ya sea en la parte trasera o en el fondo de la unidad.
Sírvase anotar dichos números en el espacio
siguiente, y mantenga este librete como una
anotación permanente de su compra para
ayudar en la identificación en el caso de robo.
NÚMERO DEL MODELO CQ-DP383U
NÚMERO DE SERIE
FECHA DE COMPRA
NOMBRE DE LA TIENDA
ATTENTION:
CET APPAREIL EST UN PRODUIT LASER DE LA
CLASSE
I.
L’UTILISATION DE COMMANDES OU RÉGLAGES OU
L’EXÉCUTION D’OPÉRATIONS AUTRES QUE CELLES QUI
SONT INDIQUÉES DANS CE DOCUMENT PEUVENT
RÉSULTER EN UNE EXPOSITION À UN RAYONNEMENT
DANGEREUX.
N’OUVREZ PAS LES COUVERCLES ET N’ESSAYEZ PAS
D’EFFECTUER VOUS-MÊME DES RÉPARATIONS.
ADRESSEZ-VOUS À UN PERSONNEL QUALIFIÉ POUR
TOUTE RÉPARATION.
MISE EN GARDE:
POUR RÉDUIRE LES RISQUES D’INCENDIE OU
D’ÉLECTROCUTION, N’EXPOSEZ PAS CET APPAREIL À
LA PLUIE OU À L’HUMIDITÉ.
AFIN DE PRÉVENIR TOUT RISQUE D’INCENDIE OU
D’INTERFÉRENCES, UTILISER UNIQUEMENT LES
COMPOSANTS FOURNIS.
PRECAUCIÓN:
ÉSTE ES UN PRODUCTO LÁSER DE LA CLASE I.
LA UTILIZACIÓN DE CONTROLES, EL HACER AJUSTES
O EL SEGUIR PROCEDIMIENTOS DISTINTOS DE LOS
ESPECIFICADOS EN ESTE MANUAL PODRÍA CAUSAR
UNA EXPOSICIÓN PELIGROSA A LA RADIACIÓN.
NO ABRA LAS CUBIERTAS NI HAGA REPARACIONES
USTED MISMO. SOLICITE LOS TRABAJOS DE SERVICIO
AL PERSONAL CALIFICADO.
ADVERTENCIA:
PARA REDUCIR EL RIESGO DE INCENDIOS O
SACUDIDAS ELÉCTRICAS, NO EXPONGA ESTE
PRODUCTO A LA LLUVIA NI A LA HUMEDAD.
PARA REDUCIR EL RIESGO DE INCENDIOS O
SACUDIDAS ELÉCTRICAS, Y PARA EVITAR LAS
INTERFERENCIAS MOLESTAS, UTILICE SOLAMENTE
LOS COMPONENTES INCLUIDOS.
Consignes de sécurité
Información para su seguridad

E
N
G
L
I
S
H
E
N
G
L
I
S
H
CQ-DP383U CQ-DP383U
4 5
When Driving
Keep the volume level low enough to be aware of
road and traffic conditions.
When Washing Your Car
Do not expose the product, including the speakers
and CDs, to water or excessive moisture. This could
cause electrical shorts, fire, or other damage.
When Parked
Parking in direct sunlight can produce very high
temperatures inside your car. Give the interior a
chance to cool down before switching the unit on.
Use the Proper Power Supply
This product is designed to operate with a 12 V DC,
negative ground battery system (the normal system
in a North American car).
Disc Mechanism
Do not insert coins or any small objects. Keep
screwdrivers and other metallic objects away from
the disc mechanism and disc.
Use Authorized Servicenters
Do not attempt to disassemble or adjust this preci-
sion product. Please refer to the Servicenter list in-
cluding with this product for service assistance.
For Installation
This product should be installed in a horizontal po-
sition with the front end up at a convenient angle,
but not more than 30x.
Note:
≥ The preset memory is cleared to return to the
original factory setting when the power connector
or battery is disconnected.
Panasonic welcomes you to our ever growing family of electronic product owners. We know that this prod-
uct will bring you many hours of enjoyment. Our reputation is built on precise electronic and mechanical
engineering, manufactured with carefully selected components and assembled by people who take pride in
their work. Once you discover the quality, reliability, and value we have built into this product, you too will
be proud to be a member of our family.
Use this Product Safely
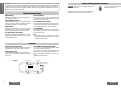
Features
Front speaker
Front speaker Rear speaker
Rear speaker
Power amplifier for
front and rear speakers
CQ-DP383U
CD changer
Example:
Large-sized Volume Control
An large-sized rotary volume control that looks like
one belonging to a Hi-Fi audio system is featured.
CD Changer Control
You need connect the optional CD changer unit. For
details, refer to the operating instructions on the CD
changer unit.
MP3/WMA Playback from CD-R/RW
You can play your MP3/WMA (Windows Media
Audio) files as well as regular CDs.
With up to 10 to 12 times* the capacity of a con-
ventional CD, a single MP3/WMA-encoded disc can
keep you entertained throughout your entire jour-
ney.
*Depending on data bit rate.
Before Reading these Instructions
This can only be controlled through the
main unit.
Operations with neither mark can be performed ei-
ther by the main unit or the remote control unit.
This can only be controlled through
the remote control unit.

E
N
G
L
I
S
H
E
N
G
L
I
S
H
CQ-DP383U CQ-DP383U
6 7
Safety Information. . . . . . . . . . . . . . . . . . . . . . . . . . . . . . . . . . . . . . . . Page 2
Use this Product Safely . . . . . . . . . . . . . . . . . . . . . . . . . . . . . . . . . . . . . . . 14
Features. . . . . . . . . . . . . . . . . . . . . . . . . . . . . . . . . . . . . . . . . . . . . . . . . . . . 4
Before Reading these Instructions. . . . . . . . . . . . . . . . . . . . . . . . . . . . . . . 15
❒ Accessories . . . . . . . . . . . . . . . . . . . . . . . . . . . . . . . . . . . . . . . . . . . . . 16
❒ Remote Control Unit Preparation . . . . . . . . . . . . . . . . . . . . . . . . . . . . 16
Battery installation, battery notes
❒ General. . . . . . . . . . . . . . . . . . . . . . . . . . . . . . . . . . . . . . . . . . . . . . . . . 17
Power (POWER), source (SRC), volume, muting, loudness
❒ Clock Set . . . . . . . . . . . . . . . . . . . . . . . . . . . . . . . . . . . . . . . . . . . . . . . 19
Time reset, display change
❒ Radio . . . . . . . . . . . . . . . . . . . . . . . . . . . . . . . . . . . . . . . . . . . . . . . . . . 20
Radio mode, band, tuning, display change, preset station setting, manual
preset memory, Auto Preset Memory (APM), preset station calling
❒ CD Player . . . . . . . . . . . . . . . . . . . . . . . . . . . . . . . . . . . . . . . . . . . . . . . 22
Listening to a CD, insert the disc, stop and eject the disc, pause, track
(file) selection, folder selection, fast forward/fast reverse, repeat play,
random play, folder random play (MP3/WMA only), folder repeat play
(MP3/WMA only), scan play, folder scan play (MP3/WMA only), display
change, direct track (file) selection, direct folder selection, text scroll,
ID3/WMA tag setting, notes on MP3/WMA
❒ CD Changer Control . . . . . . . . . . . . . . . . . . . . . . . . . . . . . . . . . . . . . . . 29
CD changer mode, disc selection, track selection, fast forward/fast
reverse, repeat play, disc repeat play, random play, disc random play,
scan play, disc scan play, display change, direct disc selection
❒ Audio Settings . . . . . . . . . . . . . . . . . . . . . . . . . . . . . . . . . . . . . . . . . . . 32
Volume, bass and treble, balance and fader
❒ Troubleshooting. . . . . . . . . . . . . . . . . . . . . . . . . . . . . . . . . . . . . . . . . . 34
Preliminary steps, if you suspect something wrong, troubleshooting tips,
error display messages, maintenance, product servicing, replacing the
fuse
❒ Maintenance. . . . . . . . . . . . . . . . . . . . . . . . . . . . . . . . . . . . . . . . . . . . . 41
Notes on CD-Rs/RWs, notes on CD/CD media (CD-ROM, CD-R, CD-RW)
❒ Installation Guide. . . . . . . . . . . . . . . . . . . . . . . . . . . . . . . . . . . . . . . . . 42
Remove the unit
❒ Anti-Theft System. . . . . . . . . . . . . . . . . . . . . . . . . . . . . . . . . . . . . . . . . 47
Place the removable face plate into case, install removable face plate
❒ Electrical Connections . . . . . . . . . . . . . . . . . . . . . . . . . . . . . . . . . . . . . 48
Caution, wiring diagram, upgrading the system
❒ Specifications. . . . . . . . . . . . . . . . . . . . . . . . . . . . . . . . . . . . . . . . . . . . 51
WELCOME
FM
MP3/WMA
Contents

E
N
G
L
I
S
H
2
17
CQ-DP383U
E
N
G
L
I
S
H
1
16
CQ-DP383U
General
Note:
≥ When the power is switched on for the
first time, a demonstration message ap-
pears on the display.
To cancel this display, press [DISP]
(display).
ACC
ON
Power (POWER)
Turn your car’s ignition key to ACC or ON
position.
ON: Press [POWER].
OFF: Press and hold [POWER] again on the
main unit for more than 1 second.
Press and hold [POWER] again on the
remote control unit for more than
2 second.
1
Source (SRC)
Press [SRC] (source) to change the source.
2
Radio
CD player
MP3/WMA player
CD changer control
or
(page 20)
(When a CD is in the
player.) (page 22)
(When a MP3/WMA data
disc is in the player.)
(page 22)
(When a CD changer
is connected.) (page 29)
Remote control signal sensor
Point the remote control unit at the main unit’s
sensor.
Remote Control Unit Preparation
1 Remove the battery holder.
Pull the battery holder by the position B while
pushing position A in the direction indicated by
the arrow.
2 Install the battery on the battery holder.
3 Insert the battery holder back into its original
position.
≥ Remove and dispose of an old battery immediately.
≥ Do not disassemble or short the battery. Do not
throw a battery into a fire.
≥ Keep batteries away from children to avoid the
risk of accidents.
≥ Be careful to observe proper local disposal rules
when you dispose of batteries.
Caution:
≥ Improper use of batteries may cause overheat-
ing, an explosion or ignition, resulting in injury
or a fire. Battery leakage may damage the unit.
Lithium battery
(included)
Back side
Position B
Position A
Battery holder
Battery Installation
Battery Notes
≥ Battery type: Panasonic lithium battery (CR2025)
(included)
≥ Battery life: Approximately 6 months with nor-
mal use (at room temperature)
[DISP] (display)
Accessories
64
97
5
Car Audio
SOURCE
MUTE
POWER
RAND
VOL
312
DISPBAND
REP
6
5
SET
SEL
#
SCAN
MENU
NUMBER
8
0
≥ Remote control unit
(1)
≥ Lithium battery
(CR2025) (1)
≥ Operating guide for
Sirius (1)
≥ Installation hardware
(screws, power con-
nector, etc.)
(page 42)
≥ Operating instruc-
tions (1)
64
97
5
Car Audio
SOURCE
MUTE
POWER
RAND
VOL
312
DISPBAND
REP
6
5
SET
SEL
#
SCAN
MENU
NUMBER
8
0
[SOURCE]
(power/source)
[DISP]
(display)
≥ Warranty card, etc.
For details on the Sirius mode, refer to the
separate operating guide for Sirius.
≥ To display the message again, press and
hold [SRC] (source) on the main unit for
more than 4 seconds when the power is
off.

E
N
G
L
I
S
H
19
CQ-DP383U
E
N
G
L
I
S
H
3
18
CQ-DP383U
E
N
G
L
I
S
H
4
Clock Set
The 12-hour system is used for the clock.
1 Press [DISP] (display).
2 Press and hold [DISP] (display) again for
more than 2 seconds.
Hours:
3 Press [%] or [$].
4 Press [DISP] (display).
Minutes:
5 Press [%] or [$].
6 Press [DISP] (display).
Note:
Displays before adjusting
the clock.
≥ Press and hold [%] or [$] to change numbers
rapidly.
1 Press and hold [DISP] (display) for more than
2 seconds.
2 Repeat steps
3
to
6
.
Press [DISP] (display).
When the power is off:
Clock display
Clock display
Hours blink.
Hours set.
Minutes blink.
Minutes set.
End.
Time Reset
Display Change
General (continued)
Press [
MUTE
].
Setting range: 0 to 40
(default: 18)
No sound.
lights.
Note:
≥ The sound level for each source is stored in mem-
ory.
(For radio, one volume setting for AM, one vol-
ume setting for all FMs)
[VOL "]
Up
[VOL #]
Down
To enhance bass and treble tones at low or medium
volume.
Press [LOUD] (loudness).
lights.
[DISP] (display)
Volume
Loudness
Turn [VOL].
[VOL "]: Up
[VOL #]: Down
Muting
Display off
[%][$] (hour/minute)
[VOL "]
[VOL #]
(volume)
[DISP]
(display)
[MUTE]
[%] [$]
(hour/minute)
64
97
5
Car Audio
SOURCE
MUTE
POWER
RAND
VOL
312
DISPBAND
REP
6
5
SET
SEL
#
SCAN
MENU
NUMBER
8
0
Press [LOUD] (loudness) again to cancel.
Press [MUTE] again to cancel.

CQ-DP383U CQ-DP383U
E
N
G
L
I
S
H
6
21
E
N
G
L
I
S
H
5
20
Band
Press [BAND].
2
Radio Mode
Press [SRC] (source) to change to the radio
mode.
1
Tuning
[$]: Up
[%]: Down
Press and hold [%] or [$] for more than
0.5 seconds, then release.
Seeking will start.
3
Radio mode display
Note:
≥ Existing saved stations are overwritten with new
stations after this procedure above.
1 Select a band. (previous page)
2 Press [1] to [6].
Caution:
≥ To ensure safety, never attempt to preset stations while you are driving.
Press [DISP] (display).
Radio mode display
(default)
Clock display
Band Frequency
FM stereo indicator
Manually save a station in the preset memory.
1 Select a band and frequency. (previous page)
2 Press and hold [1] to [6] for more than
2 seconds to memorize.
≥ The display blinks once, and a receiving sta-
tion is saved in the memory.
Automatically save stations with good reception in
the preset memory.
1 Select a band. (previous page)
2 Press and hold [APM] for more than 2 sec-
onds.
≥ The 6 stations with good reception will be auto-
matically saved in the memory under preset num-
ber 1 to 6.
≥ Once set, the preset stations are sequentially
scanned for 5 seconds each. (scanning)
≥ To stop the scanning, press [1] to [6].
Preset Station Setting
Preset Station Calling
Manual Preset Memory
Auto Preset Memory (APM)
Radio
[1] to [6] (preset station)
Preset number
Display Change
≥ Up to 6 stations each can be saved in the FM1,
FM2, FM3 and AM preset station memories.
[SOURCE]
[BAND]
(auto preset
memory)
[%] [$]
(tuning)
[1] to [6]
(preset station)
[DISP] (display)
64
97
5
Car Audio
SOURCE
MUTE
POWER
RAND
VOL
312
DISPBAND
REP
6
5
SET
SEL
#
SCAN
MENU
NUMBER
8
0
-
 1
1
-
 2
2
-
 3
3
-
 4
4
-
 5
5
-
 6
6
-
 7
7


Panasonic CQDP383U Mode d'emploi
- Catégorie
- Récepteurs multimédia de voiture
- Taper
- Mode d'emploi
dans d''autres langues
Documents connexes
-
Panasonic CQ-C8303U Manuel utilisateur
-
-
-
-
-
-
-
-
-