GE Profile PTD9000BNTS Le manuel du propriétaire
- Catégorie
- Micro-ondes
- Taper
- Le manuel du propriétaire
Ce manuel convient également à

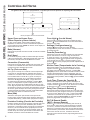
Write the model and serial
numbers here:
Model # _________________
Serial # _________________
You can find them on a label on
the side trim or on the front of the
(lower) oven behind the oven door.
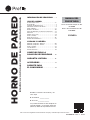
OWNER’S MANUAL
WALL OVEN
Direct Air Convection Built-In Electric
49-2000376 Rev. 5 10-23
GE is a trademark of the General Electric Company. Manufactured under trademark license.
30" Single Wall Oven
PTS9000
30" Double Wall Oven
PTD9000
SAFETY INFORMATION ..........3
USING THE OVEN
Oven Controls .........................6
Double Oven ..........................7
Settings ..............................7
Oven Door Camera .....................8
Sabbath ..............................9
Oven Racks ..........................10
Aluminum Foil and Oven Liners .........12
Cookware ............................12
Cooking Modes .......................13
Probe ...............................15
Cooking Guides ......................16
Dehydrating Guide ....................18
CARE AND CLEANING
Cleaning The Oven - Exterior .......... 20
Cleaning The Oven - Interior ...........21
Probe ...............................21
Oven Light ...........................22
Oven Door ...........................22
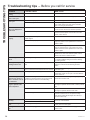
TROUBLESHOOTING TIPS ..... 24
LIMITED WARRANTY .......... 26
ACCESSORIES ...................27
CONSUMER SUPPORT ..........28
ENGLISH / FRANÇAIS /
ESPAÑOL

THANK YOU FOR MAKING GE APPLIANCES A PART OF YOUR HOME.
Whether you grew up with GE Appliances, or this is your first, we’re happy to have you in the family.
We take pride in the craftsmanship, innovation and design that goes into every GE Appliances
product, and we think you will too. Among other things, registration of your appliance ensures that we
can deliver important product information and warranty details when you need them.
Register your GE appliance now online. Helpful websites and phone numbers are available in the
Consumer Support section of this Owner’s Manual. You may also mail in the pre-printed registration
card included in the packing material.

49-2000376 Rev. 5 3
READ AND SAVE THESE INSTRUCTIONS
IMPORTANT SAFETY INFORMATION
READ ALL INSTRUCTIONS BEFORE USING THE APPLIANCE
SAFETY INFORMATION
WARNING Read all safety instructions before using the product. Failure to follow these instructions may result
in fire, electrical shock, serious injury or death.
WARNING GENERAL SAFETY INSTRUCTIONS
Ŷ 8VHWKLVDSSOLDQFHRQO\IRULWVLQWHQGHGSXUSRVHDV
described in the Owner’s Manual.
Ŷ%HVXUH\RXUDSSOLDQFHLVSURSHUO\LQVWDOOHGDQG
grounded by a qualified installer in accordance with
the provided installation instructions.
Ŷ'RQRWDWWHPSWWRUHSDLURUUHSODFHDQ\SDUWRI\RXU
oven unless it is specifically recommended in this
manual. All other servicing should be performed by a
qualified technician.
Ŷ%HIRUHSHUIRUPLQJDQ\VHUYLFHGLVFRQQHFWWKH
power supply at the household distribution panel by
removing the fuse or switching off the circuit breaker.
Ŷ,IWKHKHDWLQJHOHPHQWLQWKHDSSOLDQFHGHYHORSV
a glowing spot or shows other signs of damage,
do not use that area of the appliance. A glowing
spot indicates the element may fail and present
a potential burn, fire, or shock hazard. Turn the
appliance off immediately and have heating element
replaced by a qualified service technician.
Ŷ%HVXUHDOOSDFNLQJPDWHULDOVDUHUHPRYHGIURPWKH
appliance before operating to prevent ignition of
these materials.
Ŷ$YRLGVFUDWFKLQJRULPSDFWLQJJODVVGRRUVRUFRQWURO
SDQHOV'RLQJVRPD\OHDGWRJODVVEUHDNDJH
Ŷ'RQRWFRRNRQDSURGXFWZLWKEURNHQJODVV6KRFN
fire, or cuts may occur.
Ŷ'RQRWOHDYHFKLOGUHQDORQH²FKLOGUHQVKRXOGQRW
be left alone or unattended in an area where an
appliance is in use. They should never be allowed to
climb, sit or stand on any part of the appliance.
Ŷ CAUTION 'RQRWVWRUHLWHPVRILQWHUHVWWR
children in cabinets above an appliance - children
climbing on the oven to reach items could be
seriously injured.
Ŷ 1HYHUXVH\RXUDSSOLDQFHIRUZDUPLQJRUKHDWLQJ
the room.
Ŷ8VHRQO\GU\SRWKROGHUV²PRLVWRUGDPSSRWKROGHUV
RQKRWVXUIDFHVPD\UHVXOWLQEXUQVIURPVWHDP'R
QRWOHWSRWKROGHUVWRXFKKRWKHDWLQJHOHPHQWV'R
not use a towel or other bulky cloth in place of pot
holders.
Ŷ'RQRWWRXFKWKHKHDWLQJHOHPHQWVRUWKHLQWHULRU
surface of the oven. These surfaces may be hot
enough to burn even though they are dark in color.
Ŷ'XULQJDQGDIWHUXVHGRQRWWRXFKRUOHWFORWKLQJ
or other flammable materials contact any interior
area of the oven; allow sufficient time for cooling
first. Other surfaces of the appliance may become
hot enough to cause burns. Potentially hot surfaces
include the oven vent opening, surfaces near the
opening and crevices around the oven door.
Ŷ'RQRWXVHDQ\W\SHRIIRLORUOLQHUWRFRYHUWKH
bottom of the oven or anywhere in the oven, except
as described in the Owner’s Manual. Oven liners can
trap heat or melt, resulting in damage to the product
and risk of shock, smoke or fire.
Ŷ'RQRWKHDWXQRSHQHGIRRGFRQWDLQHUV3UHVVXUH
could build up and the container could burst, causing
an injury.
Ŷ&RRNIRRGWKRURXJKO\WRKHOSSURWHFWDJDLQVW
foodborne illness. Minimum safe food temperature
UHFRPPHQGDWLRQVDUHSURYLGHGE\WKH86'$
DQG)'$8VHDIRRGWKHUPRPHWHUWRWDNHIRRG
temperatures and check several locations.
WARNING KEEP FLAMMABLE MATERIALS AWAY FROM THE OVEN
Failure to do so may result in fire or personal injury.
Ŷ 'RQRWVWRUHRUXVHIODPPDEOHPDWHULDOVLQDQRYHQ
including paper, plastic, pot holders, linens, wall
coverings, curtains, drapes and gasoline or other
flammable vapors and liquids.
Ŷ 1HYHUZHDUORRVHILWWLQJRUKDQJLQJJDUPHQWVZKLOH
using the appliance. These garments may ignite if
they contact hot surfaces, causing severe burns.
Ŷ 'RQRWOHWFRRNLQJJUHDVHRURWKHUIODPPDEOH
materials accumulate in or near the oven. Grease in
the oven or near the oven may ignite.
Ŷ Remote Operation - This appliance is configurable
WRDOORZUHPRWHRSHUDWLRQDWDQ\WLPH'RQRWVWRUH
any flammable materials or temperature sensitive
items inside of the appliance.

449-2000376 Rev. 5
SAFETY INFORMATION
READ AND SAVE THESE INSTRUCTIONS
IMPORTANT SAFETY INFORMATION
READ ALL INSTRUCTIONS BEFORE USING THE APPLIANCE
WARNING IN THE EVENT OF A FIRE, TAKE THE FOLLOWING
STEPS TO PREVENT INJURY AND FIRE SPREADING
Ŷ 'RQRWXVHZDWHURQJUHDVHILUHV1HYHUSLFNXS
a flaming pan. Turn the controls off. Smother a
flaming pan on a surface unit by covering the pan
completely with a well-fitting lid, cookie sheet or flat
WUD\8VHDPXOWLSXUSRVHGU\FKHPLFDORUIRDPW\SH
fire extinguisher.
Ŷ ,IWKHUHLVDILUHLQWKHRYHQGXULQJEDNLQJVPRWKHU
the fire by closing the oven door and turning the
oven off or by using a multi-purpose dry chemical or
foam-type fire extinguisher.
Ŷ ,IWKHUHLVDILUHLQWKHRYHQGXULQJVHOIFOHDQWXUQ
WKHRYHQRIIDQGZDLWIRUWKHILUHWRJRRXW'RQRW
IRUFHWKHGRRURSHQ,QWURGXFWLRQRIIUHVKDLUDWVHOI
clean temperatures may lead to a burst of flame
from the oven. Failure to follow this instruction may
result in severe burns.
WARNING OVEN SAFETY INSTRUCTIONS
Ŷ 6WDQGDZD\IURPWKHUDQJHZKHQRSHQLQJWKHRYHQ
door. Hot air or steam which escapes can cause
burns to hands, face and/or eyes.
Ŷ ,IWKHKHDWLQJHOHPHQWLQWKHDSSOLDQFHGHYHORSV
a glowing spot or shows other signs of damage,
do not use that area of the appliance. A glowing
spot indicates the element may fail and present
a potential burn, fire, or shock hazard. Turn the
appliance off immediately and have heating element
replaced by a qualified service technician.
Ŷ 3XOOLQJRXWWKHUDFNVWRWKHLUVWRSORFNVRUIXOO\RSHQ
SRVLWLRQLVDFRQYHQLHQFHLQOLIWLQJKHDY\IRRGV,WLV
also a precaution against burns from touching hot
surfaces of the doors or oven walls.
Ŷ .HHSWKHRYHQYHQWXQREVWUXFWHG
Ŷ 1HYHUSODFHFRRNLQJXWHQVLOVSL]]DRUEDNLQJVWRQHV
or any type of foil or liner on the oven floor. These
items can trap heat or melt, resulting in damage to
the product and risk of shock, smoke or fire.
Ŷ 3ODFHRYHQUDFNVLQGHVLUHGORFDWLRQZKLOHRYHQLV
FRRO,IUDFNPXVWEHPRYHGZKLOHRYHQLVKRWEH
careful to avoid touching hot surfaces and do not let
pot holder contact hot heating element in oven.
Ŷ 'RQRWOHDYHLWHPVVXFKDVSDSHUFRRNLQJXWHQVLOV
RUIRRGLQWKHRYHQZKHQQRWLQXVH,WHPVVWRUHGLQ
an oven can ignite.
Ŷ 1HYHUEURLOZLWKWKHGRRURSHQ
Ŷ .HHSWKHRYHQIUHHIURPJUHDVHEXLOGXS*UHDVHLQ
the oven may ignite.
Ŷ :KHQXVLQJFRRNLQJRUURDVWLQJEDJVLQWKHRYHQ
follow the manufacturer’s directions.
Ŷ SHOCK OR BURN HAZARD: %HIRUHUHSODFLQJRYHQ
light bulb, disconnect the electrical power to the oven
at the main fuse or circuit breaker panel. Failure to
do so may result in electric shock or burn.
Ŷ CAUTION
BURN HAZARD: The glass cover
and bulb should be removed when cool. Touching
hot glass with bare hands or a damp cloth can cause
burns.
WARNING SELF-CLEANING OVEN SAFETY INSTRUCTIONS
The self-cleaning feature operates the oven at temperatures high enough to burn away food soils in the oven.
Follow these instructions for safe operation.
Ŷ 'RQRWWRXFKRYHQVXUIDFHVGXULQJVHOIFOHDQ
RSHUDWLRQ.HHSFKLOGUHQDZD\IURPWKHRYHQGXULQJ
self-cleaning. Failure to follow these instructions
may cause burns.
Ŷ %HIRUHRSHUDWLQJWKHVHOIFOHDQF\FOHUHPRYHSDQV
shiny metal oven racks, any aluminum foil, and
other utensils from the oven. Only dark-colored
porcelain-coated oven racks may be left in the
oven. Failure to do so may cause damage to these
items and the oven and present a potential burn or
fire hazard.
Ŷ %HIRUHRSHUDWLQJWKHVHOIFOHDQF\FOHZLSHJUHDVH
and food soils from the oven. Excessive amount of
grease may ignite leading to smoke damage to your
home.

49-2000376 Rev. 5 5
SAFETY INFORMATION
READ AND SAVE THESE INSTRUCTIONS
IMPORTANT SAFETY INFORMATION
READ ALL INSTRUCTIONS BEFORE USING THE APPLIANCE
NOTE: Some cooking functions and features are not available until after you WiFi connect your new oven to your
local home wireless network. Please follow the instructions on the oven control and the WiFi & Remote Enable
section of this guide. This provides capability to use SmartHQ app functions and ensures that the oven has the latest
software.
WARNING SELF-CLEANING OVEN SAFETY INSTRUCTIONS (Cont.)
Ŷ ,IWKHVHOIFOHDQLQJPRGHPDOIXQFWLRQVWXUQWKH
oven off and disconnect the power supply. Have it
serviced by a qualified technician.
Ŷ 'RQRWXVHDSURWHFWLYHFRDWLQJWROLQHWKHRYHQDQG
do not use commercial oven cleaner unless certified
for use in a self-cleaning oven.
Ŷ 'RQRWFOHDQWKHGRRUJDVNHWV7KHGRRUJDVNHWV
are essential for a good seal. Care should be taken
not to rub, damage or move the gaskets.
Ŷ IMPORTANT: The health of some birds is extremely
sensitive to the fumes given off during the self-
cleaning cycle of any range. Move birds to another
well-ventilated room.
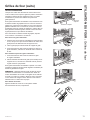
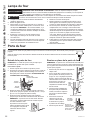
How to Remove Protective Shipping Film and Packaging Tape
Carefully grasp a corner of the protective shipping film
with your fingers and slowly peel it from the appliance
VXUIDFH'RQRWXVHDQ\VKDUSLWHPVWRUHPRYHWKHILOP
Remove all of the film before using the appliance for the
first time.
To assure no damage is done to the finish of the product,
the safest way to remove the adhesive from packaging
tape on new appliances is an application of a household
liquid dishwashing detergent. Apply with a soft cloth and
allow to soak.
NOTE:7KHDGKHVLYHPXVWEHUHPRYHGIURPDOOSDUWV,W
cannot be removed if it is baked on.
Consider recycling options for your appliance packaging
material.
The remote enable equipment installed on this oven
has been tested and found to comply with the limits for
D&ODVV%GLJLWDOGHYLFHSXUVXDQWWRSDUWRIWKH)&&
Rules. These limits are designed to:
(a) provide reasonable protection against harmful
interference in a residential installation. This equipment
generates, uses and can radiate radio frequency energy
and, if not installed and used in accordance with the
instructions, may cause harmful interference to radio
communications. However, there is no guarantee that
LQWHUIHUHQFHZLOOQRWRFFXULQDSDUWLFXODULQVWDOODWLRQ,I
this equipment does cause harmful interference to radio
or television reception, which can be determined by
turning the equipment off and on, the user is encouraged
to try to correct the interference by one or more of the
following measures:
Ŷ5HRULHQWRUUHORFDWHWKHUHFHLYLQJDQWHQQD
Ŷ,QFUHDVHWKHVHSDUDWLRQEHWZHHQWKHHTXLSPHQWDQG
receiver.
Ŷ&RQQHFWWKHHTXLSPHQWLQWRDQRXWOHWRQDFLUFXLW
different from that to which the receiver is connected.
Ŷ&RQVXOWWKHGHDOHURUDQH[SHULHQFHGUDGLR79
technician for help.
(b) accept any interference received, including
interference that may cause undesired operation of the
device.
Note that any changes or modifications to the wireless
communication device installed on this oven that are not
expressly approved by the manufacturer could void the
user's authority to operate the equipment.
PROPER DISPOSAL OF YOUR APPLIANCE
'LVSRVHRIRUUHF\FOH\RXUDSSOLDQFHLQDFFRUGDQFHZLWK)HGHUDODQG/RFDO5HJXODWLRQV&RQWDFW\RXUORFDO
authorities for the environmentally safe disposal or recycling of your appliance.

649-2000376 Rev. 5
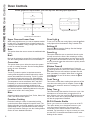
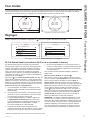
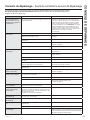
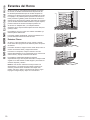
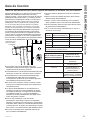
Oven Controls
USING THE OVEN: Oven Controls
Upper Oven and Lower Oven
When using a double oven you can set separate modes
in each oven. The selected oven will appear above the
cooking modes. NOTE: ,I XVLQJ D VLQJOH RYHQ WKHUH ZLOO
not be an oven selection.
Bake
This option allows the user to access the traditional bake
mode.
Broil
%URLO FDQ EH VHOHFWHG WR DFFHVV %URLO /RZ DQG %URLO +LJK
See the Cooking Modes section for more information.
Convection
This option allows you to utilize the convection system
to cook in a variety of modes. See the Cooking Modes
section for more information.
Air Fry
The Air Fry mode is a special, no-preheat convection
cooking mode designed to produce foods with a crispier
exterior than traditional oven cooking. The Air Fry mode
is intended for single rack cooking only. Select Air Fry,
then select the desired set temperature and press Start.
The temperature can be set between 300°F and 500°F.
Preheating is not recommended for this mode. Follow
traditional oven recipe or package guidelines for set
temperatures and cook times; adjust cook time to achieve
your desired crispness. Additional guidelines for using this
mode can be found in the Cooking Guide.
More
Select this option to access the Proof, Probe, Warm, Self
Clean, and Steam Clean options.
Precision Cooking
Precision Cooking is a suite of customized cooking
cycles that have been designed for specific foods. The
display will guide you through setting the oven and food
appropriately for the cycle selected. Precision cooking
cycles vary based on food type; see the Cooking Modes
section for more detailed information.
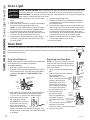
Oven Light
To turn on or off the oven cavity lights, press the %RWK
cavity lights will be illuminated if using a double oven.
Settings
Press the to access the Settings. See the Settings
section for more information.
Favorite
This option allows the user to save their favorite cycles
for easy access in the future. After selecting a cooking
mode and setting the temperature and any timers, press
the to save it as a favorite for future use. After saving
a cycle, press the on the main menu to quickly access
the saved mode.
Kitchen Timer
This feature works as a countdown timer. Press the
, select the amount of time for the timer to operate, and
press Set. The oven will continue to operate once the
timer countdown is complete. When timer is complete,
press Dismiss. To turn off the timer, select the and
press Cancel.
Cook Time
This function counts down cooking time and turns off the
oven when the cooking time is complete. Press the
during a cycle, select the amount of cooking time, and
press Set.
Delay Time
7KLV IHDWXUH GHOD\V WKH VWDUW WLPH IRU DQ RYHQ F\FOH 8VH
this feature to set a time when you want the oven to
start. Select a cycle, then press the . Select the time of
day for the oven to turn on and press Set. A cook time
can also be programmed if desired.
Wi-Fi & Remote Enable
Press
GET CONNECTED
to connect your oven to Wi-Fi.
This option allows you to download content to your
oven and control it remotely. The oven must be
connected to Wi-Fi before Remote Enable can be
activated. For instructions on how to connect your oven,
see the Wi-Fi Connect/Remote Enable section under
Settings in this manual.
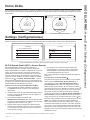
Single Wall Oven Main Menu
12:30 PM
GET CONNECTED
Bake Broil Convection Precision
Cooking
Smart
Home More
'RXEOH :DOO 2YHQ 0DLQ 0HQXV
Bake Broil Convection Precision
Cooking
Smart
Home More
UPPER OVEN
12:30 PM
Bake Broil Convection More
LOWER OVEN
12:30 PM
12:30 PM
UPPER OVEN
LOWER OVEN
GET CONNECTED
Control graphics are representative; your oven may have alternate graphic appearances.

49-2000376 Rev. 5 7
USING THE OVEN: 'RXEOH 2YHQ 6HWWLQJV
Double Oven
When using both cavities to cook, the control will allow you to switch back and forth between the upper and lower
oven to review the cycle selection for each. When viewing the cooking mode screen you can access the alternate
cavity by pressing on the banner at the top or bottom of the screen.
* Compatible Apple or Android devices and home Wi-Fi network required.
Settings
There are numerous settings that are accessed by pressing in the top right corner of the main screen.
Wi-Fi & Remote Enable
This appliance is configurable to allow remote operation
DW DQ\ WLPH 'R QRW VWRUH DQ\ IODPPDEOH PDWHULDOV RU
WHPSHUDWXUH VHQVLWLYH LWHPV LQVLGH %\ XVLQJ WKH :L)L
Connect feature, you will be able to control essential
oven operations such as temperature settings, timers
and cooking modes using your smartphone or tablet.*
Select the then Wi-Fi & Remote Enable - follow the
LQVWUXFWLRQV RQ \RXU RYHQ GLVSOD\ DQG SKRQH DSS ,W LV
necessary to turn on Wi-Fi before using Remote Enable
on your oven.
Connecting your Wi-Fi Connect Enabled oven
Have your smart phone or tablet ready with the ability
to access the internet and download apps.
2. You will need to know the password of your home
Wi-Fi router. Have this password ready while you are
setting up your GE Appliances oven.
3. On your smart phone or tablet, visit
GEAppliances.com/connect to learn more about
connected appliance features and to download the
app to connect to your oven.
4. Follow the onscreen instructions in the app to connect
your GE Appliances oven. When connected, your
oven should show that it is connected to your home
Wi-Fi network.
5. ,I WKHUH DUH LVVXHV FRQQHFWLQJ ZLUHOHVVO\ WR \RXU RYHQ
please call 800.220.6899 and ask for assistance
regarding oven wireless connectivity.
To connect additional smart devices, repeat steps 3 and 4.
Remote Starting your Oven
To be able to start the oven remotely once connected
to Wi-Fi, press Remote Enable on the main menu or
access Wi-Fi & Remote Enable in the settings menu
and turn Remote Enable on. The oven can now be
started remotely using a connected device. The icon
must be active to start the oven remotely. To disconnect
your phone from Remote Enable, access the Wi-Fi &
Remote Enable settings and turn Remote Enable off.
NOTE: )RRGV WKDW VSRLO HDVLO\²VXFK DV PLON HJJV ILVK
VWXIILQJV SRXOWU\ DQG SRUN²VKRXOG QRW EH DOORZHG WR
VLW IRU PRUH WKDQ KRXU EHIRUH RU DIWHU FRRNLQJ 5RRP
WHPSHUDWXUH SURPRWHV WKH JURZWK RI KDUPIXO EDFWHULD %H
sure that the oven light is off because heat from the bulb
will speed harmful bacteria growth.
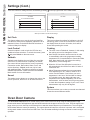
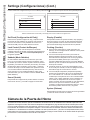
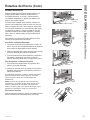
SETTINGS
LOCK CONTROL
SABBATH
SOUND
SET CLOCK
Wi-Fi & REMOTE ENABLE
12:30 PM
COOKING
SYSTEM
SETTINGS
SABBATH
SOUND
DISPLAY
12:30 PM
Slide up and down to access all the settings
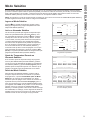
TO LOWER OVEN BAKE 400°F
12:30 PM
350
°F
PREHEATED
BAKE
CANCEL
BAKE 350°F
TO UPPER OVEN 12:30 PM
BAKE
400
PREHEATED
°F
CANCEL
8SSHU 2YHQ %DNH &\FOH /RZHU 2YHQ %DNH &\FOH

849-2000376 Rev. 5
USING THE OVEN: Settings
Settings (Cont.)
There are numerous settings that are accessed by pressing in the top right corner of the main screen.
Set Clock
This feature allows you to set the clock and specifies
how the time of day will be displayed. Options are for a
VWDQGDUG KRXU FORFN ZLWK $0 DQG 30 VHOHFWLRQV RU
24-hour military time display.
Lock Control
6HOHFW WKLV RSWLRQ LQ RUGHU WR ORFN WKH /&' IURP DQ\
undesired screen selections. To unlock the screen, press
and press Unlock on the next screen.
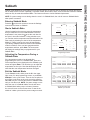
Sabbath
Sabbath mode disables the oven lights (the oven light
will not turn on when the door is opened), all sounds
(the control will not beep when the screen is pressed),
&RQYHFWLRQ PRGHV %URLO PRGHV :DUP 3URRI DQG
all time functions. Sabbath mode can only be used
ZLWK WUDGLWLRQDO %DNH 7KLV IHDWXUH FRQIRUPV WR -HZLVK
Sabbath requirements. Please reference the Sabbath
Mode section for more information.
Sound
This setting screen allows you to change the volume, the
end of cycle tone, and turn on or off the touch sound.
Display
This screen shows the options for brightness, clock off,
and energy saver. Clock off will remove the clock from
the display when the screen is inactive, but it will be
shown after pressing the screen.
Cooking
Ŷ The oven is set to Fahrenheit, however, in this setting
the cooking unit can be changed to Celsius.
Ŷ Auto Recipe Conversion can be turned on in order
to automatically reduce the programmed cooking
WHPSHUDWXUH IRU &RQYHFWLRQ %DNH RU &RQYHFWLRQ %DNH
0XOWL 1RWH WKDW WKLV ZLOO RQO\ UHGXFH WKH FRRNLQJ
temperature, not the baking time.
Ŷ :KHQ WKH +RXU 6KXW 2II RSWLRQ LV WXUQHG RQ LW
ZLOO DXWRPDWLFDOO\ VKXW RII WKH RYHQ DIWHU KRXUV RI
continuous use.
Ŷ Adjust Temperature allows the oven temperature
to be adjusted up to 35°F hotter or down to 35°F
FRROHU 8VH WKLV IHDWXUH LI \RX EHOLHYH \RXU RYHQ
temperature is too hot or cold and wish to change
it. For double ovens, the upper and lower oven
WHPSHUDWXUHV DUH DGMXVWHG VHSDUDWHO\ 'R QRW XVH
thermometers, such as those found in grocery stores,
to check the temperature setting of your oven. These
thermometers may vary 20–40 degrees.
System
This screen allows you to clear your saved user data and
shows the current software version.
SETTINGS
LOCK CONTROL
SABBATH
SOUND
SET CLOCK
Wi-Fi & REMOTE ENABLE
12:30 PM
COOKING
SYSTEM
SETTINGS
SABBATH
SOUND
DISPLAY
12:30 PM
Slide up and down to access all the settings
Oven Door Camera
The Oven Door Camera allows for remote viewing of the center of the oven cavity using the Café Appliances app.
'RZQORDG WKH ODWHVW &DIp $SSOLDQFHV DSS DQG IROORZ LQVWUXFWLRQV LQ WKH DSS WR FRQQHFW \RXU RYHQ )URP WKH DSSV KRPH
page, select your oven, then tap on the camera icon to start the camera stream to your smart device. The oven lights
will illuminate while the camera is streaming. The camera stream will stop if the oven door is opened, and is not allowed
during certain modes such as Proof and Self Clean. Turn off camera streaming in the app to resume normal oven light
operation.

49-2000376 Rev. 5 9
USING THE OVEN: Settings / Sabbath
Sabbath
Sabbath mode disables the oven lights (the oven light will not turn on when the door is opened), all sounds (the control
ZLOO QRW EHHS ZKHQ WKH VFUHHQ LV SUHVVHG &RQYHFWLRQ PRGHV %URLO PRGHV :DUP 3URRI DQG DOO WLPH IXQFWLRQV 6DEEDWK
PRGH FDQ RQO\ EH XVHG ZLWK WUDGLWLRQDO %DNH 7KLV IHDWXUH FRQIRUPV WR -HZLVK 6DEEDWK UHTXLUHPHQWV
NOTE: ,I D SRZHU RXWDJH RFFXUV GXULQJ ZKHQ WKH RYHQ LV LQ 6DEEDWK 0RGH WKH XQLW ZLOO UHWXUQ WR 6DEEDWK 0RGH
when power is restored.
Entering Sabbath Mode
Press the on the main screen to access the Settings
menu and scroll down to Sabbath.
Start a Sabbath Bake
8VH WKH NH\SDG RQ WKH VFUHHQ WR HQWHU WKH WHPSHUDWXUH
WKDW \RX ZRXOG OLNH WR XVH IRU 6DEEDWK %DNH 2QFH WKH
temperature is set, press the to set the cook time for
WKH F\FOH LQ KRXUV DQG PLQXWHV ,I XVLQJ D GRXEOH RYHQ
you can then set the temperature and time desired for the
other cavity by selecting it to the left of the temperature
GLVSOD\ ,I D WLPHU LV QRW VHW WKH RYHQ ZLOO VWDUW D EDNH
cycle during Sabbath mode and continue until Sabbath
mode is turned off. Once you have programmed the
temperature and time, press Start. The next screen
will display the settings that you programmed for your
6DEEDWK %DNH
Adjusting the Temperature During a
Sabbath Bake
,I WKH WHPSHUDWXUH QHHGV WR EH DGMXVWHG DIWHU
SURJUDPPLQJ WKH RYHQ IRU D 6DEEDWK %DNH SUHVV RQH
of the temperature icons displayed on the Sabbath cycle
screen and press Enter. This will allow you to adjust the
WHPSHUDWXUH IRU WKH F\FOH 1RWH WKDW WKH GLVSOD\ ZLOO QRW
show that the oven temperature has been changed.
Exit the Sabbath Mode
To exit Sabbath mode, either press the X in the upper
right corner if in the programming screen, or press Exit
Sabbath if in the cycle screen. There is also an option to
turn off the cycle when on the cycle screen by pressing
Turn Off, but your oven will still remain in Sabbath mode
until you exit the mode. NOTE: ,I D SRZHU RXWDJH RFFXUV
while the oven is in Sabbath Mode, the unit will return
to Sabbath Mode when power is restored, however
the oven will return to the off state even if it was in the
middle of a bake cycle when the power outage occurred.
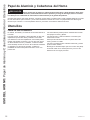
SABBATH
ENTER TURN OFFOven On
EXIT SABBATH
12:30 PM
Select temperature, then press ENTER to edit.
200°F 250°F 300°F 350°F 400°F
SABBATH EXIT SABBATH
Select temperature, then press ENTER to edit.
5:30ENTER TURN OFFUpper Oven On
250°F200°F 300°F 350°F 400°F
5:30ENTER TURN OFFLower Oven On
250°F200°F 300°F 350°F 400°F
12:30 PM
Programming Screens
6LQJOH DQG 'RXEOH 2YHQ
Sabbath Cycle Screens
12:30 PM
SABBATH
BAKE TEMP
UPPER OVEN
LOWER OVEN
123
456
789
0
i
--- °F
START
12:30 PM
SABBATH
BAKE TEMP 123
456
789
0
i
--- °F
START

49-2000376 Rev. 5
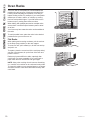
USING THE OVEN: Oven Racks
Your oven has six rack positions. Recommended rack
positions for various types of foods are provided in the
Cooking Guide. Adjusting rack position is one way to
impact cooking results. For example, if you would prefer
darker tops on cakes, muffins, or cookies, try moving
IRRGRQHUDFNSRVLWLRQKLJKHU,I\RXILQGIRRGVDUHWRR
brown on top try moving them down next time.
When baking with multiple pans and on multiple racks,
ensure there is sufficient space between pans to allow
air to flow.
Your Oven may have extension racks and/or traditional
flat racks.
To avoid possible burns, place the racks in the desired
position before you turn the oven on.
Flat Racks
When placing and removing cookware, pull the rack out
to the bump (stop position) on the rack support.
To remove a rack, pull it toward you, tilt the front end up
and pull it out.
To replace, place the curved end of the rack (stop-locks)
onto the oven supports, tilt up the front of the rack and
push the rack in.
Racks may become difficult to slide, especially after
a self-clean. Put some vegetable oil on a soft cloth or
paper towel and rub onto the left and right edges.
NOTE: 8VLQJRWKHUFRRNLQJRLOVZLOOFDXVHDGLVFRORULQJ
or a rust like color residue on the racks and cavity sides.
To clean this residue, use a soap and water or a vinegar
and water solution. Rinse with clean water and dry with
a soft cloth.
Oven Racks

49-2000376 Rev. 5
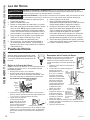
USING THE OVEN: Oven Racks
Oven Racks (Cont.)
Extension Racks
Always pull the rack out by its upper front rail to its fully
open position, when placing or removing cookware.
Extension racks cannot be used in the top rack position.
,IH[WHQVLRQUDFNVDUHGLIILFXOWWRH[WHQGOXEULFDWHWKH
racks with the graphite lubricant provided with your
oven. Remove the rack from the oven, remove debris in
the side tracks with a paper towel, shake the graphite
lubricant and place 4 small drops on the two bottom
tracks of the left and right sides. Open and close the
rack several times to distribute the lubricant.
To order additional graphite lubricant, read the
Accessories section of the manual.
To Remove An Extension Rack:
0DNHVXUHWKHUDFNLVSXVKHGDOOWKHZD\LQWRWKHRYHQ
so that side paddles on the rack disengage from the
oven support.
2. Slide the rack toward you to the bump (stop position)
on the rack support.
3. Firmly grasp both sides of the rack frame and the
sliding rack, tilt the front end up and pull it out.
To Replace An Extension Rack:
)LUPO\JUDVSERWKVLGHVRIWKHUDFNIUDPHDQGWKH
sliding rack.
2. Place the curved end of the rack (stop-locks) onto
the oven supports, tilt up the front of the rack and
push it in as far as it will go.
,IH[WHQVLRQUDFNVDUHGLIILFXOWWRUHSODFHRUUHPRYHZLSH
WKHRYHQUDFNVXSSRUWVZLWKYHJHWDEOHRLO'RQRWZLSHRLO
on the rack slides.
NOTE: 8VLQJRWKHUFRRNLQJRLOVZLOOFDXVHDGLVFRORULQJ
or a rust like color residue on the racks and cavity sides.
To clean this residue, use a soap and water or a vinegar
and water solution. Rinse with clean water and dry with
a soft cloth.
To Lubricate the Paddle:
Shake lubricant and apply to the moving parts of the
paddle mechanisms as shown.
8SSHU)URQW
Rail
Fully Open Position
Grasp here

49-2000376 Rev. 5
CAUTION Do not use any type of foil or oven liner to cover the oven bottom. These items can trap heat
or melt, resulting in damage to the product and risk of shock, smoke or fire. Damage from improper use of
these items is not covered by the product warranty.
)RLOPD\EHXVHGWRFDWFKVSLOOVE\SODFLQJDVKHHWRQDORZHUUDFNVHYHUDOLQFKHVEHORZWKHIRRG'RQRWXVHPRUH
IRLOWKDQQHFHVVDU\DQGQHYHUHQWLUHO\FRYHUDQRYHQUDFNZLWKDOXPLQXPIRLO.HHSIRLODWOHDVW´IURPRYHQZDOOV
to prevent poor heat circulation.
Aluminum Foil and Oven Liners
Cookware Guidelines
The material, finish, and size of cookware affect baking
performance.
'DUNFRDWHGDQGGXOOSDQVDEVRUEKHDWPRUHUHDGLO\
than light, shiny pans. Pans that absorb heat more
readily can result in a browner, crisper, and thicker crust.
,IXVLQJGDUNDQGFRDWHGFRRNZDUHFKHFNIRRGHDUOLHU
WKDQPLQLPXPFRRNWLPH,IXQGHVLUDEOHUHVXOWVDUH
obtained with this type of cookware consider reducing
oven temperature by 25º F next time.
Shiny pans can produce more evenly cooked baked
goods such as cakes and cookies.
Glass and ceramic pans heat slowly but retain heat well.
These types of pans work well for dishes such as pies
and custards.
Air insulated pans heat slowly and can reduce bottom
browning.
.HHSFRRNZDUHFOHDQWRSURPRWHHYHQKHDWLQJ
Cookware used in broil modes and air fry must be broil-
safe.
USING THE OVEN:$OXPLQXP)RLODQG2YHQ/LQHUV&RRNZDUH*XLGHOLQHV

49-2000376 Rev. 5
Cooking Modes
Your new oven has a variety of cooking modes to help you get the best results. These modes are described below.
Refer to the Cooking Guide section for recommendations for specific foods. Remember, your new oven may perform
differently than the oven it is replacing.
Baking and Roasting Modes
Select a mode for baking and roasting based on the
type and quantity of food you are preparing. When
preparing baked goods such as cakes, cookies, and
pastries always preheat the oven first. Follow recipe
UHFRPPHQGDWLRQVIRUIRRGSODFHPHQW,IQRJXLGHOLQHVDUH
provided, center food in the oven.
Traditional Bake
The traditional bake mode is intended for single rack
cooking. This mode uses heat primarily from the lower
element but also from the upper element to cook food.
To use this mode press Bake, enter a temperature, and
then press Start. Preheating is generally recommended
when using this mode.
Convection Bake with Direct Air
7KH&RQYHFWLRQ%DNHPRGHLVLQWHQGHGIRUVLQJOHUDFN
cooking. This mode uses heat from the lower element
and also the upper and rear elements, along with air
movement directly down from the top of the oven to
enhance evenness. Your oven is equipped with Auto
Recipe Conversion, so it is not necessary to convert the
temperature when using this mode. To use this mode
press Bake under Convection, enter a temperature, and
then press Start. Preheating is generally recommended
when using this mode.
Convection Bake Multi Rack
7KH&RQYHFWLRQ%DNH0XOWL5DFNPRGHLVLQWHQGHG
for baking on multiple racks at the same time. This
mode uses heat primarily from the rear element but
also heat from the upper and lower elements, along
with air movement from the convection fan to enhance
cooking evenness. Your oven is equipped with Auto
Recipe Conversion, so it is not necessary to convert the
WHPSHUDWXUHZKHQXVLQJWKLVPRGH%DNLQJWLPHPLJKW
be slightly longer for multiple racks than what would be
expected for a single rack. To use this mode press Bake
Multi Rack under Convection, enter a temperature, and
then press Start. Always preheat when using this mode.
Convection Roast with Direct Air
The Convection Roast mode is intended for roasting
whole cuts of meat on a single rack. This mode uses
heat from the lower, upper, and rear elements along with
air movement directly down from the top of the oven
WRLPSURYHEURZQLQJDQGUHGXFHFRRNLQJWLPH,WLVQRW
necessary to convert temperature. Check food earlier
than the recipe suggested time when using this mode,
or use the probe. To use this mode press Roast under
Convection, enter a temperature, and then press Start.
,WLVQRWQHFHVVDU\WRSUHKHDWZKHQXVLQJWKLVPRGH
Broiling Modes
Always broil with the door closed. The broil element in
this oven is very powerful. Monitor food closely while
EURLOLQJ8VHFDXWLRQZKHQEURLOLQJRQXSSHUUDFN
positions as placing food closer to the broil element
increases smoking, spattering, and the possibility
of fats igniting. Broiling on rack position 6 is not
recommended.
Try broiling foods that you would normally grill. Adjust
rack positions to adjust the intensity of the heat to the
food. Place foods closer to the broil element when a
seared surface and rare interior is desired. Thicker foods
and foods that need to be cooked through should be
broiled on a rack position farther from the broiler or by
XVLQJ7UDGLWLRQDO%URLO/RRU&RQYHFWLRQ%URLO/R)RU
best performance, center food below the broil heating
element.
Traditional Broil Hi
7KH7UDGLWLRQDO%URLO+LPRGHXVHVLQWHQVHKHDWIURPWKH
XSSHUHOHPHQWWRVHDUIRRGV8VH%URLO+LIRUWKLQQHUFXWV
of meat and/or foods you prefer less done on the interior.
To use this mode press Broil, select High, and then
press Start,WLVQRWQHFHVVDU\WRSUHKHDWZKHQXVLQJ
this mode.
Traditional Broil Lo
7KH7UDGLWLRQDO%URLO/RPRGHXVHVOHVVLQWHQVHKHDW
from the upper element to cook food thoroughly while
DOVRSURGXFLQJVXUIDFHEURZQLQJ8VH%URLO/RIRUWKLFNHU
cuts of meat and/or foods that you would like cooked all
the way through. To use this mode press Broil, select
Low, and then press Start,WLVQRWQHFHVVDU\WRSUHKHDW
when using this mode.
USING THE OVEN: Cooking Modes

49-2000376 Rev. 5
USING THE OVEN: Cooking Modes
Cooking Modes (Cont.)
Convection Broil Hi with Direct Air
7KH &RQYHFWLRQ %URLO +L PRGH XVHV LQWHQVH KHDW IURP WKH
upper element along with air movement directly down from
the top of the oven for improved searing and browning. To
use this mode press Convection, press Broil, select High,
and then press Start. For best results preheat 5 minutes
when using this mode.
Convection Broil Lo with Direct Air
7KH &RQYHFWLRQ %URLO /R PRGH XVHV OHVV LQWHQVH KHDW
from the upper element along with air movement directly
down from the top of the oven.
To use this mode press
Convection, press Broil, select Low, and then press
Start.
For best results preheat 5 minutes when using this
mode.
Air Fry
The Air Fry mode is a special, no-preheat convection
cooking mode designed to produce foods with a crispier
exterior than traditional oven cooking. The Air Fry mode
is intended for single rack cooking only. Select Air Fry,
then input the desired set temperature and press Start.
The temperature can be set between 300°F and 500°F.
Preheating is not recommended for this mode. Follow
traditional oven recipe or package guidelines for set
temperatures and cook times; adjust cook time to achieve
your desired crispness. Additional guidelines for using this
mode can be found in the Cooking Guide.
Proof
Proof mode is designed for rising (fermenting and
proofing) bread doughs. Press the Proof pad and then
press Start. Cover dough well to prevent drying out.
%UHDG ZLOO ULVH PRUH UDSLGO\ WKDQ DW URRP WHPSHUDWXUH
Warm
Warm mode is designed to keep hot foods hot for up to
3 hours. To use this mode, press the Warm pad then
press Start. Cover foods that need to remain moist and
do not cover foods that should be crisp. Preheating is
QRW UHTXLUHG 'R QRW XVH ZDUP WR KHDW FROG IRRG RWKHU
WKDQ FULVSLQJ FUDFNHUV FKLSV RU GU\ FHUHDO ,W LV DOVR
recommended that food not be kept warm for more than
2 hours.
Precision Cooking
These modes provide guidance or pre-set cooking
algorithms to assist the user in cooking various types of
food. The selection you make in the Precision Cooking
menu will guide you
to input the information required to
help cook your food. At the end of estimated cooking
time, check the food to see if it is done to your liking.
1RWH WKDW GLIIHUHQFHV LQ IRRG VKDSH SUHSDUDWLRQ DQG
preferences for doneness can impact the time required
to cook the food.
Some cycles require the food temperature probe
supplied with your oven. The target temperature for the
probe is automatically set based on selections made
for each food. Always check foods using a secondary
food thermometer as probe placement can impact the
measured temperature. See Probe section for more
details on using and positioning the probe properly.
On some screens iwill show up. Press i to access
additional information that pertains to the cooking cycles
within the category.
Additional cycles will be available through software
updates. Connect your oven to have access to these
updates. See the WiFi Connect section for details on
how to connect your oven.

49-2000376 Rev. 5
Probe
USING THE OVEN: Probe
,QWHUQDOIRRGWHPSHUDWXUHLVIUHTXHQWO\XVHGDVDQLQGLFDWRURIGRQHQHVVHVSHFLDOO\IRUURDVWVDQGSRXOWU\7KH3UREH
mode monitors the internal food temperature and turns the oven off when the internal food temperature reaches the
programmed temperature.
WARNING
Consuming undercooked food can result in foodborne illness. Use probe according to
the following instructions to ensure all portions of the food reach minimum safe cooking temperatures.
Recommendations for minimum safe food temperatures can be found at foodsafety.gov or IsItDoneYet.gov.
Always check the temperature at multiple locations in the food with a food thermometer after cooking to
ensure that all portions of the food have reached the minimum safe internal temperature for that food.
Proper Probe Placement
After preparing the meat and placing it on the cooking
pan follow these instructions for proper probe placement.
Ŷ ,QVHUWWKHSUREHLQWRWKHIRRGVRWKDWWKHWLSRIWKH
probe will rest in the center of the thickest part of
the food. For best performance the probe should
EHIXOO\LQVHUWHGLQWRWKHIRRG,IWKHSUREHLVQRW
located properly, it may not accurately measure the
temperature of the coolest portion of the food. Some
foods, particularly small items, are not well suited for
cooking with the probe due to their shape or size.
Ŷ 7KHSUREHVKRXOGQRWWRXFKERQHIDWRUJULVWOH
Ŷ )RUZKROHSRXOWU\LQVHUWWKHSUREHLQWRWKHWKLFNHVW
part of the breast.
Ŷ )RUERQHOHVVURDVWVLQVHUWWKHSUREHLQWRWKHFHQWHU
of the roast.
Ŷ )RUERQHLQKDPRUODPELQVHUWWKHSUREHLQWRWKH
center of the lowest large muscle or joint.
Ŷ )RUFDVVHUROHVRUGLVKHVVXFKDVPHDWORDILQVHUWWKH
probe into the center of the dish.
Ŷ )RUILVKLQVHUWWKHSUREHIURPMXVWDERYHWKHJLOOLQWR
the meatiest area, parallel to the backbone.
Probe Usage
To use the probe without preheating:
,QVHUWWKHSUREHLQWRWKHIRRGVHH3URSHU3UREH
Placement).
2. Place the food in the oven and connect the probe into
the probe outlet in the oven(s).
3. Select the desired cooking mode and temperature.
%HIRUHSUHVVLQJVWDUWSUHVVWKHProbe icon at the
bottom right of the screen. The probe setting screen
will be displayed. Enter the desired internal food
temperature and press Start. The probe temperature
FDQEHVHWEHWZHHQ)DQG)
To use the probe with preheating:
3UHVVWKHGHVLUHGFRRNPRGH7UDGLWLRQDOBake,
Convection Bake, or Convection Roast) pad and
enter the desired cooking temperature.
,QVHUWWKHSUREHLQWRWKHIRRGVHH3URSHU3UREH
Placement). Place the food in the oven and connect
the probe into the probe outlet in the oven(s).
3. Once the oven is preheated, place the food in the
oven and connect the probe to the probe outlet,
PDNLQJVXUHLWLVIXOO\LQVHUWHG8VHFDXWLRQWKHRYHQ
walls and probe outlet are hot.
4. The oven will detect that the probe has been inserted
and the probe setting screen will be displayed. Enter
the desired internal food temperature and press
Start. The probe temperature can be set between
)DQG)
Probe Care Guidelines
NOTE: some double oven models have a probe in the
upper oven only.
Ŷ 8VHRISUREHVRWKHUWKDQWKHRQHSURYLGHGZLWKWKLV
product may result in damage to the probe.
Ŷ 8VHWKHKDQGOHVRIWKHSUREHDQGSOXJZKHQLQVHUWLQJ
and removing them from the meat and outlet
Ŷ 7RDYRLGGDPDJLQJ\RXUSUREHGRQRWXVHWRQJVWR
pull on the cable when removing it.
Ŷ 7RDYRLGEUHDNLQJWKHSUREHPDNHVXUHIRRGLV
completely defrosted before inserting the probe.
Ŷ 7RSUHYHQWSRVVLEOHEXUQVGRQRWXQSOXJWKHSUREH
from the outlet until the oven has cooled.
Ŷ 1HYHUOHDYHWKHSUREHLQVLGHWKHRYHQGXULQJDVHOIRU
steam clean cycle.
Ŷ 'RQRWVWRUHWKHSUREHLQWKHRYHQ

49-2000376 Rev. 5
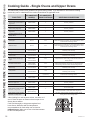
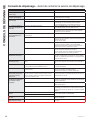
Cooking Guide - Single Ovens and Upper Ovens
USING THE OVEN: &RRNLQJ*XLGH6LQJOH2YHQVDQG8SSHU2YHQV
FOOD TYPE
RECOMMENDED
MODE(S)
RECOMMENDED
RACK POSITION(S) ADDITIONAL SUGGESTIONS
Baked Goods
/D\HUFDNHVVKHHWFDNHVEXQGW
cakes, muffins, quick breads on a
Single Rack
&RQYHFWLRQ%DNH
7UDGLWLRQDO%DNH 38VHVKLQ\FRRNZDUH
/D\HUFDNHVRQ0XOWLSOH5DFNV &RQYHFWLRQ%DNH0XOWL 2 and 4 Ensure adequate airflow (see illustration below).
Chiffon cakes (angel food) &RQYHFWLRQ%DNH
7UDGLWLRQDO%DNH 8VHVKLQ\FRRNZDUH
Cookies, biscuits, scones on a
Single Rack
&RQYHFWLRQ%DNH
7UDGLWLRQDO%DNH 38VHVKLQ\FRRNZDUH
Cookies, biscuits, scones on
Multiple Racks &RQYHFWLRQ%DNH0XOWL 2 and 4 Ensure adequate airflow.
Beef & Pork
Hamburgers %URLO+L 5 ext.
8VHDEURLOSDQPRYHIRRGGRZQIRUPRUHGRQHQHVVOHVVVHDULQJ
Watch food closely when broiling. For best performance, center
food below the broil heating element.
Steaks & Chops %URLO+L 5 ext.
8VHDEURLOSDQPRYHIRRGGRZQIRUPRUHGRQHQHVVOHVVVHDULQJ
Watch food closely when broiling. For best performance, center
food below the broil heating element.
Roasts 7UDGLWLRQDO%DNH
Convection Roast RU /HDYHXQFRYHUHGXVHDORZVLGHGSDQVXFKDVDEURLOSDQ
Preheating is not necessary.
Poultry
Whole chicken 7UDGLWLRQDO%DNH
Convection Roast 28VHDORZVLGHGSDQVXFKDVDEURLOSDQ
Preheating is not necessary.
%RQHLQFKLFNHQEUHDVWVOHJV
thighs
%URLO/R
7UDGLWLRQDO%DNH
Convection Roast
2 or 3
%URLOVNLQVLGHGRZQILUVW:DWFKIRRGFORVHO\ZKHQEURLOLQJ)RU
best performance when broiling, center food below the broil
heating element.
%RQHOHVVFKLFNHQEUHDVWV
%URLO/R
7UDGLWLRQDO%DNH
Convection Roast
2 or 3
Move food down for more doneness/less searing and up for
greater searing/browning when broiling. For best performance
when broiling, center food below the broil heating element.
Whole turkey 7UDGLWLRQDO%DNH
Convection Roast RU 8VHDORZVLGHGSDQVXFKDVDEURLOSDQ
Preheating is not necessary.
7XUNH\%UHDVW 7UDGLWLRQDO%DNH
Convection Roast RU 8VHDORZVLGHGSDQVXFKDVDEURLOSDQ
Preheating is not necessary.
Fish %URLO/R WKLFNRUOHVV
!LQFK
Watch food closely when broiling. For best performance, center
food below the broil heating element.
Casseroles &RQYHFWLRQ%DNH
7UDGLWLRQDO%DNH 3
Frozen Convenience Foods
Pizza on a single rack &RQYHFWLRQ%DNH
7UDGLWLRQDO%DNH 38VHVKLQ\FRRNZDUH
Pizza on multiple racks &RQYHFWLRQ%DNH0XOWL 2 and 4 8VHVKLQ\FRRNZDUH
Potato products, chicken nuggets,
appetizers on single racks
&RQYHFWLRQ%DNH
7UDGLWLRQDO%DNH 3
8VHVKLQ\FRRNZDUHZKHQXVLQJWUDGLWLRQDOEDNH
and convection bake.
Air Fry (on single and
upper ovens only) 8VHGDUNFRRNZDUHRUFRRNLHVKHHWZKHQXVLQJ$LU)U\
Potato products, chicken nuggets,
appetizers on multiple racks &RQYHFWLRQ%DNH0XOWL 2 and 4 8VHVKLQ\FRRNZDUH6ZLWFKIRRGORFDWLRQSDUWLDOO\WKURXJK
cooking for more even cooking results.
*When baking four cake layers at a time, use racks on 2
and 4. Place the pans as shown so that one pan is not
directly above another.
Cook food thoroughly to help protect against food
borne illness. Minimum safe food temperature
recommendations for food safety can be found at
IsItDoneYet.gov. Make sure to use a food thermometer
to take food temperatures.
7KHWDEOHEHORZSURYLGHVVRPHJXLGHOLQHVIRUW\SLFDOFRRNLQJPRGHV,I\RXZRXOGOLNHWRXVH3UHFLVLRQ&RRNLQJ
modes they can be substituted for the modes shown below for applicable foods.

49-2000376 Rev. 5
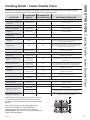
Cooking Guide - Lower Double Oven
FOOD TYPE
RECOMMENDED
MODE(S)
RECOMMENDED
RACK POSITION(S) ADDITIONAL SUGGESTIONS
Baked Goods
/D\HUFDNHVVKHHWFDNHVEXQGW
cakes, muffins, quick breads on a
Single Rack
&RQYHFWLRQ%DNH
7UDGLWLRQDO%DNH 38VHVKLQ\FRRNZDUH
/D\HUFDNHVRQ0XOWLSOH5DFNV &RQYHFWLRQ%DNH0XOWL H[WDQGIODW Ensure adequate airflow (see illustration below).
Chiffon cakes (angel food) &RQYHFWLRQ%DNH
7UDGLWLRQDO%DNH 8VHVKLQ\FRRNZDUH
Cookies, biscuits, scones on a
Single Rack
&RQYHFWLRQ%DNH
7UDGLWLRQDO%DNH 38VHVKLQ\FRRNZDUH
Cookies, biscuits, scones on
Multiple Racks &RQYHFWLRQ%DNH0XOWL H[WDQGIODW Ensure adequate airflow.
Beef & Pork
Hamburgers %URLO+L 5 ext.
8VHDEURLOSDQPRYHIRRGGRZQIRUPRUHGRQHQHVVOHVVVHDULQJ
Watch food closely when broiling. For best performance, center
food below the broil heating element.
Steaks & Chops %URLO+L 5 ext.
8VHDEURLOSDQPRYHIRRGGRZQIRUPRUHGRQHQHVVOHVVVHDULQJ
Watch food closely when broiling. For best performance, center
food below the broil heating element.
Roasts 7UDGLWLRQDO%DNH
Convection Roast RU /HDYHXQFRYHUHGXVHDORZVLGHGSDQVXFKDVDEURLOSDQ
Preheating is not necessary.
Poultry
Whole chicken 7UDGLWLRQDO%DNH
Convection Roast 28VHDORZVLGHGSDQVXFKDVDEURLOSDQ
Preheating is not necessary.
%RQHLQFKLFNHQEUHDVWVOHJV
thighs
%URLO/R
7UDGLWLRQDO%DNH
Convection Roast
2 or 3
%URLOVNLQVLGHGRZQILUVW:DWFKIRRGFORVHO\ZKHQEURLOLQJ)RU
best performance when broiling, center food below the broil
heating element.
%RQHOHVVFKLFNHQEUHDVWV
%URLO/R
7UDGLWLRQDO%DNH
Convection Roast
2 or 3
Move food down for more doneness/less searing and up for
greater searing/browning when broiling. For best performance
when broiling, center food below the broil heating element.
Whole turkey 7UDGLWLRQDO%DNH
Convection Roast RU 8VHDORZVLGHGSDQVXFKDVDEURLOSDQ
Preheating is not necessary.
7XUNH\%UHDVW 7UDGLWLRQDO%DNH
Convection Roast RU 8VHDORZVLGHGSDQVXFKDVDEURLOSDQ
Preheating is not necessary.
Fish %URLO/R WKLFNRUOHVV
!LQFK
Watch food closely when broiling. For best performance, center
food below the broil heating element.
Casseroles &RQYHFWLRQ%DNH
7UDGLWLRQDO%DNH 3
Frozen Convenience Foods
Pizza on a single rack &RQYHFWLRQ%DNH
7UDGLWLRQDO%DNH 38VHVKLQ\FRRNZDUH
Pizza on multiple racks &RQYHFWLRQ%DNH0XOWL H[WDQGIODW 8VHVKLQ\FRRNZDUH
Potato products, chicken nuggets,
appetizers on single racks
&RQYHFWLRQ%DNH
7UDGLWLRQDO%DNH 3
8VHVKLQ\FRRNZDUHZKHQXVLQJWUDGLWLRQDOEDNH
and convection bake.
Air Fry (on single and
upper ovens only) 8VHGDUNFRRNZDUHRUFRRNLHVKHHWZKHQXVLQJ$LU)U\
Potato products, chicken nuggets,
appetizers on multiple racks &RQYHFWLRQ%DNH0XOWL H[WDQGIODW 8VHVKLQ\FRRNZDUH6ZLWFKIRRGORFDWLRQSDUWLDOO\WKURXJK
cooking for more even cooking results.
*When baking four cake layers at a time, use racks on
H[WHQVLRQDQGIODWIRUDORZHUGRXEOHRYHQ3ODFH
the pans as shown so that one pan is not directly above
another.
Cook food thoroughly to help protect against food
borne illness. Minimum safe food temperature
recommendations for food safety can be found at
IsItDoneYet.gov. Make sure to use a food thermometer
to take food temperatures.
7KHWDEOHEHORZSURYLGHVVRPHJXLGHOLQHVIRUW\SLFDOFRRNLQJPRGHV,I\RXZRXOGOLNHWRXVH3UHFLVLRQ&RRNLQJ
modes they can be substituted for the modes shown below for applicable foods.
/RZHUGRXEOHRYHQ
USING THE OVEN: &RRNLQJ*XLGH/RZHU'RXEOH2YHQ

49-2000376 Rev. 5
USING THE OVEN: Cooking Guide
Cooking Guide
Air Fry Cooking Guide
Air Fry is a special, no-preheat, cooking mode that
is designed to produce foods with a crispier exterior
than traditional oven cooking. Select Air Fry, then
input the desired set temperature and press Start. The
temperature can be set between 300°F and 500°F.
Air Fry Cookware Guidelines
• Only use broil safe cookware when using Air Fry mode.
• A dark sheet pan is recommended. A dark pan
promotes better browning and crisping.
• Oven baking baskets and baking grids can also be
used. A sheet pan should be placed on the rack below
the foods to catch any drippings when using a baking
basket.
General Tips for Air Fry Mode
• The Air Fry mode is designed for cooking on a single
rack.
• The Air Fry mode is designed to be used without
preheating.
5DFN SRVLWLRQ LV UHFRPPHQGHG IRU PRVW IRRGV,I
foods are browning too rapidly try using a lower rack
position.
• Foods may cook faster than expected if the oven is
already hot when food is placed in the oven.
• When air frying foods with sauce, it is recommended to
apply the sauce at the end of cooking.
,I IRRGV DUH EURZQLQJ WRR TXLFNO\ WU\ D ORZHU UDFN
position or lower oven set temperature.
• For packaged foods, use traditional oven cooking
instructions for set temperature and expected cook
time.
,W LV QRW QHFHVVDU\ WR IOLS RU VWLU IRRG GXULQJ FRRNLQJ
• Arrange food in a single layer on the pan, do not
overload the pan.
• Always check internal food temperature to confirm
minimum safe temperatures have been reached.
Minimum safe food temperatures can be found on
packages and at IsItDoneYet.gov.
FOOD TYPE
RECOMMENDED
RACK POSITION(S)
RECOMMENDED
SET TEMPERATURES (F°)
RECOMMENDED
COOK TIME (MIN) NOTES
Fresh boneless fish or
poultry pieces, breaded such
as nuggets, tenders, fillets
3 extension 375-400 8VHU ORZHU VHW WHPSHUDWXUHV IRU ODUJHU SLHFHV
8VH VKLQ\ FRRNZDUH
Fresh bone in
chicken wings 3 extension 375-400 25-40 Salt wings or coat in a dry rub, if using sauce
apply after cooking or toward the end of cooking
Fresh bone in chicken
drumsticks or thighs 3 extension 375-400 30-55 8VHU ORZHU VHW WHPSHUDWXUHV IRU ODUJHU SLHFHV
Fresh French fries,
thin (< ½ inch) 3 extension 400-425
Parchment paper is recommended when
preparing fresh French fries. For crispier fries,
toss fries in corn starch or rice flour before
cooking.
Fresh French fries,
thick (> ½ inch) 3 extension 375-400 20-35
Parchment paper is recommended when
preparing fresh French fries. For crispier fries,
toss fries in corn starch or rice flour before
cooking.
Frozen packaged
foods 3 extension
8VH WUDGLWLRQDO RYHQQRW $LU )U\ FRRNLQJ LQVWUXFWLRQV DV D JXLGHOLQH IRU VHW WHPSHUDWXUH DQG FRRN WLPH$GGLWLRQDO
FRRN WLPH EH\RQG UHFRPPHQGHG SDFNDJH WLPH PD\ EH UHTXLUHG IRU VRPH IRRGV ,I RYHQ LV KRW ZKHQ VWDUWLQJ IRRG
may cook faster than the minimum package time.
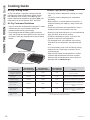
Primary recommended cookware
Alternate cookware options

49-2000376 Rev. 5
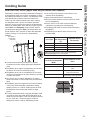
DEHYDRATING GUIDE (upper oven only on double oven models)
'HK\GUDWHLVDVSHFLDOFRQYHFWLRQPRGHWKDWLVGHVLJQHG
for dehydrating foods such as fruits, vegetables or herbs,
and making fruit leathers or jerkies. The dehydrate mode
uses airflow and low heat to remove moisture from
foods. The door must be partially open when running
WKHGHK\GUDWHPRGH8VHWKHGRRUVSDFHUSURYLGHG
with your oven to prop the door open to the appropriate
position as shown below. Once the door prop is in place,
select More, then Dehydrate, then input the desired
set temperature and press Start. The temperature can
EHVHWEHWZHHQ)DQG):KHQWKHGHK\GUDWH
PRGHLVUXQQLQJKRXUVKXWRIILVDXWRPDWLFDOO\
disabled.
Ŷ&RQVXOWRQOLQHDQGERRNUHIHUHQFHVIRUGHWDLOHG
information on how to safely and properly dehydrate
foods.
Ŷ'HK\GUDWLQJDWWRRKLJKRIDWHPSHUDWXUHFDQSUHYHQW
the interior of foods from sufficiently drying.
Ŷ'HK\GUDWLQJDWWRRORZRIDWHPSHUDWXUHRUWRRVORZO\
can allow microorganisms to grow resulting in spoilage
or food borne illness.
Ŷ'RQRWRQO\UHO\RQH[WHULRUDSSHDUDQFHRUWH[WXUH
check food interior to ensure that foods are sufficiently
dried.
Ŷ'HK\GUDWLQJWLPHVDUHLPSDFWHGE\WKHLQLWLDOFRQGLWLRQ
of the food, ambient humidity, temperature setting,
quantity of food, etc. Thinner, smaller pieces of foods
will dehydrate more quickly than thicker or larger
pieces.
Ŷ)RUEHVWSHUIRUPDQFHZKHQXVLQJWKHGHK\GUDWHPRGH
use grids or racks with small spacing that allow air to
reach food from all sides. These can be placed directly
on your oven rack. Parchment paper or silicone
baking mats can be used for dehydrating purees.
Ŷ,WLVQRUPDOWRVHHPRLVWXUHRQWKHLQWHULRURYHQ
surfaces when dehydrating.
Ŷ6RPHIRRGVEHQHILWIURPDSUHWUHDWPHQW
Ŷ5HPRYHH[FHVVPRLVWXUHIURPWKHH[WHULRURIIRRGV
prior to dehydrating.
Ŷ3LHUFHFKHFNRUFXWIRRGVVXFKDVEOXHEHUULHV
cranberries or grapes prior to dehydrating.
Ŷ3HULRGLFDOO\EORWPHDWVWRUHPRYHH[FHVVIDWGXULQJ
dehydrating.
Ŷ'HK\GUDWLQJPRUHWKDQUDFNVDWDWLPHLVQRW
recommended.
Food Type
Recommended
Set Temperature
(°F)
Expected Drying
Time (hours)
Fruits 4 - 36
Herbs
0HDW-HUN\
9HJHWDEOHV 3 - 24
0HDWVKRXOGEHKHDWHGWR)EHIRUHGHK\GUDWLQJ
See fsis.usda.gov for more information
Number of Oven Racks
Used During Dehydrate
Mode
Rack Positions in Your
Oven
UDFN 3 (flat or extension rack)
2 racks 2 (extension rack) and 4 (flat
rack)
3 racks 2 (flat rack), 3 (extension
rack) and 5 (flat rack)
4 racks 2 (flat rack), 3 (flat rack),
4 (flat rack), and 5 (flat rack)
'RRU6SDFHUWR
be used when
dehydrating
Cooking Guide
USING THE OVEN: Cooking Guide

20 49-2000376 Rev. 5
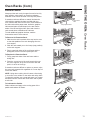
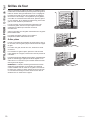
%HVXUHHOHFWULFDOSRZHULVRIIDQGDOOVXUIDFHVDUHFRROEHIRUHFOHDQLQJDQ\SDUWRIWKHUDQJH
Control Panel
To lock the controls, press in the bottom left corner
DQGIROORZLQVWUXFWLRQVRQWKHGLVSOD\,QVWUXFWLRQVIRU
XQORFNLQJDUHYLVLEOHZKHQWKHGLVSOD\LVORFNHG,W¶V
a good idea to wipe the control panel after each use.
Clean with mild soap and water or vinegar and water,
rinse with clean water and polish dry with a soft cloth.
'RQRWXVHDEUDVLYHFOHDQVHUVVWURQJOLTXLGFOHDQVHUV
plastic scouring pads or oven cleaners on the control
SDQHO²WKH\ZLOOGDPDJHWKHILQLVK
Oven Exterior
'RQRWXVHRYHQFOHDQHUVDEUDVLYHFOHDQVHUVVWURQJ
liquid cleansers, steel wool, plastic scouring pads, or
cleaning powders on the exterior of the oven. Clean with
a mild soap and water or vinegar and water solution.
Rinse with clean water and dry with a soft cloth. When
cleaning surfaces, make sure that they are at room
temperature and not in direct sunlight.
,IVWDLQRQWKHGRRUYHQWWULPLVSHUVLVWHQWXVHDPLOG
abrasive cleaner and a sponge-scrubber for best results.
Spillage of marinades, fruit juices, tomato sauces and
basting liquids containing acids may cause discoloration
DQGVKRXOGEHZLSHGXSLPPHGLDWHO\/HWKRWVXUIDFHV
cool, then clean and rinse.
Cleaning The Oven - Exterior
Painted Surfaces and Black Stainless Steel (on some models)
Painted surfaces may include the door and trim around
the control panel. Clean these with soap and water or a
vinegar and water solution.
'RQRWXVHFRPPHUFLDORYHQFOHDQHUVFOHDQLQJ
powders, steel wool or harsh abrasives on any painted
VXUIDFHLQFOXGLQJ%ODFN6WDLQOHVV6WHHO
Stainless Steel - Excluding Black Stainless Steel (on some models)
'RQRWXVHDVWHHOZRROSDGLWZLOOVFUDWFKWKHVXUIDFH
To clean the stainless steel surface, use warm sudsy
water or a stainless steel cleaner or polish. Always wipe
the surface in the direction of the grain. Follow the cleaner
instructions for cleaning the stainless steel surface.
&OHDQHUVZLWKR[DOLFDFLGVXFKDV%DU.HHSHUV)ULHQG6RIW
Cleanser™ will remove surface rust, tarnish and small
EOHPLVKHV8VHRQO\DOLTXLGFOHDQVHUIUHHRIJULWDQGUXELQ
the direction of the brush lines with a damp, soft sponge.
To inquire about purchasing cleaning products including
stainless steel appliance cleaner or polish, see the
Accessories and Consumer Support sections at the end of
this manual.
CARE AND CLEANING: Cleaning The Oven -Exterior
La page est en cours de chargement...
La page est en cours de chargement...
La page est en cours de chargement...
La page est en cours de chargement...
La page est en cours de chargement...
La page est en cours de chargement...
La page est en cours de chargement...
La page est en cours de chargement...
La page est en cours de chargement...
La page est en cours de chargement...
La page est en cours de chargement...
La page est en cours de chargement...
La page est en cours de chargement...
La page est en cours de chargement...
La page est en cours de chargement...
La page est en cours de chargement...
La page est en cours de chargement...
La page est en cours de chargement...
La page est en cours de chargement...
La page est en cours de chargement...
La page est en cours de chargement...
La page est en cours de chargement...
La page est en cours de chargement...
La page est en cours de chargement...
La page est en cours de chargement...
La page est en cours de chargement...
La page est en cours de chargement...
La page est en cours de chargement...
La page est en cours de chargement...
La page est en cours de chargement...
La page est en cours de chargement...
La page est en cours de chargement...
La page est en cours de chargement...
La page est en cours de chargement...
La page est en cours de chargement...
La page est en cours de chargement...
La page est en cours de chargement...
La page est en cours de chargement...
La page est en cours de chargement...
La page est en cours de chargement...
La page est en cours de chargement...
La page est en cours de chargement...
La page est en cours de chargement...
La page est en cours de chargement...
La page est en cours de chargement...
La page est en cours de chargement...
La page est en cours de chargement...
La page est en cours de chargement...
La page est en cours de chargement...
La page est en cours de chargement...
La page est en cours de chargement...
La page est en cours de chargement...
La page est en cours de chargement...
La page est en cours de chargement...
La page est en cours de chargement...
La page est en cours de chargement...
La page est en cours de chargement...
La page est en cours de chargement...
La page est en cours de chargement...
La page est en cours de chargement...
La page est en cours de chargement...
La page est en cours de chargement...
La page est en cours de chargement...
La page est en cours de chargement...
-
 1
1
-
 2
2
-
 3
3
-
 4
4
-
 5
5
-
 6
6
-
 7
7
-
 8
8
-
 9
9
-
 10
10
-
 11
11
-
 12
12
-
 13
13
-
 14
14
-
 15
15
-
 16
16
-
 17
17
-
 18
18
-
 19
19
-
 20
20
-
 21
21
-
 22
22
-
 23
23
-
 24
24
-
 25
25
-
 26
26
-
 27
27
-
 28
28
-
 29
29
-
 30
30
-
 31
31
-
 32
32
-
 33
33
-
 34
34
-
 35
35
-
 36
36
-
 37
37
-
 38
38
-
 39
39
-
 40
40
-
 41
41
-
 42
42
-
 43
43
-
 44
44
-
 45
45
-
 46
46
-
 47
47
-
 48
48
-
 49
49
-
 50
50
-
 51
51
-
 52
52
-
 53
53
-
 54
54
-
 55
55
-
 56
56
-
 57
57
-
 58
58
-
 59
59
-
 60
60
-
 61
61
-
 62
62
-
 63
63
-
 64
64
-
 65
65
-
 66
66
-
 67
67
-
 68
68
-
 69
69
-
 70
70
-
 71
71
-
 72
72
-
 73
73
-
 74
74
-
 75
75
-
 76
76
-
 77
77
-
 78
78
-
 79
79
-
 80
80
-
 81
81
-
 82
82
-
 83
83
-
 84
84


GE Profile PTD9000BNTS Le manuel du propriétaire
- Catégorie
- Micro-ondes
- Taper
- Le manuel du propriétaire
- Ce manuel convient également à