Ideal 61-164 Manuel utilisateur

Taper
Manuel utilisateur

Ce manuel convient également à

#61-165
GFCI
AFCI
RMS
True
S
u
r
e
e
T
s
t
SureTest®
Circuit Analyzer
#61-164
#61-165
Introduction
Utilizing patented technology, the SureTest® circuit analyzers
“look behind walls” to identify wiring problems that can lead to
personal shock hazards, electrical fires, or equipment performance issues. Personal shock hazards
stem from poor grounding, false grounds, and/or no ground fault protection. Electrical fires are
primarily caused from arc faults and high resistance points that lead to glowing connections in the
circuit wiring. And, equipment performance issues arise due to insufficient voltage available under
load, poor ground impedance, and high ground-to-neutral voltage. In fact, it’s estimated that 80%
of power quality performance issues are related to the faulty wiring issues stated above.
Product Features
True RMS
Indicates voltage drop at 12, 15 and 20-amp loads
Measures voltage: Line, Ground-to-Neutral, Peak, Frequency
Indicates Hot, Neutral and Ground conductor impedances
Identifies proper wiring in 3-wire receptacles
Identifies false (bootleg) grounds
Tests GFCIs for proper operation and reports time to trip.
Tests AFCI circuits for proper wiring (61-165). This unit is no longer available.
Checks for Shared Neutrals that lead to AFCI nuisance tripping (61-165)
Verifies dedicated circuits (with 61-176 adapter)
Includes 1-ft. extension cord and carrying case
General Operation
The SureTest
®
Circuit Analyzer takes only seconds to test each outlet and circuit under a short
duration rated load. This test tool checks for various wiring conditions including: correct wiring,
polarity reversal and no ground per UL-1436. A simple menu gives access to measurements of line
voltage, voltage drop under a full load condition, ground-neutral voltage and line impedances. The
ground fault circuit interrupter (GFCI) test is performed separately in accordance with UL-1436 and
disrupts the electrical supply if a functional and grounded GFCI is present.
Note: References to the 61-165 SureTest with AFCI is for informational purposes for legacy users of
this model. This model is no longer available. The SureTest
®
w/AFCI, #61-165, also tests arc fault
SureTest® Circuit Analyzer
Instruction Manual
2
circuit interrupter (AFCI) devices to ensure that AFCI breakers protecting the circuit have been
installed correctly. This test disrupts the electrical supply if a functional AFCI is present. This tool
also checks for a shared neutral condition that leads to AFCI nuisance tripping.
To maintain stated accuracies during repeated use, allow 20 seconds between insertions to
adequately dissipate any heat buildup during the load testing.
SureTest Circuit Analyzer
1. Menu Structure
2. Navigation Buttons
3. GFCI Test Button
4. AFCI Test Button
Menu Navigation
The microprocessor’s top priorities are to take live measurements and then analyze the data.
Hence, the microchip occasionally will not recognize the keypad buttons being rapidly depressed,
while it’s executing these routines. To avoid this issue, hold down the keypad button each time
until the menu changes.
The measurements taken by the SureTest are broken into five main menus positioned down the
left side of the display: Wiring Configuration (•••), Voltage (V), Voltage Drop (VD), Amperage
(A), and Impedance (Z). To navigate to each of the main menus, use the down arrow button ( ).
The Wiring Configuration (•••) screen indicates correct wiring, reverse polarity, hot/
ground reversal and no ground conditions by sequencing the three balls. The label on the back of
the product explains the wiring sequence indications.
The Voltage (V) menu displays the True RMS line voltage in real-time. This main menu has a
sub-menu positioned horizontally at the bottom of the screen that displays the line voltage
(RMS HN), ground-to-neutral voltage (RMS GN), Peak voltage (Peak), and Frequency (Hz). To
navigate through the submenu, use the side arrow button ( ) .
The Voltage Drop (VD) screen dual displays percent voltage drop with a 15 amp load along with
the resultant loaded voltage (VL). This main menu has a submenu, which also displays the
percent voltage drop and loaded voltage with 20 amp and 12 amp loads. To navigate through the
submenu, use the side arrow button ( ).
WARNING: Do not use on outputs from UPS systems, light dimmers or square
wave generating equipment as damage to the analyzer will occur.
#61-165
GFCI
AFCI
RMS
True
S
u
r
e
e
T
s
t
SureTest®
Circuit Analyzer
2
3
4
1
The Amperage (A) menu displays the Estimated Load on Line (ELL) in real-time and holds the
maximum amperage in the upper right of the display. The main menu has a submenu positioned
horizontally which displays (ASCC1), Available Short-Circuit Current from H-N and (ASCC2)
Available Short Circuit Current H-N-G. To navigate through the submenu, use the side arrow
button. ( )
The Impedance (Z) main menu displays the impedance in ohms (Ω) of the hot conductor. This
main menu has a sub-menu positioned horizontally at the bottom of the screen that also displays
the neutral (N) and ground (G) conductor impedances. To navigate through the submenu, use the
side arrow button ( ). Note that testing the ground impedance will trip a GFCI protected circuit.
GFCI Test Button
Depressing this button displays the GFCI main menu. Two tests can
be performed in this menu: GFCI and EPD. The GFCI tests Ground
Fault Circuit Interrupting devices by faulting 6-9mA from hot-to-
ground per UL-1436. The EPD tests those breakers, which have an
Equipment Protective Device feature that trips the breaker if a ground fault of greater than 30mA is
detected. Pressing the side arrow button ( ) navigates between these two tests. Once the desired
test is highlighted, depress the GFCI test button on the keypad to activate the test.
AFCI Test Button
Depressing this button displays the AFCI main menu. Two tests
can be performed in this menu: AFCI and NEUT. The AFCI tests
Arc Fault Circuit Interrupting devices by creating a 106-141 amp
short-duration arc between the hot and neutral conductors per
UL1436. The NEUT tests for a Shared Neutral or falsely grounded neutral conductor, which
causes AFCI breakers to nuisance trip with normal loads. This test applies 300mA between hot
and neutral to ensure that the AFCI breaker does not trip.
Testing Procedure
Wiring Verification
Immediately after being inserted into a receptacle, the
SureTest displays the IDEAL logo while it performs a battery
of tests. The first test result displayed is the wiring condition. The
SureTest checks for the following conditions and indicates the test
result on the display.
3
4
Wiring Condition Display Indication
H G N
Correct Wiring
No Ground
Polarity Reversal
Open/Hot Neutral
False Ground
If the wiring condition is other than normal, the SureTest is limited on its
measurements that can be performed. If a no ground condition exists, only the line
voltage and voltage drop measurements are available. In a hot/ground reversal, open
neutral or open hot condition, the unit will not have any power so the display will be
blank.
Notes:
1) Will not detect two hot wires in a circuit.
2) Will not detect a combination of defects.
3) Will not detect reversal of grounded and grounding conductors.
4) For individual conductor impedance, refer to page 7.
False Ground Indication
The SureTest indicates when a false ground condition exists from an improper bond
via a bootleg (ground jumper wire at the outlet device) or inadvertent contact of the
ground wire to the neutral connection. Note that if the SureTest is within 15-20 feet
of the main panel, the unit will indicate a false ground condition on a properly wired
circuit due to its close proximity to the proper ground-neutral bond in the main panel.
If necessary, simply use a 3 conductor extension cord that is 20 feet long to make the
measurements.
Voltage Measurements
The line voltage measurement should be 120VAC +/-10% fluctuation at 60 Hz. The peak voltage
should be 1.414 times the rms line voltage reading for a clean sine waveform. Ground-to-neutral
voltage should be less than 2 VAC. In a single-phase circuit, a higher ground-neutral voltage
indicates excessive current leakage between the neutral and ground conductors. In a 3-phase
circuit with a shared neutral, a high ground-neutral voltage could indicate an unbalanced load
between the three phases or harmonic distortion on the shared neutral. Excessive ground-neutral
voltage may result in inconsistent or intermittent equipment performance.
F
Legend
On
Off
Flashing
5
Troubleshooting Tips for Voltage Issues
Voltage Drop (VD) Measurements
The SureTest measures the line voltage, applies a load on the circuit, measures the loaded voltage,
then calculates the voltage drop. Results are displayed for 12A, 15A, and 20A loads. The National
Electrical Code recommends 5% as the maximum voltage drop for branch circuits for reasonable
efficiency (NEC article 210-19. FPN 4). And, the voltage under load (VL) should not drop below
108VAC for reliable equipment operation.
A good branch circuit should start out with less than 5% voltage drop at the furthest receptacle
from the panel at the end of the cable run. Then, each receptacle tested in sequence towards the
panel should show a steady decrease in voltage drop. If the voltage drop is above 5% and does
not noticeably decrease as you get closer to the first device on the circuit, then the problem is
between the first device and the panel. Visually check the terminations at the first device, the wir-
ing between the device and the panel, and the circuit breaker connections. High resistance points
can usually be identified as hot spots using an infrared thermometer or by measuring the voltage
W
ARNING: Do not exceed the unit’s maximum voltage rating of 250VAC. The
SureTest is rated for use at 120 and protected to 250 volts in case of miswired circuits.
Immediately unplug the unit and do not press any buttons if 240 volts is displayed.
Measurement Expected
Result Problem Possible Causes Possible Solutions
Line Voltage
120VAC
220 VAC
108-132VAC
198-242VAC High/low
Too much load on the load
on circuit. Redistribute loads on the
circuit.
High resistance
connection within the
circuit or at the panel.
Locate high resistance
connection/device and
repair/replace.
Supply voltage too
high/low. Consult power company.
Neutral-Ground
Voltage <2VAC Voltage High G-N <2VAC
Current leaking from
neutral to ground.
Identify source of leakage;
multiple bonding points
equipment or devices.
Unbalanced 3-phase
system. Check load balance and
redistribute load.
Triple harmonics
returning on neutral in
3-phase system.
Oversize neutral to
impedance. Reduce
harmonic effect via
filter or other methods.
Peak Voltage
120VAC
220VAC
153-185VAC
280-342VAC High/low peak
voltage
Supply voltage too
high/low. Consult power company.
High Peak Loads on line
caused by electronic
equipment on line.
Evalue number of
electronic devices on
circuit and redistribute if
necessary.
Frequency 60HZ High/low
frequency Supply frequency too
high/low. Consult power company.
across the breaker. If the voltage drop exceeds 5% but noticeably decreases as you nearer the
panel, the circuit may have undersized wire, too long of a cable run, or too much current on the
circuit. Check the wire to ensure that it is sized per code and measure the current on the branch
circuit. If a voltage drop reading changes significantly from one receptacle to the next, then the
problem is a high impedance point at or between two receptacles. It is usually located at a termi-
nation point, such as a bad splice or loose wire connection, but it might also be a bad receptacle.
Troubleshooting Tips for Voltage Drop
Measurement Expected Problem Possible Possible
Result Causes Solutions
Too much Redistribute the
load on load on
the circuit. the circuit.
Undersized wire for Check code requirements
length of run. and re-wire if necessary.
High resistance Locate high
connection within resistance connection/
the circuit or at device and
the panel. repair/replace.
Estimated Load on Line (ELL) Measurement
The SureTest estimates the load on a branch circuit to provide an indication of how much capac-
ity in the circuit remains or to quickly check if the circuit is dedicated. This function is a rough
estimate (no stated accuracy), as accurately measuring circuit current has to be done with a clamp
meter at the electrical panel. The proprietary way in which these calculations are made allows the
user to plug the unit into an outlet and quickly determine the current load on that branch circuit.
Both the distance of the SureTest from the load and branch circuit impedance will affect accuracy.
Best accuracy is obtained by positioning the SureTest in the same outlet as the largest load on
line; otherwise, try to position the SureTest between the load(s) and the electrical panel. The maxi-
mum amperage reported by the tester is 15A.
ASCC Measurement
The SureTest calculates the Available Short-Circuit Current (ASCC) that the branch circuit can
deliver through the breaker during a bolted fault (dead-short) condition.
The ASCC is calculated by dividing the line voltage by the circuit’s line impedance (hot + neutral).
Depressing the side arrow ( ) displays the worst-case scenario where all three conductors (hot,
neutral, ground) are shorted together -- the neutral and ground provide a lower impedance via
a parallel return path. Note that this second test will trip a GFCI. See the following equations for
clarification.
ASCC1 = Line Voltage (VHN)/ (Hot Ω + Neu Ω)
ASCC2 = Line Voltage (VHN)/ (Hot Ω + 1/(1/Neu Ω+ 1/ Grd Ω)
Voltage Drop <5% High Voltage
Drop
6
Impedance (Z) Measurements
If the voltage drop measurement exceeds 5%, analyze the hot and neutral impedances. If one is
significantly higher than the other, the problem is with the conductor with the much higher imped-
ance. Then, check all connections on that conductor back to the panel. If both impedances appear
high, the source can be undersized wire for the length of run, a bad device, or poor connections at
the pigtails, devices, or panel.
The ground impedance measured should be less than 1 ohm as a rule of thumb to ensure that
fault current has a sufficient path back to the panel. IEEE states the ground impedance should be
less than 0.25 ohms to ensure the ground conductor can safely return any fault current which
could damage equipment on the circuit. Surge suppression systems require a good ground to
adequately protect equipment from transient overvoltages. Note that a current is applied to the
ground conductor to accurately measure its impedance. By the inherent nature of this test, a GFCI
protected circuit will trip unless the device is temporarily removed from the circuit. Due to the
ground impedance test inducing current on the ground conductor, this tester must not be used in
active paitent care areas or in situations where people may be connected through devices to the
electrical grounding system such as ESD strap protection or medical equipment.
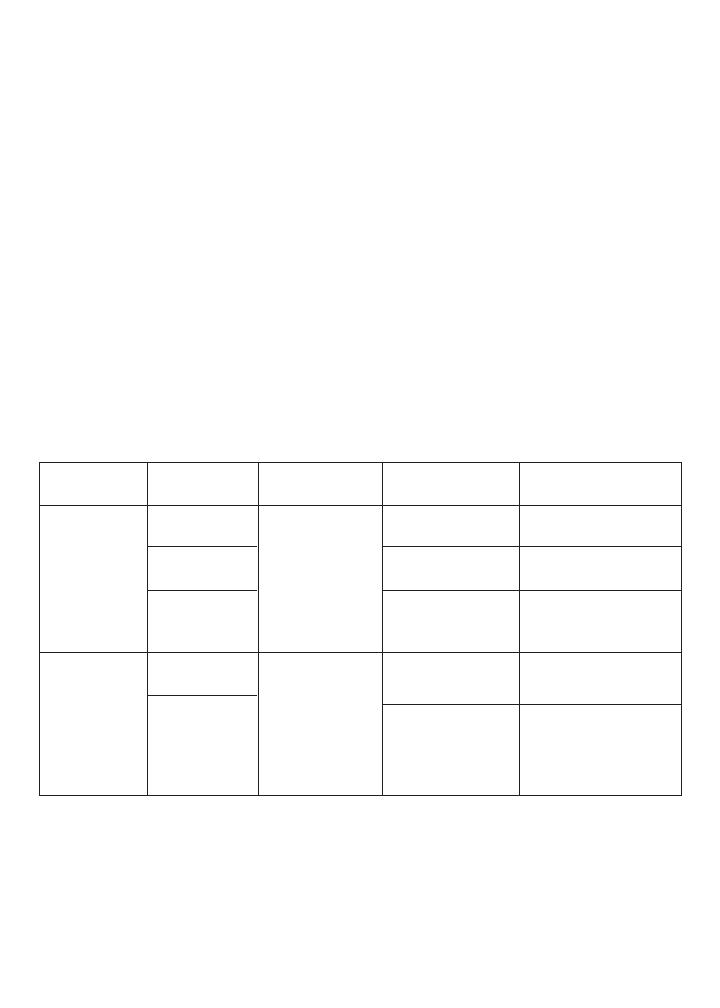
Troubleshooting Tips - Impedances
Measurement Expected Problem Possible Possible
Result Causes Solutions
<0.0048Ω/foot Too much load Redistribute the load
of 14 AWG wire on branch circuit. on the circuit.
<0.003Ω/ foot Undersized wire Check code requirements
of 12 AWG wire for length of run. and rewire if necessary.
<0.001Ω/ foot High resistance Locate high resistance
or 10 AWG wire connection within the connection/device
circuit or at the panel. and repair/replace.
< 1 Ω to
protect people
High resistance Locate high resistance
connection within connection/device
the circuit or at and repair/replace.
the panel.
GFCI Testing
To test the GFCI device, the SureTest
®
creates an imbalance between the hot and neutral conduc-
tors by leaking a small amount of current from hot to ground using a fixed value resistor. The test
current applied by the SureTest
®
should not be less than 6mA or greater than 9mA per UL-1436.
A functional GFCI should sense the imbalance and disconnect the power. The SureTest displays
the actual test current in milliamps and trip time in milliseconds.
Hot and Neutral
Impedance
Ground Impedance
<0.25Ω to
protect
equipment
Undersized wire
for length of run. Check code requirements
and re-wire if necessary.
High conductor
impedance
High ground
impedance
7
8
To conduct a GFCI test, press the GFCI button to enter the GFCI main menu. The GFCI symbol in
the display should be highlighted as the default test. If EPD is lit, then use the side arrow ( )
to highlight the GFCI symbol. Then, press the GFCI button to activate the test. The actual current
being leaked to ground is displayed. The TEST icon and hourglass symbol appear on the display
to let the user know that the GFCI test is being performed. The GFCI device should trip within the
UL established guideline causing the display to blank out with the loss of power. When the GFCI
device is reset, the unit displays the actual trip time that the GFCI took to respond to the current
imbalance and open the circuit. Pressing the down arrow button ( ) returns it to the wiring veri-
fication mode. If the GFCI fails to trip, the SureTest terminates the test after 6.5 seconds. Further
inspection should determine whether the GFCI circuitry is faulty, the GFCI is installed incorrectly,
or if the circuit is protected by a GFCI device.
UL Guideline
for trip time:
Notes:
1) In order to test a GFCI in a 2-wire system (no ground), the #61-175 ground continuity
adapter must be used. Connect the alligator clip on the adapter to a ground source, such as
to a metal, water or gas pipe.
2) All appliances or equipment on the ground circuit being tested should be unplugged
to help avoid erroneous readings.
In addition to performing a GFCI test for evaluating personal protection from shock hazards, the
SureTest can also conduct testing to ensure equipment protection from ground faults exceeding
30mA. The method of operation is the same as the GFCI test noted in the first paragraph above
but uses a different resistor to create a 30mA leakage current from hot-to-ground. To conduct an
EPD test on an Equipment Protective Device, press the GFCI button to enter the GFCI main menu.
The GFCI symbol in the display should be highlighted as the default test. Press the side arrow
( ) button to highlight the EPD symbol. Then, press the GFCI button to activate the test. The
actual current being leaked to ground is displayed. The TEST icon and hourglass symbol appear
on the display to let the user know that the EPD test is being performed. The EPD should trip
causing the display to blank out with the loss of power. When the EPD is reset and power is
restored, the unit displays the actual trip time that the EPD took to respond to the current imbal-
ance and open the circuit. Pressing the down arrow button ( ) returns it to the wiring verification
mode. If the EPD fails to trip, the SureTest terminates the test after 6.5 seconds. Further inspection
should determine whether the EPD circuitry is faulty, the EPD is installed incorrectly, or if the
circuit is protected by an EPD.
I
T=(20)1.43
9
Troubleshooting Tips
Measurement Expected Problem Possible Possible
Result Causes Solutions
Check wiring for proper
installation in accordance
with manufacturer’s
instructions and NEC.
GFCI doesn’t trip. GFCI may be Check wiring and ground.
defective. Replace GFCI if necessary.
AFCI Testing (#61-165 only)
The SureTest
®
w/AFCI applies 8-12 current pulses in less than a half second across hot-to-neutral
with each pulse no longer than 8.3ms in duration, and having an amplitude of 106-141 amps in
accordance with UL1436. A functional AFCI breaker should recognize these current pulses as a
dangerous arc and disconnect the power to the circuit. To restore power, reset the breaker at the
panel.
To properly test the AFCI, execute the following steps:
1) Consult the AFCI manufacturer’s installation instructions to determine that the AFCI is installed
in accordance with the manufacturer’s specifications.
2) Plug in the SureTest and check for correct wiring of receptacle and all remotely connected
receptacles on the branch circuit. Then, go to the panel and operate the test button on the AFCI
installed in the circuit. The AFCI must trip. If it does not, do not use the circuit - consult an
electrician. If the AFCI does trip, reset the AFCI.
3) Return to the tester and press the AFCI button on the tester to enter the AFCI main menu. The
AFCI symbol in the display should be highlighted as the default test. If NEUT is lit, then use
the side arrow ( ) to highlight the AFCI symbol. Then, press the AFCI button to activate the
test. The TEST icon and lightning bolt symbol light brightly on the display to let the user know
that the AFCI test is being performed. The AFCI device should trip causing the display to blank
out with the loss of power. If the AFCI fails to trip, the SureTest
®
will not lose power and the
display shows a dimly lit lightning bolt. This non-trip condition would suggest:
a) A wiring problem with a totally operable AFCI, or
b) Proper wiring with a faulty AFCI.
Consult with an electrician to check the condition of the wiring and AFCI.
4) CAUTION: AFCIs recognize characteristics unique to arcing, and AFCI testers produce charac-
teristics that mimic some forms of arcing. Because of this, the tester may give a false indication
that the AFCI is not functioning properly. If this occurs, recheck the operation of the AFCI
using the test and reset buttons. The AFCI’s test button function should demonstrate proper
operation.
GFCI Test GFCI trips
within trip time
GFCI doesn’t
trip within proper
trip time.
GFCI maybe
installed
improperly.
10
Note: The AFCI circuitry is protected by a thermal sensor to assure long life. If a
thermometer icon appears in the display during repeated AFCI testing, the sensor delays fur-
ther testing until the circuitry cools. At that point, the testing will automatically
continue.
Shared Neutral Test (#61-165 only)
AFCI breakers are prone to nuisance tripping when wired with a shared neutral or when the neutral
conductor is accidentally grounded before the panel. The AFCI tripping occurs because it senses
an imbalance between the current going out on the hot and the current returning on the neutral.
A shared neutral between two hot conductors creates this imbalance. See the illustration below to
see how this imbalance can occur.
The SureTest can test for these conditions by applying a small load of 300mA between hot and
neutral to simulate a normal load and ensure that the AFCI breaker does not trip. To conduct a
shared neutral test, press the AFCI button to enter the AFCI main menu. Press the side arrow ( )
to highlight the NEUT symbol. Then, press the AFCI button to activate the test. The TEST icon will
light brightly while the test is being conducted. The AFCI breaker should not trip. If the breaker
does trip, a shared neutral is the probable cause.
Illustration:
SureTest Shared Neutral Test w/300mA load
3A H1
3.3A N
300mA H2
)
)
)
)
Lights
Outlet
Circuit #1: Breaker
Circuit #2: Breaker
Troubleshooting Tips
Measurement Expected Problem Possible Possible
Result Causes Solutions
Check wiring and re-
wire device according
to manufacturer’s
instructions.
AFCI defective. Replace AFCI.
High source of Check for
line impedance high voltage
or resistance. drop.
Re-wire circuit
per AFCI
manufacturer’s
Instructions.
Optional Accessories
#61-183 Alligator Clip Adapter
This adapter allows the SureTest to analyze non-outlet based circuits for branch circuit
safety and performance. Simply plug the alligator clip adapter into the IEC connection on the front
of the SureTest. Then, properly connect the hot (black), neutral (white) and ground (green) alliga-
tor clips onto the circuit. Correct test results are dependent on making good connections with the
alligator clips onto the circuit.
WARNING: The SureTest is designed for 120VAC circuits only. Do not exceed the
rating of the SureTest with this adapter.
This adapter also allows the operator to use the SureTest (#61-165 only) to verify AFCI
protection on non-outlet based circuits in bedrooms, such as on circuits used for lighting, ceiling
fans, and smoke detectors.
#61-175 Ground Continuity Adapter
This adapter allows the operator to verify that a cabinet or equipment chassis has been properly
bonded to the system ground. Plugging the SureTest into the ground continuity adapter isolates
the SureTest from the electrical ground. If the equipment is properly grounded, then connecting the
alligator clip from the ground continuity adapter to the cabinet or equipment chassis should pro-
vide a pathway to ground, and consequently a normal wiring condition on the SureTest.
After the ground continuity adapter has been connected, the SureTest can be used to measure the
ground impedance of the cabinet or equipment chassis back to the panel. See the section on Line
Impedance Measurements for test instructions for ground impedance.
AFCI Test
AFCI installed
incorrectly.
Shared neutral
exists.
Shared Neutral
Test AFCI does
not trip AFCI does
trip.
AFCI trips AFCI does
not trip.
11
This adapter can also be used to test GFCI receptacles on 2-wire circuits. Connect the alligator
clip on the adapter to a ground, such as a metal water or gas pipe prior to testing the GFCI.
#61-176 Isolated Ground Adapter
This adapter allows the operator to verify that a receptacle is completely isolated from the system
ground that is bonded to other devices on the branch circuit. Test the ground impedance of the
receptacle and record the ohms value. (See the section on Line Impedance Testing for details on
obtaining the ground impedance value). Remove the SureTest and plug it into the isolated ground
adapter. Attach the alligator clip to the center receptacle screw or metal junction box, and re-
insert the SureTest into the receptacle and record the ohms value.
The isolated ground adapter creates a parallel pathway to ground, which results in a lower ground
impedance reading with the adapter versus with the receptacle with the isolated ground. If the two
readings are the same, then the receptacle does not have an isolated ground. If the reading taken
with the isolated ground adapter is lower, then the receptacle has an isolated ground.
Maintenance
Clean case with a damp cloth and mild detergent. Do not use abrasives or solvents.
Service and Replacement Parts:
This unit has no user-serviceable parts. To inquiry about service information, call Technical
Support at 877 201-9005 or visit our website at www.idealindustries.com.
Repair address is:
IDEAL INDUSTRIES, INC.
Attention: Repair Dept.
1000 Park Ave.
Sycamore, IL 60178
12
13
General Specifications
Characteristics Description
Display 128 x 64 OLED with backlight
Display update for Volt Less than 2.5 times Second.
Over-range Indication on all functions Display “OL”
Operating Environment,
Relative Humidity 32°F to 122°F (0°C to 50°C) at <80%RH
Storage Environment: 32°F to 122°F (0°C to 50°C) at <80% RH
Case Construction: ABS UL 94V/0/5VA rated
Altitude: 6561.7 ft (2000m)
Dimensions: 6.4” (L) x 3” (W) x 1.4” (D)
162mm (L) x 76mm (W) x 36mm (D)
Weight: 9.4 oz (267g)
Safety: UL61010B-1, Cat III-300V
UL-1436 for AFCI, GFCI & Outlet
Accessories: Includes 1’ plug adapter, carrying case,
instruction manual. Optional alligator clip
adapter available.
Double Insulation
Instrument has been evaluated and complies with insulation category III (overvoltage category III).
Pollution degree 2 in accordance with IEC-644. Indoor use.
Measuring
Equipment
10DB
14
Measurement Specifications:
All specifications are at 23°C ± 5°C at less than 80% relative humidity.
Accuracy is state as ± ([% of range] + [counts]).
AC converter is true rms sensing.
Measurement Ranges Resolution Accuracy
Line Voltage 85.0 - 250.0 VAC 0.1V 1.0% ± .2V
Peak Line Voltage 121.0 - 354.0 VAC 0.1V 1.0% ± .2V
Frequency 45.0 - 65.0 Hz 0.1Hz 1.0% ± .2Hz
% Voltage Drop 0.1% - 99.9% 0.1% 2.5% ± .2%
Voltage Loaded 10.0 - 132.0 VAC 0.1V 2.5% ± .2V
Neutral-Ground V 0.0 - 10.0 VAC 0.1V 2.5% ± .2V
Impedance - Hot 0.00 Ω - 3.00 Ω0.01Ω2.5% ± .02Ω
Neutral, & Ground > 3 Ω Unspecified.
GFCI Trip Time 1mS to 6.500S counter. 1 mS 1.0% ± 2mS
GFCI Trip Current 6.0 - 9.0 mA 0.1 mA 1.0% ± .2mA
EPD Trip Current 30.0 - 37.0 mA 0.1 mA 1.0% ± .2mA
Estimated Load on
Line 1.00 – 20.0A 0.1A Unspecified
15
Warranty:
This tester is warranted to the original purchaser against defects in material and workmanship for
two years from the date of purchase. During this warranty period, IDEAL INDUSTRIES, INC. will,
at its option, replace or repair the defective unit, subject to verification of the defect or malfunc-
tion. Your original receipt from an authorized distributor of IDEAL INDUSTRIES, INC. is your
proof of purchase. Register your product at: http://www.idlim.net/support/registration/.
Any implied warranties arising out of the sale of an IDEAL product, including but not limited to
implied warranties of merchantability and fitness for a particular purpose, are limited to the above.
The manufacturer shall not be liable for loss of use of the instrument or other incidental or
consequential damages, expenses, or economic loss, or for any claim or claims for such damage,
expenses or economic loss.
State laws vary, so the above limitations or exclusions may not apply to you. This warranty gives
you specific legal rights, and you may also have other rights which vary from state to state.
Warranty does not cover batteries.
16
#61-165
GFCI
AFCI
RMS
True
S
u
r
e
e
T
s
t
SureTest®
Circuit Analyzer
17
Introducción
Gracias a su tecnología patentada, los analizadores de circuitos
SureTest® “ven a través de las paredes” para identificar problemas
de cableado que pueden causar riesgos de descarga eléctrica a las
personas, incendios o problemas en el funcionamiento de los
equipos. Los riesgos personales de descarga eléctrica se originan en conexiones a tierra
incorrectas, tierras falsas y/o ausencia de protección contra fallas de tierra. Los incendios
eléctricos se producen como consecuencias de fallas de arco y puntos de alta resistencia
que crean fuego en las conexiones del cableado del circuito. Finalmente, los problemas de
funcionamiento de los equipos surgen debido a la insuficiencia de la tensión disponible en
carga, una impedancia a tierra deficiente y una alta tensión de tierra a neutro. Como dato,
se estima que el 80% de los problemas de la calidad del suministro eléctrico se relacionan
con las fallas del cableado arriba indicadas.
Características del producto
Valor eficaz verdadero
Indica una caída de tensión de 12, 15 y 20 amperios
Medición de tensión: de línea, de tierra a neutro, valor pico y frecuencia
Indica impedancias de conductor Caliente, Neutro y de Tierra
Identificación del cableado correcto en receptáculos para tres conductores
Identificación de tierras falsas
Pruebas para el correcto funcionamiento y GFCIs informa del tiempo de viaje
Prueba de funcionamiento correcto de disyuntores por falla de arco (AFCI) (61-165).
Esta unidad ya no está disponible.
Verificaciones de neutros compartidos que producen disparos de AFCI injustificados
(61-165)
Verificación de circuitos dedicados (con adaptador 61-176)
Cordón de extensión de 1 pie (30 cm) y estuche de transporte incluidos
Analizador de circuitos SureTest®
Manual de Instrucciones
#61-164
#61-165
18
Operación en general
El analizador de circuito SureTest® toma solo unos segundos para probar cada salida y cir-
cuito con una carga nominal de corta duración. Esta herramienta de prueba comprueba diver-
sas condiciones del cableado, que incluyen: corrección del cableado, inversión de polaridad
y falta de tierra según norma UL-1436. Un sencillo menú permite acceder a las mediciones
de tensión de línea, caída de tensión en condiciones de plena carga, tensión tierra-neutro
e impedancias de línea. La prueba del interruptor de circuito de falla a tierra (GFCI, por sus
siglas en inglés) se realiza por separado de acuerdo con UL-1436 e interrumpe el suministro
eléctrico si está presente un GFCI funcional y conectado a tierra.
Nota: Las referencias al SureTest® 61-165 con AFCI son para fines informativos para usu-
arios legacy de este modelo. Este modelo ya no está disponible. El instrumento SureTest®
con AFCI, Nº 61-165, prueba también dispositivos disyuntores por falla de arco (AFCI)
para asegurar que dichos dispositivos de protección de circuitos hayan sido instalados
correctamente. Esta prueba interrumpe el suministro eléctrico si hay presente un AFCI en
funcionamiento. La herramienta comprueba también las condiciones de neutro compartido
que originan disparos de AFCI injustificados.
Para mantener las precisiones indicadas durante el uso repetido, espere 20 segundos entre
inserciones para disipar adecuadamente cualquier acumulación de calor producida durante
la prueba bajo carga.
Analizador de circuitos
SureTest®
1. Estructura de menús
2. Botones de navegación
3. Botón de prueba de GFCI
4. Botón de prueba de AFCI
ADVERTENCIA: No use este instrumento en salidas de sistemas UPS, atenu-
adores de luz o equipos generadores de onda cuadrada, puesto que puede dañarse el
analizador.
#61-165
GFCI
AFCI
RMS
True
S
u
r
e
e
T
s
t
SureTest®
Circuit Analyzer
2
3
4
1
19
Navegación por los menús
Las máximas prioridades del microprocesador son tomar mediciones en vivo y luego anali-
zar los datos. Por lo tanto, ocasionalmente el microchip no reconoce los botones del teclado
que se pulsan rápidamente, mientras está ejecutando estas rutinas. Para evitar este prob-
lema, mantenga oprimido el botón del teclado cada vez, hasta que cambie el menú.
Las mediciones tomadas por el SureTest se dividen en cinco menús principales que se
ubican en el costado izquierdo de la pantalla: Configuración de cableado (•••), Tensión
(V), Caída de tensión (VD), Corriente (A) e Impedancia (Z). Para navegar a cualquiera de los
menús principales, use el botón de flecha abajo ( ).
La pantalla de configuración del cableado (•••) indica la corrección del cableado y las
condiciones de inversión de polaridad, inversión de vivo/neutro y falta de tierra, efectuando
una secuencia con los tres círculos. El rótulo del dorso del producto explica las indicaciones
de la secuencia del cableado.
El menú de tensión (V) muestra el valor eficaz (RMS) de la tensión de línea en tiempo real.
Este menú principal tiene un submenú ubicado horizontalmente al pie de la pantalla, que
muestra la tensión de línea (RMS HN), la tensión de tierra a neutro (RMS GN), la tensión
pico (Peak) y la frecuencia (Hz). Para navegar por el submenú, use el botón de flecha lat-
eral ( ).
La pantalla dual de caída de tensión (VD) muestra la caída de tensión porcentual con una
carga de 15 A, junto con la tensión en carga resultante VL). Este menú principal tiene un
submenú, que muestra también la caída de tensión porcentual y la tensión en carga con
cargas de 20 y 12 A. Para navegar por el submenú, use el botón de flecha lateral ( ).
El menú Corriente (A) muestra la carga estimada en línea (ELL) en tiempo real y retiene la cor-
riente máxima en la parte superior derecha de la pantalla. El menú principal tiene un submenú
posicionado horizontalmente que muestra (ASCC1), la corriente de cortocircuito disponible
entre vivo y neutro (H-N) y (ASCC2), la corriente de cortocircuito disponible en vivo, neutro y
tierra (H-N-G). Para navegar por el submenú, use el botón de flecha lateral ( ).
El menú principal de impedancia (Z) muestra la impedancia en ohmios (Ω) del conductor
vivo. Este menú principal tiene un submenú ubicado horizontalmente al pie de la pantalla,
que muestra también las impedancias de los conductores neutro (N) y de tierra (G). Para
navegar por el submenú, use el botón de flecha lateral ( ). Tenga en cuenta que la prueba
de impedancia a tierra hará disparar un circuito protegido por un GFCI.
20
Botón de prueba de GFCI
Al oprimir este botón se muestra el menú principal de GFCI. Es
posible realizar dos pruebas en este menú: GFCI y EPD. La prueba
de GFCI verifica los dispositivos disyuntores diferenciales por falla
de tierra enviando del vivo a tierra 6-9 mA según norma UL-1436. La
prueba EPD es para probar los disyuntores que tienen una características de dispositivo protec-
tor de equipos (EPD) que dispara el disyuntor si se detecta una falla de tierra superior a 30 mA.
Oprimiendo el botón de flecha lateral ( ) se navega entre estas dos pruebas. Una vez resaltada la
prueba deseada, oprima el botón de prueba de GFCI del teclado para activar la prueba.
Botón de prueba de AFCI
Al oprimir este botón se muestra el menú principal de GFCI. Es
posible realizar dos pruebas en este menú: AFCI y NEUT. La
prueba de AFCI comprueba los dispositivos disyuntores por falla
de arco creando un arco de corta duración de 106-141 A entre los
conductores vivo y neutro según norma UL1436. La prueba NEUT comprueba si existe un
conductor neutro compartido o falsamente puesto a tierra, lo que causa que los disyuntores
AFCI produzcan disparos injustificados con cargas normales. En esta prueba se aplican 300
mA entre el vivo y el neutro para asegurar que el disyuntor AFCI no se dispare.
Procedimiento de las pruebas
Verificación del cableado
Inmediatamente después de ser insertado en un receptáculo el instrumento
SureTest muestra el logotipo de IDEAL mientras realiza una bat-
ería de pruebas. El primer resultado de prueba mostrado es el
estado del cableado. SureTest comprueba las siguientes condi-
ciones e indica los resultados de la prueba en la pantalla.
Condición del Indicación de pantalla
cableado H G N
Cableado correcto
Falta de tierra
Inversión de polaridad
Vivo/neutro abierto
Tierra falsa
Símbolos
Encendido
Apagado
Destellando
F
  • Page 1 1
  • Page 2 2
  • Page 3 3
  • Page 4 4
  • Page 5 5
  • Page 6 6
  • Page 7 7
  • Page 8 8
  • Page 9 9
  • Page 10 10
  • Page 11 11
  • Page 12 12
  • Page 13 13
  • Page 14 14
  • Page 15 15
  • Page 16 16
  • Page 17 17
  • Page 18 18
  • Page 19 19
  • Page 20 20
  • Page 21 21
  • Page 22 22
  • Page 23 23
  • Page 24 24
  • Page 25 25
  • Page 26 26
  • Page 27 27
  • Page 28 28
  • Page 29 29
  • Page 30 30
  • Page 31 31
  • Page 32 32
  • Page 33 33
  • Page 34 34
  • Page 35 35
  • Page 36 36
  • Page 37 37
  • Page 38 38
  • Page 39 39
  • Page 40 40
  • Page 41 41
  • Page 42 42
  • Page 43 43
  • Page 44 44
  • Page 45 45
  • Page 46 46
  • Page 47 47
  • Page 48 48

Ideal 61-164 Manuel utilisateur

Taper
Manuel utilisateur
Ce manuel convient également à

dans d''autres langues