INNOCN 44C1G Manuel utilisateur
- Catégorie
- Téléviseurs
- Taper
- Manuel utilisateur


English
Contents
Precautions
Package Content
Installation
Adjustment of monitor
Instructions for use
Specification
OSD menu
German Rhine TÜV Low Blue Light Certfication
Common troubleshooting
Warranty Information
Contact us
1
2
3
4
9
4
6
9
10
11
11

English
1
Precautions Before using this product, please read this User Manual carefully and keep it well
Please use a reliable grounded socket, Do not overload the socket, or it may cause fire or
electric shock.
Do not cover or block the vent hole in the rear casing, and do not use the product on a bed,
sofa, blanket or similar objects.
The range of the supply voltage of the monitor is printed on the label on the rear casing.
If it is impossible to determine the supply voltage, please consult the distributor or local
power company.
If the monitor will not be used for a long period, please cut off the power supply to avoid
electric shock in rainy days and damage due to abnormal supply voltage.
Keep the monitor away from water sources or damp places, such as bath rooms, kitchens,
basements and swimming pools.
Make sure the monitor is placed on a flat surface. If the monitor falls down, it may cause
human injury or device damage.
Store and use the monitor in a cool, dry and well ventilated place, and keep it away from
emission and heat sources.
Do not put foreign matters into the monitor, or it may cause short circuits resulting fire or
electric shock.
Do not disassemble or repair this product by self to avoid electric shock. If faults occur,
please contact the after-sales service directly.
Do not pull or twist the power cable forcedly.
There is a polarizer layer (not a protective film) on the surface of the screen. Do not peel
it off, or the product may be damaged and the warranty will be invalid.

English
2
2
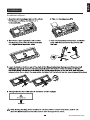
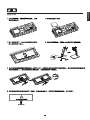
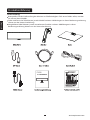
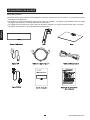
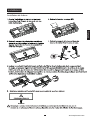
Package Content
Packing list
Please check that the package of the monitor contains all parts. If any part is lost, please contact
the distributor.
The color and shape of parts may vary with models. Figures in this User Manual are for reference only.
Cables supplied may vary with purchased products. Figures in this User Manual are for reference only.


English
4
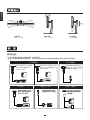
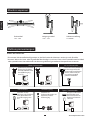
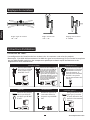
Adjustment of monitor
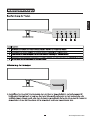
Instructions for use
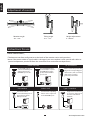
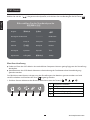
Cable connection:
* The bottom interface configuration at the back of the monitor varies with products.
* Note: If the power cable or signal cable is damaged, you must replace it with special soft cables or
special components purchased from the manufacture or maintenance department.
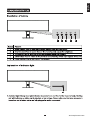
Rotation angle
-30° -+30°
Tilting angle
-5.0°- +15°
Height adjustment
0- 120mm
OR
AUDIO OUT
Connect audio outputting
devices such as earphones
to the AUDIO OUT port.
Type-C interface
A Type-C line can be used
to connect to data ports of
machines and external
terminals.
DP interface
Use the DP cable to
connect the DP IN port of
the product to the DP
OUT port of a PC.
HDMI interface
Use the HDMI-DVI cable
(not included) to connect
the HDMI IN port of the
product to the DVI OUT
port of a PC.
Use the HDMI cable to
connect the HDMI IN port
of the product to the
HDMI OUT port of a PC
Please connect the power cable
plug to the corresponding port
of the monitor, and connect the
other end to a properly
grounded power outlet.
AC IN interface


English
6
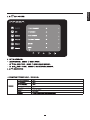
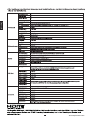
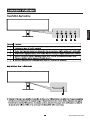
1 2 3 4 5
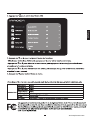
OSD menu
Enter the main menu
Adjust the brightness
Adjust the volume
Switch port input signal
Power ON/OFF
1
2
3
4
5
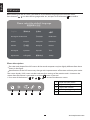
Menu description
The color and shape of the OSD menu of the actual computer may be slightly different from them
shown in the figure.
Specifications of the OSD menu may change with improvements of functions without prior notice.
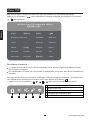
The screen display (OSD) menu can be used to adjust settings of the monitor and is shown on the
screen after the monitor is powered on and the button is pressed.
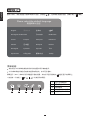
1. Press one of the buttons ( ) to activate the browser screen.
When booting for the first time, you need to set the default language of the monitor menu.
Press buttons ( ) to select the language to be set, and press the OK button( ) to confirm.
Portugues do Brasilazil Deutsch Nederland
简体中文English 한국어
Suomi Français Ελληνικά Indonesia
Українська Tiếng Việt繁体中文 Türkçe
Italiano 日本語 Malaysia Polskie
Português Pусский Español ไทย
Please select the default language
请选择默认语言


English
9
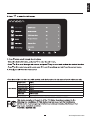
Blue light may cause eye fatigue and discomfort. Joint Innovation
now offers the screen that passes German Rhine TÜV Low Blue Light
certification to ensure the comfort and health of users' eyes.
Please follow the instructions below operate the screen to reduce
symptoms caused by prolonged exposure to blue light on the
screen.
1. Place the screen 20-28 inches (50-70 cm) away from the eyes, with the center of the screen slightly
below the line of sight.
2. When you need to use the screen for a long time, blinking consciously from time to time will help
reduce eye fatigue.
3. Take a 20-minute break every 2 hours.
4. Take your eyes away from the screen when you rest and stare at distant objects for at least 20 seconds.
5. Stretch moderately during rest to relieve physical fatigue or pain.
6.After factory setting, when the low blue light function is set to 50,70,100, it conforms to TUV Rheinland's
low blue light certification
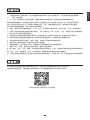
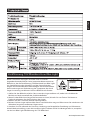
German Rhine TÜV Low Blue Light Certification
Low Blue Light
(Software
Solution)
www.tuv.com
ID 0217008683
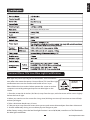
0.279 (H) X 0.279 (V) mm
1.07G

English
10
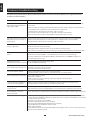
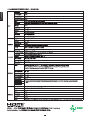
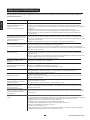
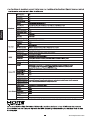
Common troubleshooting
Common Symptoms Possible Solutions
The following table contains general information about common monitor problems you might encounter
and the possible solutions.
• Ensure that the video cable connecting the monitor and the computer is properly connected
and secure.
• Make sure if the operating system had entered hibernation, sleep or power-save mode. Press
any key (Enter key / Power key) or move the mouse to wake it up.
• Check for bent or broken pins in the video cable connector.
• Ensure that the correct input source is selected in the Input Source menu.
• Replace other identical signal cable (HDMI / DisplayPort) to take cross-test.
No display after turning monitor
ON (screen is black but power s
upply lights is ON)
• Verify that the power outlet is functioning properly using any other electrical equipment.
• Make sure the power button on the front panel is normal for boot and pressed fully.
• Check for bent or broken pins in the video cable connector.
No display after turning monitor
ON (not boot, black screen & no
power lights)
• Eliminate video extension cables.
• Reset the monitor to factory settings.
• Change the video resolution to the correct resolution and aspect ratio.
• If the words are still blurry, please try enabling or disabling CLEAR TYPE function from windows
Poor Focus. Picture is fuzzy,
blurry, or ghosting
• Cycle power On-Off.
• Pixel that is permanently Off is a natural defect that can occur in LCD technology.
• For more information on Dell Monitor Quality and Pixel Policy, see INNOCN Support site
at: http://www.innocn.com
Missing Pixels. LCD screen has
spots
• Do not perform any troubleshooting steps.
• Contact INNOCN immediately.
Safety Related Issues
(Visible signs of smoke or sparks)
• Check the resolution setting in your PC
• Reset the monitor to factory settings.
• Make sure the device was not set to “Care Eyes mode”
• Check here: OSD→Picture Setting→Contextual mode→Care Eyes mode
• Press only one key at a time.
• Restart the computer
• Make sure to have a valid video signal going through the monitor before
you can turn on the OSD
• Make sure the “contextual mode”is OFF before setting brightness and contrast ratio.
• Check here: OSD→Picture Setting→Contextual mode→off
The screen appears yellow
Control panel keys do not work
I cannot adjust the brightness/
contrast ratio through OSD
• Make sure your video card supports that feature.
• Also make sure you are using DisplayPort to connect from your computer to your monitor.
• Not every computer/phone ‘s USB Type-C port will support video out signals. Please check
your cable and your computer/phone to make sure those will support a video signal.our monitor.
• Check to see if you plugged a USB-B uplink cable(included in the package) from your computer
to the monitor’s USB-B port. Without an uplink cable to the computer, the USB ports on the back
of the monitor will not work.
• Check that your monitor is turned On.
• Reconnect the uplink cable to your computer.
• Reconnect the USB peripherals(downstream connector).
• Switch Off and then turn On the monitor again.
• Reboot the computer.
• Some USB devices like external portable HDD require higher electric current; connect the device
directly to the computer system.
I cannot get higher refresh rate
on my monitor
After plugged in USB Type-C
from computer to monitor,
there is no video
USB interface is not working
• Check the Aspect Ratio setting in the Display menu OSD.Image is centered on screen, but
does not fill entire viewing area

English
11
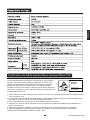
Warranty Information
1. What is covered in your warranty?
2. Contact us
3. This Warranty is not applicable:
1.The product is not purchased from an Authorized Innocn dealer.
2.The product is not used according to instructions given in the instruction manual.
3.Defects caused by improper use as determined by company personnel.
4.Modification or alteration of any nature is made in the electrical circuitry / or physical construction of
the set.
5.Installation / repair work is carried out by persons / agency other than authorized by the company.
6.The original serial number is removed, obliterated or altered from the machine or cabinet.
7.Accidents, Acts of God, lightning, water, fire, public disturbances, improper ventilation, voltage
fluctuations or any cause beyond the control of Innocn.
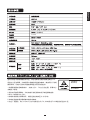
Item
Monitor
Warranty term
1 Year
Service Email
Service Website
http://www.innocn.com
Contact us
Thank you for choosing Innocn® !
We hope the Innocn® product you purchased will serve you well. To ensure safety and trouble-free
operation of your device, please read the user guide carefully and keep it for future needs.
Please email us for customer service & technical support at [email protected].
We recommend you go online to our homepage for the most up-to-date guidance for your product.
registering Innocn membership; refering to warranty information.
http://www.innocn.com

简体中文
注意事项
产品介绍
安装
调整显示
使用
基本参数
OSD菜单
德国莱因 TÜV Low Blue Light (低蓝光) 认证
常见故障排查
保修说明
联系我们
1
2
3
4
9
4
6
9
10
11
11

简体中文
1
使用产品前请仔细阅读本说明书,并妥善保管
请勿覆盖、堵塞后壳上的通风孔,请勿置于床、沙发、毛毯或类似物体表面使用。
设备操作的电源电压范围标示于后壳标签上。若不能确认所供应的电压,可洽询经销商或当地的电力公司。
当设备长期不使用,请切断电源,防止在雷雨天受到电击以及异常电源电压的损伤。
请勿靠近水源或潮湿的地方,如浴室、厨房、地下室、游泳池等。
确保设备安装放置在平稳处,若掉落,可能产生人身伤害或设备损坏。
在阴凉、干燥、通风处存放、使用,请勿靠近辐射源和热源。
请使用可靠接地插座,勿让插座过载,否则会引起火灾或电击。
请勿把异物放入机内,否则可能会引起短路而导致火灾或电击。
请勿自行拆卸,维修本产品,以免发生电击危险,若有故障,请直接与售后服务人员联系。
请勿过度拉扯、扭曲电源线。
屏幕表面附有一层偏光片(非保护膜),请勿撕除,否则会损坏产品且无法保修。

简体中文
2
2
包装清单
请检查所有物品是否包含在您的显示器包装中,如有丢失配件,请联系您的经销商。
配件的颜色和形状可能随型号的不同而有所变化,具体以您收到的实物为准。
根据所购产品的不同,提供的线材可能会有所不同,具体以收到的实际线材为准。

简体中文
3
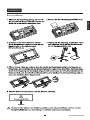
底座安装

简体中文
4
线缆连接:
* 显示器背面的底部接口配置根据产品不同而异。
* 注意:如果电源线或信号线损坏,必须用专用软线或从其制造商或维修部买到的专用组件来更换。
旋转角度
-30°- +30°
倾斜角度
-5°- +15°
高度调整
0- 120mm
使用HDMI信号线,将产品的
HDMI IN接口连接到PC的
HDMI OUT 接口。
使用HDMI-DVI信号线,将产
品的HDMI IN接口连接到PC的
DVI OUT接口。
HDMI接口
请将电源线连接显示器对应
电源接口上,将另一端连接到
正确接地的电源插座。
AC IN接口
使用Type-C线可以连接
到机器数据端口和外部
终端设备。
Type-C接口
使用Type-C线可以连接
到机器数据端口和外部
终端设备。
Type-C接口
将耳机等音频输出设备
连接到AUDIO OUT接口。
AUDIO OUT
OR
将耳机等音频输出设备
连接到AUDIO OUT接口。
AUDIO OUT
OR
使用DP信号线,将产品
的DP IN接口连接到PC
的DP OUT 接口。
DP接口
使用DP信号线,将产品
的DP IN接口连接到PC
的DP OUT 接口。
DP接口

简体中文
5

简体中文
6
屏幕显示(OSD)菜单可用于调整显示器的设置,并在打开显示器并按 按钮后显示在屏幕上。
1. 按任意一个按钮( )以激活导航界面。
菜单说明
进入主菜单图标
调节亮度
调节音量
切换端口输入信号
电源开/关
1
2
3
4
5
实际机台OSD菜单的颜色和形状可能与图中所示略有差异。
OSD菜单规格可能会因功能改进而有所变化,恕不另行通知。
首次开机时,需要设置显示器菜单的默认语言。按按钮( ),选择需要设置的语言,按确认键( )确定。
1 2 3 4 5
Portugues do Brasilazil Deutsch Nederland
简体中文English 한국어
Suomi Français Ελληνικά Indonesia
Українська Tiếng Việt繁体中文 Türkçe
Italiano 日本語 Malaysia Polskie
Português Pусский Español ไทย
Please select the default language
请选择默认语言
La page est en cours de chargement...
La page est en cours de chargement...
La page est en cours de chargement...
La page est en cours de chargement...
La page est en cours de chargement...
La page est en cours de chargement...
La page est en cours de chargement...
La page est en cours de chargement...
La page est en cours de chargement...
La page est en cours de chargement...
La page est en cours de chargement...
La page est en cours de chargement...
La page est en cours de chargement...
La page est en cours de chargement...
La page est en cours de chargement...
La page est en cours de chargement...
La page est en cours de chargement...
La page est en cours de chargement...
La page est en cours de chargement...
La page est en cours de chargement...
La page est en cours de chargement...
La page est en cours de chargement...
La page est en cours de chargement...
La page est en cours de chargement...
La page est en cours de chargement...
La page est en cours de chargement...
La page est en cours de chargement...
La page est en cours de chargement...
La page est en cours de chargement...
La page est en cours de chargement...
La page est en cours de chargement...
-
 1
1
-
 2
2
-
 3
3
-
 4
4
-
 5
5
-
 6
6
-
 7
7
-
 8
8
-
 9
9
-
 10
10
-
 11
11
-
 12
12
-
 13
13
-
 14
14
-
 15
15
-
 16
16
-
 17
17
-
 18
18
-
 19
19
-
 20
20
-
 21
21
-
 22
22
-
 23
23
-
 24
24
-
 25
25
-
 26
26
-
 27
27
-
 28
28
-
 29
29
-
 30
30
-
 31
31
-
 32
32
-
 33
33
-
 34
34
-
 35
35
-
 36
36
-
 37
37
-
 38
38
-
 39
39
-
 40
40
-
 41
41
-
 42
42
-
 43
43
-
 44
44
-
 45
45
-
 46
46
-
 47
47
-
 48
48
-
 49
49
-
 50
50
-
 51
51


INNOCN 44C1G Manuel utilisateur
- Catégorie
- Téléviseurs
- Taper
- Manuel utilisateur
dans d''autres langues
- English: INNOCN 44C1G User manual
- Deutsch: INNOCN 44C1G Benutzerhandbuch

