Maytag LAV3600AWW Manuel utilisateur
- Catégorie
- Machines à laver
- Taper
- Manuel utilisateur

LAV-3
Use & Care Guide
Table of Contents
Safety . . . . . . . . . . . . . . . . . . 1-2
Operating Tips . . . . . . . . . . . . . 3
Detergent
Loading
Additional Tips
Using the Controls . . . . . . . 4-6
Select Load Size
Extra Rinse
Select Temperature
Select Wash/Spin Speed
Select Cycle
Pull Control Dial Out to Start
Special Features . . . . . . . . . . . . 7
Bleach Dispenser
Fabric Softener Dispenser
Care & Cleaning . . . . . . . . . . . . 8
Storing the Washer . . . . . . . . . 8
Troubleshooting . . . . . . . . . 9-10
Service & Warranty . . . . . . . . 11
Guide d’utilisation
et d’entretien . . . . . . . . . . . 12
Guía de uso y cuidado . . . . . 24
Form No. Y81915 A Part No. 2206683 www.maytag.com Litho U.S.A. ©2006 Maytag Appliances Sales Co.

1
Safety
WARNING – Hazards or unsafe practices which COULD
result in severe personal injury or death.
WARNING
CAUTION – Hazards or unsafe practices which COULD
result in minor personal injury or property damage.
CAUTION
Installer: Please leave this manual with this
appliance.
Consumer: Please read and keep this manual for
future reference. Keep sales receipt and/or canceled
check as proof of purchase.
Model Number _______________________________
Serial Number ________________________________
Date of Purchase______________________________
If you have questions, call:
Maytag Customer Assistance
1-800-688-9900 U.S.A.
1-800-688-2002 Canada
(Mon.-Fri., 8am-8pm Eastern Time)
Internet: http://www.maytag.com
U.S. Customers using TTY for deaf, hearing impaired
or speech impaired, call 1-8
00-688-2080.
In our continuing effort to improve the quality and
performance of our appliances, it may be necessary
to make changes to the appliance without revising
this guide.
For service information, see page 11.
What You Need to Know About
Safety Instructions
Warning and Important Safety Instructions appearing in
this manual are not meant to cover all possible
conditions and situations that may occur. Common
sense, caution and care must be exercised when
inst
alling, maint
aining or operating appliance.
Always contact your dealer, distributor, service agent or
manufacturer about problems or conditions you do not
understand.
Recognize Safety Symbols, Words,
Labels
WARNING! FIRE HAZARD
Do not add gasoline, dry-cleaning solvents, or other
flammable or explosive substances to the wash
water. These substances give off vapors that could
ignite or explode.
Do not wash articles which have been previously
cleaned, washed, soaked, or spotted with gasoline,
dry-cleaning solvents, oil, waxes, chemical solvents,
alcohol, turpentine, or other flammable or explosive
materials. These substances will be retained in
articles, and articles which still contain these
flammable or explosive substances give off vapors
that could ignite or explode.
Observe these precautions when using cleaning
fluids, spot or stain removers, etc. These products
should be labeled “nonflammable.” Use according to
manufacturers directions in a well ventilated area or
outdoors. Thoroughly rinse articles by hand before
placing them in the washer
. Some of the
se products
– rust removers for example – will damage
components and the finish of the washer.
Keep area around and underneath washer free from
the accumulation of combustible materials, such as
lint, paper, rags, gasoline, and all other flammable
vapors and liquids.
HYD
ROGEN GAS IS EXPLOSIVE!
Under cer
tain
conditions, hydrogen gas may be produced in a hot
water system that has not been used for two weeks
or more. If the hot water system has not been used
for such a period, before using the washer, turn on
all the hot water faucets and let the water flow from
each faucet for several minute
s. T
his will release any
accumulated hydrogen gas. As this gas is
flammable, do not smoke or use an open flame
during this time.
Recent studies have shown that if vegetable oil
contaminated materials are incompletely washed, a
c
arry-over and buildup of the oil may contribute to a
chemical reaction (spontaneous combustion) that
could c
ause a load to c
atch fire by it
self
. T
his would
be more likely to happen if the load were left in the
dryer after tumbling stopped or if items were folded
and st
acked while warm.

2
1. Read all instructions before using the appliance.
2. As with any equipment using electricity and having
moving parts, there are potential hazards. To use this
appliance safely, the operator should become familiar
with the instructions for operation of the appliance
and always exercise care when using it.
3. Do not install or store this appliance where it will be
exposed to the weather.
4. Install and level washer on a floor that can support
the weight.
5. This appliance must be properly grounded. Never
plug the appliance cord into a receptacle which is not
grounded adequately and in accordance with local
and national codes. See installation instructions for
grounding this appliance.
6. To avoid the possibility of fire or explosion:
a. Do not wash items that have been previously
cleaned in, washed in, soaked in, or spotted with
gasoline, dry-cleaning solvents, other flammable or
explosive substances as they give off vapors that
could ignite or explode. Hand wash and line dry
any items containing these substances.
Any material on which you have used a cleaning
solvent, or which is saturated with flammable
liquids or solids, should not be placed in the
washer until all traces of these liquids or solids
and their fumes have been removed.
These items include acetone, denatured alcohol,
gasoline, kerosene, some liquid household
cleaners, some spot removers, turpentine, waxes
and wax removers.
b. Do not add gasoline, dry-cleaning solvents, or
other flammable or explosive substances to the
wash water. These substances give off vapors that
could ignite or explode.
c.
Under cer
t
ain conditions, hydrogen gas may be
produced in a hot water system that has not been
used for two weeks or more. HYD
R
O
G
E
N G
AS IS
E
XPLOSIVE. If the hot water system has not been
used for such a period, before using a washing
machine or combination washer-dryer
, turn on all
hot water faucets and let the water flow from each
for several minute
s. T
his will release any
To reduce the risk of fire, explosion, electric shock,
or personal injury when using your washer, follow
basic safety precautions, including the following:
WARNING
accumulated hydrogen gas. As the gas is
flammable, do not smoke or use an open flame
during this time.
D. Do not wash or dry items that are soiled with
vegetable or cooking oil. These items may contain
some oil after laundering. Due to the remaining oil,
the fabric may smoke or catch fire by itself.
7. Do not reach into the appliance if the tub or agitator
is moving.
8. Do not allow children or pets to play on, in, or in front
of the appliance. Close supervision is necessary when
the appliance is used near children and pets.
9. Do not tamper with controls.
10. Do not repair or replace any part of the appliance or
attempt any servicing unless specifically
recommended in published user-repair instructions
that you understand and have the skills to carry out.
11. Unplug power supply cord before attempting to
service your washer. Service is to be done only by
qualified service personnel.
12. The agit
ator should not be removed. If the agitator is
removed, it must be replaced by pushing down
completely and the locking screw tightened before
the washer is operated.
13. Keep all laundry aids such as detergents, bleach, etc.,
out of the reach of children, preferably in a locked
cabinet. Use laundry aids only as directed by the
manufacturer. Observe all warnings on container labels.
14. Keep the area around and underneath washer free
from the accumulation of combustible materials, such
as lint, paper, rags, gasoline, and all other flammable
vapors and liquids.
15. Do not use chlorine bleach and ammonia or acids
(such as vinegar or rust remover) in the s
ame wash.
Hazardous fumes can form.
16.
Do not machine wash fiberglass materials. Small
particles can stick to fabrics washed in following
loads and c
ause skin irrit
ation.
17. For flame resistant finishes - follow garment
manufacturer's instructions carefully. Improper
laundering could remove the finish.
18. Before the appliance is removed from service or
disc
arded, remove the door to the washing compar
tment.
19. Inlet hoses are subject to damage and deterioration
over time. Check the hoses periodically for bulges, kinks,
cuts, wear or leaks and replace them every five years.
Safety
SAVE THESE INSTRUCTIONS

3
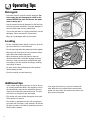
Additional tips
• If the washer stops during the spin, it may be due to
an unevenly distributed load. If this happens, push in
the control knob, open the lid, redistribute the load,
close the lid and pull out the control knob. The spin
will re
sume at the point it was interrupted.
• The washer will pause briefly throughout each cycle.
T
he
se pause
s are normal.
• This washer is designed so that it will not agitate or
spin when the lid is open. It will, however, fill with the
lid open so water is available for pretreating stains or
diluting fabric softener
.
• If you open the lid during a cycle, the washer will
stop. When the lid is closed and the control knob
pulled out, the washer will continue the c
ycle at the
point it was interrupted.
Operating Tips
Detergent
• Use either liquid or granular laundry detergent. For
best results, be sure detergent is added to the
washer BEFORE the load and be sure the wash
water is above 65
°
F.
• Use the correct amount of detergent for the load size,
soil level and water conditions. Use more detergent if
you have hard water and very soiled loads.
If you have soft water or a lightly soiled load, use less
detergent. (See manufacturer’s instructions.)
• Wipe up any detergent spills on the washer.
Loading
•
Put dry, unfolded clothes loosely in the tub, up to the
top row of holes for a maximum load.
• Do not wrap large items like sheets around the agitator.
• Mix large and small items for best circulation. Wash
bulky items like blankets separately.
• When laundering wrinkle free items or items of
delicate construction, washable woolens or loosely
knit items, never use less than the MEDIUM water
level setting. This will minimize shrinkage, wrinkling
and pulling of seams.
• For be
st results add the detergent to the washtub
before adding the load.
• Close lid carefully to avoid slamming.

4
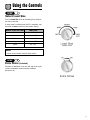
Using the Controls
Select Load Size
Turn the Load Size knob to the setting that matches
the size of the load.
If more water is needed once the fill is complete, turn
the knob to
reset and then to the proper setting.
Extra Rinse (if desired)
Provides an additional rinse near the end of the cycle
to more completely remove laundry additives,
per
fumes, etc.
STEP 1
STEP 2
WATER LEVEL SETTING LOAD SIZE
Mini 1/4 Full
Small 1/4 – 1/3 Full
Medium 1/3 – 1/2 Full
Large 1/2 – 3/4 Full
Super 3/4 – Full
Note
• Items must circulate freely for best results.

Select Temperature
Turn the Wash/Rinse Temperature knob to the
desired water temperatures. Follow the garment care
label for best results. Use the chart below as a guide.
5
Using the Controls
STEP 3
STEP 4
Hot/Cold
White and heavily soiled, color-fast
items
Warm/Cold
Moderately soiled, colored items;
most permanent pre
ss items
Cold/Cold
Brightly colored, lightly soiled
items; washable woolens
WASH/RINSE LOAD TYPE
TEMPS
Select Wash/Spin Speed
Your washer has selectable wash and spin speed
combinations.
Note
• In wash water temperatures below 65
°
F,
detergent
s do not dissolve well or clean well. Care
labels define cold water as up to 85
°
F.
Regular Sturdy fabrics needing maximum
F
ast/
F
ast
water extraction
Perm. Press Sturdy fabrics needing a slower spin
Fast/Slow speed because of wrinkling
Gentle
Delic
ate fabrics needing slower spin
Slow/Slow
speed because of clothing
construction
WASH/SPIN LOAD TYPE
SPEEDS

Select Cycle
To select a cycle, push the control dial IN and turn it to
the right (clockwise) until the pointer is at the number
of minutes desired for the wash load.
Regular Cycle
For regular fabrics, select the cycle time and turn the
Wash/Spin Speed dial to Regular/Fast/Fast. For
maximum cleaning set the dial at 16.
Permanent Press Cycle
This cycle provides up to 10 minutes of agitation.
Depending on the load, select either the Regular/Fast/Fast
or Perm. P
ress/Fast/Slow wash spin speed.
Gentle Cycle
The Gentle Cycle provides approximately 10 minutes of
agitation and soaking to help remove stains.
Soak Only
There will be a brief period of agitation followed by a
soak. Soaking should be no longer than 30 minutes.
The control dial must be advanced manually to a spin
or a wash setting.
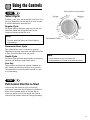
6
Using the Controls
STEP 5
STEP 6
C
ontrol features vary by model.
Note
• Do not attempt to turn the control dial
counterclockwise. Damage to the timer will result.
Note
• The spin speed will always be Fast on Regular
cycle settings.
Pull Control Dial Out to Start
You may stop the washer at any time by simply
pushing the control dial IN. Therefore it is possible to
obt
ain a non-agit
ated soak or to shor
ten, skip or
repeat any par
t of a c
ycle. T
he control dial must be
pushed IN (off position) when you change the setting.

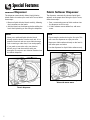
7
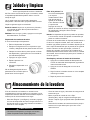
Bleach Dispenser
The dispenser automatically dilutes liquid chlorine
bleach before it reaches your wash load. To use, follow
these steps:
1. Measure liquid chlorine bleach carefully, following
the instructions on the bottle.
2. Add the bleach to the dispenser before adding the
load. Avoid splashing or over-filling the dispenser.
Pour liquid chlorine bleach into
bleach dispenser.
Fabric Softener Dispenser
The dispenser automatically releases liquid fabric
softener at the proper time during the cycle. To use,
follow these steps:
1. Pour a measured amount of fabric softener into
the dispenser to fill line only.
2. If fabric softener comes below line, add warm
water.
Note
• Never pour undiluted liquid chlorine bleach
directly onto the load or into the wash tub. It is a
powerful chemical and can cause fabric damage,
such as tearing or color loss, if not used properly.
• If you prefer to use color-safe, non-chlorine
bleach, pour it into the wash tub with your
detergent. Do not pour non-chlorine bleaches into
the bleach dispenser.
Special Features
P
our liquid fabric softener into cup and
dilute with warm water.
Note
• Do not stop the washer during the first spin. This
will cause the dispenser to empty too soon.
• Never pour fabric softener directly on the load. It
will leave spots and stains.
• Use the dispenser for liquid fabric softeners only.

8
Care & Cleaning
Turn off the water faucets after finishing the day’s
washing. This will shut off the water supply to the
washer and prevent the unlikely possibility of damage
from escaping water.
Use a soft cloth to wipe up all detergent, bleach or
other spills as they occur.
Clean the following as recommended:
Control Panel – clean with a soft, damp cloth and
glass cleaner. Do not use abrasive powders or
cleaning pads.
Cabinet – clean with soap and water followed with an
appliance wax, if desired.
Fabric Softener Dispenser
1. Pull the dispenser off of the top of the agitator.
2. Soak for one hour in sink or container in hot
water and dishwashing liquid.
3. Hold hands over top and bottom of dispenser
and shake to loosen buildup.
4. Rinse with clean, hot water.
5. Repeat process if necessary.
6. Replace dispenser on
agit
ator.
Do not use dishwashing liquid
inside the washer. Oversudsing
can occur.
Lint Filter – it is self-
cleaning and requires
no maintenance. The
filter is located under
the agitator on the
bottom of the
washtub. During the
wash and rinse portion
of the cycle, lint is collected on the filter. Then
during the spin and drain the filter is cleaned
automatically.
Interior – hard water deposits may be removed, if
needed, using a recommended cleaner labeled
washer safe.
The interior of the washer should be cleaned
periodically to remove dirt, soil, odor or bacteria
residue that may remain in the washer as a result of
washing clothe
s. We recommend taking the following
steps every 60 to 120 days to clean and freshen your
washer interior. The frequency with which the washer
should be cleaned and freshened depends on factors
such as usage, the amount of dir
t, soil or bacteria
being run through your washer, or the use of cold
water.
To clean and freshen the washer interior:
1. Add a measured amount of chlorine bleach to
the bleach dispenser, following package
directions.
2. Add 1/4 cup of detergent to the tub.
3. Run the washer through a complete cycle using
hot water
.
4. Repeat the process if necessary.
Storing the Washer
Washers can be damaged if water is not removed from
hoses and internal components before storage. Prepare
the washer for storage as follows:
• Select Regular, eight minutes, and add one cup of
chlorine bleach OR white vinegar to a full load of
water without clothe
s. Run the washer through a
complete c
ycle.
• Turn the water faucets off and disconnect the inlet
hoses.
• Advance the cycle control knob to Spin and lower
the drain hose to eliminate any water that may be in
the drain hose.
•
Disconnect the washer from the electric
al supply
and leave the washer lid open to let air circulate
inside the tub.
•
Do not mix bleach and vinegar in the s
ame wash.
Hazardous fumes can form.
CAUTION

9
• Plug cord into live electrical outlet.
• Check fuse or reset circuit breaker.
• Turn the control knob to proper cycle and pull knob out to start the washer.
• Turn both faucets on fully.
• Straighten inlet hoses.
• Disconnect hoses and clean screens. Hose filter screens may be plugged.
• Check fuse or reset circuit breaker.
• Make sure the lid is completely closed.
• Turn the control knob to proper cycle and pull knob out to start the washer.
• Close lid and pull knob out to start the washer. For your safety, washer will not
agitate or spin unless the lid is closed.
• The washer is equipped with a lid switch failure detector. If the lid switch should
malfunction, the detector will stop operations for your safety. Call for service.
• Unevenly distributed load. Redistribute the load, close the lid and pull knob out.
Check for leveling. Be sure water level is acceptable for load size.
• Check fuse or reset circuit breaker.
• Straighten drain hose
s. Eliminate kinked hose
s. If there is a drain restriction, c
all for
service.
• Close lid and pull knob out to start the washer. For your safety, washer will not spin
unless lid is closed.
• The washer is equipped with a lid switch failure detector. If the lid switch should
malfunction, the detector will stop operations for your safety. Call for service.
• Suds lock – caused by too much suds. Rewash without detergent. Use correct
amount of a low-sudsing detergent.
• The washer may have sensed an unevenly distributed load. Redistribute the load in
the tub, close the lid and pull the control knob out.
• A normal spin speed is recommended for heavy loads like jeans or towels.
•
Unevenly distributed load. Redistribute the load, close the lid and pull knob out.
Check for leveling. Be sure water level is acceptable for load size.
• Plug cord into live electrical outlet.
• Check fuse or reset circuit breaker.
• Turn the control knob to proper cycle and pull knob out to start the washer.
• Close lid and pull knob out to start the washer. For your safety, washer will not
agitate or spin unless lid is closed.
• This may be a pause or soak period in the cycle. Wait briefly and it may start.
•
The washer is equipped with a lid switch failure detector. If the lid switch should
malfunction, the detector will stop fill operations for your safety. Call for service.
Won’t Fill
Won’t Agitate
Won’t Spin or Drain
Load is Wet
Stops
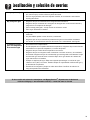
Troubleshooting

10
For further assistance contact Maytag Services
SM
, Maytag Customer Assistance:
U.S. 1-800-688-9900 or Canada 1-800-688-2002.
U.S. Customers using TTY for deaf, hearing impaired or speech impaired, call 1-8
00-6
88-2
080.
Troubleshooting
• Make sure hose connections are tight.
• Make sure end of drain hose is correctly inserted and secured to drain facility.
• Avoid extended soaking – soak for 30 minutes or less.
• Avoid overloading.
• Be sure washer is leveled properly as outlined in installation manual.
• Weak floors can cause vibration and walking.
• Be sure rubber feet are installed on leveling legs.
• Operating sounds will vary depending on agitation speed.
• Turn both faucets on fully.
• If equipped with a temperature selector knob, be sure it is set directly on a
temperature setting and not between settings.
• Make sure temperature selection is correct.
• Make sure hoses are connected to correct faucets and inlet connections. Be sure
water supply is regulated correctly. Flush water line before filling washer.
• Check the water heater. It should be set to deliver a minimum 120° F (49° C) hot
water at the tap. Also check water heater capacity and recovery rate.
• Disconnect hoses and clean screens. Hose filter screens may be plugged.
Leaks Water
Is Noisy
Fills with the Wrong
Temperature Water

Service & Warranty
11
Warranty
Limited One Year Warranty -
Parts and Labor
For one (1) year from the original retail
purchase date, any part which fails in
normal home use will be repaired or
replaced free of charge.
Canadian Residents
The above warranties only cover an
appliance installed in Canada that has
been certified or listed by appropriate test
agencies for a compliance to a National
Standard of Canada unless the appliance
was brought into Canada due to transfer
of residence from the United States to
Canada.
The specific warranties expressed above are
the ONLY warranties provided by the
manufacturer. These warranties give you
specific legal rights, and you may also have
other rights which vary from state to state.
What is Not Covered By These Warranties
1. Conditions and damages resulting from any of the following:
a
. Improper installation, delivery, or maintenance.
b
. Any repair, modification, alteration, or adjustment not authorized by the
manufacturer or an authorized servicer.
c. Misuse, abuse, accidents, unreasonable use, or acts of God.
d. Incorrect electric current, voltage, electrical and/or gas supply.
e. Improper setting of any control.
2. Warranties are void if the original serial numbers have been removed, altered,
or cannot be readily determined.
3. Light bulbs, water filters and air filters.
4. Products purchased for commercial or industrial use.
5. The cost of service or service call to:
a. Correct installation errors. For products requiring ventilation, rigid metal
ducting must be used.
b. Instruct the user on the proper use of the product.
c. Transport the appliance to and from the servicer.
6. Any food loss due to refrigerator or freezer product failures.
7. Expenses for travel and transportation for product service in remote locations.
8. Outside of the United States and Canada this warranty does not apply.
Contact your dealer to determine if another warranty applies.
9. Consequential or incidental damages sustained by any person as a result of
any breach of these warranties. Some states do not allow the exclusion or
limitation of consequential or incidental damages, so the above exclusion may
not apply.
If You Need Service
First see the Troubleshooting section in your Use and Care Guide or call the
dealer from whom your appliance was purchased or call Maytag Services, LLC,
Customer Assistance at 1-800-688-9900 USA and 1-800-688-2002 Canada to
locate an authorized servicer.
• Be sure to retain proof of purchase to verify warranty status. Refer to WARRANTY
for fur
ther information on owner’s responsibilities for warranty service.
•
If the dealer or service company cannot re
solve the problem, write to Mayt
ag
Services, LLC, Attn: CAIR
®
Center, P.O. Box 2370, Cleveland, TN 37320-2370, or call
1-800-688-9900 USA and 1-800-688-2002 Canada. U.S. customers using
TTY for deaf, hearing impaired or speech impaired, call 1-800-688-2080.
•
User’s guide
s, service manuals and par
t
s information are available from Maytag
Services, LLC, Customer Assistance.
Notes: When writing or calling about a service problem, please include:
a. Your name, address and telephone number;
b. Model number and serial number;
c.
Name and address of your dealer or servicer;
d. A clear description of the problem you are having;
e. Proof of purchase (sales receipt).
CUSTOMER’S SOLE AND EXCLUSIVE
REMEDY UNDER THIS LIMITED
WARRANTY SHALL BE PRODUCT REPAIR
AS PROVIDED HEREIN. IMPLIED
WARRANTIES, INCLUDING WARRANTIES
OF MERCHANTABILITY OR FITNESS FOR
A PARTICULAR PURPOSE, ARE LIMITED
TO ONE YEAR OR THE SHORTEST
PERIOD ALLOWED BY LAW. MAYTAG
CORPORATION SHALL NOT BE LIABLE
F
O
R INCIDENTAL OR CONSEQUENTIAL
DAMAGES. SOME STATES AND
PROVINCES DO NOT ALLOW THE
EXCLUSION OR LIMITATION OF
INCIDENTAL OR CONSEQUENTIAL
DAMAGES, OR LIMITATIONS ON THE
DURATION OF IMPLIED WARRANTIES OF
M
E
RCHANTABILITY OR FITNESS, SO
THESE EXCLUSIONS OR LIMITATIONS
MAY NOT APPLY TO YOU. THIS
W
A
R
R
A
NT
Y G
I
VES YOU SPECIFIC LEGAL
RIGHTS AND YOU MAY ALSO HAVE
O
TH
E
R R
IGHTS, WHICH VARY STATE TO
ST
A
TE O
R P
R
OVI
N
CE TO PROVINCE.

LAV-3
Guide d’utilisation et d’entretien
Table des matières
Sécurité . . . . . . . . . . . . . . . 13-14
Fonctionnement . . . . . . . . . . . 15
Détergent
Chargement
Conseils supplement
aire
s
Employer les commandes . . 16-18
Sélection du volume de charge
Sélection de Extra Rinse
Sélection de la température
Sélection le c
ycle de lavage/d’
e
ssorage
Sélection du c
ycle
T
irer le sélecteur pour mettre en marche
Caractéristiques spéciales . . 19
Distributeur de javellisant liquide
Distributeur d’assouplissant
Nettoyage et entretien . . . . . 20
Remisage de la machine
à laver . . . . . . . . . . . . . . . . . 20
Recher
che des pannes . . 21-22
Garantie et service
après-vente . . . . . . . . . . . . 23
Guía de uso y cuidado . . . . . 24

13
Sécurité
Installateur : Veuillez laisser le présent guide avec
l
’appareil.
Client : Veuillez lire le présent guide et le conserver pour
r
éférence future. Conservez aussi les reçus de caisse et
les chèques oblitérés à titre de preuve d’achat.
Numéro de modèle ________________________________
Numéro de série___________________________________
Date d’achat ______________________________________
Pour toute question, contacter :
Service-clients Maytag
1-800-688-2002 Canada
(Lundi au Vendredi, 8 h à 8 h, heure de l’Est)
Site Internet: http://www.maytag.com
En raison de nos efforts constante d’amélioration de la
qualité de nos appareils électro-ménagers, il se peut
qu’une machine à laver soit modifée sans que le guide
soit révisé.
Pour le service après-vente, voir page 23.
AVERTISSEMENT ! RISQUE D’INCENDIE
Ne pas ajouter d’essence, de solvants de nettoyage à sec
ou toute autre substance inflammable ou explosive à
l’eau de lavage. Ces substances produisent des vapeurs
q
ui pourraient s’enflammer ou exploser.
Ne pas laver d’articles qui ont auparavant été nettoyés,
lavés, trempés ou détachés à l’aide d’essence, de solvants
de nettoyage à sec, d’huiles, de cires, de solvants
chimiques, d’alcool, de térébenthine ou d’autres produits
explosifs ou inflammables. Ces substances resteront
incrustées dans les articles, et ceux-ci produisent des
vapeurs qui peuvent s’enflammer ou exploser.
Suivre ces précautions lors de l’utilisation de produits
nettoyants liquides, de détachants, etc. Ces produits
doivent porter la mention « inflammable ». Utiliser
conformément aux directive
s du fabricant dans un
endroit bien aéré ou à l’extérieur. Rincer à fond les
articles à la main avant de les mettre dans la sécheuse.
Certains produits - ceux qui enlèvent la rouille par
exemple - peuvent endommager les pièces et la finition
de la machine à laver.
Éviter toute accumulation de matériaux combustibles, tels
que la ouate, le papier, les chiffons, l’essence et autres
vapeurs et liquides inflammables, sous la machine à laver
et autour de celle-ci.
L’HYDROGÈNE EST UN GAZ EXPLOSIF! Dans
certaines conditions, il peut y avoir production
d’hydrogène dans un système de chauffage d’eau qui
n’est pas utilisé pendant 2 semaines ou davantage. Si le
système de chauffage d’eau n’a pas été utilisé pendant
une telle durée, ouvrir tous les robinets d’eau chaude et
laisser couler l’
eau pendant plusieurs minutes avant
d’utiliser la machine à laver. Ceci élimine toute
accumulation d’hydrogène. Ce gaz étant inflammable, ne
pas fumer ni utiliser de flamme vive pendant cette
procédure.
De
s études récentes ont démontré que si les substances
contaminées d’huile végétale ne sont pas complètement
nettoyées, une accumulation d’huile peut provoquer une
réaction chimique (combustion spontanée) qui pourrait
c
auser un incendie. Cela risque davantage de survenir
lorsque les vêtements sont laissés dans la sécheuse
après que le tambour ait cessé de tourner ou que les
articles sont pliés et empilés avant que la chaleur ne se
soit dissipée.
Ce qu’il faut savoir à propos
des consignes de sécurité
Les consignes de sécurité et les mises en garde présentées
dans ce manuel ne couvrent pas toutes les situations
possibles. Faire preuve de jugement, de prudence et
d’attention lors de l’installation, de l’entretien et de
l’utilisation du propriétaire.
Lorsque survient un problème ou une situation inhabituelle,
toujours communiquer avec le dét
aillant, le distributeur, le
technicien agréé ou le fabricant.
Reconnaissez les étiquettes, phrases
ou symboles sur la securite
AVERTISSEMENT – Risques ou pratiques non sûres, qui
POURRAIENT résulter en de graves blessures ou même
la mor
t.
AVERTISSEMENT
A
T
TE
NTI
O
N –
R
isque
s ou pratique
s non sûre
s qui
POURRAIENT résulter en blessures mineure ou
d’
endommager le produit.
ATTENTION

14
1. Lire toutes les instructions avant d’utiliser la machine.
2. Comme avec tout équipement fonctionnant à l’électricité
et comportant des pièces mobiles, il existe toujours des
possibilités de danger. Pour utiliser cette machine dans
les meilleures conditions de sécurité, l’opérateur doit se
familiariser avec les instructions de fonctionnement de
l’appareil et user de prudence pendant son utilisation.
3. Ne pas installer ni remiser la machine dans un endroit
où elle e
st exposée aux intempéries.
4. Installer la machine et la mettre de niveau sur un
plancher pouvant supporter son poids.
5. Cet appareil doit être correctement mis à la terre. Ne
jamais brancher le câble électrique d’une machine à
laver sur une prise murale non mise à la terre
conformément aux codes locaux et nationaux. Voir les
instructions d’installation pour la mise à la terre de cette
machine.
6. Pour éviter les risques d’incendie ou d’explosion :
a. Ne pas laver d’articles qui ont auparavant été nettoyés
ou lavés à l’aide d’essence, de solvants de nettoyage à
sec ou d’autres produits explosifs ou inflammables, ou
qui en sont imbibés ou éclaboussés, car ces
substances produisent des vapeurs qui peuvent
s’enflammer ou exploser. Laver à la main et sécher à
l’air tout article contenant ces substances.
Tout tissu sur lequel de
s solvants de nettoyage ont été
utilisés ou qui sont saturés de liquides ou solides
inflammables ne doit pas être mis dans la machine à
laver avant que toute trace et toute vapeur de ces
liquides ou solides ne soient complètement éliminées.
Ces produits comprennent l’acétone, l’alcool dénaturé,
l’essence, le kérosène, certains produits de nettoyage
ménagers, les dét
achant
s, la térébenthine, les cires et
les décapants de cire.
b.
Ne pas ajouter d’
e
ssence, de solvants de nettoyage à
sec ou toute autre substance inflammable ou
explosive à l’eau de lavage. Ces substances produisent
des vapeurs qui pourraient s’enflammer ou exploser.
c. Dans certaines conditions, il peut y avoir production
d’hydrogène dans un système de chauffage d’eau qui
n’est pas utilisé pendant 2 semaines ou plus.
L’HYDROGÈNE EST UN EXPLOSIF. Si votre système
de chauffage d’eau n’est pas utilisé sur une telle
durée, ouvrir tous les robinets d’eau chaude et laisser
couler l’eau pendant plusieurs minutes avant d’utiliser
votre machine à laver ou votre ensemble machine à
laver-sécheuse. Ceci élimine toute accumulation
d’hydrogène. Ce gaz étant inflammable, ne pas fumer
Pour réduire les risques d’incendie, d’explosion,
d’électrocution ou des blessures lors de l’utilisation de cet
a
ppareil, suivre les précautions d’usage, dont les suivantes :
AVERTISSEMENT
ni utiliser de flamme vive pendant ces quelques
m
inutes.
d. Ne pas laver ou sécher d’articles tachés d’huile
végétale ou de cuisson. Ces articles pourraient être
e
ncore imprégnés d’huile après la lessive. Pour cette
raison, le tissu pourrait émettre des fumées ou
prendre feu de lui-même.
7. Ne pas mettre la main ou le bras dans la machine si
l’agitateur ou cuve est en mouvement.
8. Ne pas permettre aux enfants ou aux animaux familiers
de jouer sur l’appareil, à l’intérieur ou en face de celui-
ci. Une supervision étroite est nécessaire lorsque
l’appareil est utilisé à proximité d’enfants ou d’animaux
familiers.
9. Ne pas modifier les mécanismes de commande.
10. Ne pas réparer ou remplacer une pièce de la machine
ou procéder à un dépannage, sauf si les instructions
publiées le recommandent et que la personne effectuant
la réparation les comprend et possède les
connaissances voulues pour les exécuter.
11. Débrancher le cordon d’alimentation électrique avant
d’essayer de réparer la laveuse. Les réparations ne
doivent être effectuées que par du personnel qualifié.
12. L’agitateur ne doit pas être retiré. S’il est retiré, le
replacer en l’enfonçant à fond, puis serrer la vis de
blocage avant de faire fonctionner la machine.
13. Conserver tous les produits de lessive, les détergents,
les produits de blanchiment, etc., hors de portée des
enfants, et de préférence dans une armoire fermée à
clé. N’utiliser ces produits que selon les directives du
fabricant. Observer tous les avertissements paraissant
sur les étiquettes des différents produits.
14.
S’
assurer que toute la zone autour de la laveuse et en
dessous, soit dégagée de toute accumulation de
matériaux combustibles comme charpie, papier, chiffons,
e
ssence et tout autre liquide ou vapeur inflammable.
15. Ne pas mélanger de javellisant et d’ammoniaque ou
d’
acide
s (tels que du vinaigre ou du produit pour enlever
la rouille) pour une même charge de linge. De
s vapeurs
nocives peuvent se former.
16.
Ne pas laver d’
ar
ticle
s en fibre de verre à la machine.
De petites particules peuvent se coller sur le linge lavé
par la suite et provoquer des irritations cutanées.
17. Apprêts résistants aux flammes – suivre attentivement
les instructions du fabricant du vêtement. Un vêtement
incorrectement lavé ou séché pourrait perdre son apprêt
ignifuge.
18.
Avant de mettre la machine hors service ou au rebut,
retirer la porte du compartiment de lavage.
19. Les tuyaux d'alimentation se détériorent progressivement.
Inspecter les tuyaux à intervalle régulier; rechercher
dilatations, écrasements, coupures, fuites et indices
d'usure. Remplacer les tuyaux après 5 ans de service.
C
ycles, options, lights
W
hat can & cannot be
washed
o
perating tips
dishwasher use
loading
Controls at a glance
Dryer Exhaust tips
S
afety
Care & Cleaning
Service & Warranty
S
urface Cooking
troubleshooting
Oven Cooking
Storing the washer
Installation
S
pecial Features
Notes
Sécurité
C
ycles, options, lights
What can & cannot be
w
ashed
operating tips
dishwasher use
l
oading
Controls at a glance
Dryer Exhaust tips
Safety
C
are & Cleaning
Service & Warranty
S
urface Cooking
troubleshooting
Oven Cooking
Storing the washer
Installation
S
pecial Features
Notes
CONSERVER CES INSTRUCTIONS

Conseils supplementaires
•
Il e
st possible pour la charge peut être déséquilibrée
pendant l’essorage. Si cela se produit, pousser sur le
sélecteur
, ouvrir le couvercle, rééquilibrer la charge, fermer
le couvercle et tirer sur le sélecteur
. L
’
e
ssorage reprend au
point où il s’était interrompu.
•
Cette machine effectue de
s pause
s à plusieurs reprise
s au
cours d’un cycle de lavage. Ces pauses momentanées font
par
tie de son fonctionnement normal.
•
Cette laveuse e
st conçue pour ne pas essorer lorsque que
le couvercle e
st ouver
t. T
outefois, elle se remplit et
l’agitation a lieu même si le couvercle est ouvert pour que
l’eau soit disponible et permettre le prélavage des taches
ou la dilution de l’
adouciss
ant.
• Si le couvercle est ouvert au cours d’un cycle, la machine
s’arrête. Une fois le couvercle fermé et le sélecteur tiré, le
cycle reprend là où il avait été interrompu.
15
C
ycles, options, lights
W
hat can & cannot be
w
ashed
o
perating tips
dishwasher use
l
oading
C
ontrols at a glance
D
ryer Exhaust tips
S
afety
C
are & Cleaning
S
ervice & Warranty
S
urface Cooking
t
roubleshooting
Oven Cooking
S
toring the washer
Installation
S
pecial Features
N
otes
Fonctionnement
Détergent
• Utiliser du détergent liquide ou en poudre. Pour des
r
ésultats optimums, ajouter suffisamment de
détergent dans la machine AVANT de la remplir et
régler la température de l’eau à plus de 18° C (65° F).
• Utiliser la quantité de détergent qui convient à la charge,
au degré de saleté et à la dureté de l’eau. Utiliser plus de
détergent si l’eau est dure et que la charge est très sale.
Si l’eau est douce ou que la charge est peu sale, utiliser
moins de détergent. (Voir les instructions du fabricant.)
• Essuyer la machine si elle se trouve éclaboussée de
détergent.
Chargement
• Mettre le linge sec, non plié sans le tasser dans la
machine, en remplissant le panier jusqu’au rang supérieur
de trous pour une charge maximum.
• Ne pas enrouler de grands articles tels que des draps
autour de l’agitateur.
• Pour une meilleure circulation, mélanger les petits et les
grands articles. Laver les articles volumineux comme les
couvertures séparément.
• Lors du lavage d’articles infroissables, fragiles, de lainages
lavables ou d’articles en tricot à mailles lâches, ne jamais
utiliser un niveau d’eau inférieur au réglage MEDIUM
(moyen). Ils auront moins tendance à rétrécir, à se froisser
et les coutures tiendront mieux.
• Pour des résultats optimums, mettre du détergent dans la
cuve avant d’ajouter le linge.
• Refermer soigneusement le couvercle pour qu’il ne
claque pas.

16
C
ycles, options, lights
What can & cannot be
w
ashed
operating tips
d
ishwasher use
l
oading
Controls at a glance
Dryer Exhaust tips
Safety
C
are & Cleaning
S
ervice & Warranty
S
urface Cooking
troubleshooting
O
ven Cooking
S
toring the washer
I
nstallation
S
pecial Features
Notes
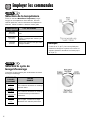
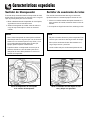
Employer les commandes
Sélection du volume de charge
Mettre le sélecteur Load Size (charge) sur le réglage
correspondant à la charge de linge.
Pour ajouter de l’eau à la fin du remplissage, régler le
sélecteur sur la position «reset» (nouveau réglage), puis le
positionner face au réglage désiré.
ÉTAPE 1
RÉGLAGE DU GROSSEUR DE
NIVEAU D’EAU LA CHARGE
Mini
(mini)
1/4 plein
Small
(petit)
1/4 – 1/3 plein
Medium
(moyen)
1/3 – 1/2 plein
Large
(élevé)
1/2 – 3/4 plein
Super
(super)
3/4 plein – plein
Remarque
• Pour des résultats optimums, le linge doit circuler
librement.
Sélection de Extra Rinse
(Rinçage supplémentaire)
Supplémentaire rinçage à la fin du programme pour
l’élimination plus complète de
s additifs de lavage et par
fums.
ÉTAPE 2

ÉTAPE 3
ÉTAPE 4
17
Hot/Cold
Blanc très sale et couleurs bon
(chaud/froid)
teint
Warm/Cold
Linge modérément sale, articles de
(tiède/froid)
couleur ; la plupart des articles à pli
permanent
Cold/Cold
Articles aux couleurs vives, peu sales ;
(froid/froid) lainages lavables
TEMPÉRATURE TYPE DE CHARGE
LAVAGE/RINÇAGE
C
ycles, options, lights
What can & cannot be
w
ashed
operating tips
d
ishwasher use
l
oading
Controls at a glance
Dryer Exhaust tips
Safety
C
are & Cleaning
S
ervice & Warranty
S
urface Cooking
troubleshooting
O
ven Cooking
S
toring the washer
I
nstallation
S
pecial Features
Notes
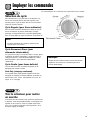
Employer les commandes
Sélection de la température
Tourner le sélecteur Wash/Rinse Temperature (lavage/
rinçage) sur les températures d’eau désirées. Pour des
résultats optimums, suivre las indications de l’étiquette du
vêtement. Utiliser le tableau ci-dessous comme guide.
Remarque
•
À moins de 18° C, (65° F), l’eau est trop froide pour
dissoudre les détergents en poudre et les activer. Les
étiquettes d’entretien considèrent l’eau froide jusqu’à
29° C (85° F).
Sélection le cycle de
lavage/d’essorage
La machine est programmée pour combinaisons de vitesse
de lavage et d’essorage.
V
ITE
S
SES DE
TYPE DE
L
AVAGE/
CHARGE
ESSORAGE
Regular
Fast/Fast
Tissus robustes nécessitant un essorage
normal
maximum literie
rapide/rapide
Perm. Press
Tissus robustes nécessitant un essorage
Fast/Slow
à moindre vitesse qui minimisera le
vêtements infroissables
froissement
rapide/lente
Gentle
Slow/Slow
Tissus fragiles, couvertures ou draps
douce
nécessitant une attention particulière
lente/lente

Sélection du cycle
Pour sélectionner un cycle, pousser sur le sélecteur et le
t
ourner vers la droite (dans le sens des aiguilles d’une
montre) jusqu’à ce que la flèche soit vis-à-vis la durée de
lavage (en minutes) désirée.
Cycle Regular (pour tissus ordinaires)
Pour les tissus ordinaires, sélectionner le temp de cycle et
tourner le sélecteur de vitesse « Wash/Spin » (lavage/
essorage) à « Regular/Fast/Fast » (normale/rapide/rapide).
Pour un lavage optimum, régler le sélecteur à la position 16.
Cycle Permanent Press (pour
vêtements infroissables)
Ce cycle procure jusqu’à 10 minutes. Selon la charge, placer
le sélecteur de vitesse « Wash/Spin » (lavage/essorage) à
« Regular/Fast/Fast » (normale/rapide/rapide) OU « Perm.
Press/Fast/Slow » (pour vêtements infroissables/
rapide/lente).
Cycle Gentle (pour tissus delicats)
Le cycle delicats environ 10 minutes d'agitation et de
trempage pour enlever la saleté.
Soak Only (trempage seulement)
Il se compose d’une brève période d’agitation suivie d’un
trempage. Le trempage ne doit pas dépasser 30 minutes. Le
sélecteur doit être passé manuellement à un cycle de
lavage ou à l’essorage.
Tirer le sélecteur pour mettre
en marche
La machine peut être arrêtée à tout moment en poussant sur
le sélecteur. Il est alors possible d’obtenir un trempage sans
agit
ation ou de raccourcir
, s
auter ou répéter toute partie
d’un cycle. Le sélecteur doit être enfoncé (position « off »)
lorsque le réglage est modifié.
18
ÉTAPE 5
ÉTAPE 6
Remarque
• Ne pas tourner le sélecteur dans le sens contraire des
aiguilles d’une montre car la minuterie pourrait se
trouver endommagée.
Les caractéristiques des commandes et le style varient selon le modèle.
C
ycles, options, lights
What can & cannot be
w
ashed
operating tips
d
ishwasher use
l
oading
Controls at a glance
Dryer Exhaust tips
Safety
C
are & Cleaning
S
ervice & Warranty
S
urface Cooking
troubleshooting
O
ven Cooking
S
toring the washer
I
nstallation
S
pecial Features
Notes
Employer les commandes
Note
•
La vitesse d’essorage sera toujours rapide lors des
réglages pour cycle normal.

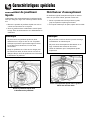
Distributeur de javellisant
liquide
Le distributeur dilue automatiquement le javellisant liquide
a
vant qu’il atteigne le linge. Pour l’utiliser, procéder comme
suit :
1. Mesurer la quantité de javellisant liquide avec soin en
suivant les instructions sur le récipient.
2. Verser le javellisant dans le distributeur avant d’ajouter
le linge. Éviter les éclaboussures ou le débordement du
distributeur.
Distributeur d’assouplissant
Ce distributeur ajoute l’assouplissant liquide au moment
v
oulu du cycle. Pour l’utiliser, procéder comme suit :
1. Verser la quantité voulue de liquid dans le godet,
jusqu’au repère de remplissage seulement.
2. Si le liquide n’atteint pas le repère, ajouter de l’eau tiède.
Remarque
• Ne jamais verser de javellisant liquide non dilué
directement sur le linge ou dans la cuve. Ce produit
chimique est puissant et peut endommager les tissus,
en les déchirant ou décolorant, s’il n’est utilisé
correctement.
• Lorsqu’un javellisant sans chlore et sans danger pour
les couleurs est utilisé, le verser dans la cuve avec le
détergent. Ne pas verser de javellisant sans chlore dans
le distributeur de javellisant.
Cycles, options, lights
What can & cannot be
w
ashed
operating tips
d
ishwasher use
loading
Controls at a glance
Dryer Exhaust tips
S
afety
C
are & Cleaning
S
ervice & Warranty
Surface Cooking
troubleshooting
Oven Cooking
Storing the washer
Installation
S
pecial Features
Notes
Caractéristiques spéciales
19
Remarque
• Ne pas arrêter la machine durant le premier essorage.
Le distributeur se viderait trop tôt.
• Ne jamais verser d’assouplissant directement sur le
linge. Il laisserait des traînées et des taches.
• Utiliser le distributeur pour l’assouplissant liquide
uniquement.
Verser le javellisant liquide dans
le distributeur de javellisant.
Verser l’assouplissant liquide dans le godet et
diluer avec de l’eau tiède.
La page est en cours de chargement...
La page est en cours de chargement...
La page est en cours de chargement...
La page est en cours de chargement...
La page est en cours de chargement...
La page est en cours de chargement...
La page est en cours de chargement...
La page est en cours de chargement...
La page est en cours de chargement...
La page est en cours de chargement...
La page est en cours de chargement...
La page est en cours de chargement...
La page est en cours de chargement...
La page est en cours de chargement...
La page est en cours de chargement...
La page est en cours de chargement...
-
 1
1
-
 2
2
-
 3
3
-
 4
4
-
 5
5
-
 6
6
-
 7
7
-
 8
8
-
 9
9
-
 10
10
-
 11
11
-
 12
12
-
 13
13
-
 14
14
-
 15
15
-
 16
16
-
 17
17
-
 18
18
-
 19
19
-
 20
20
-
 21
21
-
 22
22
-
 23
23
-
 24
24
-
 25
25
-
 26
26
-
 27
27
-
 28
28
-
 29
29
-
 30
30
-
 31
31
-
 32
32
-
 33
33
-
 34
34
-
 35
35
-
 36
36


Maytag LAV3600AWW Manuel utilisateur
- Catégorie
- Machines à laver
- Taper
- Manuel utilisateur
dans d''autres langues
- English: Maytag LAV3600AWW User manual
- español: Maytag LAV3600AWW Manual de usuario
Documents connexes
-
Maytag LAT3500 Mode d'emploi
-
-
-
-
Maytag Atlantis MAV8551AWW Manuel utilisateur
-
-
-
-
Maytag AAV-2 Manuel utilisateur
-