Indesit ADG 361 Mode d'emploi
- Catégorie
- Lave-vaisselle
- Taper
- Mode d'emploi

ADG 361
EN
English
Operating instructions
DISHWASHER - Contents
Operating instructions,1
Important Safety Instructions, 2-3
Assistance, 6
Product Data, 7
Installation, 8-9
Description of the appliance, 10
Refined salt and rinse aid, 11
Loading the racks, 12-13
Detergent and dishwasher use, 14
Wash cycles, 15
Special wash cycles and Options, 16
Care and maintenance, 17
Troubleshooting, 18
FR
Français
Mode d’emploi
LAVE-VAISSELLE - Sommaire
Mode d’emploi, 1
Informations de Sécurité Importantes, 4-5
Service, 6
Fiche produit, 7
Installation, 19-20
Description de l’appareil, 21
Sel régénérant et Produit de rinçage, 22
Charger les paniers, 23-24
Produit de lavage et utilisation du lave-vaisselle, 25
Programmes, 26
Programmes spéciaux et Options, 27
Entretien et soin, 28
Anomalies et remèdes, 29

2
LEGEND OF SYMBOLS/LÉGENDE DES SYMBOLES
Warning/Avertissement
Grounding/Mise à la terre
Electrical Hazard/Risque d’électrocution
Waste/Déchet
Safeguarding the environment/Protection de l’environnement
Recycling/Recyclage
Use gloves/Utiliser des gants
IMPORTANT SAFETY
INSTRUCTIONS
Read the instructions carefully before
using, as they include important information
on safe installation, use and maintenance.
Keep this instruction manual in a safe place
for future reference. If the appliance is sold,
given away or moved, make sure the
manual is kept with the machine.
Remove the appliance from all packaging
and make sure it was not damaged during
transportation, if it was damaged contact
the retailer and do not proceed any further
with the installation process.
When using your dishwasher, follow
the precautions listed below:
• The appliance must be used to wash
domestic crockery in accordance with
the instructions in this manual.
• This appliance can be used by children
aged from 8 years and above and persons
with reduced physical, sensory or mental
capabilities or lack of experience and
knowledge if they have been given
supervision or instruction concerning
use of the appliance in a safe way
and understand the hazards involved.
Children shall not play with the appliance.
• Cleaning and user maintenance shall not
be made by children without supervision.
• The appliance must not be installed
outdoors, even in covered areas. It
is extremely dangerous to leave the
machine exposed to rain and storms.
• Do not store flammable materials in close
proximity to the appliance.
• The water in the appliance is not potable.
• Do not use solvents inside the appliance:
risk of explosion!
• The door should not be left in the open
position since this could present a
tripping hazard.
• Do not rest objects on the open door or sit
or stand on it since the appliance could
trip forward.
• The open appliance door can only
support the weight of the loaded rack
when pulled out.
• The water supply tap must be shut off
and the plug should be removed from
the electrical socket at the end of every
cycle and before cleaning the appliance
for carrying out any maintenance work
also disconnect in the event of any
malfunction.
• Repairs and technical modifications must
be carried out exclusively by a qualified
technician.
• When unplugging the appliance always
pull the plug from the mains socket. Do
not pull on the cable.
• In order to avoid laceration hazard,
usage of special gloves is needed
during the assembling of the appliance.
• During use, the access to the rear wall
should be limited in a sustainable manner
such as approaching the device to the
wall or furniture board.
• Keep packaging materials out of the
reach of Children, packaging materials
should not be used as a toy.
• Children must not be allowed to play with
the appliance.
• Store the detergent, rinse aid and salt out
of the reach of children.
• Appliance is dedicated only for household
use.
• Appliance can not be operated until
installation process is complete.
GROUNDING INSTRUCTIONS
• This appliance must be grounded. In the
event of a malfunction or breakdown,
grounding will reduce the risk of an

3
electric shock by providing a path of
least resistance of electric current. This
appliance is equipped with a cord having
an equipment- grounding conductor and
a grounding plug.
• The plug must be plugged into an
appropriate outlet that is installed and
grounded in accordance with all local
codes and ordinances.
• Extension cord, adapters and conversion
plugs must not be used to connect the
appliance to the outlet.
• Improper connection of the equipment-
grounding conductor can result in the
risk of an electric shock.
• Check with a qualified electrician or
service representative if you are in
doubt whether the appliance is properly
grounded. Do not modify the plug
provided with the appliance; If it does not
fit the outlet. Have a proper outlet installed
by a qualified electrician.
PROPER USE
• Access to disconnection of the appliance
(main plug) shall be ensured after
installation.
• When loading items to be washed:
1 - Locate sharp items so that they are not
likely to damage the door seal;
2 - WARNING: Knives and other utensils
with sharp points must be loaded in the
cutlery basket with their points/blades
down or placed in a horizontal position
with the sharp end facing away from the
front of the appliance.
• Use only detergent and rinse additives
designed for an automatic dishwasher.
• WARNING: Some dishwasher detergents
are strongly alkaline. They can be
extremely dangerous if swallowed. Avoid
contact with the skin and eyes and keep
children away from the dishwasher when
the door is open. Check that the detergent
receptacle is empty after completion of
the wash cycle.
• If the supply cord is damaged, it must
be replaced by the manufacturer or its
service agent or a similarly qualified
person in order to avoid a hazard.
• During installation, the power supply must
not be excessively or dangerously bent
or flattened. Do not tamper with controls.
• To dispose of any packaging materials,
follow local legislation so that the
packagings may be reused.
• Use the dishwasher only for its intended
function.
• The appliance is to be connected to the
water mains using new hose sets. The old
hose-sets should not be reused.
• The maximum number of place settings
is shown in the product sheet.
SAFEGUARDING THE ENVIRONMENT
• This appliance has been made of
recyclable or re-usable material.
Scrapping must be carried out in
compliance with local waste disposal
regulations. Before scrapping it, make
sure to cut off the mains cord so that the
appliance cannot be re-used.
• For more detailed information on handling
and recycling of this product, contact
your local authorities who deal with the
separate collection of rubbish or the shop
where you bought the appliance.
SCRAPPING OF PACKAGING
•The packaging can be 100% recycled as
confirmed by the recycling symbol .
The various parts of the packaging
must not be dispersed in the environment,
but must be scrapped in line with local
authority regulations.
• The European Directive 2012/19/EU
relating to Waste Electrical and Electronic
Equipment (WEEE) states that household
appliances should not be disposed of
using the normal solid urban waste cycle.
Exhausted appliances should be collected
separately in order to optimise the cost of
reusing and recycling the materials inside
the machine, while preventing potential
damage to the atmosphere and public
health. The crossed-out dustbin symbol
shown on all products reminds the owners
of their obligations regarding separated
waste collection. For further information
relating to the correct disposal of
household appliances, owners may
contact the relevant public authority or
the local appliance dealer.

4
travaux d’entretien. Débrancher également
en cas de dysfonctionnement.
• Seul un technicien qualifié est apte à
effectuer les réparations et les modifications
techniques.
• Pour débrancher l’appareil, toujours
extraire la fiche de la prise principale. Ne
pas tirer sur le câble.
• Pour éviter tout risque de coupure,
l’utilisation de gants spéciaux est
nécessaire pour l’assemblage de l’appareil.
• Pendant l’utilisation, l’accès à la paroi
arrière doit être limité de façon durable,
en rapprochant par exemple la machine
du mur ou d’un meuble.
• Conserver les matériaux d’emballage hors
de portée des enfants. Les emballages ne
sont pas des jouets.
• Les enfants ne sont pas autorisés à jouer
avec l’appareil.
• Ranger les produits de nettoyage, de
rinçage et le sel hors de portée des enfants.
• La machine est conçue pour un usage
domestique exclusivement.
• L’appareil ne peut pas être utilisé avant que
l’installation ait été menée à terme.
CONSIGNES DE MISE À LA TERRE
• Cet appareil doit être mis à la terre.
En cas de dysfonctionnement ou de
panne, une prise de terre réduit le risque
d’électrocution en permettant au courant
électrique de suivre un chemin de moindre
résistance. Cet appareil est doté d’un
cordon comportant un conducteur de terre
et d’une fiche de mise à la terre.
• La fiche doit être branchée sur une prise
de courant compatible, installée et mise
à la terre conformément aux codes et
règlementations en vigueur dans le pays.
• Éviter les allonges et les adaptateurs pour
relier la machine à la prise.
• Un mauvais branchement du
conducteur de terre de l’appareil peut
entraîner un risque d’électrocution.
• En cas de doute, consulter un électricien
qualifié ou un préposé du service pour
s’assurer que l’appareil est correctement
mis à la terre. Ne pas modifier la fiche fournie
avec l’appareil si elle n’est pas compatible
avec la prise de courant. Demander à un
électricien qualifié d’installer une prise
adaptée.
FR
INFORMATIONS DE SÉCURITÉ
IMPORTANTES
Lire attentivement les consignes avant
toute utilisation. Elles contiennent des
informations importantes pour une installation,
une utilisation et un entretien en toute sécurité.
Conserver ce manuel en lieu sûr pour une
consultation future. Si l’appareil est vendu,
donné ou déplacé, le manuel devra
l’accompagner.
Déballer complètement l’appareil et vérifiez
si le transport ne l’a pas endommagé. Le
cas échéant, contacter le revendeur et
interrompre l’installation.
Pour utiliser le lave-vaisselle, suivre les
précautions suivantes :
• L’appareil doit être utilisé pour le lavage
de la vaisselle domestique conformément
aux consignes figurant dans ce manuel.
• L’appareil peut être utilisé par des enfants de
plus de 8 ans et des personnes présentant
des capacités physiques, sensorielles
ou mentales limitées, voire dépourvues
de l’expérience et des connaissances
nécessaires, sous surveillance et après
avoir reçu les instructions nécessaires
quant à l’utilisation de l’appareil en toute
sécurité. Une compréhension des risques
est également nécessaire. Les enfants ne
sont pas autorisés à jouer avec l’appareil.
• Les enfants ne sont pas autorisés à
nettoyer ni effectuer l’entretien de l’appareil
sans surveillance.
• Ne pas installer l’appareil à l’extérieur,
même dans un endroit protégé. Il est
extrêmement dangereux de l’exposer à la
pluie et aux orages.
• Ne pas conserver de matériaux
inflammables à proximité de l’appareil.
• L’eau dans l’appareil n’est pas potable.
• Ne pas utiliser de solvants dans l’appareil :
risque d’explosion !
• Ne pas laisser la porte ouverte, car elle
présente un danger de trébuchement.
• Ne rien poser sur la porte ouverte. Ne
pas s’asseoir ni monter sur la porte car la
machine pourrait basculer.
• Ouverte, la porte de la machine ne peut
supporter que le poids du tiroir rempli.
• Le robinet d’alimentation en eau doit
être fermé et la fiche enlevée de la prise
électrique au terme de chaque cycle et
avant le nettoyage de l’appareil en vue des

5
UTILISATION APPROPRIÉE
• L’accès à la prise principale doit être
assuré au terme de l’installation afin de
pouvoir débrancher la machine le cas
échéant.
• Pour charger l’appareil:
1 - Placer les objets coupants de sorte à ne
pas endommager le joint de la porte.
2 - AVERTISSEMENT: Les couteaux
et les autres utensiles présentant des
pointes coupantes doivent être placés
dans le panier à couverts. Les pointes
et lames doivent être orientées vers le
bas ou placées à l’horizontale. La partie
coupante doit être tournée vers l’arrière
de la machine.
• Utiliser uniquement des produits de
lavage et de rinçage pour lave-vaisselle
automatique.
• AVERTISSEMENT: Certains produits
de lavage pour lave-vaisselle sont très
alcalins. Ils peuvent s’avérer extrêmement
dangereux en cas d’ingestion. Éviter tout
contact avec la peau et les yeux et tenir
les enfants à l’écart de l’appareil lorsque
la porte est ouverte. Vérifier que le bac de
produit de lavage est vide une fois le cycle
de lavage achevé.
• Si le cordon d’alimentation est
endommagé, il doit être remplacé par le
fabricant, son agent d’entretien ou une
personne aux qualifications identiques
pour éviter tout danger.
• Pendant l’installation, l’alimentation
électrique ne doit pas subir des
déformations ou un aplatissement
excessifs ou dangereux. Ne pas altérer
les commandes.
• Pour éliminer les matériaux
d’emballage, respecter la législation
locale en termes de recyclage.
• Utiliser l’appareil uniquement pour l’usage
auquel il est destiné.
• La machine doit être reliée à une alimentation
d’eau à l’aide de tuyaux neufs. Les tuyaux
usagés doivent être évités.
• Le nombre maximal de couverts pour
lequel la machine est prévue figure dans
la fiche produit.
PROTECTION DE L’ENVIRONNEMENT
• La machine a été fabriquée à partir de
matériaux recyclables ou réutilisables.
La mise au rebut doit être réalisée
conformément à la législation locale en la
matière. Avant la mise au rebut, veillez à
couper le cordon d’alimentation pour éviter
toute réutilisation de l’appareil.
• Pour de plus amples informations sur la
prise en charge et le recyclage de ce
produit, contactez les autorités locales
compétentes en termes de tri sélectif ou
votre revendeur.
MISE AU REBUT DE L’EMBALLAGE
• L’emballage peut être intégralement
recyclé, comme l’indique le symbole
Recyclable. Les différentes parties de
l’emballage ne doivent pas être dispersées
dans la nature, mais mise au rebut
conformément à la législation locale.
• La Directive européenne 2012/19/EU
relative aux déchets d’équipements
électriques et électroniques (DEEE)
stipule que les appareils domestiques
doivent faire l’objet d’une collecte séparée
de celle des déchets domestiques. Les
appareils en fin de vie doivent être collectés
séparément afin d’optimiser le coût de
réutilisation et de recyclage des matériaux
composant la machine tout en évitant les
effets néfastes pour l’atmosphère et la
santé publique. Le symbole représentant
une poubelle sur roues barrée d’une croix
rappelle aux utilisateurs leurs obligations
en termes de tri sélectif. Pour plus
d’informations quant à la mise au rebut
correcte des appareils domestiques, les
propriétaires sont invités à prendre contact
avec les autorités publiques compétentes
ou leur revendeur.

6
FR
Service
Avant d’appeler le service d’assistance technique:
• Vérifier s’il est possible de résoudre l’anomalie soi-même
(voir
Anomalies et remèdes).
• Faire repartir le programme pour s’assurer que l’inconvénient
a été résolu.
• Si ce n’est pas le cas, contacter un Service d’Assistance
Technique agréé.
Ne jamais faire appel à des techniciens non agréés.
Communiquer:
• le type d’anomalie;
• le modèle de l’appareil (Mod.);
• le numéro de série (S/N).
Ces informations figurent sur la plaque signalétique apposée sur
l’appareil
(voir Description de l’appareil).
EN
Assistance
Before contacting Assistance:
• Check whether the problem can be resolved using the
Troubleshooting guide
(see Troubleshooting).
• Restart the programme to check whether the problem has
ceased to exist.
• If the problem persists, contact the Authorised Technical
Assistance Service.
Never use the services of unauthorised technicians.
Please have the following information to hand:
• The type of malfunction.
• The appliance model (Mod.).
• The serial number (S/N).
This information can be found on the appliance data plate
(see
Description of the appliance)
.

7
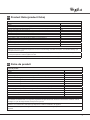
Product Fiche
Brand
WHIRLPOOL
Model
ADG 361
Rated capacity in standard place settings (1)
10
Energy efciency class on a scale from A+++ (low consumption) to D (high consumption)
A+
Energy consumption per year in kWh (2)
237
Energy consumption of the standard cleaning cycle in kWh
0.83
Power consumption of the off-mode in W
0.5
Power consumption of the left-on mode in W
5.0
Water consumption per year in litres (3)
2520
Drying efcacy class on a scale from G (low efcacy) to A (high efcacy)
A
Programme time for standard cleaning cycle in minutes
180
The duration of the left-on mode in minutes
12
Noise in dB(A) Re 1pW
48
Built-in model
Yes
NOTES
1) The information on the label and che relates to the standard cleaning cycle, this programme is suitable to clean normally soiled
tableware and it is the most efcient programme in terms of combined energy and water consumption. The standard cleaning cycle
corresponds to the Eco cycle.
2) Based on 280 standard cleaning cycles using cold water ll and the consumption of the low power modes. Actual energy
consumption depends on how the appliance is used.
3) Based on 280 standard cleaning cycles. Actual water consumption depends on how the appliance is used.
EN
Product Data (product fiche)
Fiche de produit
Marque
WHIRLPOOL
Modèle
ADG 361
Capacité nominale dans un environnement standard (1)
10
Classe énergétique sur une échelle de A+++ (faible consommation) à D (consommation élevée)
A+
Consommation d''énergie par année en kWh (2)
237
Consommation d''énergie du cycle de lavage standard en kWh
0.83
Consommation d''energie en mode "off" en W
0.5
Consommation d''energie en mode "on" en W
5.0
Consommation d''eau par an en litres (3)
2520
Classe d’efcacité du séchage sur une échelle de G (efcacité minimum) à A (efcacité maximum)
A
Durée du programme pour un cycle de lavage standard en minutes
180
Durée du mode "on" en minutes
12
Émissions acoustiques dans l’air, exprimées en dB(A) re 1 pW
48
Encastrable
Oui
NOTES
1) Les informations sur l’étiquette et sur la che se rapportent au cycle de lavage standard. Ce programme convient pour laver
une vaisselle normalement sale, et il s’agit des programmes les plus efcaces en termes de consommation combinée d’eau et
d’énergie. Le cycle de lavage standard correspond au cycle éco.
2) Sur la base de 280 cycles de lavage standard avec une alimentation en eau froide et une consommation en modes à faible
puissance. La consommation réelle d’énergie dépend des conditions d’utilisation de l’appareil
3) Sur la base de 280 cycles de lavage standard. La consommation réelle d’énergie dépend des conditions d’utilisation de
l’appareil.
FR
Fiche de produit

8
EN
If the appliance must be moved at any time, keep it in an
upright position; if absolutely necessary, it may be tilted onto
its back.
Connecting the water supply
Adaptation of the water supply for installation should only
be performed by a qualified technician.
The water inlet and outlet hoses may be positioned towards
the right or the left in order to achieve the best possible
installation.
Make sure the dishwasher does not bend or squash the hoses.
Connecting the water inlet hose
• To a 3/4” gas cold or hot water connection point (max.
60°C).
• Run the water until it is perfectly clear.
• Screw the inlet hose tightly into position and turn off the
tap.
If the inlet hose is not long enough, contact a specialist
store or an authorised technician
(see Assistance)
.
The water pressure must be within the values indicated
in the Technical Data table - otherwise the dishwasher may
be function properly.
Make sure the hose is not bent or compressed.
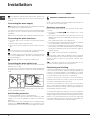
Connecting the water outlet hose
Connect the outlet hose to a drain duct with a minimum
diameter of 2 cm. (A)
The outlet hose connection must be at a height ranging from
40 to 80 cm from the floor or surface where the dishwasher
rests.
Before connecting the water outlet hose to the sink drain,
remove the plastic plug (B).
Anti-flooding protection
To ensure floods do not occur, the dishwasher:
- is provided with a special system which blocks the water
supply in the event of anomalies or leaks from inside the
appliance.
Some models are also equipped with the supplementary
safety device New Acqua Stop, which guarantees anti-
flooding protection even in the event of a supply hose rupture.
WARNING: HAZARDOUS VOLTAGE!
Under no circumstances should the water inlet hose be cut
as it contains live electrical parts.
Electrical connection
Before inserting the plug into the electrical socket, make
sure that:
• The socket is earthed and complies with current
regulations;
• the socket can withstand the maximum load of the
appliance as shown on the data plate located on the inside
of the door
(see chapter Description of the appliance);
• The power supply voltage falls within the values indicated
on the data plate on the inside of the door.
• The socket is compatible with the plug of the appliance. If
this is not the case, ask an authorised technician to replace
the plug (
see Assistance
). Do not use extension cables or
multiple sockets.
The cable should not be bent or compressed.
If the power supply cable is damaged, have it replaced
by the manufacturer or its authorised Technical Assistance
Service in order to prevent all potential hazards.
(See
Assistance)
The Company shall not be held responsible for any
incidents, if these regulations are not observed.
Positioning and levelling
1. Position the dishwasher on a level sturdy floor. If the floor is
uneven, the front feet of the appliance may be adjusted until
it reaches a horizontal position. If the appliance is levelled
correctly, it will be more stable and much less likely to move
or cause vibrations and noise while it is operating.
2. Before recessing the dishwasher, stick the adhesive
transparent strip under the wooden shelf in order to protect
it from any condensation which may form.
3. Place the dishwasher so that its sides or back panel
are in contact with the adjacent cabinets or the wall. This
appliance can also be recessed under a single worktop
(see
the Assembly instruction sheet)
.
4. To adjust the height of the rear foot, turn the red hexagonal
bushing on the lower central part at the front of the dishwasher
using a hexagonal spanner with an opening of 8 mm. Turn the
spanner in a clockwise direction to increase the height and
in an anticlockwise direction to decrease it.
(see Building-in
instruction sheet attached to the documentation)
Installation
MIN 40 cm
MAX 80 cm

9
EN
Advice regarding the first wash cycle
After the installation, remove the stoppers from the racks and
the retaining elastic elements from the upper rack
(if any).
Water softener settings
Before starting the first wash cycle, set the hardness lev-
el of the water from the mains supply.
(see chapter Rinse
aid and refined salt).
First load the softener tank with water, then introduce about
1 kg of salt. It is perfectly normal for water to flow out.
As soon as this procedure is complete, run a wash cycle.
Only use salt that has been specifically designed for dish-
washers.
After the salt has been poured into the machine, the LOW
SALT indicator light switches off.
If the salt container is not filled, the water softener and the
heating element may be damaged as a result.
Technical data
Dimensions
width 44,5 cm
height 82 cm
depth 55 cm
Capacity 10 standard place-settings
Water supply pressure
0,05 ÷ 1MPa (0.5 ÷ 10 bar)
7,25 psi – 145 psi
Power supply voltage See appliance data plate
Total absorbed power See appliance data plate
Fuse See appliance data plate
This dishwasher conforms to the
following European Community
Directives:
-93/68/EEC (CE Marking)
-2006/95/EC (Low Voltage)
-2004/108/EC (Electromagnetic
Compatibility)
-2009/125/EC (Comm. Reg.
1016/2010) (Ecodesign)
-2010/30/EC (Energy Labelling)
-2011/65/EC (RoHS)
-2012/19/CE Waste Electrical
and Electronic Equipment (WEEE)
The machine has a buzzer/set of tones to inform the user that
a command has been implemented: power on, cycle end etc.
The symbols/indicator lights/LEDs on the control panel/
display may vary in colour and may have a flashing or fixed
light.
The display provides useful information concerning the type
of wash cycle, drying/wash-cycle phase, remaining time,
temperature etc.

10
EN
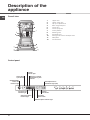
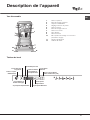
Overall view
Description of the
appliance
Control panel
1. Upper rack
2. Upper spray arm
3. Tip-up compartments
4. Rack height adjuster
5. Lower rack
6. Lower spray arm
7. Cutlery basket
8. Washing filter
9. Salt dispenser
10. Detergent and rinse aid dispensers
11. Data plate
12. Control Panel
Low Salt
indicator light
Low Rinse Aid
indicator light
Multizone Option indicator light
Tablet Option button
and indicator light (Tab)
Start Delay Option
indicator light
Wash-Cycle number
and Remaining Time
indicator
Select Wash
Cycle button
Start Delay
Option button
Multizone
Option button
ON/OFF/RESET
button and
indicator light

11
EN
(°dH = hardness measured in German degrees - °f = hardness
measured in French degrees – mmol/l = millimoles per litre)
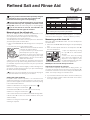
Measuring out the rinse aid
Rinse aid makes dish DRYING easier. The rinse aid dispenser
should be filled:
• When the LOW RINSE AID indicator light on the panel/display
is lit;
• When the dark optical indicator on the dispenser door “E”
becomes transparent.
1. Open the dispenser by turning
the cap "G" in an anticlockwise
direction.
2. Pour in the rinse aid, making
sure it does not overflow from the
dispenser. If this happens, clean
the spill immediately with a dry cloth.
3. Screw the cap back on.
NEVER pour the rinse aid directly into the tub.
Adjusting the amount of rinse aid
If you are not completely satisfied with the drying results, you
can adjust the quantity of rinse aid used. Turn the adjuster “F”.
A maximum of 4 levels can be set according to the dishwasher
model. The factory setting is for a medium level.
• If you see bluish streaks on the dishes, set a low number (1-2).
• If there are drops of water or limescale marks on the dishes,
set a high number (3-4).
Only use products which have been specifically designed
for dishwashers. Do not use table salt or industrial salt.
Follow the instructions given on the packaging.
If you are using a multi-function product, we recommend
that you add salt in any case, especially if the water is hard
or very hard.
(Follow the instructions given on the packaging.)
If you do not add salt or rinse aid, the LOW SALT and
LOW RINSE AID indicator lights will remain lit.
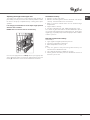
Measuring out the refined salt
The use of salt prevents the formation of LIMESCALE on the
dishes and on the machine's functional components.
• It is important that the salt dispenser be never empty.
• It is important to set the water hardness.
The salt dispenser is located in the lower part of the dishwasher
(see Description)
and should be filled:
• When the LOW RINSE AID indicator light in the control panel
is lit ;
• See autonomy in the water hardness table.
1. Remove the lower rack and unscrew the
container cap (anticlockwise).
2. Only the first time you do this: fill the
water dispenser up to the edge.
3. Position the funnel
(see figure)
and
fill the salt container right up to its edge
(approximately 1 kg); it is not unusual for
a little water to leak out.
4. Remove the funnel and wipe any salt residue away from the
opening; rinse the cap under running water and then screw it on.
It is advisable to perform this procedure every time you add salt
to the container.
Make sure the cap is screwed on tightly, so that no detergent can
get into the container during the wash cycle (this could damage
the water softener beyond repair).
Whenever you need to add salt, we recommend carrying out
the procedure before the washing cycle is started.
Setting the water hardness
For perfect water softener operation, it is essential that the
adjustment be based on the water hardness in your house. Ask
your local water supplier for this information. The factory setting
is for medium water hardness.
• Switch the dishwasher on using the On/Off button.
• Switch it off using the On/Off button
• Hold down button P for 5 seconds until you hear a beep.
• Switch it on using the On/Off button
• The current selection level number and salt indicator light flash.
• Press button P to select the desired hardness level
(see
hardness table).
• Switch it off using the On/Off button
• Setting is complete!
Water Hardness Table
Average autonomy
salt dispenser with 1
wash cycle per day
level °dH °fH mmol/l months
1 0 - 6 0 - 10 0 - 1 7 months
2 6 - 11 11 - 20 1.1 - 2 5 months
3 12 - 17 21 - 30 2.1 - 3 3 months
4 17 - 34 31 - 60 3.1 - 6 2 months
5 34 - 50 61 - 90 6.1 - 9 2/3 weeks
For values between 0°f and 10°f, we do not recommend the use
of salt. A setting of 5 may increase cycle duration.
Refined Salt and Rinse Aid

12
EN
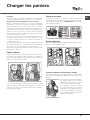
Loading the racks
Upper rack
Load this rack with delicate and lightweight crockery such as
glasses, cups, saucers and shallow salad bowls.
Tips
Before loading the racks, remove all food residues from the
crockery and empty liquids from glasses and containers. No
preventive rinsing is needed under running water.
Arrange the crockery so that it is held in place firmly and does
not tip over; and arrange the containers with the openings facing
downwards and the concave/convex parts placed obliquely,
thus allowing the water to reach every surface and flow freely.
Make sure that the lids, handles, trays and frying pans do not
prevent the spray arms from rotating. Place any small items in
the cutlery basket.
Since plastic dishes and non-stick frying pans usually retain more
water drops, their drying will be not so good as that of ceramic
or stainless-steel dishes.
Lightweight items such as plastic containers should be placed in
the upper rack and arranged so that they cannot move.
After loading the appliance, make sure that the spray arms can
rotate freely.
Lower rack
The lower rack can hold pans, lids, dishes, salad bowls, cutlery
etc. Large plates and lids should ideally be placed at the sides.
Very soiled dishes and pans should be placed in the lower rack
because in this sector the water sprays are stronger and allow
a higher washing performance.
Cutlery basket
The basket is equipped with top grilles for improved cutlery
arrangement. The cutlery basket should be positioned only at
the front of the lower rack.
Adjustable position tip-up compartments
The side tip-up compartments can be positioned at three different
heights to optimize the arrangement of the crockery inside the
rack.
Wine glasses can be placed safely
in the tip-up compartments by
inserting the stem of each glass
into the corresponding slot.
For optimum drying results incline
the tip-up compartments more. To
change the inclination, pull up the
tip-up compartment, slide it slightly
and position it as you wish.

13
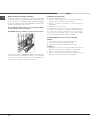
EN
Adjusting the height of the upper rack
The height of the upper rack can be adjusted: high position to
place bulky crockery in the lower rack and low position to make
the most of the tip-up compartments by creating more space
upwards.
It is strongly recommended to never adjust height position
when the rack is loaded.
NEVER raise or lower the rack on one side only.
If the rack is equipped with a Lift-Up device
(see figure)
, lift it
up by holding its sides. To restore the lower position, press the
levers (A) at the sides of the rack and follow the rack down.
Unsuitable crockery
• Wooden crockery and cutlery.
• Delicate decorated glasses, artistic handicraft and antique
crockery. Their decorations are not resistant.
• Parts in synthetic material which do not withstand high
temperatures.
• Copper and tin crockery.
• Crockery soiled with ash, wax, lubrificating grease or ink.
The colours of glass decorations and aluminium/silver pieces
can change and fade during the washing process. Some types
of glass (e.g. crystal objects) can become opaque after a number
of wash cycles too.
Damage to glass and crockery
Caused by:
• Type of glass and glass production process.
• Chemical composition of detergent.
• Water temperature of rinse cycle.
Tips:
• Only use glasses and porcelain guaranteed by the
manufacturer as dishwasher safe.
• Use a delicate detergent suitable for crockery.
• Collect glasses and cutlery from the dishwasher as soon as
the wash cycle is over.

14
EN
Detergent and
dishwasher use
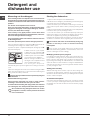
Measuring out the detergent
Good washing results also depend on the correct amount of
detergent being used. Exceeding the stated amount does not
result in a more effective wash and increases environmental
pollution.
The amount can be adjusted to the soil level.
In the case of normally soiled items, use approximately either
25g (powder detergent) or 25ml (liquid detergent). If tablets
are used, one tablet will be enough.
If the crockery is only lightly soiled or if it has been rinsed
with water before being placed in the dishwasher, reduce the
amount of detergent used accordingly.
For good washing results also follow the instructions shown
on the detergent box.
For further questions please ask the detergent producers.
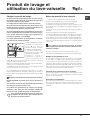
Open the detergent dispenser using button D and measure out
the detergent according to the Table of wash cycles:
• powder or liquid: compartments A (wash detergent) and B
(pre-wash detergent)
• tablets: when the cycle requires
1 tablet, place it in compartment A
and close cover C; when it requires
2 tablets, place the second tablet
on the bottom of the appliance.
Remove detergent residues from
the edges of the compartment and
close cover C until it clicks.
The detergent dispenser
automatically opens up at the right time according to the wash
cycle.
If all-in-one detergents are used, we recommend using the TABS
option, because it adjusts the cycle so that the best washing and
drying results are always achieved.
Only use detergent which has been specifically designed
for dishwashers.
DO NOT USE washing up liquid.
Using excessive detergent may result in foam residues
remaining in the machine after the cycle has ended.
To achieve the best washing and drying results, the combined
use of detergent, rinse aid liquid and refined salt is required.
We recommend using detergents that do not contain
phosphates or chlorine, as these products are harmful
to the environment.
Starting the dishwasher
1. Open the door and press the ON/OFF button.
2. Measure out the detergent.
(see Measuring out the Detergent).
3. Load the racks (
see Loading the racks
).
4. Select the wash cycle in accordance with the type of crockery
and its soil level
(see Table of wash cycles)
by pressing the P
button.
5. Select the wash options
(see Special wash cycles and options)
.
6. Start the wash cycle by shutting the door.
7. The end of the wash cycle is indicated by beeps and by the
flashing of the wash cycle number on the display. Open the door,
switch off the appliance by pressing the ON/OFF button.
8. Wait a few minutes before removing the crockery in order to
avoid burns. Unload the racks, beginning with the lower level.
The machine will switch off automatically during long
periods of inactivity in order to minimise electricity
consumption.
If the crockery is only lightly soiled or if it has been rinsed
with water before being placed in the dishwasher, reduce the
amount of detergent used accordingly.
Modifying a wash cycle in progress
If a mistake was made during the wash cycle selection process,
it is possible to change the cycle, provided that it has only just
begun: open the door taking care to avoid the escaping steam,
by pressing and holding the ON/OFF button, the machine will
switch off. Switch the machine back on using the ON/OFF button
and select the new wash cycle and any options desired; start the
cycle by closing the door.
Adding extra crockery
Without switching off the machine, open the door, taking care
to avoid the escaping steam, and place the crockery inside the
dishwasher. Shut the door and the cycle will begin from the point
at which it was interrupted.
Accidental interruptions
If the door is opened during the wash cycle, or if there is a power
cut, the cycle stops. It starts again from the point at which it was
interrupted once the door has been shut or the electricity supply
is restored.

15
EN
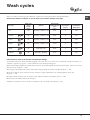
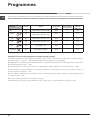
Wash cycle
Wash cycle
which
include
drying
Options
Approximate
duration of wash
cycles
h:min.
Water
consumption
(l/cycle)
Energy
consumption
(KWh/cycle)
1. Eco Yes Start Delay - Multizone - Tab 03:00 9 0,83
2. Intensive Yes Start Delay - Multizone - Tab 02:50 17 1,45
3. 1 Hour No Start Delay - Multizone - Tab 01:00 13 0,95
4. Fragile Yes Start Delay - Multizone - Tab 01:40 9 0,85
5. Rapid No Start Delay - Tab 00:25 8 0,45
6. PreWash No Start Delay - Multizone 00:10 4 0,01
Instructions on wash cycle selection and detergent dosage
1. Normally soiled crockery. Standard program, the most efficient in terms of its combined energy and water con-
sumption. 4 gr/ml**+ 21 gr/ml – 1 Tab
(**Quantity of pre-washing detergent)
2. Recommended program for heavily soiled crockery, specially suitable for pans and saucepans (not to be used for
delicate items). 25 gr/ml – 1 Tab
3. For lightly soiled loads that need a quick basic drying. (Ideal for 4 place settings) 25 gr/ml – 1 Tab
4. Cycle for delicate items, which are more sensitive to high temperatures, for example glasses and cups.
25 gr/ml – 1 Tab
5. Lightly soiled crockery, with no dried-on food. (Ideal for 2 place settings) 21 gr/ml – 1 Tab
6. Crockery to be washed later. No detergent
Standby consumption: Left-on mode consumption: 5 W - Off mode consumption: 0.5 W
Wash-cycle data is measured under laboratory conditions according to European Standard EN 50242.
Based on the different conditions of use, the wash-cycle duration and data can change.
Wash cycles

16
EN
Special wash cycles
and Options
Wash options
If an option is not compatible with the selected wash cycle
(see table of wash cycles), the corresponding LED flashes
rapidly 3 times and beeps will sound.
Tablet Option (Tab)
This option optimises washing and drying results.
When using Tablet, press the TABLET button; the
corresponding indicator will light up. If the button is pressed
again, the option will be deselected.
The “Tablet” option results in a longer wash cycle.
Start Delay Option
The start of the wash cycle may be delayed for a period
of time between 1 and 12 hours.
1. Press the START DELAY button: the corresponding symbol
appears on the display; each time you press the button, the time
(1h, 2h, etc. up to max. 12h) from the start of the selected wash
cycle will be increased.
2. Select the cycle and close the door: the timer will begin
counting down;
3. Once this time has elapsed, the indicator light switches off
and the wash cycle begins.
To adjust the delay time and select a smaller period of time,
press the START DELAY button. To cancel it, press the button
repeatedly until the selected delayed start indicator light switches
off. The wash cycle will start automatically as soon as the door
is shut.
The Start Delay function cannot be set once a wash
cycle has started.
Multizone Option
If there are not many dishes to be washed, a half
load cycle may be used in order to save water, electricity
and detergent. Select the wash cycle and then press the
MULTIZONE button: the indicator corresponding to the
chosen rack lights up and the wash cycle starts only in the
upper or lower rack.
Remember to load the upper or lower rack only, and
to reduce the amount of detergent accordingly.
Notes:
Optimum performance levels when using the “1 Hour and Rapid
” cycles can be achieved by respecting the specified number
of place settings.
To reduce consumption, only run the dishwasher when it is full.
Note for Test Laboratories: for information on comparative EN
testing conditions, please send an email to the following address:

17
EN
C
1
A
3
Care and maintenance
Shutting off the water and electricity supplies
• Turn off the water tap after every wash cycle to avoid leaks.
• Always unplug the appliance when cleaning it and when
performing maintenance work.
Cleaning the dishwasher
• The external surfaces of the machine and the control panel
can be cleaned using a non-abrasive cloth which has been
dampened with water. Do not use solvents or abrasive
products.
• Any marks on the inside of the appliance may be removed
using a cloth dampened with water and a little vinegar.
Preventing unpleasant odours
• Always keep the door of the appliance ajar in order to avoid
moisture from forming and being trapped inside the machine.
• Clean the seals around the door and detergent dispensers
regularly using a damp sponge. This will avoid food becoming
trapped in the seals, which is the main cause behind the
formation of unpleasant odours.
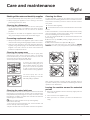
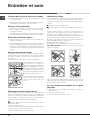
Cleaning the spray arms
Food residue may become encrusted onto the spray arms
and block the holes used to spray the water. It is therefore
recommended that you check the arms from time to time and
clean them with a small non-metallic brush.
The two spray arms may both be removed.
To remove the upper spray arm,
turn the plastic locking ring in an
anti-clockwise direction. The upper
spray arm should be replaced
so that the side with the greater
number of holes is facing upwards.
The lower spray arm can be
removed by pressing on the side
tabs and pulling it upwards.
Cleaning the water inlet hose
If the water hoses are new or have not been used for an extended
period of time, let the water run to make sure it is clear and free
of impurities before performing the necessary connections. If this
precaution is not taken, the water inlet could become blocked
and damage the dishwasher.
Clean the water inlet filter at the tap outlet regularly.
- Turn off the water tap.
- Unscrew the end of the water inlet hose, remove the filter and
clean it carefully under running water.
- Re-place the filter and screw the water hose back into position.
Cleaning the filters
The filter assembly consists of three filters which remove food
residues from the washing water and then recirculate the water.
They must be cleaned if you wish to achieve the best results in
every wash.
Clean the filters regularly.
The dishwasher must not be used without filters or if the filter
is loose.
• After several washes, check the filter assembly and if necessary
clean it thoroughly under running water, using a non-metallic
brush and following the instructions below:
1. Turn the cylindrical filter C in an anti-clockwise direction and
pull it out
(fig. 1).
2. Remove the cup filter B by exerting a slight pressure on the
side flaps
(fig. 2);
3. Slide out the stainless-steel plate filter A.
(fig. 3).
4. Inspect the trap and remove any food residues. NEVER
REMOVE the wash-cycle pump protection
(black detail) (fig.4).
After cleaning the filters, re-place the filter assembly and fix it
in position correctly; this is essential for maintaining the efficient
operation of the dishwasher.
Leaving the machine unused for extended
periods
• Disconnect the appliance from the electricity supply and shut
off the water tap.
• Leave the door of the appliance ajar.
• When you return, run a wash cycle when the dishwasher is
empty.

18
EN
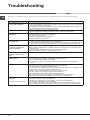
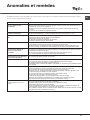
Troubleshooting
Whenever the appliance fails to work, check for a solution from the following list before calling for Assistance.
Problem: Possible causes / Solutions:
The dishwasher does not start
or cannot be controlled.
• The water supply tap is not turned on.
• Switch off the appliance by pressing the ON/OFF button, switch it back on after approximately
one minute and reset the wash cycle.
• The appliance has not been plugged in properly or another electricity socket should be used.
• The dishwasher door has not been closed properly.
The door won’t close.
• Make sure that the racks were inserted all the way.
• The lock was released. Strongly push the door until a “clacking” noise is heard.
No water drain out of the
dishwasher.
• The wash cycle has not nished yet.
• The water drain hose is bent
(see Installation).
• The drain duct is clogged up.
• The lter is clogged up with food residues.
• Check the height of the drain hose.
The dishwasher makes
excessive noise.
• The dishes are rattling against each other or against the spray arms. Place the dishes
properly and make sure the spray arms can rotate freely.
• Too much foam: the detergent has not been measured out correctly or it is not suitable for use
in dishwashers.
(See Detergent and dishwasher use.)
Do not prewash the dishes by hand.
The dishes and glasses are
covered in a white lm or
limescale deposits.
• No rened salt.
• Water hardness adjustment is not suitable: increase the relevant values.
(See Rened Salt
and Rinse Aid.)
• The salt and rinse-aid dispenser cap has not been closed properly.
• The rinse aid has been used up or the dosage is too low.
The dishes and glasses are
streaked or have a bluish
tinge.
• The rinse aid dosage is too high.
The crockery has not been
dried properly.
• A wash cycle without a drying programme has been selected.
• The rinse aid has been used up.
(See Rened Salt and Rinse Aid.)
• The rinse aid dispenser setting is not suitable.
• The crockery is made from non-stick material or plastic; the presence of water drops is
normal.
The dishes are not clean. • The crockery has not been arranged properly.
• The spray arms cannot rotate freely, being hindered by the dishes.
• The wash cycle is too gentle
(see Wash Cycles).
• Too much foam: the detergent has not been measured out correctly or it is not suitable for use
in dishwashers.
(See Detergent and dishwasher use.)
• The lid on the rinse aid compartment has not been closed correctly.
• The lter is dirty or clogged up
(see Care and maintenance.)
• The rened salt level is low
(See Rened Salt and Rinse Aid.)
• Make sure that the height of the dishes is compatible with the rack adjustment.
• The holes in the spray arms are clogged up.
(See Care and maintenance.)
The dishwasher won’t load
any water.
It is blocked with ashing lights.
• There is no water in the mains supply or the tap is shut off.
• The water inlet hose is bent
(see Installation).
• The lters are clogged up: they need cleaning.
(See Care and maintenance.)
• The drain duct is clogged up: it needs cleaning.
• After checking and cleaning, switch the dishwasher on and off and start a new wash cycle.
• If the problem persists, turn off the water tap, remove the plug and call the Service Centre.

FR
19
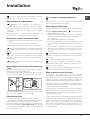
Installation
En cas de déménagement, transporter l’appareil
verticalement ; si besoin est, l’incliner sur le dos.
Raccordements hydrauliques
L’adaptation des installations de plomberie de
l’installation doit être effectuée par du personnel qualifié
Les tuyaux d’amenée et d’évacuation de l’eau peuvent être
orientés vers la droite ou vers la gauche pour simplifier
l’installation.
Attention à ce que les tuyaux d’arrivée et d’évacuation ne
soient pas pliés ou écrasés par le lave-vaisselle.
Raccord du tuyau d’amenée de l’eau
• Auneprised'eaufiletée3/4”gazfroideouchaude(max.
60°C).
• Fairecoulerl'eaujusqu'àcequ'ellesoitlimpide.
• Bienvisserletuyaud'évacuationetouvrirlerobinet.
Si la longueur du tuyau d’amenée ne suffit pas, s’adresser
à un magasin spécialisé ou à un technicien agréé
(voir
Service)
.
La pression de l’eau doit être comprise entre les valeurs
citées dans le tableau des Caractéristiques techniques,
autrement le lave-vaisselle risque de ne pas fonctionner
correctement.
Faireattentionàcequ'iln'yaitnipliuresniétranglements
au niveau du tuyau.
Raccordement du tuyau d’évacuation de
l’eau
Raccorder le tuyau d’évacuation à une conduite d’évacuation
ayantaumoins2cmdediamètre.(A)
Leraccorddutuyaud’évacuationdoitêtreplacéentre40et
80 cm au-dessus du sol ou du plan d’appui du lave-vaisselle.
Avant de raccorder le tuyau d’évacuation de l’eau au siphon
del’évier,retirerlebouchonenplastique(B).
Sécurité anti-fuite
Pour éviter tout risque d’inondation, le lave-vaisselle :
- est équipé d’un dispositif qui coupe l’arrivée de l’eau en
cas d’anomalie ou de fuite à l’intérieur de l’appareil.
Quelques modèles sont aussi équipés d’un dispositif de
sécurité supplémentaire New Acqua Stop, qui garantit
contre tout risque d’inondation même en cas de rupture du
tuyau d’amenée de l’eau.
ATTENTION : TENSION DANGEREUSE !
Il ne faut en aucun cas couper le tuyau d’amenée de l’eau
car il contient des parties sous tension.
Raccordement électrique
Avantdebrancherlafichedanslaprisedecourant,s'assurer
que :
• lapriseest bien reliée à la terre et est conforme aux
réglementations en vigueur ;
• lapriseestbienapteàsupporterlapuissancemaximale
de la machine reportée sur la plaquette signalétique fixée
à la contre-porte
(voirchapitreDescriptiondulave-vaisselle);
• latension d’alimentationest bien compriseentre les
valeurs figurant sur la plaque signalétique de la contre-
porte ;
• lapriseestbiencompatibleaveclafichedel’appareil.
Autrement, faire remplacer la fiche par un technicien
agréé
(voirService)
; n’utiliser ni rallonges ni prises
multiples.
Après installation de l’appareil, le cordon d’alimentation
électrique et la prise de courant doivent être facilement
accessibles.
Le câble ne doit être ni plié ni trop écrasé.
Afin d’éviter tout danger, faire changer le cordon
d’alimentation abîmé, par le fabricant ou par son service
après-vente.
(VoirService)
Nous déclinons toute responsabilité en cas de non-
respect des normes énumérées ci-dessus.
Mise en place et mise à niveau
1. Installer le lave-vaisselle sur un sol plat et rigide.
Compenser les irrégularités en vissant ou en dévissant les
piedsavantjusqu'àcequel'horizontalitédel’appareilsoit
parfaite. Une bonnehorizontalité garantitla stabilitéde
l’appareil et supprime tout risque de bruits et de vibrations.
2.Avantd'encastrerlelave-vaisselle,collerlerubanadhésif
transparent sous le plan en bois pour le protéger contre le
risque de formation de condensation.
3.Installerlelave-vaisselledemanièreàcequelescôtéset
laparoiarrièretouchentauxmeublesadjacentsouaumur.
L’appareil peut être encastré sous un plan de travail continu
(voirfeuilledemontage)
.
4.Pourréglerlahauteurdupiedarrière,agirsurladouille
rouge à six pans située dans la partie avant du lave-
vaisselle, en bas et au milieu, à l’aide d’une clé mâle à six
pans, ouverture 8 mm. Tourner dans le sens des aiguilles
d’une montre pour augmenter la hauteur et dans le sens
inverse pour la diminuer.
(voirfeuilled’instructionsjointeà
la documentation)
MIN 40 cm
MAX 80 cm

20
FR
Caractéristiques techniques
Dimensions
largeur 44,5 cm
hauteur 82 cm
profondeur 55 cm
Capacité 10 couverts standard
Pression eau
d’alimentation
0,05 ÷ 1 MPa (0,5 ÷ 10 bar)
7,25 – 145 psi
Tension
d’alimentation
Voir étiquette des caractéristiques
Puissance totale
absorbée
Voir étiquette des caractéristiques
Fusible Voir étiquette des caractéristiques
Cet appareil est conforme aux
Directives Communautaires suivantes:
- 93/68/EEC (CE)
- 2006/95/EC (Basse Tension)
- 2004/108/EC (Compatibilité
Electromagnétique)
- 2009/125/EC (Comm. Reg.
1016/2010) (Ecodesign)
- 2010/30/EC (Etiquetage)
- 2011/65/EC (RoHS)
- 2012/19/EU (DEEE)
Cet électroménager dispose de signaux sonores/bips qui
signalent que la commande a été activée: allumage, fin de
cycle etc..
Tous les symboles/voyants/led lumineux du bandeau de
commande/afficheur peuvent avoir des couleurs différentes,
flasher ou être en fixe.
Affichage d'informations utiles concernant le type de cycle
sélectionné, la phase de lavage/séchage, le temps résiduel,
la température etc.... etc...
Conseils pour le premier lavage
Aprèsl'installation,retirerlescalesplacéessouslespaniers
ainsi que les élastiques de fixation du panier supérieur
(si
prévus).
Réglages de l'adoucisseur d'eau
Avant de lancer le premier lavage, sélectionner le ni-
veau de dureté del'eauduréseau.
(voirchapitreProduit
de rinçage et sel régénérant))
Lors de son premier chargement, il faut d'abord remplir
l'adoucisseurd'eaupuisintroduireenviron1kgdesel.Il
estnormalquedel'eaudéborde..
Fairedémarreruncycledelavagetoutdesuiteaprès.
N’utiliser que du sel spécial lave-vaisselle.
Aprèsremplissageduréservoir,levoyantSELs'éteint.
L'absence de remplissagedu réservoirà selpeut
endommager l’adoucisseur d’eau et l’élément chauffant.
La page est en cours de chargement...
La page est en cours de chargement...
La page est en cours de chargement...
La page est en cours de chargement...
La page est en cours de chargement...
La page est en cours de chargement...
La page est en cours de chargement...
La page est en cours de chargement...
La page est en cours de chargement...
La page est en cours de chargement...
La page est en cours de chargement...
La page est en cours de chargement...
-
 1
1
-
 2
2
-
 3
3
-
 4
4
-
 5
5
-
 6
6
-
 7
7
-
 8
8
-
 9
9
-
 10
10
-
 11
11
-
 12
12
-
 13
13
-
 14
14
-
 15
15
-
 16
16
-
 17
17
-
 18
18
-
 19
19
-
 20
20
-
 21
21
-
 22
22
-
 23
23
-
 24
24
-
 25
25
-
 26
26
-
 27
27
-
 28
28
-
 29
29
-
 30
30
-
 31
31
-
 32
32


Indesit ADG 361 Mode d'emploi
- Catégorie
- Lave-vaisselle
- Taper
- Mode d'emploi
dans d''autres langues
- English: Indesit ADG 361 User guide
Documents connexes
Autres documents
-
Whirlpool ADG 562 X Mode d'emploi
-
Bauknecht BFP 5O41 PLT X Mode d'emploi
-
-
-
Whirlpool WIS 1150 PEL Mode d'emploi
-
Franke FDW 613 E5P F Mode d'emploi
-
-
-
-
Ariston LFP 5P31 WLT X Mode d'emploi