Philips FWM206 Manuel utilisateur
- Catégorie
- Ensembles audio pour la maison
- Taper
- Manuel utilisateur
Ce manuel convient également à

Mini Hi-Fi System
Register your product and get support at
www.philips.com/welcome
FWM206
EN User manual
ES Manual del usuario
FR Mode d’emploi
Thank you for choosing Philips.
Need help fast?
Read your Quick Start Guide and/or
User Manual first for quick tips
that make using your Philips product
more enjoyable.
If you have read your instructions
and still need assistance,
you may access our online help at
www.philips.com/welcome
Philips vous remercie de
votre confiance.
Besoin d'une aide
rapide?
Le Guide rapide de début et Manuel de
l'utilisateur regorgent d'astuces destinées à
simplifier l'utilisation de votre produit Philips.
Toutefois, si vous ne parvenez pas à résoudre
votre probléme, vous pouvez accéder à
notre aide en ligne à l'adresse
www.philips.com/welcome
Gracias por escoger Philips
Necesita ayuda
inmediata?
Lea primero la Guía rápida del comienzo
o el Manual del usuario, en donde encontrará
consejos que le ayudarán a disfrutar
plenamente de su producto Philips.
Si después de leerlo aún necesita ayuda,
consulte nuestro servicio de
asistencia en línea en
www.philips.com/welcome

2
Canada
English:
This digital apparatus does not exceed the Class B limits for radio noise
emissions from digital apparatus as set out in the Radio Interference
Regulations of the Canadian Department of Communications.This Class B
digital apparatus complies with Canadian ICES-003.
Français:
Cet appareil numérique n’émet pas de bruits radioélectriques dépassant
les limites applicables aux appareils numériques de Classe B prescrites dans
le Règlement sur le Brouillage Radioélectrique édicté par le Ministère des
Communications du Canada. Cet appareil numérique de la classe B est
conforme à la norme NMB-003 du Canada.
The set complies with the FCC-Rules, Part 15 and with 21 CFR 1040.10.
Operation is subject to the following two conditions:
1. This device may not cause harmful interference, and
2. This device must accept any interference received, including interference
that may cause undesired operation.
L’appareil est conforme à la réglementation FCC, section 15, et à la norme
21 CFR 1040.10. Son utilisation est soumise à deux conditions :
1. L’appareil ne doit pas provoquer d’interférences nuisibles, et
2. L’appareil doit supporter les interférences reçues, y compris les interférenc-
es empêchant son fonctionnement correct.

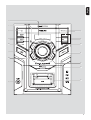
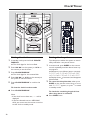
English
3
1
0
9
!
@
#
%
$
2
3
5
4
7
6
8

4
1
!
$
%
*
&
@
#
3
4
5
8
9
0
2
^
6
7

English
5

6

English
7
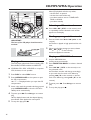
IMPORTANT SAFETY INSTRUCTIONS
Class II equipment symbol
This symbol indicates that the unit has
a double insulation system
Clean only with dry cloth.
Where the MAINS plug or an appliance
coupler is used as the disconnet device,
the disconnet device shall remain
readily operable.
materials
9

8
CAUTION
Use of controls or adjustments or per-
formance of procedures other than
herein may result in hazardous radiation
exposure or other unsafe operation.

English
9
Contents
General Information
Supplied accessories............................................10
Environmental Information................................10
Safety information................................................10
Preparation
Rear connections.................................................11
Inserting batteries into the remote control ..12
Controls
Controls on the system .....................................13
Controls on the remote control................13-14
Basic Functions
Switching the system on.....................................15
Power-saving automatic standby.......................15
Adjusting volume and sound.............................15
CD/MP3/WMA Operation
Playing a disc .........................................................16
Selecting a different track ..................................16
Finding a passage within a track .......................16
Playing an MP3/WMA disc...........................16-17
Discs for playback................................................17
'LIIHUHQWSOD\PRGHV6KXIÁHDQG5HSHDW.......17
Programming track numbers.............................17
Erasing the programme ......................................17
Radio Reception
Tuning to radio stations......................................18
Programming radio stations ..............................18
Tuning to preset radio stations.........................18
External Sources
Using MP3 LINK ..................................................19
Using an external device ..................................19
Clock/Timer
Setting the clock...................................................20
Setting the sleep timer ......................................20
Setting the timer .................................................21
6SHFLÀFDWLRQV
................................. 22
Maintenance
................................... 23
Troubleshooting
......................24-25

10
General Information
Congratulations on your purchase and
welcome to Philips!
7RIXOO\EHQLÀWIURPWKHVXSSRUWWKDW
Philips offers, register your product at
www.philips.com/welcome.
Supplied accessories
– 2 speaker boxes
– remote control
– MP3 link cable
Environmental Information
All unnecessary packaging has been omitted.
We have tried to make the packaging easy to
separate into three materials: cardboard (box),
polystyrene foam (buffer) and polyethylene
(bags, protective foam sheet).
Your system consists of materials which can
be recycled and reused if disassembled by a
specialized company. Please observe the local
regulations regarding the disposal of packaging
materials, exhausted batteries and old
equipment.
Safety Information
M
Before operating the system, check that the
operating voltage indicated on the typeplate
(or the voltage indication beside the voltage
selector) of your system is identical with the
voltage of your local power supply. If not, please
consult your dealer.
M
3ODFHWKHV\VWHPRQDÁDWKDUGDQGVWDEOHVXU-
face.
M
Where the MAINS plug or an appliance cou-
pler is used as the disconnect device, the dis-
connet device shall remain readily operable.
M
Place the system in a location with adequate
ventilation to prevent internal heat build-up in
your system. Allow at least 10 cm (4 inches)
clearance from the rear and the top of the unit
and 5 cm (2 inches) from each side.
M
The ventilation should not be impeded by cov-
ering the ventilation openings with items, such
as newspapers, table-cloths, curtains, etc.
M
Do not expose the system, batteries or discs
to excessive moisture, rain, sand or heat
sources caused by heating equipment or direct
sunlight.
M
1RQDNHGÁDPHVRXUFHVVXFKDVOLJKWHGFDQ-
dles, should be placed on the apparatus.
M
1RREMHFWVÀOOHGZLWKOLTXLGVVXFKDVYDVHV
shall be placed on the apparatus.
M
The apparatus shall not be exposed to dripping
or splashing.
M
Install this unit near the AC outlet and where
the AC power plug can be reached easily.
M
If the system is brought directly from a cold to
a warm location, or is placed in a very damp
room, moisture may condense on the lens of
the disc unit inside the system. Should this oc-
cur, the CD player would not operate normally.
Leave the power on for a
bout one hour with
no disc in the system until normal playback is
possible.
M
The mechanical parts of the set contain self-
lubricating bearings and must not be oiled or
lubricated.
M
Batteries (battery pack or batteries installed)
shall not be exposed to excessive heat such as
VXQVKLQHÀUHRUWKHOLNH
M
When the system is switched to Standby
mode, it is still consuming some power.
To disconnect the system from the
power supply completely, remove the AC
power plug from the wall socket.

English
11
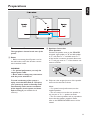
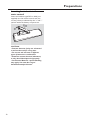
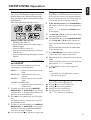
Preparations
Rear connections
The type plate is located at the rear of the
system.
A
Power
– Before connecting the AC power cord to
the wall outlet, ensure that all other connec-
tions have been made.
WARNING!
– For optimal performance, use only the
original power cable.
– Never make or change any connections
with the power switched on.
To avoid overheating of the system, a
safety circuit has been built in. Therefore,
your system may switch to Standby mode
automatically under extreme conditions.
If this happens, let the system cool down
before reusing it (not available for all
versions).
B
Speakers Connection
Front Speakers
Connect the speaker wires to the SPEAKERS
terminals, right speaker to "R" and left speaker
to "L", red wires to "+" and black wires to "-"
of the woofer connection terminals, blue wires
to "+" and grey wires to "-" of the tweeter con-
nection terminals.
M
Fully insert the stripped portion of the speaker
wire into the terminal as shown.
Notes:
– For optimal sound performance, use the
supplied speakers.
– Do not connect more than one speaker to
any one pair of
+
/
-
speaker terminals.
– Do not connect speakers with an impedance
lower than the speakers supplied. Please
refer to the SPECIFICATIONS section of this
manual.
R
L
LOW CH
Ð +
HIGH CH
R
L
8
FM ANT
AUX IN
LR

12
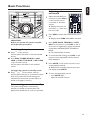
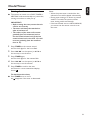
Inserting batteries into the re-
mote control
Insert two batteries type R03 or AAA (not
supplied) into the remote control with the
correct polarity as indicated by the “+”and“-”
symbols inside the battery compartment.
3
1
2
CAUTION!
– Remove batteries if they are exhausted
or will not be used for a long time.
– Do not use old and new or different
types of batteries in combination.
– Batteries contain chemical substances,
so they should be disposed of properly.
– Perchlorate Material - special handling
may apply. See www.dtsc.ca.gov/
hazardouswaste/perchlorate.
Preparations

English
13
Controls
(illustrations on pages 3 and 4)
Controls on the system
1
OPEN/CLOSE
– open/close the CD compartment in DISC
mode.
2
¡1
/
2™
– skips to the beginning of a current track/previ-
ous/ next track.
– (press and hold) fast searches back and forward
within a track/disc.
– sets the hours and minutes for the clock and
timer.
3
2;
– starts or pauses DISC playback.
4
TUNING +/-
– tunes to a radio station.
5
VOLUME
– adjusts the volume level.
6
MAX SOUND
– to activate or deactivate the optimal mix of
various sound features.
7
DSC (Digital Sound Control) buttons
– selects sound characteristics: JAZZ, ROCK,
TECHNO or OPTIMAL.
DBB (Dynamic Bass Boost)
– turns the bass enhancement on/off.
8
LCD Display
– shows the status of the system.
9
iR SENSOR
– infrared sensor for remote control.
0
y
– switches the system on or to normal standby
mode.
!
ALBUM/PRESET+/-
– for MP3-CD: selects albums.
– selects preset radio stations.
@
9
– stops DISC playback or erases a CD program.
#
CLOCK/DISPLAY
– sets the clock.
– views the clock.
$
Source (DISC/ TUNER/AUX IN/MP3
LINK)
– selects the respective sound source for DISC/
TUNER/AUX IN/MP3 LINK.
%
MP3 LINK
– 3.5mm audio input jack.
Controls on the remote control
1
y
– switches the system on or to standby mode.
2
SHUFFLE
– to play tracks in a random order.
3
SLEEP
– activates/deactivates or selects the sleep time.
– views the remaining sleep time.
4
TIMER
– activates/deactivates the timer
– reviews the timer time
5
2;
– starts or pauses DISC playback.
¡
/
™
– skips to the beginning of a current track/previ-
ous/ next track.
– sets the hours and minutes for the clock and
timer.
5
/
6
– (press and hold) fast searches back and forward
within a track/disc.
– tunes to radio stations.
6
DBB (Dynamic Bass Boost)
– turns the bass enhancement on/off.
7
MAX
– to activate or deactivate the optimal mix of
various sound features.
8
VOL +/-
– adjusts the volume level.
9
Numeric Keypad (0-9)
– enters a track/album number.
– selects exact preset radio station.
0
CLOCK/DISPLAY
– sets the clock.
– views the clock.
!
Source (DISC/ TUN/AUX/MP3 LINK)
– selects the respective sound source for DISC/
TUNER/AUX/MP3 LINK.
@
REPEAT ALL
– plays all tracks repeatedly.
#
REPEAT
– plays a track repeatedly.
$
MUTE
– switches playback sound off and on.

14
Controls
(illustrations on pages 3 and 4)
%
DSC (Digital Sound Control)
– selects sound characteristics: OPTIMAL, JAZZ,
TECHNO or ROCK.
^
9
– stops DISC playback or erases a program.
&
ALBUM/PRESET+/-
– selects preset radio stations.
– selects an album.
*
PROGRAM
– programs tracks and reviews the program.
– programs preset radio stations.

English
15
Basic Functions
IMPORTANT:
Before you operate the system, complete
the preparation procedures.
Switching the system on
M
Pres
s
y
on the main set.
©
The system will switch to the last selected
source.
M
Press DISC, TUNER, AUX IN, or MP3
LINK (or DISC, TUN, AUX, or MP3 LINK
on the remote control).
©
The system will switch to the selected
source.
To switch the system to standby mode
M
Press
y
(or
y
on the remote control).
©
The volume level (up to a maximum volume
level of 15), interactive sound settings, last
selected source and tuner presets will be re-
tained in the player's memory.
Power-saving automatic standby
The power-saving feature automatically
switches to standby 15 minutes after CD
playback has ended and no control is operated.
Adjusting volume
and sound
1
Adjust the VOLUME con-
trol knob or press VOL+/-
on the remote control
to increase or decrease
volume.
©
Display shows the vol-
ume level
U
oL
and a num-
ber from 0-40.
2
Press DBB to switch bass enhancement on or
off.
©
Display shows: DBB if the DBB is activated.
3
Press JAZZ, ROCK, TECHNO or OPTI-
MAL on the system or press DSC on the re-
mote control repeatedly to select the desired
sound effect: OPTIMAL, JAZZ, TECHNO or
ROCK.
©
The selected DSC is shown.
M
To cancel the DSC setting, press DSC on the
remote control repeatedly until the related
DSC disappears.
4
Press MUTE on the remote control to stop
sound playback instantly.
©
Playback will continue without sound and
the display shows MUTE.
M
To start sound playback
you can:
– press MUTE again;
– adjust the volume controls.

16
CD/MP3/WMA Operation
IMPORTANT:
The lens of the CD player should never be
touched.
Playing a disc
This CD player plays Audio Discs including CD-
Recordables, CD-Rewritables and MP3 CD.
CD-ROM, CD-I, CDV, VCD, DVD or computer
CDs, however, are not possible.
1
Press DISC to select DISC source.
2
Press OPEN/CLOSE on the system to open
the CD compartment.
©
oPEn
is displayed when you open the CD
compartment.
3
Insert a disc with the printed side facing up and
press OPEN/CLOSE to close the CD door.
©
Play starts automatically.
4
To pause, press
2;
. Press
2;
again to resume
play.
©
The display freezes and the elapsed playing
WLPHÁDVKHVZKHQSOD\EDFNLVLQWHUUXSWHG
5
To stop disc play, press
9
.
Note: CD playback will also stop when;
– the CD door is opened.
– the disc has reached the end.
– you select another source: TUNER, MP3
LINK or AUX IN.
– you select standby.
Selecting a different track
M
Press
¡1
or
2™
(
í
/
ë
on the remote) once
or repeatedly until the desired track number
appears in the display.
Finding a passage within a track
1
Press and hold down
¡1
or
2™
(
5
/
6
on the
remote).
©
The disc is played at high speed and low vol-
ume.
2
:KHQ\RXÀQGWKHSDVVDJH\RXZDQWUHOHDVH
¡1
or
2™
(
5
/
6
on the remote).
©
Normal playback continues.
Playing an MP3/WMA disc
1
Load an MP3/WMA disc.
©
Play starts automatically.
2
Press PRESET/ALBUM+/- to select a desired
album.
3
Press
¡1
/
2™
(
í
/
ë
on the remote) to se-
lect a desired track.
©
The album number will change accordingly
DV\RXUHDFKWKHÀUVWWUDFNRIDQDOEXPE\
pressing
4
(
í
on the remote) or the last
track of an album by pressing
¢
(
ë
on the
remote).
4
To pause, press
2;
. Press
2;
again to resume
play.
5
To stop disc play, press
9
.

English
17
Discs for playback
This system can playback all digital audio CD,
ÀQDOLVHGGLJLWDODXGLR&'5HFRUGDEOH&'5
GLVFVDQGÀQDOLVHGGLJLWDODXGLR&'5HZULWDEOH
(CDRW)discs.
MP3-CDs (CD-ROMs with MP3 tracks)
Supported MP3 disc formats:
– ISO9660, Joliet, UDF 1.5
– Maximum title number: 511 (depending on
À
lename length)
– Maximum album number: 52
– Supported sampling frequencies: 32 kHz, 4.1
kHz, 48 kHz
– Supported Bit-rates: 32~256 (kbps), variable
bitrates
Different play modes: SHUFFLE
and REPEAT
You can select and change the various play
modes before or during playback.
REPEAT ............ plays the current track continu-
ously
REPEAT ALL....repeats the entire disc/ pro-
gramme
SHUFFLE..........plays the entire disc in random
order
SHUFFLE and REPEAT ALL
...........................repeats the disc continuously in
random order
1
To select your play mode, press REPEAT,
REPEAT ALL or SHUFFLE on the remote
control before or during playback until the dis-
play shows the desired function.
2
Press
2;
to start playback if in the STOP posi-
tion
.
©
Playback will automatically start if you se-
lect SHUFFLE mode.
3
To return to normal playback, press REPEAT,
REPEAT ALL or SHUFFLE on the remote
control until the various SHUFFLE/ REPEAT
modes are no longer displayed.
M
You can also press
9
to cancel your play mode.
Programming track numbers
Programme in the STOP position to select and
store your disc tracks in the desired sequence.
If you like, store any track more than once. Up
to 20 tracks can be stored in the memory.
1
In the STOP position, press PROGRAM on
the remote control to enter the programming
mode.
©
P-01:-
-
is displayed and PROG ÁDVKHV
on the display.
2
Use
¡1
/
2™
(
í
/
ë
on the remote) to select
your desired track number.
M
For MP3/WMA disc, press ALBUM/PRESET
+/- and
¡1
/
2™
(
í
/
ë
on the remote) to
select the desired album and title for program-
ming.
©
The selected track number and
PROGÁDVK
on the display panel.
3
Press PROGRAM on the remote control to
FRQÀUPWKHWUDFNQXPEHUWREHVWRUHG
4
Repeat steps 2-3 to select and store all desired
tracks.
©
If you attempt to store more than 20 preset
radio stations, "
FULL
" is displayed.
5
To start playback of your disc programme,
press
2;
.
Note:
– If you wish, you can add further tracks to
your current program.
Erasing the programme
You can erase the programme by:
M
pressing
9
once in the STOP mode;
M
pressing
9
twice during playback;
M
opening the CD compartment;
M
selecting another sound source
©
CLEAR
appears on the display.
CD/MP3/WMA Operation

18
Tuning to radio stations
1
Press TUNER on the system or TUN on the
rem
ote control to select TUNER source.
2
Press TUNER on the system or TUN on the
remote control once or more to select desired
waveband: FM or AM.
3
Press TUNING+/- (or
5
/
6
on the remote
control) to tune to a desired radio frequency.
M
You can also press and hold TUNING+/- (or
5
/
6
on the remote control) for three sec-
onds to search for a radio station.
©
SEArCH
is displayed.
Note:
– The system is equipped with a built-in AM
DQWHQQDDQGDÀ[HG)0DQWH
nna. For optimal
AM reception, adjust the position of the
main set until the strongest signal is found.
For optimal FM reception, fully extend and
adjust the position of the FM antenna until
the strongest signal is found.
Radio Reception
Programming radio stations
You can store up to 20 radio stations in the
memory manually or automatically (Auto store).
Automatic programming
In tuner mode, press and hold PROGRAM on
the remote control for more than 2 seconds to
activate programming.
©
All available stations are programmed in the
order of waveband reception strength.
M
To cancel the programming, press
9
.
Manual programming
1
Tune to your desired station (refer to “Tuning
to radio stations”).
2
Press PROGRAM to activate programming.
©
P1
is displayed and PROGÁDVKHVRQWKH
display.
3
Press ALBUM/PRESET +/- to allocate a pre-
set number.
4
Press
PROGRAM
DJDLQWRFRQÀUPWKHVHWWLQJ
5
Repeat the above four steps to store other sta-
tions.
M
You can override a preset station by storing
another frequency in its place.
Tuning to preset radio stations
M
Press ALBUM/PRESET +/- until the desired
preset station is displayed.

English
19
External Sources
Using MP3 LINK
1
Use the audio cable to connect the system's
MP3 LINK jack (3.5 mm, located on the front
panel) to the headphone jack or AUDIO OUT
on an external device (such as an MP3 player,
or CD player).
2
Press MP3 LINK to select MP3 LINK.
©
"
MP3 LINK
" is displayed.
Using an external device
1
Connect the system's AUX IN jacks to the AU-
DIO OUT jacks on another audio/visual device
(such as a VCR, Laser Disc player or cassette
desk).
2
Press AUX IN on the set or AUX on the re-
mote control to select external equipment.
©
"
AUX I
n
" is displayed.
Note:
– All the sound control features (DSC or DBB,
for example) are available for selection.
– Refer to the operating instructions for the
connected equipment for details.

20
Clock/Timer
Setting the sleep timer
The sleep timer enables the system to switch
off by itself after a set period of time.
1
In active mode, press SLEEP on the remote
control repeatedly until the desired timer op-
tion appears.
©
Selections are as follows (time in minutes):
SLPOFF
=
SLP120
=
SLP90
=
SLP60
=
SLP45
=
SLP30
=
SLP15
=
SLPOFF
©
Display shows
if activated, and disappears
if deactivated.
2
To cancel the sleep function, either press
SLEEP on the remote control once or more
until “
SLPOFF
” appears, or press
y
to switch
to standby mode.
To check the remaining length of time
after sleep timer is activated
M
Press SLEEP once.
Setting the clock
1
In standby mode, press and hold CLOCK/
DISPLAY.
©
7KHFORFNGLJLWVIRUWKHKRXUVÁDVK
2
Press
¡1
/
2™
on the system (or
¡
/
™
on
the remote) to set the hours.
3
Press CLOCK/DISPLAY.
©
7KHFORFNGLJLWVIRUWKHPLQXWHVÁDVK
4
Press
¡1
/
2™
(or
¡
/
™
on the remote) on
the system to set the minutes.
5
Press CLOCK/DISPLAY WRFRQÀUPWKH
time.
To view the clock in active mode
M
Press CLOCK/DISPLAY.
Note:
– If the clock has not been set, - -:- - will be
displayed.
– If the last selected source is MP3-LINK/
AUX, you cannot use the remote control to
set the clock in standby mode.
La page est en cours de chargement...
La page est en cours de chargement...
La page est en cours de chargement...
La page est en cours de chargement...
La page est en cours de chargement...
La page est en cours de chargement...
-
 1
1
-
 2
2
-
 3
3
-
 4
4
-
 5
5
-
 6
6
-
 7
7
-
 8
8
-
 9
9
-
 10
10
-
 11
11
-
 12
12
-
 13
13
-
 14
14
-
 15
15
-
 16
16
-
 17
17
-
 18
18
-
 19
19
-
 20
20
-
 21
21
-
 22
22
-
 23
23
-
 24
24
-
 25
25
-
 26
26


Philips FWM206 Manuel utilisateur
- Catégorie
- Ensembles audio pour la maison
- Taper
- Manuel utilisateur
- Ce manuel convient également à
dans d''autres langues
- English: Philips FWM206 User manual
Documents connexes
-
Philips MC235B/37 Manuel utilisateur
-
-
-
-
Philips MCM330/12 Manuel utilisateur
-
-
-
Philips MCD107/98 Manuel utilisateur
-
-