
OUT
LL
RR
IN
SPEAKER
© 2007 Sony Corporation Printed in Malaysia
Active Subwoofer
SA-W3800/SA-W3000/
SA-W2500
2-899-141-13(1)
SPEAKER IN
A
LINE IN
B
LINE
OUT
LL
RR
IN
IN
SPEAKER
1
SPEAKER IN
LINE IN
LINE
OUT
LL
RR
IN
OUT IN
SPEAKER
2
SPEAKER
OUT
LL
RR
IN
SPEAKER
F G
1
2
MONO OUT
LINE
OUT IN
MONO OUT
LINE
IN
CD E
SPEAKER A
SPEAKER B
OUT
LL
RR
IN
SPEAKER
WARNING
To reduce the risk of fire or electric shock,
do not expose this apparatus to rain or
moisture.
To prevent fire, do not cover the ventilation of the
apparatus with newspapers, table-cloths, curtains,
etc. And don’t place lighted candles on the
apparatus.
To prevent fire or shock hazard, do not place
objects filled with liquids, such as vases, on the
apparatus.
To avoid electrical shock, do not open the cabinet.
Refer servicing to qualified personnel only.
Do not install the appliance in a confined
space, such as a bookcase or built-in cabinet.
Install this system so that the power cord can be
unplugged from the wall socket immediately in
the event of trouble.
NOTICE FOR THE CUSTOMERS
IN THE U.S.A
This symbol is intended to alert the
user to the presence of uninsulated
“dangerous voltage” within the
product’s enclosure that may be of
sufficient magnitude to constitute a
risk of electric shock to persons.
This symbol is intended to alert the
user to the presence of important
operating and maintenance
(servicing) instructions in the
literature accompanying the
appliance.
WARNING
This equipment has been tested and found to
comply with the limits for a Class B digital device,
pursuant to Part 15 of the FCC Rules. These limits
are designed to provide reasonable protection
against harmful interference in a residential
installation. This equipment generates, uses, and
can radiate radio frequency energy and, if not
installed and used in accordance with the
instructions, may cause harmful interference to
radio communications. However, there is no
guarantee that interference will not occur in a
particular installation. If this equipment does
cause harmful interference to radio or television
reception, which can be determined by turning
the equipment off and on, the user is encouraged
to try to correct the interference by one or more of
the following measures:
— Reorient or relocate the receiving antenna.
— Increase the separation between the equipment
and receiver.
— Connect the equipment into an outlet on a
circuit different from that to which the receiver
is connected.
— Consult the dealer or an experienced radio/TV
technician for help.
CAUTION
You are cautioned that any changes or
modification not expressly approved in this
manual could void your authority to operate this
equipment.
CAUTION
Use of this appliance with some systems may
present a shock or fire hazard. Do not use with
any units which have the following marking
located near output.
WARNING: HAZARDOUS ENERGY!
English
Owner’s Record
The model number and serial numbers are located
on the rear of the unit. Record the serial number in
the space provided below. Refer to them whenever
you call upon your Sony dealer regarding this
product.
Model No.
Serial No.
Precautions
On safety
•Before operating the subwoofer, be sure that the
operating voltage of your subwoofer is identical
with that of your local power supply.
•Unplug the subwoofer from the wall outlet if it
is not to be used for an extended period of time.
To disconnect the cord, pull the cord by
grasping the plug. Never pull the cord itself.
•Should any liquid or solid object fall into the
subwoofer, unplug the subwoofer and have the
subwoofer checked by qualified personnel
before operating it any further.
•AC power cord must be changed only at the
qualified service shop.
When turning on or off an amplifier or
other equipment
Lower the volume of the amplifier to minimum.
To avoid damaging the subwoofer
•Be careful in setting the volume control of the
amplifier to avoid an excessive input power.
•Do not attempt to open the enclosure or remove
speaker units and networks.
•Do not press the dust cap intentionally or
unintentionally.
In case color irregularity is observed on
the nearby TV screen
With the magnetically shielded type of the
speaker system, the subwoofer can be installed
near a TV set. However, color irregularity may
still be observed on the TV screen depending on
the type of your TV set.
If color irregularity is observed...
tTurn off the TV set once, then turn it on after
15 to 30 minutes.
If color irregularity is observed again...
tPlace the subwoofer further apart from the
TV set.
When howling occurs
Relocate the speaker or turn down the volume of
the amplifier.
On installation
•Do not install the subwoofer near heat sources
such as radiators or air ducts, or in a place
subject to direct sunlight, excessive dust,
mechanical vibration or shock.
•Good ventilation is essential to prevent internal
heat build-up in the subwoofer. Place the
subwoofer in a location with adequate air
circulation. Do not place the subwoofer on a
soft surface or too close to a wall as this may
obstruct the ventilation hole on the back.
•Use caution when placing the subwoofer on a
specially treated (waxed, oiled, polished, etc.)
floor, as staining or discoloration may result.
•Take care to avoid any possible injury on the
corners of the subwoofer.
On cleaning the cabinet
Clean the cabinet with a soft cloth lightly
moistened with water. Do not use any type of
abrasive pad, scouring powder or solvent such as
alcohol or benzine.
If you have any questions or problems
concerning your subwoofer that is not
covered in this manual, please consult your
nearest Sony dealer.
Installation
Since the human ear cannot detect the
direction and position where the bass sound
being reproduced by a subwoofer (below
200 Hz) comes from, you can install the
subwoofer wherever you like in your room.
To obtain a better bass reproduction, we
recommend you to install the subwoofer on
a solid floor where the resonance is unlikely
to occur.
You can obtain a sufficient heavy bass
reproduction from a single subwoofer.
However if you use a couple of the
subwoofers, you can obtain an even more
effective heavy bass reproduction.
Notes
•Always install the subwoofer vertically, keeping
a few centimeters away from the wall.
•Do not place an object on the subwoofer or sit
on it.
•If the subwoofer is installed in the center of a
room, the bass could be extremely weakened.
This is due to the influence of the standing wave
of the room. If this happened, move the
subwoofer away from the center of a room or
eliminate the cause of the standing wave, by
installing a bookshelf on the wall, etc.
Français
AVERTISSEMENT
Afin de réduire les risques d’incendie et
de choc électrique, ne pas exposer cet
appareil à la pluie ni à l’humidité.
Pour prévenir tout risque d’incendie, ne couvrez
pas les orifices d’aération de l’appareil avec des
journaux, nappes, rideaux, etc. Et ne placez pas
de bougies allumées sur l’appareil.
Pour prévenir tout risque d’incendie ou
d’électrocution, ne posez aucun objet rempli de
liquide, comme un vase, sur l’appareil.
Pour prévenir tout risque d’électrocution, n’ouvrez
jamais le coffret. Adressez-vous à un personnel
qualifié uniquement pour toute intervention sur
l’appareil.
N’installez pas l’appareil dans un espace confiné
comme dans une bibliothèque ou un meuble
encastré.
Installez ce caisson de grave de manière à
pouvoir débrancher immédiatement le cordon
d’alimentation de la prise secteur en cas de
problème.
Précautions
Sécurité
•Avant d’utiliser le caisson de grave, vérifiez que
sa tension de fonctionnement est identique à
celle du secteur local.
•Si vous prévoyez de ne pas utiliser le caisson
pendant longtemps, débranchez-le de la prise
murale. Pour débrancher le cordon
d’alimentation secteur, tirez sur la fiche. Ne
jamais tirer sur le cordon proprement dit.
•Si un liquide ou un solide tombait dans le
coffret, débranchez le caisson et faites-le
contrôler par un technicien qualifié avant de le
remettre en service.
•Le cordon d’alimentation secteur doit être
changé par un professionnel seulement.
Avant d’allumer ou d’éteindre
l’amplificateur ou un autre appareil
N’oubliez pas de baisser complètement le
volume.
Pour éviter d’endommager le caisson
de grave
•Réglez avec soin le volume de l’amplificateur
pour éviter toute entrée de son excessive.
•Ne pas essayer d’ouvrir le coffret ou de modifier
les haut-parleurs et les circuits.
•Ne pas appuyer sur le cache-poussière, ni
intentionnellement ni par erreur.
Si vous observez des anomalies de
couleurs sur l’écran du téléviseur
installé à proximité du caisson
Le caisson de graves peut être installé près d’un
téléviseur car ce système acoustique est à
blindage magnétique. Mais il est possible
d’observer des anomalies de couleurs avec
certains types de téléviseur.
Si vous observez des anomalies de
couleurs...
tEteignez le téléviseur, puis rallumez-le 15 à
30 minutes plus tard.
S’il n’y a aucun changement...
tPlacez le caisson de graves un peu à l’écart
du téléviseur.
En cas de réaction acoustique
Changez l’emplacement des enceintes ou baissez
le volume de l’amplificateur.
Installation
•Ne pas installer le caisson de grave près d’une
source de chaleur, comme un radiateur ou une
bouche d’air chaud, dans un endroit en plein
soleil ou exposé à de la poussière, des vibrations
ou des chocs mécaniques.
•Une bonne ventilation est essentielle pour éviter
une surchauffe interne du caisson. Installez le
caisson dans un endroit où la circulation d’air
est suffisante. Ne pas l’installer sur une surface
molle ou trop près d’un mur pour ne pas
boucher l’orifice de ventilation à l’arrière du
caisson.
•Faites attention si le caisson de graves doit être
posé sur une sol traité (ciré, huilé, poli, etc.) car
il peut salir ou décolorer le sol.
•Veillez à ne pas vous blesser en heurtant les
coins du caisson.
Nettoyage du coffret
Nettoyez le coffret avec un chiffon doux
légèrement imprégné d’eau. Ne pas utiliser de
tampons abrasifs, poudre à récurer ou diluant,
comme l’alcool ou la benzine.
Pour toute question ou problème au sujet du
caisson de grave, veuillez contacter votre
revendeur Sony le plus proche.
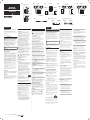
Hooking Up the System
Overview
Use the LINE IN jacks or the SPEAKER IN
terminals of the subwoofer when you
connect the amplifier (
A).
• If your amplifier has one of the following
types of output jacks, connect the LINE IN
jack and the amplifier’s jack using the
supplied audio connecting cord.
— MONO OUT jack
— MIX OUT jack
— SUBWOOFER output jack(s)
— SUPER WOOFER output jack(s)
• If your amplifier does not have the above
mentioned output jacks, connect the
speaker terminals of the amplifier to the
SPEAKER IN terminals instead.
Before you get started
• Turn off the power of the amplifier and
the subwoofer before making any
connection.
• Use the audio connecting cords that are
supplied to the respective equipment. If
there are not enough audio connecting
cords to make the necessary connections,
you need to purchase some optional audio
connecting cords.
• Be sure to make connections firmly to
avoid noise.
• Connect the AC power cord from the
subwoofer to a wall outlet.
• You cannot connect the CENTER output
jack for use with Dolby Pro Logic function
to the subwoofer. Bass sound is not
output with some Dolby Pro Logic modes.
Connecting to an amplifier with a
single set of speaker terminals
Connect the subwoofer to the amplifier and
then connect the front speakers to the
subwoofer.
1 Connect the subwoofer to the
amplifier. (B)
Connect the SPEAKER IN terminals of
the subwoofer to the amplifier’s speaker
terminals with the speaker cords. Be
sure to connect both L and R channels.
2 Connect the front speakers to the
subwoofer. (C)
Connect the speakers to the SPEAKER
OUT terminals of the subwoofer.
Connecting to an amplifier with
double (A + B) sets of speaker
terminals
If your amplifier has double (A + B) sets of
speaker terminals, connect both the
subwoofer and the front speakers to the
amplifier.
1 Connect the front speakers to the
amplifier. (D)
Connect the speakers to your
amplifier’s SPEAKER A terminals.
2 Connect the subwoofer to the
amplifier. (E)
Connect the SPEAKER IN terminals of
the subwoofer to the amplifier’s
SPEAKER B terminals using speaker
cords (not supplied).
When using the double (A + B) sets of
speakers, make sure that you select the
“A + B” position with your amplifier.
Note
When you are using SPEAKER A terminals only
(front speaker only) or when the power of the
amplifier is turned off, turn down the volume or
turn off the power of the subwoofer otherwise,
hum noise may be heard.
Connecting to an amplifier with a
special jack for a subwoofer
If your amplifier has a special jack for a
subwoofer (like a MONO OUT jack, MIX
OUT jack, SUBWOOFER jack or SUPER
WOOFER jack), connect the LINE IN jack of
the subwoofer to one of those jacks using
the supplied audio connecting cord. (
F
)
Hookups
Connect the MONO OUT jack of your
amplifier to the LINE IN jack of the
subwoofer with the supplied audio
connecting cord. (
G
)
Note
If the output level of your amplifier is not large
enough, the sound may not be loud enough. In
this case, connect the speaker terminals of the
amplifier directly to the SPEAKER IN terminals of
the subwoofer.
Installation
Comme l’oreille humaine ne peut pas
détecter la direction ni la position des basses
reproduites par un caisson de grave (en
dessous de 200 Hz), vous pouvez installer le
caisson où vous voulez dans la pièce. Pour
obtenir une meilleure reproduction du
grave, il est toutefois conseillé de l’installer
sur un sol ferme, où la résonnance est peu
probable.
Vous pouvez obtenir suffisamment de grave
à partir d’un seul caisson. Toutefois, si vous
utilisez plusieurs caissons de grave, les
basses seront naturellement plus puissantes.
Remarques
•Installez toujours le caisson à la verticale et à
plusieurs centimètres du mur.
•Ne pas poser d’objet sur le caisson ni s’asseoir
dessus.
•Si le caisson est installé au centre d’une pièce, le
son grave est extrêmement affaibli. Ce phénomème
est dû aux ondes stationnaires de la pièce. Le
cas échéant, éloignez le caisson du centre de la
pièce, ou éliminez la cause des ondes
stationnaires, en installant, par exemple, une
étagère.
Raccordement du système
Aperçu
Utilisez les prises LINE IN ou les bornes
SPEAKER IN du caisson quand vous
raccordez l’amplificateur. (A)
• Si votre amplificateur comporte l’un des
modèles de prises de sortie suivants,
raccordez-la à la prise LINE IN et la prise
de l’amplificateur à l’aide du câble de
connexion audio fourni.
— Prise MONO OUT
— Prise MIX OUT
— Prise(s) de sortie SUBWOOFER
— Prise(s) de sortie SUPER WOOFER
• Si l’amplificateur n’offre aucune des
prises de sortie indiquées, reliez les bornes
d’enceintes de l’amplificateur aux bornes
SPEAKER IN.
Avant de commencer
• Eteignez l’amplificateur et le caisson de
grave avant de les relier.
• Utilisez les cordons audio fournis avec les
différents appareils. Si vous n’avez pas
assez de cordons pour faire les liaisons
nécessaires, vous devrez acheter des
cordons de liaison audio en option.
• Veillez à insérer à fond les fiches dans les
prises pour éviter toute source de parasites.
• Branchez le cordon d’alimentation secteur
du caisson sur une prise murale.
• Vous ne pouvez pas relier la prise de
sortie CENTER à ce caisson pour utiliser
la fonction Dolby Pro Logic. Le son grave
n'est pas fourni par certains modes Dolby
Pro Logic.
Raccordement à un amplificateur
avec une seule paire de bornes
d’enceintes
Raccordez le caisson de grave à
l’amplificateur, puis les enceintes avant au
caisson de grave.
1 Raccordez le caisson de grave à
l’amplificateur. (B)
Raccordez les bornes SPEAKER IN du
caisson aux bornes d’enceintes de
l’amplificateur avec les cordons
d’enceintes. Veillez à raccorder les
canaux gauche (L) et droit (R).
2 Raccordez les enceintes avant au
caisson de grave. (C)
Raccordez les enceintes aux bornes
SPEAKER OUT du caisson de grave.
Raccordement à un amplificateur
avec double paire (A + B) de
bornes d’enceintes
Si votre amplificateur possède une double
paire de bornes d’enceintes (A + B),
raccordez le caisson de grave et les enceintes
avant à l’amplificateur.
1 Raccordez les enceintes avant à
l’amplificateur. (D)
Raccordez les enceintes aux bornes
SPEAKER A de votre amplificateur.
2 Raccordez le caisson de grave à
l’amplificateur. (E)
Raccordez les bornes SPEAKER IN du
caisson de grave aux bornes SPEAKER
B de l’amplificateur avec des cordons
d’enceintes (non fournis).
Quand vous utilisez la double paire de
prises (A + B), veillez à sélectionner la
position « A + B » sur l’amplificateur.
Remarque
Lorsque vous utilisez les bornes SPEAKER A
seulement (enceintes avant seulement) ou lorsque
l’amplificateur est éteint, réduisez le volume du
caisson de grave, ou éteignez-le, sinon du bruit
sera audible.
Raccordement à un amplificateur
doté d’une prise spéciale pour
caisson de grave
Si votre amplificateur comporte une prise
spéciale pour caisson de grave (comme une
prise MONO OUT, MIX OUT, SUBWOOFER
ou SUPER WOOFER), raccordez la prise
LINE IN du caisson à l’une de ces prises à
l’aide du câble de connexion audio fourni.
(
F
)
Raccordements
Raccordez la prise MONO OUT de votre
amplificateur à la prise LINE IN du haut-
parleur à l’aide du câble de connexion audio
fourni. (
G
)
Remarque
Si le niveau de sortie de l’amplificateur n'est pas
suffisant, le son peut ne pas être assez puissant.
Dans ce cas, reliez les bornes d’enceintes de
l’amplificateur directement aux bornes SPEAKER
IN du caisson.
This subwoofer
Caisson de grave
This subwoofer
Caisson de grave
Amplifier
Amplificateur
Front
speaker (R)
Front
speaker (L)
Enceinte
avant (G)
This subwoofer
Caisson de grave
l: Signal flow
Sens du signal
l: Signal flow
Sens du signal
l: Signal flow
Sens du signal
Enceinte
avant (D)
Enceinte
avant (G)
Front
speaker (L)
Front
speaker (R)
Enceinte
avant (D)
l: Signal flow
Sens du signal
(SA-W2500 only)
(SA-W2500 seulement)
(SA-W3800/SA-W3000 only)
(SA-W3800/SA-W3000 seulement)
Amplifier
Amplificateur
Amplifier
Amplificateur
Amplifier
Amplificateur
This subwoofer
Caisson de grave
l: Signal flow
Sens du signal
Amplifier
Amplificateur
This subwoofer
Caisson de grave
(SA-W2500 only)
(SA-W2500 seulement)
(SA-W3800/SA-W3000 only)
(SA-W3800/SA-W3000 seulement)
l: Signal flow
Sens du signal
(1)
Активен субуфер
(Само за SA-W2500)
(Само за SA-W3800/SA-W3000)
Усилвател
Този субуфер
Посока на сигнала
Този субуфер
Преден
говорител (R)
Преден
говорител (L)
Посока на сигнала
Усилвател
Преден
говорител (R)
Преден
говорител (L)
Посока на сигнала
Усилвател
Този субуфер
Посока на сигнала
(Само за SA-W2500)
Усилвател Този субуфер
Посока на сигнала
(Само за SA-W3800/SA-W3000)
Усилвател Този субуфер
Посока на сигнала
Номерът на модела и серийните номера се
намират от задната страна на това устройство.
Запишете серийните номера на мястото по-
долу. Обръщайте се към тях винаги, когато се
обаждате на вашия доставчик на Sony относно
този продукт.
Номер на модела: ___________
Сериен номер: ______________
Български
ПРЕДУПРЕЖДЕНИЕ
Ръководство на потребителя
За да намалите риска от пожар или токов
удар, не излагайте устройството на дъжд
или влага.
За да предотвратите пожар, не покривайте
вентилационните отвори на устройството с
вестници, покривки, завеси и др. Не поставяйте
запалени свещи върху устройството.
За да намалите риска от пожар или токов удар,
не поставяйте върху устройството предмети,
пълни с течност - като например вази.
За да избегнете токов удар, не отваряйте
кутията. Обръщайте се единствено към
квалифициран сервиз.
Не инсталирайте устройството в затворени
пространства, като полица за книги или
вграден шкаф.
Инсталирайте системата така, че да можете
незабавно да изключите захранващия кабел от
стенния контакт, ако се случи някакъв проблем.
Предпазни мерки
Безопасност
Преди да започнете работа със субуфера се •
уверете, че работният волтаж на субуфера
е идентичен с този на вашето мрежово
захранване.
Изключете субуфера от мрежата от 220 V, ако •
не планирате да го използвате за дълъг период
от време. За да изключите кабела, дръпнете,
като хванете щекера. Никога не дърпайте
самия кабел.
Ако в субуфера попадне течност или твърд •
предмет, изключете захранващия кабел и
проверете устройството в квалифициран
сервиз преди по-нататъшна употреба.
Захранващият кабел трябва да бъде подменян •
само от квалифициран сервиз.
Когато включвате или изключвате
усилвател или друго оборудване
Намалете силата на звука на усилвателя до
минимум.
За да избегнете повреда на субуфера
Внимавайте, когато настройвате силата на •
звука на усилвателя, за да избегнете прекалено
високо ниво на звука.
Не се опитвайте да отваряте кутията или да •
изваждате говорителите и веригите.
Не натискайте случайно или не мембраната на •
говорителя.
Ако забележките промяна на цветовете на
екрана на телевизора
Системата говорители е от магнитно защитен
вид, така че можете да поставите субуфера
близо до телевизор. Въпреки това, в зависимост
от вида на вашия телевизор е възможно
да се наблюдават смущения в цветовете на
телевизионния екран.
Ако се получат смущения в цветовете...
Изключете телевизора, след което изчакайте
15 до 30 минути и после отново включите
устройството.
Ако смущенията в цветовете
продължават...
Поставете субуфера на разстояние от
телевизора.
Ако чуете микрофония
Сменете позицията на говорителя или намалете
силата на звука на усилвателя.
Поставяне
Не поставяйте субуфера в близост до топлинни •
източници, като например радиатори или
въздушни шахти, както и на прекалено прашни
места или на такива, изложени на директна
слънчева светлина, механични вибрации или
удар.
Добрата вентилация е много важна за •
предотвратяване на повишаването на
вътрешната температура на субуфера.
Поставете субуфера на място, където
циркулацията на въздух е гарантирана. Не
поставяйте субуфера на меки повърхности
или твърде близо до стена, защото това може
да попречи на правилната вентилация през
задните отвори.
Бъдете внимателни, когато поставяте субуфера •
върху обработен с препарати под (например
върху полирана повърхност или такава,
обработена с лак и т.н.), тъй като е възможно
подовата повърхност да стане на петна или да
се обезцвети.
Внимавайте да не се нараните на •
ъглите на субуфера.
Почистване на корпуса
Почиствайте корпуса с парче мек плат, леко
навлажнено с вода. Не използвайте никакви
абразивни гъбички, прахове или разтворители
като алкохол и бензин.
Ако имате въпроси или проблеми, които се
отнасят към вашия субуфер и не са описани в
това ръководство, моля, консултирайте се с най-
близкия доставчик на Sony.
Инсталация
Тъй като човешкото ухо не може да различи
посоката и позицията, от която идва бас звука от
субуфера (под 200 Hz), вие можете да поставите
субуфера където пожелаете във вашата стая .
За да получите по-добър бас звук ви
препоръчваме да инсталирате субуфера на
твърда повърхност, където вероятността от
резониращ звук е по-малка.
Можете да получите достатъчно силен бас от
един субуфер. Въпреки това, ако използвате
два субуфера ще получите още по-силно и
реалистично възпроизвеждане на басите.
Забележки
Винаги инсталирайте субуфера във вертикална •
позиция на поне няколко сантиметра от
стената.
Не поставяйте различни предмети върху •
субуфера и не сядайте върху него.
Ако субуферът е поставен в средата на •
стаята, басите може да се окажат твърде
слаби. Това се дължи на разпространението
на стационарните вълни в стаята. Ако това
се случи, преместете субуфера в позиция,
различна от центъра, или махнете причината
за стационарните вълни, като поставите
етажерка за книги на стената и др.
Свързване на системата
Преглед
Използвайте жаковете LINE IN или SPEAKER
IN на субуфера, когато свързвате към усилвател
( ).
Ако усилвателят притежава един от следните •
видове изходни жакове, свържете жака LINE
IN и жака на усилвателя, като използвате
приложения аудио свързващ кабел.
- Жак MONO OUT
- Жак MIX OUT
- Изходен жак SUBWOOFER
- Изходен жак SUPER WOOFER
Ако вашият усилвател не притежава •
гореспоменатите изходни жакове, свържете
терминалите за говорителите на усилвателя
към терминалите SPEAKER IN.
Преди да започнете
Изключете захранването на усилвателя и •
субуфера преди да извършите връзките.
Използвайте аудио свързващите кабели, които •
са приложени към съответното оборудване.
Ако аудио свързващите кабели не са
достатъчни, за да извършите нужните връзки,
купете допълнителни аудио свързващи кабели.
Уверете се, че сте извършили връзките •
правилно, за да избегнете смущения.
Свържете захранващия кабел от субуфера към •
мрежата от 220 V.
Не можете да свързвате изходния жак CENTER •
към субуфера, за да използвате функцията
Dolby Pro Logic. При някои Dolby Pro Logic
режими не се извежда бас звук.
Свързване към усилвател с един
комплект терминали за говорителите
Свържете субуфера към усилвател и след това
свържете предните говорители към субуфера.
1 Свържете субуфера към усилвателя. ( )
Свържете терминалите SPEAKER IN на
субуфера към терминалите за говорители
на усилвателя, като използвате кабелите на
говорителите. Уверете се, че сте свързали и
двата канала L и R.
2 Свържете предните говорители към
субуфера. ( )
Свържете говорителите към терминалите
SPEAKER OUT на субуфера.
Свързване към усилвател с два
комплекта (A + B) терминали за
говорителите
Ако вашият усилвател притежава два
комплекта (А + В) терминали за говорителите,
свържете субуфера и предните говорители към
усилвателя.
1 Свържете предните говорители към
усилвателя. ( )
Свържете говорителите към терминалите
SPEAKER A на усилвателя.
2 Свържете субуфера към усилвателя. ( )
Свържете терминалите SPEAKER IN на
субуфера към терминалите SPEAKER B
на усилвателя, като използвате кабели
за говорителите (не са приложени в
комплекта).
Когато използвате двоен комплект (А+В)
говорители, се уверете, че сте избрали позиция
“А+В” на вашия усилвател.
Забележка
Когато използвате само терминалите SPEAKER
A (само за предни говорители) или когато
захранването на усилвателя е изключено,
намалете силата на звука или изключете
захранването на субуфера. В противен случай
може да се появи жужене.
Свързване към усилвател със
специален жак за субуфер
Ако вашият усилвател притежава специален
жак за субуфер (като например жак MONO
OUT, жак MIX OUT, жак SUBWOOFER или жак
SUPER WOOFER), свържете жака LINE IN на
субуфера към един от тези жакове,
като използвате приложения аудио свързващ
кабел. ( )
Връзки
Свържете жака MONO OUT на вашия усилвател
към жака LINE IN на субуфера, като изпозлвате
приложения аудио свързващ кабел. ( )
Забележка
Ако изходното ниво на вашия усилвател
не е достатъчно силно, звукът може да не е
достатъчно силен. В този случай свържете
терминалите за говорители на усилвателя
директно към терминалите SPEAKER IN на
субуфера.
Printed in Czech Republic
ПРЕДУПРЕЖДЕНИЕ
Това устройство е тествано и отговаря на
ограниченията за клас В цифрови устройства,
съответстващи с част 15 от Правилата FCC. Тези
ограничения са създадени, за да предоставят
защита срещу опасна намеса при инсталацията
на продукта. Оборудването генерира, използва
и може да излъчва радио-честотна енергия и ако
тя не бъде използвана според инструкциите, това
може да причини смущения в радио връзките.
Въпреки това не даваме гаранция, че смущения
няма да бъдат получени дори при извършването
на определена инсталация. Ако това
оборудване причинява смущения в радио или
телевизионното приемане, което може да бъде
установено чрез неколкократно изключване и
включване на устройството, потребителят може
да отстрани тези смущения, като предприеме
някоя от следните мерки:
- като преориентира антената за приемане на
сигнала.
- ако увеличи разстоянието между устройството
и приемника.
- ако свърже оборудването към контакт,
който е различен от този, в който е включен
приемникът.
- като се свърже се с доставчика на устройството
или с професионален радио/телевизионен
техник и потърси помощ от него.
ВНИМАНИЕ
Предупреждаваме ви, че всякакви модификации
и промени, които не са изрично одобрени в това
ръководство, могат да нарушат гаранцията на
вашия уред и да ви попречат да работите с това
устройство.
ВНИМАНИЕ
Възможно е използването на това устройство с
някои системи да увеличава опасността от токов
удар или пожар. Не използвайте с устройства,
които са маркирани от външната си страна със
следните етикети.
WARNING: HAZARDOUS ENERGY!

HI
POWER
PO WER
POWER
LJ
POWER SAVE
AUTO
OFF
N
K
O
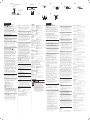
When using two or more
subwoofers (
H
)
(SA-W3800/SA-W3000 only)
Connect the MONO OUT jack of your
amplifier to the LINE IN jack of this
subwoofer. Then, use the supplied audio
connecting cord to connect the LINE OUT
jack of this subwoofer to the LINE IN jack of
another subwoofer.
Connecting the AC power cord
• Connect the AC power cord from the
subwoofer and from your amplifier to a
wall outlet.
• Make sure that power to the subwoofer is
turned off before you plug in or unplug
any power cord.
Listening to the Sound (
I
)
1 Turn on the amplifier and select the
program source.
2 Press POWER.
The subwoofer turns on and the
POWER indicator lights up in green.
3 Play the program source.
Adjust the VOLUME so that sound
from the front speakers is not distorted.
If it is distorted, the sound from the
subwoofer will also be distorted.
To turn on and off the power automatically
— Auto power on/off function (
J
)
When the subwoofer is on (i.e, the POWER
indicator lights up green) and there is no
signal input for a few minutes, the POWER
indicator changes to red and the subwoofer
enters power saving mode. While in this
mode a signal is input to the subwoofer, the
subwoofer automatically turns on (auto
power on/off function).
To turn this feature off, slide the POWER
SAVE switch on the rear panel to OFF.
Notes
•Never set the amplifier’s tone control (BASS,
TREBLE, etc.) or the equalizer output to a high
level or input sine curves of 20 Hz to 50 Hz
recorded on a commercially-available test disc
or special sound (bass sound of electronic
musical instrument, pop noise of analog disc
turntable, sound with abnormally enhanced
bass, etc.) in a high level to this unit. These
actions may cause damage to the speakers.
When a special disc containing abnormally
enhanced bass is played, noise may be output in
addition to the original sound. In such a case,
decrease the sound level.
•The subwoofer output signal (DOLBY digital
signal) of the digital surround processor sold
singularly is set 10 dB higher by Dolby
Laboratories Licensing Corporation. In the case
of using normally, adjust the subwoofer level.
•If you turn down the volume level of the
amplifier too low, the auto power on/off
function may activate, causing the subwoofer to
enter power saving mode.
Adjusting the Sound
You can adjust the sound of the subwoofer
to suit the sound of your front speakers.
Reinforcing the bass sound gives you a
greater sense of atmosphere.
1 Adjust the cut-off frequency. (
K
)
Turn the CUT OFF FREQ control,
depending on the reproduction
frequencies of your front speakers.
Refer to the following when adjusting.
1 Typical very small sized speakers:
4- 5 cm (1
5
/
8
− 2 in.) dia.
2 Typical small sized speakers:
6 - 8 cm (2
3
/
8
− 3
1
/
8
in.) dia.
3 Typical medium sized speakers:
9 - 15 cm (3
5
/
8
−5
7
/
8
in.) dia.
4 Typical large sized speakers:
16 − 24 cm (6
3
/
8
−9
1
/
2
in.) dia.
5Typical very large sized speakers:
more than 25cm (9
7
/
8
in.) dia.
To make the most of the low level
converter function
When playing back the sound of LFE
signals, Dolby digital, or DTS, we
recommend to set the CUT OFF FREQ
control to 200Hz (maximum) to obtain
the best performance from the low level
converter function.
2 Adjust the volume level of the
subwoofer. (
L
)
Turn the LEVEL control so that you can
hear the bass sound a little more than
before. To increase the volume, turn the
control clockwise. To decrease the
volume, turn the control
counterclockwise.
3 Play your favorite song and movie.
Male vocal tunes and voice containing
bass sounds are most suitable for
adjustment. Turn the volume for front
speakers to the same level as usual.
4 Select the phase polarity. (M)
Use the PHASE selector to select the
phase polarity.
5 Repeat steps 1 to 4 to adjust for your
preference.
Once you have adjusted the subwoofer
to the settings you desire, use the
VOLUME control on the amplifier to
adjust the volume of the subwoofer with
that of the other speakers. You don’t
need to adjust the subwoofer settings
when you change the volume level of
the amplifier.
Notes
• If the sound distorts when you turn on the
bass reinforcement from your amplifier
(such as, D.B.F.B., GROOVE, the graphic
equalizer, etc.), turn off the bass
reinforcement and adjust the sound.
• Do not turn the LEVEL knob to maximum.
Doing so may weaken the bass sound.
Moreover, extraneous noise may be heard.
• Selecting NORMAL or REVERSE with the
PHASE selector reverses the polarity and
may provide better bass reproduction in
certain listening environments (depending
on the type of front speakers, the position
of the subwoofer and the adjustment of
the cut-off frequency). It may also change
the expanse and tightness of sound, and
effect the feeling of the sound field. Select
the setting that provides the sound you
prefer when listening in your normal
listening position.
Setting the subwoofer (N)
To prevent subwoofer vibration or
movement while listening, attach the
supplied foot pads to the subwoofer.
Setting the voltage selector
(voltage selector equipped
models only) (O)
Check that the voltage selector on the rear
panel of the subwoofer is set to the local
power line voltage. If not, set the selector to
the correct position using a screwdriver
before connecting the AC power cord to a
wall outlet.
Troubleshooting
If you experience any of the following
difficulties while using the subwoofer, use
this troubleshooting guide to help you
remedy the problem. Should any problem
persist, consult your nearest Sony dealer.
There’s no sound.
•Check that this subwoofer and
components are connected correctly and
securely.
•Turn LEVEL clockwise to turn the
volume up.
•Reset the level.
The sound has suddenly stopped.
•The speaker cords may have short-
circuited. Connect the cords properly.
The sound is distorted.
•The input signal is imperfect.
•The input signal level is too high.
•Set the CUT OFF FREQ
as high as possible when playing back
the Dolby digital.
Severe hum or noise is heard.
•Connect the ground wire of the turntable
properly.
•The contacts between the plugs of the
connecting cords and the corresponding
jacks have not been made properly.
Connect the plugs firmly.
•The audio system is picking up some
noise from a TV set. Move the audio
system away from the TV set or turn the
TV set off.
Specifications
SA-W3800
AUDIO POWER SPECIFICATIONS
For the U.S.A. model
POWER OUTPUT AND TOTAL HARMONIC
DISTORTION:
With 6 ohm loads, from 20 – 200 Hz; rated
120 W, minimum RMS power, with no more
than 1 % total harmonic distortion from 250
milliwatts to rated output.
System
Type Active Subwoofer, (magnetically
shielded design)
Speaker unit Woofer : 38 cm dia. (15 in.),
cone type
Continuous RMS output
South American models
180 W (6 ohms, 80 Hz, 10% THD)
Other models
200 W (6 ohms, 80 Hz, 10% THD)
Reproduction frequency range
20 Hz – 200 Hz
High frequency cut-off frequency
50 Hz – 200 Hz
Phase selector NORMAL, REVERSE
Si vous utilisez deux haut-
parleurs d’extrêmes-graves ou
plus (
H
)
(SA-W3800/SA-W3000 seulement)
Reliez la prise MONO OUT de votre
amplificateur à la prise LINE IN de ce
caisson de graves. Ensuite pour relier la
prise LINE OUT de ce caisson de graves à la
prise LINE IN d’un autre caisson de graves,
utilisez le cordon de liaison audio fourni.
Raccordement du cordon
d’alimentation secteur
• Branchez le cordon d’alimentation secteur
du caisson de grave et de l’amplificateur
sur une prise murale.
• Assurez-vous que le caisson de grave est
hors tension avant de brancher ou de
débrancher un câble d’alimentation.
Pour écouter le son (
I
)
1 Allumez l’amplificateur et
sélectionnez la source de programme.
2 Appuyez sur POWER.
Le caisson est mis sous tension et
l’indicateur POWER s’allume en vert.
3 Reproduisez la source de programme.
Ajustez VOLUME pour que le son des
enceintes avant soit sans distorsion.
Si le son des enceintes avant présente
une distorsion, il en sera de même du
son du caisson de grave.
Mise sous et hors tension automatique —
Fonction de mise sous/hors tension
automatique (
J
)
Si le caisson de grave est sous tension (le
témoin POWER est allumé en vert) et si
aucun signal n’est transmis pendant
quelques minutes, le témoin POWER
devient rouge et le caisson de grave se met
en mode d’économie d’énergie. Si, dans ce
mode, un signal est entré sur le haut-
parleur, le haut-parleur se met
automatiquement sous tension (fonction de
mise sous/hors tension automatique).
Pour désactiver cette fonction, ramenez le
commutateur POWER SAVE du panneau
arrière sur OFF.
Remarques
•Ne réglez jamais le timbre (BASS, TREBLE, etc.)
de l’amplificateur ou la sortie de l’égaliseur sur
un niveau élevé. Ne laissez jamais entrer à
niveau élevé des ondes sinusoïdales de 20 Hz à
50 Hz enregistrées sur les disques d’essai
vendus dans le commerce ou des sons spéciaux
(son grave d’un instrument de musique
électronique, bruit de surface d’une platine
tourne-disque, son avec des graves
excessivement accentués, etc.), car les enceintes
pourraient être endommagées.
La lecture d’un disque qui contient des graves
excessivement accentués peut produire des
parasites en plus du son d’origine. Dans ce cas,
diminuez le niveau sonore.
•Le signal de sortie d'extrême grave (signal
numérique DOLBY ) du processeur de son
numérique vendu séparément est réglé 10 dB
plus haut par Dolby Laboratories Licensing
Corporation. Pour une utilisation normale,
ajustez le niveau de l'extrême grave.
•Si vous réduisez trop le volume de
l’amplificateur, il se peut que la fonction de mise
sous/hors tension automatique soit activée et
que le caisson de grave passe en mode
d’économie d’énergie.
Réglage du son
Vous pouvez ajuster le son du caisson de
grave pour l’adapter au son des enceintes
avant. L’amplification du grave intensifiera
l’ambiance générale.
1 Ajustez la fréquence de coupure. (
K
)
Tournez la commande CUT OFF FREQ
en fonction des fréquences que peuvent
reproduire les enceintes avant.
Pour faire le réglage, tenez compte des
indications suivantes :
1 Haut-parleurs typiques de très
petites dimensions : 4 - 5 cm (1
5
/
8
− 2
po.) de diamètre
2 Haut-parleurs typiques de petites
dimensions : 6 - 8 cm (2
3
/
8
− 3
1
/
8
po.)
de diamètre
3 Haut-parleurs typiques de moyennes
dimensions : 9 - 15 cm (3
5
/
8
− 5
7
/
8
po.) de diamètre
4 Haut-parleurs typiques de grandes
dimensions : 16 - 24 cm (6
3
/
8
− 9
1
/
2
po.) de diamètre
5 Haut-parleurs typiques de très
grandes dimensions : plus de 25 cm
(9
7
/
8
po.) de diamètre
Pour profiter pleinement de la fonction
de convertisseur à bas niveau
Lorsque vous écoutez des signaux LFE,
Dolby digital ou DTS, il est conseillé de
régler la commande CUT OFF FREQ sur
200 Hz (maximum) afin d’optimiser les
performances de la fonction de
convertisseur à bas niveau.
2 Réglez le volume du caisson de grave.
(L)
Tournez la commande LEVEL de
manière à entendre un peu plus le
grave. Pour augmenter le volume,
tournez la commande vers la droite et
pour le diminuer, tournez-la vers la
gauche.
3 Reproduisez un de vos morceaux
favoris.
Les voix d’hommes contiennent des
sons graves qui permettent d’effectuer
facilement les réglages. Réglez le
volume des enceintes avant au niveau
habituel.
4 Sélectionnez la polarité de la phase.
(M)
Utilisez le sélecteur PHASE pour
sélectionner la polarité de la phase.
5 Refaites les réglages 1 à 4 pour obtenir
le son qui vous convient.
Une fois que le caisson de grave a été
ajusté selon vos préférences, utilisez la
commande VOLUME sur
l’amplificateur pour régler le volume du
caisson de grave et des autres enceintes.
Vous n’avez pas besoin de changer les
réglages du caisson lorsque vous réglez
le volume sur l’amplificateur.
Remarques
•Si le son présente une distorsion quand le
système de renforcement des graves de votre
amplificateur est en service (D.B.F.B., GROOVE,
égaliseur graphique, etc.) mettez-le hors service
et ajustez le son.
• Ne tournez pas la molette LEVEL au maximum.
Vous risquez sinon d’atténuer les graves. De
plus, des bruits étrangers peuvent être audibles.
•Une inversion de polarité avec le sélecteur
PHASE (réglage sur NORMAL ou REVERSE)
peut assurer une meilleure reproduction du son
grave dans certaines situations d’écoute (en
fonction du type d’enceintes avant, de la
position du caisson de grave et du réglage de la
fréquence de coupure). Elle peut aussi changer
la sensation d’expansion ou de contraction du
son et modifier le champ sonore. Sélectionnez le
réglage qui donne le son que vous préférez par
rapport à votre position d’écoute habituelle.
Installation du caisson de graves
(N)
Pour éviter les vibrations ou le déplacement
du caisson de graves pendant l’écoute, fixez
les tampons fournis au caisson de graves.
Réglage du sélecteur de tension
(sur les modèles pourvus d’un
sélecteur de tension seulement)
(O)
Assurez-vous que le sélecteur de tension sur
le panneau arrière du caisson de graves est
réglé sur la tension secteur locale. Si ce n’est
pas le cas, réglez-le sur la position correcte
avec un tournevis avant de brancher le
cordon d’alimentation sur une prise secteur.
Guide de dépannage
Si vous rencontrez une des difficultés
suivantes quand vous utilisez le caisson de
grave, lisez le guide de dépannage pour
vous aider à trouver une solution. Si vous
n’y parvenez pas, adressez-vous à votre
revendeur Sony le plus proche.
Aucun son
•Vérifiez si le caisson de grave et les
différents éléments sont raccordés
comme il faut.
•Tournez la commande LEVEL dans le
sens des aiguilles d’une montre pour
augmenter le volume.
•Réajustez le niveau.
Le son s’est soudainement arrêté.
•Il y a peut-être eu un court-circuit au
niveau des cordons d’enceintes.
Raccordez-les correctement.
Le son présente une distorsion.
•Le signal d’entrée n’est pas parfait.
•Le niveau du signal d’entrée est trop
élevé.
•Réglez CUT OFF FREQ le plus possible
lorsque vous écoutez des
enregistrements en Dolby numérique.
Bourdonnement ou bruit important.
•Raccordez le fil de masse du tourne-
disque correctement.
•Le contact entre les fiches des cordons de
liaison et les prises correspondantes est
mauvais. Insérez les fiches à fond.
•La chaîne audio capte le bruit d’un
téléviseur. Eloignez la chaîne audio du
téléviseur ou éteignez le téléviseur.
Spécifications
SA-W3800
Système
Type Haut-parleur d’extrêmes-graves
actif (à blindage magnétique)
Haut-parleurs Grave: dia. 38 cm (15 po.), à cône
Inputs
Input jacks LINE IN: input pin jack
SPEAKER IN: input terminals
Output jacks LINE OUT: output pin jack
SPEAKER OUT: output terminals
General
Power requirements
North American models: 120 V AC, 60 Hz
South American models: 120/220/240 V AC,
50/60 Hz
European models: 230 V AC, 50/60 Hz
Australian models: 240 V AC, 50 Hz
Other models: 230 – 240 V AC, 50/60 Hz
Power consumption
100 W
Dimensions Approx. 440 × 495 × 512 mm
(17
3
/
8
× 19
1
/
2
× 20
1
/
8
in.) (w/h/d)
Mass Approx. 23 kg (50 lb 12 oz)
Supplied accessories
Foot pads (4)
Audio connecting cord (1 phono – 1 phono),
2 m (6 ft 6
1
/
2
in.) (1)
SA-W3000
AUDIO POWER SPECIFICATIONS
For the U.S.A. model
POWER OUTPUT AND TOTAL HARMONIC
DISTORTION:
With 6 ohm loads, from 20 – 200 Hz; rated
100 W, minimum RMS power, with no more
than 1 % total harmonic distortion from 250
milliwatts to rated output.
System
Type Active Subwoofer, (magnetically
shielded design)
Speaker unit Woofer : 30 cm dia. (11
7
/
8
in.),
cone type
Continuous RMS output
South American models
160 W (6 ohms, 80 Hz, 10% THD)
Other models
180 W (6 ohms, 80 Hz, 10% THD)
Reproduction frequency range
20 Hz – 200 Hz
High frequency cut-off frequency
50 Hz – 200 Hz
Phase selector NORMAL, REVERSE
Inputs
Input jacks LINE IN: input pin jack
SPEAKER IN: input terminals
Output jacks LINE OUT: output pin jack
SPEAKER OUT: output terminals
General
Power requirements
North American models: 120 V AC, 60 Hz
South American models: 120/220/240 V AC,
50/60 Hz
Australian models: 240 V AC, 50 Hz
Korean models: 220 – 230 V AC, 50/60 Hz
Other models: 230 – 240 V AC, 50/60 Hz
Power consumption
100 W
Dimensions Approx. 360 × 425 × 421 mm
(14
1
/
8
× 16
3
/
4
× 16
1
/
2
in.)
(w/h/d)
Mass Approx. 16 kg (35 lb 5 oz)
Supplied accessories
Foot pads (4)
Audio connecting cord (1 phono – 1 phono),
2 m (6 ft 6
1
/
2
in.) (1)
SA-W2500
AUDIO POWER SPECIFICATIONS
For the U.S.A. model
POWER OUTPUT AND TOTAL HARMONIC
DISTORTION:
With 6 ohm loads, from 28 – 200 Hz; rated
60 W, minimum RMS power, with no more
than 1 % total harmonic distortion from
250 milliwatts to rated output.
System
Type Active Subwoofer,
(magnetically shielded
design)
Speaker unit Woofer : 25 cm dia. (9
7
/
8
in.),
cone type
Continuous RMS output
South American models
90 W (6 ohms, 80 Hz, 10% THD)
Other models
100 W (6 ohms, 80 Hz, 10% THD)
Reproduction frequency range
28 Hz – 200 Hz
High frequency cut-off frequency
50 Hz – 200 Hz
Phase selector NORMAL, REVERSE
Inputs
Input jacks LINE IN: input pin jack
SPEAKER IN: input terminals
Output jacks SPEAKER OUT: output terminals
General
Power requirements
North American models: 120 V AC, 60 Hz
South American models: 120/220/240 V AC,
50/60 Hz
European models: 230 V AC, 50/60 Hz
Australian models: 240 V AC, 50 Hz
Korean models: 220 – 230 V AC, 50/60 Hz
Taiwan models: 110 V AC, 60 Hz
Other models: 230 – 240 V AC, 50/60 Hz
Power consumption
Taiwan models: 90 W
Other models: 70 W
Dimensions Approx. 290 × 350 × 391 mm
(11
3
/
8
× 13
3
/
4
× 15
3
/
8
in.) (w/h/d)
Mass Approx. 9 kg (19 lb 14 oz)
Supplied accessories
Foot pads (4)
Audio connecting cord (1 phono – 1 phono),
2 m (6 ft 6
1
/
2
in.) (1)
Design and specifications are subject to change
without notice.
Puissance de sortie RMS continue
Modèles sud-américains
180 W (6 ohms, 80 Hz, 10% THD)
Autres modèles
200 W (6 ohms, 80 Hz, 10% THD)
Plage de fréquences
20 Hz à 200 Hz
Fréquence de coupure haute fréquence
50 Hz à 200 Hz
Sélecteur de phase
NORMAL (phase normale),
REVERSE (phase inversée)
Entrées
Prises d’entrée LINE IN: Prise à broche d’entrée
SPEAKER IN: Bornes d’entrée
Prises de sortie LINE OUT: Prise à broche de sortie
SPEAKER OUT: Bornes de sortie
Généralités
Alimentation
Modèles nord-américains: 120 V CA, 60 Hz
Modèles sud-américains: 120/220/240 V CA,
50/60 Hz
Modèles européens: 230 V CA, 50/60 Hz
Modèles australiens: 240 V CA, 50 Hz
Autres modèles: 230 à 240 V CA, 50/60 Hz
Consommation 100 W
Dimensions Approx. 440 × 495 × 512 mm
(17
3
/
8
× 19
1
/
2
× 20
1
/
8
po.) (l/h/p)
Poids Approx. 23 kg (50 li. 12 on.)
Accessoires fournis
Tampons (4)
Cordons de liaison audio (1 phono á 1 phono),
2 m (6 pi 6
1
/
2
po.) (1)
SA-W3000
Système
Type Haut-parleur d’extrêmes-graves
actif (à blindage magnétique)
Haut-parleurs Grave: dia. 30 cm (11
7
/
8
po.),
à cône
Puissance de sortie RMS continue
Modèles sud-américains
160 W (6 ohms, 80 Hz, 10% THD)
Autres modèles
180 W (6 ohms, 80 Hz, 10% THD)
Plage de fréquences
20 Hz à 200 Hz
Fréquence de coupure haute fréquence
50 Hz à 200 Hz
Sélecteur de phase
NORMAL (phase normale),
REVERSE (phase inversée)
Entrées
Prises d’entrée LINE IN: Prise à broche d’entrée
SPEAKER IN: Bornes d’entrée
Prises de sortie LINE OUT: Prise à broche de sortie
SPEAKER OUT: Bornes de sortie
Généralités
Alimentation
Modèles nord-américains: 120 V CA, 60 Hz
Modèles sud-américains: 120/220/240 V CA,
50/60 Hz
Modèles australiens: 240 V CA, 50 Hz
Modèles pour la Corée: 220 à 230 V CA, 50/60 Hz
Autres modèles: 230 à 240 V CA, 50/60 Hz
Consommation 100 W
Dimensions Approx. 360 × 425 × 421 mm
(14
1
/
8
× 16
3
/
4
× 16
1
/
2
po.) (l/h/p)
Poids 16 kg (35 li. 5 on.)
Accessoires fournis
Tampons (4)
Cordons de liaison audio (1 phono á 1 phono),
2 m (6 pi 6
1
/
2
po.) (1)
SA-W2500
Système
Type Haut-parleur d’extrêmes-graves
actif (à blindage magnétique)
Haut-parleurs Grave: dia. 25 cm (9
7
/
8
po.), à cône
Puissance de sortie RMS continue
Modèles sud-américains
90 W (6 ohms, 80 Hz, 10% THD)
Autres modèles
100 W (6 ohms, 80 Hz, 10% THD)
Plage de fréquences
28 Hz à 200 Hz
Fréquence de coupure haute fréquence
50 Hz à 200 Hz
Sélecteur de phase
NORMAL (phase normale),
REVERSE (phase inversée)
Entrées
Prises d’entrée LINE IN: Prise à broche d’entrée
SPEAKER IN: Bornes d’entrée
Prises de sortie SPEAKER OUT: Bornes de sortie
Généralités
Alimentation
Modèles nord-américains: 120 V CA, 60 Hz
Modèles sud-américains: 120/220/240 V CA,
50/60 Hz
Modèles européens: 230 V CA, 50/60 Hz
Modèles australiens: 240 V CA, 50 Hz
Modèles pour la Corée: 220 à 230 V CA, 50/60 Hz
Modèles pour Taiwan: 110 V CA, 60 Hz
Autres modèles: 230 à 240 V CA, 50/60 Hz
Consommation
Modèles pour Taiwan: 90 W
Autres modèles: 70 W
Dimensions Approx. 290 × 350 × 391 mm
(11
3
/
8
× 13
3
/
4
× 15
3
/
8
po.) (l/h/p)
Poids Approx. 9 kg (19 li. 14 on.)
Accessoires fournis
Tampons (4)
Cordons de liaison audio (1 phono á 1 phono),
2 m (6 pi 6
1
/
2
po.) (1)
La conception et les spécifications sont sujettes
à modification sans préavis.
English Français
Amplifier
Amplificateur
This subwoofer
Caisson de grave
Another subwoofer
Un autre caisson de
grave
POWER indicator
Indicateur POWER
l: Signal flow
Sens du signal
(SA-W3800/SA-W3000 only)
(SA-W3800/SA-W3000 seulement)
Foot pads
Tampons
INOUT
LINE
MONO OUT
LINE
OUT IN
LEVEL
PHASE
M
CUT OFF
FREQ
50 Hz
200 Hz
1
2
3
4
5
(Само за SA-W3800/SA-W3000)
Усилвател
Посока на сигнала
Този субуфер Друг субуфер
Индикатор POWER
Крачета
Когато използвате два или повече
субуфера (
)
(Само за SA-W3800/SA-W3000)
Свържете жака MONO OUT на вашия усилвател
към жака LINE IN на субуфера. След това
използвайте приложения аудио свързващ кабел,
за да свържете жака LINE OUT на този субуфер
към жака LINE IN на друг субуфер.
Свързване на захранващия кабел
Свържете захранващите кабели от субуфера и •
от вашия усилвател към мрежата от 220 V.
Уверете се, че захранването на субуфера е •
изключено преди да включвате или изключвате
захранващия кабел.
Слушане на звук ( )
1 Включете усилвателя и изберете програмен
източник.
2 Натиснете POWER.
Субуферът се включва и индикаторът
POWER светва в зелено.
3 Възпроизведете програмния източник.
Регулирайте силата на звука VOLUME, така
че звукът от предните говорители да не е
изкривен.
Ако звукът от говорителите съдържа
смущения, звукът от субуфера също ще се
изкриви.
За да включвате и изключвате захранването
автоматично
– Функция за автоматично включване/
изключване на захранването (
)
Когато субуферът е включен (например
индикаторът POWER свети в зелено) и в
продължение на няколко минути не се въвежда
сигнал, индикаторът POWER се променя
в червено и субуферът влиза в режим на
пестене на енергия. Ако се подаде сигнал към
субуфера, докато устройството е в този режим,
субуферът автоматично се включва (функция
за автоматично включване/изключване на
захранването).
За да изключите тази функция, преместете
ключа POWER SAVE, намиращ се на задния
панел, в положение OFF.
Забележки
Не задавайте високи стойности в управлението •
на тоновете на усилвателя (BASS, TREBLE
и др.) или за еквалайзера, както и не
въвеждайте синусови криви от 20 Hz до 50
Hz, записани на тестови дискове, които се
продават в търговската мрежа, а също не
възпроизвеждайте силно специални звуци
(баси от електронни музикални инструменти,
пукащия шум от аналогови грамофони плочи,
звук с крайно увеличени баси и др.). Това
може да доведе до повреда в говорителите.
Когато възпроизвеждате специален диск,
който съдържа звук с крайно увеличени баси, е
възможно да се появят силни смущения. В този
случай намалете силата на звука.
Стойността на изведеният сигнал от субуфера •
(DOLBY цифров сигнал) на цифровия съраунд
процесор е зададена с 10 dB повече от Dolby
Laboratories Licensing Corporation. В случай на
нормално използване, регулирайте силата на
звука на субуфера.
Ако намалите нивото на силата на звука •
на усилвателя твърде много, функцията за
автоматично включване/изключване може да
се активира, което ще причини влизането на
субуфера в режим на пестене на енергия.
Настройка на звука
Можете да настроите звука от субуфера така,
че да подхожда на звука от вашите предни
говорители. Увеличаването на басите ви
предоставя по-добро усещане на атмосферата.
1 Задайте честотата. ( )
Завъртете контролния бутон CUT OFF
FREQ в зависимост от възпроизвежданите
честоти на вашите предни говорители.
Когато регулирайте, съблюдавайте
следното.
Типични много малки говорители:
4-5 cm в диаметър.
Типични малки говорители:
6-8 cm в диаметър.
Типични средни говорители:
9-15 cm в диаметър.
Типични големи говорители:
16-24 cm в диаметър.
Типични много големи говорители:
Повече от 25 cm в диаметър.
За да се възползвате напълно от функцията
за преобразуване на ниските нива
Когато възпроизвеждате звук с LFE сигнали,
Dolby Digital или DTS, препоръчваме ви да
зададете контролния бутон CUT OFF FREQ в
положение 200Hz (максимум), за да получите
най-доброто от функцията за преобразуване
на ниските нива.
2 Регулирайте силата на звука
на субуфера. ( )
Завъртете контролния бутон LEVEL така,
че да чувате басите малко по-добре от
преди. За да увеличите силата на звука,
завъртете контролния бутон по посока
на часовниковата стрелка. За да намалите
силата на звука, завъртете контролния
бутон в посока обратна на часовниковата
стрелка.
Български
3 Възпроизведете вашата любима музика или
филм.
Най-подходящи за настройка на басите са
мъжките вокални изпълнения и звуците,
съдържащи глас. Регулирайте силата
на звука за предните говорители както
обикновено.
4 Изберете поляритета на фазата. ( )
Използвайте селектора PHASE, за да
изберете поляритета на фазата.
5 Повторете стъпки от 1 до 4, за да регулирате
според вашите предпочитания.
След като веднъж зададете желаните от
вас настройки за субуфера, използвайте
контролния бутон VOLUME на усилвателя,
за да регулирате силата на звука на субуфера
спрямо тази на другите говорители. Не е
необходимо да регулирате настройката
на субуфера, когато променяте нивото на
силата на звука на усилвателя.
Забележки
Ако звукът съдържа смущения, когато •
включите функциите за подсилване на басите
на усилвателя (например D.B.F.B., GROOVE,
графичен еквалайзер и др.), изключете
функциите и регулирайте звука.
Не въртете контролния бутон LEVEL в •
максимално положение. Това може да причини
отслабване на басите. Възможно е да се чуе и
неприсъщ шум.
Когато изберете NORMAL или REVERSE за •
PHASE селектора, поляритетът се обръща и
е възможно възпроизвеждането на басите
да е по-добро в някои случаи (в зависимост
от вида на предните говорители, позицията
на субуфера и настройката на честотата).
Обръщането на поляритета може да промени
простора и стегнатостта на звука, както и да
повлияе на усещането за звуково поле. Изберете
настройката, която ви предлага звук според
вашите изисквания, когато се намирате в
обикновената си позиция на слушане.
Настройка на субуфера ( )
За да предотвратите вибрация или движение
по време на слушане, прикрепете към субуфера
приложените крачета.
Настройка на ключа за избор на волтаж
(само за моделите, които притежават
такъв) (
)
Уверете се, че ключът за избор на волтаж на
задния панел на субуфера е зададен спрямо
местния волтаж на захранването. Ако не е,
задайте ключа в правилната позиция преди да
свържете захранващия кабел към мрежата, като
използвате отвертка.
Отстраняване на проблеми
Ако срещнете някой от следните проблеми при
работата с вашия субуфер, използвайте списъка
с проблеми по-долу, за да отстраните повредата.
Ако проблемът продължава, консултирайте се с
най-близкия доставчик на Sony.
Не се извежда звук.
Уверете се, че субуферът и всички •
компоненти са правилно свързани.
Завъртете LEVEL по посока на часовниковата •
стрелка, за да увеличите силата на звука.
Нулирайте нивото.•
Звукът спира внезапно.
Контактът между оголени кабели и •
терминалите може да доведе до късо
съединение. Уверете се, че всички връзки са
извършени правилно.
Звукът съдържа смущения.
Въвежданият сигнал съдържа смущения.•
Нивото на въвеждания сигнал е твърде •
силно.
Задайте CUT OFF FREQ колкото е възможно •
по-високо, когато възпроизвеждате Dolby
digital звук.
При извеждане на звук се чува шум или жужене.
Свържете правилно заземяващия кабел на •
грамофона.
Контактът между щекерите на свързващите •
кабели и съответните жакове не е извършен
правилно. Свържете щекерите добре.
Аудио системата улавя смущения от •
телевизора. Преместете аудио системата на
разстояние от телевизора или изключете
телевизора.
Технически характеристики
SA-W3800
Система
Вид Активен субуфер (магнитно
защитен)
Говорител Ууфър: 38 cm в диаметър,
коничен тип
Непрекъснат RMS изход
200 W (6 ома, 80 Hz, 10% THD)
Честотен обхват при възпроизвеждане
20 Hz – 200 Hz
Отрязваща честота
50 Hz – 200 Hz
Селектор на фазата NORMAL, REVERSE
Входове
Входни жакове LINE IN: входен жак с пинове
SPEAKER IN: входни
терминали
Изходни жакове LINE OUT: изходен жак с
пинове
SPEAKER OUT: изходни
терминали
Общи
Изисквания към захранването
Модел за Европа: 230 V AC, 50/60 Hz
Консумация на захранване
100 W
Размери Прибл. 440 х 495 х 512 mm
(ш/в/д)
Тегло Прибл. 23 kg
Приложени аксесоари
Крачета (4)
Аудио свързващ кабел (1 фоно – 1 фоно), 2 m
SA-W3000
Система
Вид Активен субуфер (магнитно
защитен)
Говорител Ууфър: 30cm в диаметър,
коничен тип
Непрекъснат RMS изход
180 W (6 ома, 80 Hz, 10% THD)
Честотен обхват при възпроизвеждане
20 Hz – 200 Hz
Отрязваща честота
50 Hz – 200 Hz
Селектор на фазата NORMAL, REVERSE
Входове
Входни жакове LINE IN: входен жак с пинове
SPEAKER IN: входни
терминали
Изходни жакове LINE OUT: Изходен жак с
пинове
SPEAKER OUT: Изходни
терминали
Общи
Изисквания към захранването
230 – 240 V AC, 50/60 Hz
Консумация на захранване
100 W
Размери Прибл. 360 х 425 х 421 mm
(ш/в/д)
Тегло Прибл. 16 kg
Приложени аксесоари
Крачета (4)
Аудио свързващ кабел (1 фоно – 1 фоно), 2 m
SA-W2500
Система
Вид Активен субуфер (магнитно
защитен)
Говорител Ууфър: 25 cm в диаметър,
коничен тип
Непрекъснат RMS изход
100 W (6 ома, 80 Hz, 10% THD)
Честотен обхват при възпроизвеждане
28 Hz – 200 Hz
Отрязваща честота
50 Hz – 200 Hz
Селектор на фазата NORMAL, REVERSE
Входове
Входни жакове LINE IN: входен жак с пинове
SPEAKER IN: входни
терминали
Изходни жакове SPEAKER OUT: изходни
терминали
Общи
Изисквания към захранването
Модел за Европа: 230 V AC, 50/60 Hz
Консумация на захранване
70 W
Размери Прибл. 290 х 350 х 391 mm
(ш/в/д)
Тегло Прибл. 9 kg
Приложени аксесоари
Крачета (4)
Аудио свързващ кабел (1 фоно – 1 фоно), 2 m
Дизайнът и техническите характеристики
подлежат на промяна без предупреждение.
Изхвърляне на стари електрически и електронни уреди (Приложимо за
страните от Европейския съюз и други европейски страни, използващи
система за разделно събиране на отпадъци)
Този символ на устройството или на неговата опаковка показва, че този прод
не трябва да се третира като домашен отпадък. Вместо това, той трябва да бъ
предаден в съответните пунктове за рециклиране на електрически и електр
уреди. Изхвърляйки този продукт на правилното място, вие предотвратяват
потенциални негативни последици за околната среда и човешкото здраве, к
в противен случай могат да се случат при неправилното изхвърляне на прод
Рециклирането на материалите ще помогне за запазването на естествените
ресурси. За подробна информация относно рециклирането на този продукт,
свържете се с местния градски офис, службата за изхвърляне на отпадъци ил
магазина, от който сте закупили продукта.
BG
Изхвърляне на стари електрически и
електронни уреди (Приложимо за страните от
Европейския съюз и други европейски страни,
използващи система за разделно събиране на
отпадъци)
Този символ на устройството или на неговата
опаковка показва, че този продукт не трябва да се
третира като домашен отпадък. Вместо това, той
трябва да бъде предаден в съответните пунктове
за рециклиране на електрически и електронни
уреди. Изхвърляйки този продукт на правилното
място, вие предотвратявате потенциални негативни
последици за околната среда и човешкото здраве,
които в противен случай могат да се случат
при неправилното изхвърляне на продукта.
Рециклирането на материалите ще помогне за
запазването на естествените ресурси. За подробна
информация относно рециклирането на този
продукт, моля, свържете се с местния градски офис,
службата за изхвърляне на отпадъци или с магазина,
от който сте закупили продукта
-
 1
1
-
 2
2


Sony SA-W2500 Mode d'emploi
- Taper
- Mode d'emploi
dans d''autres langues
- English: Sony SA-W2500 Operating instructions