Porsche Porsche Classic Installation Instructions Manual
- Catégorie
- Récepteurs multimédia de voiture
- Taper
- Installation Instructions Manual

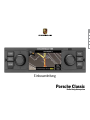
Porsche Classic
Radio-Navigationssystem
Einbauanleitung | Installation instructions | Instructions de montage
Istruzioni per l‘installazione | Instrucciones de montaje | Руководство по монтажу


Porsche Classic
Radio-Navigationssystem
Einbauanleitung
DEENFRITESRU

4
Teilenummer: 91164200100
Stand 2014
© Copyright 2014 Dr. Ing. h.c. F. Porsche
Aktiengesellschaft
Einbauanleitung Version 1.0 für Porsche Classic
Radio-Navigationssystem (PCRN).
Alle in diesem Dokument erwähnten Programme
und Bezeichnungen sind unter Umständen
eingetragene Marken beziehungsweise
Warenzeichen der Herstellerrmen und dürfen
nicht gewerblich oder in sonstiger Weise
verwendet werden. Ohne ausdrückliche
schriftliche Erlaubnis der Dr. Ing. h.c. F. Porsche
Aktiengesellschaft darf kein Teil dieser Unterlagen
für irgendwelche Zwecke vervielfältigt oder
übertragen werden, unabhängig davon auf welche
Art und Weise oder mit welchen Mitteln,
elektronisch oder mechanisch, dies geschieht.
Alle Rechte vorbehalten.
Impressum
Dr. Ing. h.c. F. Porsche Aktiengesellschaft
Porscheplatz 1
70435 Stuttgart
Internet: www.porsche.com/classic
Ausstattungen
Abweichungen in Ausstattung und Technik
gegenüber den Abbildungen und Beschreibungen
müssen wir uns wegen der laufenden Weiter-
entwicklung der Systeme und der unterschied-
lichen gesetzlichen Bestimmungen einzelner
Staaten vorbehalten. Die Ausstattungsvarianten
sind nicht immer serienmäßiger Lieferumfang.
Support
Bei Fragen wenden Sie sich bitte an Ihr
zuständiges Porsche Zentrum.
Sicherheitshinweise in der
Betriebsanleitung
In dieser Betriebsanleitung werden verschiedene
Arten von Sicherheitshinweisen verwendet.
Schwere Verletzungen oder Tod möglich. Werden
Sicherheitshinweise der Kategorie „Warnung“
nicht befolgt, können schwere Verletzungen oder
der Tod eintreten.
Sachschäden möglich.
Werden Sicherheitshinweise der Kategorie
„Hinweis“ nicht befolgt, können Sachschäden
am Fahrzeug auftreten.
Zusatzinformation, Tipps, zu beachten.

Inhaltsverzeichnis
5
Inhaltsverzeichnis
Wichtige Hinweise ....................................6
Wichtige Hinweise zur Verkehrssicherheit ........ 6
Wichtige Hinweise zum Einbau ........................ 6
Ein- und Ausbau des PCRN ......................7
Einbau .......................................................... 7
Feinjustierung der Einbautiefe ......................... 7
Ausbau ......................................................... 7
Anschlussschema .......................................... 8
Anschluss von Zubehör ............................
9
Installation der Mediabox ...............................
9
Installation des Freisprechmikrofons ............... 9
Anschluss von Soundsystemen ..................... 10
Installation von Antennen
(GPS und SiriusXM) ..................................... 10
DEENFRITESRU

6
Einbauanleitung
Wichtige Hinweise
Wichtige Hinweise zur
Verkehrssicherheit
Das PCRN (Porsche Classic Radio-Navi-
gationssystem) ist die zentrale Steuereinheit für
das Radio, Mediafunktionen, iPod, externe Audio-
quellen, Soundeinstellungen, die Navigation und
die Bluetooth-Telefonie. Um bei der Benutzung
Ihres PCRN sich selbst und andere nicht zu ge-
fährden oder zu schädigen, müssen Sie folgende
Punkte beachten:
Unfallgefahr. Durch die Ablenkung könnten
Sie die Kontrolle über das Fahrzeug verlieren.
Bedienen Sie Ihr PCRN nur dann, wenn Sie
Ihr Fahrzeug sicher steuern können und die
Verkehrssituation dies zulässt. Im Zweifels-
fall halten Sie an und bedienen Sie das
PCRN bei stehendem Fahrzeug.
Unfallgefahr. Das Navigationssystem dient
lediglich der Unterstützung des Fahrers
und gibt einen Vorschlag für die Fahrroute
ab. Dies entbindet Sie nicht von der vollen
Verantwortung für verkehrsrichtiges und
den Regeln der StVO (Straßenverkehrsord-
nung) sowie den sonstigen einschlägigen
Bestimmungen entsprechendes Verhalten im
Straßenverkehr.
Als Fahrer haben Sie das jeweilige Verkehrs-
geschehen zu beurteilen. Sie behalten die
alleinige Verantwortung für die verkehrssi-
chere Führung Ihres Fahrzeugs.
Achten Sie weiterhin auf das
Verkehrsgeschehen.
Wichtige Hinweise zum Einbau
Dieses Gerät wurde für den Einsatz in Fahr-
zeugen mit einer 12-Volt-Batterie konzipiert.
Bevor Sie das Radiogerät in Ihrem Fahrzeug
einbauen, vergewissern Sie sich, dass die
Batteriespannung dem Radiogerät entspricht.
Sollte dies nicht der Fall sein, nutzen Sie
einen Spannungswandler zur Konvertierung
der Versorgungsspannung auf 12 Volt.
Kurzschlussgefahr und Brandgefahr bei
Arbeiten an der Fahrzeugelektrik. Klemmen
Sie bei Arbeiten an der Fahrzeugelektrik die
Batterie ab.
Zur Vermeidung von Kurzschlüssen in der
Verkabelung und Beschädigungen am Gerät,
sichern Sie alle Kabel mit Kabelklemmen
oder Isolierband. Führen Sie die Kabel nicht
an Stellen vorbei die sich erhitzen. Vermei-
den Sie weiter Stellen mit sich bewegenden
Teilen, wie z.B. den Schalthebel, Hand-
bremshebel oder Sitzschienen, damit eine
Isolierung der Kabel gewährleistet bleibt.
Vermeiden Sie Kurzschlüsse und Beschädi-
gungen, indem Sie Anschlussstränge nicht
durch den Motorraum führend an der
Batterie anschließen.
Ersetzen Sie die Sicherung ausschließlich
durch eine neue 15-Ampere-Sicherung,
sollte diese defekt sein. Nutzen Sie niemals
eine andere Sicherung als angegeben, da es
ansonsten zu Kabelbränden oder Kurz-
schlüssen kommen kann.
Schließen Sie keine Geräte an die Batterie
an, da es ansonsten zur Überhitzung der
Batterie kommen kann.
Bitte versichern Sie sich, dass alle Kabelver-
bindungen zu den Lautsprechern ordnungs-
gemäß isoliert sind um Kurzschlüsse zu
vermeiden.
Vermeiden Sie Verbindungen vom Masse-
kabel zum Lautsprecherausgang, da die
interne Endstufe sonst Schaden nehmen
kann.
Die Maximalbelastung der genutzten
Lautsprecher liegt bei 4 x 45 Watt.
Achten Sie beim Anschließen der Laut-
sprecher auf den korrekten Anschluss,
da die Navigationsansagen nur auf die
vorderen Lautsprecher geleitet werden.
Grundsätzlich wird für die Funktion des
Gerätes kein Tachosignal benötigt.
Grundsätzlich empfehlen wir den Einbau des
Gerätes in einer Fachwerkstatt.
Fahrzeuge mit Antennenverstärker müssen
den Anschluss auf den ISO-Stecker (schwarz)
PIN5 (blau) legen. Bei Fragen wenden Sie
sich bitte an Ihr zuständiges Porsche
Zentrum.

Einbauanleitung
7
DEENFRITESRU
Ein- und Ausbau des PCRN
Einbau
1. Bevor Sie beginnen, trennen Sie unbedingt
die Batterie vollständig vom Bordnetz ab.
2. Trennen Sie den Einbaurahmen vom Radio-
gerät. Sollte dieser eingerastet sein,
verwenden Sie die mitgelieferten Entriege-
lungsschlüssel zum Entsichern der Rahmen.
3. Entfernen Sie das alte Gerät inklusive
Einbaurahmen.
4. Prüfen Sie, ob sich der neue Einbaurahmen
ordnungsgemäß in Ihren DIN-Schacht einfüh-
ren lässt. Der Einbaurahmen ist für Einbau-
schächte mit den Maßen 183 x 52 mm
(Breite x Höhe) ausgelegt. Den Einbaurah-
men nicht mit Gewalt einführen.
5. Biegen Sie die Sicherungslaschen des
Einbaurahmens nach oben und sorgen Sie
somit für einen sicheren und festen Halt des
Radiogerätes im Fahrzeug.
6. Positionieren Sie das Radiogerät vor dem
Einbauschacht. Ziehen Sie die Anschluss-
stränge durch den Einbaurahmen und Verbin-
den das Gerät anschließend mit den Kabeln.
Folgen Sie dabei aufmerksam und sorgfältig
dem Anschlussdiagramm und versichern Sie
sich, dass alle Kabel ordnungsgemäß isoliert
sind.
7. Grundsätzlich empfehlen wir die Montage
des mitgelieferten Abstandshalters auf der
Rückseite des Gerätes. Der Abstandshalter
dient zum Schutz der Radioanschlüsse
und wird in das dafür vorgesehene Gewinde
eingeschraubt. Anschließend wird die beige-
fügte Gummikappe aufgesteckt.
8. Schieben Sie das Radiogerät in den Einbau-
schacht bis es im Einbaurahmen einrastet.
9.
Nachdem das Radiogerät verkabelt worden
ist, schließen Sie die Batterie wieder an.
Schalten Sie das Radiogerät bei aktiver
Zündung an und prüfen, ob sich das Radio-
gerät einschalten lässt. Ist dies nicht der
Fall, prüfen Sie noch einmal die Verkabelung.
Sollte sich das Gerät erneut nicht einschal-
ten lassen, wenden Sie sich bitte an Ihr
zuständiges Porsche Zentrum.
Porsche 911 (bis Baujahr 1973):
Bei diesem Fahrzeugmodell sind Anpas-
sungen am Radioschacht vorzunehmen,
da der mitgelieferte 1-DIN-Einbaurahmen
nicht ohne Veränderungen am Armaturen-
brett in den Radioschacht zu installieren ist.
Bei Fragen wenden Sie sich bitte an Ihr
zuständiges Porsche Zentrum.
Schäden am Radiogerät: Unsachgemäßer An-
schluss kann zu irreparablen Schäden am Radio-
gerät oder an der Fahrzeugelektronik führen.
Feinjustierung der Einbautiefe
Zur individuellen Anpassung der Einbautiefe an
das jeweilige Fahrzeugmodell, lösen Sie die
Schrauben der Justierungsvorrichtung an beiden
Seiten des Gerätes. Passen Sie die Stellung
entsprechend an und ziehen Sie die Schrauben
anschließend wieder fest.
Ausbau
1. Führen Sie die beiden mitgelieferten Ent-
riegelungsschlüssel in die dafür vorgesehe-
nen Önungen links und rechts am Rand
der Gerätefront ein, bis diese einrasten.
2. Ziehen Sie das Gerät vorsichtig mit den
beiden Entriegelungsschlüsseln aus dem
Radioschacht heraus.
3. Stecken Sie alle Stecker von der
Geräterückseite ab.
4. Entfernen Sie den Einbaurahmen aus
dem Radioschacht.

8
Einbauanleitung
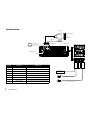
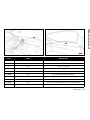
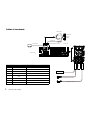
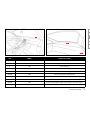
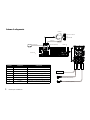
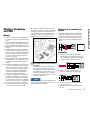
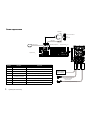
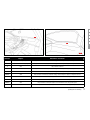
iPodUSB
GPS-Antenne
Erdung (Media-Box)
Media-Box
Radioantenne
Mikrofon
15A-Sicherung
USB-Anschluss
iPod-/iPhone-Anschluss
Aux-In
Grün
Gelb
Blau
NOKIA DSP
BLAUPUNKT DSP (optional)
SIRIUS Bus (USA/Canada)
Anschlussschema
Position Anschluss A Anschluss B
1 - Lautsprecher R (hinten) (+)/violett
2 - Lautsprecher R (hinten) (-)/violett/schwarz-gestreift
3 - Lautsprecher R (vorne) (+)/grau
4 Batterie 12V (+)/Gelb Lautsprecher R (vorne) (-)/grau/schwarz-gestreift
5 Verstärkersteuerung/Antenne Lautsprecher L (vorne) (+)/weiss
6 - Lautsprecher R (vorne) (-)/grau/schwarz-gestreift
7 ACC+/Rot Lautsprecher L (hinten) (+)/grün
8 Erdung/Schwarz Lautsprecher L (hinten) (-)/grün/schwarz-gestreift

Einbauanleitung
9
DEENFRITESRU
iPodUSB
GPS-Antenne
Erdung (Media-Box)
Media-Box
Radioantenne
Mikrofon
15A-Sicherung
USB-Anschluss
iPod-/iPhone-Anschluss
Aux-In
Grün
Gelb
Blau
NOKIA DSP
BLAUPUNKT DSP (optional)
SIRIUS Bus (USA/Canada)
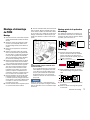
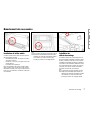
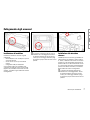
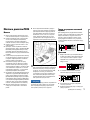
Anschluss von Zubehör
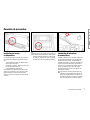
Installation der Mediabox
Die im Lieferumfang enthaltene Mediabox ermög-
licht folgende Anschlüsse:
USB-Sticks (bis max. 32 GB) zum Abspielen
von Musikdateien.
Aux-In: 3,5 mm-Klinkenanschluss für externe
Medienquellen.
USB-Anschluss für iPod/iPhone.
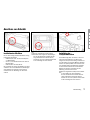
Wir empfehlen den Verbau der Mediabox im Hand-
schuhfach oder in der Mittelkonsole (Abbildungen
oben). Weitere Informationen zum Anschluss
entnehmen Sie der Abbildung zum Anschluss-
schema.
Bei den aufgeführten Einbaupositionen
handelt es sich lediglich um Empfehlungen.
Da sich die Situationen innerhalb der Fahr-
zeuge individuell unterscheiden können,
wenden Sie sich zum optimalen Verbau bitte
an Ihr zuständiges Porsche Zentrum.
Installation des
Freisprechmikrofons
Das PCRN verfügt über ein bereits in der Front-
blende verbautes Mikrofon zur Nutzung der
integrierten Freisprecheinrichtung. Zusätzlich ist
im Lieferumfang ein separates Mikrofon enthalten,
welches die Sprachqualität weiter erhöhen kann.
Zur optimalen Nutzung des Mikrofons empfehlen
wir den Verbau im Bereich der Sonnenblende.
Weitere Informationen entnehmen Sie der
Abbildung zum Anschlussschema.
Bei der aufgeführten Einbauposition handelt
es sich lediglich um eine Empfehlung.
Da sich die Situationen innerhalb der Fahr-
zeuge individuell unterscheiden können,
wenden Sie sich zum optimalen Verbau bitte
an Ihr zuständiges Porsche Zentrum.

10
Einbauanleitung
Anschluss von Soundsystemen
Das PCRN ist für den Anschluss von Sound-
systemen von Nokia und Blaupunkt vorbereitet.
Soundsysteme von Nokia können direkt über
das werkseitig verbaute Anschlusskabel des
Soundsystems angeschlossen werden. Zum
Anschluss eines Soundsystems von Blaupunkt
ist ein optional erhältliches Anschlusskabel
Teilenummer 91164220900 notwendig. Weitere
Informationen entnehmen Sie der Abbildung zum
Anschlussschema.
Für den Erwerb von Zubehörteilen, wenden
Sie sich bitte an Ihr zuständiges Porsche
Zentrum.
Installation von Antennen
(GPS und SiriusXM)
Grundsätzlich empfehlen wir den Verbau von
Antennen (GPS-Antenne und SiriusXM (nur
für USA/Kanada)) innerhalb des Fahrzeuges.
Vermeiden Sie, wenn möglich, alle Einbausi-
tuationen, bei denen Empfangsteile verdeckt
werden und den Empfang einschränken können.
Für den Einbau der Antennen empfehlen wir
die Einbaupositionen in der folgenden Tabelle.
Weitere Informationen entnehmen Sie auch der
Abbildung zum Anschlussschema.
Bei den aufgeführten Einbaupositionen
handelt es sich lediglich um Empfeh-
lungen. Da sich die Situationen innerhalb
der Fahrzeuge individuell unterscheiden
können, wenden Sie sich zum optimalen
Verbau bitte an Ihr zuständiges Porsche
Zentrum.
Das Satellitenradio des Anbieters
SiriusXM Radio Inc. ist ein kosten-
pichtiger Dienst zum Hören von Radio
via Satellit innerhalb der USA und Kanada.
Zum Abschluss eines Abonnements
beachten Sie die Bedingungen des
Anbieters in Ihrem Land.
Das Empfangsteil für SiriusXM (nur für
USA/Kanada) ist optionales Zubehör.
Tiefergehende Informationen zum
Anschluss von SiriusXM entnehmen Sie
bitte dem Handbuch des Zubehörteiles.
Für den Erwerb von Zubehörteilen,
wenden Sie sich bitte an Ihr zuständiges
Porsche Zentrum.

Einbauanleitung
11
DEENFRITESRU
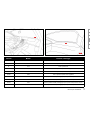
Position Modell
Einbauposition
1 oder 2 911 bis Baujahr 1973 Unter der Frontscheibe/Unter der Hutablage
1 oder 2 911 Baujahr 1974 bis 1989 Unter der Frontscheibe/Unter der Hutablage
1 914 Unter der Frontscheibe
1 oder 2 959 Unter der Frontscheibe/Unter der Hutablage
1 oder 2 964 Unter der Frontscheibe/Unter der Hutablage
1 oder 2 993 Unter der Frontscheibe/Unter der Hutablage
1 oder 3 928 Unter der Frontscheibe/Im Koerraum hinten links auf dem Radlauf
1 oder 3 924 Unter der Frontscheibe/Im Koerraum hinten links auf dem Radlauf
1 oder 3 944 Unter der Frontscheibe/Im Koerraum hinten links auf dem Radlauf
1 oder 3 968 Unter der Frontscheibe/Im Koerraum hinten links auf dem Radlauf
1
2
3


Porsche Classic
Radio Navigation System
Installation instructions
DEENFRITESRU

2
Part number: 91164200100
Version 2014
© Copyright 2014 Dr. Ing. h.c. F. Porsche
Aktiengesellschaft
Installation instructions version 1.0 for the
Porsche Classic radio navigation system (PCRN).
All programs and designations referred to in this
document may be brands or trademarks from
manufacturer companies and must not be used
for commercial or any other purposes. No part of
this document may be reproduced or distributed
for any purpose, regardless of how or by which
means, i.e. electronically or mechanically, without
express written permission from Dr. Ing. h.c. F.
Porsche Aktiengesellschaft. All rights reserved.
Legal information
Dr. Ing. h.c. F. Porsche Aktiengesellschaft
Porscheplatz 1
70435 Stuttgart
Internet: www.porsche.com/classic
Features
Due to the continuous further development of the
systems and varying national legislation, features
and technology of this device may deviate from
the illustrations and descriptions. Some features
may not be included in the standard scope of
supply.
Support
If you have any questions, please contact your
Porsche Centre.
Safety notices used in this
operating manual
This operating manual contains dierent types of
safety notices.
Risk of severe injury or death. Disregarding safety
warnings of category "Warning" may lead to
severe injury or death.
Risk of material damage
Disregarding safety notices of category "Informa-
tion" may cause material damage to the vehicle.
Useful information, tips and hints.

Contents
3
Contents
Important information ..............................4
Important information concerning road safety .. 4
Important information concerning installation ... 4
Installation and removal of your PCRN .....5
Installation .................................................... 5
Fine adjustment of the installation depth .......... 5
Removal ....................................................... 5
Connection diagram ...................................... 6
Connecting accessories ...........................
7
Installing the media box .................................
7
Installation of the hands-free microphone ......... 7
Connecting the sound system ........................ 8
Installation of antennas (GPS and SiriusXM) ...8
DEENFRITESRU

4
Installation instructions
Important information
Important information concerning
road safety
The PCRN (Porsche Classic Radio Navigation
System) is the central control centre for radio,
media functions, iPod, external audio sources,
sound settings, navigation system and Bluetooth
telephony. In order to avoid any risk to yourself and
other road users when using your PCRN, please
make sure to observe the following points:
Risk of accident! Any distraction may lead to
a loss of control over your vehicle.
Only operate the controls of your PCRN when
it is safe to do so and when trac permits.
If you have any doubt, stop and use the PCRN
when the vehicle is at standstill.
Risk of accident! The navigation system
assists the driver by suggesting a route. It is
still your sole responsibility as the driver to
drive safely and to observe and comply with
all laws and legal requirements pertaining to
road safety.
It is your obligation as the driver to be aware
of the trac situation at all times. You as
the driver are solely responsible for the safe
operation of your vehicle.
Always be aware of the trac situation.
Important information concerning
installation
This device was designed for use in vehicles
with a 12 volt battery. Before you install the
radio device in your vehicle, make sure that the
battery voltage conforms to the radio device. If
this is not the case, use a voltage transformer to
convert the supply voltage to 12 volt.
Risk of short circuit and re when working on
vehicle electrical systems. Disconnect the
battery when working on vehicle electrical
systems.
To prevent short circuits in the cabling and
damage to the device, secure all cables with
cable clamps or insulating tape. Do not run
cables past places that heat up. To ensure
that the cable insulation remains intact, also
avoid places with moving parts, such as the
gear lever, handbrake lever or seat rails.
To prevent short circuits and damage, do not
route cables through the engine compartment
to connect to the battery.
If the fuse is detective, replace it only with a
new 15 ampere fuse. Never use a fuse other
than that stated, since this can cause cable
res or short circuits.
Never connect devices to the battery, since
this can cause the battery to overheat.
Ensure that all cable connections to the
loudspeakers are properly insulatedin order to
prevent short circuits.
Avoid connections from the earth cable to the
loudspeaker output, as this can damage the
internal power amplier.
The maximum load of the used loudspeaker
is 4 x 45 watt.
Make sure the loudspeaker is correctly con-
nected, since the navigation announcements
are routed only to the front loudspeakers.
In principle, no tachometer signal is required
for the functionality of the device.
We recommend that the device is installed at
a specialist workshop.
Vehicles with antenna ampliers must connect
the ISO plug (black) to PIN5 (blue). If you have
any questions, please contact your Porsche
Centre.

Installation instructions
5
DEENFRITESRU DEENFRITESRU
Installation and removal
of your PCRN
Installation
1. Before getting started, ensure that the bat-
tery is fully disconnected from the onboard
power supply.
2. Remove the installation frame from the radio
device. If this is engaged, use the unlocking
keys supplied to release the frame.
3. Remove the old device, including installation
frame.
4. Check whether the new installation frame
can be correctly inserted in the DIN slot. The
installation frame is designed for installation
slots with dimensions of 183 x 52 mm (width
x height). Do not insert the installation frame
using force.
5.
Bend the fastening tabs of the installation
frame upwards to ensure that the radio de-
vice is held reliably and rmly in the vehicle.
6. Position the radio device in front of the instal-
lation slot. Pull the connecting cables through
the installation frame and connect the cables
to the device. Carefully the connection dia-
gram and ensure that all cables are correctly
insulated.
7. We recommend mounting of the supplied
spacer on the rear of the device. The
spacer protects the radio connections and is
screwed into the thread provided. Then attach
the supplied rubber cap.
8. Push the radio device into the installation slot
until it engages in the installation frame.
9.
Once the radio device is correctly cabled,
re-connect the battery. Turn on the radio device
with the ignition on and check whether the radio
device can be switched on. If this is not the case,
check the cabling once again. If the device still
cannot be switched on, please contact your
Porsche Centre.
Porsche 911 (to year of manufacture
1973):
With this vehicle model, adjustments are to
be made to the radio slot, since the supplied
1xDIN installation frame cannot be installed
without modifying the radio slot in the dash-
board. If you have any questions, please
contact your Porsche Centre.
Damage to radio device: Improper connection
can cause irreparable damage to the radio
device or the vehicle electronics.
Fine adjustment of the installation
depth
To adjust the installation depth to the vehicle
model concerned, loosen the screws of the
adjustment device on both sides of the device.
Adjust the position accordingly and then re-tighten
the screws.
Removal
1. Insert the two supplied unlocking keys into
the openings provided on the left and right
at the edge of the device front, until they
engage.
2. Carefully pull the device forward out of the
radio slot using the two unlocking keys.
3. Disconnect all plugs from the rear of the
device.
4. Remove the installation frame from the radio
slot.

6
Installation instructions
iPodUSB
GPS antenna Ground (Media box)
Media box
Radio antenna
Microphone
15A fuse
USB connection
iPod/iPhone connection
Aux-In
BLAUPUNKT DSP (optional)
Green
Yellow
Blue
SIRIUS bus (optional)
NOKIA DSP
Connection diagram
Position Connection A Connection A
1 - Loudspeaker R (rear) (+)/violet
2 - Loudspeaker R (rear) (+)/violet/black striped
3 - Loudspeaker R (front) (+)/grey
4 Battery 12v (+)/yellow Loudspeaker R (front) (-)/grey/black striped
5 Amplier control/antenna Loudspeaker L (front) (+)/white
6 - Loudspeaker R (front) (-)/grey/black striped
7 ACC+/red Loudspeaker L (rear) (+)/green
8 Earth/black Loudspeaker L (rear) (-)/green/black striped

Installation instructions
7
DEENFRITESRU DEENFRITESRU
iPodUSB
GPS antenna Ground (Media box)
Media box
Radio antenna
Microphone
15A fuse
USB connection
iPod/iPhone connection
Aux-In
BLAUPUNKT DSP (optional)
Green
Yellow
Blue
SIRIUS bus (optional)
NOKIA DSP
Connecting accessories
Installing the media box
The media box included in the scope of supply
permits the following connections:
USB sticks (to max. 32 GB) for playing back
music les.
Aux-In: 3.5 mm jack connector for external
media sources.
USB connection for iPod/iPhone.
We recommend that the media box is installed in
the glove compartment or in the centre console
(gures above). Further information on the con-
nection is provided in the gures on the connec-
tion diagram.
The stated installation positions are merely
recommendations. Since the situations inside
individual vehicles can dier, please contact
your Porsche Centre to optimise the installa-
tion.
Installation of the
hands-free microphone
The PCRN already has a microphone installed in
the front panel for use with the integrated hands-
free device. In addition, a separate microphone
is included in the scope of supply, which can
further improve the speech quality. For optimal
microphone use, we recommend it is installed in
the region of the sun visor. Further information is
provided in the gure on the connection diagram.
The stated installation position is merely a
recommendation. Since the situations inside
individual vehicles can dier, please contact
your Porsche Centre to optimise the installa-
tion.

8
Installation instructions
Connecting the sound system
The PCRN is prepared for connecting to Nokia
and Blaupunkt sound systems. Nokia sound
systems can be directly connected to the sound
system connection cable which is installed in the
factory. To connect a Blaupunkt sound system,
an optionally available connection cable, part
number 91164220900, is required. Further
information is provided in the gure on the con-
nection diagram.
To purchase accessory parts, please con-
tact your Porsche Centre.
Installation of antennas
(GPS and SiriusXM)
We recommend the installation of antennas (GPS
antenna and SiriusXM (for the USA/Canada only))
within the vehicle. Wherever possible, avoid all
installation situations that conceal reception
components and hence limit reception. For
the installation of antennas, we recommend
the installation positions in the following table.
Further information is provided in the gure on
the connection diagram.
The stated installation positions are merely
recommendations. Since the situations
inside individual vehicles can dier, please
contact your Porsche Centre to optimise
the installation.
The satellite radio service oered by
SiriusXM Radio Inc. is a pay-radio service
broadcasting via satellite across the USA
and Canada. To subscribe, please observe
the provider's conditions applicable in your
country.
The reception component for SiriusXM
(only for the USA/Canada) is an optional
accessory. Further information on con-
necting SiriusXM can be obtained from the
manual of the accessory component.
To purchase accessory parts, please
contact your Porsche Centre.
La page est en cours de chargement...
La page est en cours de chargement...
La page est en cours de chargement...
La page est en cours de chargement...
La page est en cours de chargement...
La page est en cours de chargement...
La page est en cours de chargement...
La page est en cours de chargement...
La page est en cours de chargement...
La page est en cours de chargement...
La page est en cours de chargement...
La page est en cours de chargement...
La page est en cours de chargement...
La page est en cours de chargement...
La page est en cours de chargement...
La page est en cours de chargement...
La page est en cours de chargement...
La page est en cours de chargement...
La page est en cours de chargement...
La page est en cours de chargement...
La page est en cours de chargement...
La page est en cours de chargement...
La page est en cours de chargement...
La page est en cours de chargement...
La page est en cours de chargement...
La page est en cours de chargement...
La page est en cours de chargement...
La page est en cours de chargement...
La page est en cours de chargement...
La page est en cours de chargement...
La page est en cours de chargement...
La page est en cours de chargement...
La page est en cours de chargement...
La page est en cours de chargement...
La page est en cours de chargement...
La page est en cours de chargement...
La page est en cours de chargement...
La page est en cours de chargement...
La page est en cours de chargement...
La page est en cours de chargement...
La page est en cours de chargement...
La page est en cours de chargement...
La page est en cours de chargement...
La page est en cours de chargement...
-
 1
1
-
 2
2
-
 3
3
-
 4
4
-
 5
5
-
 6
6
-
 7
7
-
 8
8
-
 9
9
-
 10
10
-
 11
11
-
 12
12
-
 13
13
-
 14
14
-
 15
15
-
 16
16
-
 17
17
-
 18
18
-
 19
19
-
 20
20
-
 21
21
-
 22
22
-
 23
23
-
 24
24
-
 25
25
-
 26
26
-
 27
27
-
 28
28
-
 29
29
-
 30
30
-
 31
31
-
 32
32
-
 33
33
-
 34
34
-
 35
35
-
 36
36
-
 37
37
-
 38
38
-
 39
39
-
 40
40
-
 41
41
-
 42
42
-
 43
43
-
 44
44
-
 45
45
-
 46
46
-
 47
47
-
 48
48
-
 49
49
-
 50
50
-
 51
51
-
 52
52
-
 53
53
-
 54
54
-
 55
55
-
 56
56
-
 57
57
-
 58
58
-
 59
59
-
 60
60
-
 61
61
-
 62
62
-
 63
63
-
 64
64


Porsche Porsche Classic Installation Instructions Manual
- Catégorie
- Récepteurs multimédia de voiture
- Taper
- Installation Instructions Manual
dans d''autres langues
- italiano: Porsche Porsche Classic
- English: Porsche Porsche Classic
- español: Porsche Porsche Classic
- Deutsch: Porsche Porsche Classic
- русский: Porsche Porsche Classic
Documents connexes
-
Porsche Porsche Classic Mode d'emploi
-
-
-
-
-
-
-
-
-