
THANK YOU
We appreciate the trust and confidence you have placed in Commercial Electric through the purchase of this LED
light. We strive to continually create quality products designed to enhance your home. Visit us online to see our full
line of products available for your home improvement needs. Thank you for choosing Commercial Electric!
Item # 1001171903
Model # 56507112
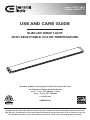
USE AND CARE GUIDE
SLIM LED WRAP LIGHT
WITH SELECTABLE COLOR TEMPERATURE
Questions, problems, missing parts? Before returning to the store,
call Commercial Electric Customer Service
8 a.m. - 7 p.m., EST, Monday - Friday
9 a.m. - 6 p.m., EST, Saturday
1-877-527-0313
HOMEDEPOT.CA

2
Safety Information
WARNING: Carefully read and understand the information
given in this manual before beginning the assembly and
installation. Failure to do so could lead to electric shock, fire, or
other injuries which could be hazardous or even fatal.
WARNING: Ensure the electricity to the wires you are
working on is shut off. Either remove the fuse or turn off the
circuit breaker.
WARNING: Risk of fire or electric shock. Installation requires
a person familiar with the construction and operation of the
light fixture’s/luminaire’s electrical system and the hazard
involved. If not qualified, do not attempt installation. Contact a
qualified electrician.
NOTICE: This device complies with Industry Canada’s license-exempt
RSSs. Operation is subject to the following two conditions:
(1) this device may not cause harmful interference; and
(2) this device must accept any interference received, including
interference that may cause undesired operation of the device.
WARNING: Changes or modifications not expressly approved
by the party responsible for compliance could void the user’s
authority to operate the equipment.
Warranty
WHAT IS COVERED
The manufacturer warrants this lighting fixture to be free from defects in materials and workmanship for a period
of five (5) years from date of purchase. This warranty applies only to the original consumer purchaser and only to
products used in normal use and service. If this product is found to be defective, the manufacturer’s only obligation,
and your exclusive remedy, is the repair or replacement of the product at the manufacturer’s discretion, provided
that the product has not been damaged through misuse, abuse, accident, modifications, alterations, neglect, or
mishandling.
WHAT IS NOT COVERED
This warranty shall not apply to any product that is found to have been improperly installed, set-up, or used in any
way not in accordance with the instructions supplied with the product. This warranty shall not apply to a failure of
the product as a result of an accident, misuse, abuse, negligence, alteration, faulty installation, or any other failure
not relating to faulty material or workmanship. This warranty shall not apply to the finish on any portion of the
product, such as surface and/or weathering, as this is considered normal wear and tear.
The manufacturer does not warrant and specifically disclaims any warranty, whether express or implied, of fitness
for a particular purpose, other than the warranty contained herein. The manufacturer specifically disclaims any
liability and shall not be liable for any consequential or incidental loss or damage, including but not limited to any
labor / expense costs involved in the replacement or repair of said product.
Contact the Customer Service Team at 1-877-527-0313 or visit www.HomeDepot.ca.
Table of Contents
Table of Contents ......................................2
Safety Information ....................................2
Warranty ...................................................2
Pre-Installation .........................................3
Planning Installation ..............................3
Tools Required .......................................3
Package Contents ..................................3
Hardware Included .................................3
Installation ................................................4
Adjusting the Color Temperature
of the Light .............................................7
Care and Cleaning ....................................8
Troubleshooting ........................................8
Light Distribution ......................................8

3 HOMEDEPOT.CA
Please contact 1-877-527-0313 for further assistance.
Pre-Installation
PLANNING INSTALLATION
Before beginning assembly, installation or operation of product, make sure all parts are present. Compare parts
with the package contents list. If any part is missing or damaged, do not attempt to assemble, install or operate the
product. Contact customer service for replacement parts.
NOTE: Keep your receipt and these instructions for proof of purchase.
If you are unfamiliar with electrical installations, we recommend you contact a qualified electrician to do the
installation.
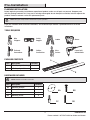
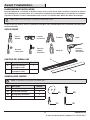
TOOLS REQUIRED
Wire
Strippers
Safety
Goggles
Ladder Gloves
Flathead
Screwdriver
Phillips
Screwdriver
Wire
Cutters
Power Drill
with drill bits
PACKAGE CONTENTS
Part Description Quantity
A LED Wrap Light Housing 1
B LED Wrap Light Diffuser 1
A
B
HARDWARE INCLUDED
NOTE: Hardware not shown to actual size.
Part Description Quantity
AA Mounting Bracket 1
BB Electrical Box Screw 2
CC Drywall Anchor 2
DD Mounting Screw 2
AA BB
CC DD

4
Installation
Select a suitable location that can support the weight of the fixture. Determine the method of mounting before
drilling.
WARNING: RISK OF ELECTRIC SHOCK. Ensure the electricity to the wires you are working on is shut off. Either remove the fuse or turn off
the circuit breaker before removing the existing light fixture or installing the new one.
With power disconnected to your electrical box, remove the existing fixture. Make a sketch of how the current
fixture is wired (by wire color) or mark the wires with masking tape and a pencil so you will know how to properly
reconnect the wires to the new LED light fixture.
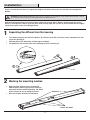
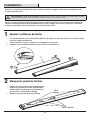
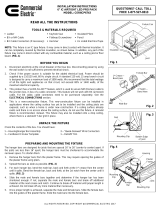
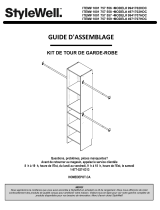
1
Separating the diffuser from the housing
□ Press down gently on one end of the diffuser (B) until you meet with resistance from the bottom of the end
cap of the housing (A).
□ Slide the diffuser (B) toward the end being pressed down.
□ Lift the diffuser (B) from the other end, removing it from the housing (A).
2
Marking the mounting location
□ With help from another person, temporarily
hold the fixture housing (A) up to the ceiling to
determine the best mounting position and which
knock out hole to use for wiring the fixture.
□ Mark two keyhole locations for mounting.
A
B
Knock out holes
Keyholes

5 HOMEDEPOT.CA
Please contact 1-877-527-0313 for further assistance.
Installation (continued)
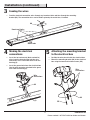
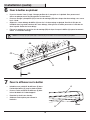
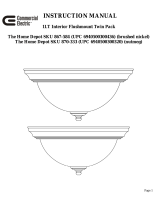
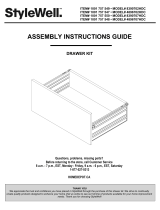
3
Feeding the wires
□ Feed the electrical connection wires through any knock out hole and then through the mounting
bracket (AA). The connection wires can be held in place by the metal tabs, if needed.
4
Making the electrical
connections
□ Insert the hot and neutral (black and white)
wires from the electrical box into the wire
connectors of the same color wires from the
housing (A).
□ Insert the ground wire from the electrical box
into the wire connector attached to the green
wire from the housing (A).
5
Attaching the mounting bracket
to the electrical box
□ Position the wires back inside the electrical box.
□ Mount the mounting bracket (AA) to the electrical
box using the two electrical box screws (BB).
AA
Metal tabs
Knock out holes
AA
BB
Wire
connectors
AA
A
Wire
connectors

6
7
Attaching the diffuser to the housing
□ Insert one end of the diffuser (B) into the end cap of the
housing (A) to the bottom of the limit part.
□ Push the other end of the diffuser (B) to the top of the
limit part on the opposite end cap.
□ Restore power to the electrical box.
□ Turn on the light switch to activate the fixture.
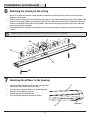
6
Attaching the housing to the ceiling
□ Drill a 1/8-in. pilot hole into the screw locations marked on the ceiling. You can also use an awl or nail to
dimple the screw holes.
□ Install a drywall anchor (CC) and a mounting screw (DD) in each drilled mounting hole, but do not tighten fully.
□ Align the 2 mounting keyholes on the housing (A) with the 2 mounting screws in the ceiling. Once the screw
heads are through the large ends of the keyholes, slide the housing until the heads of the screws slide into
the narrow ends of the keyholes.
□ Finish tightening the mounting screws (DD) until the fixture housing (A) is tightly secured to the mounting
surface.
NOTE: The drywall anchors (CC) are only to be used for mounting the fixture onto plaster or drywall surfaces.
A
B
Limit part
Installation (continued)
CC
AA
DD
A

7 HOMEDEPOT.CA
Please contact 1-877-527-0313 for further assistance.
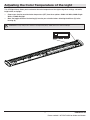
Adjusting the Color Temperature of the Light
This LED light fixture allows you to customize the color temperature of the light using three settings: soft white,
bright white, or daylight.
□ Choose your favorite correlated color temperature (CCT) from three options: 3000k Soft White, 4000k Bright
White, or 5000k Daylight.
□ Move the toggle switch on the housing (A) to make your selection before attaching the diffuser (B) to the
housing (A).
NOTICE: The factory setting for the correlated color temperature (CCT) is 3000K, which is the warmest white light.

8
Troubleshooting
WARNING: Before doing any work on the fixture, disconnect power to the light fixture.
Minor problems often can be fixed without the help of an electrician.
Problem Possible Cause Solution
The fixture will not light. The power is off. Ensure the power supply is on.
The circuit breaker is off. Ensure the circuit breaker is in the on position.
There is a bad connection. Check to ensure proper wire connections are made.
Contact a qualified electrician.
There is a defective switch. Contact a qualified electrician.
The fuse blows or the
circuit breaker trips when
the light is turned on.
The wires are crossed or the
power wire is grounding out.
Check the wire connections.
Contact a qualified electrician or call Commercial
Electric customer service 1-877-527-0313.
Care and Cleaning
CAUTION: Before attempting to clean the fixture, disconnect the power to the fixture by turning the breaker off or removing the fuse from
the fuse box.
□ Clean the fixture with a soft, dry cloth.
□ Do not use cleaners with chemicals, solvents, or harsh abrasives.
□ Do not use liquid cleaner on the LEDs, LED driver, or wiring inside the light fixture.
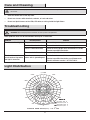
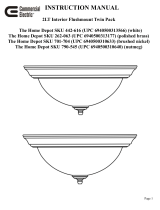
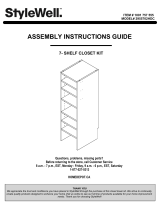
Light Distribution
0
30
60
90
120
150
-/+180
-150
-120
-90
-60
-30
UNIT:cd
C0/180,114.6
UNIT:cd
C30/210,118.5
UNIT:cd
C60/240,120.9
UNIT:cd
C90/270,121.7
AVERAGE BEAM ANGLE(50%):118.9 DEG
0
170
340
510
680
850

9 HOMEDEPOT.CA
Please contact 1-877-527-0313 for further assistance.
Notes

Questions, problems, missing parts? Before returning to the store,
call Commercial Electric Customer Service
8 a.m. - 7 p.m., EST, Monday - Friday
9 a.m. - 6 p.m., EST, Saturday
1-877-527-0313
HOMEDEPOT.CA
Retain this manual for future use.

GUIDE D’UTILISATION ET
D’ENTRETIEN
LUMINAIRE ENVELOPPANT MINCE À DEL
AVEC TEMPÉRATURE CHROMATIQUE AJUSTABLE
Questions, difficultés, pièces manquantes? Avant de retourner au magasin,
téléphonez au service à la clientèle de Commercial Electric
8 h à 19 h, HNE, du lundi au vendredi,
9 h à 18 h, HNE, samedi
1-877-527-0313
HOMEDEPOT.CA
MERCI
Nous apprécions la confiance que vous avez accordé à la Commercial Electric en achetant ce luminaire à DEL. Nous
cherchons continuellement à créer des produits de qualité visant à améliorer le décor de votre foyer. Consultez
notre gamme complète de produits pour vos projets de rénovation au foyer. Nous vous remercions d’avoir choisi
Commercial Electric!
Item n° 1001171903
Modèle n° 56507112

12
Consignes de sécurité
AVERTISSEMENT: Lisez et comprenez bien les
renseignements fournis dans ce manuel avant de procéder à
l’assemblage et à l’installation. Un manque à le faire pourrait
mener à un risque de choc électrique, d’incendie ou de
blessures qui pourraient être graves, voire même mortelles.
AVERTISSEMENT: Assurez-vous de couper le courant
au circuit sur lequel vous travaillerez. Enlevez le fusible ou
coupez le disjoncteur.
AVERTISSEMENT: Risque d’incendie ou de choc
électrique. Cette trousse de modernisation à DEL doit être
installée par une personne qui connaît bien la conception et
le fonctionnement du système électrique du luminaire ainsi
que les risques qui y sont associés. Si vous n’êtes pas
qualifié, ne procédez pas à l’installation. Faites appel à un
électricien qualifié.
AVIS: Cet appareil est conforme aux CNR exempts de licence d’industrie
Canada. Son fonctionnement est soumis aux deux conditions suivantes:
□ Ce dispositif ne peut causer d’interférences; et
□ Ce dispositif doit accepter toute interférence, y compris les
interférences qui peuvent causer un mauvais fonctionnement de
l’appareil.
AVERTISSEMENT : Tout changement ou toute modification
non expressément approuvée par la partie responsable de
la conformité peut rendre nulle l’autorisation de l’utilisateur
d’utiliser l’équipement.
Table des matières
Table des matières .................................12
Consignes de sécurité ............................12
Garantie. ..................................................12
Avant l’installation ..................................13
Planification de l’installation ................13
Outils requis .........................................13
Contenu de l’emballage .......................13
Quincaillerie fournie .............................13
Installation ..............................................14
Réglage de la température chromatique
de la lumière .......................................17
Entretien et nettoyage ............................18
Guide de dépannage ...............................18
Distribution de la lumière. ......................19
Garantie
CE QUI EST COUVERT
Le fabricant garantit cet appareil d’éclairage contre les vices de matière et de fabrication pour une période de cinq
(5) ans à partir de la date d’achat. Cette garantie n’est offerte qu’au consommateur acheteur d’origine et ne couvre
que les produits utilisés de façon normale. Si le produit s’avère défectueux, la seule obligation du fabricant et votre
seul remède sera la réparation ou le remplacement du produit, à la discrétion du fabricant, en autant que le produit
n’ait pas été endommagé suite à une mauvaise utilisation, un usage abusif, un accident, des modifications, une
négligence ou une mauvaise manutention.
CE QUI N’EST PAS COUVERT
Cette garantie est sans effet si le produit a été mal installé, mal préparé, ou utilisé d’une façon contraire aux
instructions fournies avec le produit. Cette garantie est sans effet si la panne du produit est le résultat d’un
accident, d’une mauvaise utilisation, d’un usage abusif, d’une négligence, d’une modification, d’une mauvaise
installation ou de toute cause autre qu’un vice de matière ou de fabrication. La garantie ne s’applique pas au fini
d’une partie quelconque du produit comme la surface ni à l’altération, considérés une usure normale.
Le fabricant n’offre aucune garantie et se désiste particulièrement de toute garantie, expresse ou explicite,
d’aptitude à fournir une tâche particulière, autre que la garantie offerte dans la présente. Le fabricant se désiste
particulièrement de toute responsabilité et ne peut être tenu responsable de quelque perte ou dommage fortuit
ou indirect, incluant mais non de façon limitative les frais / coûts de main-d’oeuvre liés à la réparation ou au
remplacement du produit.
Communiquez avec le service à la clientèle au 1 877 527-0313 ou consultez www.Homedepot.ca.

13 HOMEDEPOT.CA
Si vous avez besoin d’aide, composez le 1 877 527-0313.
Avant l’installation
PLANIFICATION ET INSTALLATION
Avant de commencer à assembler ou installer l’article, assurez-vous d’avoir toutes les pièces. Comparez le contenu
de l’emballage avec la nomenclature. S’il y a des pièces manquantes ou endommagées, ne tentez pas d’assembler,
d’installer, ni d’utiliser l’article. Communiquez avec le service à la clientèle pour obtenir des pièces de rechange.
NOTE : Gardez votre facture ainsi que ces instructions comme preuves d’achat.
Si vous n’êtes pas familier avec les installations électriques, nous recommandons que l’installation soit faite par un
électricien qualifié.
OUTILS REQUIS
Pince à
dénuder
Lunettes
de sécurité
Escabeau
Gants
Tournevis
à lame plate
Tournevis
à pointe
cruciforme
Coupe-fil
Perceuse
électrique
avec mèche
CONTENU DE L’EMBALLAGE
Part Description Quantité
A Boîtier du luminaire
enveloppant à DEL
1
B Diffuseur du luminaire
enveloppant à DEL
1
A
B
QUINCAILLERIE FOURNIE
NOTE : La qulncaillerie n’est pas illustrée à sa grandeur réelle.
Part Description Quantité
AA Support de montage 1
BB Vis de boîte électrique 2
CC Ancrage pour placoplâtre 2
DD Vis de montage 2
AA BB
CC DD

14
Installation
Choisissez un endroit convenable où le poids du luminaire peut être supporté. Déterminez le mode de fixation
avant de percer des trous.
AVERTISSEMENT : RISQUE DE CHOC ÉLECTRIQUE. Assurez-vous d’avoir coupé le courant aux fils que vous toucherez. Enlevez le fusible
ou déclenchez le disjoncteur du circuit avant d’enlever le luminaire existant ou d’en installer un nouveau.
Une fois le courant coupé à la boîte électrique, enlevez le luminaire existant. Faites une esquisse du câblage du
luminaire existant (par couleur de fil) ou identifiez les fils avec un papier-cache et un crayon; vous saurez ainsi
comment reconnecter les fils correctement au nouveau luminaire à DEL.
1
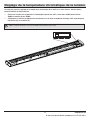
Séparer le diffuseur du boîtier
□ Pressez délicatement sur une extrémité du diffuseur (B) jusqu’à ce que vous sentiez une résistance contre
le bas de l’embout du boîtier (A).
□ Poussez le diffuseur (B) vers le point où vous appliquez une pression.
□ Soulevez l’autre extrémité du diffuseur (B) puis retirez-le du boîtier (A).
2
Marquer les points de fixation
□ Aidé d’une autre personne, tenez temporairement
le boîtier (A) du luminaire contre le plafond pour
établir le meilleur endroit pour l’installation et le
trou à pastille à utiliser pour le câblage.
□ Marquez la position des deux trous oblongs.
A
B
Trous à pastille
Trous
oblongs

15 HOMEDEPOT.CA
Si vous avez besoin d’aide, composez le 1 877 527-0313.
Installation (suite)
3
Acheminer les fils
□ Acheminez les fils électriques dans un des trous à pastille puis à travers le support de montage (AA). Au
besoin, les fils peuvent être retenus à l’aide des pattes métalliques.
4
Effectuer les connexions
□ Insérez les fils chargé et neutre (noir et
blanc) de la boîte électrique dans les
connecteurs des fils de la même couleur du
boîtier (A).
□ Insérez le fil de terre de la boîte électrique
dans la connecteur du fil vert du boîtier (A).
5
Fixer le support de montage à
la boîte électrique
□ Réintroduisez les fils dans la boîte électrique.
□ Fixez le support de montage (AA) à la boîte
électrique à l’aide des deux vis pour boîte
électrique (CC).
AA
Pattes Métalliques
Trous à pastille
AA
BB
Connecteurs
AA
A
Connecteurs

16
6
Fixer le boîtier au plafond
□ Percez un trou de 3 mm (1/8 po) à chaque position de vis marquée sur le plafond. Vous pouvez aussi
utiliser un poinçon ou un clou pour pointer les trous de vis.
□ Posez un ancrage à placoplâtre (CC) et une vis de montage (DD) dans chaque trou de montage, sans serrer
la vis à fond.
□ Alignez les 2 trous oblongs du boîtier (A) avec les 2 vis de montage au platond. Une fois le tête des vis
introduite dans le grande ouverture des trous oblongs, faites glissser le boîtier pour ancrer la tête des vis
dans la partie étroite des trous oblngs.
□ Finissez le montage en serrant les vis de montage (DD) de façon à ce que le boîtier (A) repose fermement
contre la surface de montage.
NOTE : Les ancrages pour placoplâtre (CC) ne s’utilisent que pour la fixation sur une surface en plâtre ou placoplâtre.
7
Poser le diffuseur sur le boîtier
□ Introduisez une extrémité du diffuseur (B) dans
l’embout du boîtier (A) jusqu’au fond du butoir.
□ Poussez l’autre extrémité du diffuseur (B) dans
le haut de butoir de l’embout opposé.
□ Remettez le circuit sous tension.
□ Actionnez l’interrupteur pour allumer le
luminaire.
Installation (suite)
A
B
Butoir
CC
AA
DD
A

17 HOMEDEPOT.CA
Si vous avez besoin d’aide, composez le 1 877 527-0313.
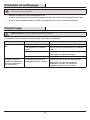
Réglage de la température chromatique de la lumière
Ce luminaire permet le réglage de la température chromatique de la lumière sur trois niveaux : blanche douce,
blanche brillante et lumière du jour.
□ Choisissez l’une de trois températures chromatiques proximales (CCT) : blanc doux 3000K, blanc brillant
4000K ou lumière du jour 5000K.
□ Sélectionnez la couleur en déplaçant le commutateur sur le flanc du module d’éclairage à DEL avant de poser
le diffuseur (B) sur le boîtier (A).
AVIS : Le réglage chromatique à l’usine est de 3000K, la lumière blanche la plus chaude.

18
Entretien et nettoyage
MISE EN GARDE : Avant le nettoyage, coupez l’alimentation du luminaire en plaçant le disjoncteur en position hors tension ou en
enlevant le fusible de la boîte à fusibles.
□ Nettoyez le luminaire à l’aide d’un linge doux et sec.
□ N’utilisez pas de nettoyants contenant des produits chimiques, des solvants ou des produits abrasifs forts.
□ N’utilisez pas de nettoyant liquide sur la DEL, le transformateur ou les fils à l’intérieur du luminaire.
Dépannage
AVERTISSEMENT: Déconnectez le luminaire avant d’effectuer tout entretien.
Les problèmes mineurs peuvent souvent être réglés sans l’aide d’un électricien.
Problème Cause Possible Mesure Corrective
Le luminaire ne s’allume
pas.
Le luminaire est hors tension. Assurez-vous que le circuit est sous tension.
Le disjoncteur est en position
d’arrêt.
Assurez-vous que le disjoncteur est à la position
« ON ».
Les fils sont mal branchés. Assurez-vous que les fils sont bien branchés.
Faites appel à un électricien qualifié.
Un interrupteur est défectueux. Faites appel à un électricien qualifié.
Le fusible saute ou le
disjoncteur se déclenche
lorsque le luminaire est
mis sous tension.
Les fils sont croisés ou un fil
d’alimentation est mis à la terre.
Assurez-vous que les fils sont bien branchés.
Faites appel à un électricien qualifié ou
téléphonez au service à la clientèle de
Commercial Electric 1-877-527-0313.

19 HOMEDEPOT.CA
Si vous avez besoin d’aide, composez le 1 877 527-0313.
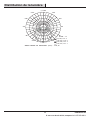
Distribution de la lumière
0
30
60
90
120
150
-/+180
-150
-120
-90
-60
-30
C0/180,114.6
C30/210,118.5
C60/240,120.9
C90/270,121.7
0
170
340
510
680
850
ANGLE MOYEN DU FAISCEAU (50%): 118,9°
UNITÉ: cd

Questions, difficultés, pièces manquantes? Avant de retourner au magasin,
téléphonez au service à la clientèle de Commercial Electric
8 h à 19 h, HNE, du lundi au vendredi,
9 h à 18 h, HNE, samedi
1-877-527-0313
HOMEDEPOT.CA
Conservez ce manuel pour référence ultérieure
-
 1
1
-
 2
2
-
 3
3
-
 4
4
-
 5
5
-
 6
6
-
 7
7
-
 8
8
-
 9
9
-
 10
10
-
 11
11
-
 12
12
-
 13
13
-
 14
14
-
 15
15
-
 16
16
-
 17
17
-
 18
18
-
 19
19
-
 20
20


Commercial Electric 56507111-4PK Mode d'emploi
- Taper
- Mode d'emploi
- Ce manuel convient également à
dans d''autres langues
Documents connexes
-
Commercial Electric 1001240169 Mode d'emploi
-
Commercial Electric 32000003 Mode d'emploi
-
Commercial Electric WRAP2C840IRMM Mode d'emploi
-
 Commercial Electric JJU3011L-2/ORB Mode d'emploi
-
 Commercial Electric EFG8012A/ORB-4P Mode d'emploi
-
 Commercial Electric CER6CP6743B-4PK Mode d'emploi
-
 Commercial Electric EFG1011-2-NTMG Mode d'emploi
-
 Commercial Electric EFG8012A-WH-8PK Mode d'emploi


Autres documents
-
 Dorel Home 2937000HDCS Assembly Manual
-
 Dorel Home 9941702HDC Assembly Manual
-
 Dorel Home 4896707HDC Assembly Manual
-
Eti 53505111-5PK Mode d'emploi
-
 Dorel Home 2955702HDC Assembly Manual
-
Hampton Bay 17262 Guide d'installation
-
 Hampton Bay 18123-000 Guide d'installation
-
 Hampton Bay HMP8012A Guide d'installation
-
 Hampton Bay 17265 Mode d'emploi
-
American Lighting NV5 Manuel utilisateur


