
Desktop Audio System
EN Owner’s Manual

2
Table of contents
Introduction ................................................................................. 3
Accessories ....................................................................................................................................................... 3
About this document ................................................................................................................................ 3
Using the unit ............................................................................... 4
Part names .................................................................................... 5
The unit .............................................................................................................................................................. 5
Display ................................................................................................................................................................. 6
Remote control .............................................................................................................................................. 7
Preparation .................................................................................. 9
Turn on the unit ............................................................................................................................................ 9
Set the unit’s clock .................................................................................................................................... 10
Use MusicCast Controller to connect to a network ............................................................. 11
Play from an input source ......................................................... 12
Listening to a CD ....................................................................................................................................... 12
Listening to music via Bluetooth® .................................................................................................. 13
Listening to DAB stations (Australia, U.K., and Europe models only) ........................ 16
Listening to FM radio stations ........................................................................................................... 19
Listening to music on USB flash drives ........................................................................................ 21
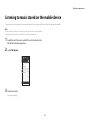
Listening to music from an external device ............................................................................. 22
Listening to music stored on the mobile device ................................................................... 23
Listening to Internet radio ................................................................................................................... 24
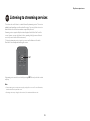
Listening to streaming services ........................................................................................................ 25
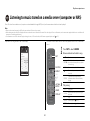
Listening to music stored on a media server (computer or NAS) ............................... 26
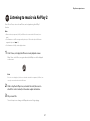
Listening to music via AirPlay 2 ........................................................................................................ 27
Other features ............................................................................ 28
Shuffle/repeat playback ........................................................................................................................ 28
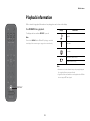
Playback information .............................................................................................................................. 29
Adjusting sound quality ........................................................................................................................ 30
Registering favorites with SCENE .................................................................................................... 31
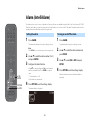
Alarm (IntelliAlarm) ................................................................................................................................... 32
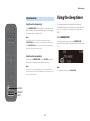
Using the sleep timer .............................................................................................................................. 33
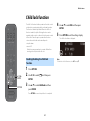
Child lock function .................................................................................................................................... 34
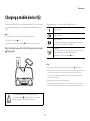
Charging a mobile device (Qi) .......................................................................................................... 35
Adjusting display brightness (dimmer) ....................................................................................... 36
Option settings ........................................................................................................................................... 37
Pair the unit with MusicCast-enabled devices ........................................................................ 40
Firmware updates ..................................................................................................................................... 41
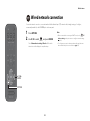
Wired network connection ................................................................................................................. 43
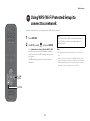
Using WPS (Wi-Fi Protected Setup) to connect to a network ....................................... 44
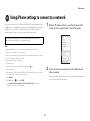
Using iPhone settings to connect to a network .................................................................... 45
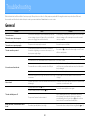
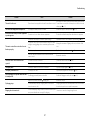
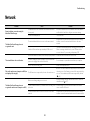
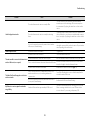
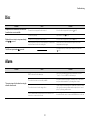
Troubleshooting ........................................................................ 46
Messages in the display ............................................................. 54
Devices/media, and file formats supported by the unit ......... 55
Specifications ............................................................................. 57
Trademarks ................................................................................. 59
Functions that require a network connection are indicated with the icon.
Thank you for purchasing this Yamaha product.
Before using the unit, be sure to read this document and the supplied “Safety
Brochure” to ensure proper and safe use. Keep these documents readily available for
future reference.

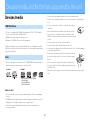
3
Introduction
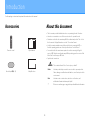
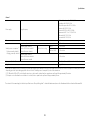
Confirm package contents and important information about this manual.
Accessories About this document
•This document provides detailed instructions on operating the unit’s functions.
•Instructions concentrate on use of the remote control to operate the unit.
•Illustrations used in the document may differ from the actual product. The clock in
this document’s display illustrations uses the 12-hour time format.
•In this document, smartphones and other mobile devices running the iOS or
Android operating systems are collectively referred to as “mobile devices”.
•Screenshots in this document were captured on a device running the English
version of iOS. Actual screen displays may differ depending upon the version of the
MusicCast Controller app or iOS used.
•Symbols and conventions
This content indicates “risk of serious injury or death.”
Notice Indicates points that you must observe in order to prevent product
failure, damage or malfunction and data loss, as well as to protect the
environment.
Note Indicates notes on instructions, restrictions on functions, and
additional information that may be helpful.
References another page or pages that provide additional information.
Remote control Quick Manual
Non-skid pad (p. 35) Safety Brochure
WARNING

4
Using the unit
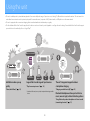
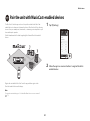
•This unit is a desktop audio system that can play audio from an incredibly wide range of input sources, including CDs, Bluetooth devices, and radio stations. This unit can also be
used with a home network or audio system to play audio from a media server (computer or NAS), Internet radio, or AirPlay devices on the same network.
•This unit is equipped with a convenient charging function and an alarm function that wakes you gently.
•The free dedicated MusicCast Controller app for mobile devices can be used to easily control playback or configure the unit’s settings. Download the MusicCast Controller app to
your mobile device from the App Store or Google Play™.
Bluetooth CD USB
MusicCast Controller
IntelliAlarm wakes you up
gently.
“Alarm (IntelliAlarm)” (p. 32)
Support for a broad range of input sources.
“Play from an input source” (p. 12)
* A wireless LAN router (access point) is required when using a mobile
device.
The unit’s top panel supports wireless
smartphone charging.
“Charging a mobile device (Qi)” (p. 35)
Bluetooth headphones allow you to listen to
music, even at night, without disturbing others.
“Using Bluetooth speakers/headphones to listen to audio
(transmitting function)” (p. 15)
Mobile device*

5
Part names
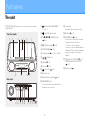
The unit
1, 2, 3, 6, and 7 are touch sensors. Tap icons with your finger to
control functions.
1 762354
A809
BHCD GE F
Top /front panels
Rear panel
1zPower on/standby/CONNECT
(p. 9, 11).
2ySwitch the input source.
31, 2, 3, 4, 5SCENE function
(p. 31)
4Wireless charger (p. 35)
5SNOOZE/SLEEP (p. 33)
6Control audio (p. 12, 19, 21, 24, 26).
7/Volume −/+
8Display (p. 6)
9Disc slot (p. 12)
0=Eject a disc (p. 12).
ARemote sensor
BAUX jack (Mini jack input) (p. 22)
CHEADPHONES jack
No sound is heard from the unit when the
headphones are connected.
DService jack
Used when the unit requires servicing.
EUSB jack (p. 21)
FNETWORK jack (p. 43)
The unit can be connected to a network
using either a wired or a wireless
connection. For a wired network
connection, connect a standard shielded
twisted pair (STP) network cable (straight,
category 5 or higher; commercially
available).
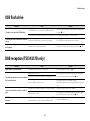
GFM antenna for TSX-N237 (p. 19)
FM/DAB antenna for TSX-N237D
(p. 16)
HPower cord (p. 9)

6
Part names
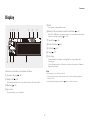
Display
Indicators and information in the display are as follows:
1Qi wireless charging (p. 35)
2Wireless LAN (p. 45)
Glows steadily when the unit is connected to a wireless LAN router via Wi-Fi.
3Bluetooth (p. 13)
4Input source
The selected input source is displayed.
5Mute
The indicator is displayed while muted.
6Repeat, shuffle, or information about the radio station (p. 28)
When FM or DAB radio is selected as the input source, information about the radio
station or broadcast is displayed (p. 16, 19).
7Current time (p. 10)
8Alarm information (p. 32)
9Child lock (p. 34)
0Sleep (p. 33)
AInfo display
Displays a variety of information, including that for a song as it plays, radio
frequency, etc.
Some information may be cut off as there is a limit on the number of characters
that can be displayed.
Note
Display brightness can be adjusted as required.
•Automatic (default setting; adjusted automatically in accordance with ambient lighting.)
•Manual (10 levels)
See “Adjusting display brightness (dimmer)” (p. 36) to configure this function.
621 3 4 5 7
8A9 0

Part names
7
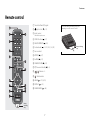
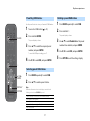
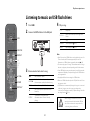
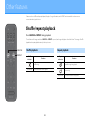
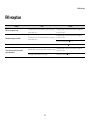
Remote control
1Transmit infrared (IR) signals.
2=Eject a disc (p. 12).
3Input sources
Switch the input source.
4SCENE function (p. 31)
5SHUFFLE/REPEAT (p. 28)
6Control audio (p. 12, 16, 19, 21, 24, 26)
7Cursor control
8OPTION (p. 37)
9ALARM (p. 32)
0SNOOZE/SLEEP (p. 33)
AzPower on/standby (p. 9).
B/Volume +/−
CMute/unmute
DHOME (p. 21, 24, 25)
EDISPLAY (p. 29)
FSOUND MODE (p. 30)
1
B
E
C
D
F
2
3
4
5
6
7
8
9
0
A
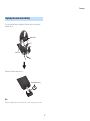
Battery
insulating
strip
Remove the battery insulating strip before
attempting to use the remote control.
Battery insulating
strip

8
Part names
Press the release tab firmly to the right and hold it there while slowly sliding the
battery holder out.
Replace the old battery with a new one.
Note
Replace the old battery with a new one when the remote control’s range becomes very short.
Replacing the remote control battery
Battery holder
Release tab
CR2025 Lithium battery

9
Preparation
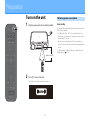
Turn on the unit
1Plug the power cord into an electrical outlet.
2Press z to turn on the unit.
The display on the front panel will be turned on.
Auto standby
The unit will automatically enter auto standby mode in any of
the following situations:
•CD, Bluetooth, USB, or NET is selected as the input source,
but no audio is played and no operations are performed for
approximately 20 minutes.
•An input source other than any of those noted above is
selected, but no operations are performed for approximately
8 hours.
See “Auto standby” in “Option settings” to disable the auto
standby function (p. 39).
Within 10 m (32 ft)
Reducing power consumption
z

Preparation
10
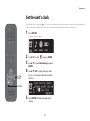
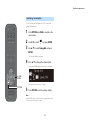
Set the unit’s clock
When the MusicCast Controller app (p. 11) is used to connect the unit to a network, the unit’s clock can be synchronized with that
of the mobile device running MusicCast Controller. If you utilize this feature, skip the procedure described below.
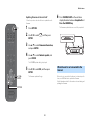
1Press OPTION.
The option menu is displayed.
2Use e/r to select and press ENTER.
3Use q/w to select Clock setting and press
ENTER.
4Use q/w/e/r to adjust the date, select
the 12- or 24-hour time format, and adjust
the time.
5Press ENTER to finalize and apply clock
settings.
CLOCK
qwer
ENTER
OPTION

11
Preparation
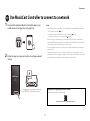
Use MusicCast Controller to connect to a network
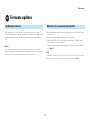
1Download the dedicated MusicCast Controller app to your
mobile device on the App Store or Google Play.
2Follow the app’s on-screen instructions to configure network
settings.
Note
•See the following when connecting to a network without using the MusicCast Controller app.
− Wired network connection (p. 43)
− Using Wi-Fi Protected Setup (WPS) to connect to a network (p. 44)
− Using iPhone settings to connect to a network (p. 45)
After connecting to a network using one of the methods described above, download and
install the MusicCast Controller app to your mobile device and follow the instructions at left to
enable simple operation of the unit from your mobile device.
•For more information on Internet connections, refer to the documentation provided with your
network devices.
•Security software installed on your computer or network device settings (firewall, etc.) may
prevent the unit from accessing your computer or Internet radio stations. If this occurs, modify
security software or network device settings to permit access by the unit.
Follow the app’s on-screen instructions and
press CONNECT for at least five seconds.
Important notice regarding information security
Visit the website shown below for details.
https://manual.yamaha.com/av/policy/mcc/

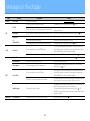
12
Play from an input source
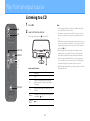
Listening to a CD
1Press CD.
2Insert a CD into the disc slot.
Music begins playing. Press = to eject a CD.
Audio control buttons
Note
•This unit supports playback of audio and data CDs to which MP3
and or WMA files have been recorded.
•This unit does not support 8-cm mini CDs. Do not insert an 8-cm
mini CD, or an adapter containing an 8-cm mini CD, into the disc
slot.
•If a CD that is not supported by the unit is inserted into the disc slot,
it may not be possible to eject the CD. See “Devices/media, and file
formats supported by the unit” for information on CDs supported
by the unit (p. 55).
•When CD playback is stopped, playback will resume from the
beginning of the song last played. Pressing
s
while playback is
stopped will clear playback memory (resume playback feature).
•If the unit is turned off when CD has been selected as the input
source and a CD has been inserted into the disc slot, CD playback
will automatically begin the next time the unit is turned on.
•The CD will begin playing if CD is selected as the input source with a
CD loaded in the unit.
ad
Play/pause
s
Stop
f
Skip to the beginning of the song being
played or previous song. Press and hold to
fast rewind.
g
Skip to the next song. Press and hold to fast
forward.
DISPLAY Information about an audio CD being played
is displayed. (p. 29)
SHUFFLE/
REPEAT p. 28
=
ad
s
f
g
CD
=
REPEAT
DISPLAY
SHUFFLE

Play from an input source
13
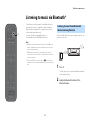
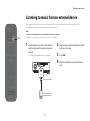
Listening to music via Bluetooth®
The unit can be used to play music from a Bluetooth device,
such as a mobile device or digital music player. In addition,
Bluetooth wireless headphones or speakers can be used to
listen to audio played via the unit.
For more information regarding Bluetooth, see
documentation provided with Bluetooth devices.
Note
•A Bluetooth device that transmits audio to the unit and Bluetooth
speakers /headphones that receive audio from the unit cannot be
connected at the same time.
•If a Bluetooth device has been connected before, the unit will
connect to the last connected device. Terminate this connection to
connect a new device.
•Press and hold $ on the remote control or y on the unit for at
least three seconds to terminate the Bluetooth connection from the
unit.
Audio from a Bluetooth device can be played on the unit over
a wireless connection.
1Press $.
The unit’s input source is switched to Bluetooth and the
unit is ready for pairing.
2Enable the Bluetooth function of the
Bluetooth device.
Listening to music from a Bluetooth
device (receiving function)
$

14
Play from an input source
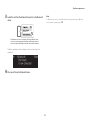
3Select this unit from the Bluetooth device list on the Bluetooth
device.
The Bluetooth indicators will be displayed once the connection has been
established.
4
Play a music file on the Bluetooth device.
Note
If a Bluetooth connection is not established, delete the unit’s registration from the Bluetooth
device, and then try repeating steps 1-3.
TSX-N237 ******
The illustration above shows an example of the display. When the unit is
connected to a network using the MusicCast Controller app, the name of
the room (assigned with the app) in which this unit is located is displayed.

15
Play from an input source
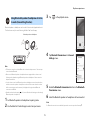
Bluetooth speakers or headphones can be used to listen to audio played via the unit.
This function can only be controlled using the MusicCast Controller app.
Note
•This function cannot be used when Bluetooth is selected as the input source. Select an input
source other than Bluetooth.
•Be sure to use Bluetooth speakers or headphone that are equipped with a volume control.
Volume must be adjusted using the Bluetooth speakers or headphones. Volume cannot be
adjusted from this unit.
•Use the volume control on the Bluetooth speakers or headphones to turn down the volume,
and then connect the speakers or headphones to the unit. Failure to turn down the volume
before connecting may result in extremely loud playback to begin when the Bluetooth
connection is established.
•Equalizer and sound mode settings (p. 30) are not reflected when listening to audio through
Bluetooth speakers or headphones.
1Set Bluetooth speakers or headphones to pairing mode.
2Use the MusicCast Controller app to select an input source.
3Tap in the playback screen.
4Tap Bluetooth Transmission in the Sound
Settings screen.
5Enable the Bluetooth transmission function in the Bluetooth
Transmission screen.
6Select the Bluetooth speakers or headphones to be connected.
Note
If a Bluetooth connection is not established, repeat the connection procedure from step 1.
Using Bluetooth speakers/headphones to listen
to audio (transmitting function)
Bluetooth speakers or headphones

Play from an input source
16
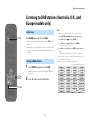
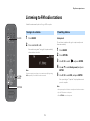
Listening to DAB stations (Australia, U.K., and
Europe models only)
Press RADIO repeatedly to select DAB.
•Initial scan starts automatically when you select DAB for the
first time.
•When scanning is completed, the number of receivable DAB
stations is displayed momentarily, and the first station stored
is played.
1Press RADIO repeatedly to select DAB.
When the unit cannot receive the DAB signal, “Off Air” is
displayed.
2Press e or r to select a DAB station.
Note
•Initial scan can also be performed from the option settings.
1 Press OPTION when DAB is selected as the input source.
2Use e/r to select , and press ENTER.
3Use q/w to select Initial scan, and press ENTER.
The initial scan display is shown.
4Use e/r to select OK, and press ENTER to begin the initial
scan.
“Complete” is displayed when the initial scan is complete.
•If an initial scan is performed, stored DAB station information and
preset DAB stations are cleared.
•This unit can receive only Band III DAB frequencies.
Frequency in MHz/Channel label
Initial scan
Tuning in DAB stations
DAB
qwer
ENTER
RADIO
OPTION

Play from an input source
17
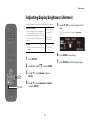
Use the preset function to store your favorite 40 DAB stations.
1Tune in to a DAB station (p. 16).
2Press and hold ENTER.
The preset display is shown.
3Press q/w to select the required preset
number, and press ENTER.
To cancel the DAB preset setting, press
s
.
4Use e/r to select OK, and press ENTER.
1Press RADIO repeatedly to select DAB.
2Press q/w to select a preset station.
Note
DAB station information shown in the display is switched in the
following order each time DISPLAY is pressed.
1Press RADIO repeatedly to select DAB.
2Press and hold
s
.
The preset display is shown.
3Use q/w to select Delete ALL or the preset
number to be deleted, and press ENTER.
4Use e/r to select OK, and press ENTER.
5Press OPTION to exit the settings display.
Presetting DAB stations
Selecting preset DAB stations
Station Label (up to 8 characters), Preset number (default)
DLS (Dynamic Label Segment)
Ensemble Label
Channel label, Frequency, Signal Quality
Audio format, DRC
Deleting a preset DAB station
qwer
ENTER
RADIO
OPTION
DISPLAY
s

Play from an input source
18
You can confirm the DAB signal level. This is useful when
setting up the antenna.
1Press OPTION when DAB is selected as the
input source.
2Use e/r to select , and press ENTER.
3Use q/w to select Tuning Aid, and press
ENTER.
The Tuning Aid display is shown.
4Press q/w to change the channel label.
The measured DAB signal reception level is displayed.
The level is from 0 (none) to 100 (best).
5Press OPTION to exit the settings display.
Note
When the DAB signal is weak in Tuning Aid, try adjusting the position
of the antenna to obtain good reception.
Confirming the reception
DAB
qwer
ENTER
OPTION

Play from an input source
19
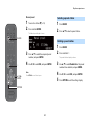
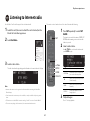
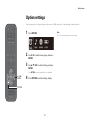
Listening to FM radio stations
Extend the antenna and position it for good FM reception.
1Press RADIO.
2Press and hold e or r.
Automatic tuning starts. Tuning will stop automatically
when a station is tuned in.
Note
If station reception is weak, tune in to a station manually by pressing
e/r repeatedly. Sound will be heard in monaural.
Auto preset
The unit tunes in stations with good reception and presets
them automatically.
1Press RADIO.
2Press OPTION.
3Use e/r to select , and press ENTER.
4Use q/w to select Auto preset, and press
ENTER.
5Use e/r to select OK, and press ENTER.
Auto preset begins. “Complete” is displayed when auto
preset is complete.
Note
•Auto preset replaces all stations currently stored with new stations.
•Up to 40 FM stations can be preset.
•Press OPTION to cancel auto preset.
Tuning in to a station Presetting stations
FM
qwer
ENTER
RADIO
OPTION

Play from an input source
20
Manual preset
1Tune in to a station (p. 19).
2Press and hold ENTER.
The Manual preset display is shown.
3Press q/w to select the required preset
number, and press ENTER.
4Use e/r to select OK, and press ENTER.
Note
Press OPTION to cancel Manual preset.
1Press RADIO.
2Press q/w to select a preset station.
1Press RADIO.
2Press and hold
s
.
The preset deletion display is shown.
3Use q/w to select Delete ALL or the preset
number to be deleted, and press ENTER.
4Use e/r to select OK, and press ENTER.
5Press OPTION to exit the settings display.
Selecting a preset station
Deleting a preset station
RADIO
OPTION
s
qwer
ENTER
La page est en cours de chargement...
La page est en cours de chargement...
La page est en cours de chargement...
La page est en cours de chargement...
La page est en cours de chargement...
La page est en cours de chargement...
La page est en cours de chargement...
La page est en cours de chargement...
La page est en cours de chargement...
La page est en cours de chargement...
La page est en cours de chargement...
La page est en cours de chargement...
La page est en cours de chargement...
La page est en cours de chargement...
La page est en cours de chargement...
La page est en cours de chargement...
La page est en cours de chargement...
La page est en cours de chargement...
La page est en cours de chargement...
La page est en cours de chargement...
La page est en cours de chargement...
La page est en cours de chargement...
La page est en cours de chargement...
La page est en cours de chargement...
La page est en cours de chargement...
La page est en cours de chargement...
La page est en cours de chargement...
La page est en cours de chargement...
La page est en cours de chargement...
La page est en cours de chargement...
La page est en cours de chargement...
La page est en cours de chargement...
La page est en cours de chargement...
La page est en cours de chargement...
La page est en cours de chargement...
La page est en cours de chargement...
La page est en cours de chargement...
La page est en cours de chargement...
La page est en cours de chargement...
La page est en cours de chargement...
-
 1
1
-
 2
2
-
 3
3
-
 4
4
-
 5
5
-
 6
6
-
 7
7
-
 8
8
-
 9
9
-
 10
10
-
 11
11
-
 12
12
-
 13
13
-
 14
14
-
 15
15
-
 16
16
-
 17
17
-
 18
18
-
 19
19
-
 20
20
-
 21
21
-
 22
22
-
 23
23
-
 24
24
-
 25
25
-
 26
26
-
 27
27
-
 28
28
-
 29
29
-
 30
30
-
 31
31
-
 32
32
-
 33
33
-
 34
34
-
 35
35
-
 36
36
-
 37
37
-
 38
38
-
 39
39
-
 40
40
-
 41
41
-
 42
42
-
 43
43
-
 44
44
-
 45
45
-
 46
46
-
 47
47
-
 48
48
-
 49
49
-
 50
50
-
 51
51
-
 52
52
-
 53
53
-
 54
54
-
 55
55
-
 56
56
-
 57
57
-
 58
58
-
 59
59
-
 60
60


Yamaha N237D Le manuel du propriétaire
- Taper
- Le manuel du propriétaire
- Ce manuel convient également à
dans d''autres langues
- italiano: Yamaha N237D Manuale del proprietario
- English: Yamaha N237D Owner's manual
- español: Yamaha N237D El manual del propietario
- Deutsch: Yamaha N237D Bedienungsanleitung
- русский: Yamaha N237D Инструкция по применению
- Nederlands: Yamaha N237D de handleiding
- dansk: Yamaha N237D Brugervejledning
- svenska: Yamaha N237D Bruksanvisning
- suomi: Yamaha N237D Omistajan opas
Documents connexes
-
Yamaha R-N600A Mode d'emploi
-
Yamaha N237D Quick Manual
-
-
Yamaha N470D Le manuel du propriétaire
-
Yamaha RX-V485 Le manuel du propriétaire
-
Yamaha RX-S602 Le manuel du propriétaire
-
Yamaha RX-A1080 Le manuel du propriétaire
-
Yamaha RX-V4A Mode d'emploi
-
Yamaha TSR-400 Mode d'emploi
-