
MANUAL DE USUARIO | MANUEL D´UTILISATION | USER’S MANUAL BEDIE-
NUNGSANLEITUNG
|
MANUAL DE USUÁRIO | MANUALE DI ISTRUZIONI
ES|FR|EN|DE|PT|IT
BÁSCULA COMERCIAL
BALANCE COMMERCIALE
RETAIL SCALE
HANDELSWAAGE
BALANÇA COMERCIAL
XTI
BILANCIA COMMERCIALE
V.1.4
14072021
marca propiedad de | est une marque de | trade mark propiety of:
Pol. Empordà Internacional Calle Molló, 3
17469 VILAMALLA - (Girona) SPAIN
T. (34) 972 527 212
El fabricante se reserva el derecho de modificar sin previo aviso las características de sus productos para introducir mejoras técnicas o cumplir con nuevas regulaciones oficiales./Le
constructeur se réserve le droit de modifier les caractéristiques de ses produits en vue d’y apporter des améliorations techniques ou de respecter de nouvelles réglamentations./The
manufacturer reserves the right to modify the specifications of its products in order to make technical improvements or comply with new regulations. Il produttore si riserva il diritto di modificare
senza preavviso le caratteristiche dei suoi prodotti al fine di introdurre dei miglioramenti tecnici o di conformarsi alle nuove normative ufficiali.

XTI
ES
1.
ANTES DE SU UTILIZACIÓN 4
2.
ESPECIFICACIONES 4
3.
ALIMENTACIÓN 4
4.
CONSUMO 4
5.
AVISO DE BATERÍA BAJA 4
6.
DESCRIPCIÓN DEL DISPLAY Y TECLADO 5
7.
FUNCIONES BÁSICAS 6
8.
PARÁMETROS 6
9. MENSAJES DE ERROR 8
10.GARANTÍA 8
FR
1.
AVANT D’UTILISER 9
2.
SPÉCIFICATIONS 9
3.
ALIMENTATION 9
4.
CONSOMMATION 9
5.
AVIS DE BATTERIE FAIBLE 9
6.
DESCRIPTION DE L’ÉCRAN ET CLAVIER 10
7.
FONCTIONS FONDAMENTALES 11
8.PARAMÈTRES 11
9.MESSAGES D’ERREUR 13
10.GARANTIE 13
EN
1.
BEFORE USING 14
2.
SPECIFICATIONS 14
3.
POWER 14
4.
SYSTEM POWER CONSUMPTION 14
5.
LOW POWER WARNING 14
6.
DISPLAYS AND KEYBOARD DESCRIPTION 15
7.
BASIC FUNCTIONS 16
8.
PARAMETERS 16
9.ERROR MESSAGES 18
10.WARRANTY 18
2

XTI
DE
1.
VOR DER INBETRIEBNAHME
19
2.
SPEZIFIKATIONEN
19
3.
STROMVERSORGUNG
19
4.
VERBRAUCH
19
5.
INFORMATION ÜBER SCHWACHE BATTERIE
19
6.
BESCHREIBUNG DISPLAY UND TASTATUR
20
7.
GRUNDFUNKTIONEN
21
8.
PARAMETER
21
9.
FEHLERMELDUNGEN
23
10.
GARANTIE
23
PT
1.
ANTES DA SUA UTILIZAÇÃO
24
2.
ESPECIFICAÇÕES
24
3.
ALIMENTAÇÃO
24
4.
CONSUMO
24
5.
AVISO DE BATERIA BAIXA
24
6.
DESCRIÇÃO DO DISPLAY E TECLADO
25
7.
FUNÇÕES BÁSICAS
26
8.
PARÂMETROS
26
9.
MENSAGENS DE ERRO
28
10.
GARANTIA
28
I
1
T
.
PRIMA
DELL
’USO
29
2.
SPECIFICHE
29
3.
ALIMENTAZIONE
29
4.
CONSUMO
29
5.
AVVISO DI BATTERIA SCARICA
29
6.
DESCRIZIONE DEL DISPLAY E DELLA TASTIERA
30
7.
FUNZIONI DI BASE
31
8.
PARAMETRI
31
9.
MESSAGGI DI ERRORE 33
10.GARANTIA
33
3

MANUAL DE USUARIO
XTI ES
!
!
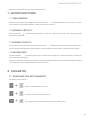
1.
ANTES DE SU UTILIZACIÓN
Situar la balanza sobre una superficie firme y llana, no exponerla en ambientes con vibraciones, nivelar la balanza utilizando
el nivel de burbuja.
Utilizar una fuente eléctrica independiente, evitar perturbaciones eléctricas.
No colocar ningún objeto sobre la plataforma en el momento de poner en marcha el indicador.
Por favor, permita que la balanza se precaliente durante 2-3 minutos antes de su utilización.
Evitar cambios de temperatura muy bruscos y corrientes de aire.
No sobrecargar la balanza, nunca exceder la capacidad máxima.
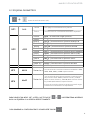
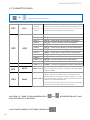
2.
ESPECIFICACIONES
XTI
Precisión
Clase III
Rango de sensibilidad de la célula carga
1.5
~
3.0mV/V
Nonlinear
≤0.01%F.S
Voltaje
DC:5V
Fracción
2/5-5/10
Conector del display LCD
Forma de salida de serie
Frecuencia de muestreo
20 veces por segundo (seleccionable)
Resolución interna
300000~600000
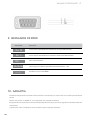
3.
ALIMENTACIÓN
Entrada
120~240V
Salida
12V/1A
Batería recargable
6V/4Ah
4.
CONSUMO
Consumo normal
12mA aproximadamente
Consumo con la retroiluminación
36mA aproximadamente
Duración de la batería: sin la retroiluminación
320 horas
5.
AVISO DE BATERÍA BAJA
•
Cuando el voltaje de la batería es inferior a 5.6V, el indicador de batería baja se activa en el display.
•
Cuando el voltaje de la batería es inferior a 5.5V, el indicador de batería baja parpadea en el display.
•
Cuando el voltaje de la batería es inferior a 5.4V, la balanza se apaga automáticamente.
4
!
!
!
!

MANUAL DE USUARIO
XTI ES
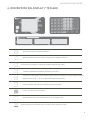
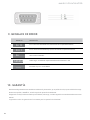
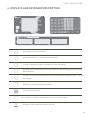
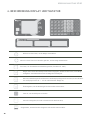
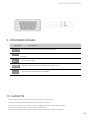
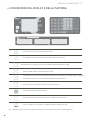
6.
DESCRIPCIÓN DEL DISPLAY Y TECLADO
Pulsar esta tecla para encender la balanza.
Mantener pulsada esta tecla durante 2 segundos para apagar la balanza.
Tecla de tara, para sustraer el peso de un recipiente (rango de tara: 100%).
Tecla de cantidad, una vez introducido el precio unitario del producto, pulsar esta tecla para introducir la
cantidad, seguidamente la balanza calculará el precio total.
Tecla de cero, para resetear el peso residual y poner la lectura del display a cero (solo cuando el peso del
display sea inferior al +/- 2% de la capacidad máxima de la balanza).
Tecla de cambio, para calcular el cambio a devolver al cliente.
Tecla C, para borrar el precio unitario.
Para introducir PLU’s (para más información ver el apartado PLU)
Tecla de grupo, para seleccionar entre el grupo P1-P20 y el grupo P21-P40
5

MANUEL D’UTILISATION
XTI FR
NOTA: las teclas no descritas no tienen función en este equipo.
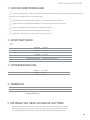
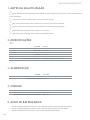
7.
FUNCIONES BÁSICAS
7.1
FUNCIÓN DE TARA
Colocar un recipiente sobre el plato y pulsar la tecla
, el peso del recipiente será automáticamente absorbido. Colocar el producto
en el interior del recipiente para conocer su peso neto.
7.2
SELECCIÓN DE PLU’S
Pulsar la tecla
para seleccionar el grupo de PLU, grupo 1 (P1 – P20) y grupo 2 (P21 – P40). El display indicará el grupo selec-
cionado.
7.3
INTRODUCCIÓN DE PLU’S
Introducir el precio unitario del articulo y pulsar la tecla
, seguidamente seleccionar una de las 20 PLU directas (P1 – P20), el precio
unitario será memorizado en la PLU seleccionada.
Para cambiar el precio unitario de una PLU, repetir el mismo procedimiento.
7.4
CAMBIO A DEVOLVER
Pulsar la tecla
, seguidamente introducir el valor del importe entregado por el cliente, la balanza calculará automáticamente el
cambio a devolver al cliente.
Por ejemplo: El precio total de la venta asciende a 15 Euros y el cliente nos entrega 20 Euros. Pulsar esta tecla e introducir 20 Euro, el
display Precio Unitario mostrará el cambio a devolver al cliente, 5 Euros.
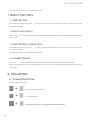
8. PARÁMETROS
8.1 CONFIGURACIÓN PARÁMETROS
La balanza dispone de tres menús:
+ Para acceder al menú de usuario (UF).
+ Para realizar un Test de Display.
+ Para la visualización del voltaje de la batería y los puntos internos (AD).
6

MANUEL D’UTILISATION
XTI FR
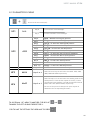
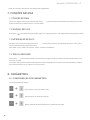
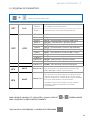
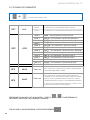
8.2 ESQUEMA PARÁMETROS
+ Acceso al menú de usuario (UF).
UF1
bLit
Tecla
0
Para apagar el retroiluminado de la pantalla.
Tecla
1
Para seleccionar el retroiluminado automático de pantalla.
UF2
rS232
Tecla 0
nonE - sin seleccionar ningún protocolo.
Tecla 1
TPU_A
- para seleccionar el protocolo TPV0 tipo A.
Tecla 2
TPU_b
- para seleccionar el protocolo TPV0 tipo B.
Tecla 3
TPU_2A
- para seleccionar el protocolo TPV-2A.
Tecla 4
TPU_2B
– para seleccionar el protocolo TPV-2B.
Tecla 5
TPU_4
– para seleccionar el protocolo TPV-4 (Berkel).
Tecla 6
TPU_7
– para seleccionar el protocolo TPV-7
(Samsung).
Tecla 7
TEdC1
– para seleccionar el protocolo TED-C1 (CAS).
Tecla 8
tiSA_A
– para seleccionar el protocolo TISA-A.
Tecla 9
tiSA_S
– para seleccionar el protocolo TISA-S.
Teclas 1+0
toLEdo
– para seleccionar el protocolo Toledo.
Teclas 1+1
nCiECr
– para seleccionar el protocolo NCI-ECR.
Teclas 1+2
nCiGEn – para seleccionar el protocolo NCI-General.
UF3
bAUd Teclas 0 a 4
Con las teclas de 0 a 4 seleccionaremos los Baudios:
1200
,
2400
,
4800
,
9600
y
19200
respectivamente.
UF4
ModE Teclas 0 a 3
Con las teclas de 0 a 3 seleccionaremos el modo de envío
del protocolo TPV0:
TrAn0
(A Petición del PC),
TrAn1C
(Modo Continuo Trama-A),
TrAn1M
(Modo Continuo Trama-
B) y
TrAn2
(Modo Manual) respectivamente.
El resto de protocolos funcionan siempre a petición según
se detalla en el documento correspondiente.
PARA PASAR DE UN MENÚ “UF” A OTRO, LAS TECLAS DE y NOS PERMITIRAN MOVERNOS
HACIA LA IZQUIERDA O LA DERECHA RESPECTIVAMENTE.
7
PARA GUARDAR LA CONFIGURACIÓN EL USUARIO DEBE PULSAR

MANUEL D’UTILISATION
XTI FR
MENSAJES DESCRIPCIÓN
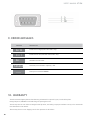
9. MENSAJES DE ERROR
Err H
El cero inicial es demasiado alto (más del 10% de la capacidad máxima)
Err
l
El cero inicial es demasiado bajo (menos del 10% de la capacidad máxima)
Err
Valor interno inestable.
hhhhhh Sobrecarga, excedida la capacidad máxima de la balanza
+
9d.
-----
Excedido el precio total 99999.
10. GARANTÍA
Esta balanza está garantizada contra todo defecto de fabricación y de materiales, por un período de un año, a partir de la fecha de entrega.
Durante este período, GIROPÈS SL, se hará cargo de la reparación de la balanza.
Esta garantía no incluye los daños causados por uso indebido, sobrecarga, o no haber seguido las recomendaciones descritas en este
manual.
La garantía no cubre los gastos de envío necesarios para la reparación de la balanza.
8

MANUEL D’UTILISATION
XTI FR
!
!
1.
AVANT D’UTILISER
Placer la balance sur une surface plane, ferme et ne pas exposer dans des environnements avec vibrations. Niveler la balance en
utilisant le niveau de bulle.
Utiliser une source électrique indépendante et éviter les perturbations électriques.
Ne placer aucun objet sur le plateau au moment de mettre en marche l’indicateur.
Avant d´utiliser la balance, laisser un temps de 2 à 3 minutes pour la préchauffer.
Éviter les changements de température très soudains et les courants d’air.
Ne pas surcharger la balance et ne jamais dépasser la capacité maximale.
2.
SPÉCIFICATIONS
XTI
Précision
Clase III
Range de sensibilité du capteur
1.5
~
3.0mV/V
Non linéaire
≤0.01%F.S
Voltage
DC:5V
Division
2/5-5/10
Connectivité de l’écran LCD
Forme de sortie en série
Frecuencia de muestreo
20 fois par seconde (éligible)
Resolución interna
300000~600000
3.
ALIMENTATION
Entrée
120~240V
Sortie
12V/1A
Batterie rechargeable
6V/4Ah
4.
CONSOMMATION
Consommation normale
12mA approx.
Consommation avec l’éclairage de l’écran
36mA approx.
Durée de la batterie, sans l’éclairage de l’écran
320 heures
5.
AVIS DE BATTERIE FAIBLE
•
Lorsque le voltage de la batterie est inférieur à 5.6V, l’indicateur de batterie faible est active dans le display.
•
Lorsque le voltage de la batterie est inférieur à 5.5V, l’indicateur de batterie faible est intermitent dans le display.
•
Lorsque le voltage de la batterie est inférieur à 5.4V, la balance s’éteint automatiquement.
9
!
!
!
!

MANUEL D’UTILISATION
XTI FR
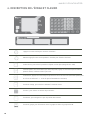
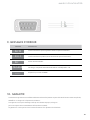
6.
DESCRIPTION DE L’ÉCRAN ET CLAVIER
Appuyer sur cette touche pour connecter la balance.
Maintenir appuyée cette touche pendant 2 secondes pour éteindre la balance.
Touche de tare, pour enlever le poids d’un récipient ou d’un objet. (Range de tare: 100%)
Touche de quantité. Une fois introduit le prix unitaire du produit, appuyer sur cette touche pour introduire la
quantité. Ensuite, la balance calcule le prix total.
Touche de zéro, appuyer sur cette touche pour que la lecture de l’écran reste à zéro (seulement quand le poids
de l’écran est inférieur à +/- 2% de la capacité maximale de la balance)
Touche de change, pour calculer le montant à rendre au client.
Touche C, pour effacer les valeurs du prix unitaire.
Touche PLU, pour enregistrer le prix du produit dans une PLU.
Touche de groupe, pour sélectionner entre le groupe P1-P20 et le groupe P21-P40.
10

MANUEL D’UTILISATION
XTI FR
NOTE: Les touches sans description n’ont pas aucune fonction dans cette équipe.
7.
FONCTIONS FONDAMENTALES
7.1
FONCTION DE TARE
Mettre un récipient sur le plateau de la balance et appuyer sur la touche
, pour soustraire son poids. Mettre le produit dans le
récipient pour connaître son poids net.
7.2
SÉLECTION DE PLU’S
Appuyer sur la touche
pour sélectionner le groupe de PLU, groupe 1 (P1 – P20) et groupe 2 (P21 – P40). L’écran affichera le
groupe sélectionné.
7.3
INTRODUCTION DES PLU
Introduire le prix unitaire du produit et appuyer sur la touche
. Ensuite, sélectionner la PLU directe souhaitée (P01 – P20), le prix
unitaire est mémorisé dans la PLU sélectionnée.
Pour changer le prix unitaire d´une PLU, répéter la même procédure.
7.4
MONTANT À RENDRE AU CLIENT
Appuyer sur la touche
, et introduire le montant de l’argent remis par le client. La balance calcule automatiquement le montant à
rembourser au client.
Par exemple: Le montant total de la vente est de 15 Euros et le client donne 20 Euros, appuyer sur cette touche et introduire 20 Euros,
l’écran Unit Price affichera 5 Euros, montant à rendre au client.
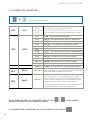
8. PARAMÈTRES
8.1 CONFIGURATION DES PARAMÈTRES
La balance comprend trois menus:
+ Pour accéder au menu utilisateur (UF).
+ Pour effectuer un test du display.
+ Pour l'affichage de la tension de la batterie et des points internes (AD).
11

MANUEL D’UTILISATION
XTI FR
8.2 SCHÉMA DES PARAMÈTRES
+ Accès au menu utilisateur (UF).
UF1
bLit
Clé
0
Pour désactiver le rétroéclairage de l'écran.
Clé
1
Pour sélectionner le rétroéclairage automatique de l'écran.
UF2
rS232
Clé 0
nonE - aucun protocole sélectionné.
Clé 1
TPU_A - pour sélectionner le protocole TPV0 type A.
Clé 2
TPU_b - pour sélectionner le protocole TPV0 type B.
Clé 3
TPU_2A - pour sélectionner le protocole TPV-2A.
Clé 4
TPU_2B – pour sélectionner le protocole TPV-2B.
Clé 5
TPU_4 – pour sélectionner le protocole TPV-4 (Berkel).
Clé 6
TPU_7 – pour sélectionner le protocole TPV7(Samsung).
Clé 7
TEdC1 – pour sélectionner le protocole TED-C1 (CAS).
Clé 8
tiSA_A – pour sélectionner le protocole TISA-A.
Clé 9
tiSA_S – pour sélectionner le protocole TISA-S.
Clés 1+0
toLEdo – pour sélectionner le protocole Toledo.
Clés 1+1
nCiECr – pour sélectionner le protocole NCI-ECR.
Clés 1+2
nCiGEn – pour sélectionner le protocole NCI-General.
UF3
bAUd Clés 0 à 4
Avec les touches 0 à 4, nous
sélectionnerons le Baud: 1200,
2400, 4800, 9600 et 19200 respectivement.
UF4
ModE Clés 0 à 3
Avec les touches 0 à 3, nous sélectionnerons le mode
d'envoi du protocole TPV0: TrAn0 (à la demande du PC),
TrAn1C (mode continu Frame-A), TrAn1M (mode continu
Frame-B) et TrAn2 (mode Manual) respectivement.
Les autres protocoles fonctionnent toujours sur demande,
comme indiqué dans le document correspondant.
POUR PASSER D'UN MENU «UF» À UN AUTRE, AVEC LES CLÉS ET NOUS POURRONS
DÉPLACER À GAUCHE OU À DROITE RESPECTIVEMENT.
12
POUR ENREGISTRER LA CONFIGURATION, L'UTILISATEUR DOIT APPUYER SUR

MANUEL D’UTILISATION
XTI FR
MESSAGE DESCRIPTION
9. MESSAGES D’ERREUR
Err H
Le zéro initial est trop élevé (plus de 10% de la capacité maximale).
Err
l
Le zéro initial est trop faible (moins de 10% de la capacité maximale).
Err
Valeur interne instable.
hhhhhh
Surcharge, la capacité maximale de la balance a été dépassée
+
9d.
-----
Dépasse le prix total de 99999.
10. GARANTIE
Cette balance est garantie contre tout défaut de fabrication et de matériel pendant 1 an partir de la date de livraison. Durant cette période,
GIROPÈS SL. se chargera de la réparation de la balance.
Cette garantie n’inclut pas les dommages causés par une utilisation impropre, surcharge ou
par le non respect des recommandations décrites dans ce manuel.
La garantie ne couvre pas les frais d’envois nécessaires à la réparation de la balance.
13

USER’S MANUAL
XTI EN
!
!
1.
BEFORE USING
Place this product on a firm and smooth place, don’t place it in vibration or shaking, use bench for use on four only adjust foot,
adjust the balance using the bubble level.
Use independent source, avoid other electrical disturbance.
Don’t put any object on the platter when turn on the balance.
Please, turn on 2-3 minutes before using.
Avoid temperature change too large and air flow strenuous sites.
Don’t overload the balance, don’t exceed the maximal capacity.
2.
SPECIFICATIONS
XTI
Accuracy
Clase III
Loadcell sensitivity range
1.5
~
3.0mV/V
Nonlinear
≤0.01%F.S
System working voltage
DC:5V
Division
2/5-5/10
Large LCD display connector
Sampling serial output way
Sample rate
20 times per second (can select)
Internal resolution
300000~600000
3.
POWER
Input
120~240V
Output
12V/1A
Rechargeable battery
6V/4Ah
4.
SYSTEM POWER CONSUMPTION
Main system power consumption
about 12mA
Main system power consumption (with backlight)
about 36mA
Battery life, none backlight
about 320 hours
5.
LOW POWER WARNING
•
When the battery voltage is below 5.6V, the low power indicator on the LCD display will light up.
•
When the battery voltage is below 5.5V, the low power indicator on the LCD display will start to flash.
•
When the battery voltage is below 5.4V, the scale will turn off.
14
!
!
!
!

USER’S MANUAL
XTI EN
6.
DISPLAYS AND KEYBOARD DESCRIPTION
Press this key to turn on the balance.
Press and hold this key for 2 seconds to turn off the balance.
Tare key, to subtract the weight of a container (tare range: full capacity).
Quantity key, after a unit price has been entered, press this key then enter how many pieces and the total price
will be calculated.
Zero key, to reset the residual weight back to zero (only when the display weight is less than +/- 2% of the
max. capacity).
Change key, to calculate the change for customer.
Clear key, to clear unit price.
Price look up key, to save unit price (for detail refer to “save the price look up).
Group key: to switch between P1-P20 and P21-P40.
15

USER’S MANUAL
XTI EN
NOTA: Not description keys has function on this device.
7.
BASIC FUNCTIONS
7.1
TARE FUNCTION
Place a container on the pan and press the
key, the weight of container will be deducted. After a tare you will be able to weigh any
object as its net weight.
7.2
PRICE LOOK UP (PLU)
Press the
key to select between PLU group 1 (P01 – P20) and PLU group 2 (P21 – P40). The display will light up the group
selected.
7.3
SAVE THE PRICE LOOK UP (PLU)
Enter the desired unit price and press the
key, then press one of the 20 PLU memories (P1 – P20), the unit price will be saved in
the appointed number.
To change save unit price, just repeat the same steps.
7.4
PAYMENT CHANGE
Press the key
, and enter the payment amount, the scale will automatically calculate the charge for customer.
Example: The total price is 15 Euro, press this key and enter 20 Euro, on the Unit Price window will be displayed 5 Euro as the change
for customer.
8. PARAMETERS
8.1 PARAMETERS SETTING
The scale has three menus:
+ To access the user menu (UF).
+ To do a display test.
+ For the display of battery voltage and internal points (AD).
16

USER’S MANUAL
XTI EN
8.2 PARAMETERS SCHEME
+ Access to the user menu (UF).
UF1
bLit
Key
0
To turn off the screen backlight.
Key
1
To select automatic screen backlight.
UF2
rS232
Key 0
nonE - Without selecting any protocol.
Key 1
TPU_A
- to select the TPV0 type A protocol.
Key 2
TPU_b
- to select the TPV0 type B protocol.
Key 3
TPU_2A
-
to select the TPV-2A protocol.
Key 4
TPU_2B
– to select the TPV-2B protocol.
Key 5
TPU_4
– to select the TPV-4 (Berkel) protocol.
Key 6
TPU_7
– to select the TPV-7 protocol (Samsung).
Key 7
TEdC1
– to select the TED-C1 (CAS) protocol.
Key 8
tiSA_A
– to select the TISA-A protocol.
Key 9
tiSA_S
– to select the TISA-S protocol.
Keys 1+0
toLEdo
– to select the Toledo protocol.
Keys 1+1
nCiECr
– to select the NCI-ECR protocol.
Keys 1+2
nCiGEn
– to select the NCI-General protocol.
UF3
bAUd Keys 0 to 4
With the 0 to 4 keys we will select the Baud: 1200, 2400,
4800, 9600 and 19200 respectively.
UF4
ModE Keys 0 to 3
With the keys 0 to 3 we will select the sending mode of the
TPV0 protocol: TrAn0 (At the request of the PC), TrAn1C
(Continuous Frame-A Mode), TrAn1M (Continuous Frame-B
Mode) and TrAn2 (Manual Mode) respectively.
The rest of the protocols always work upon request as
detailed in the corresponding document.
TO GO FROM A “UF” MENU TO ANOTHER, THE KEYS OF and
FOR TO SAVE THE SETTINGS THE USER HAVE TO PRESS
TOWARDS THE LEFT OR RIGHT RESPECTIVELY.
17

USER’S MANUAL
XTI EN
MESSAGE DESCRIPTION
9. ERROR MESSAGES
Err H
lnitial zero too high (over 10% of max. cap).
Err
l
Initial zero too low (less than 10% of max. cap).
Err
Unstable internal value.
hhhhhh Overload, over the max. capacity
+
9d.
-----
Total price exceeded 999999.
10. WARRANTY
This scale is warranted against defects of manufacturing and materials for a period of 1 year, from the delivery date.
During this period, GIROPÈS SL will take charge of repairing the scale.
This warranty does not cover defects or damaged caused by misuse, overloading or improper installation contrary to the recommenda-
tions described in this manual.
This warranty does not cover shipping costs for the reparation of the balance.
18

BEDIENUNGSANLEITUNG
XTI DE
1.
VOR DER INBETRIEBNAHME
Stellen Sie die Waage auf eine feste und ebene Oberfläche. Stellen Sie die Waage nicht an erschütterungsanfälligen Orten auf.
Nivellieren Sie die Waage mit Hilfe einer Wasserwaage.
Verwenden Sie eine unabhängige Stromquelle, um Strömstörungen zu vermeiden.
Platzieren Sie keinen Gegenstand auf der Wägeplatte, wenn die Anzeige in Betrieb genommen wird.
Lassen Sie die Waage vor der Benutzung für 2-3 Minuten vorwärmen.
Vermeiden Sie plötzliche Temperaturschwankungen und Luftströme.
Überladen Sie die Waage nicht und überschreiten Sie nie die Höchstlast.
2.
SPEZIFIKATIONEN
XTI
Präzision
Klasse III
Sensibilitätsbereich der Wägezelle
1.5
~
3.0mV/V
Nonlinear
≤0.01%F.S
Spannung
DC:5V
Fraktion
2/5-5/10
Anschluss LCD-Display
Ausgangstyp in Reihe
Stichprobenfrequenz
20 pro Sekunde (wählbar)
Interne Auflösung
300000~600000
3.
STROMVERSORGUNG
Eingang
120~240V
Ausgang
12V/1A
Akku
6V/4Ah
4.
VERBRAUCH
Normalverbrauch
ungefähr 12 mA
Consumo con la retroiluminación
ungefähr 36 mA
Lebensdauer des Akkus: ohne
Hintergrundbeleuchtung
320 Stunden
5.
INFORMATION ÜBER SCHWACHE BATTERIE
•
Wenn die Spannung der Batterie unter 5.6 V liegt, erscheint die Anzeige für schwache Batterie im Display.
•
Wenn die Spannung der Batterie unter 5.5 V liegt, blinkt die Anzeige für schwache Batterie im Display auf.
•
Wenn die Spannung der Batterie unter 5.4 V liegt, schaltet sich die Waage automatisch aus.
19
!
!
!
!
!
!

BEDIENUNGSANLEITUNG
XTI DE
6.
BESCHREIBUNG DISPLAY UND TASTATUR
Drücken Sie diese Taste, um die Waage einzuschalten.
Halten Sie diese Taste für 2 Sekunden gedrückt, um die Waage auszuschalten
Tare-Taste, für das Abziehen eines Behältergewichts (Tare-Bereich: 100 %).
Mengen-Taste. Wurde der Einheitspreis des Produkts eingegeben, drücken Sie diese Taste, um die Menge
einzugeben. Anschließend berechnet die Waage den Gesamtpreis.
Null-Taste, um das Restgewicht zurückzusetzen und die Displayanzeige auf null zu setzen (nur wenn das Gewi-
cht im Display kleiner als +/- 2 % der Höchstlast der Waage ist).
Änderungstaste, um das Wechselgeld für den Kunden zu berechnen.
Taste CE, um den Stückpreis zu löschen.
Um PLU‘s einzugeben (für mehr Information siehe Abschnitt PLU)
Gruppentaste, um zwischen den Gruppen P1-P20 und P21-P40 zu wählen.
20
La page charge ...
La page charge ...
La page charge ...
La page charge ...
La page charge ...
La page charge ...
La page charge ...
La page charge ...
La page charge ...
La page charge ...
La page charge ...
La page charge ...
La page charge ...
La page charge ...
La page charge ...
La page charge ...
-
 1
1
-
 2
2
-
 3
3
-
 4
4
-
 5
5
-
 6
6
-
 7
7
-
 8
8
-
 9
9
-
 10
10
-
 11
11
-
 12
12
-
 13
13
-
 14
14
-
 15
15
-
 16
16
-
 17
17
-
 18
18
-
 19
19
-
 20
20
-
 21
21
-
 22
22
-
 23
23
-
 24
24
-
 25
25
-
 26
26
-
 27
27
-
 28
28
-
 29
29
-
 30
30
-
 31
31
-
 32
32
-
 33
33
-
 34
34
-
 35
35
-
 36
36


Giropes 260824 Manuel utilisateur
- Taper
- Manuel utilisateur
dans d''autres langues
- italiano: Giropes 260824 Manuale utente
- español: Giropes 260824 Manual de usuario
- português: Giropes 260824 Manual do usuário
Documents connexes
Autres documents
-
Baxtran TH Manuel utilisateur
-
Baxtran RTI Manuel utilisateur
-
Gram XFOC+ Le manuel du propriétaire
-
Mettler Toledo Ariva Quick Manual
-
 Avery Berkel FX50 Mode d'emploi
-
-
-
-
-
Sharp XEA102 - Cash Register Manuel utilisateur
