
SERIES / SERIE / SÉRIE /SERIES
XFOC+ / XFOC+ PLU
XFOC+ RS PLU
OPERATION MANUAL
MANUAL DE UTILIZACIÓN
MANUEL D´UTILISATION
MANUAL DE UTILIZAÇAO
BEDIENUNGSANLEITUNG
DE

2
INDEX English
Functions 7
Warning 7
Technical specification 8
Operation 8
The time of auto power saving set 9
Set the time how long backlight will be on 9
Scale protocol transferring (model with RS-232) 10
Function Keys Operation 11
Function Explanation 12
Unit price setting methods 14
Hotkeys 14
Diagram of Basic Operation Process 15
Communication protocol (RS Model) 15
Guarantee 16

3
ÍNDICE Español
Funciones 17
Precauciones 17
Especificaciones técnicas 18
Operación 18
Selección del tiempo de autodesconexión 19
Selección del tiempo de iluminación del display 19
Transmisión del protocol (modelo con RS-232) 20
Función de las teclas 21
Funciones 23
Teclas PLU directas 23
Tecla Tara 23
Tecla de cambio (Modelo con RS-232) 23
Métodos para la introducción del precio unitario 24
Diagrama del proceso básico de utilización 24
Protocolo de comunicación (modelos con RS-232) 24
Garantía 25

4
SOMMAIRE Français
Fonctions 26
Précautions 26
Specificités techniques 27
Operation 27
Sélection du temps d´auto-déconnexion 28
Sélection du temps d´éclairage de l´écran 28
Transmission du protocole 29
Fonction des touches 30
Fonctions 31
Touches PLU directes 32
Touche TARE 32
Touche pour rendu monnaie (Modèles avec RS-232) 32
Methodes pour introduction du prix unitaire 32
Diagramme du processus fondamental d´utilisation 33
Protocole de communication (Modèles avec RS-232) 33
Garantie 34

5
ÍNDICE Português
Funções 35
Precauções 35
Especificações técnicas 36
Operações 36
Selecção de tempo de poupança de energia 37
Selecção de tempo de iluminação do visor 37
Protocolo de transmissão 38
Funções das teclas 39
Explicação das funções 41
Teclas PLU directas 41
Tecla TARA 41
Tecla de troco (Modelo com RS-232) 41
Métodos para a introdução do preço unitário 42
Diagrama do processo básico de utilização 42
Communication protocol (RS Model) 42
Garantia 43

6
INDEX Deutsch
Funktionen 44
Vorsichtsmaßnahmen 45
Technische daten 45
Betrieb 46
Auswahl der zeit bis zur automatischen abschaltung 47
Einstellung der beleuchtungszeit des displays 47
Funktionen der tasten 48
Direkte plu-tasten 49
Tara-taste 50
Rückgeldtaste (modell mit rs-232) 50
Methoden zur eingabe des stückpreises 50
Diagramm der grundanwendung 51
Kommunikationsprotokoll 51
Garantie 52

7
ENGLISH
FUNCTIONS
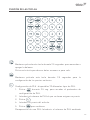
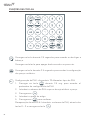
• 35 keys of unit price memory (PLU model), 8 keys for the other models.
• Auto-power saving design, will enter into the stand-by status automatically
without any operation(user-defined 4-200 seconds at will, 200 seconds
won’t enter into auto-power saving status) only consuming 21 μA,able to
be awake by any loading or operation due to the inner shaking mechanism.
(please tap the platter when there is no response in loading)
• Support backlight shift function by pressing the backlight key for 2.5
seconds ,able to save electric power by turning off backlight in bright
area and extend service life of dry battery.
• CHG function assists users to change notes accuracy.
• Store 70PLU (ps1XD)
• Support price-lock function, suitable to sell weighing commodity of
same price.
• Ranges: 6/15 kg (e = 2/5 g) or 15/30 kg (e = 5/10 g)
WARNING
• There is “stable” mark on the display screen. When the weight is stable,
the triangle indicator will light which means it is in the normal weighing
status, at this time you can put commodity on the platter to sell.

8
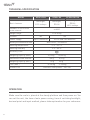
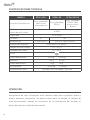
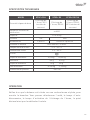
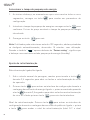
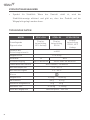
TECHNICAL SPECIFICATION
OPERATION
Make sure the scale is placed at the steady platform and then power on. You
can set the unit, the time of auto power saving, time of switching backlight,
decimal point and input method, please take explanation for your reference:
MODEL XFOC+ PLU XFOC+ RS XFOC+ RS PLU
Basic features Backlight,
35*2 hotkeys
Backlight,
RS232
Backlight,
RS232,
35*2 hotkeys
Number of verification
scale interval n=3000
Weight range 0-15-30 kg
Column Yes No
Power supply 3pcs D batteries RS232 and 3 AA batteries
Battery estimated use time 8000 hours / 24 months
Working temperature 0 ºC – 40 ºC
Working humidity 5 % - 85 %
Accuracy class
Weighing capacity (Max.) 6/15 kg 15/30 kg
Verification scale interval 2/5 g 5/10 g
Weighing capacity (Min.) 40 g 100 g
Tare (Max.) -5.998 kg -9.995 kg
Platter size Stainless steel platter - 330*230

9
The time of auto power saving set
The time of auto power saving set (power saving set aims to saving power by
setting the scale to sleeping mode and the scale can work again by putting
on some weight cargo and tapping it, the scale will power off itself for 1 hour
no operation).
1. Press key to enter into the setting interface when starting up.
2. Input the time of auto power saving and then press key to confirm.
The price column will display the time just set.
3. Press key to exit the status.
Note: user-defined 4~200 seconds at will, 200 seconds won’t enter into auto-
power saving status (display F after setting). If the time you set is in the range
of 4~199 seconds, put commodity on the platter, the scale will also enter into
the auto-power saving status after 15 minutes without any operation. When
the logo “ “ appears on the screen, it means the scale has been in auto-
power saving status.
Backlight Setting
Backlight on/off:
1. Under normal weighting status, press and hold the key for 2.5
seconds to open or close the operator display backlight:
2. Press key to enter the setting interface during the countdown of
power on —> press and hold the key for 2.5 seconds to open or close
the customer display backlight press key to exit this interface.

10
Backlight level: Press key to enter the setting interface during the
countdown of power on —> press the key to switch the backlight level
(0-7 level. the default backlight level of scale is level 3) press key to exit
this interface.
Backlight time: Press key to enter the setting interface during the
countdown of power on —> input the backlight time —> press the key to
confirm —> press key to exit this interface.
Note:
Default backlight time is 2 seconds. User-defined 1-200 seconds at will. the
backlight will be on all the time if the time be set 200 seconds (display ‘F’ on
the Total Price Column): If the scale enters into the power saving status. the
backlight will be off. Backlight time should lower than sleep tune.
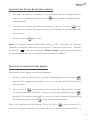
Scale protocol transferring (model with RS-232)
1. Power on your scale, then you can press key to enter into scale
protocol transferring setting.
2. Press the key for switchover, at that time the left side of display
screen is to show signals BELOW.
CO,D0. Passive sending out.
C1,D1. Wagon balance scale active sending out.
C2,D2. FTP scale active sending out.
You can enter any section you need by pressing key and press for exit.

11
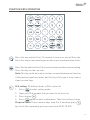
FUNCTION KEYS OPERATION
Press this key and hold it for 2.5 seconds to turn on or turn off the scale.
Press this key to clear inputting error data or exit some operation status.
Press this key and hold it for 2.5 seconds to enter into the unit price setting.
Press this key to clear up sum.
Note: This key could be used as to clear accumulated amount function
if the machine type has printer, but this key of this type is only used as
clear function keys.
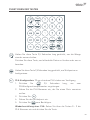
PLU setting: 70 different kinds of PLU can be set
1. Press to enter setting mode.
2. Input your PLU number that you want to set price for.
3. Press button .
4. Press again for final confirmation. Then ,the setting is done.
Plu price Check: Press numeric keys from 0 to 9, and then press
key to call the commodity price you want from PLU1-PLU70.

12
Press this key to use price lock function. The mark on the LCD will
light which means the scale is in price lock status. It‘s suitable to sell
weighing commodity of same price.
Press this key to deduct the packing weight.
Press this key for 2.5 seconds to shift the backlight.
Press this key to give changes.
Press this key to check the battery voltage.
Price key :the same to PLU key
Press this key and hold it for 2.5 seconds, the scale will display total sum.
Press key to clear total sum records.
Note: You have to accumulate each sale record if you want to use
“sum” function.
Total sum starts from last time you clearing records to current status.
This key is to adjust the ‘WEIGHT’ column to zero value. Place the
scale level steadily, if there are digits displayed on LCD, press this key
to adjust to zero. Press this key and hold it for seconds to check the
version information and the time of auto-power saving.
Function Explanation
-
Be used as unit price key.
You can use the unit price that has been set by pressing any key from M0 to M6.

13
1. Input number ”0”.
2. for confirmation.
3. Input the price.
4. Press MX(MX=M---M6).
5. If you want to quit your setting, please press for exit.
This key is to deduct the packing weight.
If you need to deduct the packing weight, put the container or wrapper on
the scale first, and then press key to enter weight- deducting state.
Then, take off the container and put the commodity into the container and
then place the packed goods on the pan again, now, the LCD will display the
net weight. Remove the merchandise and press the key , the scale will
return to normal weighting state.
Press this key and hold it for 2.5 seconds to shift the backlight.
Note: when put small weight items on the platter, if the backlight is not on,
at this time, you can input price , the backlight will be on.
This key is the function key of giving changes.
After displaying total price, press key, and input the amount you received
from customer, then press key, and then the LCD will show the changes.
If you haven’t press key in time, the scale will auto start calculating change
notes. If the payment amount is not enough, CHG operation is not allowed.
Press key continually to exit this function.
If the total price is 0 when weighing, CHG operation is not allowed, either.

14
Press this key to display battery voltage when the weight is 0.
Note: Please replace the 3PCS dry battery when the voltage is lower than 3.3V.
Unit price setting methods
Select the PLU that needs to set the unit price, pressing the direct PLU (M1 –
M6) or the indirect PLU using the numerical keys. In the case of indirect PLU,
enter the PLU number, for exemple 15 and then press the key.
Keep pressed the key for 2.5 seconds, at this time, the last digit of
display Total will flash.
Input the unit price using the numerical keys and press to confirm.
To exit press the key.
Hotkeys
PS1XD has hotkey function.
Please continuously press twice to shift PLU key when using the second
page PLU.
E.g. If you want to input ‘PLU 36’, press the first hotkey twice continuously
so as to realize inputting ‘PLU 36’.

15
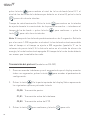
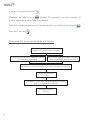
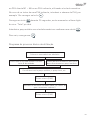
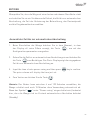
Diagram of Basic Operation Process
Press the PLU hotkey
or unit N key
By the numeric key to
input the unit price
Put the commodity onto the tray.
The screen will display the unit price, total price. etc.
Input the amount received (it must be greater
than the subtotal amount)
Press [CHG] key
Press [CHG] key
Note: You can choose any method arbitrarily to carry out selling in your
practical application.

16
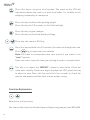
GUARANTEE
This balance is guaranteed for one year from the delivery date. The guarantee
covers any fabrication defect of the material.
During this period, GRAM PRECISION, SL, covers the manpower and the
spare parts necessary to repair the scale.
This guarantee does not cover the failures caused by an inappropriate use
or overload.
The guarantee does not cover the freight cost (transport) necessary to
repair the balance.

17
ESPAÑOL
FUNCIONES
• 35 teclas de memoria de precio unitario (modelo PLU), 8 teclas para el
resto de modelos.
• Función de auto-desconexión, la balanza entra automáticamente en
estado de Stand-by cuando no detecta ninguna operación (el usuario
puede configurar el tiempo de 4-200 segundos, con 200 segundos la
balanza no entrará en el estado de stand-by) consumiendo solo 21 μA.
La función standby se desactivará en el momento que la balanza capte
un movimiento sobre el plato de pesada.
• Función de iluminación del display pulsando la tecla de iluminación
durante 1.5 segundos.
• La función CHG ayuda al usuario a cambiar notas con exactitud.
• Almacenamiento de 70PLU (solo en modelos XFOC+ PLU).
• Función de bloqueo de precio, apta para vender productos del mismo
precio.
• Rangos: 6/15 kg (e = 2/5 g) o 15/30 kg (e = 5/10 g)
PRECAUCIONES
• Símbolo de estabilidad. Cuando el peso es estable, el indicador de
estabilidad se activará, indicando que es el momento de colocar el
producto sobre el plato de pesada.

18
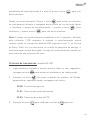
ESPECIFICACIONES TÉCNICAS
OPERACIÓN
Asegurarse de que la balanza está situada sobre una superficie firme y
plana, entonces conectarla. Se puede seleccionar la unidad, el tiempo de
auto-desconexión, tiempo de activación de la iluminación del display, el
punto decimal y el método de entrada.
MODELO XFOC+ PLU XFOC+ RS XFOC+ RS PLU
Características básicas
Visor iluminado,
35x2 teclas
acceso directo
Visor iluminado,
RS232
Visor iluminado,
RS232, 35x2
teclas acceso
directo
Nº de intervalo de la
escala de verificación n=3000
Capacidad 0-15-30 kg
Columna Si No
Alimentación 3 pilas tipo D RS232 o 3 pilas tipo AA
Duración de la batería 8000 horas / 24 meses
Temperatura de trabajo 0 ºC – 40 ºC
Humedad de trabajo 5 % - 85 %
Clase
Capacidad maxima 6/15 kg 15/30 kg
Intervalo 2/5 g 5/10 g
Capacidad minima 40 g 100 g
Tara maxima -5.998 kg -9.995 kg
Dimensión del plato Plato de acero inoxidable - 330*230

19
Selección del tiempo de autodesconexión
1. Al poner en marcha la balanza, en el momento que el display muestra
todos sus segmentos, pulsar la tecla para acceder al parámetro de
configuración.
2. Introducir el tiempo de auto-desconexión y pulsar la tecla para
confirmar. El display de precio mostrará el tiempo de autodesconexión
introducido.
3. Pulsar la tecla para salir.
Nota: El usuario puede seleccionar entre 4~199 segundos, la balanza
también se autodesconectará transcurridos 15 minutos de no uso. Cuando
el símbolo “ ” aparece debajo de “Power saving” significa que la balanza
se encuentra dentro del estado auto-desconexión (standby).
Ajuste de la iluminación del display
Iluminación del display encendida/apagada:
1. En el estado de ponderación normal, mantenga pulsada la tecla
durante 2,5 segundos para abrir o cerrar la luz de fondo de la pantalla
del operador:
2. Pulse la tecla para entrar en la interfaz de configuración durante
la cuenta atrás de encendido -> pulse y mantenga pulsada la tecla
durante 2,5 segundos para abrir o cerrar la luz de fondo de la pantalla
del cliente pulse la tecla para salir de esta interfaz.
Nivel de iluminación del display: Pulse la tecla para entrar en la
interfaz de ajuste durante la cuenta atrás del aceite de alimentación ->

20
pulse la tecla para cambiar el nivel de la luz de fondo (nivel 0-7. el
nivel de luz de fondo de la balanza por defecto es el nivel 3) pulse la tecla
para salir de esta interfaz.
Tiempo de retroiluminación: Pulse la tecla para entrar en la interfaz
de ajuste durante la cuenta atrás de la puesta en marcha -> introduzca el
tiempo de luz de fondo -> pulse la tecla para confirmar -> pulse la
tecla para salir de esta interfaz.
Nota: El tiempo de luz de fondo predeterminado es de 2 segundos. Definido
por el usuario 1-200 segundos a voluntad. la luz de fondo estará encendida
todo el tiempo si el tiempo se ajusta a 200 segundos (pantalla ‘F’ en la
columna de precio total): Si la báscula entra en el estado de ahorro de
energía, la luz de fondo estará apagada. El tiempo de la luz de fondo debería
ser menor que la melodía de sueño.
Transmisión del protocol (modelo con RS-232)
1. Poner en marcha la balanza y en el momento de que el display muestre
todos sus segmentos, pulsar la tecla para acceder al parámetro de
configuración.
2. Pulsar la tecla . En la parte izquierda del display Status aparecerán
las siguientes opciones pulsando la tecla
CO,D0. Transmisión pasiva.
C1,D1. Transmisión activa de la balanza.
C2,D2. Transmisión activa del FTP.
3. Pulsar la tecla para confirmar y la tecla para salir.
La page est en cours de chargement...
La page est en cours de chargement...
La page est en cours de chargement...
La page est en cours de chargement...
La page est en cours de chargement...
La page est en cours de chargement...
La page est en cours de chargement...
La page est en cours de chargement...
La page est en cours de chargement...
La page est en cours de chargement...
La page est en cours de chargement...
La page est en cours de chargement...
La page est en cours de chargement...
La page est en cours de chargement...
La page est en cours de chargement...
La page est en cours de chargement...
La page est en cours de chargement...
La page est en cours de chargement...
La page est en cours de chargement...
La page est en cours de chargement...
La page est en cours de chargement...
La page est en cours de chargement...
La page est en cours de chargement...
La page est en cours de chargement...
La page est en cours de chargement...
La page est en cours de chargement...
La page est en cours de chargement...
La page est en cours de chargement...
La page est en cours de chargement...
La page est en cours de chargement...
La page est en cours de chargement...
La page est en cours de chargement...
La page est en cours de chargement...
La page est en cours de chargement...
La page est en cours de chargement...
La page est en cours de chargement...
-
 1
1
-
 2
2
-
 3
3
-
 4
4
-
 5
5
-
 6
6
-
 7
7
-
 8
8
-
 9
9
-
 10
10
-
 11
11
-
 12
12
-
 13
13
-
 14
14
-
 15
15
-
 16
16
-
 17
17
-
 18
18
-
 19
19
-
 20
20
-
 21
21
-
 22
22
-
 23
23
-
 24
24
-
 25
25
-
 26
26
-
 27
27
-
 28
28
-
 29
29
-
 30
30
-
 31
31
-
 32
32
-
 33
33
-
 34
34
-
 35
35
-
 36
36
-
 37
37
-
 38
38
-
 39
39
-
 40
40
-
 41
41
-
 42
42
-
 43
43
-
 44
44
-
 45
45
-
 46
46
-
 47
47
-
 48
48
-
 49
49
-
 50
50
-
 51
51
-
 52
52
-
 53
53
-
 54
54
-
 55
55
-
 56
56


dans d''autres langues
- English: Gram XFOC+ Owner's manual
- español: Gram XFOC+ El manual del propietario
- Deutsch: Gram XFOC+ Bedienungsanleitung
- português: Gram XFOC+ Manual do proprietário
Autres documents
-
 Avery Berkel FX50 Mode d'emploi
-
Baxtran ADA Manuel utilisateur
-
Mettler Toledo Ariva Quick Manual
-
-
Sharp UP800F Mode d'emploi
-
HAEGER KS-05B.002B Manuel utilisateur
-
-
-
 Giropes Baxtran BAR150I Manuel utilisateur
-
Adam Equipment CBK CBK-M Manuel utilisateur

