
4001896-04
742CFB Traditional Cast Front
CSA approved for use with Valor Models 738 and 739 Heaters ONLY
Note: This kit must be installed
or serviced by a qualifi ed
installer, service agency or gas
supplier. These instructions are
to be used in conjunction with
the main installation instructions
for the above listed heater
model.
Installation Instructions
INSTALLER
Leave this manual
with the appliance.
CONSUMER
Retain this manual
for future reference.
HOT GLASS WILL
CAUSE BURNS.
DO NOT TOUCH GLASS
UNTIL COOLED.
NEVER ALLOW CHILDREN
TO TOUCH GLASS.
WARNING
!
A barrier designed to reduce the risk of burns from the hot viewing
glass is provided with this appliance and shall be installed
for the protection of children and other at-risk individuals.
LEGEND G3
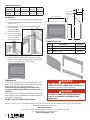
The 742CFB Traditional Cast Front is designed to be used along with an outer
surround trim (supplied separately) on the 738 or 739 Valor Legend G3 heaters.
The Traditional Front fi ts within the outer surround trim and clips onto the
standard mounting brackets supplied with the heater. The Traditional Front is
compatible with all outer surround trims and cast iron surrounds available for use
with the 738 and 739 heaters.
Casting Tolerances
Due to the nature of cast iron, dimensional consistency may vary from one unit
to the next and some variation in surface fi nish and fl atness is to be expected.
We have done our best to control and make allowance for this; however some
variation is inevitable.
29-1/4” (74,3 mm)
23” (58,3 mm)
Outer Trim
Supplied
Separately
738 or 739
Trim
Traditional Cast Front
Barrier Screen
© Copyright Miles Industries Ltd., 2014
Overview (Heater and trim sold separately)

2
Installation
1. Install engine as per instructions supplied with engine.
2. Install trim to engine as per instructions supplied with
engine or trim.
3. Hook the bottom casting unit to the second space
from the bottom
on the trim’s side
mounting brackets.
4. Hook the top casting
unit to the top space
on the trim’s side
mounting brackets.
5. Place the barrier screen on the lower casting ledge
to align it to the upper casting and push it against the
upper casting so the clips snap into place.
Maintenance
The cast iron and the screen can be brushed with a soft
brush. To remove the screen, push it sideways and pull on
the opposite side then remove it completely.
If the barrier becomes damaged, the barrier shall
be replaced with the manufacturer’s barrier for this
appliance.
For maintenance instructions of the fi replace including the
glass window, see the Installation and Owner’s Manual
supplied with the fi replace.
DO NOT clean the window with ammonia!
Code Description Part no.
1 Top Casting 4000090
2 Bottom Casting 4000091
3 Barrier Screen 4003293
Repair Parts List
Mantel Clearances
WARNING
DO NOT TOUCH THE CASTING, BARRIER
DO NOT TOUCH THE CASTING, BARRIER
SCREEN OR GLASS WHILE THEY ARE HOT!
SCREEN OR GLASS WHILE THEY ARE HOT!
Let
Let
the fi replace cool fi rst before cleaning it.
the fi replace cool fi rst before cleaning it.
WARNING
FOR SAFETY PURPOSE, ensure the barrier
FOR SAFETY PURPOSE, ensure the barrier
screen is reinstalled on the fi replace after
screen is reinstalled on the fi replace after
maintenance.
maintenance.
WARNING
!
WARNING
!
Mantel
Projection A
1”
(25 mm)
1”– 6”
(25–152 mm)
9”
(229 mm)
12”
(305 mm)
Mantel
Height B*
36”
(914 mm)
39”
(991 mm)
42”
(1067 mm)
45”
(1143 mm)
1
2
3
Hook bottom casting
Designed and Manufactured by / for
Miles Industries Ltd.
190 – 2255 Dollarton Highway, North Vancouver, B.C., CANADA V7H 3B1
Tel. 604-984-3496 Fax 604-984-0246
www.valorfi replaces.com
Because our policy is one of constant development and improvement, details may vary slightly from those given in this publication.
29-1/4” (74,3 mm)
23” (58,3 mm)
Mantel
‘A’
‘B’
Outer Trim
Supplied
Separately
Hook top casting

3
Homologuée par la CSA pour utilisation avec les foyers Valor 738 et 739 SEULEMENT
© Tous droits réservés Miles Industries Ltd., 2014
Note : Cette devanture doit être
installée par un installateur quali-
fi ée, une agence de service certi-
fi ée ou un fournisseur de gaz. Ces
instructions doivent être utilisées
conjoin-tement avec les instruc-
tions fournies avec le foyer.
LEGEND G3
29-1/4” (74,3 mm)
23” (58,3 mm)
738 ou 739
Grille de protection
Concept (Foyer et bordure vendus séparément)
Bordure extérieure
vendue séparément
Devanture traditionnelle
en fonte
Devanture traditionnelle en fonte 742CFB
Bordure
LE PREMIER
FOYER À GAZ RADIANT
MC
®
Directives d’installation
INSTALLATEUR : Laissez cette notice avec l’appareil.
CONSOMMATEUR : Conservez cette notice pour consultation ultérieure.
UNE SURFACE VITRÉE CHAUDE PEUT
CAUSER DES BRÛLURES.
LAISSEZ REFROIDIR LA SURFACE VITRÉE
AVANT D’Y TOUCHER.
NE PERMETTEZ JAMAIS À UN ENFANT
DE TOUCHER LA SURFACE VITRÉE.
AVERTISSEMENT
!
Une grille de protection conçue pour réduire les risques de brûlures sur la vitre
chaude de la fenêtre est fournie avec cet appareil et doit être installée pour la
protection des enfants et autres individus à risques.
La Devanture traditionnelle en fonte 742CFB est conçue pour être utilisée avec
une bordure (vendue séparément) sur les foyers Valor Legend G3 738 ou 739.
La devanture s’installe à l’intérieur de la bordure et se fi xe à l’aide des supports
de montage fournis avec les foyers 738 et 739. La devanture est compatible
avec toutes les bordures de métal ou de fonte utilisées sur les foyers 738 ou 739.
Variations de la fonte
De par leur nature, deux articles de fonte fabriqués du même moule peuvent
montrer de légères variations dans leurs dimensions et leur fi nition. Nous
faisons tout ce qui est possible pour limiter ces variations qui ne peuvent
cependant pas être éliminées.

4
Projection A
du manteau
1”
(25 mm)
1”– 6”
(25–152 mm)
9”
(229 mm)
12”
(305 mm)
Hauteur B*
du manteau
36”
(914 mm)
39”
(991 mm)
42”
(1067 mm)
45”
(1143 mm)
Installation
1. Installez le foyer 738 ou 739 selon les directives du
guide d’installation fourni avec le foyer.
2. Installez la bordure choisie selon les directives
fournies avec la bordure.
3. Accrochez la section de fonte du bas aux supports de
montage de la bordure dans le second espace à partir
du bas.
4. Accrochez la
section de fonte du
haut aux supports
de montage de
la bordure dans
l’espace du haut.
5. Placez la grille de protection
sur le bord de la section du
bas pour l’aligner avec la
section du haut. Pressez la
grille contre la section du
haut afi n que les crochets s’y
accrochent.
Entretien
La fonte et la grille peuvent être brossées à l’aide d’une
brosse souple. Pour enlever la grille, poussez-la sur un
côté et tirez sur l’autre côté pour dégager ses crochets.
Si la grille est endommagée, elle doit être rem-
placée par la grille conçue par le manufacturier
pour cet appareil.
Pour l’entretien du foyer incluant sa fenêtre, consultez le
Guide de l’installation et du consommateur fourni avec le
foyer.
NE PAS nettoyer la vitre avec un produit à base
d’ammoniaque!
Code Description Pièce n
o
1 Section du haut 4000090
2 Section du bas 4000091
3 Grille de protection 4003293
Liste de pièces
Dégagements pour manteau ou tablette
1
2
3
Section du bas
29-1/4” (74,3 mm)
23” (58,3 mm)
Mantel
‘A’
‘B’
Outer Trim
Supplied
Separately
Section du haut
AVERTISSEMENT
NE TOUCHEZ PAS LA FONTE, LA GRILLE DE
NE TOUCHEZ PAS LA FONTE, LA GRILLE DE
PROTECTION OU LA FENÊTRE LORSQU’ELLES
PROTECTION OU LA FENÊTRE LORSQU’ELLES
SONT CHAUDES!
SONT CHAUDES!
Laissez le foyer refroidir avant
Laissez le foyer refroidir avant
de le nettoyer.
de le nettoyer.
AVERTISSEMENT
POUR RAISONS DE SÉCURITÉ, assurez-vous
POUR RAISONS DE SÉCURITÉ, assurez-vous
que la grille de protection est réinstallée sur le
que la grille de protection est réinstallée sur le
foyer après l’entretien.
foyer après l’entretien.
Manteau
Bordure
extérieure
vendue
séparément
Conçue et fabriquée par / pour
Miles Industries Ltd.
190 – 2255 Dollarton Highway, North Vancouver, BC, CANADA V7H 3B1
Tél. 604-984-3496 Téléc. 604-984-0246
www.foyervalor.com
Parce que nous favorisons une politique de développement continu, certains détails de la présente publication peuvent varier.
-
 1
1
-
 2
2
-
 3
3
-
 4
4


dans d''autres langues
- English: Valor 742CFB Owner's manual
Documents connexes
-
Valor BSK 742 for 742CFB Le manuel du propriétaire
-
-
-
-
-
-
-
-
Miles Industries LEGEND G3 Le manuel du propriétaire
-