Quark Wooden Pegboard Wall Shelf Guide d'installation
- Taper
- Guide d'installation

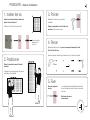
1. Insérer les vis 3. Pointer
4. Percer
5. Fixer
Ø 6 mm.
2. Positionner
Insérer les vis dans les trous situés aux
quatre coins de la board.
Utiliser la clé Torx10 fournie à cet effet.
Maintenir la board au mur en position
souhaitée.
Frapper chaque tête de vis à l’aide d’un
marteau afin de marquer le mur.
Replacer la board au sol puis percer chaque point marqué à l’aide
d’un forêt de Ø 6 mm.
Insérer ensuite les chevilles nylon dans les trous, à l’aide d’un marteau.
Placer la board sur le mur à l’endroit
souhaité.
L’utilisation d’un niveau permet d’assurer la
verticalité ou l’horizontalité.
Visser le pegboard
au mur.
Laisser la pointe
dépasser de 1
ou 2 mm.
Le montage final peut-être facilité en enfoncant
les vis au maximum avant de les mettre en face
des trous.
Nul besoin de serrer
outre mesure.
PEGBOARD : Manuel d’installation
L
’
a
v
e
n
t
u
r
e
Q
u
a
r
k
p
e
u
t
c
o
m
m
e
n
c
e
r
!

1. Insert screws 3. Mark
4. Drill
5. Set
Ø 6 mm.
2. Place the board
Insert the screws into the holes located at
the four corners of the board.
Use the Torx 10 key provided.
The board held on the wall in the desired
position.
Hit each screw head with a hammer to
mark the wall the final position of the screws.
Place the board on the ground, then drill each marked point with
a Ø 6 mm. drill.
Then insert the nylon plugs into the holes using a hammer.
Place the board on the wall in the desired
location.
Use a level to ensure verticality or horizontality.
Then screw the board to the wall.
Let the tip protrude
by 1 or 2 mm.
The final assembly can be facilitated by pressing
the screws as far as possible before placing them
in front of the dowels.
No need to over tighten.
PEGBOARD : Installation guide
T
h
e
Q
u
a
r
k
a
d
v
e
n
t
u
r
e
c
a
n
b
e
g
i
n
!
-
 1
1
-
 2
2


Quark Wooden Pegboard Wall Shelf Guide d'installation
- Taper
- Guide d'installation
dans d''autres langues
Autres documents
-
Lifetime Outdoor Storage 6406 Manuel utilisateur
-
-
DeWalt DXST6000WB Manuel utilisateur
-
-
-
-
-
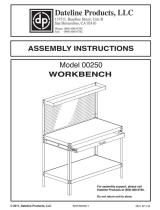 Dateline Workshop PR250 Mode d'emploi
-
-
