
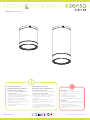
LETO 11 & 11.5 S Wet
1Rev July 3, 2020
403-216-7043 | [email protected]
MADE IN
CANADA
PROUD MEMBER OF
Overview / Vue d’ensemble
Read and follow these
instructions before installing or
maintaining this product
Veuillez lire et suivre ces
instructions avant l’installation ou
l’entretien de ce produit
• This product is suitable for DRY INDOOR
LOCATIONS ONLY
• Make sure this product is NOT on the same
circuit as inductive loads, (e.g. fluorescent bulbs,
discharge bulbs, ventilation fans, etc...)
• Allow air to flow freely around the fixture
• Do not switch on line voltage until all wiring is
complete
• Incorrect wiring will result in irreparable damage
to LED and power supply
• This product should only be installed by a
licensed electrician
• Ce produit convient pour une installation DANS
UN ENDROIT SEC SEULEMENT
• Assurer vous que des charges inductives ne se
retrouvent pas sur le même circuit que ce produit,
(i.e. fluorescent, ampoules à décharge,
ventilateurs, etc...)
• Permettre à l’air de circuler librement autour du
luminaire
• Compléter les branchements avant de mettre
sous tension
• Un branchement incorrect créerait des
dommages irréparables à l’alimentation et au DEL
• Ce produit devrait être uniquement installé par un
électricien qualifié
Warranty
Garantie
• This product must be installed in accordance
with all applicable installation codes and
ordinance
• Limited five (5) years warranty
• Warranty is void in the eventuality of
unauthorized modifications and/or improper use
• Ce produit doit être installé conformément au
code d’installation et autres normes applicables
• Garantie limitée de cinq (5) ans
• La garantie est non valide advenant une
modification non autorisée ou un usage non
approprié

LETO 11 & 11.5 S Wet
2Rev July 3, 2020
403-216-7043 | [email protected]
MADE IN
CANADA
PROUD MEMBER OF
Installation / Installation
1
Attach bracket to junction box and make
electrical connections.
Mount Leto 11 in place by inserting screws.
3
4
Line up screw holes with bracket indents.
For uneven surfaces, apply silicone
around edge before continuing install.
2
Apply silicone around edge before finishing
install. Tighten screws until they bump stop
against fixture to finish install.
-
 1
1
-
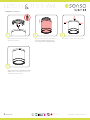 2
2


luminii Leto 11 S Wet Guide d'installation
- Taper
- Guide d'installation
- Ce manuel convient également à
dans d''autres langues
Documents connexes
-
luminii Leto 44 Mini WM UD Guide d'installation
-
-
-
-
-
-
-
-
-