GE G9OAABSSPSS Le manuel du propriétaire
- Catégorie
- Grille-pain
- Taper
- Le manuel du propriétaire
Ce manuel convient également à

Write the model and serial numbers here:
Model # _________________
Serial # _________________
Find these numbers on a label
on the back of the unit.
GE is a trademark of the General Electric Company. Manufactured under trademark license.
OWNER’S MANUAL
AIR FRY
TOASTER OVEN
49-9000013 Rev. 0 12-20 GEA
G9OAABSSPSS
ENGLISH/FRANÇAIS/
ESPAÑOL
SAFETY INFORMATION
.........3
PARTS INCLUDED ................4
GETTING STARTED ..............5
CONTROLS ........................6
FUNCTIONS .......................7
USING THE TOASTER OVEN ....7
COOKING GUIDE .................8
CARE AND CLEANING ..........10
TROUBLESHOOTING ............10
LIMITED WARRANTY ........... 11
CONSUMER SUPPORT ..........12

2 49-9000013 Rev. 0
THANK YOU FOR MAKING GE APPLIANCES A PART OF YOUR HOME.
Whether you grew up with GE Appliances, or this is your first, we’re happy to have you in the family.
We take pride in the craftsmanship, innovation and design that goes into every GE Appliances
product, and we think you will too. Among other things, registration of your appliance ensures that we
can deliver important product information and warranty details when you need them.

49-9000013 Rev. 0 3
SAFETY INFORMATION
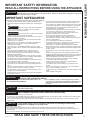
IMPORTANT SAFETY INFORMATION
READ ALL INSTRUCTIONS BEFORE USING THE APPLIANCE
CAUTION
A short power-supply cord is provided to reduce the risk resulting from becoming
entangled in or tripping over a longer cord.
If an extension cord is used:
1) The marked electrical rating of the cord set or extension cord should be at least as great as the electrical rating of the appliance;
2) The cord should be arranged so that it will not drape over the countertop or tabletop where it can be pulled on by children or tripped over
unintentionally;
3) The cord set or extension cord should be a grounding-type 3-wire cord.
WARNING
Read all safety instructions before using the product. Failure to follow these instructions may result
in fire, electrical shock, serious injury, or death.
IMPORTANT SAFEGUARDS
Always follow these safety precautions when using this appliance.
• Carefully read all instructions before operating the toaster oven.
• Remove and discard all packaging materials prior to operating the
oven.
•
WARNING
Remove plug from outlet when the appliance
is not in use, before putting on or taking off parts, and before
cleaning. Allow to cool before cleaning.
•
WARNING
To reduce risk of fire or electric shock, always
operate oven with crumb tray properly installed.
• To protect against electrical shock do not immerse cords, plugs, or
appliance in water or other liquid.
• Always place oven on a level, stable, and heat-resistant surface
whenever oven is in operation
• Keep at least 4” (10 cm) clearance on all sides of the appliance
whenever oven is in operation. Do not operate appliance
underneath wall cabinets.
• Do not place any of the following materials in the oven: paper,
plastic, pot holders, linens, gasoline or other flammable vapors and
liquids.
• A fire may occur if the toaster-oven is covered or touching
flammable material, including curtains, draperies, walls, and
the like, when in operation. Do not store any item on top of the
appliance when in operation.
• The exterior surfaces of the appliance can be hot during and after
oven operation. Allow appliance to cool completely before handling.
• Do not touch hot surfaces. Use handle or knobs.
• Do not store items on top of the appliance, as this surface can be
very hot during and after oven operation.
• To prevent burns or injury, always use proper protection, such
as hot pads or oven mitts, when removing or handling items from
oven.
• Do not touch heating elements or interior surface of oven during or
after use. Allow to cool before cleaning or handling.
• Do not let power cord hang over edge of table or counter. Do not
let power cord contact hot surfaces.
• Always clean the oven according to cleaning and care instructions,
as provided on page 10.
• Do not clean with metal scouring pads. Pieces can break off the
pad and touch electrical parts involving a risk of electric shock.
• Do not operate any appliance with a damaged cord or plug or after
the appliance malfunctions or has been damaged in any manner.
Return appliance to the nearest authorized service facility for
examination, repair, or adjustment.
• Oversize foods or metal utensils must not be inserted in a toaster-
oven as they may create a fire or risk of electric shock.
• The use of accessory attachments not recommended by the
appliance manufacturer may cause injuries.
• Do not store any materials, other than manufacturers
recommended accessories, in this oven when not in use.
• This appliance is intended for indoor household use only. Do not
store or operate outdoors.
• Do not use appliance for other than intended use.
• Do not leave children alone - children should not be left alone or
unattended in an area where an appliance is in use.
• Always stop oven operation before unplugging the appliance.
• Before handling, moving, or cleaning the appliance, always unplug
the power cord from the wall outlet and ensure the appliance has
properly cooled.
• Do not place on or near a hot gas or electric burner, or in a heated
oven.
• Cook food thoroughly to help protect against foodborne illness.
Minimum safe food temperature recommendations can be found at
IsItDoneYet.gov and fsis.usda.gov. Use a food thermometer to
take food temperatures and check several locations.
• Extreme caution should be exercised when using containers
constructed of other than metal or glass.
• Extreme caution must be used when moving an appliance
containing hot oil or other hot liquids.
• Use extreme caution when removing tray or disposing of hot
grease.
• Do not cover crumb tray or any part of the oven with metal foil.
This will cause overheating of the oven.
• To disconnect, turn any control to "off", then remove plug from wall
outlet.
• Avoid contacting moving parts.
WARNING
RISK OF FIRE OR ELECTRIC SHOCK
ŶTO REDUCE THE RISK OF FIRE OR ELECTRIC SHOCK, DO
NOT REMOVE COVER (OR BACK).
ŶDo not attempt to repair or replace any part of your toaster
oven unless it is specifically recommended in this manual. All
other servicing should be performed by authorized service
personnel.
WARNING
KEEP FLAMMABLE MATERIALS AWAY FROM THE TOASTER OVEN
Failure to do so may result in fire or personal injury.
• Do not store or use flammable materials in a toaster or near the toaster opening, including paper, plastic, pot holders, linens, wall coverings,
curtains, drapes and gasoline or other flammable vapors and liquids.
• Never wear loose-fitting or hanging garments while using the appliance. These garments may ignite if they contact hot surfaces causing
severe burns.
CAUTION
To ensure continued protection against risk of electric shock, connect to properly
grounded outlets only.
READ AND SAVE THESE INSTRUCTIONS

4 49-9000013 Rev. 0
PARTS INCLUDED
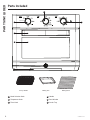
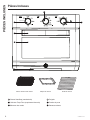
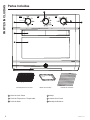
Parts Included
A
Mode Selection Knob
B
Temperature Knob
C
Timer Knob
D
Handle
E
Door Window
F
Crumb Tray
Baking RackBaking PanAir Fry Basket
B
D
C
E
F
Keep Warm
A

49-9000013 Rev. 0 5
GETTING STARTED
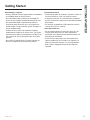
Getting Started
Unpacking and Cleaning
• Remove and safely discard all packing materials before
operating the oven.
• It is recommended to wipe the interior of the oven
FDYLW\ZLWKDGDPSVSRQJHEHIRUH¿UVWXVH
• It is recommended to thoroughly clean all accessories
EHIRUH¿UVWXVH$FFHVVRULHVPD\EHFOHDQHGZLWK
warm, soapy water. Rinse and dry thoroughly.
• Place the oven on a level and stable surface where
oven has at least 4" (10cm) of clearance on all sides of
the unit, and at least 8" (20cm) of clear space above.
• Do not place or store any items on top of the oven, with
the exception of the provided accessories.
Powering the Oven
• Unravel power cord and plug into a grounded 120V
power outlet.
Before First Use
• It is recommended to operate the oven empty for 20-30
PLQXWHVEHIRUH¿UVWXVH7KLVZLOOHQVXUHDQ\SURWHFWLYH
¿OPVRQWKHKHDWLQJHOHPHQWVDUHUHPRYHG
:KHQXVLQJWKHRYHQIRUWKH¿UVWWLPHWKHRYHQPD\
emit visible vapors and/or a slight odor. The vapors and
odor are normal, safe, and not detrimental to the oven.
Ensure that the room is well ventilated.

6 49-9000013 Rev. 0
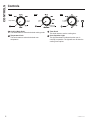
Controls
CONTROLS
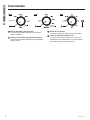
A
Cooking Mode Knob
This knob rotates to select the desired cooking mode
B
Temperature Knob
This knob rotates to select the desired oven
temperature.
C
Timer Knob
This knob rotates to set the cooking time.
D
Oven Operation Light
This light illuminates to indicate that the oven is
FXUUHQWO\LQRSHUDWLRQ7KHOLJKWZLOOWXUQRႇZKHQWKH
cooking timer expires.
B
C
D
Keep Warm
A

49-9000013 Rev. 0 7
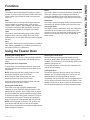
Functions
Using the Toaster Oven
USING THE TOASTER OVEN
Air Fry
This mode is ideal for browning and crisping the exterior
of foods. The air fry mode can produce a taste and texture
similar to deep frying without the need to submerge the
food in oil.
Bake
This mode is ideal for cooking foods that generally lack
structure before the cooking process, such as cakes,
FRRNLHVPXႈQVSDVWULHVSLHVODVDJQDVDQGFDVVHUROHV
Food will be cooked thoroughly and evenly, which also
makes this mode suitable for packaged frozen meals.
Toast
This mode is ideal for browning slices of bread, bagels,
(QJOLVKPXႈQVDQGIUR]HQZDႉHV(DFKVOLFHZLOOEH
EURZQHGHYHQO\RQERWKVLGHVZLWKRXWWKHQHHGIRUÀLSSLQJ
the food.
Broil
This mode is ideal for quickly searing meats (e.g. steaks or
¿VKFULVSLQJYHJHWDEOHVHJSRWDWRHVRUEURZQLQJWKH
top surface of foods (e.g. casseroles).
Roast
This mode is ideal for cooking foods that are generally solid
before the cooking process, including a wide variety of
meats and vegetables. Foods will be tender and moist on
the inside, while developing a crispy texture on the exterior.
Keep Warm
This mode is useful for keeping freshly cooked meals warm
while waiting for guests or preparing the rest of the meal.
Convection Roast
This mode is similar to the ROAST mode, but activates the
convection fan to circulate hot air around the food. This
causes the food to cook faster than normal ROAST mode,
but the oven temperature may need to be reduced for
some recipes.
Selecting the Cooking Mode
To choose the cooking mode, rotate the Mode knob until
the indicator on the knob points to the desired cooking
mode.
Selecting the Oven Temperature
To choose the oven temperature, rotate the Temp knob
until the indicator on the knob points to the desired oven
temperature.
NOTE: When using the Broil cooking mode, the oven
temperature should be set to "400°F/Broil".
When using the Toast cooking mode, the oven
temperature should be set to "450°F/Toast".
When using the Keep Warm ("Warm") mode, the oven
temperature should be set to "Warm".
Starting the Toaster Oven
Ensure the crumb tray is properly installed before
operating the oven. Place the cooking accessory in the
appropriate rack position. See Cooking Guide on page 8
for recommended rack positions based on cooking mode.
To start the selected cooking mode, rotate the Time knob
to the desired cooking time. The oven will immediately
begin to heat and the oven operation light will illuminate.
NOTE:,IWKH7HPSNQRELVVHWWRWKH2ႇSRVLWLRQWKH
oven will not heat and only the oven fan will operate.
Please ensure the desired oven temperature has been set
before setting the oven timer.
Stopping the Toaster Oven
When the selected cooking time has ended, the oven
will emit an audible alarm to indicate the cooking cycle is
FRPSOHWH7KHRYHQZLOOWXUQRႇDXWRPDWLFDOO\DQGWKHRYHQ
RSHUDWLRQOLJKWZLOOWXUQRႇ
7RPDQXDOO\WXUQRႇWKHRYHQDWDQ\WLPHURWDWHWKH7LPH
NQREWRWKH2ႇSRVLWLRQ
Cooling the Oven
The exterior surfaces of the oven can be very hot during
and after use. To facilitate cooling, the oven fan may be
operated without activating the heating elements.
To manually cool the oven after use, turn the Mode knob to
$LU)U\DQGWXUQWKHWHPSNQREWRWKH2ႇSRVLWLRQ7KHQ
rotate the Time knob to about 5 minutes to activate the fan.
7KHIDQZLOODXWRPDWLFDOO\VKXWRႇZKHQWKHDODUPVRXQGV

8 49-9000013 Rev. 0
USING THE TOASTER OVEN
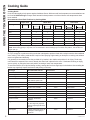
Cooking Guide
Cooking Guide
Cook food thoroughly to help protect against foodborne illness. Minimum safe food temperature recommendations can
be found at IsItDoneYet.gov$OZD\VFKHFNLQWHUQDOIRRGWHPSHUDWXUHWRFRQ¿UPPLQLPXPVDIHWHPSHUDWXUHVKDYH
been reached.
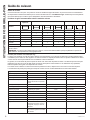
Recommended Oven Rack Positions by Cooking Mode
Upper Rack Middle Rack Lower Rack
Cooking Mode
Air Fry
9
Bake
99 99
Toast
9
Broil
9
Roast
99 99
Warm
999999
Convection
99 99
NOTE: The air fry basket must be placed on top of the wire rack at all times. DO NOT place air fry basket in the baking pan.
NOTE: When baking greasy or oily foods, it is recommended to use the baking tray in the lower rack position. This will allow for
easier clean up.
Air Fry Cooking Guidelines
Air Fry is a special, no-preheat cooking mode that is designed to produce foods with a crispier exterior than traditional
oven cooking. This cooking mode doesn’t require oil but spraying a light coating on food prior to cooking can enhance
exterior crispiness and browning.
It is generally recommended to use the provided air fry basket in the middle rack position for air frying. Foods may
cook faster than expected if the oven is already hot when food is placed in the oven. If foods are browning or drying
out too quickly, try using the lower rack position or setting a lower oven temperature.
7RDYRLGWKHQHHGWRVWLURUÀLSIRRGGXULQJFRRNLQJDUUDQJHWKHIRRGLQDVLQJOHOD\HULQWKHEDVNHW2YHUFURZGLQJWKH
basket may negatively impact food texture and prolong cook times.
Food Type Recommended Amount Temperature Time
Bacon 6 slices 400°F 8-13 minutes
Fresh Wings 1 to 2 lbs 400°F 15-20 minutes
Frozen Wings 1 ½ lbs 400°F 25-30 minutes
Fresh Hand-Cut French Fries 1 lbs. or 2 Russet Potatoes,
slice width of quarter inch
400°F 20-30 minutes
Sweet Potato Waffle Fries 1 lb 400°F 10-13 minutes
Frozen French Fries 1 lb 450°F 10-15 minutes
Breaded Pork Loins 2 Pork Loins, breaded 375°F 20-30 minutes
Frozen Convenience Foods ½ to 1 lb of Frozen Product 400°F 10 minutes
Mozzarella Sticks 6 to 20 Mozzarella Sticks 400°F 7-9 minutes
Fish Sticks 12oz or 20 sticks 400°F 10 minutes
Chicken Nuggets 1 lb or 34 pieces 400°F 10 minutes
Chicken Tenders 6 Chicken Tenderloins,
breaded
400°F 10 minutes
Vegetables 1 lb of Fresh Green Beans
(or other legumes), Squash/
Zucchini, Asparagus, Brussel
Sprouts
400°F 7-10 minutes
Fried Apples 1 Apple peeled and cored, cut
in wedges, coated lightly in
cinnamon.
400°F 10 minutes

49-9000013 Rev. 0 9
NOTES
Notes

10 49-9000013 Rev. 0
CARE AND CLEANING / TROUBLESHOOTING
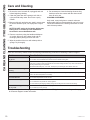
Care and Cleaning
%HVXUHWKHRYHQLVWXUQHGRႇXQSOXJJHGDQGFRRO
before beginning cleaning.
2. Clean the glass door with a sponge, soft cloth, or
nylon pad and sudsy water. Do not use a spray
cleaner.
3. Remove slide rack and bake pan; wash in soapy water
To remove stubborn spots, use a polyester or nylon
pad.
NOTE: DO NOT put the air fry basket, baking pan,
baking rack, or crumb tray in the dishwasher.
Accessories are not dishwasher safe.
4. Remove crumb tray using the handle and dispose
of crumbs. Wipe tray with a damp cloth and dry
thoroughly before placing back into the oven.
5. Wipe the outside of the oven with a damp cloth or
sponge. Dry thoroughly.
6. Do not attempt to clean the heating elements. Any
food that comes into contact with the elements will
EXUQRႇRQLWVRZQ
COOKING CONTAINERS
Only metal, oven-proof glass or ceramic cookware
without glass lids are recommended for use in this oven
Follow the manufacturers' cleaning instructions to clean
each of these products.
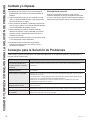
Troubleshooting
Problem Possible Solution
The oven does not turn on or fails
to get hot.
1. Check that the oven is properly plugged into a power outlet.
2. The timer is not set. Rotate the Time knob to the desired cooking time.
Oven omits a burnt smell. Ensure that the cooking time is appropriately set and that food is not being overcooked.
Fats, oils, and sauces that have dripped onto the lower heating elements may cause some smoke or
burning smell during oven operation.
Ensure that the baking tray, oven rack, and drip tray are thoroughly clean before each use.
Heater tubes turn off during
cooking.
The heater tubes turn on/off to control temperature. It is not a malfunction.
Smoke comes out. The fat from the food sticking to the heater may cause smoke during cooking especially using “Broil”
menu. Set lower temperature if necessary.
The food is undercooked after
recommended time.
1. Too much food has been added to the oven.
2. The oven temperature was set too low.
The food is not evenly cooked. 1. Too much food has been added to the oven.
2. The food items are placed too closely together.
3. Some foods require flipping halfway through the cooking time to ensure even browning.
The food is not crispy after using
Air Fry mode
1. The food items are placed too closely together.
2. The food was not dry enough
If the problem persists after trying these solutions, please contact GE Appliances Customer Support. See page 12
for Customer Support contact information.
Save time and money! Please review the following troubleshooting chart before contacting Customer Support.

49-9000013 Rev. 0 11
Ŷ Failure of the product if it is abused, misused, or
used for other than the intended purpose or used
commercially.
Ŷ Replacement of house fuses or resetting of circuit
breakers.
Ŷ Damage caused after delivery.
Ŷ Damage to the product caused by accident, fire, floods
or acts of God.
Ŷ Incidental or consequential damage caused by
possible defects with this appliance.
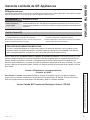
What GE Appliances Will Not Cover:
For the Period of: GE Appliances Covers
One Year
From the date of the
original purchase
If the toaster oven fails due to a defect in materials or workmanship, during the limited one-
year warranty, GE Appliances will either repair your product, replace your product with a new
or remanufactured product, or refund the purchase price of the product at GE Appliances sole
discretion.
Staple your receipt here. Proof of the original purchase
date is needed to obtain service under the warranty.
If your appliance fails to operate properly while in use under normal household conditions within the warranty period, visit
geappliances.com/contact for product care/maintenance self-help.
To initiate a warranty claim, please visit geappliances.com/contact, or call 1-800-GECARES. Please have your model
number and serial number available. Return and packing instruction information will be provided at that time
LIMITED WARRANTY
GE Appliances Limited Warranty
EXCLUSION OF IMPLIED WARRANTIES
Your sole and exclusive remedies are product exchange or refund as provided in this Limited Warranty. Any
implied warranties, including the implied warranties of merchantability or fitness for a particular purpose, are
limited to one year or the shortest period allowed by law.
For sale in the 50 United States and the District of Columbia only: For US Customers: This limited warranty is
extended to the original purchaser for products purchased for home use within the USA.
Some states do not allow the exclusion or limitation of incidental or consequential damages. This warranty gives you
specific legal rights, and you may also have other rights which vary from state to state. To know what your legal rights
are, consult your local or state consumer affairs office or your state’s Attorney General.
Warrantor: GE Appliances, a Haier company
Louisville, KY 40225
For Customers in Canada: This limited warranty is extended to the original purchaser and any succeeding
owner for products purchased in Canada for home use within Canada. In-home warrant service will be provided in
areas where it is available and deemed reasonable by Mabe to provide.
Warrantor Canada: MC Commercial, Burlington, Ontario, L7R 5B6

12 49-9000013 Rev. 0
Customer Support / Return Contacts
CUSTOMER SUPPORT
Service and Registration
Register your new appliance on-line at your convenience! Timely product registration will allow for enhanced
communication and prompt service under the terms of your warranty, should the need arise.
Register your appliance at GEAppliances.com/register.
Contact Us
If you are not satisfied with the service you receive from GE Appliances, contact us on our Website with all the
details including your phone number, or write to:
In the US: General Manager, Customer Relations | GE Appliances, Appliance Park | Louisville, KY 40225
GEAppliances.com/contact
In Canada: Director, Consumer Relations, MC Commercial Inc. | Suite 310, 1 Factory Lane | Moncton, N.B. E1C 9M3
GEAppliances.ca/en/contact-us

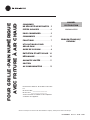
FOUR GRILLE-PAIN NUMÉRIQUE
AVEC FRITURE À AIR CHAUD
49-9000013 Rev. 0 12-20 GEA
G9OAAASSPSS
CONSIGNES
DE SÉCURITÉ IMPORTANTES .3
PIÈCES INCLUSES ...........4
POUR COMMENCER ..........5
COMMANDES ...............6
FONCTIONS .................7
UTILISATION DU FOUR
GRILLE-PAIN ................7
GUIDE DE CUISSON ..........8
ENTRETIEN ET NETTOYAGE .10
DÉPANNAGE ...............10
GARANTIE LIMITÉE ..........11
SOUTIEN
AU CONSOMMATEUR ....... 12
ENGLISH/FRANÇAIS/
ESPAÑOL
Inscrivez les numéros de modèle et de série
ici :
No de modèle __________________
No de série ____________________
Vous trouverez ces numéros sur l’étiquette
à l’arrière de l’appareil.
GE est une marque de commerce de General Electric Company. Fabriqué sous licence de marque.
MANUEL
D’UTILISATION

2 49-9000013 Rev. 0
NOUS VOUS REMERCIONS D’INTÉGRER GE APPLIANCES À VOTRE DEMEURE.
Que vous ayez grandi avec des électroménagers GE ou qu’il s’agisse de votre première acquisition,
nous sommes heureux de vous accueillir dans notre famille.
Nous sommes fiers du savoir-faire, de l’innovation et du design qui constituent chaque
électroménager GE, et nous pensons que vous le serez aussi. Nous vous rappelons que
l’enregistrement de votre électroménager vous assure de recevoir des renseignements importants
sur le produit et la garantie lorsque vous en avez besoin.

49-9000013 Rev. 0 3
AVERTISSEMENT
Veuillez lire toutes les consignes de sécurité avant d’utiliser le produit. L’omission d'observer
ces consignes peut poser une risque d’incendie, de choc électrique, de blessure grave ou fatale.
MESURES DE SÉCURITÉ IMPORTANTES
Observez toujours les présentes consignes de sécurité lorsque vous utilisez cet électroménager.
• Lisez attentivement toutes les instructions avant de faire fonctionner
le four grille-pain.
• Retirez et jetez tous les matériaux d'emballage avant d'utiliser le four.
•
AVERTISSEMENT
DÉBRANCHEZ L'APPAREIL DE LA
PRISE QUAND IL N'EST PAS UTILISÉ ET AVANT LE NETTOYAGE.
Laisser le four refroidir avant de le nettoyer ou de le manipuler.
•
AVERTISSEMENT
Pour réduire les risques d'incendie ou
d'électrocution, faites toujours fonctionner le four avec le plateau
ramasse-miettes correctement installé.
• Pour vous protéger contre les chocs électriques, ne plongez pas les
cordons, les fiches ou l'appareil dans l'eau ou tout autre liquide.
• Placez toujours le four sur une surface plane, stable et résistante à
la chaleur chaque fois que le four est en marche
• Gardez un dégagement d'au moins 4 ”(10 cm) sur tous les côtés de
l'appareil lorsque le four est en marche. N'utilisez pas l'appareil sous
des armoires murales.
• Un incendie peut se produire si le four grille-pain est couvert
ou touche un matériau inflammable, y compris des rideaux, des
rideaux, des murs, etc., lorsqu'il fonctionne. Ne rangez aucun article
sur le dessus de l'appareil lorsqu'il est en marche.
• Les surfaces extérieures de l'appareil peuvent être chaudes pendant
et après le fonctionnement du four. Laisser l'appareil refroidir
complètement avant de manipuler l'appareil.
• Ne touchez pas les surfaces chaudes. Utilisez la poignée ou les
boutons.
• Ne rangez pas d'articles sur le dessus de l'appareil, car cette surface
peut être très chaude pendant et après le fonctionnement du four.
• Pour éviter les brûlures ou les blessures, utilisez toujours une
protection appropriée, comme des coussinets chauffants ou des gants
de cuisine, lorsque vous retirez ou manipulez des articles du four.
• Ne touchez pas les éléments chauffants ou la surface intérieure
du four pendant ou après l'utilisation. Laisser refroidir avant le
nettoyage ou la manipulation.
• Ne laissez pas le cordon d'alimentation pendre du bord de la table
ou du comptoir. Ne laissez pas le cordon d'alimentation entrer en
contact avec des surfaces chaudes.
• Nettoyez toujours le four conformément aux instructions de nettoyage
et d'entretien, comme indiqué à la page 10. parties du four.
• Ne nettoyez pas avec des tampons à récurer métalliques. Des
pièces peuvent se détacher du tampon et toucher les pièces
électriques, ce qui présente un risque de choc électrique.
• N'utilisez aucun appareil dont le cordon ou la fiche sont
endommagés ou après un dysfonctionnement de l'appareil ou s'il a
été endommagé de quelque manière que ce soit.
• Il est recommandé de n'utiliser que les accessoires fournis à l'origine
avec cet appareil.
• Ne stockez aucun matériau, autre que les accessoires
recommandés par le fabricant, dans ce four lorsqu'il n'est pas utilisé.
• Cet appareil est destiné à un usage domestique à l'intérieur
uniquement. Ne pas stocker ni utiliser à l'extérieur.
• N'utilisez pas l'appareil à d'autres fins que celles pour lesquelles il a
été conçu.
• Ne laissez pas les enfants seuls - les enfants ne doivent pas être
laissés seuls ou sans surveillance dans une zone où un appareil est
utilisé.
• Arrêtez toujours le fonctionnement du four avant de débrancher
l'appareil.
• Avant de manipuler, déplacer ou nettoyer l'appareil, débranchez
toujours le cordon d'alimentation de la prise murale et assurez-vous
que l'appareil a bien refroidi.
• Ne pas placer sur ou à proximité d'un brûleur à gaz ou électrique
chaud, ou dans un four chauffé.
• Faites bien cuire les aliments pour les protéger contre les
maladies d'origine alimentaire. Les recommandations relatives à
la température minimale de sécurité des aliments sont disponibles
sur IsItDoneYet.gov et fsis.usda.gov. Utilisez un thermomètre
pour aliments pour prendre la température des aliments et vérifier
plusieurs endroits.
• Une extrême prudence doit être exercée lors de l'utilisation de
récipients construits autrement qu'en métal ou en verre.
• Soyez extrêmement prudent lorsque vous retirez le plateau ou jetez
de la graisse chaude.
• Ne couvrez pas le plateau ramasse-miettes ni aucune partie du four
avec du papier d'aluminium. Cela entraînera une surchauffe du four.
AVERTISSEMENT
RISQUE D’INCENDIE OU DE CHOC ÉLECTRIQUE
ŶPOUR RÉDUIRE LE RISQUE D’INCENDIE OU DE CHOC
ÉLECTRIQUE, NE RETIREZ PAS LE COUVERCLE (OU
L’ARRIÈRE)
ŶNe tentez pas de réparer ou de remplacer une pièce
quelconque du robot culinaire, sauf si cela est recommandé
dans ce manuel. Toute réparation doit être effectuée par un
technicien en réparation autorisé.
LISEZ ET CONSERVEZ CES INSTRUCTIONS
CONSIGNES DE SÉCURITÉ
CONSIGNES DE SÉCURITÉ IMPORTANTES
LISEZ TOUTES LES INSTRUCTIONS AVANT D'UTILISER L'APPAREIL
ATTENTION
Un cordon d'alimentation court est fourni pour réduire le risque de s'emmêler ou de
trébucher sur un cordon plus long.
Si une rallonge est utilisée:
1) La puissance électrique indiquée du cordon ou de la rallonge doit être au moins aussi élevée que la puissance électrique de l'appareil;
2) Le cordon doit être disposé de telle sorte qu'il ne se drape pas sur le comptoir ou la table où il pourrait être tiré par des enfants ou trébuché
involontairement;
3) Le cordon ou la rallonge doit être un cordon à 3 fils avec mise à la terre.
AVERTISSEMENT
GARDEZ LES MATIÈRES INFLAMMABLES À DISTANCE DU AVEC FRITURE À AIR CHAUD
L’omission de prendre cette précaution peut causer un incendie ou une blessure corporelle.
• Ne rangez ni n’utilisez des matières inflammables dans le grille-pain ou près de son orifice, y compris le papier, le plastique, les poignées ou
mitaines de four, le linge de maison, le revêtement mural, les rideaux, les draperies, l’essence ou d’autres vapeurs ou liquides inflammables.
• Ne portez jamais de vêtements amples ou pendants lorsque vous utilisez l’électroménager. Ces vêtements peuvent prendre feu au contact de
surfaces chaudes et causer des brûlures graves.
ATTENTION
Afin d’assurer une protection continuelle contre le risque de choc électrique, branchez
l’appareil dans des prises correctement mises à la terre seulement.

4 49-9000013 Rev. 0
A
Bouton Start/Stop (marche/arrêt)
B
Sélecteur Temp/Time (température/minuterie)
C
Sélecteur des modes
D
Poignée
E
Fenêtre de porte
F
Ramasse-miettes
Grille de cuisson
Plaque de cuissonPanier de friture à air chaud
PIÈCES INCLUSES
Pièces Incluses
B
D
C
E
F
Keep Warm
A

49-9000013 Rev. 0 5
POUR COMMENCER
Pour commencer
Déballage et nettoyage
• Retirez et jetez proprement toutes les matières
d’emballage avant d’utiliser le four.
• Nous recommandons d’essuyer l’intérieur de la cavité
du four avec une éponge humide avant la première
utilisation.
• Nous recommandons de nettoyer à fond tous
les accessoires avant la première utilisation. Les
accessoires doivent être nettoyés avec de l'eau tiède
savonneuse. Rincez et séchez à fond.
• Placez le four sur une surface de niveau et stable où il
dispose d’un dégagement d’au moins 10 cm (4 po) sur
tous les côtés, et d’au moins 20 cm (8 po) au dessus.
• Ne placez ni ne rangez aucun article sur le dessus du
four, à l’exception des accessoires fournis.
Mise en marche du four grille-pain
• Déroulez le cordon et branchez-le dans une prise de
120 V.
• Une fois le cordon branché, l’écran va s’illuminer et
WRXWHVOHVLF{QHVYRQWV¶DႈFKHUEULqYHPHQW
3DUGpIDXWO¶pFUDQDႈFKHOHPRGHGHFXLVVRQ$LU)U\
(friture à air chaud).
Avant la première utilisation
• Nous recommandons de faire fonctionner le four à vide
durant 20 à 30 minutes avant la première utilisation.
Cela permet de retirer toute pellicule plastique qui se
WURXYHUDLWVXUOHVpOpPHQWVFKDXႇDQWV
• Lorsque vous utilisez le four grille-pain pour la première
fois, il peut émettre une vapeur visible et/ou une légère
odeur. Cette vapeur et cette odeur sont normales, sûres
et sans problème pour le four. Assurez-vous que la
pièce est bien ventilée.

6 49-9000013 Rev. 0
Commandes
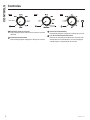
COMMANDES
A
Bouton Start/Stop (marche/arrêt)
Ce bouton tourne pour sélectionner le mode de
cuisson souhaité
B
Sélecteur Temp/Time (température/minuterie)
Ce bouton tourne pour sélectionner la température
désirée du four
C
Sélecteur des modes
Ce bouton tourne pour régler le temps de cuisson
D
Lampe de fonctionnement du four
Ce voyant s'allume pour indiquer que le four est
actuellement en fonctionnement. Le voyant s'éteint
lorsque la minuterie de cuisson expire.
B
C
D
Keep Warm
A

49-9000013 Rev. 0 7
Fonctions
Utilisation du four grille-pain
UTILISATION DU FOUR GRILLE-PAIN
Friture à air chaud (Air Fry)
Ce mode est idéal pour brunir et rendre croustillant l’extérieur des
aliments. Le mode de friture à air chaud peut produire un goût et
une texture semblables à la grande friture sans la nécessité de
plonger l’aliment dans l’huile.
Cuisson au four régulière (Bake)
Ce mode est idéal pour cuire les aliments qui manquent
généralement de structure avant la cuisson, tels que gâteaux,
ELVFXLWVPXႈQVSkWLVVHULHVWDUWHVODVDJQHVHWFDVVHUROHV/HV
aliments seront cuits de part en part et uniformément, ce qui en
fait aussi le mode idéal pour les mets surgelés en emballage.
Pain grillé (Toast)
Ce mode est idéal pour griller des tranches de pain, des bagels,
GHVPXႈQVDQJODLVHWGHVJDXIUHVVXUJHOpHV&KDTXHWUDQFKH
sera grillée également sur les deux côtés sans devoir la retourner.
Cuisson au gril (Broil)
Ce mode est idéal pour griller les viandes (p.ex. steaks ou
poissons), les légumes croustillants (p.ex. pommes de terre) ou
pour brunir le dessus des aliments (p.ex. casseroles).
Rôtissage (Roast)
Ce mode est idéal pour cuire les aliments qui sont généralement
solides avant la cuisson, incluant une grande variété de
viandes et de légumes. Les aliments seront tendres et humides
à l’intérieur tout en développant une texture croustillante à
l’extérieur.
Fermentation (Proof)
Ce mode est idéal pour préparer du pain à la levure et d’autres
produits de boulangerie et de pâtisserie dont la pâte nécessite
de reposer et de lever avant la cuisson. La chaleur à basse
température va faciliter la fermentation.
Tenue au chaud (Keep Warm)
Ce mode est pratique pour garder au chaud les repas fraîchement
cuits en attendant les invités ou la préparation des autres étapes
du repas.
Rôtissage par convection (Convection Roast)
&HPRGHHVWVLPLODLUHDXPRGH52$67jODGLႇpUHQFHTX¶LO
DFWLYHOHYHQWLODWHXUjFRQYHFWLRQD¿QGHIDLUHFLUFXOHUO¶DLUFKDXG
DXWRXUGHVDOLPHQWV&HODDSRXUHႇHWGHFXLUHOHVDOLPHQWVSOXV
rapidement que dans le mode ROAST normal, mais la température
du four devra parfois être réduite pour certaines recettes.
Sélection du mode de cuisson
Pour choisir le mode de cuisson, tournez le bouton Mode
jusqu'à ce que l'indicateur sur le bouton pointe vers le
mode de cuisson souhaité.
Sélection de la température du four
Pour choisir la température du four, tournez le bouton
Temp jusqu'à ce que l'indicateur sur le bouton indique la
température désirée du four.
REMARQUE: Lors de l'utilisation du mode de cuisson au
gril, la température du four doit être réglée sur «400 ° F /
gril».
Lorsque vous utilisez le mode de cuisson Toast, la
température du four doit être réglée sur «450 ° F / Toast».
Lorsque vous utilisez le mode de maintien au chaud
("Warm"), la température du four doit être réglée sur
"Warm".
Démarrage du four grille-pain
Assurez-vous que le plateau ramasse-miettes est
correctement installé avant de faire fonctionner le four.
Placez l'accessoire de cuisson dans la position de grille
appropriée. Voir le Guide de cuisson à la page 8 pour les
positions de grille recommandées en fonction du mode de
cuisson.
Pour démarrer le mode de cuisson sélectionné, tournez
le bouton Time sur le temps de cuisson souhaité. Le four
FRPPHQFHUDLPPpGLDWHPHQWjFKDXႇHUHWOHYR\DQWGH
fonctionnement du four s'allumera.
REMARQUE: Si le bouton de température est réglé
VXUODSRVLWLRQ©2ႇªOHIRXUQHFKDXႇHUDSDVHWVHXOOH
ventilateur du four fonctionnera. Veuillez vous assurer que
la température désirée du four a été réglée avant de régler
la minuterie du four.
Arrêt du four grille-pain
Lorsque le temps de cuisson sélectionné est terminé, le
four émet une alarme sonore pour indiquer que le cycle de
cuisson est terminé. Le four s'éteint automatiquement et le
voyant de fonctionnement du four s'éteint.
Pour éteindre manuellement le four à tout moment,
WRXUQH]OHERXWRQ7LPHVXUODSRVLWLRQ©2ႇª
Refroidir le four
Les surfaces extérieures du four peuvent être très
chaudes pendant et après l'utilisation. Pour faciliter le
refroidissement, le ventilateur du four peut fonctionner
VDQVDFWLYHUOHVpOpPHQWVFKDXႇDQWV
Pour refroidir manuellement le four après utilisation,
tournez le bouton de mode sur «Air Fry» et tournez le
ERXWRQGHWHPSpUDWXUHVXUODSRVLWLRQ©2ႇª7RXUQH]
ensuite le bouton Time sur environ 5 minutes pour activer
le ventilateur. Le ventilateur s'arrête automatiquement
lorsque l'alarme retentit.

8 49-9000013 Rev. 0
UTILISATION DU FOUR GRILLE-PAIN
Guide de cuisson
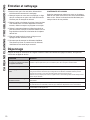
Guide de cuisson
Cuisez les aliments à fond pour vous prémunir contre les maladies d’origine alimentaire. On peut trouver des recommandations
de températures minimales sécuritaires pour la cuisson des aliments sur le site IsItDoneYet.gov.9pUL¿H]WRXMRXUVODWHPSpUDWXUH
LQWHUQHGHVDOLPHQWVSRXUFRQ¿UPHUTXHODWHPSpUDWXUHPLQLPDOHVpFXULWDLUHDpWpDWWHLQWH
Positions de grille recommandées selon le mode de cuisson
Panier
supérieur
Rack du milieu Panier inférieur
Mode de
cuisson
Frire à l'air
9
Cuire
99 99
Le pain grillé
9
Griller
9
Le grillage
99 99
&KDXႇHU
999999
Convection
99 99
REMARQUE: Le panier à friture doit être placé au-dessus de la grille en tout temps. NE PAS placer le panier à friture dans le
plat de cuisson.
REMARQUE: Lors de la cuisson d'aliments gras ou huileux, il est recommandé d'utiliser la plaque à pâtisserie en position de
grille inférieure. Cela permettra un nettoyage plus facile.
Conseils pour la friture à air chaud (Air Fry)
/DIULWXUHjDLUFKDXGHVWXQPRGHGHFXLVVRQVSpFLDOVDQVSUpFKDXႇDJHFRQoXGRQQHUDX[DOLPHQWVXQVXUIDFHH[WpULHXUHSOXV
croustillante que la cuisson au four régulière. Ce mode de cuisson ne requiert pas d’huile mais en vaporiser l’aliment d’une mince
couche avant la cuisson peut améliorer leur croustillance et leur brunissement.
En général, on recommande de placer le panier de friture à air chaud dans la position du milieu. Les aliments peuvent cuire plus
rapidement que prévu si le four est déjà chaud au moment de les placer. S’ils brunissent ou se dessèchent trop rapidement,
baissez la position de la grille ou la température de cuisson.
Pour éviter d’avoir à brasser ou retourner les aliments pendant la cuisson, disposez-les en une seule couche dans le panier.
/¶HQFRPEUHPHQWGXSDQLHUSHXWSURORQJHUOHWHPSVGHFXLVVRQHWDYRLUXQHႇHWLQGpVLUDEOHVXUODWH[WXUHGHVDOLPHQWV
Type d’aliment Quantité Température Time
Bacon coupé épais 6 tranches 400°F 8-13 minutes
Ailes fraîches 1 à 2 lbs 400°F 15-20 minutes
Ailes congelées 1 ½ lbs 400°F 25-30 minutes
Frites fraîches coupées à la main 1 lb ou 2 pommes de terre Russet,
largeur de tranche d'un quart de
pouce
400°F 20-30 minutes
Frites gaufres à la patate douce 1 lb 400°F 10-13 minutes
Frites surgelées 1 lb 450°F 10-15 minutes
Filets de porc panés 2 Filets de porc panés 375°F 20-30 minutes
Plats cuisinés surgelés ½ à 1 lb de produit congelé 400°F 10 minutes
Bâtonnets de mozzarella 6 à 20 Bâtonnets de mozzarella 400°F 7-9 minutes
Bâtonnet de poisson 12oz ou 20 Bâtonnets 400°F 10 minutes
Croquettes de poulet 1 lb oo 34 pièces 400°F 10 minutes
Offres de poulet 6 Filets de poulet panés 400°F 10 minutes
Légumes 1 lb de haricots verts frais (ou
autres légumineuses), courges /
courgettes, asperges, choux de
Bruxelles
400°F 7-10 minutes
Pommes frites 1 Pomme pelée et évidée, coupée
en quartiers, légèrement enrobée
de cannelle.
400°F 10 minutes
La page charge ...
La page charge ...
La page charge ...
La page charge ...
La page charge ...
La page charge ...
La page charge ...
La page charge ...
La page charge ...
La page charge ...
La page charge ...
La page charge ...
La page charge ...
La page charge ...
La page charge ...
La page charge ...
-
 1
1
-
 2
2
-
 3
3
-
 4
4
-
 5
5
-
 6
6
-
 7
7
-
 8
8
-
 9
9
-
 10
10
-
 11
11
-
 12
12
-
 13
13
-
 14
14
-
 15
15
-
 16
16
-
 17
17
-
 18
18
-
 19
19
-
 20
20
-
 21
21
-
 22
22
-
 23
23
-
 24
24
-
 25
25
-
 26
26
-
 27
27
-
 28
28
-
 29
29
-
 30
30
-
 31
31
-
 32
32
-
 33
33
-
 34
34
-
 35
35
-
 36
36


GE G9OAABSSPSS Le manuel du propriétaire
- Catégorie
- Grille-pain
- Taper
- Le manuel du propriétaire
- Ce manuel convient également à
dans d''autres langues
- English: GE G9OAABSSPSS Owner's manual
- español: GE G9OAABSSPSS El manual del propietario
Documents connexes
-
GE G9OAAASSPSS Digital Air Fry Toaster Oven Le manuel du propriétaire
-
GE G9OAAASSPSS Le manuel du propriétaire
-
-
-
Yes 1892723 Le manuel du propriétaire
-
GE Cafe Series CGY366SELSS Le manuel du propriétaire
-
-
GE ZGP304LRSS Le manuel du propriétaire
-
GE ZDP304NPSS Le manuel du propriétaire
-