
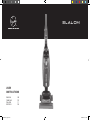
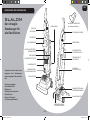
slalom
USER
INSTRUCTIONS
ENGLISH GB
FRANÇAIS FR
ITALIANO IT
DEUTSCH DE
®
Slalom IM_4 langs.indd 1 03/09/2008 17:43:45

- 3 -
Congratulations on the purchase of your
new Hoover Slalom.
This highly advanced machine - with new
Airvolution technology unique to Hoover -
makes cleaning easier and more efficient.
Please take the time to read this manual
carefully.
You’ll be ready to make the most of the
special features only the new Hoover
Slalom can offer!
This appliance is double insulated and must not
earthed.
The plug is fitted with a 13 amp fuse.
IMPORTANT:The wires in the mains lead are
coloured in accordance with the following
code:
Blue - NEUTRAL
Brown - LIVE
IMPORTANT SAFETY REMINDERS
WARNING!
ELECTRICITY CAN BE
EXTREMELY DANGEROUS
User manual - This cleaner should only be
used for its intended purpose as described in
these instructions. Ensure that these are fully
understood before operating this appliance.
Only use attachments recommended or
supplied by Hoover.
When using cleaning tools ensure that the
cleaner is kept in the upright (parked) position.
This will avoid possible damage to the carpet
or floor covering. When cleaning stairs DO
NOT position the cleaner above you.
STATIC ELECTRICITY. Some carpets can
cause a small build up of static electricity. Any
static discharge is not hazardous to health.
DO NOT use your cleaner out of doors, on
any wet surface or for wet pick up.
Keep hands, feet, loose clothing and hair
away from rotating brushes.
DO NOT pick up hard or sharp objects,
matches, hot ashes, cigarette ends or other
similar items.
DO NOT pick up flammable liquids such as
cleaning fluids, petrol etc. or their vapours.
Aerosol sprays may be flammable. DO NOT
spray near cleaner.
SUPPLY CORD. DO NOT run over the supply
cord when using your cleaner or remove the
plug by pulling on the supply cord.
FAULTS. DO NOT continue to use your
cleaner if it appears to be faulty. If the supply
cord is damaged stop using the cleaner
IMMEDIATELY. The supply cord must be
replaced by an authorised Hoover service
engineer to avoid a safety hazard.
AFTER USE. Switch the cleaner off and
remove the plug from the electricity supply.
Always switch off and remove the plug before
cleaning the appliance or attempting any
maintenance task.
Safety with children, elderly or the infirm:
Do not let children play with the appliance or
its controls. Please supervise the use of the
appliance by older children, the elderly or the
infirm.
HOOVER SERVICE. To ensure the continued
safe and efficient operation of this appliance
we recommend that any servicing or repairs
are only carried out by an authorised Hoover
service engineer.
GB
Slalom IM_4 langs.indd 3 03/09/2008 17:43:45

- 4 -
When first unpacking your
cleaner please check all items
are included:
Cleaner body
Removable Handle
Dusting Brush
Telescopic Crevice Tool
Pet Hair Remover Turbo Brush
Allergen Remover Turbo Brush*
(*certain models only)
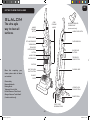
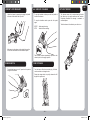
GETTING TO KNOW YOUR CLEANER
slalom
The ultra agile
way to clean all
surfaces.
HANDLE PARK CATCH
BIN RELEASE
BUTTONS
TELESCOPIC
CREVICE TOOL
FLEXIBLE HOSE
DUSTING BRUSH
START / STOP
BRUSHBAR PEDAL
POWER PEDAL
HANDLE
RELEASE
BUTTON
CORD
STORAGE
HOOKS
PET HAIR REMOVER
TURBO BRUSH
CARRY HANDLE
PRE MOTOR
FILTERS ACCESS
BUTTON
ONE TOUCH BIN
EMPTY BUTTON
EXHAUST
FILTER
UPRIGHT LOCK
RELEASE PEDAL
HANDLE PARK
DUST BIN
DUST BIN CLIPS
ALLERGEN REMOVER
TURBO BRUSH*
(certain models only)
GB
Slalom IM_4 langs.indd 4 03/09/2008 17:43:45

- 5 -
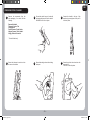
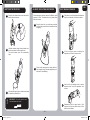
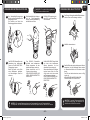
PREPARING YOUR CLEANER
Connect the stretch hose to the handle
by plugging the hose cuff into the back of
the handle until it clicks in place.
Remove the accessories from the
main packaging. You should nd the
following:
Removable Handle
Telescopic Crevice Tool
Dusting Brush
Pet Hair Remover Turbo Nozzle
Allergen Remover Turbo Nozzle*
Allergy Defender Granules*
* Certain Models only
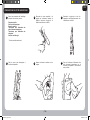
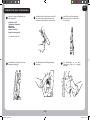
1
Secure the dusting brush onto the dusting
brush post.
4
Connect the handle to the top of the
machine by pressing down rmly until it
clicks into place.
2
Secure the pet hair turbo brush onto the
separator lid.
Push until it clicks into place.
5
Secure the telescopic crevice tool onto
the rear on the cleaner.
3
6
GB
Slalom IM_4 langs.indd 5 03/09/2008 17:43:46

- 6 -
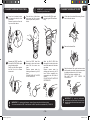
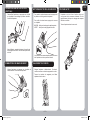
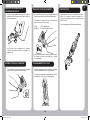
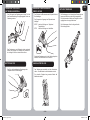
UPRIGHT LOCK RELEASE
Unlock the cleaner by pressing the upright lock pedal
at the rear of the cleaner with your foot.
After use return the cleaner to the upright lock position.
You will hear an audible click once locked in place.
ACTIVE STEERING
The cleaner comes with a unique steering function
that allows you to easily manoeuvre the machine.
Particularly benecial for cleaning in awkward or
conned spaces.
Twist the cleaner in the direction you wish to turn.
POWER SWITCH
ALL SURFACE CLEANING
To switch the cleaner on or off, press the foot pedal on
the right of the cleaner.
To start the brushbar rotation press the foot pedal on
the left of the cleaner.
To stop the brushbar rotation press the foot pedal
again.
START - Ideal carpet cleaning.
STOP - Ideal hard oor cleaning.
The brushbar rotation automatically stops when the
cleaner is put into the upright position.
CORD STORAGE
Turn the cleaner off and remove the plug. Wind the
cord around the cord storage hooks.
Rotate the storage hooks to quickly release the full
length of the power cord.
GB
Slalom IM_4 langs.indd 6 03/09/2008 17:43:47

- 7 -
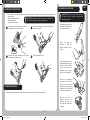
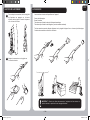
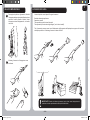
CLEANING TOOLS
!
IMPORTANT! When using cleaning tools, the cleaner must be kept in the upright position,
particularly when cleaning stairs.
The following accessories are available with the product:
Telescopic Crevice Tool
Dusting Brush
Pet Hair Remover Turbo Brush
Allergen Remover Turbo Brush* (certain models only)
All accessories can t directly onto the handle of the product or onto the telescopic crevice tool. Combine accessories
depending on use.
HANDLE RELEASE
1
2
To clean with accessories, release the handle
from the main body of the cleaner by pressing
the handle release button on the front of the
cleaner and pull upwards.
Fit accessories to the handle as desired.
GB
Slalom IM_4 langs.indd 7 03/09/2008 17:43:49

- 8 -
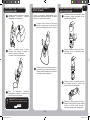
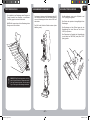
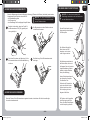
CLEANING THE STAIRS
HANDLE PARK
It is dangerous to place the cleaner above you when
cleaning stairs. Place the cleaner against the bottom
step.
ALWAYS work with the cleaner below you.
For more efcient storage, remove the handle from
the main body by pressing the handle release button
on the front of the product and pull upwards.
Park it on the side of the cleaner as shown in the
image below.
SUCTION REGULATOR
The suction regulator on the cleaner soleplate is
factory preset to “LOW”.
To obtain the best cleaning performance from your
cleaner:
Turn over your cleaner and rotate the suction regulator
to the ”HIGH” position using a coin.
To reduce the force to push your cleaner, rotate the
suction regulator to either the “MEDIUM” or “LOW”
position depending on your preference.
!
IMPORTANT! Extra care must be taken
when using the hose on the stairs. If the hose
becomes blocked it can exert a strong pull in
the direction of the cleaner.
GB
Slalom IM_4 langs.indd 8 03/09/2008 17:43:49

- 9 -
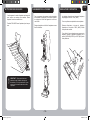
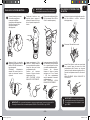
EMPTYING THE DUST BIN
DUST BIN MAINTENANCE
ALLERGY AND ASTHMA SUFFERERS
Hold the container using the carry handle over
the bin and press the bin empty button.
The dust container door will automatically
open.
Wrap the lower bin in a plastic bag and close
the bag tighty around the dust container before
emptying.
Once emptied, gently tap or shake the container
to release any excess dust.
Press the bin empty button to empty the dust
into the plastic bag. Close the bag quickly and
dispose of it immediately.
Lift the bin upper section containing the
separation unit from the lower section.
Press the bin release buttons and remove the
dustbin from the cleaner.
Reassemble the bin upper section. Push
clips back to fully close the bin then refit the
dustbin to the cleaner.
Use a cloth or the dusting brush to remove
excessive dust from the separation units
surface.
Place the bin on a flat surface and release the
clips from either side of the dust container.
When emptying any vacuum cleaner it is difcult to avoid
exposure to dust. To minimize this risk, please follow
these instructions:
1 1
1
2
2
2
3
3
4
!
IMPORTANT! Do not ll above the max
level mark shown on the bin.
GB
Slalom IM_4 langs.indd 9 03/09/2008 17:43:50

- 10 -
CLEANING THE PRE MOTOR FILTERS
Press the bin release buttons
and remove the dust bin from
the cleaner.
Remove the turbo tool from the
top cover of the cleaner.
1
Place the bin on a at surface
and press the lter access
button to open the top cover of
the bin.
2
Remove the BLUE lter pack
(containing the HEPA and foam
lter).
3
Separate the GREY foam lter
from the BLUE HEPA lter pack
using the tab provided.
Gently tap both lters against
the side of a bin to release
excess dust.
Wash the GREY foam lter
thoroughly under hand warm
water until the water runs
clean.
Remove excess water by
shaking and leave to dry for 24
hours.
DO NOT USE HOT WATER
OR DETERGENTS.
4
Wash the BLUE HEPA lter
thoroughly from the inside under
hand warm water until the water
runs clean.
Remove excess water by
shaking and leave to dry for 24
hours. When completely dry
reassemble and refit filters to
cleaner.
DO NOT USE HOT WATER OR
DETERGENTS.
65
!
IMPORTANT! For optimum performance,
always keep your lters clean.
!
IMPORTANT! For optimum performance, shake off excess dust from the lters regularly.
We recommend that the GREY foam lter and the BLUE hepa lter are washed every 3 MONTHS.
Lift the tab on the exhaust lter cover grille and
remove from the cleaner.
Wash the exhaust lter under hand warm water
until the water runs clean. Remove excess water
by shaking and leave to dry for 24 hours.
Refit filter only when completely dry.
DO NOT USE HOT WATER OR
DETERGENTS.
Remove the exhaust lter.
CLEANING THE EXHAUST FILTER
1
2
3
!
IMPORTANT! For optimum performance,
always keep your lters clean. We recommend
that the exhaust lter should be washed every
3 MONTHS.
GB
Slalom IM_4 langs.indd 10 03/09/2008 17:43:51

- 11 -
CHANGING THE AGITATOR
CHANGING THE BELT
If your cleaner is not picking up efciently, the belt or brushes (or both) may need replacing, but rst please make
sure you have:
• Emptied the dust container
• Cleaned the lters
• Checked for blockages
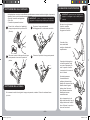
CLEARING A BLOCKAGE
IMPORTANT: Switch the cleaner off and remove
the plug from the electricity supply before
dismantling cleaner.
IMPORTANT: Switch the cleaner off and remove the plug from
the electricity supply before dismantling cleaner.
Firstly ensure that the brushbar pedal is in
the ‘ON’ position. (Pressed down)
Remove the seven brushbar cover screws
and remove the plastic cover.
Remove the brushbar from the housing and
replace if required.
Refit the brushbar cover.
If cleaning tools were in use
check the cleaning tool and
the removable handle.
Check the hose by
removing it from the
handle, stretching it to full
length.
Turn the cleaner over and
rotate the brushes until they
are free to rotate. If debris
can be seen under the
inspection cover, remove
the two screws indicated.
Check for a blockage in
the lower hose socket. To
remove the hose pull the
finger tab and pull the hose
upwards. Use a flexible rod
to remove any obstruction.
Open the pet hair or
allergen remover by
unlocking the clip. Lift
the cover and remove the
blockage.
1
2
3
4
Should the brushbar belt require changing please contact your local Hoover Service Office.
GB
Slalom IM_4 langs.indd 11 03/09/2008 17:43:52

- 12 -
GUARANTEE STATEMENT
The guarantee conditions for this appliance are as defined by our representative in
the country in which it is sold. Details regarding these conditions can be obtained
from the dealer from whom the appliance was purchased. The bill of sale or recipt
must be produced when making any claim under the terms of this guarantee.
Subject to change without notice.
Environment - WEEE Directive
This appliance is marked according to the European Directive 2002/96/EC on Waste
Electrical and Electronic Equipment (WEEE).
By ensuring this product is disposed of correctly you will help prevent potential negative
consequences for the environment and human health, which could otherwise be caused
by inappropriate waste handling of this product.
The symbol on the product indicates that this product may not be treated as houshold
waste. Instead it shall be handed over to the appliance collection point for recycling of
electrical and electronic equipment.
Disposal must be carried out in accordance with the local environmental regulations for
waste disposal.
For more detailed information about treatment, recovery and recycling of this product,
please contact your local city ofce, your household waste disposal service or the shop
where you purchased the product.
USE ONLY HOOVER SPARES
SPARE PARTS CODE
HEPA FILTER AND FOAM U48 - 35600834
EXHAUST FILTER T96 - 35600841
AGITATOR Y23 - 35600843
BELT V31 - 35600844
HOSE D103 - 35600842
PET HAIR REMOVER TURBO BRUSH J36 - 35600846
ALLERGEN REMOVER TURBO BRUSH J35 - 35600845
Hoover Service
Should you require service at any time, please contact your local Hoover
Service Ofce.
Hoover spares and Consumables
Always replace parts with genuine Hoover spares. These are available
from your local Hoover dealer or direct from Hoover.
When ordering parts always quote your model number.
GB
Slalom IM_4 langs.indd 12 03/09/2008 17:43:52

- 13 -
User checklist
If your cleaner is not working properly run through the
following checklist.
1. Is there a working electricity supply to the cleaner?
Check with another electrical product.
2. Is the dust bin full or choked with fine dust?
To empty the dust container see instructions on P9.
3. Is the hose blocked?
To clear a blockage see instructions on P11.
4. Is there a blockage in the cleaner base?
To clear a blockage, see the instruction on P11.
5. Are the filters blocked?
To clean filters, see the instruction on P10.
6. Are the brushes rotating correctly?
To check the brushes, see the instructions on p11.
7. Has the cleaner overheated? If so, it will take about 30
minutes to reset.
WARNING
A thermal cut out switches off the cleaner to prevent overheating
if it is used when full or there is a blockage or dirty filters. If
this should happen switch off, unplug and correct the fault.
It will take approximately 30minutes for the cut out to
automatically reset.
IMPORTANT
DO NOT RUN OVER THE POWER SUPPLY CORD
AS THIS COULD DAMAGE THE SUPPLY CORD
INSULATION.
GB
Slalom IM_4 langs.indd 13 03/09/2008 17:43:52

- 14 -
Félicitations pour l'achat de votre nouvel
appareil Hoover Slalom.
Cet appareil à la pointe de la technologie -
la nouvelle technologie Airvolution propre
à Hoover - rend le nettoyage plus facile et
plus efficace.
Veuillez pendre le temps de lire attentivement
ce manuel.
Vous pourrez alors profiter au maximum
des fonctions spéciales que le nouvel
Hoover Slalom peut vous offrir !
Cet appareil est doublement isolé et ne doit pas
être mis à la terre.
La prise est dotée d’un fusible de 13 A. (Unique
au R.U).
IMPORTANT : Les fils du cordon d’alimentation
sont colorés selon le code suivant :
Bleu - NEUTRE
Marron - PHASE
REMARQUES IMPORTANTES CONCERNANT LA SECURITE
ATTENTION !
L'ELECTRICITE PEUT ETRE
EXTREMEMENT DANGEREUSE
Manuel d'utilisation - Cet aspirateur doit être
utilisé uniquement pour son usage prévu
tel que décrit dans ces instructions. Ces
instructions doivent être bien comprises
avant d’utiliser cet appareil.
N'utilisez que les accessoires recommandés
ou fournis par Hoover.
Lors de l’utilisation des accessoires de
nettoyage, veillez à maintenir l’aspirateur
en position verticale ("stationnement"). Ceci
évitera d’endommager la moquette ou le
revêtement de sol. Lorsque vous nettoyez
des escaliers NE PLACEZ PAS l’aspirateur
plus haut que vous.
ELECTRICITE STATIQUE. Certains tapis/
moquettes peuvent produire une petite
accumulation d’électricité statique. Les
décharges d’électricité statique ne sont pas
dangereuses pour la santé.
N'UTILISEZ PAS l’aspirateur à l’extérieur,
sur des surfaces mouillées ou pour une
aspiration au mouillé.
N'approchez pas les pieds, les vêtements
amples et les cheveux des brosses rotatives.
N'UTILISEZ PAS l’aspirateur pour aspirer
des objets durs ou tranchants, des objets
en combustion tels qu’allumettes, cendres
chaudes, mégots de cigarettes ou autres.
N'utilisez PAS l'aspirateur pour aspirer des
liquides inflammables tels que
des fluides de nettoyage, de l'essence etc. ou
leurs vapeurs.
Les aérosols peuvent être inflammables. NE
vaporisez PAS près de l’aspirateur.
CORDON D'ALIMENTATION. NE faites PAS
rouler l’aspirateur sur le cordon lorsque vous
utilisez l’aspirateur et ne le débranchez pas
en tirant sur le cordon.
ANOMALIES DE FONCTIONNEMENT.
Cessez IMMEDIATEMENT d’utiliser votre
aspirateur s’il semble défectueux. Si le cordon
d'alimentation est endommagé, cessez
IMMEDIATEMENT d'utiliser l'aspirateur. Le
cordon d'alimentation doit être remplacé par
un technicien Hoover agréé pour éviter les
risques d'accident.
APRES UTILISATION. Eteignez l'aspirateur
et débranchez la prise de l'alimentation
secteur.
Eteignez et débranchez toujours l’aspirateur
avant de le nettoyer ou de procéder à son
entretien.
Sécurité des enfants, des personnes âgées et
i nf i r m e s : N e l a is s ez p a s l e s en f ant s jo u er a ve c
l’appareil ou avec ses commandes. Veuillez
superviser les enfants, personnes âgées ou
infirmes lorsqu’ils utilisent l’appareil.
SERVICE HOOVER. Pour assurer l’utilisation
sûre et efficace de cet appareil, nous
recommandons de n'en confier l’entretien et
les réparations qu'à un réparateur Hoover
agréé.
FR
Slalom IM_4 langs.indd 14 03/09/2008 17:43:52

- 15 -
Lorsque vous déballez votre
aspirateur neuf, vérifiez que tous
les éléments sont présents :
Corps de l’aspirateur
Poignée amovible
Brosse à meubles
Suceur plat télescopique
Turbobrosse pour élimination
des poils d'animaux
domestiques
Turbobrosse pour élimination
des allergènes*
(*certains modèles seulement)
VOTRE ASPIRATEUR
- 14 -
slalom
La solution ultra-agile
pour le nettoyage de
toutes les surfaces.
ATTACHE DE
RANGEMENT DE LA
POIGNEE
BOUTONS DE DETACHER
DU BAC
SUCEUR PLAT
TELESCOPIQUE
TUYAU
BROSSE A MEUBLES
PEDALE DE MARCHE/ARRET
DU BROSSE ROTATIVE
PEDALE DE MISE
SOUS/HORS
TENSION
BOUTON
D’EJECTION DE
LA POIGNEE
CROCHETS DE
RANGEMENT
DU CORDON
TURBOBROSSE POUR
ELIMINATION DES POILS
D'ANIMAUX DOMESTIQUES
POIGNEE DE
TRANSPORT
BOUTON D'ACCES AUX
FILTRES DE PROTECTION
DU MOTEUR
BOUTON DE VIDAGE
DU BAC A POUSSIERE
FILTRE DE SORTIE
D’AIR
PEDALE DE
DEVERROUILLAGE
DE LA POSITION
VERTICALE
POSITION ‘PARKING’
DE LA POIGNEE
BAC A POUSSIERE
CLIPS DU BAC
TURBOBROSSE POUR
ELIMINATION DES ALLERGENES*
(certains modèles seulement)
FR
Slalom IM_4 langs.indd 15 03/09/2008 17:43:53

- 16 -
PREPARATION DE VOTRE ASPIRATEUR
Raccordez le tuyau extensible à la
poignée en introduisant l'embout du
exible à l'arrière de la poignée : le
exible s'emboîte avec un déclic.
Sortez les accessoires de l'emballage
principal. Vous devriez y trouver :
Poignée amovible
Suceur plat télescopique
Brosse à meubles
Turbobrosse pour élimination des
poils d'animaux domestiques
Turbobrosse pour élimination des
allergènes*
Granules anti-allergie*
* Certains modèles seulement
1
Adaptez la brosse à meubles sur son
support.
4
Raccordez la poignée en haut de
l'appareil en l'enfonçant fermement : elle
s'emboîte avec un déclic.
2
Fixez la turbobrosse d'élimination des
poils d'animaux domestiques sur le
couvercle du séparateur : elle s'emboîte
avec un déclic.
5
Fixez le suceur plat télescopique à
l'arrière de l'aspirateur.
3
6
FR
Slalom IM_4 langs.indd 16 03/09/2008 17:43:53

- 17 -
DEVERROUILLAGE DE LA POSITION
VERTICALE
Déverrouillez l'aspirateur en appuyant avec le pied
sur la pédale de verrouillage en position verticale à
l'arrière de l'aspirateur.
Après l'utilisation, remettez l'aspirateur à la position de
verrouillage à la verticale : il se verrouille en place avec
un déclic.
PILOTAGE ACTIF
L'aspirateur est doté d'une fonction unique qui
vous permet de le manoeuvrer aisément. Ceci est
particulièrement utile pour le nettoyage des espaces
difciles ou connés.
Tournez l'aspirateur dans le sens voulu.
COMMUTATEUR DE MARCHE/ARRET
NETTOYAGE DE TOUTES LES SURFACES
Allumez l'aspirateur en appuyant sur la pédale de
marche/arrêt sur le côté droit de l'aspirateur.
Pour mettre le rouleau-brosse en marche, appuyez sur
la pédale sur le côté gauche de l'aspirateur.
Pour arrêter le rouleau-brosse, appuyez de nouveau
sur la pédale.
MARCHE - Idéal pour le nettoyage des tapis/moquettes.
ARRET - Idéal pour le nettoyage des sols durs.
Le rouleau-brosse cesse automatiquement de tourner
dès l'aspirateur est mis en position verticale.
RANGEMENT DU CORDON
Eteignez l'aspirateur et débranchez-le. Enroulez le
cordon autour des crochets de rangement du cordon.
Tournez les crochets de rangement pour libérer
rapidement tout le cordon.
FR
Slalom IM_4 langs.indd 17 03/09/2008 17:43:54

- 18 -
ACCESSOIRES
!
IMPORTANT ! Quand vous utilisez des accessoires, l'aspirateur doit être maintenu en
position verticale, en particulier lors du nettoyage d'escaliers.
Les accessoires suivants sont disponibles avec l'appareil :
Suceur plat télescopique
Brosse à meubles
Turbobrosse pour élimination des poils d'animaux domestiques
Turbobrosse pour élimination des allergènes* (certains modèles seulement)
Tous les accessoires peuvent s'adapter directement sur la poignée de l'appareil ou sur le suceur plat télescopique.
Combinez les accessoires en fonction de l'utilisation.
EJECTION DE LA POIGNEE
1
2
Pour nettoyer les accessoires, libérez la poignée
de l'aspirateur en appuyant sur le bouton
d'éjection de la poignée, à l'avant de l'aspirateur
et en la tirant vers le haut.
Adaptez les accessoires sur la poignée en
fonction des besoins.
FR
Slalom IM_4 langs.indd 18 03/09/2008 17:43:54

- 19 -
NETTOYAGE DES ESCALIERS
RANGEMENT DE LA POIGNEE
Il est dangereux de mettre l’aspirateur au-dessus de
vous lorsque vous nettoyez des escaliers. Placez
l'aspirateur contre la marche du bas.
Travaillez TOUJOURS avec l’aspirateur plus bas que
vous.
Pour un rangement plus compact, retirez la poignée
de l'aspirateur en appuyant sur le bouton d'éjection
de la poignée à l'avant de l'appareil et en la tirant
vers le haut.
Rangez la poignée sur le côté de l'aspirateur comme
illustré ci-dessous.
REGULATEUR D'ASPIRATION
Le régulateur d'aspiration sur la base de l'aspirateur
est préréglé en usine sur “LOW” (MINI).
Pour une performance optimale de votre aspirateur :
Retournez l'aspirateur et tournez le régulateur
d'aspiration sur la position ”HIGH” (MAXI) à l'aide
d'une pièce de monnaie.
Pour réduire la force nécessaire pour pousser votre
aspirateur, tournez le régulateur d'aspiration sur la
position “MEDIUM” (MOYEN) ou “LOW” (MINI) selon
votre préférence.
!
IMPORTANT ! Faites particulièrement
attention lors de l'utilisation du tuyau sur
les escaliers. Si le tuyau se bouche, il peut
exercer une forte traction dans le sens de
l'aspirateur.
FR
Slalom IM_4 langs.indd 19 03/09/2008 17:43:55

- 20 -
VIDAGE DU BAC A POUSSIERE
ENTRETIEN DU BAC A POUSSIERE
EN CAS D'ALLERGIE ET D'ASTHME
Tenez le bac a poussière par la poignée de
transport au-dessus de la poubelle et appuyez
sur le bouton de vidage du bac a poussiere.
La trappe du bac a poussière s'ouvre
automatiquement.
Enveloppez la partie inférieure du bac dans
un sac en plastique et fermez-le bien serré
autour du bac.
Une fois vide, tapotez ou secouez légèrement
le bac pour décoller la poussière accumulée.
Appuyez sur le bouton de vidage du bac a
poussiere pour vider son contenu dans le sac
en plastique. Fermez rapidement le sac et
mettez-le immédiatement à la poubelle.
Soulevez la partie supérieure du bac contenant
le séparateur de la partie inférieure.
Appuyez sur les boutons de déverrouillage du
bac et retirez le bac a poussière de l'aspirateur.
Remontez la partie supérieure du bac. Refermez
le bac complètement à l'aide des clips puis
reposez le bac à poussière sur l'aspirateur.
Placez le bac sur une surface plate et défaites
les clips de chaque côté du bac à poussière.
Il est difcile d'éviter l'exposition à la poussière lors du
vidage de n'importe quel aspirateur. Pour minimiser ce
risque, veuillez respecter ces consignes :
1 1
1
2
2
2
3
3
4
!
IMPORTANT ! Ne pas remplir au-delà du
repère maxi sur le bac.
Eliminez la poussière accumulée sur la surface
du séparateur à l'aide d'un chiffon ou d'une
brosse à poussière.
FR
Slalom IM_4 langs.indd 20 03/09/2008 17:43:55

- 21 -
NETTOYAGE DES FILTRES DE
PROTECTION DU MOTEUR
Appuyez sur les boutons de
détacher du bac et retirez le bac
à poussière de l'aspirateur.
Retirez la turbobrosse du
couvercle de l'aspirateur.
1
Placez le bac sur une surface
plate et appuyez sur le bouton
d'accès aux ltres pour ouvrir le
couvercle du bac.
2
Retirez le jeu de ltres BLEU
(contenant le ltre HEPA et en
mousse).
3
Séparez le ltre en mousse GRIS
du jeu de ltres HEPA BLEU à
l'aide de la languette pourvue.
Tapotez légèrement les deux
ltres contre le côté du bac pour
décoller la poussière accumulée.
Lavez le ltre en mousse GRIS
soigneusement à l'eau tiède
jusqu'à ce que l'eau qui s'en
écoule soit claire.
Eliminez l'excédent d'eau en le
secouant et laissez-le sécher
pendant 24 heures.
NE PAS UTILISER D’EAU
CHAUDE OU DE DETERGENTS.
4
Lavez le ltre HEPA BLEU
soigneusement à l'eau tiède de
l'intérieur jusqu'à ce que l'eau qui
s'en écoule soit claire.
Eliminez l'excédent d'eau en le
secouant et laissez-le sécher
pendant 24 heures. Une fois
complètement secs, remontez et
reposez les filtres sur l'aspirateur.
NE PAS UTILISER D’EAU
CHAUDE OU DE DETERGENTS.
65
!
IMPORTANT ! Pour une performance optimale,
maintenez toujours les ltres propres.
!
IMPORTANT ! Pour une performance optimale, secouez régulièrement les ltres pour les débarrasser de
la poussière. Nous conseillons de laver le ltre en mousse GRIS et le ltre HEPA BLEU tous les 3 MOIS.
Soulevez la languette sur la grille du ltre de
sortie d’air et retirez-la de l'aspirateur.
Lavez le ltre de sortie à l'eau tiède jusqu'à ce
que l'eau qui s'en écoule soit claire. Eliminez
l'excédent d'eau en le secouant et laissez-le
sécher pendant 24 heures.
Ne reposez le filtre sur l'aspirateur qu'une fois
complètement sec.
NE PAS UTILISER D’EAU CHAUDE OU DE
DETERGENTS.
Retirez le ltre de sortie d’air.
NETTOYAGE DU FILTRE DE
SORTIE D’AIR
1
2
3
!
IMPORTANT ! Pour une performance
optimale, maintenez toujours les filtres
propres. Nous conseillons de laver le filtre
de sortie tous les 3 MOIS.
FR
Slalom IM_4 langs.indd 21 03/09/2008 17:43:56
La page charge ...
La page charge ...
La page charge ...
La page charge ...
La page charge ...
La page charge ...
La page charge ...
La page charge ...
La page charge ...
La page charge ...
La page charge ...
La page charge ...
La page charge ...
La page charge ...
La page charge ...
La page charge ...
La page charge ...
La page charge ...
La page charge ...
La page charge ...
La page charge ...
La page charge ...
La page charge ...
La page charge ...
La page charge ...
La page charge ...
-
 1
1
-
 2
2
-
 3
3
-
 4
4
-
 5
5
-
 6
6
-
 7
7
-
 8
8
-
 9
9
-
 10
10
-
 11
11
-
 12
12
-
 13
13
-
 14
14
-
 15
15
-
 16
16
-
 17
17
-
 18
18
-
 19
19
-
 20
20
-
 21
21
-
 22
22
-
 23
23
-
 24
24
-
 25
25
-
 26
26
-
 27
27
-
 28
28
-
 29
29
-
 30
30
-
 31
31
-
 32
32
-
 33
33
-
 34
34
-
 35
35
-
 36
36
-
 37
37
-
 38
38
-
 39
39
-
 40
40
-
 41
41
-
 42
42
-
 43
43
-
 44
44
-
 45
45
-
 46
46


Hoover SL8123 Le manuel du propriétaire
- Taper
- Le manuel du propriétaire
- Ce manuel convient également à
dans d''autres langues
- italiano: Hoover SL8123 Manuale del proprietario
- English: Hoover SL8123 Owner's manual
- Deutsch: Hoover SL8123 Bedienungsanleitung
Documents connexes
-
Hoover TS70-TS20 THUNDER SPACETS70 TS21 THUNDER SPACETS70 TS3 THUNDER SPACE Manuel utilisateur
-
-
-
-
-
-
Hoover Octopus Le manuel du propriétaire
-
-
-