
59530N Rev A 06/15
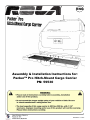
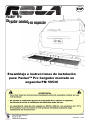
Assembly & Installation Instructions for:
Packer™ Pro Hitch-Mount Cargo Carrier
PN: 59530
TM
ENG

Packer™ Pro Hitch-Mount Cargo Carrier
Product Code: 59530
59530N Rev A 06/15
A
B
C
D
E
F
G
H
I
J
K
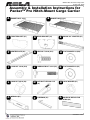
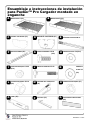
BASKET HALF B (X1)
FRONT BRACKET (X1)
REAR BRACKET (X1)
SHANK & 2” ADAPTER (X1)
CENTER PLATE (X1)
HEX BOLT 1/4-20 (X12)
FLAT WASHER 1/4 (X24)
LOCK NUT 1/4-20 (X12)
CARRIAGE BOLT 3/8-16 (X2)
FLAT WASHER 3/8 (X2)
Assembly & Installation Instructions for
Packer™ Pro Hitch-Mount Cargo Carrier
L
M
N
LOCK NUT 3/8-16 (X2)
O
P
Q
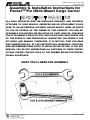
WRENCH (X1)
L-WRENCH (X1)
BASKET HALF A (X1)
ANTI-RATTLE PIN & CLIP
(X1)
LOCK WASHER (X1)
ADHESIVE REFLECTOR
STRIP (X2)

Packer™ Pro Hitch-Mount Cargo Carrier
Product Code: 59530
59530N Rev A 06/15
Assembly & Installation Instructions for
Packer™ Pro Hitch-Mount Cargo Carrier
ALL ROLA PRODUCTS MUST BE INSTALLED PROPERLY AND SECURELY
ATTACHED TO YOUR VEHICLE. IMPROPER USE OR ATTACHMENT COULD
LEAD TO AN AUTOMOBILE ACCIDENT AND/OR BODILY HARM OR DEATH
TO YOU OR OTHERS. AS THE OWNER OF THIS PRODUCT, YOU ARE RE-
SPONSIBLE FOR PROPER INSTALLATION TO YOUR VEHICLE, CHECKING
THE ATTACHMENTS PRIOR TO USE, PRACTICING SAFE AND PROPER USE
OF THE PRODUCT, AND PERIODICALLY INSPECTING THE PRODUCT FOR
FIT, WEAR, AND DAMAGE. THEREFORE, IT IS CRITICAL THAT YOU READ
AND UNDERSTAND ALL OF THE INSTRUCTIONS, WARNINGS, CAUTIONS,
AND RECOMMENDATIONS PRIOR TO INSTALLATION OR USE. IF FOR ANY
REASON, YOU DO NOT UNDERSTAND ALL PORTIONS OF THESE INSTRU-
CITONS, PLEASE CONTACT ROLA AT THE NUMBER BELOW FOR PROFES-
SIONAL ASSISTANCE.
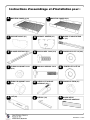
WHAT YOU’LL NEED FOR ASSEMBLY

Packer™ Pro Hitch-Mount Cargo Carrier
Product Code: 59530
59530N Rev A 06/15
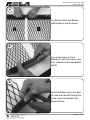
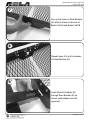
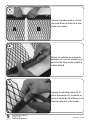
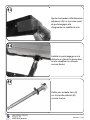
3
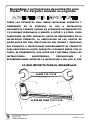
Lay Basket Half A and Basket
Half B side-by-side as shown
B
A
2
Line up the holes on Front
Bracket (C) with the holes on the
front of Basket Half A and Basket
Half B.
1
Add Flat Washer (H) to Hex Bolt
(G) and feed the bolt through the
holes in the front bracket and
Basket Halves.

Packer™ Pro Hitch-Mount Cargo Carrier
Product Code: 59530
59530N Rev A 06/15
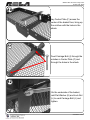
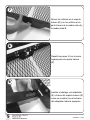
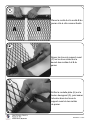
6
Add a second Washer (H) and a
Lock Nut ( I ).
5
Tighten the Hex Bolt and Lock Nut
until snug.
4
Repeat steps 3-5 in all six places
for Front Bracket (C).
1
2
3
4
5
6
5

Packer™ Pro Hitch-Mount Cargo Carrier
Product Code: 59530
59530N Rev A 06/15
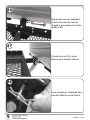
9
7
Insert Shank & Adapter (E)
through Rear Bracket (D) as
shown (with adapter end still
exposed).
Line up the holes on Rear Bracket
(D) with the holes on the rear of
Basket Half A and Basket Half B.
8
Repeat steps 3-6 in all six places
for Rear Bracket (D).
1
2
3
4
5
6

Packer™ Pro Hitch-Mount Cargo Carrier
Product Code: 59530
59530N Rev A 06/15
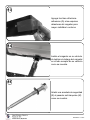
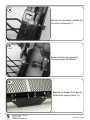
On the underside of the basket,
add Flat Washer (K) and Lock Nut
(L) to each Carriage Bolt (J) and
tighten.
Lay Center Plate (F) across the
center of the basket floor, lining up
the notches with the holes in the
shank.
Feed Carriage Bolt (J) through the
notches in Center Plate (F) and
through the holes in the shank.
10
11
12

Packer™ Pro Hitch-Mount Cargo Carrier
Product Code: 59530
59530N Rev A 06/15
Add Lock Washer (N) to Anti-
Rattle Pin (M) as shown.
13
14
15
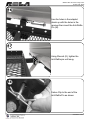
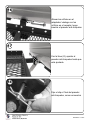
Add the Adhesive Reflector Strips
(Q) to the front corners of the
cargo carrier for increased
nighttime visibility.
Install the Cargo Carrier on your
vehicle by sliding the Shank of the
carrier into the receiver tube on
your vehicle as shown.

Packer™ Pro Hitch-Mount Cargo Carrier
Product Code: 59530
59530N Rev A 06/15
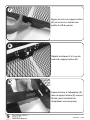
Fasten Clip to the end of the
Anti-Rattle Pin as shown.
Using Wrench (O), tighten the
Anti-Rattle pin until snug.
16
17
18
Line the holes in the adapter/
shank up with the holes in the
receiver then insert the Anti-Rattle
Pin (M).

Packer™ Pro Hitch-Mount Cargo Carrier
Product Code: 59530
59530N Rev A 06/15
19
USING WITH
1-1/4” RECEIVER?
Using L-Wrench (M), remove the
screw on the side of the Adapter,
then remove the adapter from the
shank.
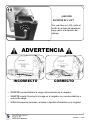
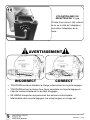
WARNING
INCORRECT
CORRECT
ALWAYS center/distribute load evenly in cargo carrier.
ALWAYS securely fasten load to cargo carrier using bungees or a cargo net.
NEVER transport people, animals, or flammable liquids in cargo carrier.

Packer™ Pro Hitch-Mount Cargo Carrier
Product Code: 59530
59530N Rev A 06/15
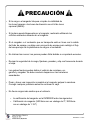
CAUTION
.
If the load or cargo carrier blocks or impairs visibility of the taillights
or turn signals, use optional light kit (part #6504).
If license plate is blocked by load or cargo carrier, relocate using existing holes
located on the carrier.
If the cargo carrier or the contents being transported is in line with the exhaust
outlet, an exhaust tip must be used to redirect the exhaust flow away from the
cargo platform or contents.
Do not lubricate threads. Bolt failure may occur due to over tightening.
Check security of load, fasteners, pin, and clip often during travel.
Severe bumps can damage your towing vehicle, hitch, and cargo carrier.
Drive slowly on rough roads.
Stop and make a thorough inspection if your cargo carrier strikes the road.
Correct any problems before resuming travel.
Do not carry loads wider than your vehicle.
The cargo carrier load rating is the LOWEST of the following:
• Cargo carrier rating (500 lb with 2” Shank; 300 lb with 1-1/4” Shank)
• Hitch tongue weight rating
• Vehicle manufacturer tongue weight rating

Packer™ Pro Hitch-Mount Cargo Carrier
Product Code: 59530
59530N Rev A 06/15
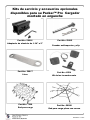
Service Kits & Optional Accessories
Available for your
Packer™ Pro Hitch-Mount Cargo Carrier
Part No.: 59916
Aluminum 1-1/4” to 2” Adapter
Part No.: 59915
Anti-Rattle Pin & Clip
Part No.: 59917
Wrench
Part No.: 6504
Incandescent Light Kit
Part No.: 7330
Cargo Net
Part No.: 59200
Flat Strap Cargo Net

59530N Rev A 06/15
Ensamblaje e instrucciones de instalación
para: Packer™ Pro Cargador montado en
enganche PN: 59530
TM
ESP
Packer
Pro
Cargador montado en enganche

59530N Rev A 06/15
A
B
C
D
E
F
G
H
I
J
K
MEDIA CESTA B (X1)
SOPORTE DELANTERO (X1)
SOPORTE POSTERIOR (X1)
VÁSTAGO Y ADAPTADOR DE
PLACA DE CENTRO (X1)
PERNO HEXAGONAL 1/4-20
(X12)
ARANDELA PLANA 1/4 (X24)
TUERCA DE BLOQUEO 1/4-20
(X12)
PERNO DE CARRUAJE 3/8-16
ARANDELA
PLANA 3/8
(X2)
Ensamblaje e instrucciones de instalación
para Packer™ Pro Cargador montado en
enganche
L
M
N
TUERCA DE BLOQUEO 3/8-16
(X2)
O
P
Q
LLAVE (X1)
LLAVE EN L (X1)
MEDIA CESTA A (X1)
PASADOR ANTI-TRAQUETEO
(X1)
ARANDELA DE BLOQUEO (X1)
TIRA ADHESIVA REFLECTORA
(X2)

59530N Rev A 06/15
Ensamblaje e instrucciones de instalación para
Packer™ Pro Cargador montado en enganche
TODOS LOS PRODUCTOS ROLA DEBEN INSTALARSE CORRECTA Y
FIRMEMENTE EN EL VEHÍCULO. EL USO O INSTALACIÓN
INCORRECTOS PODRÍAN CAUSAR UN ACCIDENTE AUTOMOVILÍSTICO
Y/O LESIONES PERSONALES O MUERTE A USTED O A OTROS. COMO
PROPIETARIO DE ESTE PRODUCTO, USTED ES RESPONSABLE DE LA
INSTALACIÓN CORRECTA, LA VERIFICACIÓN DE LOS PUNTOS DE
UNIÓN ANTES DEL USO, PRACTICAR UN USO SEGURO Y ADECUADO
DEL PRODUCTO E INSPECCIONAR PERIÓDICAMENTE EL PRODUCTO
PARA VERIFICAR SU AJUSTE, DESGASTE Y POSIBLES DAÑOS. POR LO
TANTO, ES FUNDAMENTAL QUE USTED LEA Y ENTIENDA TODAS LAS
INSTRUCCIONES, ADVERTENCIAS, PRECAUCIONES Y
RECOMENDACIONES ANTES DE LA INSTALACIÓN O DEL USO. SI POR
LO QUE NECESITA PARA EL ENSAMBLAJE
LLAVE 7/16 Y 9/16
LLAVE DE TUBO 7/16 Y 9/16

59530N Rev A 06/15
3
Colocar la media cesta A y la me-
dia cesta B una al lado de la otra,
como se muestra.
B
A
2
Alinear los orificios en el soporte
delantero (C) con los orificios en la
parte frontal de la media cesta A y
media cesta B.
1
Agregar la arandela plana (H) al
perno hexagonal (G) e insertar el
perno a través de los orificios en el
soporte delantero y las medias

59530N Rev A 06/15
6
Agregar una segunda arandela (H)
y una tuerca de seguridad (I).
5
Apretar el perno hexagonal y la
tuerca de seguridad hasta que
estén firmes.
4
Repetir los pasos 3-5 en los seis
lugares para el soporte delantero
(C).
1
2
3
4
5
6
5

59530N Rev A 06/15
9
7
Insertar el vástago y el adaptador
(E) a través del soporte trasero (D)
como se muestra (con el extremo
del adaptador todavía expuesto).
Alinear los orificios en el soporte
trasero (D) con los orificios en la
parte trasera de la media cesta A y
la media cesta B.
8
Repetir los pasos 3-6 en los seis
lugares para el soporte trasero
(D).
1
2
3
4
5
6

59530N Rev A 06/15
En la parte inferior de la cesta,
agregar una arandela plana (K) y
tuerca de seguridad (L) a cada
perno de carruaje (J) y apretar.
Colocar la placa del centro (F) a
través del centro del piso de la
cesta, alineando las muescas con
los orificios en el vástago .
Insertar el perno de carruaje (J) a
través de las muescas en la placa
del centro (F) y a través de los ori-
ficios en el vástago.
10
11
12

59530N Rev A 06/15
Añadir una arandela de seguridad
(N) al pasador anti-traqueteo (M)
como se muestra.
13
14
15
Agregar las tiras reflectoras
adhesivas (Q) a las esquinas
delanteras del cargador para
mayor visibilidad nocturna.
Instale el cargador en su vehículo
al deslizar el vástago del cargador
en el tubo receptor de su vehículo
como se muestra.
La page charge ...
La page charge ...
La page charge ...
La page charge ...
La page charge ...
La page charge ...
La page charge ...
La page charge ...
La page charge ...
La page charge ...
La page charge ...
La page charge ...
La page charge ...
La page charge ...
La page charge ...
La page charge ...
-
 1
1
-
 2
2
-
 3
3
-
 4
4
-
 5
5
-
 6
6
-
 7
7
-
 8
8
-
 9
9
-
 10
10
-
 11
11
-
 12
12
-
 13
13
-
 14
14
-
 15
15
-
 16
16
-
 17
17
-
 18
18
-
 19
19
-
 20
20
-
 21
21
-
 22
22
-
 23
23
-
 24
24
-
 25
25
-
 26
26
-
 27
27
-
 28
28
-
 29
29
-
 30
30
-
 31
31
-
 32
32
-
 33
33
-
 34
34
-
 35
35
-
 36
36


dans d''autres langues
- English: Rola 59530† Installation guide
- español: Rola 59530† Guía de instalación


