
EN Vacuum cleaner User manual
RU Пылесос Руководство пользователя
FR Aspirateur Mode d’emploi
AR
HE
Li-21 (10,8V & 10,8V+)
Li-30 (14,4V & 14,4V+)
Li-35 (18V)

22
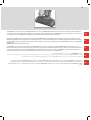
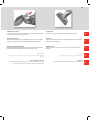
Thank you for choosing an Electrolux ERGORAPIDO™
vacuum cleaner. ERGORAPIDO™ is a cordless stick
vacuum cleaner intended for indoor use on light dry
household dust and debris. In order to ensure the best
results, always use original Electrolux accessories and
spare parts. They have been designed especially for your
vacuum cleaner.
English ........................................................................ 2
BEFORE STARTING
• Check that the package includes all parts described in
this ERGORAPIDO™ instruction manual.
• Read this instruction manual carefully.
• Pay special attention to the safety precautions chapter.
TABLE OF CONTENTS
Safety precautions .......................................3
Unpacking and charging ................................11
Cleaning the lters and dust container ..................16
Cleaning brush roll, wheels and hose ....................19
Consumer information ..................................25
Enjoy your Electrolux ERGORAPIDO™!
Français ....................................................................... 2
AVANT LA PREMIÈRE UTILISATION
• Vériez que tous les éléments décrits dans ce manuel
d’utilisation ERGORAPIDO® sont bien présents dans
l’emballage.
• Lisez attentivement ce manuel d’utilisation.
• Prêtez tout particulièrement attention au chapitre «
Consignes de sécurité ».
TABLE DES MATIÈRES
Consignes de sécurité .....................................5
Assemblage et mise en charge ...........................11
Nettoyage des ltres et du bac à poussière ...............16
Nettoyage de la brosse rotative, des roulettes et du tuyau
d’aspiration .............................................19
Informations destinées au client .........................25
En suivant ces instructions, vous apprécierez pleinement
la performance d’ERGORAPIDO!
Merci d’avoir choisi un aspirateur Electrolux
ERGORAPIDO™.
ERGORAPIDO™est un aspirateur rechargeable balai et à
main sans l conçu pour se débarrasser des poussières
domestiques sèches. An d’obtenir des performances
optimales, nous vous conseillons de toujours utiliser des
accessoires et pièces de rechange Electrolux. Ils ont été
spécialement conçus pour votre aspirateur.
. Electrolux ERGORAPIDO™
ERGORAPIDO™
.
. .Electrolux
Arabic. .......................................................................... 2
2
Electrolux
Electrolux
•
• . ERGORAPIDO™
• .
•.
6 ...............................................................................
14 ..................................................................
14 ...................................................................
14 ...............................................
25 .............................................................................
Electrolux ERGORAPIDO™ !
7 . . . . . . . . . . . . . . . . . . . . . . . . . . . . . .תוחיטב תוארוה
11 . . . . . . . . . . . . . . . . . . . . .הניעטו הזיראה ירמוח תרסה
16. . . . . . . . . . . . . . . . . קבאה ףוסיא לכימו םיננסמה יוקינ
19. . . . שימגה רוניצהו םילגלגה ,תבבותסמה תשרבמה יוקינ
26 . . . . . . . . . . . . . . . . . . . . . . . . . . . . . . . .ןכרצל עדימ
ERGORAPIDO™
!Electrolux
Pусский ....................................................................... 2
Благодарим Вас за выбор пылесоса Electrolux
ERGORAPIDO™! ERGORAPIDO™ – это беспроводный
пылесос в виде щетки, который предназначен
для сухой уборки мелких бытовых загрязнений.
Для достижения наилучших результатов всегда
используйте оригинальные дополнительные
принадлежности и запасные части Electrolux. Они
были специально разработаны для Вашего пылесоса.
ПЕРЕД ПЕРВЫМ ИСПОЛЬЗОВАНИЕМ
• Убедитесь, что в коробке содержится полный набор
частей, описанных в инструкции по эксплуатации к
пылесосу ERGORAPIDO™.
• Внимательно прочитайте настоящее руководство.
• Уделите особое внимание главе, описывающей меры
предосторожности.
СОДЕРЖАНИЕ
Меры предосторожности .............................4
Распаковка и зарядка ..................................11
Очистка фильтров и пылесборника .................16
Очистка щеточного валика, колес и шланга ........19
Сведения для потребителя ...........................25
Надеемся, что пылесос Electrolux ERGORAPIDO™
понравится Вам и хорошо Вам послужит!

3
eng
rus
fra
arb
heb
This appliance can be used by children aged from 8
years and above and persons with reduced physical,
sensory or mental capabilities or lack of experience
and knowledge if they have been given supervision
or instruction concerning use of the appliance in a
safe way and understand the hazards involved.
ERGORAPIDO™ should only be used for normal
vacuuming indoors and in a domestic enviroment.
Make sure the vacuum cleaner is stored in a dry
place.
All service or repairs must be carried out by an
authorized Electrolux service centre.
Unplug the ERGORAPIDO™ from the charger before
cleaning or maintaining your ERGORAPIDO™.
Children should be supervised to ensure that they do
not play with the appliance.
Packaging material, e.g. plastic bags should not be
accessible to children to avoid suocation.
Each vacuum cleaner is designed for a specic
voltage. Check that your supply voltage is the same
as that stated on the rating plate on the charging
adaptor.
Use only the original charging adaptor designed for
ERGORAPIDO™.
Safety precautions
Never use the vacuum cleaner:
• In wet areas.
• Close to ammable gases, etc.
• When the product shows visible signs of damage.
• On sharp objects or uids.
• On hot or cold cinders, lighted cigarette butts, etc.
• On ne dust, for instance from plaster, concrete,
our, hot or cold ashes.
• Do not leave the vacuum cleaner in direct sunlight.
• Avoid exposing the vacuum cleaner to strong heat.
• The battery cells within must not be dismantled,
short circuited, placed against a metal surface.
• Never use the vacuum cleaner without its lters.
• Do not try to touch the brush roll while the cleaner
is switched on and the brush roll is turning.
Using the vacuum cleaner in the above
circumstances may cause serious personal injury or
damage to the product. Such injury or damage is not
covered by the warranty or by Electrolux.
This warranty does not cover reduction in battery
runtime due to battery age or use, as the life of the
battery depends upon the amount and nature of use.

44
Данный прибор может эксплуатироваться
детьми старше 8 лет и лицами с ограниченными
физическими, сенсорными или умственными
способностями и с недостаточным опытом
или знаниями только после получения
соответствующих инструкций, позволяющих
им безопасно эксплуатировать электроприбор
и дающих им представление об опасности,
сопряженной с его эксплуатацией.
• Пылесос ERGORAPIDO™ должен
эксплуатироваться только в целях обычной
уборки внутри помещений в бытовых условиях.
• Храните пылесос в сухом месте.
• Все работы по обслуживанию и ремонту должны
производиться в уполномоченном сервисном
центре Electrolux.
• Перед очисткой или обслуживанием пылесоса
ERGORAPIDO™ выньте вилку зарядного адаптера
из розетки.
• Необходимо присматривать за детьми и не
разрешать им играть с прибором.
• Упаковочный материал, например,
полиэтиленовые пакеты, следует хранить
в недосягаемом для детей месте для
предотвращения риска смерти от удушья.
• Каждый пылесос рассчитан на определенное
напряжение питания. Убедитесь, что напряжение
в Вашей электросети соответствует напряжению,
указанному на зарядном адаптере.
• Используйте только фирменный зарядный
адаптер, предназначенный для пылесоса
ERGORAPIDO™.
Ни в коем случае не используйте пылесос:
• На влажных поверхностях.
• В непосредственной близости от горючих газов
и т.д.
• При явных признаках повреждения корпуса.
• Для уборки острых предметов или жидкостей.
• Для уборки горячего или холодного угольного
мусора, непогашенных окурков и т.д.
• Для уборки тонкой пыли, например, штукатурки,
бетона, муки, горячей или холодной золы.
• Не оставляйте пылесос там, где на него будет
падать прямой солнечный свет.
• Не подвергайте пылесос сильному нагреву.
• Запрещается разбирать или закорачивать
аккумуляторные элементы, придвигать их
вплотную к металлической или облицованной
металлом поверхности.
• Ни в коем случае не эксплуатируйте пылесос без
фильтров.
• Не касайтесь щеточного валика, когда пылесос
включен и щеточный валик вращается.
Эксплуатация пылесоса в описанных выше
условиях может привести к серьезным травмам
или повреждениям изделия. На подобные
повреждения травмы и повреждения гарантия
Electrolux не распространяется.
Данная гарантия не покрывает уменьшения
времени работы от батареи, которое может
иметь место в ходе старения или в процессе
эксплуатации, поскольку срок службы батареи
зависит от степени и условий эксплуатации.
Меры предосторожности

55
eng
rus
fra
arb
heb
Cet appareil peut être utilisé par des enfants de plus
de 8 ans, ainsi que des personnes dont les capacités
physiques, sensorielles et mentales sont réduites ou
dont les connaissances et l’expérience sont
insusantes, à condition d’être surveillés ou d’avoir
reçu des instructions concernant l’utilisation sécurisée
de l’appareil et de comprendre les risques encourus.
ERGORAPIDO™ est un aspirateur exclusivement
destiné au nettoyage de l’intérieur de la maison.
Assurez-vous que l’aspirateur est rangé dans un
endroit sec.
• Débranchez l’ERGORAPIDO™ du chargeur avant de
nettoyer ou entretenir votre ERGORAPIDO™.
• Ne laissez pas les enfants jouer avec l’appareil.
• Tenez les emballages, notamment les sacs en
plastique, hors de portée des enfants an d’éviter
tout risque d’étouement.
• Chaque aspirateur est conçu pour une tension
électrique spécique. Vériez que la tension
d’alimentation est la même que celle indiquée sur
la plaque signalétique du chargeur.
• Utilisez uniquement le chargeur d’origine conçu
pour ce modèle.
N’utilisez jamais l’aspirateur :
• Dans un environnement humide.
• À proximité de gaz inammables, etc.
• Lorsque le corps de l’aspirateur est visiblement
endommagé.
• Sur des objets pointus, tranchants ou des liquides.
Sur des cendres chaudes ou froides, des mégots de
cigarettes incandescents, etc.
• Sur de la poussière très ne provenant par
exemple de plâtre, de béton, de farine ou de
cendres chaudes ou froides.
• Ne laissez jamais l’aspirateur en plein soleil.
• Évitez d’exposer l’aspirateur ou la batterie à une
forte chaleur.
• La batterie et les éléments de la batterie ne
doivent pas être démontés, court-circuités ni
placés contre une surface métallique.
• N’utilisez jamais l’aspirateur sans ses ltres.
• Ne touchez jamais à la brosse rotative si
l’aspirateur fonctionne et que la brosse rotative
tourne.
L’utilisation de l’aspirateur dans les circonstances
décrites ci-dessus peut sérieusement endommager
l’appareil ou provoquer de graves blessures
physiques. De tels dommages ou blessures ne sont
pas couverts par la garantie ni par Electrolux.
La garantie ne couvre pas la perte d’autonomie de la
batterie liée à son âge et/ou à son utilisation.
Consignes de sécurité

66
8
.
.
ERGORAPIDO™
.
.
Electrolux
.
. ERGORAPIDO™
.
.
.
.
.ERGORAPIDO™
:
.
.
.
.
.
)(
.
.
.
.
.
.
Electrolux .
.
.

77
eng
rus
fra
arb
heb
8
Electrolux
Electrolux

8
./ .1
/ .2
/ .3
.4
.5
.6
.7
.8
.9
. .10
) ( .11
) ( .12
.13
*Lithium .14
.15
* .16
* .17
* .18
* .19
.20
*BRUSHROLLCLEAN™ .21
* .22
*NiMH .23
.24
.25
*
1.
2.
11.
4.
12.
21.
16.
17.
9.
10.
8.
15.
3.
5.
7.
14.
23.
20.
24.
25.
19.
18.
6.
13.
22.

99
eng
rus
fra
arb
heb
./ .1
/ .2
/ .3
.4
.5
.6
.7
.8
.9
. .10
) ( .11
) ( .12
.13
*Lithium .14
.15
* .16
* .17
* .18
* .19
.20
*BRUSHROLLCLEAN™ .21
* .22
*NiMH .23
.24
.25
*
ОПИС ERGORAPIDO™
1. Кнопка увімкнення/вимкнення
2. Кнопка збільшення/зменшення потужності
3. Кнопка увімкнення/вимкнення ручного модуля
4. Рукоятка
5. Основний модуль
6. Стопорний гвинт
7. Кнопка розблокування ручного модуля
8. Зарядна станція, стінний блок
9. Зарядна станція, підлоговий блок
10. Адаптер
11. Фільтр тонкого очищення (внутрішній фільтр)
12. Фільтр попереднього очищення (зовнішній фільтр)
13. Кнопка розблокування контейнера для пилу
14. Дисплей акумулятора (літієва версія)*
15. Контейнер для пилу
16. Щітка*
17. Щілинна насадка*
18. Кнопка розблокування щіткового валика*
19. Кришка люка для щіткового валика*
20. Щітковий валик
21. Кнопка функції BRUSHROLLCLEAN™*
22. Передні світлові індикатори насадки*
23. Індикатор заряджання (нікель-металогідридна
версія)*
24. Прогумована ручка
25. Альтернативне кріплення для щілинної насадки та
щітки
* Не всі моделі
2
3
4
5
6
7
8
9
*
22
23
24
25
DESCRIPTION D’ERGORAPIDO™
1. Touche Marche/Arrêt
2. Touche de régulation de puissance Plus/ Moins
3. Touche Marche/Arrêt de l’aspirateur à main
4. Poignée
5. Corps de l’appareil
6. Vis de blocage
7. Bouton de déverrouillage de l’aspirateur à main
8. Support de charge mural
9. Support de charge posable
10. Chargeur
11. Filtre n (ltre intérieur)
12. Préltre (ltre extérieur)
13. Bouton de déverrouillage du bac à poussière
14. Achage de la batterie pour la version au lithium*
15. Bac à poussière
16. Brosse meubles*
17. Suceur plat*
18. Touche de déverrouillage de la brosse rotative*
19. Cache de la brosse rotative*
20. Brosse rotative
21. Pédale fonction BRUSHROLLCLEAN™*
22. Eclairage frontal*
23. Témoin de charge, version NiMH*
24. Butée cahoutchoutée
25. Crochet de support pour les accessoires : suceur plat –
brosse meubles
* Selon les modèles
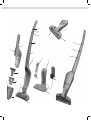
DESCRIPTION OF ERGORAPIDO™
1. On/o button
2. Power Up/Down button
3. On/o button, hand unit
4. Handle
5. Main body
6. Locking screw
7. Release button, hand unit
8. Charging station, wall unit
9. Charging station, oor unit
10. Adapter
11. Fine lter (inner lter)
12. Pre lter (outer lter)
13. Release button, dust container
14. Battery display, Lithium version*
15. Dust container
16. Brush*
17. Crevice nozzle*
18. Brush roll release button*
19. Hatch cover for brush roll*
20. Brush roll
21. BRUSHROLLCLEAN™ TECHNOLOGY button*
22. Nozzle front lights*
23. Charging indicator, NiMH version*
24. Cli hanger
25. Alternative placement for crevice and brush
* Certain models only

1010

1111
eng
rus
fra
arb
heb
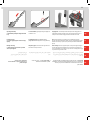
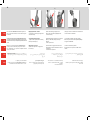
Unpacking and assembly
1. Fit the handle by carefully inserting it into the main
body.
Charging station 1. Insert the adaptor into the mains and position the charging station on a
stable and horizontal surface away from heat sources, direct sunlight or wet places. There is a
hollow space in the bottom of the charging station where unused cable can be wound.
2. Secure the handle by tightening the locking screw supplied. Use
a screwdriver or a coin.
Déballage et montage
1. Installez la poignée en l'insérant avec précaution
dans le corps de l'appareil.
2. Bloquez la poignée en serrant la vis de blocage fournie à l’aide
d’un tournevis ou d’une pièce de monnaie.
Station de charge 1. Insérez le chargeur dans la prise secteur et placez le support de charge sur
une surface stable horizontale en l'éloignant de toute source de chaleur, des rayons directs du
soleil et des lieux humides. 2. Vous trouverez un espace vide sous le socle du support de charge qui
vous permettra de ranger l’excédent de câble.
. .2
.
.1
.
.
. .1
1
2
Распаковка и сборка
1. Установите ручку, аккуратно вставив ее в корпус
прибора.
2. Зафиксируйте ручку, затянув идущий в комплекте
фиксирующий винт. Используйте для этого отвертку или монету.
База 1. Вставьте адаптер в сеть и установите базу на устойчивую горизонтальную
поверхность вдали от источников тепла, прямого солнечного света или влаги. В основании
базы имеется незанятое пространство, в котором можно разместить смотанный избыток
провода.

1212
В модели ERGORAPIDO™ 14,4 V , 18 V число горящих светодиодов отражает уровень заряда. 3 горящих
светодиода = полный заряд. В случае полного разряда ERGORAPIDO™ ему требуется приблизительно: 16 час.
Для оптимальной работы аккумуляторной батареи держите пылесос ERGORAPIDO™ на базе все время, когда
он не используется.
Зарядка ERGORAPIDO™
При установке пылесоса ERGORAPIDO™ на базу загорается оранжевых индикатор заряда. Когда пылесос
ERGORAPIDO™ полностью заряжен, индикатор зарядки медленно мигает с частотой один раз в минуту.
Sur l'ERGORAPIDO™14,4V , 18V, le nombre de voyants allumés indique le niveau de charge. 3 voyants = batterie complètement
chargée. Si l'ERGORAPIDO™ est complètement déchargé, il faudra environ 4 heures pour que la batterie soit complètement chargée.
Pour obtenir des performances optimales de la batterie, laissez toujours l'ERGORAPIDO™en charge lorsque vous ne l'utilisez pas.
Charge de l'ERGORAPIDO™
Le voyant orange de charge s'allume lorsque l'ERGORAPIDO™ est placé sur le support de charge. Lorsque
l'ERGORAPIDO™ est complètement chargé, le voyant de charge clignote lentement toutes les minutes.
= LED 3 . LED 14,4V , 18V ERGORAPIDO™
. 4
ERGORAPIDO™
. ERGORAPIDO™
ERGORAPIDO™
. ERGORAPIDO™
ERGORAPIDO™
43
eng
rus
fra
arb
heb
On ERGORAPIDO™ 14,4V , 18V the numbers of LED lamps will indicate the level of charge. 3 LED = fully charged.
If ERGORAPIDO™ is fully discharged, it requires approximately 4h. For better battery performance, always keep
ERGORAPIDO™ on charge when it is not being used.
Charging ERGORAPIDO™
The charging indicator will be lit with orange light when ERGORAPIDO™ is placed in the charging station. When
ERGORAPIDO™ is fully charged, the charging indicator will blink slowly every minute.

1313
eng
rus
fra
arb
heb
Уборка при помощи пылесоса ERGORAPIDO™ Перед уборкой
убедитесь, что на колесах и щеточном валике насадки отсутствуют
острые посторонние предметы или фрагменты. Это поможет избежать
повреждения напольных покрытий, требующих особенно бережного
обращения, и обеспечит максимальную производительность уборки.
Включение и выключение пылесоса ERGORAPIDO™ производится нажатием кнопки А «ВКЛ/
ВЫКЛ». Пылесос ERGORAPIDO™ имеет 2 уровня мощности, которые регулируются кнопкой В.
1. При включении пылесос ERGORAPIDO™ работает в режиме высокой мощности. 2. Для того,
чтобы понизить уровень шума, повторно нажмите на кнопку «В» для перехода в «Тихий режим».
Настенный блок также может быть прикреплен
к стене. Отделите его от напольного блока.
Обязательно убедитесь, что стена достаточно
прочна, чтобы выдержать вес пылесоса
ERGORAPIDO™.
Comment utiliser l'ERGORAPIDO Avant de l’utiliser, vériez qu'il n'y a
pas d'objets tranchants dans les roulettes ni dans la brosse rotative an
d'éviter de rayer les sols fragiles et pour assurer une aspiration parfaite.
Démarrez et arrêtez l'ERGORAPIDO™ en appuyant sur la touche Marche/Arrêt « A ». L'ERGORAPIDO™
dispose de 2 niveaux de puissance que vous pouvez régler en appuyant sur la touche « B ». 1.
L'ERGORAPIDO™ démarre en « mode puissance maximale ». 2. Pour un nettoyage plus silencieux,
appuyez une fois sur la touche de régulation « B » pour activer le « mode Silencieux ».
L'élément mural peut également être installé seul sur
un mur en enlevant le socle. Assurez-vous toujours
que le mur peut supporter le poids de l'ERGORAPIDO™.
ERGORAPIDO™
.
ERGORAPIDO™ .”“ / ERGORAPIDO™
. ERGORAPIDO™ .1 .
.” “ ”“ .2
.
.
.ERGORAPIDO™.
A
B
B2
A
B
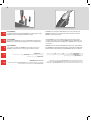
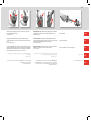
Vacuuming with ERGORAPIDO™ Before vacuuming, check that the nozzle
wheels and the brush roll are clean from sharp objects in order to avoid
scratching sensitive oors and to ensure full cleaning performance.
Start and stop ERGORAPIDO™ by pushing the ON/OFF button A. ERGORAPIDO™ has 2 power settings
which is regulated with button B. 1. ERGORAPIDO™ will start on the high power mode. 2. For more
silent cleaning and longer runtime, press the B button one more time to activate the “Silent mode”.
The wall unit can also be mounted on a wall.
Separate it from the oor unit. Always ensure that
the wall can withstand the weight of ERGORAPIDO™.

1414
Модели ERGORAPIDO™ 10,8 В и 14,4 B с системой BRC, а также модели 18 В оснащены системой
BRUSHROLLCLEAN™ – эта функция помогает высвобождать щеточный валик от волос и ниток. Рекомендуется
использовать данную функцию один раз в неделю. Для оптимальных результатов используйте функцию
BRUSHROLLCLEAN ™, когда пылесос ERGORAPIDO™ полностью заряжен.
Уборка мебели, сидений автомашины и т.д. 1. Хранящиеся на базе щелевую насадку и небольшую щетку
также можно хранить на ручке. 2. Воспользуйтесь щелевой насадкой для уборки труднодоступных мест. Для
уборки пыли установите на щелевую насадку щетку. 3. Включение и выключение ручного блока производится
нажатием на кнопку «Пуск».
TECHNOLOGIE BRUSHROLLCLEAN™ Les modèles ERGORAPIDO 10,8 V avec BRC, 14,4 V avec BRC et 18 V sont
équipés de la technologie BRUSHROLLCLEAN™, une fonction qui permet de retirer et d’aspirer les cheveux et les
bres coincés dans la brosse rotative. Il est conseillé d'utiliser cette fonction une fois par semaine. Pour un résultat
optimal, utilisez la fonction BRUSHROLLCLEAN ™lorsque l'ERGORAPIDO™ est complètement chargé.
Aspiration du mobilier, des sièges auto, etc. Le suceur plat et la brosse meubles se rangent dans le support de
charge, ou se xent sur la poignée 1.Retirez l’aspirateur à main en appuyant sur les boutons de déverrouillage. 2. Fixez
le suceur plat pour faciliter le nettoyage des zones diciles à atteindre. Emboîtez la brosse meubles sur le suceur plat
pour dépoussiérer. 3. Démarrez/arrêtez l’aspirateur à main en appuyant sur la touche Marche/Arrêt.
18 )BRC( 4,14 )BRC(
8,10 ERGORAPIDO™
. . - BRUSHROLLCLEAN™
BRUSHROLLCLEAN™ .
ERGORAPIDO™
.
.1
. . .2
. / .3
2
3
BRC
BRC
eng
rus
fra
arb
heb
1 2 3
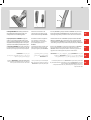
BRUSHROLLCLEAN™ Technology ERGORAPIDO™ 10,8V with BRC, 14,4V with BRC and 18V models are equipped with
BRUSHROLLCLEAN™ Technology – a function that helps to keep the brush roll free from hair and bres. It is recommended
to use this function once a week. For best results use the BRUSHROLLCLEAN™ function when ERGORAPIDO™ is fully charged.
Vacuuming furniture, car seats etc. 1. The crevice nozzle and small brush are stored in the charging station and
can also be´placed on the handle. 2. Attach the crevice nozzle to facilitate cleaning of areas dicult to reach. Attach
the brush on the crevice nozzle for dusting. 3. Start/stop the hand unit by pushing the start button.

1515
eng
rus
fra
arb
heb
1. Поставьте пылесос ERGORAPIDO™ на ровную и устойчивую поверхность. Не используйте функцию BRUSHROLLCLEAN ™, если прибор находится на ковровом покрытии. 2. Когда пылесос включен, нажмите ногой на педаль
BRUSHROLLCLEAN ™. Удерживайте педаль в течение 5 секунд, пока волосы и нитки не будут удалены, а затем отпустите педаль. Резкий шум в ходе процесса очистки является нормой. Если на щеточном валике остались волосы,
повторите процедуру. В целях безопасности функция очистки щеточного валика автоматически прекращает свою работы через 30 секунд. В подобнм случае установите ERGORAPIDO™ обратно на базу, чтобы функция BRC снова
оказалась доступной.
ВНИМАНИЕ! Лезвие для чистки щетки-валика может быть острым.
1. Placez l'ERGORAPIDO™ sur une surface dure et plate. N'utilisez jamais la fonction BRUSHROLLCLEAN™ sur les tapis et moquettes. 2. Appuyez avec le pied sur la pédale BRUSHROLLCLEAN™ le pied lorsque l'aspirateur est en marche.
Maintenez-la enfoncée pendant 5 secondes jusqu'à ce que les cheveux et les bres aient été aspirés, puis relâchez la pédale. Vous entendrez un bruit de coupe durant le processus. Ce phénomène est normal. S'il reste des cheveux sur la brosse
rotative, répétez l'opération. Pour des raisons de sécurité la fonction BRUSHROLLCLEAN™ s'arrête automatiquement au bout de 30 secondes. Si cela se produit, replacez l'ERGORAPIDO™ sur le support de charge pendant 10 minutes pour
réinitialiser la fonction. ATTENTION. Ne pas introduire les doigts à l'intérieur du compartiment contenant la brosse rotative - Risque de coupure avec la lame du Brush Roll Clean.
. BRUSHROLLCLEAN™ .
ERGORAPIDO™ .1
. . .
5 . BRUSHROLLCLEAN™ .2
. . . (BRC) ERGORAPIDO™ . 30
2 . ERGORAPIDO™
5
BRC
1. Place ERGORAPIDO™ on a hard and even surface. Do not use the BRUSHROLLCLEAN™ function on carpets. 2. Press the BRUSHROLLCLEAN™ pedal with your foot while the cleaner is switched on. Hold for 5 seconds until hairs and bres are
removed and then release the pedal. There will be a cutting noise during this process, this is normal. If hairs remain on the brush roll repeat the process. The BRUSHROLLCLEAN™ function stops automatically after 30 seconds, this is for safety
reasons. If this happens please place the ERGORAPIDO™ back in the charging stand to make the BRC function work again. CAUTION. The brush roll clean blade may be sharp.

1616
Обратите внимание: функция очистки BRUSHROLLCLEAN™ может
не справиться с удалением толстых ниток, кусков проволоки или
толстых волокон из коврового покрытия, застрявших в щеточном
валике.
Опорожнение пылесборника.
а) Откройте пылесборник, нажав на кнопку
фиксатора контейнера (А).
b) Извлеките фильтры, нажав для этого на кнопки
фиксатора*. Извлеките фильтры, потянув за
выступы*.
* Только в ряде моделей
c) Опорожните содержимое в мусорную корзину.
Ни в коем случае не мойте пылесборник или фильтры
в посудомоечной машине.
Remarque : il est possible que la fonction BRUSHROLLCLEAN™
ne puisse pas retirer les ls et bres plus épais coincés dans la
brosse rotative. Dans ce cas, reportez-vous au chapitre « Comment
enlever la brosse rotative ».
Vidage du bac à poussière
a) Enlevez le bac à poussière en appuyant sur
les boutons (A).
b) Sortez les ltres en appuyant sur les boutons de
déverrouillage*. Séparez les deux ltres en tirant sur
les languettes.*
* Certains modèles uniquement
c) Videz le contenu dans une poubelle.
Ne lavez jamais le bac à poussière ni les ltres au lave-
vaisselle.
BRUSHROLLCLEAN™
.
.
)
.)(
* )
.*
*
. )
A
eng
rus
fra
arb
heb
a) b)
* *
c)
A
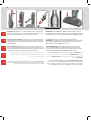
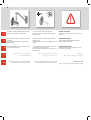
Please note that the BRUSHROLLCLEAN™ function might not be
able to remove thicker threads, wires or bres that are caught in
the brush roll.
b) Take out the lters by pressing the release
buttons*. Take out the lters by pulling the tabs*.
* Certain models only
Emptying of the dust container.
a) Open the dust container by pressing the dust
container button (A).
c) Empty the contents into a dustbin. Never wash the dust
container or lters in a dishwasher.

1717
eng
rus
fra
arb
heb
Для удаления пыли из внутреннего фильтра вытяните стержень
очистки фильтра (B) в его конечное положение и отпустите. Повторите
5 раз.
Только в ряде моделей
Очистка фильтров (Рекомендуется производить при каждом 5-м
опорожнении пылесборника). Извлеките оба фильтра, нажав на кнопки
фиксатора*. Извлеките фильтры, потянув за выступы*.
* Только в ряде моделей
Разделите оба фильтра.
Nettoyage rapide du ltre intérieur*. (Il est recommandé de le faire à chaque fois
que le bac est vidé). Enlevez le bac à poussière. Tirez la tige de nettoyage du ltre
(B)* jusqu'à la butée puis relâchez-la pour secouer la poussière se trouvant sur le
ltre intérieur. Répétez cette opération 5 fois. * Selon les modèles
Nettoyage des ltres (Recommandé toutes les 5 vidages du bac) Sortez les
deux ltres en appuyant sur les boutons de déverrouillage.*
* Selon les modèles
Séparez les deux ltres en tirant sur les languettes.
. )(
. 5
.) 5 ( .
.* .
*
.
B
5
5
B
* *
Pull the lter cleaning rod (B) to its end position and release it to remove dust
from the inner lter. Repeat 5 times.
Certain models only
Cleaning the lters. (Recommended every 5th emptying). Take out both lters
by pressing the release buttons*. Take out the lters by pulling the tabs*.
* Certain models only
Separate both lters.

1818
eng
rus
fra
arb
heb
Тщательно промойте детали фильтров в теплой воде без каких-либо
моющих средств
(ни в коем случае не используйте для этого посудомоечную или
стиральную машину).
Встряхните, чтобы удалить остатки воды, и оставьте сушиться как
минимум на 12 часов.
Перед установкой в пылесос убедитесь, что детали фильтров полностью
просохли.
ВНИМАНИЕ: ОЧИСТКА ФИЛЬТРОВ!
Для обеспечения высокой эффективности уборки необходимо
регулярно производить очистку фильтров
Rincez soigneusement les ltres à l'eau tiède, sans détergent. (N'utilisez
jamais le lave-vaisselle ni le lave-linge.)
Secouez-les pour extraire l'excédent d'eau et laissez-les sécher pendant 12
heures minimum (ne pas les mettre au sèche linge).
Assurez-vous que les ltres sont parfaitement secs avant de les remettre en
place dans l'aspirateur.
IMPORTANT : NETTOYAGE DU FILTRE!
Les ltres doivent être nettoyés à intervalles réguliers pour assurer des
performances de nettoyage optimales.
.
)
(
. 21
.
! –
12
3
6
9
Rinse the lter parts carefully under lukewarm water without using any
detergents. (never use the dishwasher or washing machine)
Shake to remove excess water and leave to dry minimum 12h.
Make sure that the lter parts are completely dried before putting them
back into the cleaner.
IMPORTANT - FILTER CLEANING!
The lters must be cleaned at regular intervals to ensure a high cleaning
performance

1919
eng
rus
fra
arb
heb
Очистка шланга и воздуховода
Отсоедините заднюю часть насадки от шланга, который входит в нее сверху. Удалите посторонние предметы,
блокирующие поток воздуха из шланга или воздуховода в пылесборник, и установите шланг на место.
Очистка колес
В случае необходимости очистки колес или в случае, если они перестали вращаться, аккуратно извлеките их
при помощи отвертки с плоским шлицем.
Nettoyage du tube d’aspiration et du conduit d’air
Détachez la partie supérieure du tube exible qui se trouve à l’arrière de la brosse. Retirez tout objet pouvant bloquer le ux
d'air dans le tube exible ou dans le conduit d'air allant vers le bac à poussière, puis remettez-le en place.
Nettoyage des roulettes
Si vous devez nettoyer les roulettes ou si un objet se coince dedans, retirez-les soigneusement en utilisant un
tournevis plat.
.
.
.
Cleaning the hose and air channel
Loosen the hose behind the nozzle from its upper connection. Remove any object that can be blocking the airow in
the hose or in the air channel to the dust cup, and put the hose back.
Cleaning the wheels
If the wheels need to be cleaned or get jammed, remove them carefully by using a at screwdriver.

2020
Световые индикаторы – обычный режим работы Значение? Что следует предпринять?
Модель 14,4 B - 18 В (с литий-ионной
аккумуляторной батареей):
3 индикатора = емкости аккумуляторной батареи все еще
достаточно, осталось > 75 %
OK
1 – 3 оранжевых индикатора светятся во время
работы.
2 индикатора = емкости аккумуляторной батареи все еще
достаточно, осталось > 25%
OK
1 индикатор = через несколько минут пылесос ERGORAPIDO™
прекратит работу.
Завершите уборку и зарядите пылесос
ERGORAPIDO™.
Прибор на базе, горит оранжевый индикатор. Это нормально: идет зарядка пылесоса ERGORAPIDO™. OK
Прибор на базе, оранжевый индикатор мигает
каждые 5 секунд.
Это нормально: пылесос ERGORAPIDO™ полностью заряжен.
Рекомендуется после использования
устанавливать и держать пылесос
ERGORAPIDO™ на базе.
Предупреждающий индикатор (только в моделях
с 14,4 B - 18 B литий-ионной аккумуляторной
батареей)
Причина проблемы? Что следует предпринять?
Мигает оранжевый индикатор + прибор
прекращает работу.
Аккумуляторная батарея разряжена. Зарядите ERGORAPIDO™.
Мигает красный индикатор Заело щеточный валик.
Извлеките щеточный валик и произведите
его очистку вручную
Мигают красный и оранжевый индикаторы,
функция очистки щеточного валика
BRUSHROLLCLEAN™ не действует, подсветка
выключилась.
Функция очистки щеточного валика BRUSHROLLCLEAN™
использовалась слишком длительное время.
Оставьте пылесос ERGORAPIDO™ на базе для
зарядки в течение 10 минут, чтобы функция
снова стала доступной.
Постоянно горит КРАСНЫЙ индикатор + пылесос
ERGORAPIDO™ прекратил работу.
ERGORAPIDO™ перегрелся.
Произведите очистку фильтров. Проверьте,
нет ли засоров в шланге или насадке. Если
эти действия не решают проблему, обратите
в сервисный центр.
ПРИМЕЧАНИЕ! У модели ERGORAPIDO™ с 10,8 B (Li-ion) батареями в ходе работы светодиод не светится. Светодиод светится только в ходе зарядки.
eng
rus
fra
arb
heb
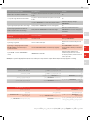
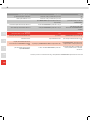
Indication lights-normal operation What does it mean? What to do?
14,4V -18V version (Li-Ion battery) : 3 lights = Battery capacity is still good > 75 % left OK
1 – 3 Orange lights during operation 2 lights = Battery capacity is still good > 25 % left OK
1 light = ERGORAPIDO™ will stop in a few minutes. Finish cleaning + charge ERGORAPIDO™
Orange light when placed in the charging
stand
No problem - ERGORAPIDO™ is being charged OK
Orange light blinks once every minute in the
charging stand .
No problem –ERGORAPIDO™ is fully charged.
We recommend to keep ERGORAPIDO™ in
the charging stand after using it.
Warning lights (14,4V - 18V Li-Ion Version Only) What is the problem What to do?
Orange light blinking + product stops Battery is empty Charge ERGORAPIDO™.
Red light - blinking The brush roll is jammed.
Remove the brush roll and clean it
manually
Red + Orange light blinking +
BRUSHROLLCLEAN ™ function does not work +
headlights are turned OFF
The BRUSHROLLCLEAN ™ function has been used for too
long time.
Place ERGORAPIDO™ in the charging
stand for 10 minutes to reset the function.
RED light – constant + ERGORAPIDO™ stops ERGORAPIDO™ is overheated
Clean the lters . Check the hose and
nozzle for blockages. If this does not help,
please contact a service station.
NOTE! The ERGORAPIDO™ 10,8V (Li-Ion) does not have LED at normal usage. The LED is only lit when charging.
La page est en cours de chargement...
La page est en cours de chargement...
La page est en cours de chargement...
La page est en cours de chargement...
La page est en cours de chargement...
La page est en cours de chargement...
La page est en cours de chargement...
La page est en cours de chargement...
-
 1
1
-
 2
2
-
 3
3
-
 4
4
-
 5
5
-
 6
6
-
 7
7
-
 8
8
-
 9
9
-
 10
10
-
 11
11
-
 12
12
-
 13
13
-
 14
14
-
 15
15
-
 16
16
-
 17
17
-
 18
18
-
 19
19
-
 20
20
-
 21
21
-
 22
22
-
 23
23
-
 24
24
-
 25
25
-
 26
26
-
 27
27
-
 28
28


Electrolux ZB3105 Manuel utilisateur
- Catégorie
- Aspirateurs
- Taper
- Manuel utilisateur
Documents connexes
-
Electrolux ZB5020 Manuel utilisateur
-
-
Electrolux ZB11ER Manuel utilisateur
-
-