Yamaha TSX-80 Le manuel du propriétaire
- Catégorie
- Réveils
- Taper
- Le manuel du propriétaire

U
DESKTOP AUDIO SYSTEM
SYSTEME AUDIO DESKTOP
TSX-80
OWNER’S MANUAL
MODE D’EMPLOI

i En
1 Read these instructions.
2 Keep these instructions.
3 Heed all warnings.
4 Follow all instructions.
5 Do not use this apparatus near water.
6 Clean only with dry cloth.
7 Do not block any ventilation openings. Install in
accordance with the manufacturer’s instructions.
8 Do not install near any heat sources such as radiators,
heat registers, stoves, or other apparatus (including
amplifiers) that produce heat.
9 Do not defeat the safety purpose of the polarized or
grounding-type plug. A polarized plug has two blades
with one wider than the other. A grounding type plug has
two blades and a third grounding prong. The wide blade
or the third prong are provided for your safety. If the
provided plug does not fit into your outlet, consult an
electrician for replacement of the obsolete outlet.
10 Protect the power cord from being walked on or pinched
particularly at plugs, convenience receptacles, and the
point where they exit from the apparatus.
11 Only use attachments/accessories specified by the
manufacturer.
12 Use only with the cart, stand, tripod,
bracket, or table specified by the
manufacturer, or sold with the apparatus.
When a cart is used, use caution when
moving the cart/apparatus combination to
avoid injury from tip-over.
13 Unplug this apparatus during lightning storms or when
unused for long periods of time.
14 Refer all servicing to qualified service personnel.
Servicing is required when the apparatus has been
damaged in any way, such as power-supply cord or plug
is damaged, liquid has been spilled or objects have fallen
into the apparatus, the apparatus has been exposed to rain
or moisture, does not operate normally, or has been
dropped.
Yamaha and the Electronic Industries Association’s Consumer Electronics Group want you to get the most out
of your equipment by playing it at a safe level. One that lets the sound come through loud and clear without
annoying blaring or distortion – and, most importantly, without affecting your sensitive hearing. Since hearing
damage from loud sounds is often undetectable until it is too late, Yamaha and the Electronic Industries
Association’s Consumer Electronics Group recommend you to avoid prolonged exposure from excessive
volume levels.
IMPORTANT SAFETY INSTRUCTIONS
CAUTION
RISK OF ELECTRIC SHOCK DO
NOT OPEN
CAUTION: TO REDUCE THE RISK OF
ELECTRIC SHOCK, DO NOT REMOVE
COVER (OR BACK). NO USER-SERVICEABLE
PARTS INSIDE. REFER SERVICING TO
QUALIFIED SERVICE PERSONNEL.
• Explanation of Graphical Symbols
The lightning flash with arrowhead symbol,
within an equilateral triangle, is intended to
alert you to the presence of uninsulated
“dangerous voltage” within the product’s
enclosure that may be of sufficient magnitude
to constitute a risk of electric shock to
persons.
The exclamation point within an equilateral
triangle is intended to alert you to the
presence of important operating and
maintenance (servicing) instructions in the
literature accompanying the appliance.
IMPORTANT
Please record the serial number of this unit in the space
below.
MODEL:
Serial No.:
The serial number is located on the rear of the unit. Retain
this Owner’s Manual in a safe place for future reference.
We Want You Listening For A Lifetime

ii En
IMPORTANT SAFETY INSTRUCTIONS
FCC INFORMATION (for US customers)
1 IMPORTANT NOTICE: DO NOT MODIFY THIS
UNIT!
This product, when installed as indicated in the
instructions contained in this manual, meets FCC
requirements. Modifications not expressly approved
by Yamaha may void your authority, granted by the
FCC, to use the product.
2 IMPORTANT: When connecting this product to
accessories and/or another product use only high
quality shielded cables. Cable/s supplied with this
product MUST be used. Follow all installation
instructions. Failure to follow instructions could void
your FCC authorization to use this product in the
USA.
3 NOTE: This product has been tested and found to
comply with the requirements listed in FCC
Regulations, Part 15 for Class “B” digital devices.
Compliance with these requirements provides a
reasonable level of assurance that your use of this
product in a residential environment will not result in
harmful interference with other electronic devices.
This equipment generates/uses radio frequencies and,
if not installed and used according to the instructions
found in the users manual, may cause interference
harmful to the operation of other electronic devices.
Compliance with FCC regulations does not guarantee
that interference will not occur in all installations. If
this product is found to be the source of interference,
which can be determined by turning the unit “OFF”
and “ON”, please try to eliminate the problem by
using one of the following measures:
Relocate either this product or the device that is being
affected by the interference.
Utilize power outlets that are on different branch
(circuit breaker or fuse) circuits or install AC line
filter/s.
In the case of radio or TV interference, relocate/
reorient the antenna. If the antenna lead-in is 300 ohm
ribbon lead, change the lead-in to coaxial type cable.
If these corrective measures do not produce
satisfactory results, please contact the local retailer
authorized to distribute this type of product. If you can
not locate the appropriate retailer, please contact
Yamaha Electronics Corp., U.S.A. 6660 Orangethorpe
Ave., Buena Park, CA 90620.
The above statements apply ONLY to those products
distributed by Yamaha Corporation of America or its
subsidiaries.
FCC WARNING
Change or modifications not expressly approved by the
party responsible for compliance could void the user’s
authority to operate the equipment.
FOR CANADIAN CUSTOMERS
To prevent electric shock, match wide blade of plug to
wide slot and fully insert.
This Class B digital apparatus complies with Canadian
ICES-003.

iii En
1 To assure the finest performance, please read this
manual carefully. Keep it in a safe place for future
reference.
2 Install this unit in a well ventilated, cool, dry, clean
place - away from direct sunlight, heat sources,
vibration, dust, moisture and cold. For proper
ventilation, allow the following minimum clearances.
Top: 15 cm (6 in)
Rear: 10 cm (4 in)
Sides: 10 cm (4 in)
3 Locate this unit away from other electrical
appliances, motors, or transformers to avoid
humming sounds.
4 Do not expose this unit to sudden temperature
changes from cold to hot, and do not locate this unit
in an environment with high humidity (i.e. a room
with a humidifier) to prevent condensation inside this
unit, which may cause an electrical shock, fire,
damage to this unit, and/or personal injury.
5 Avoid installing this unit where foreign object may
fall onto this unit and/or this unit may be exposed to
liquid dripping or splashing. On the top of this unit,
do not place:
– Other components, as they may cause damage
and/or discoloration on the surface of this unit.
– Burning objects (i.e. candles), as they may cause
fire, damage to this unit, and/or personal injury.
– Containers with liquid in them, as they may fall
and liquid may cause electrical shock to the user
and/or damage to this unit.
6 Do not cover this unit with a newspaper, tablecloth,
curtain, etc. in order not to obstruct heat radiation. If
the temperature inside this unit rises, it may cause
fire, damage to this unit, and/or personal injury.
7 Do not plug in this unit to a wall outlet until all
connections are complete.
8 Do not operate this unit upside-down. It may
overheat, possibly causing damage.
9 Do not use force on switches, knobs and/or cords.
10 When disconnecting the power cable from the wall
outlet, grasp the plug; do not pull the cable.
11 Do not clean this unit with chemical solvents; this
might damage the finish. Use a clean, dry cloth.
12 Only voltage specified on this unit must be used.
Using this unit with a higher voltage than specified is
dangerous and may cause fire, damage to this unit,
and/or personal injury. Yamaha will not be held
responsible for any damage resulting from use of this
unit with a voltage other than specified.
13 To prevent damage by lightning, keep the power
cable disconnected from a wall outlet or this unit
during a lightning storm.
14 Do not attempt to modify or fix this unit. Contact
qualified Yamaha service personnel when any
service is needed. The cabinet should never be
opened for any reasons.
15 When not planning to use this unit for long periods of
time (i.e. vacation), disconnect the AC power plug
from the wall outlet.
16 Be sure to read the “TROUBLESHOOTING” section
on common operating errors before concluding that
this unit is faulty.
17 Before moving this unit, press to set the system to
off, and disconnect the AC power plug from the wall
outlet.
18 Condensation will form when the surrounding
temperature changes suddenly. Disconnect the power
cable from the outlet, then leave this unit alone.
19 When using this unit for a long time, this unit may
become warm. Turn the system off, then leave this
unit alone for cooling.
20 Install this unit near the wall outlet and where the AC
power plug can be reached easily.
21 The batteries shall not be exposed to excessive heat
such as sunshine, fire or the like. When you dispose
of batteries, follow your regional regulations.
22 Be sure to use the AC adaptor supplied with this unit.
Using an AC adaptor other than the one provided
may cause fire or damage to this unit.
CAUTION: READ THIS BEFORE OPERATING YOUR UNIT.
This unit is not disconnected from the AC power source
as long as it is connected to the wall outlet, even if this
unit itself is turned off by . In this state, this unit is
designed to consume a very small quantity of power.
WARNING
TO REDUCE THE RISK OF FIRE OR ELECTRIC
SHOCK, DO NOT EXPOSE THIS UNIT TO RAIN OR
MOISTURE.
CAUTION
Danger of explosion if battery is incorrectly replaced.
Replace only with the same or equivalent type.
There is a chance that placing this unit too close to a
CRT-based (Braun tube) TV set might impair picture
color. Should this happen, move this unit away from the
TV set.

1 En
English Français
PREPARATION
■ Features
– Hi-quality iPod/iPhone, radio and external device playability.
– Firm bass sound and spacious stereo sound from 2.1 ch speaker system (tweeter × 2, woofer × 1), SR-
Bass™ (Yamaha Swing Radiator Bass technology) and DSP in a compact unit.
– Easy user-intuitive interface by buttons with Guide LED and knob dials.
■ About this manual
• This unit is iPod and also iPhone-compatible. “iPod” described in this manual may also refer to “iPhone”.
• This manual describes how to operate this unit using buttons on the unit. Some of these operations are also
available using the remote control.
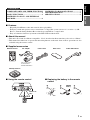
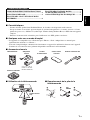
■ Supplied accessories
■ Using the remote control ■ Replacing the battery in the remote
control
NAMES OF PARTS AND THEIR FUNCTIONS
............................................................................... 2
BASIC FUNCTIONS........................................... 4
LISTENING TO iPod™ AND EXTERNAL
SOURCES............................................................. 6
LISTENING TO RADIO STATIONS ...............7
TROUBLESHOOTING.......................................8
SPECIFICATIONS.............................................. 9
Remote control AC adaptor Power cable Dock cover Indoor FM antenna
(DC 15 V, 2.66 A,
model number:
NU40-2150266-I3)
AM loop antenna
Within 6 m
(20’)
CR2025
battery
CONTENTS

2 En
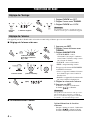
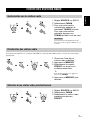
■ Front and top panel
1 : Press to turn the system on/off.
Time is displayed even when the system is off.
y
• Press and hold on the top of the unit for more than 3
seconds to set the system to standby mode. All the
information on the front panel display is not displayed
in standby mode. This can reduce power consumption.
To cancel standby mode, press .
• Even in system off/standby mode, the alarm function is
available.
2 TIMER: Timer setting (☞ P. 5)
3 ALARM: Alarm on/off (☞ P. 4)
4 SET: Alarm setting (☞ P. 4)
5 Front panel display
6 SOURCE: iPod, AUX, RADIO
7 VOLUME: Volume control
8 PRESET: Storing your favorite 5 FM and 5 AM
stations (☞ P. 7)
9 SNOOZE/SLEEP (☞ P. 5)
0 DIMMER:
Setting brightness of the front panel
A (auto) 3 (brightest) 2 1 (darkest) back to A
y
When A (auto) is set, the brightness of the front panel is
adjusted automatically depending on the brightness of the
room.
A MEMORY (☞ P. 7)
B TUNING (☞ P. 7)
C FM, AM: Switching FM/AM
D iPod dock: Set an iPod.
y
Cover the iPod dock with the dock cover when not using.
E Illumination sensor: Measuring surrounding
illuminance. Do not cover this sensor.
NAMES OF PARTS AND THEIR FUNCTIONS
Dock Adaptor
Set your iPod in the iPod dock (see D below).
y
An iPod is charged when set in the iPod dock.
• To secure the connection, attach a compatible Dock
Adaptor supplied with the iPod.
• The iPod may not be set in the iPod dock securely
if it is in its protective case.
Notes

NAMES OF PARTS AND THEIR FUNCTIONS
3 En
English
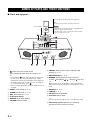
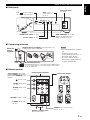
■ Rear panel
■ Connecting antennas
■ Remote control
• The antenna should be stretched
out.
• If radio reception is poor,
change the height, direction, or
placement of the antenna.
• If you use outdoor antennas
instead of the supplied antennas,
reception will be better.
15V : Connect supplied
AC adaptor and power cable.
AUX: Connect an
external device.
(☞ P. 6)
Antenna terminal
(See below.)
ALARM TYPE switch (☞ P. 4)
CLOCK switch (☞ P. 4)
TONE CONTROL: As you turn
the knob clockwise, Bass and
Treble are emphasized more.
AM loop antenna (supplied): Connect the black cord
to GND, and the white to AM ANT.
Indoor FM
antenna
(supplied)
Ground (GND terminal):
For minimum interference, connect the antenna GND terminal
to a good earth ground. A good earth ground is a metal stake
driven into moist earth.
Notes
: System on/off
Source buttons: iPod, AUX,
RADIO. RADIO button switches
FM/AM when SOURCE is set to
RADIO.
iPod control buttons
SLEEP: Sleep setting
(☞ P. 5)
ALARM: Alarm on/off
(☞ P. 4)
Battery insulation sheet:
Remove before using.
PRESET: Select the preset radio
station. (☞ P. 7)
VOLUME: Volume control
TUNING: Tuning radio
(☞ P. 7)
Infrared signal transmitter

4 En
OPERATION
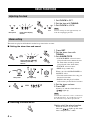
This unit can play back iPod/radio and/or beep sound at the set time.
■ Setting the alarm time and sound
■ Switching the alarm on/off
BASIC FUNCTIONS
Adjusting the clock
1Set CLOCK to SET.
2 Set the time with TUNING.
3Set CLOCK to LOCK.
The time settings are lost approximately one
week after unplugging the unit.
Alarm setting
1Press SET.
2 Set the alarm time with
TUNING.
3Set ALARM TYPE.
• SOURCE+BEEP: selected source
(played back from 3 minutes before
the alarm time) and beep sound
(played back at the alarm time)
• SOURCE: selected source
• BEEP: beep sound only
When you select SOURCE+BEEP or
SOURCE, select:
• iPod: this unit resumes the song you
listened to last time.
• RADIO: this unit plays back the
radio station you listened to last time.
4 Set the alarm volume.
5Press SET.
Alarm is set and the alarm indicator
( ) lights up.
When iPod is selected as a source, set the iPod
in the iPod dock (☞ P. 2). If iPod is not set at
the alarm time, beep sound is played back.
Switch on/off the alarm function.
When the alarm is on, the alarm
indicator ( ) lights up and alarm
time is displayed for a while.
Rear panel Front panel display
flashes.
Note
Alarm indicator ( )
and front panel display
flashes.
Note
Rear panel (As required)

BASIC FUNCTIONS
5 En
English
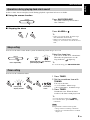
At the set time, alarm sound plays back. During playback, operations below are available.
■ Using the snooze function
■ Stopping the alarm
You can set the time to turn off the system automatically when sleep is set to on.
You can set the countdown timer.
Operations during playing back alarm sound
Press SNOOZE/SLEEP.
The alarm sound stops and resumes
after 5 minutes.
Press ALARM or .
y
• Unless you stop the alarm, the alarm stops
after 60 minutes automatically.
• When you stop the alarm, the alarm time
setting, etc., is saved for convenient use next
time.
Sleep setting
Select the sleep time.
You can set 30, 60, 90 or 120 minutes.
When the sleep function is on, the
sleep indicator ( ) lights up.
y
To cancel the sleep, press SNOOZE/SLEEP.
Timer setting
1Press TIMER.
2 Set the countdown time with
TUNING.
You can set the time,
• 1 to 15 minutes: minute steps.
• 20 to 120 minutes: 10-minute steps.
3Press TIMER.
Countdown starts. When the timer
reaches 0, the timer sound plays back.
y
• To stop the timer sound, press TIMER.
• To cancel the timer, press TIMER during
countdown.
Sleep and timer cannot be used together.
• Sleep cannot be set during countdown.
• Sleep is set to off when timer is set while
sleep is on.
Sleep indicator ( ) and front
panel display flash.
Press repeatedly.
Front panel
display flashes.
Countdown
starts.
Note

6 En
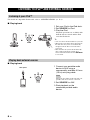
For details on compatible iPod models, refer to “SPECIFICATIONS” (☞ P. 9).
■ Playing back
■ Playing back
LISTENING TO iPod™ AND EXTERNAL SOURCES
Listening to your iPod™
1 Set your iPod in the iPod dock.
2Set SOURCE to iPod.
3 Play the iPod.
Playback operations are available with
both the remote control and the iPod
set in the iPod dock.
y
• You can remove the iPod whenever you want.
• When music/video in the iPod is played back,
this unit turns the system on automatically
and plays back the iPod even if the unit is
system off.
• This unit turns the system off automatically
after a while if the iPod is turned off or
removed from the iPod dock when SOURCE
is set to iPod.
Playing back external sources
1 Connect your portable audio
device to AUX using a
commercially available 3.5 mm
(1/8 in) mini plug cable.
Turn down the volume of this unit and your
portable audio device before connection.
2Set SOURCE to AUX.
3 Start playback on the
connected portable audio
device.
Rear panel
Note

7 En
English
You can store your favorite 5 FM and 5 AM radio stations with the preset function.
LISTENING TO RADIO STATIONS
Tuning radio stations
1Set SOURCE to RADIO.
2 Select FM/AM.
3 For automatic tuning, press
and hold TUNING.
For manual tuning, press
TUNING repeatedly.
If you tune to a station manually during FM
reception, the sound is monaural.
Presetting radio stations
1 Tune into a favorite radio
station.
2Press MEMORY.
3 Select the PRESET number
you want to store to.
y
To cancel the preset, press TUNING again.
4Press MEMORY to complete.
Selecting preset radio stations
1Set SOURCE to RADIO.
2 Select FM/AM.
3 Select the preset radio station
with PRESET.
Note

8 En
ADDITIONAL INFORMATION
In case of a problem with the unit, check the following list first. If you cannot solve your problem with the
suggested solutions or if your problem is not listed below, turn off and unplug the unit, and consult the nearest
authorized Yamaha dealer or service center.
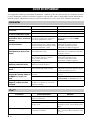
TROUBLESHOOTING
General
Problem Cause Solution
The speakers make no
sound.
The volume may be set to the minimum
level.
Adjust the volume level.
The source may be incorrect. Select the correct source.
Sound suddenly turns off.
The sleep (☞ P. 5) may be set. Turn on the system and play the source
again.
Sound is cracked/distorted
or there is abnormal noise.
Input source volume is excessive, or
volume of this unit is excessive
(especially Bass).
Adjust volume with VOLUME, or adjust
Bass with TONE CONTROL.
The unit does not operate
properly.
The unit may have received a strong
electrical shock such as lightning or
excessive static electricity, or power
supply may have dropped.
Set the system to off, and disconnect the
power cable. Wait about 30 seconds,
reconnect the power cable, and turn on the
system.
The system turns on but
immediately shuts off.
The power cable may be connected
improperly.
Make sure the power cable is plugged into
the wall outlet firmly.
The unit may have received a strong
electrical shock such as lightning or
excessive static electricity.
Set the system to off, and disconnect the
power cable. Wait about 30 seconds,
reconnect the power cable, and turn on the
system.
A digital or high-frequency
equipment produces noises.
The unit may be placed too close to the
digital or high-frequency equipment.
Place the unit farther away from the
equipment.
The clock setting has been
cleared.
The unit is left more than one week after
you disconnect the power cable from the
wall outlet.
Plug the power cable into the wall outlet
firmly, and set the clock again (☞ P. 4).
iPod does not play back at
the alarm time even if
SOURCE is set to iPod.
The iPod is not set in the iPod dock. Set the iPod in the iPod dock (☞ P. 2).
ALARM TYPE is set to BEEP. Set ALARM TYPE to SOURCE+BEEP or
SOURCE (☞ P. 4).
Clock flashes and the unit
cannot be operated.
CLOCK on the rear panel is set to SET,
and this unit is in clock setting mode.
Set CLOCK to LOCK.
iPod™
Problem Cause Solution
No sound
The iPod is not set in the iPod dock
firmly.
Set the iPod firmly.
Earphones are connected. Remove the earphones.
The iPod software version has not been
updated.
Download the latest iTunes software to
update the iPod software version to the
latest.
The iPod does not charge up.
The iPod is set in the iPod dock
improperly.
Remove the iPod from the unit, and then set
it in the iPod dock again (☞ P. 2).

SPECIFICATIONS
9 En
English
■ PLAYER SECTION
iPod
• Supported iPod .............iPod (5th generation), iPod classic,
iPod nano, iPod touch
• Supported iPhone ..............iPhone, iPhone 3G, iPhone 3GS
AUX IN
• Input connector
............ STEREO L/R: 3.5 mm (1/8 in) STEREO mini jack
■ AMPLIFIER SECTION
• Maximum output power ..........................4 W + 4 W + 8 W
(6 Ω 1 kHz, 10% THD)
• Driver unit ...................4 cm (1 5/8 in) full-range driver × 2
5.5 cm (2 1/8 in) woofer + SR-Bass × 1
■ TUNER SECTION
• Tuning range
FM...................................................87.50 to 107.90 MHz
AM ......................................................... 530 to 1710 kHz
■ GENERAL
• Power supply ........................................... AC 120 V, 60 Hz
• Power consumption .....................................................10 W
• System off consumption .............................................1.2 W
• Standby consumption...................................... 1.0 W or less
• Dimensions (W × H × D)......................260 × 90 × 141 mm
(10 1/4 × 3 1/2 × 5 1/2 in)
• Weight......................................................... 1.2 kg (2.6 lbs.)
Specifications are subject to change without notice.
iPod™, iPhone™
iPod is a trademark of Apple Inc., registered in the U.S. and
other countries.
iPhone is a trademark of Apple Inc.
“Made for iPod” means that an electronic accessory has been
designed to connect specifically to iPod and has been
certified by the developer to meet Apple performance
standards.
“Works with iPhone” means that an electronic accessory has
been designed to connect specifically to iPhone and has been
certified by the developer to meet Apple performance
standards.
Apple is not responsible for the operation of this device or its
compliance with safety and regulatory standards.
Radio reception
Problem Cause Solution
Too much noise during
stereo broadcast.
The antenna may be connected
improperly.
Make sure the antenna is connected
properly (☞ P. 3).
The radio station you selected may be far
from your area, or the radio wave
reception is weak in your area.
Try manual tuning to improve the signal
quality (☞ P. 7) or use a multi-channel
outdoor antenna.
Even with an outdoor antenna,
radio wave reception is weak.
(Sound is distorted.)
Multipath reflection or other radio
interferences may have occurred.
Change the height, direction, or placement
of the antenna.
Remote control
Problem Cause Solution
The remote control does not
work properly.
The remote control may be operated
outside its operation range.
For information on the remote control
operation range, refer to “Using the remote
control” (☞ P. 1).
The remote control sensor on the unit
may be exposed to direct sunlight or
lighting (inverted fluorescent lamps).
Change the lighting or orientation of the
unit.
The battery may be worn out.
Replace the battery with a new one
(☞ P. 1).
There are obstacles between the sensor of
the unit and the remote control.
Remove the obstacles.
SPECIFICATIONS

i Fr
1 Lire ces instructions.
2 Conserver ces instructions.
3 Tenir compte de tous les avertissements.
4 Suivre toutes les instructions.
5 Ne pas utiliser cet appareil à proximité de l’eau.
6 Nettoyer cet appareil avec un chiffon sec seulement.
7 Ne pas recouvrir les ailettes de ventilation. Installer
l’appareil selon les instructions du fabricant.
8 Ne pas installer près d’une source de chaleur, comme un
appareil de chauffage, une résistance électrique, un
poêle, ou tout autre appareil (amplificateurs compris)
produisant de la chaleur.
9 Ne pas désamorcer le système de sécurité d’une fiche
polarisée ou d’une fiche avec mise à la terre. Une fiche
polarisée est munie de deux lames, dont l’une est plus
large que l’autre. Une fiche avec mise à la terre est munie
de deux lames et d’une broche de terre. La lame la plus
large ou la troisième broche sont reliées à la terre pour
des raisons de sécurité. Si la fiche fournie ne s’insère pas
dans la prise, s’adresser à un électricien pour faire
remplacer la prise obsolète.
10 Protéger le cordon d’alimentation de sorte qu’il ne risque
pas d’être piétiné ou coincé, surtout au niveau des fiches,
des prises et de sa sortie de l’appareil.
11 Utiliser seulement les fixations et accessoires spécifiés
par le fabricant.
12 Utiliser seulement le chariot, socle,
trépied, support ou meuble spécifié par le
fabricant ou vendu avec l’appareil. Si un
chariot est utilisé, faire attention de ne pas
se blesser ou de le renverser pendant le
transport de l’appareil.
13 Débrancher cet appareil pendant les orages électriques,
ou s’il ne doit pas être utilisé pendant un certain temps.
14 Pour toute inspection s’adresser à un personnel qualifié.
Une inspection est nécessaire en cas de dommage, quel
qu’il soit, par exemple cordon d’alimentation ou fiche
endommagé, liquide répandu ou objet tombé à l’intérieur
de l’appareil, exposition de l’appareil à la pluie ou à
l’humidité, fonctionnement anormal ou chute de
l’appareil.
Yamaha et le Groupe des Entreprises Électroniques Grand Public de l’Association des Industries Électroniques
vous demandent de tirer le meilleur parti de votre équipement tout en écoutant à un niveau non dommageable
pour l’ouïe, c’est-à-dire un niveau où vous pouvez obtenir un son fort et clair, sans hurlement ni distorsion, mais
sans aucun danger pour l’ouïe. Comme les sons trop forts causent des lésions auditives qui ne peuvent être
détectées qu’à long terme, lorsqu’il est trop tard, Yamaha et le Groupe des Entreprises Électroniques Grand
Public de l’Association des Industries Électroniques vous déconseillent l’écoute prolongée à des volumes
excessifs.
PRÉCAUTIONS CONCERNANT LA SÉCURITÉ
CAUTION
RISK OF ELECTRIC SHOCK DO
NOT OPEN
ATTENTION : POUR RÉDUIRE LES RISQUES
D’INCENDIE ET DE DÉCHARGE
ELECTRIQUE, NE PAS RETIRER LE
COUVERCLE (OU LE PANNEAU ARRIÈRE).
AUCUNE PIÈCE INTERNE NE PEUT ÊTRE
CHANGÉE PAR L’UTILISATEUR. POUR
L’ENTRETIEN, S’ADRESSER À UN
PERSONNEL QUALIFIÉ.
• Explication des symboles
L’éclair avec une flèche à l’intérieur d’un
triangle équilatéral est destiné à attirer
l’attention de l’utilisateur sur la présence
d’une « tension dangereuse » non isolée à
l’intérieur du produit, pouvant être
suffisamment élevée pour constituer un
risque d’électrocution.
Le point d’exclamation à l’intérieur d’un
triangle équilatéral est destiné à attirer
l’attention de l’utilisateur sur la présence
d’instructions importantes sur l’emploi ou de
la maintenance (réparation) de l’appareil dans
la documentation fournie.
IMPORTANT
Veuillez enregistrer le numéro de série de cet appareil dans
l’espace réservé à cet effet, ci-dessous.
MODÈLE :
No. de série :
Le numéro de série se trouve à l’arrière de l’appareil. Prière
de conserver le mode d’emploi en lieu sûr pour toute
référence future.
Nous vous souhaitons un plaisir musical durable

ii Fr
PRÉCAUTIONS CONCERNANT LA SÉCURITÉ
Informations de la FCC (Pour les clients résidents aux États-Unis)
1 AVIS IMPORTANT : NE PAS APPORTER DE
MOFIDICATIONS À CET APPAREIL !
Ce produit est conforme aux exigences de la FCC s’il
est installé selon les instructions du mode d’emploi.
Toute modification non approuvée expressément par
Yamaha peut invalider l’autorisation, accordée par la
FCC, d’utiliser ce produit.
2 IMPORTANT : N’utiliser que des câbles blindés de
haute qualité pour le raccordement de ce produit à des
accessoires et/ou à un autre produit. Seuls le ou les
câbles fournis avec le produit DOIVENT être utilisés.
Suivre les instructions concernant l’installation. Le
non respect des instructions peut invalider
l’autorisation, accordée par la FCC, d’utiliser ce
produit aux États-Unis.
3 REMARQUE : Ce produit a été testé et déclaré
conforme aux normes relatives aux appareils
numériques de Classe
“B”, telles que fixées dans l’Article 15 de la
Réglementation FCC. Ces normes sont destinées à
assurer une protection suffisante contre les
interférences nuisibles avec d’autres appareils
électroniques dans une installation résidentielle.
Cet équipement génère et utilise des fréquences radio
qui, en cas d’installation et d’utilisation non conformes
aux instructions du mode d’emploi, peuvent être à
l’origine d’interférences empêchant d’autres appareils
de fonctionner.
Cependant, la conformité à la Réglementation FCC ne
garantit pas l’absence d’interférences dans une
installation particulière. Si ce produit devait produire
des interférences, ce qui peut être déterminé en
“ÉTEIGNANT” et en “RALLUMANT” le produit,
l’utilisateur est invité à essayer de corriger le problème
d’une des manières suivantes :
Réorienter ce produit ou le dispositif affecté par les
interférences.
Utiliser des prises d’alimentation branchées sur
différents circuits (avec interrupteur de circuit ou
fusible) ou installer un ou des filtres pour ligne
secteur.
Dans le cas d’interférences radio ou TV, changer de
place l’antenne et la réorienter. Si l’antenne est un
conducteur plat de 300 ohms, remplacer ce câble par
un câble de type coaxial.
Si ces mesures ne donnent pas les résultats escomptés,
prière de contacter le détaillant local autorisé à
commercialiser ce type de produit. Si ce n’est pas
possible, prière de contacter Yamaha Electronics
Corp., États-Unis, 6660 Orangethorpe Ave, Buena
Park, CA 90620.
Les déclarations précédentes NE concernent QUE les
produits commercialisés par Yamaha Corporation of
America ou ses filiales.
AVERTISSEMENT DE LA FCC
Tout changement ou toute modification non approuvé
expressément par le tiers responsable peut aboutir à
l’interdiction de faire fonctionner cet appareil.
POUR LES CONSOMMATEURS CANADIENS
Pour éviter les chocs électriques, introduire la lame la plus
large de la fiche dans la borne correspondante de la prise et
pousser jusqu’au fond.
Cet appareil numérique de la classe B est conforme à la
norme NMB-003 du Canada.

iii Fr
1 Pour utiliser l’appareil au mieux de ses possibilités,
lisez attentivement ce mode d’emploi. Conservez-le
soigneusement pour référence.
2 Installez cet appareil dans un endroit frais, bien aéré,
sec et propre - à l’abri de la lumière du soleil, des
sources de chaleur, des vibrations, des poussières, de
l’humidité et du froid. Pour une aération correcte,
tenez compte des distances minimales suivantes.
Au-dessus : 15 cm (6 po.)
À l’arrière : 10 cm (4 po.)
Sur les côtés : 10 cm (4 po.)
3 Placez l’appareil loin des équipements, moteurs et
transformateurs électriques, pour éviter les
ronflements parasites.
4 N’exposez pas l’appareil à des variations brutales de
température, ne le placez pas dans un environnement
très humide (par exemple dans une pièce contenant
un humidificateur) car cela peut entraîner la
condensation d’humidité à l’intérieur de l’appareil
qui elle-même peut être responsable de décharge
électrique, d’incendie, de dommage à l’appareil ou de
blessure corporelle.
5
Evitez d’installer l’appareil dans un endroit où des
objets peuvent tomber, ainsi que là où l’appareil pourrait
être exposé à des éclaboussures ou des gouttes d’eau.
Sur le dessus de l’appareil, ne placez pas :
–
d’autres appareils qui peuvent endommager la
surface de l’appareil ou provoquer sa décoloration.
–
des objets se consumant (par exemple, une bougie)
qui peuvent être responsables d’incendie, de
dommage à l’appareil ou de blessure corporelle.
– des récipients contenant des liquides qui peuvent
être à l’origine de décharge électrique ou de
dommage à l’appareil.
6
Ne couvrez pas l’appareil d’un journal, d’une nappe,
d’un rideau, etc. car cela empêcherait l’évacuation de la
chaleur. Toute augmentation de la température
intérieure de l’appareil peut être responsable d’incendie,
de dommage à l’appareil ou de blessure corporelle.
7 Ne branchez pas la fiche du câble d’alimentation de
l’appareil sur une prise secteur aussi longtemps que
tous les raccordements n’ont pas été effectués.
8 Ne pas faire fonctionner l’appareil à l’envers. Il
risquerait de chauffer et d’être endommagé.
9 N’exercez aucune force excessive sur les
commutateurs, les boutons et les cordons.
10 Pour débrancher la fiche du câble d’alimentation au
niveau de la prise secteur, saisissez la fiche et ne tirez
pas sur le cordon.
11 Ne nettoyez pas l’appareil au moyen d’un solvant
chimique, ce qui pourrait endommager la finition.
Utilisez un chiffon sec et propre.
12 N’alimentez l’appareil qu’à partir de la tension
prescrite. Alimenter l’appareil sous une tension plus
élevée est dangereux et peut être responsable
d’incendie, de dommage à l’appareil ou de blessure
corporelle. Yamaha ne saurait être tenue responsable
des dommages résultant de l’alimentation de
l’appareil sous une tension autre que celle prescrite.
13 Pour empêcher tout dommage causé par les éclairs,
déconnectez la câble d’alimentation et toute antenne
extérieure de la prise murale pendant un orage.
14 Ne tentez pas de modifier ni de réparer l’appareil.
Consultez le service Yamaha compétent pour toute
réparation qui serait requise. Le coffret de l’appareil
ne doit jamais être ouvert, quelle que soit la raison.
15 Si vous envisagez de ne pas vous servir de l’appareil
pendant une longue période (par exemple, pendant
les vacances), débranchez la fiche du câble
d’alimentation au niveau de la prise secteur.
16 Lisez la section intitulée « GUIDE DE
DÉPANNAGE » où figurent une liste d’erreurs de
manipulation communes avant de conclure que
l’appareil présente une anomalie de fonctionnement.
17 Avant de déplacer l’appareil, appuyez sur pour
éteindre le système puis débranchez la fiche du câble
d’alimentation au niveau de la prise secteur.
18 La condensation se forme lorsque la température
ambiante change brusquement. En ce cas, débranchez
la fiche du câble d’alimentation et laissez l’appareil
reposer.
19 La température de l’appareil peut augmenter en
raison d’une utilisation prolongée. En ce cas, coupez
l’alimentation de l’appareil et laissez-le au repos pour
qu’il refroidisse.
20 Installez cet appareil à proximité de la prise secteur et
à un emplacement où la fiche du câble d’alimentation
est facilement accessible.
21 Les piles ne doivent pas être exposées à une chaleur
extrême, par exemple au soleil, à une flamme, etc.
Lors de la mise au rebut des piles, suivez vos
réglementations locales.
22 Utilisez l’adaptateur secteur fourni avec cet appareil.
L’emploi de tout autre adaptateur secteur peut causer
un incendie ou endommager l’appareil.
ATTENTION : VEUILLEZ LIRE CE QUI SUIT AVANT D’UTILISER
L’APPAREIL.
Cet appareil n’est pas déconnecté du secteur tant qu’il reste
branché à la prise de courant, même si l’appareil en soi est
éteint par la touche . Dans cet état, l’appareil consomme
une très faible quantité de courant.
AVERTISSEMENT
POUR RÉDUIRE LES RISQUES D’INCENDIE OU DE
DÉCHARGE ÉLECTRIQUE, N’EXPOSEZ PAS CET
APPAREIL À LA PLUIE OU À L’HUMIDITÉ.
ATTENTION
Danger d’explosion si la pile n’est pas remplacée correctement.
La remplacer par une pile de type identique ou équivalent.
Il y a un risque possible de création d’interférences,
visibles sur les images en couleurs si cet appareil est placé
à côté d’un téléviseur à tube cathodique (tube de Braun).
Dans ce cas, éloigner l’unité du téléviseur.

1 Fr
Français
PREPARATION
■ Caractéristiques
– Lecture de haute qualité d’un iPod/d'un iPhone, de la radio et de dispositifs audio externes.
– Son grave ferme et son stéréo spacieux depuis le système haut-parleur à 2.1 canaux (tweeter × 2, haut-
parleur de graves × 1), SR-Bass™ (technologie Yamaha Swing Radiator Bass) et DSP dans un appareil
compact.
– Interface à boutons facile et intuitive pour l’utilisateur avec DEL guides et molettes.
■ Quelques mots sur ce mode d’emploi
• Cet appareil est compatible avec l’iPod ainsi que l’iPhone. « iPod » indiqué dans ce manuel peut
également faire référence à « iPhone ».
• Ce mode d’emploi indique comment faire fonctionner cet appareil en utilisant les boutons sur l’appareil.
Certaines de ces fonctions sont également disponibles en utilisant la télécommande.
■ Accessoires fournis
■ Utilisation de la télécommande ■ Remplacement de la pile de la
télécommande
NOM DES PARTIES ET LEURS FONCTIONS
............................................................................... 2
FONCTIONS DE BASE...................................... 4
ÉCOUTE DE L’iPod™ ET DE SOURCES
EXTERNES.......................................................... 6
ÉCOUTE DES STATIONS RADIO...................7
GUIDE DE DÉPANNAGE..................................8
CARACTÉRISTIQUES TECHNIQUES...........9
Télécommande Adaptateur
secteur
Cordon
d’alimentation
Cache station
d’accueil
Antenne intérieure FM
Antenne cadre AM
(CC 15 V, 2,66 A,
numéro de modèle :
NU40-2150266-I3)
À moins de 6 m
(20’)
Pile
CR2025
TABLE DES MATIÈRES

2 Fr
■ Panneau avant et supérieur
1 : Appuyez pour allumer/éteindre le système.
L’heure est affichée même lorsque le système est
éteint.
y
• Appuyez et maintenez sur la partie supérieure de
l’appareil pendant plus de 3 secondes pour mettre le
système en mode veille. Toutes les informations de
l’afficheur ne s’affichent pas en mode veille. Cela peut
réduire la consommation d’électricité. Pour annuler le
mode veille, appuyez sur .
• Si le système est éteint/en mode veille, la fonction
d’alarme est disponible.
2 TIMER : Réglage de la minuterie (☞ P. 5)
3 ALARM : Alarme activée/désactivée (☞ P. 4)
4 SET : Paramètres de l’alarme (☞ P. 4)
5 Afficheur
6 SOURCE : iPod, AUX, RADIO
7 VOLUME : Réglage du volume
8 PRESET : Mémorisation de vos 5 stations radio FM
et de vos 5 stations radio AM favorites (☞ P. 7)
9 SNOOZE/SLEEP (☞ P. 5)
0 DIMMER : Réglage de la luminosité de l’afficheur
A (auto) 3 (le plus lumineux) 2 1 (le plus
sombre) retour à A
y
Lorsque réglé sur A (auto), la luminosité de l’afficheur
s’ajuste automatiquement en fonction de la luminosité de
la chambre.
A MEMORY (☞ P. 7)
B TUNING (☞ P. 7)
C FM, AM : Commutation FM/AM
D Station d’accueil iPod : Placez un iPod.
y
Recouvrez la station d’accueil iPod avec le cache station
d’accueil lorsque vous ne l’utilisez pas.
E Capteur d’illumination : Mesure le niveau
d’illumination ambiante. Ne pas couvrir ce capteur.
NOM DES PARTIES ET LEURS FONCTIONS
Placez votre iPod dans la station d’accueil iPod
(voir D ci-dessous).
y
L’iPod se charge lorsqu’il est placé dans la station
d’accueil iPod.
• Afin d’assurer la connexion, veuillez utiliser un
adaptateur station d’accueil compatible fourni avec
l’iPod.
• Il est possible que l’iPod soit mal inséré dans la
station d’accueil iPod, s’il se trouve dans son etui
protecteur.
Remarques
Adaptateur station d’accueil

NOM DES PARTIES ET LEURS FONCTIONS
3 Fr
Français
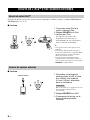
■ Panneau arrière
■ Branchement d’antennes
■ Télécommande
• L’antenne doit être déployée.
• Si la réception de la radio est
mauvaise, changez la hauteur,
le sens ou la disposition de
l’antenne.
• Si vous utilisez une antenne
extérieure au lieu de l’antenne
fournie, la réception sera
meilleure.
15V : Branchez l’adaptateur
secteur fourni et le cordon
d’alimentation
AUX : Branchez un
dispositif audio
externe. (☞ P. 6)
Borne d’antenne
(voir ci-dessous.)
Commutateur ALARM TYPE (☞ P. 4)
Commutateur CLOCK (☞ P. 4)
TONE CONTROL : Les aigus et
les graves seront plus accentués en
tournant la molette dans le sens
des aiguilles d’une montre.
Antenne intérieure
FM (fournie)
Antenne cadre AM (fournie) : Connectez le cordon
noir à GND et le cordon blanc à AM ANT.
Masse (prise GND) : Pour réduire au minimum les
interférences, reliez la prise GND de l’antenne à une
bonne masse. Une bonne masse peut être un pieu de
métal enfoncé dans un sol humide.
Remarques
: Allumer/éteindre système
Touches de sélection de
source : iPod, AUX, RADIO.
Le bouton RADIO commute entre
FM/AM lorsque SOURCE est
réglé sur RADIO.
Touches de réglage iPod
SLEEP : Réglage de la mise
en veille (☞ P. 5)
ALARM : Alarme activée/
désactivée (☞ P. 4)
Feuille isolante de la pile :
retirer avant usage.
PRESET : Sélectionnez la station
radio présélectionnée. (☞ P. 7)
VOLUME : Réglage du volume
TUNING : Syntonisation
de la radio (☞ P. 7)
Transmetteur de signaux
infrarouges

4 Fr
OPERATION
Cet appareil peut lire l’iPod/la radio et/ou faire retentir le bip à l’heure que vous avez définie.
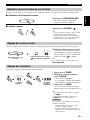
■ Réglage de l’alarme et du son
■ Activer/désactiver l’alarme
FONCTIONS DE BASE
Réglage de l’horloge
1Réglez CLOCK sur SET.
2 Réglez l’heure avec TUNING.
3Réglez CLOCK sur LOCK.
Les paramètres de l’heure se perdent après plus ou
moins une semaine après avoir débranché l’appareil.
Panneau
arrière
L’afficheur clignote.
Remarque
Réglage de l’alarme
1 Appuyez sur SET.
2 Réglez l’heure d’alarme avec
TUNING.
3Réglez ALARM TYPE.
• SOURCE+BEEP : source
sélectionnée (lue jusqu’à 3 minutes
avant l’heure d’alarme) et bip sonore
(lu à l’heure d’alarme)
• SOURCE : source sélectionnée
• BEEP : uniquement bip sonore
Lorsque vous sélectionnez SOURCE+BEEP
ou SOURCE, sélectionnez :
• iPod : cet appareil continue la lecture
de la chanson que vous écoutiez la
dernière fois.
• RADIO : cet appareil lit la station radio
que vous écoutiez la dernière fois.
4 Réglez le volume de l’alarme.
5 Appuyez sur SET.
L’alarme est réglée et l’indicateur
d’alarme ( ) s’illumine.
Lorsqu’iPod est sélectionné en tant que source,
placez l’iPod dans la station d’accueil iPod
(☞ P. 2). Si l’iPod n’est pas placé au moment
de l’alarme, vous entendrez le bip sonore.
Activer/désactiver la fonction
d’alarme.
Lorsque l’alarme est activée, l’indicateur
d’alarme ( ) s’allume et l’heure
d’alarme s’affiche pendant un moment.
L’indicateur d’alarme
( ) et l’afficheur
clignotent.
Remarque
Panneau arrière (comme souhaité)
La page est en cours de chargement...
La page est en cours de chargement...
La page est en cours de chargement...
La page est en cours de chargement...
La page est en cours de chargement...
La page est en cours de chargement...
La page est en cours de chargement...
La page est en cours de chargement...
-
 1
1
-
 2
2
-
 3
3
-
 4
4
-
 5
5
-
 6
6
-
 7
7
-
 8
8
-
 9
9
-
 10
10
-
 11
11
-
 12
12
-
 13
13
-
 14
14
-
 15
15
-
 16
16
-
 17
17
-
 18
18
-
 19
19
-
 20
20
-
 21
21
-
 22
22
-
 23
23
-
 24
24
-
 25
25
-
 26
26
-
 27
27
-
 28
28


Yamaha TSX-80 Le manuel du propriétaire
- Catégorie
- Réveils
- Taper
- Le manuel du propriétaire
dans d''autres langues
- English: Yamaha TSX-80 Owner's manual
Documents connexes
-
Yamaha TSX-80 Le manuel du propriétaire
-
-
Yamaha TSX-70 Le manuel du propriétaire
-
Yamaha ISX-800 Le manuel du propriétaire
-
-
-
Yamaha TSX-132 Le manuel du propriétaire
-
Yamaha MCR-042 Le manuel du propriétaire
-
Yamaha MCR-B142 Le manuel du propriétaire
-
Yamaha TSX-W80 Le manuel du propriétaire
