Thermo Fisher Scientific Ion GeneStudio S5 Food Protection System Mode d'emploi
- Taper
- Mode d'emploi

Ion GeneStudio™ S5 Food Protection System
Publication Number MAN0017966 Revision B.0
■Site preparation workow .............................................. 1
■Site preparation checklist ............................................... 3
■Customer responsibilities ............................................... 4
■Site requirements ...................................................... 5
■Materials for installation and operation ................................. 20
■Receive and inspect the shipment ....................................... 21
■Move the crated instrument to the installation site ........................ 21
■Related documentation and support .................................... 22
This guide contains the information that is needed to prepare your site for installation
of an Ion GeneStudio™ S5 Food Protection System, Ion GeneStudio™ S5 Plus Food
Protection System, and Ion GeneStudio™ S5 Prime Food Protection System. An
external Ion Torrent™ Server is required for use with the Ion GeneStudio™ S5 Prime
Food Protection Instrument and is included in the Ion GeneStudio™ S5 Prime Food
Protection System.
Note: In this guide, Ion GeneStudio™ S5 Food Protection Instrument or System refers
generically to the series of three Ion GeneStudio™ S5 Food Protection Instruments or
Systems, unless otherwise specied.
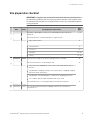
Site preparation workflow
A Thermo Fisher Scientic representative will contact you to schedule the installation.
When the installation is scheduled:
1. Receive and inspect the shipment of the Ion GeneStudio™ S5 Food Protection
System (see “Receive and inspect the shipment“ on page 21).
2. Move the crated Ion GeneStudio™ S5 Food Protection Instrument to the
installation site (see “Move the crated instrument to the installation site“ on
page 21).
3. Complete the site preparation checklist (see “Site preparation checklist“ on
page 3).
4. Ensure that:
• The site preparation checklist is complete.
• The purchase order is complete.
SITE PREPARATION GUIDE
For testing of Food and Environmental samples only.

After your Ion GeneStudio™ S5 Food Protection Instrument is uncrated, installation
and testing of the Ion GeneStudio™ S5 Food Protection System takes approximately
8 hours.
The Ion Chef™ Food Protection System is purchased and installed separately.
Installation requires an additional 4 to 6 hours.
During or after installation, the Thermo Fisher Scientic service representative
reviews data and provides basic operator training. For additional training and
reference information, see the user documents that are provided with the Ion
GeneStudio™ S5 Food Protection System.
Installation
timeline and
training
Site preparation workflow
2
Ion GeneStudio
™
S5 Food Protection System Site Preparation Guide

Site preparation checklist
IMPORTANT! Complete, date, and initial all items in the following checklist before
the scheduled installation date. If the site preparation checklist is not complete when
the Thermo Fisher Scientic service representative arrives, the scheduled installation
can be postponed.
3Date Initials Site preparation requirement See
page
Customer responsibilities have been reviewed and personnel have been
assigned.
4 −5
The installation site is identified and meets requirements:
Space and clearance
5
Environmental 13
Electrical 16
Network 18 −22
Safety 19 −23
All materials needed for installation and operation are available. 20
The instrument was received and inspected: 21
All items on the shipping list are the same items ordered at the time of
purchase.
Any damage to shipping containers was reported to the shipping company
that delivered the instrument.
Any damage or mishandling was recorded on the shipping documents.
The reagents box was unpacked and stored as specified.
The installation site is cleared and ready for instrument installation. 21
The crated instrument and other shipping containers are moved to the
installation site.
Site preparation checklist
Ion GeneStudio
™
S5 Food Protection System Site Preparation Guide
3

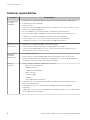
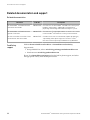
Customer responsibilities
Personnel Responsibilities
Site preparation/
installation
coordinator
• Reviews the site preparation guide for safety information and instrument requirements.
• Coordinates personnel and tasks.
• Chooses the site.
• Reviews checklists with applicable personnel, then with the service representative to verify
that the site is properly prepared.
• Receives and inspects the Ion GeneStudio™ S5 Food Protection Instrument.
• Stores the reagents box according to the specifications indicated in the product inserts.
• Schedules the installation and informs personnel of the installation day.
• Ensures that the site is clear of unnecessary material on the installation day.
• Is available to assist the service representative throughout installation.
Laboratory safety
representative
• Reviews the site preparation guide for safety information.
• Ensures that the required safety practices and equipment are in place.
• Is in the vicinity and available to the service representative at all times while the service
representative is at the customer's facility.
Laboratory
personnel/
primary users
• Review safety information.
• Ensures that all customer-provided materials for installation are present at the site.
• Ensures that primary users (responsible for training other users) are available during the
installation, so that they can be trained on the instrument.
Facilities
personnel
• Ensures that the installation requirements are met for:
– Space at the installation site
– Building clearances
– Temperature and humidity
– Waste collection
– Electrical supply
– Computer
– Safety and installation materials
• If possible, moves the crated Ion GeneStudio™ S5 Food Protection Instrument to the site
before the installation date.
• Is available to assist service representative and laboratory personnel throughout
installation.
• If applicable, ensures that at least two people are available to help the service representative
move and position the instrument.
Customer responsibilities
4
Ion GeneStudio
™
S5 Food Protection System Site Preparation Guide

Personnel Responsibilities
Network or IT
specialist (if the
instrument will
be connected to a
network)
• Ensures that active, tested local area network (LAN) connections are in place before the
scheduled installation date.
• Ensures that network hardware is compatible with an RJ45-type connector.
• If necessary, supplies additional cables.
• Is available during installation to connect the Ion GeneStudio™ S5 Food Protection
Instrument to the network.
• If applicable, provides and installs a network or dedicated printer.
IMPORTANT! Do not attempt to connect the Ion GeneStudio™ S5 Food Protection Instrument
components to the network before the service representative arrives.
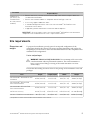
Site requirements
To prepare for installation, provide space for receipt and conguration of the
components listed in this section. This section provides dimensions and weights for
the packages you will receive, and it describes the dimensions of the components after
installation and conguration.
Crates and packages
WARNING! PHYSICAL INJURY HAZARD. Do not aempt to lift or move the
crated instrument without professional assistance. The crated instrument is
heavy. Any incorrect lifting or moving of the crated instrument can cause
serious injury.
Ensure that the building clearances allow for the passage of the instrument crates and
packages.
Crate Height Length (depth) Width Weight
Ion GeneStudio™ S5 Food Protection
Instrument 25.5 in (64.8 cm) 39 in (99 cm) 28 in (71.1 cm) 200 lbs (90.7 kg)
Ion GeneStudio™ S5 Plus Food
Protection Instrument 25.5 in (64.8 cm) 39 in (99 cm) 28 in (71.1 cm) 200 lbs (90.7 kg)
Ion GeneStudio™ S5 Prime Food
Protection Instrument 25.5 in (64.8 cm) 39 in (99 cm) 28 in (71.1 cm) 200 lbs (90.7 kg)
Ion Torrent™ Server[1] 28.3 in (71.9 cm) 27.8 in (70.6 cm) 13.5 in (34.3 cm) 116.9 lbs (53.0 kg)
Ion Chef™ Food Protection Instrument 28 in (71.1 cm) 34 in (86.4 cm) 34 in (86.4 cm) 295 lbs (134.0 kg)
[1] Required for use with the Ion GeneStudio™ S5 Prime Food Protection Instrument.
Dimensions and
weights
Site requirements
Ion GeneStudio
™
S5 Food Protection System Site Preparation Guide
5

Components
Ensure that the installation site bench space is level and can accommodate the
dimensions and support the weights.
Component
Height Length
(depth)
Width
Weight
Open Closed Open Closed
Ion GeneStudio™ S5 Food
Protection Instrument —20 in
(50.9 cm)
31.75 in
(80.6 cm)
34 in
(86.4 cm)
21.4 in
(54.2 cm)
140 lbs
(63.5 kg)
Ion GeneStudio™ S5 Plus Food
Protection Instrument —20 in (50.9
cm)
31.75 in
(80.6 cm)
34 in (86.4
cm)
21.4 in (54.2
cm)
140 lbs
(63.5 kg)
Ion GeneStudio™ S5 Prime Food
Protection Instrument —20 in (50.9
cm)
31.75 in
(80.6 cm)
34 in (86.4
cm)
21.4 in (54.2
cm)
140 lbs
(63.5 kg)
Ion Torrent™ Server[1] —17.5 in (44.4
cm)
27.5 in (69.8
cm) —12.1 in (30.8
cm)
101.4 lbs
(46.0 kg)
Ion Chef™ Food Protection
Instrument
33 in
(83.9 cm)
22.1 in
(56.1 cm)
27.6 in
(70.0 cm) —28.1 in
(71.4 cm)
150 lbs
(68.2 kg)
[1] Required for use with the Ion GeneStudio™ S5 Prime Food Protection Instrument.
WARNING! PHYSICAL INJURY HAZARD.
Do not aempt to lift or move the instrument without professional help. The
instrument is heavy. Any incorrect lifting or moving of the instrument can
cause serious injury.
Site requirements
6
Ion GeneStudio
™
S5 Food Protection System Site Preparation Guide

During instrument setup and maintenance, it is necessary to access the back and sides
of all instruments. If the back of an instrument component faces a wall, it is necessary
to have enough space to allow rotation of the instrument on the bench for access.
IMPORTANT! For safety, the power outlet that is used for powering the instrument
components must be accessible always.
Component Top Front Left/right Back
Ion GeneStudio™ S5 Food Protection
Instrument 12.0 in (30.5 cm) 12.0 in (30.5 cm)[1] 4.0 in/12 in
(10.0 cm/30.5 cm) [2] 12.0 in (30.5 cm)
Ion GeneStudio™ S5 Plus Food
Protection Instrument 12.0 in (30.5 cm) 12.0 in (30.5 cm)[1] 4.0 in/12 in
(10.0 cm/30.5 cm) [2] 12.0 in (30.5 cm)
Ion GeneStudio™ S5 Prime Food
Protection Instrument 12.0 in (30.5 cm) 12.0 in (30.5 cm)[1] 4.0 in/12 in
(10.0 cm/30.5 cm) [2] 12.0 in (30.5 cm)
Ion Torrent™ Server 2.0 in (5.0 cm) 12.0 in (30.5 cm) 2.0 in (5.0 cm) 61.0 cm (24.0 in)
Ion Chef™ Food Protection
Instrument 14 in (35.6 cm) 6.7 in (17.0 cm) 4.0 in (10.0 cm) 4.0 in (10.0 cm)
[1] The instrument requires 36.0 in (90.0 cm) aisle in front of bench for operator access.
[2] To allow sufficient clearance for the instrument door to open.
If any of the instruments will be placed on a mobile bench, verify that the bench is
level and meets the requirements in “Crates and packages“ on page 5.
IMPORTANT! All instruments must be installed on a level surface.
Note: Thermo Fisher Scientic is not responsible for any damage caused by using a
laboratory bench that does not meet the minimum weight capacity requirements
mentioned above.
The Ion GeneStudio™ S5 Food Protection Instrument uses a virtual server, and the Ion
GeneStudio™ S5 Plus Food Protection Instrument is equipped with an internal Ion
Torrent™ Server. These instruments are not connected to an external Ion Torrent™
Server.
The Ion GeneStudio™ S5 Prime Food Protection System includes the Ion GeneStudio™
S5 Prime Food Protection Instrument and an external Ion Torrent™ Server. We support
the layout in which the external Ion Torrent™ Server is connected directly to the Ion
GeneStudio™ S5 Prime Food Protection Instrument, instead of through a local area
network from a remote location such as a server room. Data are most robustly
transferred from the Ion GeneStudio™ S5 Prime Food Protection Instrument to the Ion
Torrent™ Server when they are connected directly by a standard Category 6 Ethernet
cable that is provided with the installation materials.
IMPORTANT! The Ion GeneStudio™ S5 Prime Food Protection Instrument must be
connected to the Ion Torrent™ Server by a standard Category 6 Ethernet cable. We do
not troubleshoot data transfer problems that are associated with an indirect
connection between the Ion GeneStudio™ S5 Prime Food Protection Instrument and
the Ion Torrent™ Server.
Instrument
clearances
Placement of the
instruments
Ion GeneStudio™
S5 Food
Protection System
component
configuration and
layout
Site requirements
Ion GeneStudio
™
S5 Food Protection System Site Preparation Guide
7

6
5
4
2
1
3
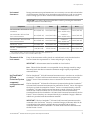
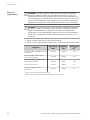
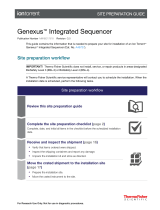
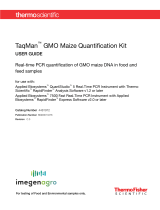
Ion GeneStudio™ S5 Prime Food Protection System configuration
1Ion GeneStudio™ S5 Prime Food
Protection Instrument
2Ion template preparation instrument
(Ion Chef™ Instrument (shown) or
Ion OneTouch™ 2 System)
3Ion Torrent™ Server
4Local area network
5Internet
6Client computer
5
3
4
1
2
Ion GeneStudio™ S5 Food Protection System, or Ion GeneStudio™ S5 Plus Food Protection
System configuration
1Ion GeneStudio™ S5 Food Protection Instrument, or Ion GeneStudio™ S5 Plus Food
Protection Instrument
2Ion template preparation instrument (Ion Chef™ Instrument (shown) or Ion OneTouch™ 2
System)
3Local area network
4Internet
5Client computer
Site requirements
8
Ion GeneStudio
™
S5 Food Protection System Site Preparation Guide

The Ion GeneStudio™ S5 Food Protection Instrument should be connected to a
network with internet access. Connecting to the Internet allows you to update your
software and access remote system support easily. Software updates through the
network/Internet are free. If you do not connect your instrument or server to a
network, software updates must be manually installed via USB.
IMPORTANT! Thermo Fisher Scientic does not support the USB method for
updating software.
Any problems (for example, le corruption, incomplete updates) resulting from
update of the instrument or server using a USB device that require correction of the
faulty update is not covered by your Ion GeneStudio™ S5 Food Protection System
warranty or any service contract you may have bought. You are required to schedule
an on-site Time and Materials visit by a eld service engineer to correct the problem
at your own expense.
In providing outbound access to the Internet from the server, you enable the support
team to provide inbound support. The Ion GeneStudio™ S5 Food Protection
Instrument runs a remote monitor agent that can provide service personnel with
critical system information, such as installed software versions and instrument
alarms. With your permission, the agent also allows service personnel to access
remotely the Ion GeneStudio™ S5 Food Protection Instrument, which is required for
system support. Without remote access, service personnel cannot access, view, and
troubleshoot problems regarding machine performance.
To enable full support, the Ion Torrent™ Server must have outbound internet access
(ports 22, 80, and 443) and be behind an appropriately congured rewall. Although
not recommended, you can enable access to the Torrent Browser (the web server
running on the Ion Torrent™ Server from the Internet). If you provide such access, you
must restrict access to the server using HTTP and AUTH rewall rules, or a
combination of the two. Implementing and maintaining such restrictions is the
responsibility of your server administrator and not of Thermo Fisher Scientic.
When preparing for system installation, you must plan the layout of your laboratory
to accommodate library and template preparation activities, in addition to those
related to chip preparation and sequencing. This section describes the stations
involved in the sequencing workow and the basic laboratory layouts.
Layout of instruments and equipment
When designing your PCR laboratory layout, follow good laboratory practices to
ensure reliable and contamination-free PCR results. Pay particular aention to the
need to separate the areas for pre- and post-PCR activities. Isolating the amplicon
source, separating pre-PCR from post-PCR activities, and dedicating laboratory
supplies and/or equipment to each space can signicantly reduce the potential for
contamination.
You can deploy the system in both one- and two-room laboratory congurations. The
two-room layout is highly recommended due to the protection that it aords against
contamination. However, the suboptimal one-room layout produces acceptable results
when proper precautions are observed.
Internet
connectivity
Planning the
installation
Site requirements
Ion GeneStudio
™
S5 Food Protection System Site Preparation Guide
9

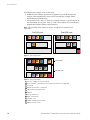
If you deploy the system in a one-room layout:
• Establish clearly-labeled, separate sets of pipees for pre-PCR activities (for
example, DNA amplication) and post-PCR activities (for example, library
purication and quantication).
• Always move from "clean" to "dirty" (for example, from pre- to post-PCR). We do
not recommend moving from "dirty" to "clean" (for example, do not handle post-
amplication samples and then make libraries).
Note: The positions of the stations in the pre- and post- PCR rooms are not
important.
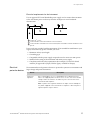
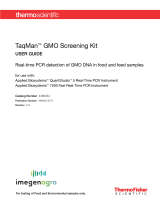
4
Pre-PCR room Post-PCR room
65
33 9 8 6
7
10 11
2
1
4
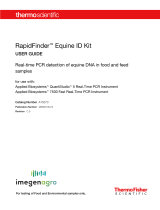
Figure 1 Two-room layout
Post-PCR Area
5
3
8
6
72
1
6
9
Pre-PCR Area
10 11
4
3
Figure 2 One-room layout
1Ion Chef™ Food Protection Instrument
2Ion GeneStudio™ S5 Food Protection Instrument and server, if applicable
3Centrifuge
4Amplification mixture setup hood
5Library pool preparation hood
6Pipettes
7Gel electrophoresis
8Qubit™ Fluorometer
9Thermal cycler
10 Sample homogenization station
11 DNA extraction station
Site requirements
10
Ion GeneStudio
™
S5 Food Protection System Site Preparation Guide

Laboratory workstations
The following table describes workstations that are associated with a generic
laboratory layout. The stations are categorized in terms of their involvement pre- and
post-PCR activities. Note that some stations (pipee and centrifuge) are present in
both environments, but the equipment is not necessarily shared between the pre- and
post-PCR stations.
# Station Location Description/requirements
1 Ion Chef™ Food
Protection
Instrument
Post-PCR
area
When planning the placement of the instrument, ensure that the location
meets all clearance and environmental requirements described in this
document.
Note: If possible, connect the instrument to a dedicated power outlet.
2 Ion GeneStudio™
S5 Food
Protection
Instrument
Post-PCR
area
When planning the placement of the instrument, ensure that the location
meets all clearance and environmental requirements described in this
document.
Note: If possible, connect the instrument to a dedicated power outlet.
IMPORTANT! The instrument is sensitive to electrical noise, vibration, and
temperature changes.
3 Centrifuges Pre- and
post-PCR
areas
Centrifuges are used during library preparation, so access is required in both
the pre- and post-PCR areas.
When planning centrifuge placement:
• Consider dedicating separate centrifuges for the pre- and post-PCR
operations to minimize contamination.
• If only one centrifuge is available, place it in a central location, which is
accessible from both areas.
• To limit vibrational interference, do not place centrifuges on the same
bench as the Ion GeneStudio™ S5 Food Protection Instrument.
• Most importantly, place the centrifuges in convenient locations.
4Amplification
mixture setup
hood
Pre-PCR
area
Whenever possible, perform amplification mixture preparation in a dedicated
hood. When selecting a location for amplification mixture preparation:
• The amplification mixture setup station requires a set of dedicated
pipettes.
• If only one hood is available in the pre-PCR area, dedicate the hood for
amplification mixture preparation.
• If a hood is unavailable in the pre-PCR area, select a bench that is
sterilized regularly and preferably isolated from the neighboring
stations.
IMPORTANT! Separation of the amplification mixture preparation area
from the other stations is critical to preventing contamination.
Site requirements
Ion GeneStudio
™
S5 Food Protection System Site Preparation Guide
11

# Station Location Description/requirements
5 Library pool
preparation hood
Post-PCR
area
Whenever possible, perform library pool preparation in a dedicated hood. The
use of a dedicated hood allows for UV treatment of the library pool
preparation area and minimizes contamination from post-PCR material
containing adaptors.
When selecting a location for library pool preparation:
• In a one-room laboratory layout, the use of a dedicated hood for library
pool preparation is highly recommended, but not required.
• The library pool area setup station requires a set of dedicated pipettes.
• If a dedicated hood is unavailable, select a bench that is preferably
isolated from the neighboring stations.
6 Pipettes Pre- and
post-PCR
areas
Both the pre- and post-PCR areas require a complete set of dedicated
pipettes.
7 Gel
electrophoresis
Post-PCR
area
Whenever possible, perform gel electrophoresis in a dedicated hood. The use
of a dedicated hood allows for UV treatment and minimizes contamination.
When selecting a location for gel electrophoresis of post-PCR material.
• In a one-room laboratory layout, we highly recommend the use of a
dedicated hood for gel electrophoresis.
• If a dedicated hood is unavailable, select a bench that is isolated from
the neighboring stations.
8 Qubit™ System Post-PCR
area
You can use the Qubit™ 4 Fluorometer to perform library quantification or
quality control following PCR or just before library preparation.
9 Thermal cycler Post-PCR
area
Use a 96-well thermal cycler to perform amplification during library
preparation. When selecting a location for the thermal cycler, ensure that the
location meets all clearance and environmental requirements for the
instrument.
10 Sample
homogenization
station
Pre-PCR
area
The sample homogenization working area should be properly cleaned before
and after processing each sample to prevent cross-contamination with other
processed samples.
Cleaning of the sample homogenization working area should include
products for disinfection and cleaning and removal of DNA (such as ethanol
(70%), bleach (1:10), or commercial DNA removal products).
If possible, disposable table covers replaced after each sample can be used
to minimize the risk of cross-contamination.
11 DNA extraction
station
Pre-PCR
area
In those steps where opening microtubes is required or discarding solutions
and supernatants is necessary, all samples must be handled carefully to
avoid cross-contamination and bias of DNA sequencing results.
Cleaning of the sample homogenization working area should include
products for disinfection and cleaning and removal of DNA (such as ethanol
(70%), bleach (1:10), or commercial DNA removal products).
Site requirements
12
Ion GeneStudio
™
S5 Food Protection System Site Preparation Guide

Ensure that the installation room is maintained under correct environmental
conditions. Avoid placing the instrument or server next to heaters, cooling ducts, or in
direct sunlight. Place the instrument at least 1 meter away from major sources of
electronic noise such as refrigerators or microwaves. Fluctuations between day and
night temperatures can cause system instability.
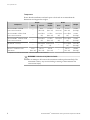
Component Acceptable range
Altitude Locate between sea level and 6,500 ft (2,000 m) above sea level
Humidity Ion GeneStudio™ S5 Food Protection Instrument: 40–60%, non-condensing
Ion Chef™ Food Protection Instrument: 40–60%, non-condensing
Operating
Temperature
Ion GeneStudio™ S5 Food Protection Instrument: 20°C to 30°C (68°F to
86°F)
Note: The room temperature must not fluctuate more than 2°C over a
2‑hour period.
Ion Chef™ Food Protection Instrument: 20°C to 25°C (68°F to 77°F)
Vibration Install the instrument(s) on benches that have no contact with equipment
that causes vibration (freezers, pumps, and similar equipment).
Significant vibration during sequencing can add noise and reduce the
quality of the sequencing measurements.
Note: Where possible we recommend placing the Ion GeneStudio™ S5
Food Protection Instrument on a separate bench from the Ion
GeneStudio™ S5 Food Protection Instrument because the Ion Chef™ Food
Protection Instrument can itself cause vibration.
Pollution The Ion GeneStudio™ S5 Food Protection Instrument and the Ion Chef™
Food Protection Instrument are for use in Office or Laboratory controlled
environments.
Overvoltage
category
The Ion GeneStudio™ S5 Food Protection Instrument and the Ion Chef™
Food Protection Instrument have installation (overvoltage) categories of
II (2), and are classified as portable equipment.
Other
conditions
For indoor use only. Install the Ion GeneStudio™ S5 Food Protection
Instrument on a level surface. The installation location must be away from
any vents that could expel particulate material on the system
components.
Environmental
requirements
Site requirements
Ion GeneStudio
™
S5 Food Protection System Site Preparation Guide
13

Thermal specifications for the instrument
During operation, the thermal outputs based on the typical current draw of the
components are:
Component Typical draw (W) Thermal output (BTU/h)
Ion GeneStudio™ S5 Food
Protection Instrument 520[1] 1,774
Ion GeneStudio™ S5 Plus Food
Protection Instrument 700[1] 2,388
Ion GeneStudio™ S5 Prime Food
Protection Instrument 700[1] 2,388
Ion Torrent™ Server 1,100 3,753
Ion Chef™ Food Protection
Instrument 990 3,378
[1] Maximum draw: 1,350W
Ion GeneStudio™ S5 Food Protection Instrument: Allow at least 12 inches of clearance
around the instrument for ventilation.
Ion Chef™ Food Protection Instrument: Allow at least 4 inches of clearance at the sides
and back, 14 inches of clearance at the top, and 6.7 inches of clearance at the front of
the instrument for ventilation.
Do not block air inlets or outlets to allow proper ventilation.
See the user documentation for your Ion GeneStudio™ S5 Food Protection Instrument
for information on how to clean or decontaminate the instrument.
Wear appropriate protection, including gloves, laboratory goggles, and coat whenever
you work with the uids that are used on this instrument, or parts that may come into
contact with these uids.
Use only the cleaning agents as described in the user documentation for your Ion
GeneStudio™ S5 Food Protection Instrument. Use of cleaning agents that are not
described in user documentation can impair the instrument. Contact Technical
Support if you have questions.
Wipe o any liquid on or near the instrument using a lint-free tissue.
Ventilation
requirements
Cleaning or
decontamination
Site requirements
14
Ion GeneStudio
™
S5 Food Protection System Site Preparation Guide

WARNING! CHEMICAL HAZARD. Refer to Safety Data Sheets (SDSs) and
local regulations for handling and disposing of plastic consumables. Follow
local municipal waste ordinances for proper disposal provisions to reduce the
environmental impact of plastic consumables.
WARNING! DANGER CHIMIQUE. Consulter les ches de données de
sécurité (FDS) et les réglementations locales en matière de manipulation et
d’élimination des consommables en plastique. Se conformer à la réglementation
locale relative à l’élimination des déchets usuels pour réduire l’impact
environnemental des consommables en plastique.
WARNING! CHEMICAL HAZARD. Before handling chemicals, refer to the
Safety Data Sheet (SDS) provided by the manufacturer, and observe all relevant
precautions.
WARNING! DANGER CHIMIQUE. Avant de manipuler des produits
chimiques, se référer à la che de données de sécurité (FDS) fournie par le
fabricant et respecter toutes les précautions d’usage.
WARNING! CHEMICAL HAZARD. All chemicals in the instrument, including
liquid in the lines, are potentially hazardous. Always determine what chemicals
have been used in the instrument before changing reagents or instrument
components. Wear appropriate eyewear, protective clothing, and gloves when
working on the instrument.
WARNING! DANGER CHIMIQUE. Tous les produits chimiques contenus
dans l’instrument, notamment le liquide dans les lignes, sont potentiellement
dangereux. Toujours déterminer les produits chimiques utilisés dans
l’instrument avant le remplacement de réactifs ou de composants de
l’instrument. Porter des gants, des vêtements de protection et des protections
oculaires appropriés lors de toute intervention sur l’instrument.
WARNING! CHEMICAL HAZARD. Waste produced by instruments can be
hazardous and can cause injury or illness.
WARNING! DANGER CHIMIQUE Les déchets produits par les instruments
peuvent être dangereux et entraîner des blessures ou des maladies.
Disposing of waste
Site requirements
Ion GeneStudio
™
S5 Food Protection System Site Preparation Guide
15

WARNING! For safety, the power outlet used for powering the instrument
must be accessible at all times. See “Instrument clearances“ on page 7 for
information about the space needed between the wall and the instrument. In
case of emergency, you must be able to immediately disconnect the main power
supply to all the equipment. Allow adequate space between the wall and the
equipment so that the power cords can be disconnected in case of emergency.
WARNING! Par souci de sécurité, la prise de courant alimentant l’instrument
doit être accessible à tout moment. En cas d’urgence, il doit être possible de
débrancher immédiatement l’alimentation principale de l’ensemble des
équipements. Laisser susamment d’espace entre le mur et les équipements
an de pouvoir débrancher les câbles d’alimentation sans encombre, en cas
d’urgence.
• Electric receptacle required: 2-prong with ground pin
• Mains AC line voltage tolerances must be up to ±10% percent of nominal voltage
Component Input voltage
(VAC)
Frequency
(Hz)
Rated current
(A)[1]
Ion GeneStudio™ S5 Food Protection
Instrument 100–240 50/60 14.0
Ion GeneStudio™ S5 Plus Food
Protection Instrument 100-240 50/60 14.0
Ion GeneStudio™ S5 Prime Food
Protection Instrument 100-240 50/60 14.0
Ion Torrent™ Server[2] 90-265 50/60 12
Ion Chef™ Food Protection
Instrument 100–240 50/60 12
[1] Based on rated current at minimum input voltage.
[2] Minimum Efficiency: 65% (Energy Star Qualified); 85% Efficient Power Supply.
Electrical
requirements
Site requirements
16
Ion GeneStudio
™
S5 Food Protection System Site Preparation Guide

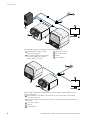
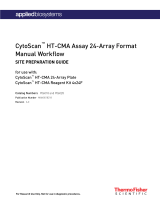
Electrical requirements for the instrument
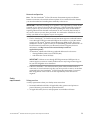
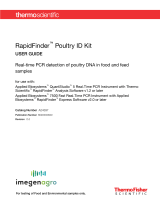
Use an approved UL Listed detachable power supply cord to connect the instrument
to the wall. Route power cords away from the workspace to avoid accidental
disconnection.
1
2 3
1Ion Torrent™ Server
2Ion GeneStudio™ S5 Prime Food Protection Instrument
3Ion GeneStudio™ S5 Food Protection Instrument/Ion GeneStudio™ S5 Plus Food Protection
System
Power cords are provided with the instruments. If not suitable for installation in your
region, ensure that any power cord that you use is:
• Maximum 10 ft (3 m) in length
• Grounding type
• Compatible with the power supply receptacles used to connect to main power
• Suitable for the rating of the instrument and mains power supply
• Compliant with local safety requirements (for example, UL Listed for North
America, JIS approved for Japan, HAR or agency certied for Europe)
We recommend several protective devices to protect the system in environments with
large voltage and power uctuations.
Device Description
Power line
regulator
We recommend the use of a 1.5-kVA power line regulator in areas
where the supplied power fluctuates in excess of ± 10% of the normal
voltage. Power fluctuations can adversely affect the function of the
instrument and computer.
Note: A power line regulator monitors the input current and adjusts
the power supplied to the instrument or computer. It does not protect
against a power surge or failure.
Electrical
protective devices
Site requirements
Ion GeneStudio
™
S5 Food Protection System Site Preparation Guide
17

Device Description
Uninterruptible
power supply
(UPS)
We recommend the use of a 1.5-kVA uninterruptible power supply
(UPS), especially in areas prone to power failure. Power failures and
other events that abruptly terminate the function of the instrument and
computer can corrupt data and possibly damage the system.
WARNING! PHYSICAL INJURY HAZARD. Do not attempt to lift
the UPS unit without assistance of at least two people.
Improper lifting can cause painful and permanent back injury.
Refer to the UPS manufacturer user guide for more
information.
WARNING! RISQUE DE BLESSURES CORPORELLES. Ne pas
essayer de soulever l’onduleur sans l’aide d’au moins deux
personnes. En soulevant incorrectement l’appareil, l’opérateur
risque de se blesser au dos de façon permanente. Voir le guide
de l’utilisateur du fabricant de l’onduleur pour plus
d’informations.
IMPORTANT! UPSs provide power for a limited time. They are meant
to delay the effects of a power outage, not to serve as replacement
power sources. In the event of a power loss, power off the instrument
and computer unless you expect to regain power within the battery life
of the UPS.
Surge protector We recommend the use of a 10-kVA surge protector (line conditioner)
in areas with frequent electrical storms or near devices that are
electrically noisy, such as refrigerators, air conditioners, or
centrifuges. Short-duration, high-voltage power fluctuations can
abruptly terminate the function of, and thereby damage the
components of, the computer and the instrument.
Note: A dedicated line and ground between the instrument, computer,
and the building’s main electrical service can also prevent problems
caused by power fluctuations.
The Ion Torrent™ Server is factory-congured for the TCP/IP protocol. The product
includes a fast Ethernet adapter (10/100 Mbps) with an RJ45-type connector and one
3-m (9.8-ft) crossover Ethernet cable that connects the computer and the instrument.
For the instrument to be connected to a LAN, an active, tested LAN connection must
be in place before the scheduled installation date.
You must supply a standard Category 6 Ethernet cable of the required length to
connect the computer to your LAN.
Network
requirements
Site requirements
18
Ion GeneStudio
™
S5 Food Protection System Site Preparation Guide

Network configuration
Note: The Ion GeneStudio™ S5 Food Protection Instrument requires an ecient
Internet connection to download software updates. If it is isolated from the Internet,
you must download and install updates manually to the server.
IMPORTANT! Manually installing server updates is not supported by Thermo Fisher
Scientic. If you choose to download the updates to a USB and manually update the
server, you do so at your own risk. Any issues updating the server in this manner
requiring Thermo Fisher Scientic intervention are not covered by the warranty or
any service contract you may have purchased. You will need to schedule an on-site
visit by your eld service engineer at your own expense.
• The Ion GeneStudio™ S5 Food Protection Instrument requires outbound Internet
access through HTTPS/port-443 and SSH/port-22 to allow us to provide remote
support via the Axeda™ Remote System Monitoring (RSM) Agent. The server
includes the Axeda™ Agent to assist you in maintaining your Ion GeneStudio™ S5
Food Protection System and to provide timely technical support (for more
information, see hp://www.axeda.com/community/customers/
applied-biosystems).
At minimum, whitelist the following outbound addresses for the server:
– drm.appliedbiosystems.com on HTTPS (443)
– rssh.iontorrent.com on SSH (22)
IMPORTANT! Without access through HTTPS/port-443 and SSH/port-22, we
cannot support your site in a timely fashion and we may forego remote support
for your site altogether at our discretion.
• If the Ion GeneStudio™ S5 Food Protection System will be installed without a
connection to a local area network, then you must provide a router to access data
generated by the Ion GeneStudio™ S5 Food Protection Instrument. Connection
and conguration of the router is not the responsibility of the eld service
engineer.
Safety practices
A safety representative from your facility must ensure that:
• Personnel establish and follow all applicable safety practices and policies to
protect laboratory personnel from potential hazards.
• All applicable safety devices and equipment are available at all times.
Safety
requirements
Site requirements
Ion GeneStudio
™
S5 Food Protection System Site Preparation Guide
19

Required safety equipment
Your laboratory has specic safety practices and policies designed to protect
laboratory personnel from potential hazards that are present. Follow all applicable
safety-related procedures at all times.
The following safety equipment and protection from hazards must be available at the
installation site:
• Protection from any sources of hazardous chemicals, radiation (for example,
lasers, radioisotopes, radioactive wastes, and contaminated equipment), and
potentially infectious biological material that may be present in the area where
the service representative will work.
• Eyewash
• Safety shower
• Eye and hand protection
• Adequate ventilation, including vent line/fume hood, if applicable
• Biohazard waste container, if applicable
• First-aid equipment
• Spill cleanup equipment
• Applicable Safety Data Sheets (SDSs)
Materials for installation and operation
See the Ion GeneStudio™ S5 Food Protection System IT Checklist (Pub. No. MAN0017970)
for the materials required for instrument installation. The checklist species the
materials that must be onsite before installation and subsequent training can take
place.
The Ion S5™ Installation Kit (Cat. No. A27215) is available to rst-time owners of an
Ion GeneStudio™ S5 Food Protection System and is shipped with the instrument. The
kit contains the core reagents and controls that are used during the installation,
training, and operation of the instrument.
Ion S5™ Installation Kit (Part No. A27215; Not available for separate purchase.)
Contents Part No. Quantity Storage
Ion 540™ Chip Kit A27765 4 pack 15°C to 30°C
Ion S5™ Sequencing Solutions A27767 1
Ion S5™ Sequencing Reagents A27768 1 –30°C to –10°C
Ion 540™ Control Ion Spheres A28195 1
Ion 540™ Loading Reagents OT2 A27897 1
Ion S5™ Cartridge Tool A28308 2 15°C to 30°C
Ion Chef™ S5 Series Chip Balance A29022 1
Installation
checklist
Installation kit
Materials for installation and operation
20
Ion GeneStudio
™
S5 Food Protection System Site Preparation Guide
La page est en cours de chargement...
La page est en cours de chargement...
La page est en cours de chargement...
-
 1
1
-
 2
2
-
 3
3
-
 4
4
-
 5
5
-
 6
6
-
 7
7
-
 8
8
-
 9
9
-
 10
10
-
 11
11
-
 12
12
-
 13
13
-
 14
14
-
 15
15
-
 16
16
-
 17
17
-
 18
18
-
 19
19
-
 20
20
-
 21
21
-
 22
22
-
 23
23


Thermo Fisher Scientific Ion GeneStudio S5 Food Protection System Mode d'emploi
- Taper
- Mode d'emploi
dans d''autres langues
Documents connexes
-
 Thermo Fisher Scientific Ion GeneStudio S5 Food Protection Mode d'emploi
-
 Thermo Fisher Scientific Ion S5 and Ion S5 XL Mode d'emploi
-
 Thermo Fisher Scientific Genexus Integrated Sequencer Mode d'emploi
-
 Thermo Fisher Scientific TaqMan GMO Screening Kit Mode d'emploi
-
 Thermo Fisher Scientific RapidFinder Poultry ID Kit Mode d'emploi
-
 Thermo Fisher Scientific TaqMan GMO Maize Quantification Kit Mode d'emploi
-
 Thermo Fisher Scientific RapidFinder Equine ID Kit Mode d'emploi
-
 Thermo Fisher Scientific CytoScan HT-CMA Assay 24-Array Format Le manuel du propriétaire
-
 Thermo Fisher Scientific EASY-nLC II Pre Mode d'emploi
-
 Thermo Fisher Scientific AgPath-ID One Step RT PCR Reagents Mode d'emploi


