Feit Electric WRAP-4C-840-IR-MM LED Wrap Utility Light Mode d'emploi
- Taper
- Mode d'emploi

READ BEFORE INSTALLATION
SAVE THESE INSTRUCTIONS
Questions, problems, missing parts? Before returning to
the store, visit feit.com/help for further assistance
THANK YOU
We appreciate the trust and confidence you have placed in Feit Electric through the purchase of this LED utility fixture.
We strive to continually create quality products designed to enhance your home. Visit us online to see our full line of products available for your
home improvement needs. Thank you for choosing Feit Electric.
Model: WRAP/4C/840/IR/MM
REV024
USE AND CARE GUIDE
4 FTLED WRAP UTILITY LIGHTWITH
MOTION SENSOR AND REMOTE

NOTE: This fixture is designed for use in a circuit protected by
a fuse or circuit breaker. It is also designed to be installed in
accordance with local electrical codes. If you are unsure about
your wiring, consult a qualified electrician or local electrical
inspector, and check your local electrical code.
NOTICE: All connections must be in accordance with local electrical
standards and the National Electrical Code (N.E.C.) or Canadian
Electrical Code (C.E.C) as appropriate.
Remove the fixture and the mounting package from the box and make
sure that no parts are missing by referencing the illustrations on the
installation instructions.
Limited Warranty
Table of Contents
Safety Information
WARNING: RISK OF SHOCK. House electric current can
cause painful shock or serious injury unless handled properly.
Product Specifications
• 120VAC, 60Hz, 55 Watts
• Not Dimmable with Standard Wall Dimmer
• Damp Location
Turn off the power supply at the fuse or circuit breaker box
before you install the fixture.
Double-check all connections to be sure they are tight and correct.
Wear rubber soled shoes and work on a sturdy wooden ladder.
Account for small parts and destroy packing material, as these
may be hazardous to children.
WARNING: Changes or modifications to this unit not expressly
approved by the party responsible for compliance could void
the user’s authority to operate the equipment.
This product is warrantied to be free from defects in workmanship and materials for up to 5 years from date of purchase. If the product fails within the warranty
period, please contact Feit Electric at [email protected], visit feit.com/contact-us or call 1-866-326-BULB (2852) for instructions on replacement or refund.
REPLACEMENT OR REFUND IS YOUR SOLE REMEDY. EXCEPT TO THE EXTENT PROHIBITED BY APPLICABLE LAW, ANY IMPLIED WARRANTIES ARE LIMITED IN
DURATION TO THE DURATION OF THIS WARRANTY. LIABILITY FOR INCIDENTAL OR CONSEQUENTIAL DAMAGES IS HEREBY EXPRESSLY EXCLUDED. Some states and
provinces do not allow the exclusion of incidental or consequential damages, so the above limitation or exclusion may not apply to you. This warranty gives you
specific legal rights, and you may also have other rights which vary from state to state or province to province.
For your safety, always remember to:
IMPORTANT: This fixture is intended to be only installed
directly beneath a ceiling mounted receptacle.
CAUTION: Turn off the main power at the circuit breaker before
installing the fixture, in order to prevent possible shock.
CAUTION, IMPORTANT SAFTEY INSTRUCTIONS: This portable light-emitting-diode (LED) luminaire has a polarized plug (One blade is wider than the
other) as a feature to reduce risk of electric shock. This plug will fit in a polarized outlet only one way. If the plug does not fit fully in the outlet,
reverse the plug. If it still does not fit, contact a qualified electrician. Never use with an extension cord unless the plug can be fully inserted. Do not
alter the plug.
2
Safety Information . . . . . . . . . . . . . . . . . . . . . . . . . . . . . . . . . . . . . 2
FCC Statement . . . . . . . . . . . . . . . . . . . . . . . . . . . . . . . . . . . . . . . . 2
Warranty . . . . . . . . . . . . . . . . . . . . . . . . . . . . . . . . . . . . . . . . . . . . . 2
Pre-Installation. . . . . . . . . . . . . . . . . . . . . . . . . . . . . . . . . . . . . . . . 3
Tools Required. . . . . . . . . . . . . . . . . . . . . . . . . . . . . . . . . . . . . . . 3
Package Contents . . . . . . . . . . . . . . . . . . . . . . . . . . . . . . . . . . . . 3
For Hanging Installation. . . . . . . . . . . . . . . . . . . . . . . . . . . . . . . . . 4
Ceiling Flush Mount Plug-in Installation . . . . . . . . . . . . . . . . . . . . 5
Hardwire Fixture Installation . . . . . . . . . . . . . . . . . . . . . . . . . . . 6-7
Using the Wireless Remote . . . . . . . . . . . . . . . . . . . . . . . . . . . . . . 7
Group Programming . . . . . . . . . . . . . . . . . . . . . . . . . . . . . . . . . . . . 7

3
Pre-Installation
WWW.FEIT.COM
Please contact 1-866-326-BULB (2852) for further assistance.
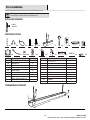
TOOLS REQUIRED
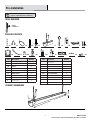
PACKAGE CONTENTS
Phillips
screwdriver
AA JJ
KK
BB CC
LL
DD
MM
EE
NN OO PP
GG HH IIFF
QQ RR SS
PRODUCT DIMENSIONS
Part Description Quantity
AA 6 in. Hanging Chain 2
BB V-Hook 2
CC Zip Tie 3
DD Mounting Screw 4
EE Wall Anchor 4
FF Utility Fixture 1
GG Screw Hook 2
HH Remote 1
II Double Sided Tape 1
Part Description Quantity
QQ Mounting Template 1
RR Washer 4
SS Butt Connector 1
JJ Screws with Wall Anchors
(For remote mount) 2
KK Remote Mount 1
LL 6 in. Hardwire Pigtail 1
MM Wire Nut 3
NN C-Channel Bracket 2
OO 5 ft. Linking Cable 1
PP 5 ft. Power Cable 1
NOTE: Hardware images are for illustration
purposes only. Actual product size may vary.
(For remote mount)
46 in.
2.9 in.
5 in.

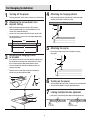
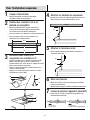
For Hanging Installation
Connect to
power outlet
4
□
□
□For wood ceilings, screw in the screw hooks (GG) directly
into the wood ceiling.
□Screw in the screw hooks (GG) into the wall anchors (EE).
4 Attaching the hanging chains
5 Attaching the zip tie
6
Turning on the power
□Press down firmly on the C-channel brackets (NN) to snap
into the groove on the top of the utility fixture (FF). Slide
the C-channel brackets (NN) about 40 inches apart.
□Place the V-hook (BB) through the bottom rung of the
hanging chain (AA).
□Squeeze on the V-hook (BB) and insert it through the
center of the C-channel bracket (NN).
3Installing the hanging chains
to V-hooks
1Turning off the power
2Attaching the screw hooks to a
drywall ceiling
□Hang the hanging chains (AA) onto the screw hooks (GG)
and plug in the power cord to the outlet.
□Use the zip tie (CC) to attach the cord to the hanging
chain (AA).
□
□
Turn the power ON at the switch, fusebox, or the circuit breaker.
Turn the fixture ON/OFF using the provided remote.
7Linking multiple fixtures (optional)
□Link up to 6 using linking cable (OO) or butt connector (SS).
AA
GG
NN
AA
BB
BB
NN
FF
Connect to
additional shoplight
Turn the power OFF at the switch, fusebox, or circuit breaker.
Mark the location for the wall anchors (EE) using the
mounting template (QQ). The spacing between the wall
anchors (EE) should be 40 inches.
Ceiling
AA
CC
Ceiling
40 in.
GG
EE

Hanging and Flush Mount Installation Template
Modèle d'installation suspendu et encastré
4x4 in/po
J-BOX
1
2
3
4
5
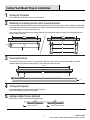
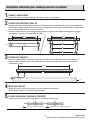
Ceiling Flush Mount Plug-In Installation
□Turn the power OFF at the switch, fusebox, or circuit breaker.
□Position the mounting template (QQ) in the desired fixture location on the ceiling. Tape the four (4) corners of mounting template (QQ)
to the ceiling. Mark the location for the mounting screws (DD) using the mounting template (QQ). The spacing between the mounting
screws (DD) should be 1.1 inches and 40 inches apart.
□
Turning off the power
□Use the washers (RR) and mounting screws (DD) to mount the C-channel brackets (NN) to the ceiling. Use included wall anchors if
ceiling is drywall or concrete.
Attaching the mounting screws and C-channel brackets
Lift the utility fixture (FF) up to the to the C-channel brackets (NN). Push firmly until the C-channel brackets (NN) snap into the
lenghtwise groove on the top of the utility fixture (FF). Plug in the power cord to the outlet.
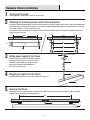
□Link up to 6 using linking cable (OO) or butt connector (SS).
Connect to power outlet Connect to additional shoplight
Securing the fixture
QQ Tape
5 WWW.FEIT.COM
Please contact 1-866-326-BULB (2852) for further assistance.
Turning on the power
□
□
Turn the power ON at the switch, fusebox, or the circuit breaker.
Turn the fixture ON/OFF using the provided remote.
Linking multiple fixtures (optional)
Ceiling
40 in.
40 in.
NN
FF
Ceiling
Ceiling
40 in.
NN
RR
DD
1.1
in.
1.1 in.
1.1
in.

Hanging and Flush Mount Installation Template
Modèle d'installation suspendu et encastré
4x4 in/po
J-BOX
40 in.
NN NN
Hardwire Fixture Installation
□
□
□
1Turning off the power
3Wiring power supply to the fixture
□Plug the hardwire pigtail (LL) into the socket on top of the fixture (FF).
4Plugging the pigtail into the fixture
Securing the fixture
5
LL
LL
LL
FF
FF
Power Supply
J-Box
Ceiling
6
□Position the mounting template (QQ) in the desired fixture location on the ceiling. Tape the four (4) corners of mounting template (QQ)
to the ceiling. Mark the location for the mounting screws (DD) using the mounting template (QQ). The spacing between the mounting
screws (DD) should be 1.1 inches and 40 inches apart.
2
□Use the washers (RR) and mounting screws (DD) to mount the C-channel brackets (NN) to the ceiling. Use included wall anchors if
ceiling is drywall or concrete.
Attaching the mounting screws and C-channel brackets
Ceiling
40 in.
QQ
RR
Tape
Turn the power OFF at the switch, fusebox, or circuit breaker.
Connect supply wires to the 6 inch hardwire pigtail (LL).
Connect the 120V live (black) wire to the black wire.
Connect the neutral (white) wire to the white wire.
Connect the ground wire to the ground wire.
Tuck the wires into the J-box.
Lift the utility fixture (FF) up to the to the C-channel brackets (NN). Push firmly until the C-channel brackets (NN) snap into the
lenghtwise groove on the top of the utility fixture (FF).
NN
DD
Ceiling
40 in.
1.1
in. 1.1
in.
1.1 in.

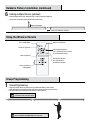
NOTE: Fixture uses microwave technology for motion detection
which could interfere with WiFi within 5 feet of the unit.
NOTE: If the fixture did not flash,
it did not receive new light setting.
Using the Wireless Remote
Group Programming
Hardwire Fixture Installation (continued)
□
□
□
Program multiple fixtures at once by pressing down and holding a light setting.
While holding the desired light setting, walk closer towards the fixture until it flashes.
The fixture will flash to verify the new setting has been received.
1Group Programming
□
□
Connect to hardwire
Connect to additional shoplight
6Linking multiple fixtures (optional)
Turns unit ON & OFF Decreases Light level
Increases Light level
Lowest Light level
Select any distance
setting button
Set to highest brightness
Press and hold for three seconds
to reset to default setting
Unit will turn Off after
pre-selected time if
no motion is detected
Linking multiple fixture flush mounted using a single junction box (optional).
Link up to 6 using linking cable (OO) or butt connector (SS).

A LIRE AVANT L'INSTALLATION
CONSERVEZ CES INSTRUCTIONS
Des questions, des problèmes, des pièces manquantes ? Avant de
retourner au magasin, visitez feit.com/help pour obtenir de l'aide.
MERCI
Nous apprécions la confiance que vous accordez à Feit Electric lors de l'achat de cette lampe utilitaire à LED.
Nous nous efforçons de créer continuellement des produits de qualité conçus pour embellir votre maison. Visitez-nous en ligne pour
voir notre gamme complète de produits disponibles pour vos besoins de rénovation domiciliaire. Merci d'avoir choisi Feit Electric.
Modèle: WRAP/4C/840/IR/MM
REV024
GUIDE D'UTILISATION ET D'ENTRETIEN
4 PI. LUMIÈRE UTILITAIRE ENVELOPPÉE À DEL
AVEC CAPTEUR DE MOUVEMENT ET TÉLÉCOMMANDE

AVIS : Toutes les connexions doivent être conformes aux normes
électriques locales et au Code national de l'électricité (N.E.C.) ou au
Code canadien de l'électricité (C.E.C) selon le cas.
Retirez le luminaire et l'ensemble de montage de la boîte et
assurez-vous qu'aucune pièce ne manque en vous référant aux
illustrations sur les instructions d'installation.
Garantie Limitée:
Table des matières
9
Information sur la sécurité
AVERTISSEMENT : RISQUE DE CHOC. Le courant électrique
de la maison peut provoquer un choc douloureux ou des
blessures graves s'il n'est pas manipulé correctement.
REMARQUE : Ce luminaire est conçu pour être utilisé dans un
circuit protégé par un fusible ou un disjoncteur. Il est également
conçu pour être installé conformément aux codes électriques
locaux. Si vous n'êtes pas sûr de votre câblage, consultez un
électricien qualifié ou un inspecteur électrique local et vérifiez
votre code électrique local.
Coupez l'alimentation électrique au niveau de la boîte à fusibles ou
à disjoncteurs avant d'installer le luminaire.
Vérifiez toutes les connexions pour vous assurer qu'elles sont bien
serrées et correctes.
Portez des chaussures à semelles en caoutchouc et travaillez sur
une échelle en bois solide.
Tenez compte des petites pièces et détruisez le matériel d'embal-
lage, car ils peuvent être dangereux pour les enfants.
Ce produit est garanti d’être exclut de défauts de fabrication et de matériaux pendant 5 ans maximum à compter de la date d’achat. Si le produit échoue pendant
la période de garantie, veuillez contacter Feit Electric à [email protected], visiter feit.com ou appeler les services à la clientèle 1-866-326-BULB (2852) pour obtenir
des instructions sur le remplacement ou le remboursement. LE REMPLACEMENT OU LE REMBOURSEMENT EST VOTRE SEUL RECOURS. SAUF DANS LA MESURE
INTERDITE PAR LA LOI APPLICABLE, TOUTES GARANTIES IMPLICITES SONT LIMITÉES A UNE PERIODE À LA DURÉE DE CETTE GARANTIE. LA RESPONSABILITÉ POUR
LES DOMMAGES ACCESSOIRES OU INDIRECTS EST EXPRESSÉMENT EXCLUE. Certains états et provinces n'autorisant pas l'exclusion de dommages consécutifs ou
indirects, ainsi la limitation ou l'exclusion ci-dessus peut ne pas s'appliquer à vous. Cette garantie vous donne des droits légaux spécifiques et vous pouvez
également avoir d’autres droits qui varient d’un état à l’autre ou d’une province à l’autre.
Pour votre sécurité, pensez toujours à :
IMPORTANT : Ce luminaire est destiné à être installé
uniquement directement sous une prise de courant montée
au plafond.
ATTENTION : Coupez l'alimentation principale au disjoncteur
avant d'installer le luminaire, afin d'éviter
tout choc possible.
ATTENTION, INSTRUCTIONS DE SÉCURITÉ IMPORTANTES : Ce luminaire portatif à diodes électroluminescentes (DEL) est doté d'une fiche polarisée
(une lame est plus large que l'autre) afin de réduire le risque de choc électrique. Cette fiche s'insère dans une prise polarisée dans un seul sens. Si la
fiche ne rentre pas complètement dans la prise, inversez la fiche. S'il ne rentre toujours pas, contactez un électricien qualifié. Ne jamais utiliser avec
une rallonge à moins que la fiche ne puisse être complètement insérée. Ne modifiez pas la prise.
Spécifications du produit
• 120VAC, 60Hz, 55 Watts
• Non dimmable avec gradateur mural standard
• Emplacement humide
AVERTISSEMENT : Les changements ou modifications
apportés à cet appareil non expressément approuvés par la
partie responsable de la conformité peuvent annuler le droit
de l'utilisateur à utiliser l'équipement.
Informations de sécurité . . . . . . . . . . . . . . . . . . . . . . . . . . . . . . . . 9
Déclaration FCC . . . . . . . . . . . . . . . . . . . . . . . . . . . . . . . . . . . . . . . 9
Garantie. . . . . . . . . . . . . . . . . . . . . . . . . . . . . . . . . . . . . . . . . . . . . . 9
Pré-installation. . . . . . . . . . . . . . . . . . . . . . . . . . . . . . . . . . . . . . . 10
Outils nécessaires . . . . . . . . . . . . . . . . . . . . . . . . . . . . . . . . . . . 10
Contenu du colis . . . . . . . . . . . . . . . . . . . . . . . . . . . . . . . . . . . . 10
Pour l'installation suspendue . . . . . . . . . . . . . . . . . . . . . . . . . . . 11
IInstallation enfichable pour montage encastré au plafond. . . . 12
Installation du luminaire câblé . . . . . . . . . . . . . . . . . . . . . . . 13-14
Utilisation de la télécommande sans fil . . . . . . . . . . . . . . . . . . . 14
Programmation de groupe . . . . . . . . . . . . . . . . . . . . . . . . . . . . . . 14

10
Pré-installation
WWW.FEIT.COM
Veuillez contacter le 1-866-326-BULB (2852) pour obtenir de l'aide.
REMARQUE : les images du matériel sont fournies à titre d'illustration
fins seulement. La taille réelle du produit peut varier.
OUTILS NÉCESSAIRES
CONTENU DU COLIS
Phillips
Tournevis
AA JJ
KK
BB CC
LL
DD
MM
EE
NN OO PP
GG HH IIFF
QQ
DIMENSIONS DU PRODUIT
Partie La description Quantité
AA Chaîne de suspension de 6 po 2
BB Crochet en V 2
CC Zip cravate 3
DD Vis de fixation 4
EE Ancre murale 4
FF Luminaire utilitaire 1
GG Crochet à vis 2
HH À distance 1
II Ruban adhésif double face
1
Partie La description Quantité
QQ Gabarit de montage 1
RR Rondelles 4
SS Connecteur bout à bout 1
JJ Vis avec chevilles
(Pour montage à distance) 2
KK Montage à distance 1
LL Queue de cochon câblée de 6 po 1
MM Écrous de fil 3
NN Supports de canal C 2
OO Câble de liaison de 5 pi 1
PP Câble d'alimentation de 5 pi 1
(pour montage à distance)
46 in.
2.9 in.
5 in.
RR SS

□Vissez les crochets à vis (GG) dans les ancrages muraux (EE).
11
Pour l'installation suspendue
Se connecter à
prise de courant
□
□
□Pour les plafonds en bois, vissez les crochets à vis
directement dans le plafond en bois.
4 Attacher les chaînes de suspension
5Attacher la fermeture éclair
6
Mise sous tension
□Appuyez fermement sur les supports du profilé en C (NN)
pour les enclencher dans la rainure sur le dessus du
luminaire utilitaire (FF). Faites glisser les supports du canal C
(NN) à environ 40 pouces de distance.
□Placez le crochet en V (BB) dans l'échelon inférieur de la
chaîne de suspension (AA).
□Appuyez sur le crochet en V (BB) et insérez-le au centre
du support du canal en C (NN).
3Installation des chaînes de
suspension aux crochets en V
1Couper l'alimentation
2Fixation des crochets à vis à un
plafond en placoplâtre
□
□
□
□
Mettez sous tension au niveau de l'interrupteur, de la boîte à
fusibles ou du disjoncteur.
Allumez/éteignez l'appareil à l'aide de la télécommande fournie.
7Liaison de plusieurs appareils (facultatif)
□
NN
AA
BB
BB
NN
FF
Se connecter à
éclairage de magasin supplémentaire
Marquez l'emplacement des ancrages muraux (EE) à
l'aide du gabarit de montage (QQ). L'espacement entre
les ancrages muraux (EE) doit être de 40 pouces.
Accrochez les chaînes de suspension (AA) aux crochets à vis
(GG) et branchez le cordon d'alimentation à la prise.
Utilisez l'attache zippée (CC) pour attacher le cordon à la
suspension chaîne (AA).
Reliez jusqu'à 6 à l'aide d'un câble de liaison (OO) ou d'un
connecteur bout à bout (SS).
AA
GG
Plafond
AA
CC
Coupez l'alimentation au niveau de l'interrupteur,
de la boîte à fusibles ou du disjoncteur.
Plafond
40 po.
GG
EE

Hanging and Flush Mount Installation Template
Modèle d'installation suspendu et encastré
4x4 in/po
J-BOX
Installation enfichable pour montage encastré au plafond
□
□
1Couper l'alimentation
Soulevez le luminaire utilitaire (FF) jusqu'aux supports du canal C (NN). Poussez fermement jusqu'à ce que les supports du
profilé en C (NN) s'enclenchent dans la rainure longitudinale sur le dessus du luminaire utilitaire (FF). Branchez le cordon
d'alimentation à la prise.
□Reliez jusqu'à 6 à l'aide d'un câble de liaison (OO) ou d'un connecteur bout à bout (SS).
Connectez-vous à la prise de courant Connectez-vous à un éclairage supplémentaire
Fixation de l'appareil
3
12 WWW.FEIT.COM
Veuillez contacter le 1-866-326-BULB (2852) pour obtenir de l'aide.
4Mise sous tension
□
□
Mettez sous tension au niveau de l'interrupteur, de la boîte à fusibles ou du disjoncteur.
Allumez/éteignez l'appareil à l'aide de la télécommande fournie.
5Liaison de plusieurs luminaires (facultatif)
□Positionnez le gabarit de montage (QQ) à l'emplacement de fixation souhaité au plafond. Collez les quatre (4) coins du gabarit de
montage (QQ) au plafond. Marquez l'emplacement des vis de montage (DD) à l'aide du gabarit de montage (QQ). L'espacement entre
les vis de montage (DD) doit être de 1,1 pouces et 40 pouces.
2
□Utilisez les rondelles (RR) et les vis de montage (DD) pour monter les supports du canal C (NN) au plafond. Utilisez les ancrages
muraux inclus si le plafond est en cloison sèche ou en béton.
Fixation des chevilles et des vis
Plafond
40 po.
QQ ruban
adhésif
Coupez l'alimentation au niveau de l'interrupteur, de la boîte à fusibles ou du disjoncteur.
40 in.
NN
FF
Plafond
RR
NN
DD
Plafond
40 po.
1.1po.
1.1
po. 1.1
po.

Hanging and Flush Mount Installation Template
Modèle d'installation suspendu et encastré
4x4 in/po
J-BOX
FF
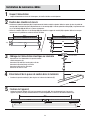
Installation de luminaires câblés
13
□Positionnez le gabarit de montage (QQ) à l'emplacement de fixation souhaité au plafond. Collez les quatre (4) coins du gabarit de
montage (QQ) au plafond. Marquez l'emplacement des vis de montage (DD) à l'aide du gabarit de montage (QQ). L'espacement entre
les vis de montage (DD) doit être de 1,1 pouces et 40 pouces.
□Utilisez les rondelles (RR) et les vis de montage (DD) pour monter les supports du canal C (NN) au plafond. Utilisez les ancrages
muraux inclus si le plafond est en cloison sèche ou en béton.
40 po.
NN NN
□Coupez l'alimentation au niveau de l'interrupteur, de la boîte à fusibles ou du disjoncteur.
□Connectez les fils d'alimentation à la queue de cochon
câblée de 6 pouces (LL).
Connectez le fil 120V sous tension (noir) au fil noir.
Connectez le fil neutre (blanc) au fil blanc.
Connectez le fil de terre au fil de terre.
Rentrez les fils dans la J-box.
□Soulevez le luminaire utilitaire (FF) jusqu'aux supports du canal C (NN). Poussez fermement jusqu'à ce que les
supports du profilé en C (NN) s'enclenchent dans la rainure longitudinale sur le dessus du luminaire utilitaire (FF).
1 Couper l'alimentation
3Câblage de l'alimentation électrique au luminaire
□Branchez la queue de cochon (LL) dans la prise sur le dessus du luminaire (FF).
4 Branchement de la queue de cochon dans le luminaire
Fixation de l'appareil
5
LL
LL
LL
FF
Source de courant
Plafond
2
Fixation des chevilles et des vis
Plafond
40 po.
QQ
RR
ruban
adhésif
Boîte J
NN
DD
Plafond
40 po.
1.1po.
1.1
po. 1.1
po.

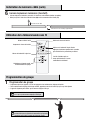
REMARQUE : le luminaire utilise la technologie
micro-ondes pour la détection de mouvement qui pourrait
interférer avec le Wi-Fi à moins de 5 pieds de l'unité.
REMARQUE : Isi le luminaire ne clignote pas,
il n'a pas reçu de nouveau réglage d'éclairage.
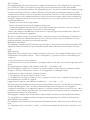
Utilisation de la télécommande sans fil
Programmation de groupe
Installation du luminaire câblé (suite)
□
□
□
Programmez plusieurs appareils à la fois en appuyant et en maintenant un réglage de lumière.
Tout en maintenant le réglage d'éclairage souhaité, approchez-vous de la lumière jusqu'à ce qu'elle clignote.
L'appareil clignotera pour vérifier que le nouveau réglage a été reçu.
1 Programmation de groupe
□Liaison de plusieurs luminaires encastrés à l'aide d'une seule boîte de jonction (en option).
□Reliez jusqu'à 6 à l'aide d'un câble de liaison (OO) ou d'un connecteur bout à bout (SS).
Connectez-vous à un éclairage supplémentaire
6Liaison de plusieurs luminaires (facultatif)
Allume et éteint l'unité Diminue le niveau de lumière
Augmente le niveau de lumière
Niveau de luminosité le plus bas
Sélectionnez n'importe quelle
distance bouton de réglage
Régler sur la luminosité la plus élevée
Appuyez et maintenez pendant trois secondes
pour réinitialiser les paramètres par défaut
L'unité s'éteindra après un
temps présélectionné si aucun
mouvement n'est détecté
Connectez-vous au câble

FCC Statement
This equipment has been tested and found to comply with the limits for a Class B digital device, pursuant to
part 15 of the FCC Rules. These limits are designed to provide reasonable protection against harmful
interference in a residential installation. This equipment generates, uses and can radiate radio frequency energy
and, if not installed and used in accordance with the instructions, may cause harmful interference to radio
communications. However, there is no guarantee that interference will not occur in a particular installation. If
this equipment does cause harmful interference to radio or television reception, which can be determined by
turning the equipment off and on, the user is encouraged to try to correct the interference by one or more of
the following measures:
·Reorient or relocate the receiving antenna.
·Increase the separation between the equipment and receiver.
·Connect the equipment into an outlet on a circuit different from that to which the receiver is connected.
·Consult the dealer or an experienced radio/TV technician for help.
Caution: Any changes or modifications to this device not explicitly approved by manufacturer could void
your authority to operate this equipment.
This device complies with part 15 of the FCC Rules. Operation is subject to the following two conditions: (1)
This device may not cause harmful interference, and (2) this device must accept any interference received,
including interference that may cause undesired operation.
RF Exposure Information
This equipment complies with FCC radiation exposure limits set forth for an uncontrolled environment. This
equipment should be installed and operated with minimum distance 20cm between the radiator and your
body.
ISED Statement
English:This device contains licence-exempt transmitter(s)/receiver(s) that comply with Innovation, Science
and Economic Development Canada’s licence-exempt RSS(s). Operation is subject to the following two
conditions:
(1) This device may not cause interference.
(2) This device must accept any interference, including interference that may cause undesired operation of the
device.
The digital apparatus complies with Canadian CAN ICES‐3 (B)/NMB‐3(B).
French: Cet appareil contient des émetteurs/récepteurs exempts de licence qui sont conformes aux RSS
exemptés de licence d'Innovation, Sciences et Développement économique Canada.
L'exploitation est soumise aux deux conditions suivantes :
(1) Cet appareil ne doit pas provoquer d'interférences.
(2) Cet appareil doit accepter toute interférence, y compris les interférences susceptibles de provoquer un
fonctionnement indésirable de l'appareil.
l'appareil numérique du ciem conforme canadien peut ‐ 3 (b) / nmb ‐ 3 (b).
This device meets the exemption from the routine evaluation limits in section 2.5 of RSS 102 and compliance
with RSS 102 RF exposure, users can obtain Canadian information on RF exposure and compliance.
cet appareil est conforme à l'exemption des limites d'évaluation courante dans la section 2.5 du cnr - 102 et
conformité avec rss 102 de l'exposition aux rf, les utilisateurs peuvent obtenir des données canadiennes sur
l'exposition aux champs rf et la conformité.
This equipment complies with Canada radiation exposure limits set forth for an uncontrolled environment.
Cet équipement est conforme aux limites d'exposition aux rayonnements du Canada établies pour un
environnement non contrôlé.
This equipment should be installed and operated with minimum distance 20cm between the radiator & your
body.
Cet équipement doit être installé et utilisé à une distance minimale de 20 cm entre le radiateur et votre
corps.
-
 1
1
-
 2
2
-
 3
3
-
 4
4
-
 5
5
-
 6
6
-
 7
7
-
 8
8
-
 9
9
-
 10
10
-
 11
11
-
 12
12
-
 13
13
-
 14
14
-
 15
15


