Brother Laminator LX-1200 Manuel utilisateur
- Catégorie
- Laminateurs
- Taper
- Manuel utilisateur
Ce manuel convient également à


ENGLISH
- 1 -
Brother Cool Laminator LX-1200
Fax-Back System
Brother Customer Service has installed an easy-to-use Fax-Back System, so you can get instant answers to
common technical questions and product information for all Brother products. This system is available 24
hours a day, 7 days a week. You can use the system to send faxes to any fax machine, not just the one
from which you are calling.
If you can't resolve a difficulty with your laminator using this manual, call our Fax-Back System, and follow
the voice prompts to receive faxed instructions about using the system and an index of Fax-Back subjects.
Canada: 1-800-681-9838
Brother on the World Wide Web
You can find more information about Brother products, from product specification sheets to Frequently
Asked Questions (FAQs), on the World Wide Web. Visit us at
http://www.brother.com
For Customer Service
In Canada: 1-800-853-6660 (voice)
In Montreal: 1-514-685-6464 (voice)
Corporate Headquarters
1 rue Hôtel de Ville
Dollard-des-Ormeaux,
Québec, Canada H9B 3H6
Brother Bulletin Board: 1-514-685-2040

- 2 -
ENGLISH
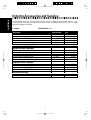
Ordering Accessories and Supplies
For best quality results use only genuine Brother accessories, available at most Brother retailers. If you
cannot find the accessory you need and you have a Visa or MasterCard credit card, you can order
accessories directly from Brother.
In Canada: 1-800-668-2768 (voice)
Description Model Number Price
Double-side Laminate
12” wide film cartridge (40m/131.2ft. long) LC-D12 $179.99
12” wide refill roll (40m/131.2ft. long) LC-D12R $119.99
9” wide film cartridge (20m/65.6ft. long) LC-D9 $59.99
9” wide refill roll (20m/65.6ft. long) LC-D9R $44.99
4.8” wide film cartridge (20m/65.6ft. long) LC-D5 $46.99
4.8” wide refill roll (20m/65.6ft. long) LC-D5R $36.99
Adhesive Back Laminate
12” wide film cartridge (10m/32.8ft. long) LC-A12 $154.99
12” wide refill roll (10m/32.8ft. long) LC-A12R $119.99
9” wide film cartridge (20m/65.6ft. long) LC-A9 $104.99
9” wide refill roll (20m/65.6ft. long) LC-A9R $79.99
4.8” wide film cartridge (20m/65.6ft. long) LC-A5 $69.99
4.8” wide refill roll (20m/65.6ft. long) LC-A5R $59.99
Magnetic Back Laminate
9” wide film cartridge (4m/13.1ft. long) LC-M9 $179.99
9” wide refill roll (l0m/32.8ft. long) LC-M9R $249.99
4.8” wide film cartridge (4m/13.lft. long) LC-M5 $119.99
4.8” wide refill roll (10m/32.8ft. long) LC-M5R $159.99
Other Accessories
Replacement Ceramic Side Cutters (2 blades) SC-2 $24.99
Replacement Corner Cutter Tray CC-3 $24.99

ENGLISH
- 3 -
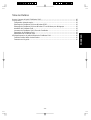
Table of Contents
Getting started.................................................................................................................................................4
Features ..........................................................................................................................................................4
Precautions......................................................................................................................................................5
Package list.....................................................................................................................................................6
Part names......................................................................................................................................................7
Outside of the machine...............................................................................................................................7
Inside of the machine..................................................................................................................................7
Control Panel...............................................................................................................................................8
Film Cartridge..............................................................................................................................................8
Setup...............................................................................................................................................................9
Turning the machine on/off..........................................................................................................................9
About Auto Power Saver.............................................................................................................................9
Operating the machine..................................................................................................................................10
Document Size..............................................................................................................................................13
The Auto Sheet Feeder.............................................................................................................................14
The Auto Cross Cutting System................................................................................................................14
How to define the cutting position (creating borders).....................................................................................15
Auto Cutter Mode - Border........................................................................................................................15
Auto Cutter Mode - No Border...................................................................................................................15
Auto Cutter Mode - Cutter Off (for sensitive documents)...........................................................................15
Auto Cutter Mode - Extra Border...............................................................................................................16
How to use Continuous mode........................................................................................................................17
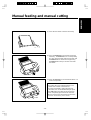
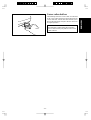
Manual feeding and manual cutting...............................................................................................................19
Corner cutting................................................................................................................................................20
Corner cutter dust box...............................................................................................................................21
About film rolls...............................................................................................................................................22
Film-supply maintenance..........................................................................................................................22
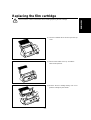
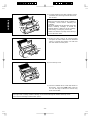
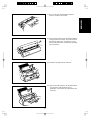
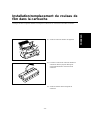
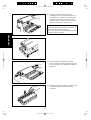
Replacing the film cartridge...........................................................................................................................23
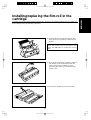
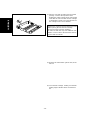
Installing/replacing the film roll in the cartridge..............................................................................................25
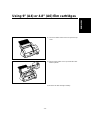
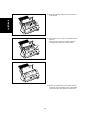
Using 9” (A4) or 4.8” (A6) film cartridges.......................................................................................................29
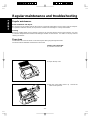
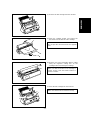
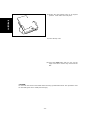
Regular maintenance and troubleshooting....................................................................................................32
Regular maintenance................................................................................................................................32
Paper jams................................................................................................................................................32
Replacing the side cutter units..................................................................................................................35
Replacing the corner cutter trimmer tray...................................................................................................37
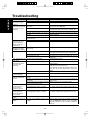
Troubleshooting.............................................................................................................................................38
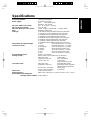
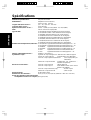
Specifications ................................................................................................................................................39
Index..............................................................................................................................................................40

- 4 -
ENGLISH
Getting started
Thank you for purchasing a Brother Cool Laminator. This machine has been designed to be easy to use, but
can be utilized to its fullest potential by taking some time to read this owner’s manual.
Features
· Depending upon the type of film used, this machine turns a variety of documents into professional, self-
adhesive stickers, dual-sided, coated lamination sheets, magnetic signs etc.
· In addition to output from computers and word processors, you can laminate hand-written sheets,
clippings from magazines, photographs or any other type of document.
· Your documents are perfectly coated to protect them from water, dust, tearing, yellowing, and to create a
professional, high quality finish.
· No heat is used. The unique cold pressure method and specially formulated adhesives make the
operation safe, easy and fast.
· You can start laminating immediately after turning the power on (no warm-up time is necessary).
· This machine has an auto sheet feeder and auto cross cutting mechanism. It automatically detects the
width and length of your document and precisely trims the excess laminate from your square or
rectangular finished documents.
· The film is easily installed and replaced.
· The LX-1200 supports document widths of up to 11.7” (A3 - 297mm).

ENGLISH
- 5 -
Precautions
To avoid personal injury or damage to the machine, please pay close attention to the CAUTION and
WARNING notices in this manual. They are here for your safety, as well as to point out actions that might
cause damage to your machine.
WARNING:
- Do not attempt to repair or disassemble this equipment yourself. The warranty will be voided if
this machine is not repaired by authorized service personnel.
- Do not touch the blades inside of the machine.
- Use only the AC adapter that was supplied with the machine. Using the wrong AC adapter may
damage the machine and will void the warranty.
CAUTION:
- Do not pull the power cord. To disconnect it, always grasp the plug itself.
- Do not place the machine under direct exposure to sunlight and other sources of heat,
excessive moisture, or dust.
- If any liquid is spilled onto the machine, immediately unplug the machine from its power source
and consult with authorized service personnel.
- Unplug the machine during a lightning storm.
- Do not place heavy objects on the machine.
- Keep the back and sides of the machine clear of obstructions to prevent overheating.
- Use only a soft, dry cloth to clean the machine (do not use chemicals, solvents, or detergents).
- To avoid electrical interference, do not place the machine close to a radio receiver or
television.
- Do not turn the machine off while operating except in the event of a malfunction.
- Turn the machine off in the event of a malfunction.
- If you use adhesive laminate film, do not attach the laminated output to one’s skin, or the
sensitive surface of objects.
- The laminated documents are not easily digested. Great care should be taken to prevent
accidental ingestion by infants or the elderly.
- The laminate film contains UV resistance materials. However, the color of the documents may
fade if the documents are printed with liquid type ink. Solid type ink is recommended to
prevent the document from fading.
- The laminated document may be wrinkled or damaged if it is placed under a heavy object.
- Do not place the magnetic back laminate output close to floppy disks or audio tapes. The data
on the disks or tapes may be damaged.
- Brother can not be held liable for loss or damage of items used in the laminator machine.
- Under the terms of an agreement with Xyron, Inc., the purchase or other acquisition of this
product confers no right or license to use the product in the Retroreflective Field.
- Laminating thermal paper may cause the print to fade.
- When a document is first laminated it may feel sticky to the touch. This stickiness is caused by
silicone that is used in processing the film.
- Discard the machine or laminated output according to local regulations. If you are not sure of
them, call your local Sanitation Department.
IMPORTANT OPERATIONAL PRECAUTIONS:
- Select Cutter Off Mode when laminating sensitive or irregularly shaped documents.
- Do not insert your precious and valuable items into the machine.
- Do not laminate any photograph which cannot be replaced.

- 6 -
ENGLISH
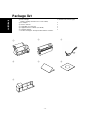
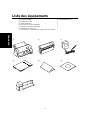
Package list
1 Machine 1
2 Film cartridge 1 (Double side laminate type)
(Starter cartridge includes 13.1’ or 4m of film)*
3 AC adapter 1
4 Owner’s manual 1
5 Compatible accessory list 1
6 Supplemental PC software (CD-ROM) 1
7 Cartridge adapter 1
* The film cartridge is already installed into the machine.
1
23
456
7

ENGLISH
- 7 -
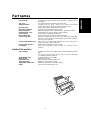
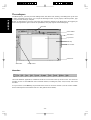
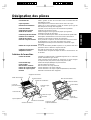
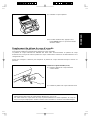
Part names
Outside of the machine
DC connector Located on the left, backside of the machine. Aperture for the
AC adapter.
Top cover For replacing the film cartridge and cutter units.
Viewing window Located on the top cover. Allows you to make sure that the
correct type of film cartridge is loaded into the machine.
Document tray Where documents to be laminated are placed.
Document supporter Supports the document being laminated.
Document guide Aligns the left edge of the paper for proper document insertion.
Document tray cover Easily lifts for the removal small sized documents.
Control panel Power switch and function button area.
Document output Location where the document exits the machine.
Corner cutter slot Allows you to trim the corners of your document after laminating.
Corners of a document are automatically trimmed after insertion
into the corner cutter slot.
Corner cutter trimmer tray The corner of your laminated document is placed on this tray to
position it into the corner cutter slot.
Corner cutter dust box Collects trimmings from the corner cutter.
AC adapter Plugs into an electrical outlet and the DC connector on the
machine.
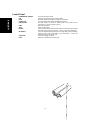
Inside of the machine
Film cartridge Contains the roll film. The label on the cartridge identifies the film
type.
You can use 12.0 inch (A3), 9.0 inch (A4) or 4.8 inch (A6) width
LC cartridges with this machine.
Roller holder lever Locks/releases the roller holder.
Roller holder Holds the roller unit.
Side cutter arm Arm for the side (vertical) cutter unit.
Side cutter units Blades for side (vertical) cutting.
Top/bottom cutter units Blades for top/bottom (horizontal) cutting.
Roller Feeds the document into the unit.

- 8 -
ENGLISH
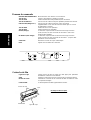
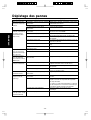
Control Panel
POWER DIAL ON/OFF Turns the machine on/off.
Cut Cuts the document in the current position.
Feed Manually feeds the laminate and/or the document.
Continuous Use this feature to laminate multiple documents.
Extra Border Use this feature to create an extra border on one-side of your
document (i.e. area for 3-hole punch).
Start Starts an operation.
Stop Stops an operation.
Border The machine will trim the film with about a 0.18” (4.5mm) margin
from each edge of the document. - Leaves a margin of laminate.
No Border The machine will trim the film with a margin that is approximately
0.06” (1.5mm) from each edge of the document. - Trims the
laminate close to the document.
Cutter Off Turns the cutting mode off.
Error Indicates a malfunction of machine.

ENGLISH
- 9 -
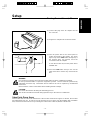
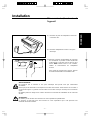
Setup
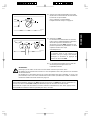
Turning the machine on/off
(1) Connect the plug of the AC adapter into the
DC connector.
(2) Plug the AC adapter into an electrical outlet.
(3) Turn the power dial on the control panel to
Cutter Off, Border or No Border. The green
light on top of the Start button will light up. If
the machine does not respond, check the
connection of the AC adapter.
To turn the machine off, turn the power dial to
POWER OFF.
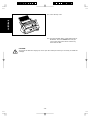
(4) Press the Feed button until you can see the
edge of the film to remove any slack from the
film.
WARNING:
Do not plug your machine into an electrical outlet until it has been completely assembled.
Do not try to disassemble or repair this equipment yourself. Service should be performed by
authorized personnel only. Warranties will be voided if the unit is repaired by unauthorized
technicians.
Never touch the surface of the blades when installing the film cartridge.
CAUTION:
Do not turn the machine off during the laminating process.
The machine should be turned off during operation only in the event of a malfunction.
About Auto Power Saver
This machine has an Auto Power Off function. If the machine is left idle for approx. 5 minutes, the machine
will automatically turn off. In order to turn the machine back on, please turn the POWER dial to POWER
OFF, and then turn the machine on by selecting the cutter mode: Cutter Off, Border or No Border.
ONON OFF
Cutter Off
POWER
No Border
Border
StartStop

- 10 -
ENGLISH
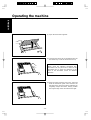
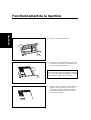
Operating the machine
Laminate documents, create magnetic signs, and create adhesive stickers:
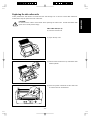
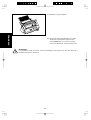
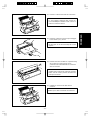
(1) Open the document supporter.
(2) Load the document to be laminated onto the
document tray. Insert the document face up.
(3) Align the paper with the tab on the right and
slide the document guide until it touches the
left edge of the document. When laminating an
irregularly shaped document, always position
the longest edge of the document to the right.
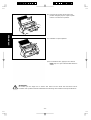
TIP
When using the adhesive laminating film,
documents can be placed face down on the
document tray to apply the adhesive to the
front of the document (Great for Window
Stickers).

ENGLISH
- 11 -
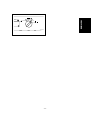
ONON OFF
Cutter Off
POWER
No Border
Border
Start

- 12 -
ENGLISH
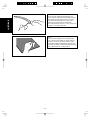
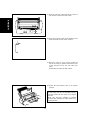
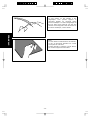
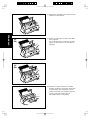
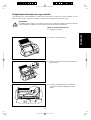
Note
If you use the adhesive laminate film, the
back surface of the laminated output is a liner
which will need to be peeled off. To mount
the laminated document on a surface for
display, peel off the liner as illustrated.
For easy peeling, there is a crack in the line
r
approx. 1” from the right side.
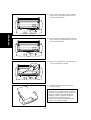
Note
If you use the magnetic back laminate film,
y
ou can place the output on metal surfaces.
There is a liner on the back surface of the
laminated output (magnet side). Please peel
the liner off gently as illustrated before placin
g
the output sheet on a metal surface.

ENGLISH
- 13 -
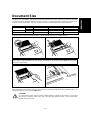
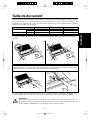
Document Size
The size of the document that you wish to laminate should not be larger (or smaller) than the width that your
machine can accommodate. The document should be between 2.0 and 11.7 inches (50 and 297 mm) wide.
The minimum paper length should be 3.5 inches (90 mm). The paper thickness should be between 17 lbs.
to 40 lbs. (0.004” and 0.008”). Only one document at a time can be loaded onto the document tray.
Type of cartridge 12.0 inch cartridge 9.0 inch cartridge 4.8 inch cartridge
Maximum 11.7” (297 mm) 8.5” (216 mm) 4.3” (108 mm)Paper width
Minimum 2.0” (50 mm) 2.0” (50 mm) 2.0” (50 mm)
Paper length Minimum 3.5” (90 mm) 3.5” (90 mm) 3.5” (90 mm)
Paper thickness 0.004” - 0.008” 0.004” - 0.008” 0.004” - 0.008”
Business card-size paper should be inserted vertically into the machine as illustrated below.
When laminating a document longer than 18.5” (470 mm), the machine will pause after laminating 18.5”. To
continue the process just press the Start button.
CAUTION:
Do not insert documents that are curled, wrinkled, folded or ripped into the machine. Documents
must be free of staples, paper clips, glue, correction fluid and sticky tape. Do not insert fabric
material into the machine.
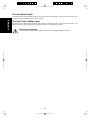
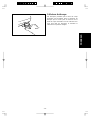
Note
If you place a small document into the machine incorrectly, it can be removed by lifting the document
tray cover as illustrated.

- 14 -
ENGLISH
The Auto Sheet Feeder
The Auto Sheet Feeder automatically feeds your document into the machine, one sheet at a time. Load only
a single document at a time onto the document tray.
The Auto Cross Cutting System
The Auto Cross Cutting System automatically detects the width and length of the inserted document. The
built-in mechanism precisely trims each side of the square or rectangular document.
IMPORTANT INFORMATION:
- Select Cutter Off Mode when laminating sensitive or irregularly shaped documents.

ENGLISH
- 15 -
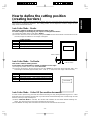
How to define the cutting position
(creating borders)
The Auto Cross Cutting System automatically detects the size of your document and trims each edge of
your square or rectangular document. The cutting position can be adjusted to create a margin on each
edge of the laminated document
.
Auto Cutter Mode – Border
This mode is ideal for protecting documents from water or dust.
To create a margin on each edge of your square or rectangular document…
(1) Change the position of the Power dial to Border.
(2) Place the document in the document tray and press Start. The document will be cut with about a 0.18”
(4.5 mm) margin of laminate on each edge of the paper.
Cutting Position
To p
Top of paper 0.18^± 0.06^ ( 4.5mm ±1.5mm)
Bottom
Bottom of paper 0.18^± 0.06^ ( 4.5mm ±1.5mm)
Right
Right edge of paper 0.18^± 0.06^ ( 4.5mm ±1.5mm)
Left
Left edge of paper 0.18^± 0.06^ ( 4.5mm ±1.5mm)
Auto Cutter Mode – No Border
This mode is ideal for making stickers.
To generate a document without a margin of laminate on each edge…
(1) Change the position of the Power Dial to No Border.
(2) Place the document in the document tray and press Start. The document will be trimmed with a very
small margin of laminate (approximately 0.04^ - 0.06^ (1 - 1.5mm) from each edge of the document).
Cutting Position
To p
Top of paper 0.06^ ± 0.06^ (1.5mm ± 1.5 mm)
Bottom
Bottom of paper 0.06^ ± 0.06^ (1.5mm ± 1.5 mm)
Right
Right edge of paper 0.04^ ± 0.06^ (1.0mm ± 1.5 mm)
Left
Left edge of paper 0.04^ ± 0.06^ (1.0mm ± 1.5 mm)
Auto Cutter Mode – Cutter Off (for sensitive documents)
Use this mode to prevent any part of the document from being cut away during the finishing process. Cutter
Mode will sense the beginning and the end of your document and automatically leave a wide margin of extra
laminate, which you may manually trim.
Document
0.18” (4.5mm)
0.18” (4.5mm)
(1) When Cutter Off Mode is selected, the machine will laminate the document without trimming the
edges. The document is processed and ejected from the machine.
(2) Press Cut to manually cut the laminate and remove the document from the machine.
Document

- 16 -
ENGLISH
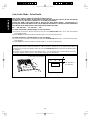
Auto Cutter Mode - Extra Border
This mode is ideal for making documents for filing purposes.
The Extra Border will always be generated on the last part of the document to be fed through the
machine. You can choose 0.8” (20 mm) or 1.2” (30 mm) extra margin.
Change the width of the Extra Border by pressing the Extra Border button. The first time it is
pressed, the extra border will be set to 0.8” (20 mm), the next time 1.2” (30 mm) and the next time the
extra border mode will be turned off (as well as the Extra Border LED).
Off ® 0.8” (20 mm) ® 1.2” (30 mm) ® Off
To create an extra 0.8” (20 mm) margin on your document...
(1) Place the document in the document tray and press the Extra Border button once. The Extra Border
green LED will light.
(2) Press Start. The document will be laminated with a 0.8” (20 mm) Extra Border.
To create an extra 1.2” (30 mm) margin on your document...
(1) Place the document in the document tray and press Extra Border button twice. The Extra Border green
LED will blink.
(2) Press Start. The document will be laminated with a 1.2” (30 mm) Extra Border.
Document
Document
0.8” (20 mm) or
1.2” (30 mm)
Note
Selected Extra Border mode will remain on until the power is turned off or the Extra Border mode i
s
turned off. To turn the Extra Border mode off, press the Extra Border button until the Extra Border LED i
s
no longer lit.
To create an extra border for hole punching an 8.5” ´ 11” document, place the document in the tray
landscape with the side to have the extra border on the top (see illustration).
The Extra Border will appear
on this edge of the document

ENGLISH
- 17 -
1
ONON OFF
Cutter Off
POWER
No Border
Border
StartStop
1
2
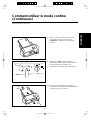
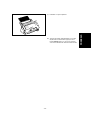
How to use Continuous mode
Continuous mode can reduce the wasted film between documents when laminating multiple documents.
(1) Set the first document on the document tray
and press the Continuous button. The green
Continuous LED will light.
(2) Press Start. The machine will start to laminate
your document. When the end of the
document is detected the laminating process
pauses and the buzzer sounds.
(3) Place the next document in the document tray.
The next document will automatically be fed
after approximately 7 seconds.

- 18 -
ENGLISH
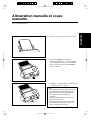
(4) Continue with step (3) until you are finished laminating documents. If a document is not placed in the
feeder within 7 seconds, the machine will finish laminating the document in the machine and then return
to normal mode.
Note
If a new document is not placed in the feeder within 7 seconds, the machine will restart and finish the
current document.
If Start button is pressed after placing the next document in the feeder, the laminating process will restart
without waiting 7 seconds.
If Stop button is pressed before placing next document in the feeder, the Continuous mode is paused.
Press Start to restart the operation.
Note
The Feed and Extra Border buttons will not work while the machine is in Continuous mode.
Do not change the setting of the Cutter Mode during Continuous mode.
To create an extra border with continuous mode, select the extra border mode before turning on the
continuous mode. All documents laminated will have an extra border. To turn off the extra border, turn off
continuous mode first and then turn off the extra border mode.
La page charge ...
La page charge ...
La page charge ...
La page charge ...
La page charge ...
La page charge ...
La page charge ...
La page charge ...
La page charge ...
La page charge ...
La page charge ...
La page charge ...
La page charge ...
La page charge ...
La page charge ...
La page charge ...
La page charge ...
La page charge ...
La page charge ...
La page charge ...
La page charge ...
La page charge ...
La page charge ...
La page charge ...
La page charge ...
La page charge ...
La page charge ...
La page charge ...
La page charge ...
La page charge ...
La page charge ...
La page charge ...
La page charge ...
La page charge ...
La page charge ...
La page charge ...
La page charge ...
La page charge ...
La page charge ...
La page charge ...
La page charge ...
La page charge ...
La page charge ...
La page charge ...
La page charge ...
La page charge ...
La page charge ...
La page charge ...
La page charge ...
La page charge ...
La page charge ...
La page charge ...
La page charge ...
La page charge ...
La page charge ...
La page charge ...
La page charge ...
La page charge ...
La page charge ...
La page charge ...
La page charge ...
La page charge ...
La page charge ...
La page charge ...
La page charge ...
La page charge ...
La page charge ...
La page charge ...
La page charge ...
La page charge ...
La page charge ...
La page charge ...
La page charge ...
La page charge ...
La page charge ...
La page charge ...
La page charge ...
La page charge ...
La page charge ...
La page charge ...
La page charge ...
La page charge ...
La page charge ...
-
 1
1
-
 2
2
-
 3
3
-
 4
4
-
 5
5
-
 6
6
-
 7
7
-
 8
8
-
 9
9
-
 10
10
-
 11
11
-
 12
12
-
 13
13
-
 14
14
-
 15
15
-
 16
16
-
 17
17
-
 18
18
-
 19
19
-
 20
20
-
 21
21
-
 22
22
-
 23
23
-
 24
24
-
 25
25
-
 26
26
-
 27
27
-
 28
28
-
 29
29
-
 30
30
-
 31
31
-
 32
32
-
 33
33
-
 34
34
-
 35
35
-
 36
36
-
 37
37
-
 38
38
-
 39
39
-
 40
40
-
 41
41
-
 42
42
-
 43
43
-
 44
44
-
 45
45
-
 46
46
-
 47
47
-
 48
48
-
 49
49
-
 50
50
-
 51
51
-
 52
52
-
 53
53
-
 54
54
-
 55
55
-
 56
56
-
 57
57
-
 58
58
-
 59
59
-
 60
60
-
 61
61
-
 62
62
-
 63
63
-
 64
64
-
 65
65
-
 66
66
-
 67
67
-
 68
68
-
 69
69
-
 70
70
-
 71
71
-
 72
72
-
 73
73
-
 74
74
-
 75
75
-
 76
76
-
 77
77
-
 78
78
-
 79
79
-
 80
80
-
 81
81
-
 82
82
-
 83
83
-
 84
84
-
 85
85
-
 86
86
-
 87
87
-
 88
88
-
 89
89
-
 90
90
-
 91
91
-
 92
92
-
 93
93
-
 94
94
-
 95
95
-
 96
96
-
 97
97
-
 98
98
-
 99
99
-
 100
100
-
 101
101
-
 102
102
-
 103
103


Brother Laminator LX-1200 Manuel utilisateur
- Catégorie
- Laminateurs
- Taper
- Manuel utilisateur
- Ce manuel convient également à
dans d''autres langues
Documents connexes
Autres documents
-
Hama 00057388 Le manuel du propriétaire
-
GBC FOTON 30 Le manuel du propriétaire
-
MyBinding 13 PRO Manuel utilisateur
-
-
Ibico GBC Ibico PQ Series Manuel utilisateur
-
-
-
-
Epson PowerLite 485W Mounting Templates
-
Epson ELPMB62 Ultra-Short Throw Wall Mount Template