
MODE D’EMPLOI
MODE D’EMPLOI
2
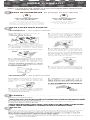
AVEC PAPIER TRANSFERT
OU «LES DÉCOUPES »
Il s'agit d'un vinyle blanc sur
lequel nous imprimons un motif,
et que nous découpons.
A
B
C’est un vinyle d’une seule couleur
que nous avons découpé à la forme du visuel
souhaité. Le papier transfert est une pellicule
transparente appliquée par dessus le motif.
SANS PAPIER TRANSFERT
OU «LES IMPRIMÉS»
1. Je découpe à l’aide de ciseaux les
1. Je retire délicatement les éléments de
leur support en évitant le contact des
doigts avec le côté collant, surtout aux
bords.
TECHNIQUE A • avec papier transfert
Que faire des bulles d’air?
J
Mon adhésif est-il repositionnable?
Les imprimés peuvent éventuellement être repositionnés, mais je dois les manipuler avec précaution.
Comment enlever mon adhésif?
2. Je place la surface visible de mon
adhésif face contre table (je ne dois pas
voir les motifs). J’applique une pression
en «brossant» le visuel à l’aide d’une
carte de crédit ou d’un objet de même type.
2. J’applique les éléments sur le mur en
appliquant graduellement à l’aide d’une
légère pression de la main. Si nécessaire,
le repositionner.
POUR POSER MON ADHÉSIF
B
A
C
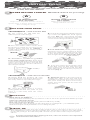
3. Je retire le papier opaque parallèle-
ment à la table (angle de 180). Si le visuel
se décolle de la pellicule transparente, je
reviens en arrière et applique une
que le visuel colle à
la pellicule transparente.
4. En tenant la pellicule transparente
par les deux coins supérieurs, je place le
visuel sur le mur et frotte la pellicule
avec la carte de haut en bas, en commen-
çant à gauche et en allant vers la droite.
5. Je retire la pellicule transparente en
tirant doucement par le coin supérieur
gauche, en diagonale. Le papier qui vient
d’être décollé est rabattu parallèlement
au mur (angle de 180), au fur et mesure
qu’il se décolle. Il touche ainsi le papier
transparent toujours au mur.
C
6. Si le visuel reste collé à la pellicule, je
le replace avec la pellicule transparente
sur le mur et frotte de nouveau (étape 4).
3. Une fois l’adhésif en place, j’applique
une pression en «brossant» le visuel du
revers de la main ou avec un linge doux,
du centre vers les bords.
TECHNIQUE B • sans papier transfert
1
AVANT DE COMMENCER De quel type est mon adhésif?
*NOTE : LA SURFACE SUR LAQUELLE JE VAIS APPLIQUER MON ADHÉSIF DOIT
ÊTRE PROPRE, SÈCHE ET LISSE.
3
ET APRÈS?
4
ASTUCE
Si vous rencontrez un problème lors de la pose de votre adhésif, contactez le service à la clientèle au
514-664-5193 ou [email protected]
C
(angle de 180°)
(angle de 180°)
C
DOS
Dans certaines situations et selon certaines surfaces, il peut arriver que votre adhésif présente des signes de décollement
au niveau des zones extérieures. Dans ce cas, utilisez un séchoir à cheveux en mode température maximum, à une
2
AVEC PAPIER TRANSFERT
OU «LES DÉCOUPES»
Il s'agit d'un vinyle blanc sur
lequel nous imprimons un motif,
et que nous découpons.
A
B
C’est un vinyle d’une seule couleur
que nous avons découpé à la forme du visuel
souhaité. Le papier transfert est une pellicule
transparente appliquée par dessus le motif.
SANS PAPIER TRANSFERT
OU «LES IMPRIMÉS»
1. Je découpe à l’aide de ciseaux les
1. Je retire délicatement les éléments de
leur support en évitant le contact des
doigts avec le côté collant, surtout aux
bords.
TECHNIQUE A • avec papier transfert
Que faire des bulles d’air?
J
Mon adhésif est-il repositionnable?
Les imprimés peuvent éventuellement être repositionnés, mais je dois les manipuler avec précaution.
Comment enlever mon adhésif?
2. Je place la surface visible de mon
adhésif face contre table (je ne dois pas
voir les motifs). J’applique une pression
en «brossant» le visuel à l’aide d’une
carte de crédit ou d’un objet de même type.
2. J’applique les éléments sur le mur en
appliquant graduellement à l’aide d’une
légère pression de la main. Si nécessaire,
le repositionner.
POUR POSER MON ADHÉSIF
B
A
C
3. Je retire le papier opaque parallèle-
ment à la table (angle de 180). Si le visuel
se décolle de la pellicule transparente, je
reviens en arrière et applique une
que le visuel colle à
la pellicule transparente.
4. En tenant la pellicule transparente
par les deux coins supérieurs, je place le
visuel sur le mur et frotte la pellicule
avec la carte de haut en bas, en commen-
çant à gauche et en allant vers la droite.
5. Je retire la pellicule transparente en
tirant doucement par le coin supérieur
gauche, en diagonale. Le papier qui vient
d’être décollé est rabattu parallèlement
au mur (angle de 180), au fur et mesure
qu’il se décolle. Il touche ainsi le papier
transparent toujours au mur.
C
6. Si le visuel reste collé à la pellicule, je
le replace avec la pellicule transparente
sur le mur et frotte de nouveau (étape 4).
3. Une fois l’adhésif en place, j’applique
une pression en «brossant» le visuel du
revers de la main ou avec un linge doux,
du centre vers les bords.
TECHNIQUE B • sans papier transfert
1
AVANT DE COMMENCER De quel type est mon adhésif?
*NOTE : LA SURFACE SUR LAQUELLE JE VAIS APPLIQUER MON ADHÉSIF DOIT
ÊTRE PROPRE, SÈCHE ET LISSE.
3
ET APRÈS?
4
ASTUCE
Si vous rencontrez un problème lors de la pose de votre adhésif, contactez le service à la clientèle au
514-664-5193 ou [email protected]
C
(angle de 180°)
(angle de 180°)
C
DOS
Dans certaines situations et selon certaines surfaces, il peut arriver que votre adhésif présente des signes de décollement
au niveau des zones extérieures. Dans ce cas, utilisez un séchoir à cheveux en mode température maximum, à une

INSTRUCTIONS
INSTRUCTIONS
2
WITH TRANSFER FILM
OR A “CUT-OUT”
White vinyl on which we print a
design and then cut it out.
A
B
Single-colour vinyl that we have cut into a
specific shape or design. There is a transparent
film covering the design.
WITHOUT TRANSFER FILM
OR A “PRINT”
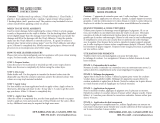
1. Use scissors to cut out the
dierent parts of the design.
1. Gently peel the backing o each
piece. Make sure your ngers don’t touch
the sticky surface, especially the edges.
TECHNIQUE A • with transfer lm
What about air bubbles?
You can press them out with the palm of your hand or a soft tool. You can also puncture them with the tip of a pin.
Can I reposition the decal?
Prints can be repositioned if you wish, but they must be handled very carefully.
How can I remove a decal?
Use a tool with a thin edge to unstick the top of the decal. Don’t use your ngernails – you could mark the paint.
Lift the decal and peel it evenly downward so as not to damage the paint.
2. Place the visible surface of the decal
face down on a table (so you can’t see the
design). Apply pressure by rubbing a
credit card or similar tool evenly over the
paper backing.
2. Apply the pieces to the wall. Start by
sticking one edge to the wall and then
gradually and gently press the rest of it
into place with your hand. If necessary,
gently peel the piece o the wall and
reposition it.
APPLYING YOUR DECAL
B
A
C
3. Peel o the paper backing parallel
to the table (angle of 180°). If the decal
comes unstuck from the transparent lm,
replace the paper backing and rub that
spot again so that the decal re-adheres to
the transparent lm.
4. Pick up the transparent lm by the two
top corners and place the decal against
the wall. Rub the card against the lm
from top to bottom, starting in the top left
corner and working toward the right.
C
C
BACK
5. Peel o the lm, starting in the upper
left-hand corner, gently pulling it down
and to the right until the whole top edge
is free. Then gently and evenly peel the
lm straight down, parallel to the wall.
C
6. If any part of the decal remains stuck
to the lm, stick the lm with that part
back against the wall and rub the lm
again until the decal adheres properly to
the wall (step 4).
C
C
(angle of 180°)
(angle of 180°)
3. Once the entire decal is in place,
gently press it with the palm of your
hand or a soft cloth, from the centre
outward.
TECHNIQUE B • without transfer lm
1
BEFORE GETTING STARTED
*NOTE: THE SURFACE YOU ARE APPLYING YOUR DECAL ONTO MUST BE
CLEAN, DRY AND SMOOTH.
3
What next?
4
USEFUL TIP
If you have any problems when applying your decal, contact our customer service department
at 514-664-5193 or [email protected]
What kind of decal are you using?
It may happen that your sticker shows signs of curling around the edges on some surfaces. In that case, use a hair
dryer at maximum heat setting to apply heat around the edges of the product, at a distance of 5 in, while applying
pressure with your ngers. The softened vinyl will conform closely to the surface texture and present a perfect
adhesion.
2
WITH TRANSFER FILM
OR A “CUT-OUT”
White vinyl on which we print a
design and then cut it out.
A
B
Single-colour vinyl that we have cut into a
specific shape or design. There is a transparent
film covering the design.
WITHOUT TRANSFER FILM
OR A “PRINT”
1. Use scissors to cut out the
dierent parts of the design.
1. Gently peel the backing o each
piece. Make sure your ngers don’t touch
the sticky surface, especially the edges.
TECHNIQUE A • with transfer lm
What about air bubbles?
You can press them out with the palm of your hand or a soft tool. You can also puncture them with the tip of a pin.
Can I reposition the decal?
Prints can be repositioned if you wish, but they must be handled very carefully.
How can I remove a decal?
Use a tool with a thin edge to unstick the top of the decal. Don’t use your ngernails – you could mark the paint.
Lift the decal and peel it evenly downward so as not to damage the paint.
2. Place the visible surface of the decal
face down on a table (so you can’t see the
design). Apply pressure by rubbing a
credit card or similar tool evenly over the
paper backing.
2. Apply the pieces to the wall. Start by
sticking one edge to the wall and then
gradually and gently press the rest of it
into place with your hand. If necessary,
gently peel the piece o the wall and
reposition it.
APPLYING YOUR DECAL
B
A
C
3. Peel o the paper backing parallel
to the table (angle of 180°). If the decal
comes unstuck from the transparent lm,
replace the paper backing and rub that
spot again so that the decal re-adheres to
the transparent lm.
4. Pick up the transparent lm by the two
top corners and place the decal against
the wall. Rub the card against the lm
from top to bottom, starting in the top left
corner and working toward the right.
C
C
BACK
5. Peel o the lm, starting in the upper
left-hand corner, gently pulling it down
and to the right until the whole top edge
is free. Then gently and evenly peel the
lm straight down, parallel to the wall.
C
6. If any part of the decal remains stuck
to the lm, stick the lm with that part
back against the wall and rub the lm
again until the decal adheres properly to
the wall (step 4).
C
C
(angle of 180°)
(angle of 180°)
3. Once the entire decal is in place,
gently press it with the palm of your
hand or a soft cloth, from the centre
outward.
TECHNIQUE B • without transfer lm
1
BEFORE GETTING STARTED
*NOTE: THE SURFACE YOU ARE APPLYING YOUR DECAL ONTO MUST BE
CLEAN, DRY AND SMOOTH.
3
What next?
4
USEFUL TIP
If you have any problems when applying your decal, contact our customer service department
at 514-664-5193 or [email protected]
What kind of decal are you using?
It may happen that your sticker shows signs of curling around the edges on some surfaces. In that case, use a hair
dryer at maximum heat setting to apply heat around the edges of the product, at a distance of 5 in, while applying
pressure with your ngers. The softened vinyl will conform closely to the surface texture and present a perfect
adhesion.
-
 1
1
-
 2
2


dans d''autres langues
Autres documents
-
South Shore 8050089K Guide d'installation
-
South Shore Furniture 8050012 Guide d'installation
-
South Shore Furniture 8050118K Guide d'installation
-
-
-
MULTIPLEX LTS D-KJBN Le manuel du propriétaire
-
-
-
-
 Trade Secret 686310 Manuel utilisateur
