
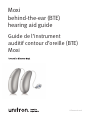
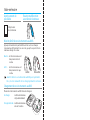
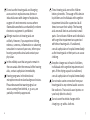
Moxi
behind-the-ear (BTE)
hearing aid guide
A Sonova brand
Guide de l’instrument
auditifcontour d’oreille (BTE)
Moxi

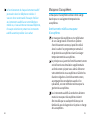
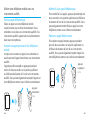
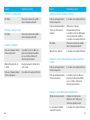
Thank you
Thank you for choosing these hearing aids.
Unitron is a hearing solution company that
believes people should feel really good about
the entire hearing care experience, start to nish.
Our ingenious products, technologies, services
and programs oer a level of personalization
you can’t get anywhere else. Get ready to
Love the experience.
™
This user guide applies to the following models:
Year of introduction:
DX Moxi
™
Jump R T
DX Moxi
™
Jump R T
DX Moxi
™
Jump R T
DX Moxi
™
Jump R T
DX Moxi
™
Move R
DX Moxi
™
Move R
DX Moxi
™
Move R
DX Moxi
™
Move R
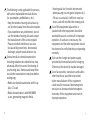
Merci
Merci d’avoir choisi ces instruments auditifs.
Unitron est une entreprise proposant des
instruments auditifs qui a la conviction que les
personnes devraient bénécier d’une excellente
expérience de soins auditifs, du début à la
n. Nos produits, technologies, services et
programmes ingénieux orent un niveau de
personnalisation inégalé. Préparez-vous pour
Uneexpérience exceptionnelle.
Ce guide d’utilisation s’applique aux modèles
suivants :
Année d’introduction:
DX Moxi
MC
Jump R T
DX Moxi
MC
Jump R T
DX Moxi
MC
Jump R T
DX Moxi
MC
Jump R T
DX Moxi
MC
Move R
DX Moxi
MC
Move R
DX Moxi
MC
Move R
DX Moxi
MC
Move R

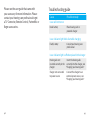
Your hearing aids
Hearing care professional: ____________________
___________________________________________
Telephone: _________________________________
Model: ____________________________________
Serial number: ______________________________
Warranty: __________________________________
Program 1 is for: ____________________________
Program 2 is for: ____________________________
Program 3 is for: ____________________________
Program 4 is for: ____________________________
Date of purchase: ____________________________

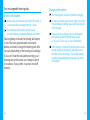
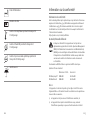
Quick reference
beeps every
minutes
Low battery warning
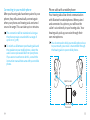
Turning hearing aids on/o
Press and hold the lower part of the button on each hearing
aid for 3 seconds until the indicator lights change.
On: Indicator light is
temporarily solid green
O: Indicator light is
temporarily solid red
Before using your hearing aids for the rst time, it is
recommended to charge them for 3 hours.
Multi-function button
with indicator light
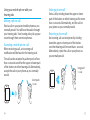
Charging your hearing aids
Place the hearing aids in the charger.
Charging: Slow blinking
indicator light
Fully charged: Solid green
indicator light
On
O
Vos instruments auditifs
Audioprothésiste: _______________________________
________________________________________________
Téléphone : _____________________________________
Modèle : _______________________________________
Numéro de série : ________________________________
Garantie : _______________________________________
Le programme1 correspond à: ____________________
Le programme2 correspond à: ____________________
Le programme3 correspond à: ____________________
Le programme4 correspond à: ____________________
Date d’achat : ___________________________________

Appuyez et maintenez la partie inférieure du bouton sur chaque
instrumentauditif pendant troissecondes, jusqu’à ce que le témoin
lumineux change de couleur.
Marche : Le témoin lumineux est
temporairement vert
continu
Arrêt : Le témoin lumineux est
temporairement rouge
continu
Aide-mémoire
bips toutes
lesminutes
Avertissement de
pilefaible
Marche/Arrêt de vos instruments auditifs
Avant d’utiliser vos instruments auditifs pour la première
fois, il est recommandé de les charger pendant troisheures.
Bouton multifonction
avec témoin lumineux
Chargement de vos instruments auditifs
Placez les instruments auditifs dans le chargeur.
En charge: Le témoin lumineux
clignote lentement
Charge terminée: Le témoin lumineux
est vertcontinu
Activé
Désactivé

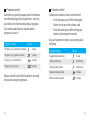
Your hearing aids at a glance ..................................................... 2
Warnings .................................................................................... 5
Tinnitus masker ........................................................................17
Turning your hearingaids onando .......................................20
Putting your hearing aids on your ears......................................21
Operating instructions ............................................................. 23
Your rechargeable hearing aids .........................................26
Charging your hearing aids ................................................28
Pairing your mobile phone with your hearing aids ............ 33
Phone calls with a mobile phone ...................................... 35
Using your mobile phone with your hearing aids ..............36
Adjusting volume balance between mobile phone
calls and your environment ............................................... 38
TV Connector ..................................................................... 39
Tinnitus masker ........................................................................40
Flight mode ...............................................................................41
Connectivity overview .............................................................. 42
Assistive listening devices ....................................................... 43
Caring for your hearing aids .....................................................44
Accessories .............................................................................. 47
Troubleshooting guide .............................................................49
Information and explanation of symbols ................................. 56
Compliance information ........................................................... 59
Your feedback .......................................................................... 63
Additional notes ....................................................................... 64
Table of contents
Table des matières
Aperçu de vos instruments auditifs .........................................66
Avertissements ........................................................................69
Masqueur d’acouphènes .........................................................81
Marche et arrêt de vos instruments auditifs ...........................84
Mise en place des instruments auditifs sur vos oreilles .......... 85
Instructions d’utilisation.......................................................... 87
Vos instruments auditifs rechargeables ............................90
Coupler votre téléphone mobile avec vos
instruments auditifs ........................................................... 97
Appels téléphoniques avec un téléphone mobile ..............99
Utiliser votre téléphone mobile avec vos
instruments auditifs ......................................................... 100
Régler l’équilibre du volume entre les appels de
votre téléphonemobile et votre environnement .............. 102
TVConnector ..................................................................... 103
Masqueur d’acouphènes ....................................................... 104
Mode avion .............................................................................105
Aperçu de la connectivité ....................................................... 106
Aides de suppléance à l'audition ............................................107
Entretien de vos instruments auditifs .................................... 108
Accessoires ............................................................................. 111
Guide de dépannage ............................................................... 113
Information et explications sur les symboles ........................ 120
Information sur la conformité ................................................ 123
Votre rétroaction .....................................................................127
Remarques supplémentaires ................................................. 128

2 3
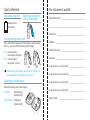
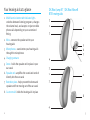
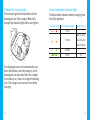
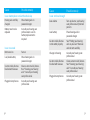
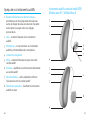
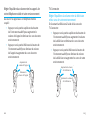
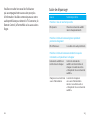
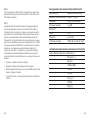
Your hearing aids at a glance
1 Multi-function button with indicator light -
switches between listening programs, changes
the volume level, and accepts or rejects mobile
phone calls depending on your customized
tting
2 Wire - connects the speaker unit to your
hearingaids
3 Microphones - sound enters your hearingaids
through the microphones
4 Charging contacts
5 Dome - holds the speaker unit in place in your
ear canal
6 Speaker unit - amplies the sound and sends it
directly into the ear canal
7 Retention piece - helps prevent the dome and
speaker unit from moving out of the ear canal
8 Custom mold - holds the hearing aids in place
DX Moxi Jump R T / DX Moxi Move R
BTE hearing aids
3
3
1
7
2
8
2
5
4
6
3
3
1
4

4 5
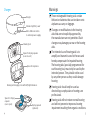
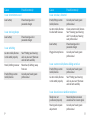
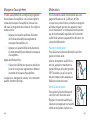
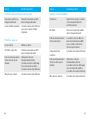
Space for earpieces
Cleaning tool
Space for drying
capsule
(cover open)
Drying capsule
(optional)
Hearing aid charging slots with le/right indicators
Space for drying capsule
(cover closed)
Charger
Charger
Indicator light for power
Micro-USB connection
to external power supply
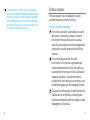
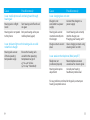
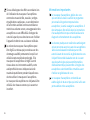
Warnings
These rechargeable hearing aids contain
lithium-ion batteries that can be taken onto
airplanes as carry-on luggage.
Changes or modications to the hearing
aids that are not explicitly approved by
the manufacturer are not permitted. Such
changes may damage your ear or the hearing
aids.
The intended use of hearing aids is to
amplify and transmit sound to the ears and
hereby compensate for impaired hearing.
The hearing aids (specially programmed for
each hearing loss) must only be used by the
intended person. They should not be used
by any other person as they could damage
hearing.
Hearing aids should only be used as
directed by your physician or hearing care
professional.
Hearing aids will not restore normal hearing
and will not prevent or improve a hearing
impairment resulting from organic conditions.

6 7
Do not use the hearing aids and charging
accessories in explosive areas (mines or
industrial areas with danger of explosions,
oxygen rich environments or areas where
flammable anesthetics are handled) or where
electronic equipment is prohibited.
Allergic reactions to hearing aids are
unlikely. However, if you experience itching,
redness, soreness, inflammation or a burning
sensation in or around your ears, inform your
hearing care professional and contact your
physician.
In the unlikely case that any parts remain in
the ear canals aer the removal of the hearing
aids, contact a physician immediately.
Hearing programs in the directional
microphone mode reduce background noises.
Please be aware that warning signals or
noises coming from behind, e. g. cars, are
partially or entirely suppressed.
These hearing aids are not for children
below 36 months. The usage of this device
by children and individuals with cognitive
impairment should be supervised at all
times to ensure their safety. The hearing
aids are small devices and contain small
parts. Do not leave children and individuals
with cognitive impairment unsupervised
with these hearing aids. If swallowed,
consult a physician or hospital immediately
as the hearing aids or their parts can cause
choking.
Keep the charger out of reach of children,
individuals with cognitive impairment and
pets. If the drying capsule is swallowed,
consult a physician or hospital immediately.
Do not make a wire connection from your
hearing aids to any external audio sources
like radio etc. That could cause injuries on
your body (electric shock).
Do not cover the whole charger while
charging, e.g. with a cloth etc.

8 9
The following is only applicable for persons
with active implantable medical devices
(i.e. pacemakers, debrillators, etc.):
- Keep the wireless hearing aids at least 15
cm (6 inches) away from the active implant.
- If you experience any interference, do not
use the wireless hearing aids and contact
the manufacturer of the active implant.
Please note that interference can also
be caused by power lines, electrostatic
discharge, airport metal detectors etc.
Special medical or dental examination
including radiation described below, may
adversely aect the correct functioning of
your hearing aids. Remove and keep them
outside the examination room/area before
undergoing:
- Medical or dental examination with X-ray
(also CT scan).
- Medical examinations with MRI/NMRI
scans, generating magnetic elds.
- Hearing aids don’t need to be removed
when passing security gates (airports etc.).
If X-ray is used at all, it will be in very low
doses, and will not aect the hearing aids.
Use of this equipment adjacent to or
stacked with other equipment should be
avoided because it could result in improper
operation. If such use is necessary, this
equipment and the other equipment should
be observed to verify that they are operating
normally.
Only use the charger and power supply
provided by the manufacturer for charging.
Otherwise, the device(s) may be damaged.
Use of accessories, transducers and cables
other than those specied or provided
by the manufacturer of this equipment
could result in increased electromagnetic
emissions or decreased electromagnetic
immunity of this equipment and result in
improper operation.

10 11
Your hearing aids operate in the frequency
range of . GHz–.8 GHz. When flying
please check if flight operator requires
devices to be switched into flight mode.
Portable RF communications equipment
(including peripherals such as antenna
cables and external antennas) should be
used no closer than 30 cm (12 inches) to any
part of the hearing aids, including cables
specied by the manufacturer. Otherwise,
degradation of the performance of this
equipment could result.
The USB port of the charger is to be used for
the described purpose only.
Special care should be exercised in wearing
hearing aids when maximum sound
pressure levels exceed 132 decibels. There
may be a risk of impairing your remaining
hearing. Speak with your hearing care
professional to ensure the maximum output
of your hearing aids is suitable for your
particular hearing loss.
Note to hearing care professional
Domes should never be tted on clients with
perforated eardrums, exposed middle ear
cavities, or surgically altered ear canals. In
the case of such a condition, we recommend
to use a customized earmold.

12 13
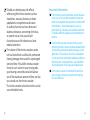
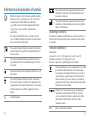
Precautions
These hearing aids are water resistant
and not waterproof. They are designed to
withstand normal activities and occasional
accidental exposure to extreme conditions.
Never immerse your hearing aids in water.
These hearing aids are not specically
designed for extended periods of water
submersion on a continual basis, that is
worn in activities such as swimming or
bathing. Always remove your hearing aids
before these activities, as the hearing aids
contain sensitive electronic parts.
Protect your hearing aids from heat (never
leave near a window or in the car). Never
use a microwave or other heating devices
to dry your hearing aids (due to risk of
re or explosion). Ask your hearing care
professional about suitable drying methods.
The dome should be changed every three
months or when it becomes sti or brittle.
This is to prevent the dome from detaching
from the tube spout during insertion into or
removal from the ear.
Do not drop your hearing aids. Dropping
onto a hard surface can damage your
hearing aids.
Store your hearing aids in the charger if you
are not using them for a long period of time.
The hearing aids have to be dry before
charging. Otherwise the charging reliability
cannot be guaranteed.
The use of hearing aids is only part of
hearing rehabilitation; auditory training and
lip reading instruction may be required as
well.
In most cases, infrequent use of hearing
aids does not provide full benet. Once you
have become accustomed to your hearing
aids, wear your hearing aids everyday all
day.

14 15
Your hearing aids use the most modern
components to provide the best possible
sound quality in every listening situation.
However, communication devices such
as digital mobile phones can create
interference (a buzzing sound) in hearing
aids. If you experience interference from a
mobile phone being used close by, you can
minimize this interference in a number of
ways. Switch your hearing aids to another
program, turn your head in a dierent
direction or locate the mobile phone and
move away from it.
Labeling
The serial number and year of manufacture are
located under the colored hearing aid marking.
Mobile phone compatibility rating
Some hearing aid users have reported a buzzing
sound in their hearing aids when they are using
mobile phones, indicating that the mobile
phone and hearing aids may not be compatible.
According to the ANSIC63.19 standard
(ANSIC63.19-2011 American National Standard
Methods of Measurement of Compatibility
Between Wireless Communications Devices and
Hearing Aids), the compatibility of particular
hearing aids and a mobile phone can be
predicted by adding the rating for the hearing
aid immunity to the rating for the mobile phone
emissions. For example, the sum of the hearing
aid rating of 4 (M4) and a telephone rating of 3
(M3) would result in a combined rating of 7. Any
combined rating that equals at least 5 would
provide “normal use”; a combined rating of 6 or
greater would indicate “excellent performance.”
The immunity of these hearing aids is at least
M4. The equipment performance measurements,
categories and system classications are based
upon the best information available but cannot
guarantee that all users will be satised.

16 17
The performance of the individual hearing
aids may vary with individual mobile phones.
Therefore, please try these hearing aids with
your mobile phone or, if you are purchasing a
new phone, please be sure to try it with your
hearing aids prior to purchase.
Tinnitus masker
Tinnitus masker uses broadband noise to
provide temporary relief of tinnitus.
Tinnitus masker warnings
The tinnitus masker is a broadband sound
generator. It provides a means of sound
enrichment therapy that can be used as
part of a personalized tinnitus management
program to provide temporary relief from
tinnitus.
The underlying principle of sound
enrichment is to provide supplementary
noise stimulation which can help defocus
your attention from your tinnitus and avoid
negative reactions. Sound enrichment,
coupled with instructional counseling, is an
established approach to managing tinnitus.
Air conduction hearing aids with the tinnitus
masker are to be tted by a hearing care
professional familiar with the diagnosis and
management of tinnitus.

18 19
Should you develop any side eects
while using the tinnitus masker, such as
headaches, nausea, dizziness or heart
palpitations or experience a decrease
in auditory function such as decreased
loudness tolerance, worsening of tinnitus,
orspeech not as clear, you should
discontinue use of the device and seek
medical attention.
The volume of the tinnitus masker can be
set to a level which could lead to permanent
hearing damage when used for a prolonged
period of time. Should the tinnitus masker
be set to such a level in your hearing aids,
your hearing care professional will advise
you of the maximum amount of time per day
you should use the tinnitus masker.
The tinnitus masker should never be used at
uncomfortable levels.
Important information
The tinnitus masker generates sounds that are
used as part of your personalized temporary
tinnitus management program to provide relief
from tinnitus. It should always be used as
prescribed by a hearing care professional who
is familiar with the diagnosis and treatment of
tinnitus.
Good health practice requires that a person
reporting tinnitus have a medical evaluation by
a licensed ear physician before using a sound
generator. The purpose of such an evaluation
is to ensure that medically treatable conditions,
which may be causing tinnitus, are identied
and treated prior to using a sound generator.
The tinnitus masker is intended for adults 18
years of age or older who have both hearing
loss and tinnitus.

20 21
Turning your hearingaids onando
Your hearing aids will turn on
automatically when removed
from the charger. To turn hearing
aids on and o when not using
the charger, press and hold the
lower part of the button on each
hearing aid for 3 seconds until the indicator
lights change.
On: Indicator light is
temporarily solid
green
O: Indicator light is
temporarily solid red
Before using your hearing aids for the rst time,
it is recommended to charge them for 3 hours.
When you turn your hearing aids on you may
hear a start-up melody.
On O
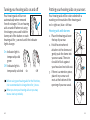
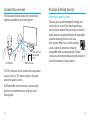
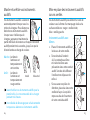
Putting your hearing aids on your ears
Your hearing aids will be color-coded with a
marking on the outside of the hearing aid:
red = right ear; blue = le ear.
Hearing aids with domes
1. Place the hearing aid over
the top of your ear.
2. Hold the wire where it
attaches to the dome and
gently push the dome into
your ear canal. The wire
should lie flush against
your head and not stick out.
3. If there is a retention piece,
place it in your ear so it
rests at the bottom of the
opening of your ear canal.
2.
3.
1.

22 23
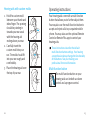
Hearing aids with custom molds
1. Hold the custom mold
between your thumb and
index nger. The opening
should be pointing in
towards your ear canal
with the hearing aid
resting above your ear.
2. Carefully insert the
custom mold into your
ear. The mold should t
into your ear snugly and
comfortably.
3. Place the hearing aid over
the top of your ear.
1.
2.
3.
Operating instructions
Your hearing aids come with a multi-function
button that allows you to further adjust them.
You may also use the multi-function button to
accept and reject calls to your paired mobile
phone. You may also use the optional Remote
Control or Remote Plus app to control your
hearing aids.
These instructions describe the default
multi-function button settings. Your hearing
care professional may change the functionality
of the buttons. See your hearing care
professional for more information.
Multi-function button
The multi-function button on your
hearing aids can be both a volume
control and a program control.

24 25
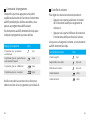
Program control
Each time you push the upper part of the button
on either hearing aid for longer than 2 seconds,
you will move to the next hearing aid program.
Your hearing aids beep to indicate which
program you are in.
Program setting Beeps
Program 1 (e.g. automatic program) 1 beep
Program 2 (e.g. speech in noise) 2 beeps
Program 3 (e.g. Telephone) 3 beeps
Program 4 (e.g. music) 4 beeps
Please see the front of this booklet for a listing
of your personalized programs.
Volume control
To adjust the volume of your environment:
• Push the upper part of the hearing aid
button to increase the volume, and
• Push the lower part of the hearing aid
button to decrease the volume
As you change the volume, your hearing aids
will beep.
Volume setting Beeps
Suggested volume level 1 beep
Turning volume up short beep
Turning volume down short beep
Maximum volume level 2 beeps
Minimum volume level 2 beeps

26 27
Your rechargeable hearing aids
Battery information
Before using your hearing aids for the rst time, it
is recommended to charge them for 3 hours.
These hearing aids contain a built-in and
non-removable rechargeable lithium-ion battery.
Two long beeps indicate the hearing aid battery
is low. You have approximately 60 minutes
before you have to charge the hearing aids (this
can vary depending on the hearing aid settings).
If you can’t hear the low battery warning, your
hearing care professional can change its pitch
or loudness. If you prefer, it can be turned o
entirely.
Charging information
The hearing aids must be dry before charging.
Charge your hearing aids every night. If you hear
the low battery warning, place your hearing aids
in the charger.
Please ensure to charge and use the hearing
aids within operating temperature range:
+5° to +40° Celsius (41° to 104° Fahrenheit).
If the charger is removed from the power source
during charging, the hearing aids will turn on
and will start to discharge. Ensure the charger
remains powered while the hearing aids are in
the charger.

28 29
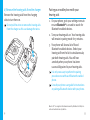
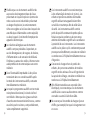
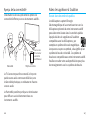
2) Insert the hearing aids
Insert the hearing aids into the charging slots.
Make sure the le and right hearing aid
markings match the le (blue)/right (red)
indicators next to the charging slots. The hearing
aids will automatically switch o when inserted
into the charger.
Charging your hearing aids
1) Connecting the power supply
a) Plug the larger end of the charging cable into
the power supply.
b) Plug the smaller end into the micro-USB port
on the charger.
c) Plug the power supply into a power outlet.
d) The indicator light is green when the charger
is connected to the power supply.
a
b
d
c
La page est en cours de chargement...
La page est en cours de chargement...
La page est en cours de chargement...
La page est en cours de chargement...
La page est en cours de chargement...
La page est en cours de chargement...
La page est en cours de chargement...
La page est en cours de chargement...
La page est en cours de chargement...
La page est en cours de chargement...
La page est en cours de chargement...
La page est en cours de chargement...
La page est en cours de chargement...
La page est en cours de chargement...
La page est en cours de chargement...
La page est en cours de chargement...
La page est en cours de chargement...
La page est en cours de chargement...
La page est en cours de chargement...
La page est en cours de chargement...
La page est en cours de chargement...
La page est en cours de chargement...
La page est en cours de chargement...
La page est en cours de chargement...
La page est en cours de chargement...
La page est en cours de chargement...
La page est en cours de chargement...
La page est en cours de chargement...
La page est en cours de chargement...
La page est en cours de chargement...
La page est en cours de chargement...
La page est en cours de chargement...
La page est en cours de chargement...
La page est en cours de chargement...
La page est en cours de chargement...
La page est en cours de chargement...
La page est en cours de chargement...
La page est en cours de chargement...
La page est en cours de chargement...
La page est en cours de chargement...
La page est en cours de chargement...
La page est en cours de chargement...
La page est en cours de chargement...
La page est en cours de chargement...
La page est en cours de chargement...
La page est en cours de chargement...
La page est en cours de chargement...
La page est en cours de chargement...
La page est en cours de chargement...
La page est en cours de chargement...
La page est en cours de chargement...
-
 1
1
-
 2
2
-
 3
3
-
 4
4
-
 5
5
-
 6
6
-
 7
7
-
 8
8
-
 9
9
-
 10
10
-
 11
11
-
 12
12
-
 13
13
-
 14
14
-
 15
15
-
 16
16
-
 17
17
-
 18
18
-
 19
19
-
 20
20
-
 21
21
-
 22
22
-
 23
23
-
 24
24
-
 25
25
-
 26
26
-
 27
27
-
 28
28
-
 29
29
-
 30
30
-
 31
31
-
 32
32
-
 33
33
-
 34
34
-
 35
35
-
 36
36
-
 37
37
-
 38
38
-
 39
39
-
 40
40
-
 41
41
-
 42
42
-
 43
43
-
 44
44
-
 45
45
-
 46
46
-
 47
47
-
 48
48
-
 49
49
-
 50
50
-
 51
51
-
 52
52
-
 53
53
-
 54
54
-
 55
55
-
 56
56
-
 57
57
-
 58
58
-
 59
59
-
 60
60
-
 61
61
-
 62
62
-
 63
63
-
 64
64
-
 65
65
-
 66
66
-
 67
67
-
 68
68
-
 69
69
-
 70
70
-
 71
71


Unitron Moxi Jump R T Mode d'emploi
- Taper
- Mode d'emploi
- Ce manuel convient également à
dans d''autres langues
- English: Unitron Moxi Jump R T User guide
Documents connexes
-
Unitron Moxi Jump R T Mode d'emploi
-
Unitron Moxi Fit Mode d'emploi
-
-
Unitron Moxi B-312 Mode d'emploi
-
Unitron Stride P R Mode d'emploi
-
-
Unitron Stride M Mode d'emploi
-
-
Unitron Stride V-PR Mode d'emploi
-
Autres documents
-
 connexx Basic Charging Station Mode d'emploi
-
Widex Sound Assist Mode d'emploi
-
Denver BTE-110BLUE Manuel utilisateur
-
-
-
-
-
Starkey Standard Charger & Custom Charger Manuel utilisateur
-
Fri-Jado LDR AC S Manuel utilisateur
-
Starkey Premium Standard Charger & Custom Charger Manuel utilisateur
