VENTURE LIGHTING 10924 – VP10923-EM Indoor Vapor Tight LED Light Fixture Manuel utilisateur

Taper
Manuel utilisateur
VENTURE LIGHTING’S LED VAPOR TIGHT FIXTURE
WITH BATTERY BACKUP
USER MANUAL
Before You Begin
Read These Instructions Completely and Carefully
(800) 451-2606 VentureLighting.com
Upgrade Instructions
STEP 1: Disconnect power from the luminaire and follow proper lockout/tagout procedures before beginning installation or
maintenance.
STEP 2: Remove the existing luminaire. Dispose of the lamp(s) and ballast(s) per local requirements.
STEP 3: Locate the drilled holes shown in Figure A. Use the hardware provided to install the mount bracket to the
mounting surface. (A)
STEP 4: Remove the lens from the fixture.
STEP 5: Remove the LED tray from the fixture as shown in Figure B.
STEP 6: Attach the back of the fixture to the mounting clips as shown in Figure C.
STEP 7: Ensure the LED tray is secured with the safety tethers. (Figure D)
STEP 8: Make the necessary wiring connections as shown in the wiring diagram. (E)
NOTE: The wiring between the battery backup, fixture test switch, driver(s) and LED modules is already
completed. There are two black input wires: the flagged black wire should be connected to continuous (or
unswitched) input power. When power is interrupted on this wire, the fixture will enter battery backup mode. The
unlabeled input wire should be connected to the switch or control that will turn the fixture on and off under normal
circumstances.
NOTE: The polarity of the dimming connections is important to ensure the performance as desired.
NOTE: If not using the dimming functionality, DO NOT connect the Driver Dim+ (purple) to the Driver DIM- (gray).
The fixture will not operate as desired.
STEP 9: Replace and secure the LED tray to the fixture back.
STEP 10: Reinstall the fixture lens as shown in Figure F.
STEP 11: Power can now be restored to the fixture.
(800) 451-2606
6675 Parkland Blvd., Suite 100
Solon, Ohio 44139 USA
V
entureLighting.com
© 2022 Venture Li
g
htin
g
International Venture Li
g
htin
g
is a re
g
istered trademark of Venture Li
g
htin
g
International.
AS0045-B
(A)
(B)
(C)
(D)
(E) Wiring Diagram
(F)
VENTURE LIGHTING’S LED VAPOR TIGHT FIXTURE
WITH BATTERY BACKUP
MANUEL UTILISATEUR
Avant de commencer
Lisez ces instructions complètement et attentivement
(800) 451-2606 VentureLighting.com
Upgrade Instructions
ÉTAPE 1: Débranchez l'alimentation du luminaire et suivez les procédures de verrouillage / marquage appropriées avant
de commencer l'installation ou l'entretien.
ÉTAPE 2: Retirer le luminaire existant. Éliminer la (les) lampe (s) et le (ou les) ballast (s) selon les exigences locales.
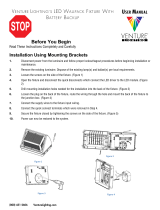
ÉTAPE 3: Repérez les trous percés dans la figure A. Utilisez le matériel fourni pour installer le support de montage sur la
surface de montage. (A)
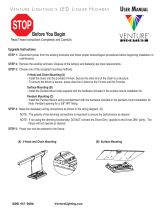
ÉTAPE 4: Retirez l'objectif de l'appareil.
ÉTAPE 5: Retirez le plateau à DEL de l'appareil comme illustré à la Figure B.
ÉTAPE 6: Fixez l'arrière de l'appareil aux attaches de montage comme illustré à la Figure C.
ÉTAPE 7: Assurez-vous que le plateau à DEL est bien fixé avec les attaches de sécurité. (Figure D)
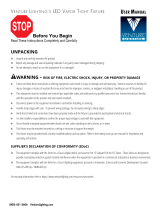
ÉTAPE 8: Effectuez les connexions de câblage nécessaires comme indiqué dans le schéma de câblage. (Figure E)
REMARQUE: Le câblage entre la batterie de secours, le commutateur de test de l'appareil, le (s) pilote (s) et les
modules DEL est déjà terminé. Il y a deux fils d'entrée noirs: le fil noir marqué doit être connecté à une
alimentation d'entrée continue (ou non commutée). Lorsque l'alimentation est interrompue sur ce fil, l'appareil
passe en mode d'économie d'énergie. Le fil d'entrée non marqué doit être connecté à l'interrupteur ou au
contrôle qui allume et éteint l'appareil dans des conditions normales.
REMARQUE: La polarité des connexions de gradation est importante pour garantir les performances souhaitées.
REMARQUE: Si vous n'utilisez pas la fonctionnalité de gradation, NE connectez PAS le Driver Dim + (violet) au
Driver DIM- (gris). L'appareil ne fonctionnera pas comme souhaité.
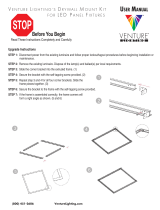
ÉTAPE 9: Remettez et fixez le plateau à DEL sur le support.
ÉTAPE 10: Réinstallez la lentille du luminaire comme le montre la Figure F.
ÉTAPE 11: La puissance peut maintenant être restaurée à l'appareil.
(800) 451-2606
6675 Parkland Blvd., Suite 100
Solon, Ohio 44139 USA
V
entureLighting.com
© 2022 Venture Li
g
htin
g
International Venture Li
g
htin
g
is a re
g
istered trademark of Venture Li
g
htin
g
International.
AS0045-B
(A)
(B)
(C)
(D)
(E) Schéma de Câblage
(F)
  • Page 1 1
  • Page 2 2
  • Page 3 3
  • Page 4 4

VENTURE LIGHTING 10924 – VP10923-EM Indoor Vapor Tight LED Light Fixture Manuel utilisateur

Taper
Manuel utilisateur