VENTURE LIGHTING BF0010 LED Linear Highbay Manuel utilisateur
- Taper
- Manuel utilisateur

(800) 451-2606 VentureLighting.com
Read These Instructions Completely and Carefully
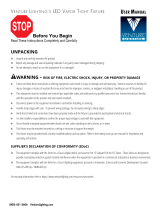
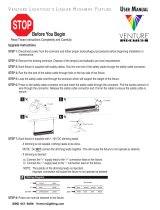
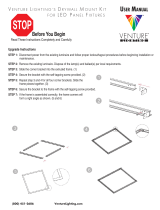
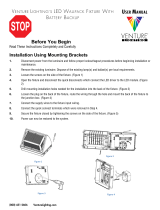
Before You Begin
USER MANUAL
STOP
VENTURE LIGHTING’S LED LINEAR HIGHBAY
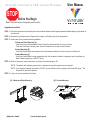
(A) V-Hook and Chain Mounting (B) Surface Mounting
Upgrade Instructions
STEP 1: Disconnect power from the existing luminaire and follow proper lockout/tagout procedures before beginning installation or
maintenance.
STEP 2: Remove the existing luminaire. Dispose of the lamp(s) and ballast(s) per local requirements.
STEP 3: Choose one of the accepted mounting methods.
V-Hook and Chain Mounting (A)
- Install the chain into the provided V-Hook. Secure the other end of the chain to a structure.
- To ensure the fixture is secure, press close the U-bend on the V-hook and the S-hooks.
Surface Mounting (B)
- Install the Surface Mount side supports with the hardware included in the surface mount installation kit.
Pendant Mounting (C)
- Install the Pendant Mount wiring compartment with the hardware included in the pendant mount installation kit.
Note: Pendant opening for a 3/8” NPT fitting.
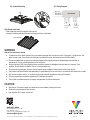
STEP 4: Make the necessary wiring connections as shown in the wiring diagram. (D)
NOTE: The polarity of the dimming connections is important to ensure the performance as desired.
NOTE: If not using the dimming functionality, DO NOT connect the Driver Dim+ (purple) to the Driver DIM- (pink). The
fixture will not operate as desired.
STEP 5: Power can now be restored to the fixture.

(C) Pendant Mounting (D) Wiring Diagram
Purple (Dim+)
Dimming Wire
to 0-10v
Lead wire to
LED load
Blue (-)
Red (+)
White (Neutral) LED DRIVER
Black (Line)
Green (Ground)
Wire Guard Installation
- Slide the wire guard clips through the wire guard.
- Using the fasteners provided to secure the wire guard clips to the fixture.
WARNING
Risk of fire and electric shock
To reduce the risk of death, personal injury or property damage from fire, electric shock, falling parts, cuts/abrasions, and
other hazards, read all warnings and instructions included with and on the fixture box and all fixture labels.
Disconnect power from the luminaire and follow proper lockout/tagout procedures before beginning installation or
maintenance. Contact a qualified electrician for installation.
Venture Lighting’s LED Linear Highbay fixture installation requires knowledge of luminaire electrical systems. If not
qualified, do not attempt installation. Contact a qualified electrician.
To prevent wiring damage or abrasion, do not expose wiring to edges of sheet metal or other sharp objects.
The product should be installed and operated by a qualified electrician or technician in accordance with relevant local codes.
Do not alter any open holes in an enclosure of wiring or electrical components during kit installation.
All wiring connections should be capped with UL listed wire connectors.
The installer must determine that the supply voltage meets the fixture requirement.
CAUTION
Risk of burn. Disconnect power and allow fixture to cool before handling the fixture.
Suitable for use in damp and dry locations.
Use minimum 90°C supply connectors.
© 2022 Venture Lighting International • Venture Lighting is a registered trademarks of Venture Lighting International.
(800) 451-2606
6675 Parkland Blvd., Suite 100
Solon, OH 44139 USA
E-mail: [email protected]
VentureLighting.com
BF0010-D
Wire Guards
Pink (Dim-)

(800) 451-2606 VentureLighting.com
Lisez ces instructions complètement et attentivement.
Avant que tu commences
MANUEL UTILISATEUR
ARRÊT
VENTURE LIGHTING’S LED LINEAR HIGHBAY
(A) Crochet en V et montage en chaîne (B) Montage en surface
Instructions de mise à
1: Coupez l'alimentation de l'appareil d'éclairage existant et suivre les procédures de verrouillage / débranchement avant de
commencer l'installation ou l'entretien.
2: Retirer le luminaire existant. Éliminer la (les) lampe (s) et le (ou les) ballast (s) selon les exigences locales.
3: Choisissez l'une des méthodes de montage acceptées.
Crochet en V et montage en chaîne (A)
- Installez la chaîne dans le crochet en V fourni. Fixer l'autre extrémité de la chaîne à une structure.
- Pour vous assurer que l'appareil est bien fixé, appuyez sur le coude en U du crochet en V et des crochets en S.
Montage en surface (B)
- Installez les supports latéraux de montage en surface avec le matériel inclus dans le kit d'installation de montage en
surface.
Suspension (C)
- Installez le compartiment de câblage du support suspendu avec le matériel inclus dans le kit d 'installation de montage
suspendu.
Remarque: Ouverture suspendue pour un raccord NPT de 3/8 ".
4: Effectuez les connexions de câblage nécessaires comme indiqué dans le schéma de câblage. (D)
REMARQUE: La polarité des connexions de gradation est importante pour assurer la performance souhaitée.
REMARQUE: Si vous n'utilisez pas la fonction de gradation, NE PAS connecter le pilote Dim + (violet) au pilote DIM- (rose). Le
montage ne fonctionnera pas comme souhaité.
5: La puissance peut maintenant être restaurée à l'appareil.

(C) Suspension (D) Schéma de câblage
Violet (Dim+)
fil Dimming
to 0-10v
fil de plomb
à la charge LED
Bleu (-)
Rouge (+)
Blanc (Neutre)
Noir (Ligne)
Vert (Sol)
LED Driver
Installation du garde-fil
- Faites glisser les attaches de protection du fil à travers la protection de fil.
- Utiliser les fixations fournies pour fixer les attaches de garde-fil au luminaire.
ATTENTION
Risque d'incendie et de choc électrique
Pour réduire le risque de mort, de blessures corporelles ou de dommages matériels résultant d'un incendie, d'une
électrocution, de chutes de pièces, de coupures / abrasions et autres dangers, lisez tous les avertissements et instructions
inclus avec et sur le boîtier et toutes les étiquettes.
Débranchez l'alimentation du luminaire et suivez les procédures de verrouillage / marquage appropriées avant de
commencer l'installation ou l'entretien. Contacter un électricien qualifié pour l'installation.
Venture Lighting LED L'installation linéaire de High Bay nécessite la connaissance des systèmes électriques des luminaires.
Si ce n'est pas le cas, n'essayez pas d'installer. Contacter un électricien qualifié.
Pour éviter tout endommagement ou abrasion du câblage, ne pas exposer le câblage aux bords de la tôle ou d'autres objets
tranchants.
Le produit doit être installé et utilisé par un électricien ou un technicien qualifié conformément aux codes locaux pertinents.
Ne modifiez aucun trou ouvert dans une enceinte de câblage ou de composants électriques pendant l'installation du kit.
Toutes les connexions de câblage doivent être bouchées avec des connecteurs Câble répertorié UL.
L'installateur doit déterminer que la tension d'alimentation est conforme aux exigences de l'appareil.
MISE EN GARDE
Risque de brûlure. Débranchez l'alimentation et laissez refroidir l'appareil avant de manipuler l'appareil.
Utilisable dans des endroits humides et secs.
Utiliser des connecteurs d'alimentation minimum de 90°C.
© 2022 Venture Lighting International • Venture Lighting is a registered trademarks of Venture Lighting International.
(800) 451-2606
6675 Parkland Blvd., Suite 100
Solon, OH 44139 USA
E-mail: [email protected]
VentureLighting.com
BF0010-D
Garde-fils
Rose (Dim-)
-
 1
1
-
 2
2
-
 3
3
-
 4
4


VENTURE LIGHTING BF0010 LED Linear Highbay Manuel utilisateur
- Taper
- Manuel utilisateur
dans d''autres langues
Documents connexes
-
 VENTURE LIGHTING BF0015 LED Strip Fixture Manuel utilisateur
-
 VENTURE LIGHTING AG0003 Surface Mount Kit for LED Panel Manuel utilisateur
-
VENTURE LIGHTING 10924 – VP10923-EM Indoor Vapor Tight LED Light Fixture Manuel utilisateur
-
 VENTURE LIGHTING BF0009 LED Vapor Tight Fixture Manuel utilisateur
-
 VENTURE LIGHTING AP0005 Manuel utilisateur
-
 VENTURE LIGHTING AG0004 Drywall Mount Kit Mode d'emploi
-
VENTURE LIGHTING VRK001-C10-413D Manuel utilisateur
-
VENTURE LIGHTING AP0013 Mode d'emploi
-
 VENTURE LIGHTING 24137 WP24137 Outdoor Wall Pack LED Fixture Manuel utilisateur
-
VENTURE LIGHTING BF0011 Manuel utilisateur


Autres documents
-
venture BF0011 Manuel utilisateur
-
venturelighting SELECT-PRO Manuel utilisateur
-
CREE LIGHTING CPY250 Richmond Civic Upgrade Kit Guide d'installation
-
Warehouse Lighting WAREHOUSE-LIGHTING Adjustable Linear High Bay Manuel utilisateur
-
Metalux LCHB1240R Guide d'installation
-
Eaton Portfolio LDRT812B Installation Instructions Manual
-
Eti 54321142 Mode d'emploi
-
Legrand FSP-301 Guide d'installation
-
-
 MaxLite 31100 Manuel utilisateur
