GE GHDF360R10SS Le manuel du propriétaire
- Catégorie
- Lave-vaisselle
- Taper
- Le manuel du propriétaire
Ce manuel convient également à

0
GEAppliances.com
Safety Instructions ........... 2-5
Operating Instructions
Core and Cleaning ................. 17
Control Panel and Settings ........ 6-8
Loading Place Settings ............. 16
Loading the Rocks ............. 14-16
Recommended Dishwasher
Products ............................. 9
Using the Dishwasher .......... 10-13
Troubleshooting Tips ...... 18-2o
Consumer Support
Consumer Support ................. 22
Worrontg .......................... 21
Stainless Steel
Tub Dishwashers
/
J
Write the model ond seriol
numbers here:
Model #
Seriul #
Youcan find them on the tub wall
just inside the door.
165D4700P390
/;9-55066 08-09 JR

IMPORTANT SAFETY INFORMATION.
READ ALL INSTRUCTIONS BEFORE USING --
SAVE THESEINSTRUCTIONS
WARNING!
For your safety, the information in this manual must be followed to minimize the risk of fire
or explosion, electric shock, and to prevent property damage, personal injury, or death.
WARNING! WATER HEATER SAFETY
Under certain conditions, hydrogen gas may be produced in a water heater that has not been used
for two weeks or more. HYDROGEN GAS IS EXPLOSIVE.
Ifthe hot water has not been usedfor two weeks or more, prevent the possibility of damage or injury
by turning on all hot water faucets and allow them to run for several minutes. Dothis before usingany
electricalappliance which isconnected to the hot water system.This simple procedure will allow any built-
up hydrogen gas to escape.Sincethe gasisflammable, do not smokeor usean open flame or appliance
during this process.
%
PROPER INSTALLATION AND MAINTENANCE
This dishwasher must be properly installed and located in accordance with the Installation
Instructions before it is used. If you did not receive an Installation Instructions sheet with
your dishwasher, you can receive one by visiting our website at GEApplionces.com.
mConnect to a grounded metal, permanent wiring
system; or run an equipment-grounding
conductor with the circuit conductors and
connect to the equipment-grounding terminal
or lead of the appliance.
m Improper connection of the equipment-grounding
conductor can result in a risk of electricshock.
Checkwith a qualified electrician or service
representative if you are in doubt whether the
appliance isproperly grounded.
m Disposeof discarded appliances and shipping
or packing material properly.
Ill Donot attempt to repair or replace any part
of your dishwasher unlessit isspecifically
recommended inthis manual. Allother servicing
should be referredto a qualified technician.
raTa minimize the possibility of electric shock,
disconnect this appliance from the power supply
beforeattempting any maintenance.
NOTE:Turningthe dishwasher off doesnot
disconnect theappliance from thepower supply.
Werecommendhaving a qualifiedtechnician
servicegout appliance.
CAUTION: Topreventminorinjuryorpropertydamage
mContents washed in Anti-bacterial mode, if
available,may be hot to the touch. Usecare
before handling.
mUsing a detergent that is
not specifically designed
for dishwashers will cause
the dishwasher to fillwith
suds.
mIf your dishwasher is connected to a
wall switch, ensure that the switch is
on prior to use.
mOn dishwasherswith electronic
controls, if you choose to turn the wall
switch off between wash cycles,allow
5-!0 secondsafter turning the switch on before
touching START/RESETto allow the control to
reboot.
mNon-Dishware Items:Donot wash itemssuch
aselectronic air cleanerfilters, furnace filters and
paint brushes in your dishwasher.Damage to
dishwasher and discoloration or staining of
dishwasher may result.
mClosesupervisionis necessary ifthis appliance
isused by or near children.
mLoad light, plastic items so they will not
become dislodged and drop to the bottom
of the dishwasher-they might come into
contact with the heating element and be
damaged.

INFORMACI6N IMPORTANTEDE SEGURIDAD
LEA TODASLAS INSTRUCCIONESANTES DE USAR--
GUARDEESTASINSTRUCCIONES
GEAppliances.com
%
iADVERTENCIA!
Para su seguridad, debe cumplirse con la informaci6n de este manual a fin de minimizar
el riesgo de incendio o explosi6n, descarga el_ctrica o para prevenir dafios a la propiedad,
lesiones personales o la muerte.
-& iADVERTENCIA! SEGURIDAD DEL CALENTADOR DE AGUA
Bajo ciertascondiciones,puede producirsegas de hidr6geno en un calentador deagua que no se ha usado
durante dos semanas o mds. ELGAS DE HIDROGENOES EXPLOSIVO.
Si elagua caliente no se ha utilizado por dos semanas o m6s, evite la posibilidad de daflos o lesiones
abriendo todos los grifos de agua caliente g dej6ndolas correr durante varios minutos. Haga esto antes
de utilizar cualquier aparato el@ctrico que se encuentre conectado al sistema de agua caliente. Este simple
procedimiento permitir6 que se libere cualquier clase de acumulaci6n de gas de hidr6geno. Ya que el gas
es inflamable, no fume o utilice una llama abierta o un aparato durante este proceso.
INSTALACION Y MANTENIMIENTO ADECUADOS
Estelavaplatos debeinstalarsede manera adecuada y ubicarse deacuerdo con lasInstruccionesde
Instalacidn antes de comenzar e!uso.Siusted no ha recibidouna pdgina de Instruccionesde instalacidn
con su lavap!atos,puede obtener una visitando nuestrositio Weben GEApplionces.com.
m Conecteel lavaplatos/aparato a un sistema m No intente reparar o cambiar ninguna piezade
de cableado permanente conconexi6n a tierra
o debe utilizarseun conductor de conexi6na tierra
del equipamiento con losconductores de circuito,
g debe conectarse a laterminal de conexi6n
a tierra o conductor del aparato.
m Unaconexi6n inadecuada del conductor de
conexi6n a tierra de equipo puede provocar
un riesgode descarga el@ctrica.Consultea un
electricistacalificadoo representantede servicio
t@cnicositiene dudas sobrelacorrecta conexi6n
a tierra del aparato.
m Eliminelosaparatos que no va a utilizarm6s g el
material de empaque o envb como corresponde.
m
sulavaplatos a menos que est@espedficamente
recomendado en este manual. Cualquierotto
serviciodebe realizarloun t@cnicocalificado.
Paraminimizar la posibilidadde una descarga
el_ctrica,desconecteeste aparato de la fuente
de energfaantes de realizarcualquierclase de
mantenimiento.
NOTA:Apagar e!lavaplatosno desconectae!
apamto delsuministro de energfa.Recomendamos
queun t_cnicoca!ificadorealicee!serviciot_cnico
desu aparato.
PRECAUCiON: Para evitar lesiones menores U dafios a la propiedad
m Loselementos lavados en el modo anti-bacterial,
si seencuentra disponible,pueden quedar
calientes al tacto. Tenga cuidado antes de
tocarlos.
m Utilizarun detergente no
disefiado espedficamente
para lavaplatos provocar6
que el aparato seIlene
de espuma.
mSisu lavaplatos seencuentra conectado
a un interruptor de pared,verifique que
el interruptor seencuentre encendido
antes del uso.
m Enlavaplatos con controles electr6nicos,siusted
elije apagar el interruptor de pared entre ciclos
de lavado,deje pasar 5-!0 segundos despu_s de
encender el interruptor antes de presionar
START/RESETpara permitir que el control seinicie.
m Elementosno aptos para lavaplatos: No lave
elementos como filtros de limpiadores de aire
electr6nicos,filtros de hornos g pincelesde pintura
en su lavaplatos. Puedenproducirse dafios en el
lavaplatos g decoloraci6n o manchas en el
aparato.
mSe requiere una supervisi6nestricta cuando
cualquier aparato esutilizado por ni_os o en
su cercania.
mCargue elementos livianos g pl6sticos de modo
que no se desplacen g caigan al fondo del
lavaplatos, ga que pueden entrar en contacto con
el elemento calentador g da_arse.

IMPORTANT SAFETY INFORMATION
READ ALL INSTRUCTIONS BEFOREUSING--
SAVE THESEINSTRUCTIONS
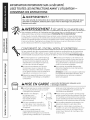
&WARNING! RISK OF CHILD ENTRAPMENT
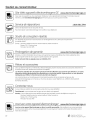
PROPERDISPOSAL OF THE DISHWASHER
Junked or abandoned dishwashers are dangerous...
even if theg will sit for "justa few dags."Ifyou are
getting rid of gour old dishwasher,pleasefollow
the instructions to help prevent accidents.
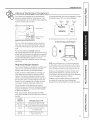
Before You Throw Away Your Old Dishwasher
Takeoff the door of the washing compartment or
remove the door latch (asshown).
Screw
(onsome
models)
0
0
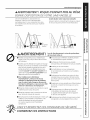
WARNING!
When using your dishwasher, follow basic precautions,
including the following:
Usethis appliance onlg for its intended purpose
as described in this Owner's Manual.
m
Useonlg powder,tabs, liquid detergents or rinse
agents recommended for use in a dishwasher and
keepthem out of the reach of children.Cascade®
and Cascade®Complete Automatic Dishwashing
Detergents,and CascadeCrystal Cleare rinse
agents have been approved for usein all GE
dishwashers.
mlOn models with the SmartDispenseTM sgstem,
do not mix ang chlorine bleach-based automatic
dishwashing detergent with ang dishwashing
detergent containing enzgmes as this could
cause the detergents to congeal and lead to
blockage of the SmartDispenseTM sgstem.
m Locatesharp itemsso that theg are not likely
to damage the door seal.
m Loadsharp kniveswith the handles up to reduce
the risk of cut-type injuries.
m Donot wash plastic items unlessmarked
dishwasher safe or the equivalent. Forplastic
items not so marked, checkthe manufacturer's
recommendations.
mDo not touch the heating element during or
immediately after use.
mDo not operate your dishwasher unlessall
enclosure panels are properly in place.
mDo not tamper with controls.
mDo not abuse,sit on or stand on the door or dish
rack of the dishwasher.
mDo not allow children to play around dishwasher
when opening or closing door due to the possibility
of small fingers being pinched in door.
mDo not discard a dishwasherwithout first removing
the door of the washing compartment or the door
Iotch.
mDo not store or usecombustible materials,gasoline
or other flammable vapors and liquidsin the
vicinity of this or any other appliance.
mDo not allow children to play with, on or insidethis
appliance or any discarded appliance.
READ AND FOLLOW THIS SAFETY INFORMATION
CAREFULLY.
SAVE THESE INSTRUCTIONS
4

INFORMACION IMPORTANTE DE SEGURIDAD
LEA TODAS LAS INSTRUCCIONES ANTES DE USAR--
GUARDE ESTASINSTRUCCiONES
GEAppliances.cam
_ILiADVERTENCIA! RIESGODE ENCIERROPARANI_IOS
ELIPIINACION CORRECTADEL LAVAPLATOS
Un lavaplatos desechado o abandonado resulta
peligroso._aOn si quedar6 en un lugar por "s61o
unos dfas".Siva a desechar su viejo lavaplatos,
siga las siguientes instrucciones para prevenir
accidentes.
Antes de desechar su viejo lavuplatos:
requite la puerta del compartimento de lavado
o saque la traba de la puerta (como puede
verse).
Tornillo
(enalgunos
modelos)
0
_..AiADVERTENCIA! Cuando usesu lavap/atos, siga precauciones b6sicas
deseguridad, induyendo las siguientes:
[] Use este aparato s61ocon el objetivo para el que
fue creado, como se describe en este Manual del
Propietario.
[] Utilice s61odetergentes en polvo, Ifquido o tabletas
o agentes de enjuague recomendados para uso
en lavaplatos g mant6ngalos alejados del alcance
de los nihos. Los detergentes para lavaplatos
autom6ticos Cascade®g Cascade ®Complete,
g los agentes de enjuague Cascade Crgstal Clear*
han sido aprobados para el uso en todos los
lavaplatos GE.
[] En modelos con el sistema SmartDispense'", no
mezcle detergentes para lavaplatos autom6ticos
a base de blanqueador con detergentes para
lavaplatos que contengan enzimas porque los
detergentes pueden solidificarse g provocar
bloqueos en el sistema SmartDispense*".
[] No toque el elemento calentador durante el uso
o inmediatamente despu_s de finalizar el uso.
[] No haga funcionar el lavaplatos a menos qua todos
los paneles del recinto se encuentren en su lugar.
[] No altere o modifique los controles.
[] No maltrate, ni se siente o se pare sobre la puerta
o bandejas de los platos del lavaplatos.
[] No permita qua los ni_osjueguen alrededor del
lavaplatos cuando abra o cierre la puerta debido
a la posibilidad de pellizcar sus dedos con la puerta.
[] No deseche el lavaplatos sin antes quitar la puerta
del compartimento de lavado o latraba de la
puerta.
[] No almacene o use materiales combustibles,
gasolina u otros vapores o Ifquidos inflamables
cerca de este o cualquier otro aparato.
[] Cargue cuchillos filosos con los mangos hacia arriba []
para reducir el riesgo de una lesi6n personal.
[] No lave elementos pl6sticos a menos qua est_n
marcados como aptos para lavaplatos o
equivalente. Enel caso de elementos pl6sticos
qua no est_n marcados asf, verifique las
recomendaciones del fabricante.
No permita qua los ni_osjueguen sobre, con
o dentro de este o cualquier otro aparato
desechado.
_tl S
ON
LEA YSIGA ESTAINFORMACION DESEGURIDAD CUIDADOSAMENTE.
GUARDE ESTAS INSTRUCCIONES
5

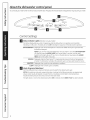
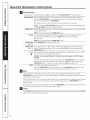
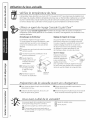
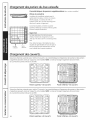
About the dishwasher control panel.
Youcanlocateyourmodelnumberonthetubwalljustinsidethedoor.Throughoutthismanual,featuresandappearancemayvaryfromyourmodel.
ControlSettings
_ Status Lights (Indicatorsvary bg models)
Indicator
TheStatusdisplagtells you what ishappeningwhile the dishwasherisinoperation and may flash,
indicating a malfunction.Thelightswill come ONindicating the sequenceofthe dishwasheroperation.
LOWDETERGENTDisplagedwhen the SmartDispenseTM needsto be refilledwith liquid or gelautomatic
dishwasherdetergent.
NOTE:Ifgou are not usingSmartDispenseTM and gou want to turn the LOWDETERGENT
LEDlightoff,presstheADDEDHEATpad 5 timeswithin 3 seconds.Youwill hear5
beeps;then the lightwillgo off.Youcan turn the light backon bgpressingtheADDED
HEATpad5 timeswithin 3 seconds.
SENSINGDisplayedwhilethe CleanSensorTM ismeasuring the amount of soiland temperature
of water.Thedishwasherwilladjust the selectedcgcle to achieveoptimal performance.
SANITIZED Displagedwhen cgcle has met sanitizationconditions.
CLEAN Displagedwhen a wash cgcleiscomplete.
_ Wash Programs (Selections)
With thedishwasherdoor closedand latched,pressthe pad forthe desiredwash cgcle.
NOTE:Allcgcle times and water usageinformation contained in the following sectionare approximate
values.Actual resultswilldepend on severalfactors,includingbut not limited to inlettemperature,
householdwater pressureand amount ofsoilin the wash water.
Thelightaboveor nextto the selectedpad will beONto indicatewhich WASHCYCLEhasbeen selected.

GEAppliances.com
Wash Programs (Selections) (continued)
SANI WASH 7.5-8.75 gal., 50-i]5 min.
This cycle raises the water temperature in the final rinse to sanitize gout dishware.
The cycle length will vary depending on the temperature of your inlet water.
NOTE:The Sani Wash cgcle is monitored for sanitization requirements. If the cycle is
interrupted during or after the main wash portion or if the incoming water temperature
is so low that adequate water heating cannot be achieved, the sanitizing conditions may
not be met. Inthese cases, the sanitized light will not illuminate at the end of the cycle.
NOTE: NSF-certified residential dishwashers are not intended for licensed food
establishments.
NORMAL WASH 5.2gal., 60-90 rain.
Thiscycle isfor medium/heavily soileddishes and glassware.
Cycle time and water usage are approximate values. Results will depend on
several factors, including but not limited to inlet temperature, household water
pressure and amount of soil in the wash water.
7.5 gal., 40-60 min.
This cycle is for everyday dishes and glassware.
RINSEONLY 2.5 gal., 11 min.
For rinsing partial loads that will be washed later. Do not use detergent with this cycle.
LIGHTWASH
(onsome models)
NOTE:Thisdishwasherisequipped with CleanSensoff'_with automatic temperature contro!;therefore,
cyclelength and time wi!!var_ldepending on sol!and water temperature conditions.
NOTE:On!_ltheSani Washc_Iclehasbeen designedto meet therequirementsof Section6,NSFJ84 for sol!
removal and sanitization efficacy.

About the dishwasher control panel.
g Enhancements
Thelight above the selected pad will be ON to indicate which ENHANCEMENThasbeen selected.
DELAY HOURS
ADDED HEAT
STEAM
Youcan delay the start of a wash cycle for up to 24 hours (dependingon model).
Pressthe DELAYHOURSpad to choose the number of hours you want to delay the
start ofthe cycle; then pressSTART/RESET.
Themachine will count down and start automatically at the correct time.
NOTE:Tocancel the DELAYHOURSselectionbefore the cycle begins,repeatedly press
the DELAYHOURSpad untilthe display isblank.
When selected,the cycle will run longer with heating element on to improve both wash
and dry performance.
NOTE:Cannot be selectedwith RINSEONLYcycle.
Forusewith heavily soiledand/or dried-on, baked-on soils.Thisoption MUSTbe
selected PRIORto starting the cycle.TheSTEAMoption adds 26 minutes to
the cycle time.
NOTE:Cannot be selectedwith RINSEONLYcycle.
HEATEDDRY When HEATEDDRYisoff,disheswill air dry.
LightOff
HEATEDDRY Turnsthe heater on for faster drying. Thiswill extend the total cycle time between
LightOn 8 and ]8 minutes depending on the cycle selected.NOTE:Cannot be selectedwith
RINSEONLYcycle.
LOCK
Start
RESET
Youcan lockthe controls to prevent any selections from being made. Or you can lock
the controls after you have started a cycle.
Children cannot accidentally start dishwasher by touching pads with this option
selected.
Tounlock the dishwasher controls, pressand hold the HEATEDDRYpad for ] seconds.
Thelight above the lock pad will turn off.Tolock the dishwasher,pressand hold the
HEATEDDRYpad for ] seconds.The light abovethe LOCKpad will turn on.
Tochange a cycle after washing starts...
TouchtheSTART/RESETpad to cancelthe cycle.TheSTART/RESETlightwill flash while
the water ispumped out if needed.This takesapproximately 2 minutes.
Closeand latch the dishwasherdoor and selectthe cycle and desiredenhancements.Touch the
START/RESETpad once to begin the cycle.Water fill begins immediately, and approximately 60 seconds
later the wash action begins.
When the dishwasher door isfully closed and latched,the control panel lights will display the last settings
you selected.If you don't want to change any of the settings,simply touch the START/RESETpad to
begin the cycle.
If the door isclosed,the indicator lightswill turn off ifthe START/RESETpad isnot selectedwithin 5 minutes.
Toactivate the display,open and closethe door or pressany pad.
Clean
TheCLEANlight will illuminate and a double beep will sound when a wash cycle iscomplete. TheCLEAN
light will turn off when the door isopened.

GEAppliances.com
Flashing display lights.
Status Indicator Lights What It Means
START/RESET Cgcle has been interrupted bg pressingthe START/RESETpad,or there
has been a power failure.TheSTART/RESETlight will stop flashing after the
dishwasher automaticallg drainsout the water.Thedishwasher will restart if
the interruption was the result of a power failure.
Recommended dishwasher products.
GErecommends the following products for use in its
dishwashers:
m Forgour manual detergent dispenser,Cescede®
powder, liquid or gel automatic dishwasher
detergents are approved.
m Forgour SmartDispenseTM Detergent Dispenser,use
onlg the recommended detergents listed on page
12of this manual.
Cescade Crystal Cleer®rinseagent to remove
spots and prevent new film buildup on gour dishes,
glasses,flatware, cookware and plastic. Using rinse
agent alsoimproves drg performance.
m Cescede®Plastic Boosteffnto remove red staining
inside gour dishwasher that can come from some
tomato-based foods.
m Cereme Bryte ®StainlessSteelApplianceCleaner
to clean the exterior stainlesssteel panel of GEand
ProfileTM dishwashers (forstainlesssteel exterior
models onlg).

Using the dishwasher.
Check the Water Tern ture
The entering water should be at least 120°F and not more than 150°F for effective cleaning and to
prevent dish damage. Check the water temperature with a candy or meat thermometer. Turn on the
hot water faucet nearest the dishwasher, place the thermometer in a glass and let the water run
continuously into the glass until the temperature stops rising.
Use Cascade stal Clear ®Rinse ,ent
Cescede Cryste! Cleer ®rinse agent improves drying, removes spots and prevents new film buildup on
btour dishes, glasses, flatware, cookware and plastic.
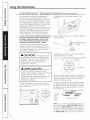
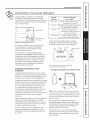
Filling the Dispenser
Therinseagent dispenser holds3.5oz.of rinseagent.
Under normal conditions,this will last approximately
one month.Try to keep it full,but do not overfill.
m
D
Make surethe dishwasher door isfully open.
Turnthe dispenser
cap to the left and
lift itout.
r_Add rinseagent until
the indicator window
looks full.
Cleanup any spilled
rinseagent with a Indicator
damp cloth, window Dispensercap
Rinse Aid Setting
Theamount of rinseagent releasedinto the final
wash can be adjusted.Thefactory setting isat the
midpoint; however,it isrecommended that the
maximum setting be used.If there are ringsof
calcium (hardwater) spots on dishes,try a higher
setting. If there isfoaming, usea lower setting.
Toadjust the setting:
Removethe dispenser cap_-_..
then turn the adjuster
counterclockwise to
increase the amount k,_ __- Rinseagent
of rinseagent or _ adjuster
clockwiseto reduce
the amount of rinseagent dispensed.
[] Replacethe dispenser cap.
Dish Pre oration Prior to Loadin
II Noprerinsing of normal food soilisrequired. II Removelarge quantities of any remaining food.
II Scrapeoff hard soils,bones,toothpicks, skinsand II Removeleafy vegetables, meat trimmings and
seeds, excessiveamounts of grease or oil.
Forget to Add a Dish?
A forgotten dish can be added any time before
the main wash.
E] Squeezethe door latch to release the door.
j-_J Do not open the door until the water spray
action stops. Steam may rise out of the
dishwasher.
r_l Add forgotten dishes.
E] Close the door.
10

GEAppliances.com
_'_f'_ Somemodelscomeequippedwithan automaticliquid
"" _ dishwasherdetergentdispenser(SmartDispenseTM) and
a manualdispenser.Youcanuseeitherofthesedispensers
butdon'tusebothatthesametime.
ent Dispenser
ForheavilUsoiledloads,usea bitmoredetergent.Forwater
temperaturesabove140°F,useabitlessdetergent.
SmartDispense TM
Manual Detergent
Dispenser
Medium Medium Extremely
Soft Soft Hard Hard
Forheavilysoiledloads,usethePotsandPansorHeavyWashcycle.
Thecoverofthemanualdispenserwillopenduringthe
washcgcle.IfOouareusingSmartDispenseTM, leavethe
coverofthe manualdispenseropenbeforestartingthe
cocle.
Forthemanualdispenser,Cascade®Automatic
DishwashingDetergentshavebeenapproved.Youmaguse
powder,liquid,gelortabletsinthisdispenser.Itisimportant
tokeeppowdereddetergentsandtabletsfreshand drUso
thegdon'tloseeffectiveness.Therefore,donotput
detergentintothemanualdispenseruntilgouare readgto
washdishes.
FflfingManual Detergent Dispenser
Theamountofdetergentto usedependsonwhethergour
waterishardor soft.Withhardwater,Oouneedextra
detergent.Withsoftwater,Oouneedlessdetergent.
Protectoourdishesanddishwasherbgcontactinggour
waterdepartmentand askinghowhardoourwateris.
Twelveor moregrainsisextremelUhardwater.Awater
softenerisrecommended.Withoutit,limecanbuildup in
thewatervalve,whichcouldstickwhileopenandcause
flooding.Toomuchdetergentwithsoftwatercancause
a permanentcloudinessofglassware,calledetching.
Usetheinformationinthetablebelowasa guideto
determinetheamountofautomaticdishwasherdetergent
toplaceinthedispenser.YoumaUusepowder,liquid,gel
ortabletsinthisdispenser.
Whenusingautomaticdishwashingdetergenttablets,
simplgplaceonetabletinthe mainwashsectionandclose
thecover.
Number
of Grains Detergent Cups to Fill
Less than 4 Fillcup to soft line (1/] full)
4 to 8 Fillcup to medium soft line (2/] full)
8 to 12 Fillcup to medium hard line
(completelg full)
Greater Fillboth main wash cup
than 12 and pre wash cup
DO NOTUSEHANDDISH DETERGENT
m
NOTE:Usinga detergent that isnot specificallydesigned
fordishwasherswillcausethedishwasherto fillwithsuds.
Duringoperation,thesesudswillspilloutofthedishwasher
vents,coveringthekitchenfloorandmakingthefloorwet.
Becausesomangdetergentcontainerslookalike,store
thedishwasherdetergentina separatespacefromall
othercleaners.Showangonewhomagusethedishwasher
thecorrectdetergentandwhereitisstored.
Whiletherewillbenolastingdamagetothedishwasher,
gourdisheswillnotgetcleanusinga dishwashing
detergentthat isnotformulatedto workwith dishwashers.
11

Using the dishwasher.
SmartDis ent Dispenser (some models)
This dishwasher may have SmartDispenseTM,a
feature which automatically dispenses liquid
automatic dishwasher detergent into each cycle
based on soil level and water hardness. To utilize
the SmartDispenseTMDetergent Dispenser, it must
first be filled. Although any liquid or gel automatic
dishwashing detergent can be used in the
SmortDispense*Msystem, all liquid or gel automatic
dishwashing detergents are not the same. Host
automatic dishwashing detergents are chlorine
bleach-based (such as Cascade®)while others
contain enzymes (such as Cascade Complete®).
Do not mix ang chlorine bleach-based automatic
dishwashing detergent with ang dishwashing
detergent containing enzgmes as this could
cause the detergents to congeal and lead to
blockage of the SmartDispense*" sgstem.
Check the detergent label to determine if the
detergent is chlorine bleach-based or one that
contains enzymes. It is recommended that the
same type of detergent be used when refilling
your SmartDispense*Msystem.
,_ CAUT_ON_ Absolutely do not add
powder detergent, tablets or any liquid soap
or detergent normally used for washing hands
or dishes in a sink. Only use liquid or gel
detergent specifically designed for use in
an automatic dishwasher.
, kiPRECAUCION! Bajo ninguna
circunstancia agregue detergente en polvo,
tabletas, o jab6n o detergente Ifquido normalmente
utilizado para lavar manos o platos en un
fregadero. $61outilice detergente Ifquidoo en gel
espec[ficamente diseAadospara utilizar en
lavaplatos autom(iticos.
To open the dispenser for filling, push down and
turn the blue cap counterclockwise until the cap is
loose. Lift cap off.
Setthe door at a comfortable angle to fill the
dispenser.
Aim the detergent bottle at the opening in the door
and begin to fill.
The dispenser will hold/45 oz of liquid dishwasher
detergent (standard size bottle).
J%
\
\
Turnclockwise.
!
i
i
When full, replace the cap and turn clockwise until
tight to ensure no water enters the SmartDispense_M
dispenser.If residue is left on the door, it will be
washed off in the next cycle.
An indicator light will turn on to notify you when
the dispenser needs to be filled again. After filling,
the light will not turn off until the door isclosed. A
full dispenser will last approximately 1 month for
the average user.
STATUS
SmartOispense
LightWill_ LOWDETERGENT• SANITIZED
TurnOn • SENSING • CLEAN
When
Timeto (appearancemayvary)
Refill
NOTE:If you are not using SmartDispense _Mand
you want to turn the LOW DETERGENTLEDlight
off, press the ADDED HEATpad 5 times within 3
seconds. You will hear ] beeps; then the light will
go off. You can turn the light back on by pressing
the ADDED HEATpad 5 times within 3 seconds.
12

GEAppliances.com
SmartDispense Detergent Dispenser
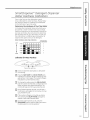
Water Hardness Calibration
Prior to the first use, the dishwasher needs
to be calibrated for water hardness. Pleasefollow
the directions below to calibrate the dishwasher
to the hardness of gour tap water.
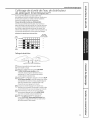
Determine the Hardness of Your Tap Water
In the bag that contained these instructions, gou
should find a water hardness test strip package.
Readthe instructions on the package, remove the
test strip and follow the instructions to determine
the hardness level of gour tap water. You will use
this information to calibrate gour dishwasher to
dispense the optimal amount of detergent.
Water hardness test strip indication. Value toEnter
into Dishwasher
SOFT 0 RED J_ 1
1 RED _ 2
2 RED _ 3
3 RED _ 4
HARD 4 RED _ 5
Calibration for Water Hardness
Pressat thesametime.
r_ Closeand latch the door (lightson,dishwasher
not running).
r_ presstheSANI WASHand DELAYHOURSpads
together for 3 seconds.All lights will light up and
gou will hear I to 5 beeps.The number of beeps
indicatesthe current hardnessvalue.
r31To change the setting, pressthe DELAYHOURS
pad the number of times that correspondsto the
water hardnessvalue determined above.The
control will beep each time gou press the pad.
r41 once finished pressingthe pad,gou will hear a
confirmation with beepsfor the number oftimes
gou pressedthe pad.
r_ ifthe number of beepsis notwhat gou desire,
start pressingthe DELAYHOURSpad again to
reentera new water hardness level.
r_ once the water hardness isset, pressthe
START/RESETpad to savethe setting and return
the dishwasherto normal operation.
13

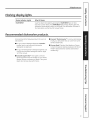
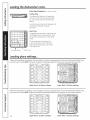
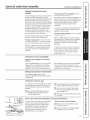
Loading the dishwasher racks.
For best dishwashing results, follow these loading guidelines. Features and appearance of racks and silverware
baskets may vary from your model.
Upper Rack
Although the upper rack isprimarily for
glasses,cups and saucers, pots and pans can
be placed inthis rack for effective cleaning.
Cupsand glassesfit best along the sides.This
isalso a secure place for dishwasher plastics.
Theutility shelf (somemodels)may be placed
in the up or down position to add flexibility.A
wine glass holder (somemodels)secureswine
glassesfor best washability.
Somemodels havecontoured metal cup
shelvesthat can secure up to 12wine glasses
(asshown).
Becausewine glassescome in various sizes,
after loading,slowly push in the rack to make
surethey will clearthe top of the dishwasher.
Somemodels havean Angled RackSystem,
which allows you to angle your dishes,such
as coffee mugs,for better cleaning and
quicker drying. To position the tines,pull the
leverforward then drop the tines into
position,then releasethe lever.
Theupper rack isgood for all kinds of
odd-shaped utensils.Saucepans,mixing
bowls and other items should be placed face
down. Fold-down tines (onsome models)
provide flexibility for extra-large and hard-
to-fit items.
Securelarger dishwasher-safe plastics over
2 tines when possible.
Makesure small plastic items are secure so
they can't fall onto the heater.
Besurethat items do not protrude through
the bottom of the rack and block rotation of
the middle spray arm. This could result in
poor wash performance for items in the
upper rack.
Checkto make surethat no items will block
rotation of the wash arm.
Lower Rack
The lower rack is best usedfor plates,saucers
and cookware. Largeitems such as broiler
pansand baking racksshould go along the
left-hand side.Load platters, pots and bowls
along the sides,in corners or in the back.The
soiled sideof items should face the center of
the rack. If necessary,oversizedglassesand
mugs can be placed in the lower rack to
maximize loading flexibility.
Also,be careful not to leta portion of an item
such asa pot or dish handle extend through
the bottom rack.This could block the wash
arm and cause poor washing results.
Fold-down tines (on some models) provide
flexibility for extra-large and hard-to-fit items.
Thetines may be left in the up position or
folded down to customizethe lower rack.
lq

GEAppliances.com
tab out Remove end cap
To Remove the Upper Rack
IT] pressthumb tab out and remove the
front end caps on each sideof the rail.
[-_ Pullthe rock straight out and off the roils.
r_ Replacethe end caps.
E] Pushthe railsall the wag back into the
dishwasher.
Fs-]Then fillthe lower rack and begin
gour cgcle.
One-piece basket (oil some models)
Three-piece basket (on some models)
Don't let any
item extend through
bottom.
Silverware Basket
Toload flatware, simplg pushthe adjustable
handle to either side(on some models).Put
flatware in the removable basketwith fork
and knife handles up to protect gour hands.
Placespoons in the basketwith handles
down. Mix knives,forks and spoons sotheg
don't nesttogether. Distributeevenlg.Small
plastic items, such as measuring spoons and
lidsfrom small containers should go in the
bottom ofthe silverware basketwith the
silverware on top.
Theone-piece silverware basket(on some
models)can be placed in the front, right side
or back of the lower rack.
A varietg of options isavailable regarding
the three-piece silverware basket(onsome
models)in gour dishwasher.Thecomplete
basket isdesignedto fit on the right sideof
the lower rack.Additionallg, each end of
the basket is removable to add loading
flexibilitg to accommodate flatware and
lower rack capacitg needs.
Thelidsof both end and middle baskets(on
some models)can be closedto contain small
items. Long items can be placed on the utilitg
shelf in the upper rack.
Toremove end baskets, grasp the basket at
opposite corners and slide apart.
15

Loading the dishwasher racks.
Extra Rack Features (on some models)
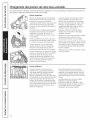
Cutlery Tray
Thecutlers trag holdsup to 4 large knifes
such as a carver,chef's knives,breadknife,
etc.,that ore too toll to fit inthe silverware
basket.
Hook the trog onto the rear of the upper rock.
Lag the knives between the guides
(asshown).
T eseti fold down
//
Bowl Tines
Thespecial large-bowl tines in the lower rack
add flexibility to uour loading pattern.Theg
are usefulfor serving bowls or other large
bowls.
Tousethe bowl tines,fold down the
2 rows of flex tines infront of the bowl
tines and load bowlsjust as Uouwould
in the upper rack.
Large-bowl tines
Loading place settings...
Follow these guidelines for loading 10 place settings. Features and appearance of racks and silverware baskets may
vary from your model. NOTE:Silverware should be individually loaded into the slots on the silverware basket lid.
Upper Rack--lO place settings Lower Rack--lO place settings
Follow these guidelines for loading 12 place settings. Features and appearance of racks and silverware baskets may
vary from your model. NOTE:Silverware should be individually loaded into the slots on the silverware basket lid.
16 Upper Rack--12 place settings Lower Rack--12 place settings

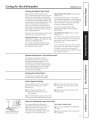
Caring for the dishwasher. GSAppliances.com
Cleaning the Exterior Door Panel
Beforecleaning the front panel,make
sure you know what type of panel you have.
Referto the last two lettersof your model
number. Youcan locate your model number
on the left-hand tub walljust insidethe door.
If your model number ends with BB,CC,WW,
SAor BG,then you have a PaintedDoor
panel. If your model number endswith SS,
then you havea StainlessSteelDoor panel.If
your model number ends with CS,then you
have a CleanSteelpanel.
Followthe instructions below for cleaning the
door panel for your specific model.
Painted Door Panel (mode!numbers ending
in BB-black,CC-bisqu¢ WW-White, SA-silver
metallic or BG-gmphite black)
Usea clean, soft, lightly dampened cloth,
then dry thoroughly. Youmay also usea
good appliance wax or polish.
Stainless SteelDoor Pond (mode!numbers
ending in SS)
Thestainlesssteel panels can be cleaned
with StainlessStee!Magic or a similar product
using a clean,soft cloth. Donot useappliance
wax, polish,bleach or products containing
chlorine on StainlessSteeldoors.
Youcan order StainlessStee!Magic
#WX!OX!5 through GEParts by calling
800.626.2002.
CleanSteel Door Panel (mode! numbers
ending in CS)
Use a clean, soft, lightly dampened cloth,
then dry thoroughly. Do not use appliance
wax, polish or any chemical agent on
CleanSteel doors.
Do not wipe the dishwasher with a soiled
dish cloth or wet towel. Thesemay leave
a residue. Do not use scouring pads or
powdered cleaners because these products
can scratch the finish.
Stainless Steel Interior-Tub and Inner Door
Thestainlesssteel usedto make the
dishwasher tub and inner door provides
the highest reliability available in a GE
dishwasher.If the dishwasher tub or inner
door should be scratched or dented during
normal use,they will not rust or corrode.
Thesesurface blemisheswill not affect
their function or durability.
Cleaning the Control Panel
Tocleanthe control panel,usea lightly
dampened cloth.Then dry thoroughly.
Protect Against Freezing
If your dishwasher isleft in an unheated
place during the winter,ask a service
technician to:
r_cut off electrical power to the
dishwasher.Removefusesor trip
circuit breaker.
r_ Turnoff the water supply and disconnect
the water inlet linefrom the water valve.
r_ Drainwater from the water inlet line
and water valve.(Usea pan to catch
the water.)
r_ Reconnectthe water inlet lineto the
water valve.
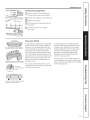
Airgap _._I_"L ].:_t_=__
Checktheairgapanytimeyour
dishwasherisn'tdrainingwell.
Does Your Dishwasher Have an Air Gap?
An air gap protects your dishwasher
against water backing up into it if a drain
clogs.The air gap is not a part of the
dishwasher.It isnot covered by your
warranty. Not all plumbing codes require
air gaps,so you may not have one.
The air gap is easy to clean.
r_ Turnoff the dishwasher and lift off the
cover.
Removethe plasticcap and clean with
r_a toothpick.
17

Before you call for service...
Error Nessages
START/RESETstatus
indicator light flashing
Dishwasher BEEPS
once every 15seconds
Beepingat theend
of thecycle
Troubleshooting Tips
Save time and money! Review the charts on the following
pages, or visit ge.com. You may not need to call for service.
Possible Causes What To Do
Youhavepressedthe
START/RESETpadwhilethe
dishwasherisrunning.Thiswill
cancelthecycle.Thelightwill
stopflashingafter the dishwasher
drains(about90seconds).
PresstheSTART/RESETpadonlyonetimeto startthedishwasher.Whenthe
dishwasherisrunning,onlUpresstheSTART/RESETpadif youwishto cancel
(reset)thecycle.
Powerto thedishwasherwas
turnedoff whileacyclewas
runningand powerhasjust been
restoredto thedishwasher.The
blinkinglightsindicatethat the
dishwasherisdrainingwater
inside.
Thelightwillstopflashingafterthedishwasherdrainsoutthewater.Anew
cyclewillstartautomaticallUwhenthedrainends.
Thisisa reminderthat your
dishwasherdoor hasbeenleft
openduring operation.It will
continuebeepinguntil youclose
thedoor.
,, Closeandlatchthedoorafteropeningit mid-cgcle.Beepingwillstopand
dishwasherwillcompletecgcle.
Thisisnormal.Thedishwasher
will beeptwiceat theendof
thecycle.
• Toturnoffthedoublebeepindicator(orre-activateitifitwas previously
turnedoff),presstheHEATEDDRYpad Stimeswithin3 seconds.Atriple
beepwillsoundto indicatetheend-of-cyclebeepoptionhasbeenturned
on oroff.
Problem
Dishesand flatware
nat clean
Spots and filming
on glasses and
flatware
18
Possible Causes What ToDo
Lowinletwater temperature
Water pressureistemporarily low ,,
o
Makesureinletwatertemperatureiscorrect(seepage8).Turnonthehot
waterfaucetnearestthedishwasher;letrununtilthewatertemperature
stopsrising.Thenstartthedishwasherandturn offthefaucet.Thisensures
theenteringwaterishot.
Trynottousethedishwasherwhenhotwaterisbeingusedelsewhere
inthehouse;forexample,whendoinglaundrUorwhena familUmember
isusingtheshower.
Turnon afaucet.Iswatercomingoutmoreslowlythanusual?Ifso,wait
untilpressureisnormalbeforeusingyourdishwasher.
Trynottousethedishwasherwhenhotwaterisbeingusedelsewhere
inthehouse;forexample,whendoinglaundrUorwhena familUmember
isusingtheshower.
Air gapor disposerisclogged • Cleantheairgaporflushthedisposer.
Improperrack loading • Makesurelargedishwaredoesnotblockthedetergentdispenserorthe
washarms.SeetheLoadingthedishwasherrackssection.
Noair gapor highdrain loop • VerifUthat youhavean airgapora highdrainloop.Refertothe
InstallationInstructions.
Extremelyhardwater • UseCascadeCrystalClear_rinseagentsto removespotsand
Lowinletwater temperature preventnewfilmbuildup.
Makesurewatertemperatureisatleast120°R
Overloadingthedishwasher
LoaddishwasherasshownintheLoadingPlaceSettingssection.
Improperloading • Makesuredetergentisfresh.
Oldor damppowderdetergent • Ifwaterisextremelyhard,asoftenermayberequired.
Rinseagentdispenserempty
Toolittle detergent

GEAppliances.com
Problem Possible Causes What ToDo
Cloudinesson Combinationof softwater and • Thisiscalledetchingandispermanent.Topreventthisfromhappening,
glassware too muchdetergent uselessdetergentifyouhavesoftwater.Washglasswareintheshortest
cyclethatwillgetthemclean.
Water temperatureentering • Thiscouldbeetching.Lowerthewaterheatertemperature.
thedishwasherexceeds150°F
Sudsin thetub Correctdetergent • Useonlyautomaticdishwasherdetergentsto avoidsudsing.
wasn'tused Cascade®AutomaticDishwashingDetergentshavebeenapprovedforuse
inallGEdishwashers.
• Toremovesudsfromthetub,openthedishwasherandlet
sudsdissipate.Closeandlatchthedishwasherdoor.Pumpoutwater
bytouchingtheSTART/RESETpadonce;then30secondslater,
touchtheSTART/RESETpadagain.Repeatifnecessary.
• Alwayswipeuprinseagentspillsimmediately.
• Repositionthedishes,sothewaterfromthelowersprayarmcan
flushthedetergentcup.Avoidplacinglargebowlsfacedownintheleft-front
cornerofthelowerrack.
Detergentleft in
dispensercups
Waterin the
SmartDispense'"
dispenser
Blackor gray
markson dishes
Dishesdon'tdry
Rinseagentwasspilled
Dishesare blockingthe
detergentcup
Capnottightened after filling
thedispenser
Aluminumutensilshave
rubbedagainstdishes
Lowinletwater temperature
Rinseagentdispenserisempty
ContralpandrespondedDoorlatch may not beproperly
toinputsbutdishwasherseated
neverfilledwith water Water valvemay beturnedoff
Stainedtub interior Sometomato-basedfoodscan
causereddishstains
Teaor coffeestains
Anoverallyellowor brownfilm can •
becausedbgirondepositsinwater
White film on insidesurface- •
hardwater minerals
• Useabasterto removeasmuchwateraspossiblefromthe
SmartDispense"dispenserandrefillitasnormal.Besuretotightenthe
capfullyto preventwaterfrom enteringthedispenser.
• Removemarkswithamild,abrasivecleaner.
• Makesureinletwatertemperatureisat least120°R
• SelectHEATEDDRY.
• UseADDEDHEAToption.
• Selecta highercycle,suchasSANIWASH.
• Checktherinseagentdispenserandfillasrequired.
• Makesurethedoorisfirmlyclosed.
• Makesurewatervalve(usuallylocatedunderthesink)isturnedon.
• Useofthe RINSEONLYcycleafteraddingthedishtothe load
candecreasethelevelofstaining.GErecommendsCascade®
PlasticBoosterto helpremovethesetypesofstains.
• Removethestainby hand,usinga solutionof 1/2cupbleach
and3cupswarmwater.
WARNING
Beforecleaning interior,wait at least 20 minutes after a cycle for the
heating elementsto cool down. Failureto do socan result in burns.
ADVERTENCIA
Antesdelimpiarel interior,espereporIomends20minutosdespu6sde
uncido paraqueloselementoscalentadoresseenfrien.Nohacerlopuede
provocarquemaduras.
Aspecialfilterinthewatersupplylineistheonlyway tocorrect
thisproblem.Contacta watersoftenercompany.
GErecommendsCascade Crystal Clear*to helppreventhardwater
mineraldepositsfromforming.
Rundishwasherwithcitricacidto removemineraldeposits.Citric
acid(Partnumber:WD35XlB1)canbeorderedthroughGEParts.
Seebackcoverfororderinginformation.
19

Before gou call for service...
Troubleshooting Tips
\
Problem
Dishwasherwon't run
What ToDoPossible Causes
• Replacefuseorresetcircuitbreaker.Removeanyotherappliancesfrom
thecircuit.
• Insomeinstallations,thepowertothedishwasherisprovidedthrougha
wallswitch,oftenlocatednexttothedisposerswitch.Rakesureitison.
• Unlockcontrolpanel.Seepage8.
• Turnoffpowertothedishwasher(circuitbreakerorwallswitch)for
]0 seconds;thenturn backon.
Fuseis blown or circuit breaker
istripped
Power isturned off
Controlpanelislocked
Controlpanelneedsto be
rebooted
Controlpanellights Timetoo longbetween • EachpadmustbetouchedwithinSminutesoftheothers.
go offwhen you're touchingof selectedpads Torelight,touchanUpadagain,or unlockandrelatchdoor.
settingcontrols
Waterstanding in Thisisnormal • Asmallamountofcleanwateraroundtheoutletonthetub
thebottomof thetub bottomatthebackofthetub keepsthepumpseallubricated.
Waterwon't pump Drainisclogged • IfLlouhaveanairgap,cleanit.Seepage17.
outof thetub • Ifthedishwasherdrainsintoa disposer,rundisposerclear.
• Checktoseeifuourkitchensinkisdrainingwell.If not,Uou
malt needaplumber.
Steam Thisisnormal • Warm,moistaircomesthroughtheventbll thedoorlatchduringdrlling
andwhenwaterisbeingpumpedout.Thisisnecessarllfordrlling.
Sanitizedlight does Thedoorwasopenedandthe • Donotinterruptthecllcleanlltimeduringor aftermainwash.
not illuminateat the cyclewasinterrupted during
endofthecycle or after the mainwashportion
_Anti-Bacteria Theincomingwater • Raisethewaterheatertemperatureto between120°Fand140°F.
cycleonly) temperaturewastoo low
Thecycleiscompleteand • Thisisnormal.Noactionisrequired.
thedoor hasbeenopenfor
longerthan 60seconds
Noise Normaloperatingsounds • Theseareallnormal.Noactionisrequired.
Detergentcupopening
Water enteringdishwasher
Themotor stopsand starts at
varioustimesduringthecycle
Drainpumpsoundsduring
pumpout
Dryingfan runningfor 2-4 hours
after CLEANlight isilluminated
(TopControlPanelmodelsonly}
Rattlingdisheswhenthe spray
arm rotates
• Hakesuredishesare properlllloaded.SeetheLoadingthe
dishwasherrackssection.
20
La page charge ...
La page charge ...
La page charge ...
La page charge ...
La page charge ...
La page charge ...
La page charge ...
La page charge ...
La page charge ...
La page charge ...
La page charge ...
La page charge ...
La page charge ...
La page charge ...
La page charge ...
La page charge ...
La page charge ...
La page charge ...
La page charge ...
La page charge ...
La page charge ...
La page charge ...
La page charge ...
La page charge ...
-
 1
1
-
 2
2
-
 3
3
-
 4
4
-
 5
5
-
 6
6
-
 7
7
-
 8
8
-
 9
9
-
 10
10
-
 11
11
-
 12
12
-
 13
13
-
 14
14
-
 15
15
-
 16
16
-
 17
17
-
 18
18
-
 19
19
-
 20
20
-
 21
21
-
 22
22
-
 23
23
-
 24
24
-
 25
25
-
 26
26
-
 27
27
-
 28
28
-
 29
29
-
 30
30
-
 31
31
-
 32
32
-
 33
33
-
 34
34
-
 35
35
-
 36
36
-
 37
37
-
 38
38
-
 39
39
-
 40
40
-
 41
41
-
 42
42
-
 43
43
-
 44
44


GE GHDF360R10SS Le manuel du propriétaire
- Catégorie
- Lave-vaisselle
- Taper
- Le manuel du propriétaire
- Ce manuel convient également à
dans d''autres langues
- English: GE GHDF360R10SS Owner's manual
Documents connexes
-
GE PDWT400R30WW Le manuel du propriétaire
-
GE 165D4700P389 49-55065 07-09 JR Manuel utilisateur
-
-
GE PDWF400P00WW Le manuel du propriétaire
-
GE HDA3640R20SA Le manuel du propriétaire
-
-
-
GE GLD6966RSS Manuel utilisateur
-
GE GHDF360RSS Manuel utilisateur
-
GE ZBD0700N20II Le manuel du propriétaire