
INSTALLATION INSTRUCTIONS: 448 SIDEKICK
12400 Earl Jones Way
Louisville, KY 40299
rev-a-shelf.com
Customer Service: 800-626-1126
448 SIDEKICK
I-448-SIDEKICK-0922
TOOLS REQUIRED:
30 MIN
ESTIMATED ASSEMBLY TIME:
CARE AND MAINTENANCE:
Clean with a damp cloth and wipe
parts dry.
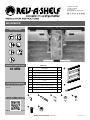
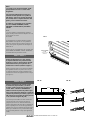
PARTS LIST
No. Description Qty.
A Sidekick Frame 1
B Bottom Product Member Slide Assembly 1
C Stop Bracket 1
D Extended Mounting Bracket 2
E Handle 6
F #8 x 1/2” Deep Thread Truss Head Screws 4
G #6 x 1/2” Flat Head Wood Screws 5
H #8 x 1/2” Flat Head Machine Screws 2
I 8-32 Lock Nuts 2
A
C
H
EFG
D
I
B
WATCH TUTORIALS OF OUR
PRODUCTS BEING INSTALLED
WWW.REV-A-SHELF.COM/VIDEOS
#2#2#2
5
64
3
8

2Customer Service: 800-626-1126 | rev-a-shelf.com
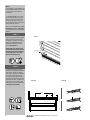
Bent bracket
(Flush)
Notes:
1. If installing a single Sidekick, the
primary 448 will need to be moved
1-1/2” over from the center of
the cabinet.
2. The 448 Sidekick comes ready
for left-side installation. If right
side is preferred, remove the (2)
screws on the inside of the unit,
ip the slide assembly 180 degrees
and reinstall the screws.
Unit is not compatible with 448SW,
448-BCBBSC, 448-BC, 448-BDDSC
or 448-BC19SC-5C reduced depth
pullouts.
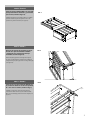
STEP 1
Place the primary 448 on the oor.
Place the bottom product slide
assembly on the oor (or bottom
shelf) of the 448 with the slide
toward the back of the unit as
shown (See Figure 1).
Note: Make sure that the back
of the bent bracket is ush with
the side of the primary 448 and
install with (2) #8 x 1/2” deep
thread truss head screws.
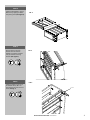
#2#2#2
#2#2#2
FIG. 1
FIG. 2A FIG. 2B
Lie the primary 448 on its side.
Using the measurements provided
and a 5/64” drill bit pre-drill (3)
screw holes. Remove the Sidekicks
TOP slide product member by
moving the black plastic lever to
the opposite side of the slide and
pulling the product member free,
and install it to the primary 448
with (3) #6 x 1/2” at head screws
(See Figures 2A and 2B).
STEP 2
13-5/32”
(334 mm)
4-13/32”
(112 mm) 3-1/4”
(83 mm)
1.00”
(25 mm)
5
64

INSTALLATION INSTRUCTIONS: 448 SIDEKICK 3
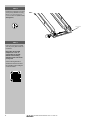
FIG. 3
Install the 448 Sidekick to primary
448 frame by aligning the slides
and pushing closed (See Figure 3).
STEP 3
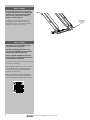
FIG. 4
STEP 4
Remove (2) door mounting
brackets from the side the
Sidekick is installed and replace
with (2) extended mounting
brackets (See Figure 5).
FIG. 5
#2#2#2
Handle
STEP 5
Install the handle to the front of
the Sidekick with (2) #8 x 1/2”
deep thread truss head screws as
shown (See Fig. 4).
#2#2#2

4Customer Service: 800-626-1126 | rev-a-shelf.com
FIG. 6
Install the stop bracket to the front
of the primary 448 slide set using
(2) #8 x 1/2” at head machine
screws and lock nuts (Sidekick side)
(See Figure 6).
STEP 6
Follow the instructions provided
with the primary 448 to nish the
installation.
Note: Move the provided
template over 1-1/2” to
accommodate for the 448
Sidekick unless installing
Sidekicks to both sides of the
primary 448.
Scan the following QR code to
download the instruction sheet for
the main 448 to nish installing the
unit into the cabinet.
STEP 7
Front of Slide

12400 Earl Jones Way
Louisville, KY 40299
rev-a-shelf.com
Customer Service: 800-626-1126
448 ESPECIERO SIDEKICK / AMÉNAGEMENT COULISSANT 448
I-448-SIDEKICK-0922
30 MIN
No. Descripción / La description Qty.
AMarco de la alacena
Cadre de l’aménagement coulissant
1
BConjunto deslizante de la pieza inferior del producto
Assemblage de la glissière du membre inférieur du produit
1
CSoporte de tope / Support de butée 1
DSoporte de montaje extendido
Support de montage prolongé
2
EAsa / Poignée 6
FTornillos de cabeza de cruz de rosca profunda #8 x 1/2”
Vis à tête bombée #8 x 1/2 po à letage profond
4
GTornillos para madera de cabeza plana n.º 6 x 1/2 “
Vis à bois à tête plate #6 x 1/2 po
5
HTornillos para metal de cabeza plana n.º 8 x 1/2 “
Vis à métaux à tête plate #8 x 1/2 po
2
IContratuercas 8-32 / Écrou auto-bloquant 8-32 2
A
C
H
EFG
D
I
B
#2#2#2
5
64
3
8
INSTRUCCIONES DE INSTALACIÓN / INSTRUCTIONS D’INSTALLATION
Herramientas requeridas:
Outils Requis:
Tiempo estimado de ensamblado:
Durée de l’installation:
CUIDADO/ ENTRETIEN:
Limpie con un paño húmedo y
seque las partes.
Nettoyez avec un linge humide et
essuyez les piéces pour les secher
complétement.
ESCANEE AQUÍ PARA VER EL
VIDEO DE INSTALACIÓN
BALAYER ICI POUR VOIR LA
VIDÉO D’INSTALLATION
WWW.REV-A-SHELF.COM/VIDEOS
INSTRUCCIONES DE INSTALACIÓN: SERIE CO Y 5CW2
INSTRUCTIONS D’INSTALLATION: MODÈLES CO ET 5CW2
LISTA DE PARTES / LISTE DES PIÈCES

6Customer Service: 800-626-1126 | rev-a-shelf.com
Soporte doblado
(a ras)
Support courbé
(afeurant)
Notas:
1. Si instala un solo especiero Sidekick, el 448
principal deberá moverse 1-1/2” del centro
del gabinete.
2. El especiero Sidekick 448 viene listo para
instalarse del lado izquierdo. Si se preere el
lado derecho, retire los (2) tornillos del interior
de la unidad, voltee el conjunto deslizante 180
grados y vuelva a instalar los tornillos.
La unidad no es compatible con los extraíbles
de la serie 448SW, 448-BCBBSC, 448-BC,
448-BDDSC or 448-BC19SC-5C profundidad
reducida.
Notes :
1. Si vous installez un aménagement coulissant
simple, le 448 primaire devra être déplacé de 1-1/2
po par rapport au centre
du meuble.
2. L’aménagement coulissant 448 est livré prêt à
être installé du côté gauche. Si vous préférez le
côté droit, retirez les (2) vis situées à l’intérieur de
l’unité, faites pivoter la glissière de 180 degrés et
rexez les vis.
L’unité n’est pas compatible avec les coulisses de la
séries 448SW, 448-BCBBSC, 448-BC, 448-BDDSC
or 448-BC19SC-5C profondeur réduite.
PASO 1 / ÉTAPE 1
Coloque el 448 primario en el piso. Coloque
el conjunto deslizante de la pieza inferior del
producto en el piso (o estante inferior) del 448
con deslizante hacia la parte posterior de la
unidad como se muestra (consulte la Figura 1).
Placez le primaire 448 sur le sol. Placez l’ensemble
de la glissière inférieure du produit sur le sol (ou
sur l’étagère inférieure) du 448, la glissière étant
orientée vers l’arrière de l’appareil comme indiqué
(voir gure 1).
FIG. 1
FIG. 2A FIG. 2B
Coloque el 448 primario de costado. Usando
las mediciones proporcionadas y una broca
de 5/64”, taladre previamente (3) oricios de
tornillo. Retire el deslizante SUPERIOR del
Sidekick moviendo la palanca de plástico negro
hacia el lado opuesto del deslizante y tirando del
elemento del producto para soltarlo y fíjelo en el
448 principal con (3) tornillos de cabeza plana #6
x 1/2” (consulte las Figuras 2A y 2B).
Couchez le primaire 448 sur le côté. À l’aide des
mesures fournies et d’une mèche de 5/64 po,
prépercez (3) trous de vis. Retirez l’élément de
produit de la glissière de côté TOP en déplaçant le
levier en plastique noir vers le côté opposé de la
glissière et en tirant sur l’élément de produit pour le
libérer, puis installez-le sur le primaire 448 à l’aide
de (3) vis à tête plate #6 x 1/2 po (voir gures 2A
et 2B).
PASO 2 / ÉTAPE 2
13-5/32”
(334 mm)
4-13/32”
(112 mm) 3-1/4”
(83 mm)
1.00”
(25 mm)

7
FIG. 3
Instale el especiero Sidekick 448 en el marco 448
principal alineando los deslizantes y presionando
para cerrarlo (consulte la Figura 3).
Installez l’équipement coulissant 448 sur le châssis
primaire 448 en alignant les glissières et en les
poussant en position fermée (voir gure 3).
PASO 3 / ÉTAPE 3
FIG. 4
PASO 4 / ÉTAPE 4
Retire los (2) soportes de montaje de la puerta
del lado en el que está instalado el Sidekick
y sustitúyalos con (2) soportes de montaje
extendidos (consulte la Figura 5).
Retirez les (2) supports de montage de la porte
du côté où l’équipement coulissant est installé et
remplacez-les par (2) supports de montage allongés
(voir gure 5).
FIG. 5
Asa
Poignée
PASO 5 / ÉTAPE 5
Instale el asa en la parte frontal del Sidekick con
(2) tornillos de cabeza de cruz de rosca profunda
#8 x 1/2” como se muestra (consulte la Fig. 4).
Installez la poignée à l’avant de l’équipement
coulissant à l’aide de deux (2) vis à tête bombée
#8 x 1/2 po à letage profond comme indiqué (voir
gure 4).

8Customer Service: 800-626-1126 | rev-a-shelf.com
FIG. 6
Instale el soporte de tope en la parte frontal
del conjunto de deslizamiento del 448 principal
utilizando (2) tornillos de máquina de cabeza
plana #8 x 1/2” y contratuercas (lado del
Sidekick) (consulte la Figura 6).
Installez le support de butée à l’avant du jeu
de glissières primaires 448 à l’aide de (2) vis à
tête plate #8 x 1/2 po et de contre-écrous (côté
équipement coulissant) (voir gure 6).
PASO 6 / ÉTAPE 6
Siga las instrucciones proporcionadas con el 448
principal para terminar la instalación.
Nota: Mueva la plantilla provista más de 1-1/2”
para acomodar el 448 Sidekick a menos que instale
Sidekicks a ambos lados del 448 principal.
Escanee el siguiente código QR para descargar la
hoja de instrucciones del 448 principal para terminar
de instalar la unidad en el gabinete.
Suivez les instructions fournies avec le primaire 448
pour terminer l’installation.
Note : Déplacez le gabarit fourni de 1-1/2 po pour
l’adapter à l’équipement coulissant 448, sauf si
vous installez des équipements coulissants des
deux côtés du 448 primaire.
Balayez le code QR suivant pour télécharger la
che d’instructions de l’unité principale 448 pour
terminer l’installation de l’appareil dans le meuble.
PASO 7 / ÉTAPE 7
Parte frontal del
deslizante
Face avant de la
glissière
-
 1
1
-
 2
2
-
 3
3
-
 4
4
-
 5
5
-
 6
6
-
 7
7
-
 8
8


Rev-A-Shelf 448-BSKS-3C Instruction Sheet
- Taper
- Instruction Sheet
- Ce manuel convient également à
dans d''autres langues
- English: Rev-A-Shelf 448-BSKS-3C
- español: Rev-A-Shelf 448-BSKS-3C
Documents connexes
-
Rev-A-Shelf 448-BC19SC-8C Instruction Sheet
-
Rev-A-Shelf 448-BBSCWC-5C Instruction Sheet
-
Rev-A-Shelf 448-WC-5C Mode d'emploi
-
-
Rev-A-Shelf 448KB-BCSC-5C Instruction Sheet
-
-
-