
GENERALITÀ:
Astro 43 M.Q.B. è una radio ricevente
da innesto a 2 canali (Astro 43/2 R M.Q.B.) e da esterno no a 4 canali (Astro 43/1 R M.Q.B. - da
abilitare con moduli relè) per la ricezione di un segnale radio a 433,92 MHz ad autoapprendimento.
Avvertenze: non esporre la radio ricevente a sorgenti elettromagnetiche o di calore.
DATI TECNICI
Radio da esterno (Astro 43/1 R M.Q.B.) e da innesto
(Astro 43/2 R M.Q.B.)
Frequenza 433,92 MHz
Alimentazione 12/24 Vac/dc (da esterno)
24 Vac/dc (da innesto)
Assorbimento massimo 20 mA
Valore impedenza antenna 50 Ohm
Temperatura di funzion. -10 °C +55 °C
Portata contatto relè 0,5 A - 120 Vac o 1A-24 Vdc
Portata ricezione 120 m (*)
Massimo numero uscite 4 (ASTRO 43/1 R M.Q.B.)
2 (ASTRO 43/2 R M.Q.B.)
N° telecomandi in memoria 800
Telecomando (DIVO 71)
Frequenza 433,92 MHz
Batteria 1 pila 3 V - CR2032
Durata stimata 2 anni
Codica Codice sso
Temperatura di funzion. -10 °C +55 °C
Dimensioni 65 x 36 x 12 mm
Peso 23 g
Potenza irradiata < 10 mW e.r.p.
(*) in caso di maltempo, presenza di polveri o campo
di trasmissione ostacolato la distanza può diminuire
anche del 50%
DIP-SWITCH
Dip 1 = relè 1: 1° canale
Dip 2 = relè 2: 2° canale
Dip 3 = relè 3: 3° canale
Dip 4 = relè 4: 4° canale
Dip 5 = abilita la memorizzazione dei canali radio
Dip 6 = abilita la cancellazione di un solo telecomando
Dip 7 = abilita la funzione Bistabile
Dip 8 = Timer 1 (1 s ÷ 15 min)
Dip 9 = Timer 2 (1 s ÷ 15 min)
Dip 10 = abilita la funzione che cancella tutta la memoria
DICHIARAZIONE DI CONFORMITÀ UE
Con la presente Meccanica Fadini S.r.l. dichiara che ASTRO 43
M.Q.B. è conforme ai requisiti essenziali ed alle altre disposizioni
pertinenti stabilite dalle Direttive 2014/53/UE.
La dichiarazione di conformità può essere consultata sul sito:
www.fadini.net nella sezione prodotti.
Meccanica Fadini S.r.l.
Direttore Responsabile
65
IT
Dis. N. 8536 20230606
Posizionare in ON il
Dip-switch corrispondente al
canale radio abilitato
RADIO DA INNESTO: Innestare la radio sul
programmatore serie Elpro con l’antenna
collegata.
RADIO DA ESTERNO: Inserire il relè nella
sede del canale radio da abilitare, collegare
l’antenna e alimentare la radio.
In prossimità della radio premere un
tasto del telecomando
e attendere che si accenda e si
spenga il led sulla radio ricevente
prima di memorizzare altri
telecomandi
operazione 1 operazione 2 operazione 3 operazione 4
MEMORIZZAZIONE DI 1 CANALE RADIO SU UNO O PIÙ TELECOMANDI (DIVO 71)
CANCELLARE UN TELECOMANDO DALLA MEMORIA
In prossimità della radio premere un
tasto del telecomando e attendere
un lampeggio del led che conferma
la trasmissione ricevuta prima di
cancellare altri telecomandi
Attendere il lampeggio di conferma cancellazione
prima di chiudere l’operazione
radio
ricevente
Posizionare in ON il
Dip-switch n°6
ON
6
OFF 6
Radio ricevente
alimentata con antenna
di ricezione collegata
operazione 1 operazione 2 operazione 3 operazione 4
ON
1
oppure 2, 3, 4
+
ON
5
ATTENZIONE: la memoria non riceve più il segnale dal telecomando, tuttavia rimane presente in memoria il codice del telecomando.
Posizionare in ON il
Dip-switch corrispondente al
canale radio sul quale
abilitare la funzione
ON
1
oppure 2, 3, 4
ON
1
oppure 2, 3, 4
ON
1
oppure 2, 3, 4
funzione passo-passo
Ripristino del
funzionamento
normale del canale
memorizzato
ON
789
+
+
operazione 1 operazione 2 operazione 3 operazione 4
operazione 1 operazione 2 operazione 3 operazione 4
operazione 1 operazione 2 operazione 3 operazione 4
operazione 1 operazione 3 operazione 4
FUNZIONI AGGIUNTIVE SULLA RADIO DA ESTERNO (ASTRO 43/1 R M.Q.B.) E DA INNESTO (ASTRO 43/2 R M.Q.B.)
Memorizzare un tasto
del telecomando
su un canale radio
(vedi memorizzazione
sulla radio) sul quale
poi abilitare questa
funzione
Memorizzare un tasto
del telecomando
su un canale radio
(vedi memorizzazione
sulla radio) sul quale
poi abilitare questa
funzione
Memorizzare un tasto
del telecomando
su un canale radio
(vedi memorizzazione
sulla radio) sul quale
poi abilitare questa
funzione
ON
7
out
input
Posizionare in ON il
Dip-switch corrispondente al
canale radio sul quale
abilitare la funzione
ON
8
Posizionare in ON il
Dip-switch corrispondente al
canale radio sul quale
abilitare la funzione
Posizionare in ON i
Dip-switch 7, 8, 9
ON
9
out
input
T
out
input
T
minuti
max 15
secondi
max 60
In prossimità della radio
premere un tasto del
telecomando e attendere che
si accenda e si spenga il led
sulla radio ricevente
In prossimità della radio premere
un tasto del telecomando per 5 s
e attendere che si accenda e
si spenga il led sulla radio
ricevente
+ 8 lampeggi di conferma
OFF
+
minuti
max 15
secondi
max 60
durata impulso out
200 ms
ATTENZIONE: ad ogni pressione dei pulsanti attendere lo spegnimento del led sulla radio ricevente come avvenuta memorizzazione del tempo.
CANCELLAZIONE TOTALE DELLA MEMORIA
In prossimità della radio premere un
tasto del telecomando per almeno 5
secondi. Il led rosso della radio si
accende no alla conclusione
dell'operazione.
Attendere il lampeggio di conferma cancellazione
prima di chiudere l’operazione
radio
ricevente
Posizionare in ON il
Dip-switch n°10
10 lampeggi
di conferma
6 lampeggi
di conferma
ON
10
OFF10
Radio ricevente
alimentata con antenna
di ricezione collegata
operazione 1 operazione 2 operazione 3 operazione 4
ON
1
oppure 2, 3, 4
operazione 2
Posizionare in ON il
Dip-switch corrispondente al
canale radio con la funzione
aggiuntiva attivata
il led della radio ricevente emetterà tanti
lampeggi quanto il tempo impostato:
- lampeggi lunghi per i minuti
- lampeggi corti per i secondi
+ 9 lampeggi di conferma
OFF
il led della radio ricevente emetterà tanti
lampeggi quanto il tempo impostato:
- lampeggi lunghi per i minuti
- lampeggi corti per i secondi
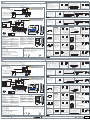
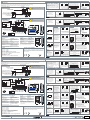
ASTRO 43/1 R M.Q.B. (radio da esterno) - ASTRO 43/2 R M.Q.B. (radio da innesto)
Radio ricevente da esterno
Astro 43/1 R M.Q.B.
Radio ricevente da innesto
Astro 43/2 R M.Q.B.
L’alimentazione e il 1° canale
radio NA vengono abilitati
inserendo la radio nell’apposito
connettore, presente su tutti i
programmatori della serie Elpro
2° canale radio: morsetti
2-3 contatto NA
morsetti 1-2 contatto NC
Modulo Relè NA o NC: l’uscita sui
morsetti viene abilitata se viene
inserito il modulo nella sua sede.
Di serie viene fornito un solo Relè
NA
Memoria estraibile
per 800 telecomandi
Memoria estraibile
per 800 telecomandi
Dip-switch per la
programmazione
Relè 1 Relè 2 Relè 3 Relè 4
ASTRO
43 M.Q.B.
1 2 3 4 5 6 7 8 9 10
Selezionare il tipo di
alimentazione
12 Vac/dc
24 Vac/dc
1° canale
Relè 1
NA/NC
2° canale
Relè 2
NA/NC
3° canale
Relè 3
NA/NC
4° canale
Relè 4
NA/NC
1 2 3 4 5 6 7 8 9 10
12 Vac/dc
24 Vac/dc
-+
27
91 mm
73
Astro 43 M.Q.B.
12-24V
cc/ ca R1 R2 R3 R4
+
-
12
3456 78910
1211
Antenna RG58
10
2
11 12
12
4
3
Bistabile
Timer 1
Timer 2
Cancellare le
funzioni aggiuntive
GENERAL DESCRIPTION:
Astro 43 M.Q.B. is a
plug-in
radio receiver
with 2 channels (Astro 43/2 R M.Q.B.) and stand-alone up to 4 channels (Astro 43/1 R M.Q.B.
- enabled by modules), self-learning, to operate with a 433,92 MHz radio signal.
Please note: do not expose the receiver to electro-magnetic or heat sources.
TECHNICAL DATA
Stand-alone receiver (Astro 43/1 R M.Q.B.) and
plug-in receiver (Astro 43/2 R M.Q.B.)
Frequency 433,92 MHz
Power supply 12/24 Vac/dc (stand-alone)
24 Vac/dc (plug-in)
Max absorption 20 mA
Aerial impedance 50 Ohm
Working temperature -10 °C +55 °C
Relay contact rating 0,5 A - 120 Vac or 1A-24 Vdc
Distance range 120 m (*)
No. of outputs max. 4 (ASTRO 43/1 R M.Q.B.)
2 (ASTRO 43/2 R M.Q.B.)
Transmitters in the memory 800
Transmitter (DIVO 71)
Frequency 433,92 MHz
Battery 1 x 3 V - CR2032
Estimated battery life 2 years
Encoding system Fixed code
Working temperature -10 °C +55 °C
Dimensions 65 x 36 x 12 mm
Weight 23 g
Radiated power < 10 mW e.r.p.
(*) in bad weather or in case of dusts or obstructed
transmission eld, distance can be reduce by 50%
DIP-SWITCH
Dip 1 = relay 1: channel 1
Dip 2 = relay 2: channel 2
Dip 3 = relay 3: channel 3
Dip 4 = relay 4: channel 4
Dip 5 = enables memorization of the receiver channels
Dip 6 = enables delete one transmitter only
Dip 7 = enables the function Bistable
Dip 8 = Timer 1 (1 s ÷ 15 min)
Dip 9 = Timer 2 (1 s ÷ 15 min)
Dip 10 = enables the function delete all memory
UE DECLARATION OF CONFORMITY (DoC)
Hereby, Meccanica Fadini S.r.l., declares that ASTRO 43 M.Q.B. is in
compliance with the essential requirements and other relevant
provisions of Directive 2014/53/UE. The declaration of conformity
can be viewed on this website: www.fadini.net in the product
section.
Meccanica Fadini S.r.l.
Managing director
65
GB
Position to ON the
Dip-switch corresponding
to the enabled radio channel
PLUG-IN RADIO RECEIVER: Fit the receiver
card into the connector in the Elpro
controller, aerial connected.
STAND-ALONE RADIO RECEIVER: Fit the
relay module on to the dedicated seat
corresponding to the required channel,
power supply and connect the aerial.
In proximity of the radio receiver
press the transmitter button
and wait for the LED to go on
and o in the radio receiver
before memorizing other
transmitters
operation 1 operation 2operation 3operation 4
MEMORIZING 1 RADIO CHANNEL ON ONE OR MORE REMOTE CONTROLS (DIVO 71)
DELETING A REMOTE CONTROL FROM THE MEMORY
In proximity of the radio receiver
press a transmitter button and wait
for the LED ash in the radio receiver
before deleting other transmitters
Wait for conrming ashes deleting achieved
before stopping the operation
radio
receiver
Position to ON
Dip-switch 6
ON
6
OFF 6
Radio receiver power
supplied and aerial
connected
operation 1 operation 2operation 3operation 4
ON
1
or 2, 3, 4
+
ON
5
ATTENTION: the memory does not receive any signal from that transmitter any longer, but the transmitter code remains in the memory.
Position to ON the
Dip-switch corresponding
to the radio channel
enabled to this function
ON
1
or 2, 3, 4
ON
1
or 2, 3, 4
ON
1
or 2, 3, 4
step-by-step function
Resetting the
enabled channel
back to normal
operating mode
ON
789
+
+
operation 1 operation 2operation 3operation 4
operation 1 operation 2operation 3operation 4
operation 1 operation 2operation 3operation 4
operation 1 operation 3operation 4
ADDITIONAL FUNCTIONS PERFORMED BY THE STAND-ALONE RECEIVER (ASTRO 43/1 R M.Q.B.) AND PLUG-IN RECEIVER (ASTRO 43/2 R M.Q.B.)
Memorize a
transmitter button on
a radio channel (see
radio receiver
memorizing) on which
this function is
required to be enabled
Memorize a
transmitter button on
a radio channel (see
radio receiver
memorizing) on which
this function is
required to be enabled
Memorize a
transmitter button on
a radio channel (see
radio receiver
memorizing) on which
this function is
required to be enabled
ON
7
output
input
Position to ON the
Dip-switch corresponding
to the radio channel
enabled to this function
ON
8
Position to ON the
Dip-switch corresponding
to the radio channel
enabled to this function
Position to ON
Dip-switches 7, 8, 9
ON
9
output
input
T
output
input
T
minutes
max 15
seconds
max 60
In proximity of the radio
receiver press a button of the
transmitter and wait for the
LED to go on and o in the
radio receiver
In proximity of the radio receiver
press a transmitter button for
5 seconds
and wait for the LED to go on and
o in the radio receiver
+ 8 conrming ashes
OFF
+
minutes
max 15
seconds
max 60
out pulse for
200 ms
ATTENTION: after each pressing of the buttons, wait for the led to go o as a conrmation that the time has been memorized.
DELETING THE TOTAL MEMORY
In proximity of the radio receiver
press a transmitter button for at least
5 seconds. The red led of the receiver
stays on until the operation is
nished.
Wait for conrming ashes deleting achieved
before stopping the operation
radio
receiver
Position to ON
Dip-switch 10
10 conrming
ashes
6 conrming
ashes
ON
10
OFF10
Radio receiver power
supplied and aerial
connected
operation 1 operation 2operation 3operation 4
ON
1
or 2, 3, 4
operation 2
Position to ON the
Dip-switch corresponding
to the radio channel enabled
to the additional function
the led in the receiver ashes as many times
as follows:
- long ashes as the minutes
- short ashes as the seconds
+ 9 conrming ashes
OFF
the led in the receiver ashes as many times
as follows:
- long ashes as the minutes
- short ashes as the seconds
ASTRO 43/1 R M.Q.B. (stand-alone receiver) - ASTRO 43/2 R M.Q.B. (plug-in receiver)
Stand-alone radio receiver
Astro 43/1 R M.Q.B.
Plug-in radio receiver
Astro 43/2 R M.Q.B.
Power supply and NO receiver
channel 1 are enabled by
inserting the receiver into the
dedicated connector, tted onto
all the Elpro controllers
Receiver channel 2:
terminals 2-3 - NO contact
terminals 1-2 - NC contact
NO
common
NC
NO or NC relay module: the
terminal output is enabled
provided that the relay module
is tted in its seat
Removable memory
for 800 remote controls
Removable memory
for 800 remote controls
Programming
Dip-switches
Programming
Dip-switches On powering the radio receiver, the
red LED:
1 Flash = voltage supplied
Relay 1 Relay 2 Relay 3 Relay 4
ASTRO
43 M.Q.B.
1 2 3 4 5 6 7 8 9 10
5 4 3
Power supply
selection
12 Vac/dc
24 Vac/dc
Aerial
Channel 1
Relay 1
NO/NC
Channel 2
Relay 2
NO/NC
Channel 3
Relay 3
NO/NC
Channel 4
Relay 4
NO/NC
1 2 3 4 5 6 7 8 9 10
12 Vac/dc
24 Vac/dc
-+
27
!
On powering the radio receiver, the
red LED:
1 Flash = voltage supplied
!
+-
91 mm
73
Astro 43 M.Q.B.
12-24V
cc/ ca R1 R2 R3 R4
+
-
12
3456 78910
ASTRO
43 M.Q.B.
1211
Aerial RG58
2 1
10
2
11 12
12
4
3
Bistable
Timer 1
Timer 2
Deleting the
additional
functions
NA
Comune
NC
Dip-switch per la
programmazione All’accensione della radio il LED rosso:
1 lampeggio = alimentazione presente
5 4 3
Antenna
!
All’accensione della radio il LED rosso:
1 lampeggio = alimentazione presente
!
+-
ASTRO
43 M.Q.B.
2 1
36 mm 12
36 mm 12
Posizionare in OFF tutti i Dip-switch
Posizionare in OFF tutti i Dip-switch
Position to OFF all the Dip-switches
Position to OFF all the Dip-switches
5 lampeggi di conferma
OFF
radio
ricevente
7 lampeggi di conferma
OFF
3 lampeggi di conferma
OFF
Posizionare in
OFF tutti i
Dip-switch
Posizionare in
OFF tutti i
Dip-switch
Posizionare in OFF
tutti i Dip-switch
5 conrming ashes
OFF
radio
receiver
7 conrming ashes
OFF
3 conrming ashes
OFF
Position to
OFF all the
Dip-switches
Position to
OFF all the
Dip-switches
Position to OFF
all the Dip-switches
V
i
a
M
a
nt
o
v
a
,
177
/
A -
3
7
0
5
3
C
e
r
e
a
(
V
R
)
I
t
a
l
y
Ph
.
+
39
0
44
2
330
4
22
F
a
x
+
39
0
44
2
33
1
0
5
4
in
f
o
ff
@
f
a
d
i
n
i
.net -
w
w
w
.f
a
d
i
n
i
.
n
e
t
VIE
T
A
TT
T
A
A
O
G
E
T
T
ARE NEI RIFIUTI
T
T
M
A
TERIALI NOCIVI PER
A
A
L
’
L
L
AMBIENTE
’
IT
D
i
r
e
t
t
i
v
a 2012/19/
U
E
S
m
a
l
t
i
m
e
n
t
o
d
ei
m
a
t
e
r
i
a
l
i
e
l
e
t
t
r
ic
i
e
d
e
l
et
t
r
o
ni
c
i

CARACTERISTIQUES:
Astro 43 M.Q.B. est un radio-émetteur
enchable à 2 canaux (Astro 43/2 R M.Q.B.) et en saillie jusqu'à 4 canaux (Astro 43/1 R M.Q.B. -
actionnable avec modules relais) pour la réception d'un signal radio à 433,92 MHz à autoapprentissage.
Avertissements: pas exposer le récepteur radio à sources électromagnétiques ou de chaleur.
DONNEES TECHNIQUES
Radio en saillie (Astro 43/1 R M.Q.B.) et enchable
(Astro 43/2 R M.Q.B.)
Fréquence 433,92 MHz
Alimentation 12/24 Vac/dc (en saillie)
24 Vac/dc (enchable)
Absorption maximale 20 mA
Impédance d'antenne 50 Ohm
Température de fonction. -10 °C +55 °C
Plage de distance contact relais 0,5 A - 120 Vac ou 1A-24 Vdc
Plage de distance réception 120 m (*)
Nr. canaux 4 (ASTRO 43/1 R M.Q.B.)
2 (ASTRO 43/2 R M.Q.B.)
Nr. émetteurs mémorisés 800
Emetteur (DIVO 71)
Fréquence 433,92 MHz
Batterie 1 x 3 V - CR2032
Autonomie estimée 2 ans
Codication Code xe
Température de fonction. -10 °C +55 °C
Dimensions 65 x 36 x 12 mm
Poids 23 g
Puissance rayonnée < 10 mW e.r.p.
(*) la distance peut diminuer même jusqu'à 50% en
présence de brouillard, pluie ou poudres.
DIP-SWITCH
Dip 1 = relais 1: 1° canal
Dip 2 = relais 2: 2° canal
Dip 3 = relais 3: 3° canal
Dip 4 = relais 4: 4° canal
Dip 5 = habilite la mémorisation des canaux radio
Dip 6 = habilite l'eacement d'une télécommande seulement
Dip 7 = habilite la fonction Bistable
Dip 8 = Timer 1 (1 s ÷ 15 min)
Dip 9 = Timer 2 (1 s ÷ 15 min)
Dip 10 = habilite la fonction qui eace toute la mémoire
DECLARATION UE DE CONFORMITE
Par la présente Meccanica Fadini S.r.l. déclare que ASTRO 43
M.Q.B. est conforme aux exigences essentielles et aux autres
dispositions pertinentes de la Directive 2014/53/UE. La déclaration
de conformité peut être consultée sur le site: www.fadini.net dans la
section produits.
Meccanica Fadini S.r.l.
Directeur général
36 mm
65
12
FR
Positionner le Dip-switch
correspondant au canal
radio actionné sur ON
6 clignotements
de conrmation
10 clignotements
de conrmation
RECEPTEUR RADIO ENCASTRABLE :
Encher le récepteur dans le connecteur sur
la carte programmateur Elpro avec l’antenne
branchée.
RECEPTEUR RADIO EN SAILLIE : Encher le
relais dans le connecteur du canal radio à
actionner, brancher l’antenne et alimenter le
récepteur.
Près de la radio, appuyez sur un
bouton de la télécommande et
attendez que la Led du récepteur
radio s'allume et s'éteigne avant la
mémorisation d'autres
télécommandes
opération 1 opération 2opération 3opération 4
MEMORISATION D'UN CANAL RADIO D'UN OU PLUS EMETTEURS (DIVO 71)
EFFACEMENT D’UN EMETTEUR DE LA MEMOIRE
Près de la radio, appuyez sur un bouton
de la télécommande et attendez un
clignotement de la Led, qui conrme la
transmission reçue avant d’eacer
d’autres télécommandes.
Terminer l'opération seulement après le clignotement
de conrmation eacement
récepteur
radio
Positionner sur ON le
Dip-switch 6
ON
6
OFF 6
Récepteur radio
alimenté avec
l’antenne branchée
opération 1 opération 2opération 3opération 4
ON
1
ou 2, 3, 4
+
ON
5
ATTENTION: la mémoire ne reçoit plus le signal de la télécommande, de toute façon le code de la télécommande reste dans la mémoire.
Positionner le Dip-switch
correspondant au canal
radio actionné sur ON
ON
1
ou 2, 3, 4
ON
1
ou 2, 3, 4
ON
1
ou 2, 3, 4
fonction pas-pas
Rétablissement du
fonctionnement
normal du canal
mémorisé
ON
789
+
+
opération 1 opération 2opération 3opération 4
opération 1 opération 2opération 3opération 4
opération 1 opération 2opération 3opération 4
opération 1 opération 3opération 4
FONCTIONS ADDITIONNELLES SUR LA RADIO EN SAILLIE (ASTRO 43/1 R M.Q.B.) ET RADIO ENFICHABLE (ASTRO 43/2 R M.Q.B.)
Mémoriser un
bouton de l'émetteur
sur un canal radio (voir
mémorisation canal
radio) sur lequel
activer ensuite cette
fonction
Mémoriser un
bouton de l'émetteur
sur un canal radio (voir
mémorisation canal
radio) sur lequel
activer ensuite cette
fonction
Mémoriser un
bouton de l'émetteur
sur un canal radio (voir
mémorisation canal
radio) sur lequel
activer ensuite cette
fonction
ON
7
out
input
Positionner le Dip-switch
correspondant au canal
radio actionné sur ON
ON
8
Positionner le Dip-switch
correspondant au canal
radio actionné sur ON
Positionner sur ON le
Dip-switch 7, 8, 9
ON
9
out
input
T
out
input
T
minutes
max 15
seconds
max 60
Près de la radio, appuyez sur
un bouton de la
télécommande et attendez
que la Led de récepteur radio
s'allume et s'éteigne
Appuyer sur le bouton de l'émetteur
à proximité du récepteur pour
5 secondes
et attendre que le voyant s'allume
et s’éteigne
+ 8 clignotements de conrmation
OFF
+
minutes
max 15
seconds
max 60
durée d'impulsion
out 200 ms
ATTENTION: a chaque pression des boutons, attendre l'extinction du led comme épreuve que la mémorisation du temps a été faite.
EFFACEMENT TOTAL DE LA MEMOIRE
Appuyez sur le bouton de la
télécommande pendant au moins 5
secondes à proximité de la radio. La Led
rouge de la radio s’allume jusqu’à ce que
l’opération soit terminée.
Terminer l'opération seulement après le clignotement
de conrmation eacement
récepteur
radio
Positionner sur ON le
Dip-switch 10
ON
10
OFF10
Récepteur radio
alimenté avec
l’antenne branchée
opération 1 opération 2opération 3opération 4
ON
1
ou 2, 3, 4
opération 2
Positionner sur ON
le Dip-switch correspondant
au canal radio avec la fonction
additionnelle activée
la Led du récepteur radio émettra les
clignotements pour le temps établi:
- clignotements longs pour les minutes
- clignotements courts pour les secondes
+ 9 clignotements de conrmation
OFF
le led du récepteur radio émettra les
clignotements pour le temps établi:
- clignotements longs pour les minutes
- clignotements courts pour les secondes
ASTRO 43/1 R M.Q.B. (radio en saillie) - ASTRO 43/2 R M.Q.B. (radio enchable)
Récepteur radio en saillie
Astro 43/1 R M.Q.B.
Récepteur radio enchable
Astro 43/2 R M.Q.B.
Encher le récepteur dans le
connecteur dédié sur la carte
programmateur série Elpro pour
actionner l'alimentation et le
1er canal radio NO
2ème canal radio:
bornier 2-3 contact NO
bornier 1-2 contact NF
Module relais NO ou NF:
encher le module dans le
connecteur dédié pour activer
la sortie du bornier. Un seul Relais
NO est fournit par défaut
Mémoire amovible
pour 800 émetteurs
Mémoire amovible
pour 800 émetteurs
Dip-switch
programmation
Relais 1 Relais 2 Relais 3 Relais 4
ASTRO
43 M.Q.B.
1 2 3 4 5 6 7 8 9 10
Sélectionner la typologie
d’alimentation
12 Vac/dc
24 Vac/dc
Canal 1
Relais 1
NO/NC
Canal 2
Relais 2
NO/NC
Canal 3
Relais 3
NO/NC
Canal 4
Relais 4
NO/NC
1 2 3 4 5 6 7 8 9 10
12 Vac/dc
24 Vac/dc
-+
27
91 mm
73
Astro 43 M.Q.B.
12-24V
cc/ ca R1 R2 R3 R4
+
-
12
3456 78910
1211
Antenne RG58
10
2
11 12
12
4
3
Bistabile
Timer 1
Timer 2
Eacer les
fonctions
additionelles
NO
Commun
NF
Dip-switch
programmation Lorsque la radio est allumée, la Led
rouge:
1 clignotement = alimentation présente
5 4 3
Antenne
!
Lorsque la radio est allumée, la Led
rouge:
1 clignotement = alimentation présente
!
+-
ASTRO
43 M.Q.B.
2 1
Positionner sur OFF tous le Dip-switch
Positionner sur OFF tous le Dip-switch
5 clignotements
de conrmation
OFF
récepteur
radio
7 clignotements
de conrmation
OFF
3 clignotements
de conrmation
OFF
Positionner sur
OFF tous le
Dip-switch
Positionner sur
OFF tous le
Dip-switch
Positionner sur OFF tous le
Dip-switch
ALLGEMEINE EIGENSCHAFTEN:
Astro 43 M.Q.B. ist ein Funkempfänger
zum Einstecken mit 2 Kanälen (Astro 43/2 R M.Q.B.) und Aufputz-Empfänger bis zu 4 Kanälen
(Astro 43/1 R M.Q.B. - mit Relaismodulen zu aktivieren), mit Selbsterlernung, wird durch Funksignal zu 433,92 MHz betätigt.
Anweisung: den Empfänger von elektromagnetischen oder warmen Quellen entfernt halten.
TECHNISCHE DATEN
Aufputz-Empfänger (Astro 43/1 R M.Q.B.) und
Einsteck-Empfänger (Astro 43/2 R M.Q.B.)
Frequenz 433,92 MHz
Stromversorgung 12/24 Vac/dc (Aufputz)
24 Vac/dc (Einsteck)
Max. Absorption 20 mA
Antenne Impedanzwert 50 Ohm
Betriebstemperatur -10 °C +55 °C
Relais Kontakt Leistung 0,5 A - 120 Vac o. 1A-24 Vdc
Reichweite 120 m (*)
Ausgänge max. Anzahl 4 (ASTRO 43/1 R M.Q.B.)
2 (ASTRO 43/2 R M.Q.B.)
Handsender im Speicher 800
Handsender (DIVO 71)
Frequenz 433,92 MHz
Batterie 1 Batterie 3 V - CR2032
Geschätze Dauer 2 Jahre
Kodierung Fester Code
Betriebstemperatur -10 °C +55 °C
Größe 65 x 36 x 12 mm
Gewicht 23 g
Strahlungsleistung < 10 mW e.r.p.
(*) bei schlechtem Wetter, Staub oder behindertem
Übertragungsfeld kann die Distanz bis zu 50%
verringert werden
DIP-SWITCH
Dip 1 = Relais 1: 1. Kanal
Dip 2 = Relais 2: 2. Kanal
Dip 3 = Relais 3: 3. Kanal
Dip 4 = Relais 4: 4. Kanal
Dip 5 = ermöglicht die Speicherung der Funkkanäle
Dip 6 = ermöglicht das Löschen von einem Handsender
Dip 7 = ermöglicht die Bistabile Funktion
Dip 8 = Timer 1 (1 s ÷ 15 min)
Dip 9 = Timer 2 (1 s ÷ 15 min)
Dip 10 = ermöglicht die Funktion Löschen des ganzen Speichers
EU-KONFORMITÄTSERKLÄRUNG
Hiermit erklärt Meccanica Fadini S.r.l., dass ASTRO 43 M.Q.B. in
Übereinstimmung mit den grundlegenden Anforderungen und den
anderen relevanten Vorschriften der Richtlinie 2014/53/UE ist. Die
Konformitätserklärung kann auf der folgenden Webseite konsultiert
werden: www.fadini.net, im Bereich Produkte.
Meccanica Fadini S.r.l.
Hauptgeschäftsführer
36
65
12
DE
Den dem aktivierten
Funkkanal entsprechenden
Dip-Schalter auf ON setzen
EINSTECK-EMPFÄNGER: Stecken Sie den
Funk auf die Elpro Steuerung ein, die
Antenne soll angeschlossen sein.
AUFPUTZ-EMPFÄNGER: Stecken Sie das
Relais in den zu aktivierenden Kanal ein, die
Antenne anschließen und den
Funkempfänger speisen.
In der Nähe des Funkempfängers
drücken Sie eine Taste des
Handsenders
und warten, bis es die LED auf
dem Funkempfänger ein-und
ausschaltet, bevor andere
Handsender gespeichert werden
Schritt 1 Schritt 2Schritt 3Schritt 4
SPEICHERUNG VON 1 FUNKKANAL AUF EINEM ODER MEHREREN HANDSENDER (DIVO 71)
EINEN HANDSENDER AUS DEM SPEICHER LÖSCHEN
In der Nähe des Funkempfängers
drücken Sie eine Taste des
Handsenders und warten Sie auf das
Blinken der LED, zur Bestätigung der
empfangenen Übertragung, bevor
andere Handsender zu löschen
Warten Sie auf das Blinken zur Speicherungsbestäti-
gung, bevor das Verfahren zu schließen
Funk-
empfänger
den Dip-Schalter Nr. 6
auf ON setzen
ON
6
OFF 6
Der Funkempfänger
ist mit Strom versorgt
und die Antenne ist
angeschlossen
Schritt 1 Schritt 2Schritt 3Schritt 4
ON
1
oder 2, 3, 4
+
ON
5
ACHTUNG: der Speicher empfängt kein Signal mehr vom Handsender, jedoch bleibt den Handsender-Code im Speicher.
Den Dip-Schalter des
entsprechenden Funkkanals
auf denen die Funktion zu
aktivieren ist auf ON setzen
ON
1
oder 2, 3, 4
ON
1
oder 2, 3, 4
ON
1
oder 2, 3, 4
schrittweise Funktion
Die normale
Funktionsweise des
gespeicherten Kanals
wiederherstellen
ON
789
+
+
Schritt 1 Schritt 2Schritt 3Schritt 4
Schritt 1 Schritt 2Schritt 3Schritt 4
Schritt 1 Schritt 2Schritt 3Schritt 4
Schritt 1 Schritt 3Schritt 4
ZUSÄTZLICHE FUNKTIONEN AUF AUFPUTZ-EMPFÄNGER (ASTRO 43/1 R M.Q.B.) UND EINSTECK-EMPFÄNGER (ASTRO 43/2 R M.Q.B.)
Eine Taste des
Handsenders auf
einem Funkkanal
speichern (sehen Sie
Speicherung auf dem
Funkempfänger), auf
denen dann diese
Funktion aktiviert wird
Eine Taste des
Handsenders auf
einem Funkkanal
speichern (sehen Sie
Speicherung auf dem
Funkempfänger), auf
denen dann diese
Funktion aktiviert wird
Eine Taste des
Handsenders auf
einem Funkkanal
speichern (sehen Sie
Speicherung auf dem
Funkempfänger), auf
denen dann diese
Funktion aktiviert wird
ON
7
out
input
Den Dip-Schalter des
entsprechenden Funkkanals
auf denen die Funktion zu
aktivieren ist auf ON setzen
ON
8
Den Dip-Schalter des
entsprechenden Funkkanals
auf denen die Funktion zu
aktivieren ist auf ON setzen
den Dip-Schalter
Nr. 7-8-9 auf ON setzen
ON
9
out
input
T
out
input
T
Min.
max 15
Sek.
max 60
In der Nähe des Funkempfän-
gers drücken Sie eine Taste
des Handsenders und warten,
bis es die LED auf dem
Funkempfänger ein-und
ausschaltet
In der Nähe des Funkempfängers
drücken Sie eine Taste des
Handsenders 5 Sekunden lang
drücken und warten, bis es die LED
auf dem Funkempfänger ein-und
ausschaltet
+ 8 Blinken zur Bestätigung
OFF
+
Min.
max 15
Sek.
max 60
Impulsdauer
out 200 ms
ACHTUNG: Bei jedem Drucken der Druckknöpfe darauf warten, dass die LED erlischt, als Bestätigung der Zeitspeicherung im Empfänger.
DEN GESAMTEN SPEICHER DES EINSTECKEMPFÄNGERS LÖSCHEN
In der Nähe des Funkempfängers
drücken Sie eine Taste des
Handsenders mindestens 5
Sekunden lang, die rote LED des
Empfängers bleibt an, bis wann die
Operation beendet ist.
Warten Sie auf das Blinken zur Speicherungsbestäti-
gung, bevor das Verfahren zu schließen
Funk-
empfänger
den Dip-Schalter Nr. 10
auf ON setzen
10 Blinken zur
Bestätigung
6 Blinken zur
Bestätigung
ON
10
OFF10
Der Funkempfänger
ist mit Strom versorgt
und die Antenne ist
angeschlossen
Schritt 1 Schritt 2Schritt 3Schritt 4
ON
1
oder 2, 3, 4
Schritt 2
Den Dip-Schalter
des entsprechenden
Funkkanals auf denen die
zusätzliche Funktion schon
aktiviert ist auf ON setzen
die Led des Funkempfängers blinkt soviele
Male, als die einsgestellte Zeit:
- lange Blinken für die Minute
- kurze Blinken für die Sekunden
+ 9 Blinken zur Bestätigung
OFF
die Led des Funkempfängers blinkt soviele
Male, als die einsgestellte Zeit:
- lange Blinken für die Minute
- kurze Blinken für die Sekunden
ASTRO 43/1 R M.Q.B. (Aufputz-Empfänger) - ASTRO 43/2 R M.Q.B. (Einsteck-Empfänger)
Aufputz-Empfänger
Astro 43/1 R M.Q.B.
Einsteck-Empfänger
Astro 43/2 R M.Q.B.
Die Stromversorgung und der
1. NO Funkkanal werden aktiviert,
indem man den Funkempfänger in
die dazu bestimmte Verbindung,
die an alle Elpro Steuerungen
vorhanden ist, einsteckt
2. Funkkanal:
Klemmen 2-3 NO Kontakt
Klemmen 1-2 NC Kontakt
NO oder NC Relaimodul: die
Ausgangsklemme ist aktiviert,
wenn das Modul eingesteckt
wird. Nur ein NO Relais wird
serienmäßig mitgeliefert
Entfernbarer Speicher
für 800 Handsender
Entfernbarer Speicher
für 800 Handsender
Dip-Schalter für die
Programmierung
Relais 1 Relais 2 Relais 3 Relais 4
ASTRO
43 M.Q.B.
1 2 3 4 5 6 7 8 9 10
die Art der Stromversorgung
auswählen
12 Vac/dc
24 Vac/dc
1. Kanal
Relais 1
NO/NC
2. Kanal
Relais 2
NO/NC
3. Kanal
Relais 3
NO/NC
4. Kanal
Relais 4
NO/NC
1 2 3 4 5 6 7 8 9 10
12 Vac/dc
24 Vac/dc
-+
27
91 mm
73
Astro 43 M.Q.B.
12-24V
cc/ ca R1 R2 R3 R4
+
-
12
3456 78910
1211
Antenne RG58
10
2
11 12
12
43
Bistabil
Timer 1
Timer 2
Die zusätzlichen
Funktionen
löschen
NO
Common
NC
Dip-Schalter für die
Programmierung
5 4 3
Antenne
Bei der Einschaltung des
Funkempfängers die ROTE LED:
1 Blinken = Stromversorgung vorhanden
!
Bei der Einschaltung des
Funkempfängers die ROTE LED:
1 Blinken = Stromversorgung vorhanden
!
+-
ASTRO
43 M.Q.B.
2 1
Alle Dip-Schalter auf OFF setzen
Alle Dip-Schalter auf OFF setzen
5 Blinken zur Bestätigung
OFF
Funk-
empfänger
7 Blinken zur Bestätigung
OFF
3 Blinken zur Bestätigung
OFF
Alle Dip-Schalter
auf OFF
setzen
Alle Dip-Schalter
auf OFF
setzen
Alle Dip-Schalter auf OFF
setzen
Dis. N. 8536 20230606
V
i
a
M
a
nt
o
v
a,
177
/
A -
3
7
0
5
3
C
e
r
e
a
(
V
R
)
I
ta
l
y
P
h
.
+
39
0
442
330
42
2
F
a
x
+
39
0
442
33
1
05
4
i
n
f
o
ff
@
f
a
d
i
n
i
.net -
w
w
w
.
f
a
d
i
n
i
.
n
e
t
VIE
T
A
T
T
T
A
A
O G
E
T
T
ARE NEI RIFIUTI
T
T
M
A
TERIALI NOCIVI PER
A
A
L
’
L
L
AMBIENTE
’
IT
D
i
r
e
tt
i
v
a 2012/19/U
E
S
m
al
t
i
me
n
t
o
dei
m
a
t
e
r
i
a
l
i
e
l
et
t
r
ic
i
e
d
e
l
et
t
r
o
ni
c
i
-
 1
1
-
 2
2


dans d''autres langues
- italiano: Fadini astro43mqb
- English: Fadini astro43mqb
- Deutsch: Fadini astro43mqb
- eesti: Fadini astro43mqb
