La page est en cours de chargement...

Antenne
Birio A8 mit
Kabel RG58
Dip -Schalter nur für die
Kodifizierung,
keine Funktion
ist durch sie möglich
Dip -Schalter nur für die
Kodifizierung,
keine Funktion
ist durch sie möglich
1. Kanal und Versorgung
(zum Einstecken in die Steuerung)
2. Kanal
Steuerung
Serie ELPRO
Dip -Schalter der
Funktionen
Antenne
RG 58
1
NA
2
3
4
5
NC
C
12345
R1R2
WICHTIG: um einen Ausgang an den
Funkempfänger Klemmen zu haben, müssen
alle Dip-Schalter auf OFF gestellt werden
!
1. Druckknopf
2. Druckknopf
1. Druckknopf
2. Druckknopf
3. Druckknopf
4. Druckknopf
Abb. 2
12V
Astro 43 Klein
1. Druckknopf
2. Druckknopf
DIP-SCHALTER NUR IM EINSTECKEMPFÄNGER ASTRO 43
Dip 1 = ON betätigt Relais 1 (1. Kanal)
Dip 2 = ON betätigt Relais 2 (2. Kanal)
Dip 3 = frei
Dip 4 = frei
Dip 5 = ON ermöglicht die Speicherung der Funkkanäle
Dip 6 =
ON ermöglicht das Löschen von einem Handsender
Dip 7 = ON ermöglicht die Bistabile Funktion
Dip 8 = ON ermöglicht die Funktion Timer T1 (1Sek. ÷ 15Min)
Dip 9 = ON ermöglicht die Funktion Timer T2 (1Sek. ÷ 15Min)
Dip10= ON ermöglicht die Funktion Löschen des ganzen Speichers
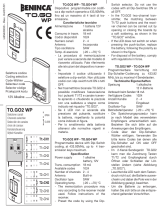
FUNKEMPFÄNGER 433.92MHz:
Einsteckempfänger mit
Selbsterlernung, wird durch Funksignal zu 433.92MHz betätigt.
ANWEISUNG: den Empfänger von elektromagnetischen oder
warmen Quellen entfernt halten.
Technische Daten:
Funkfrequenz 433,92MHz ±75KHz
Mittlere Frequenz Wert 500 KHz
Streuausstrahlung Höchstleistung 2 nW
Antennenimpedanz 50 Ohm
Empfindlichkeit 1,5 μV
Stromversorgung 24V ac
Stromaufnahme 20 mA ac
Betriebstemperatur -20°C +55°C
Sicherheitsverzugszeit 150mSec
Belastbarkeit Kontakt Relais 0,5A - 125V ac
Schutzgrad IP53
Empfangsreichweite 120 Meter
Funkkanal Einsteckversion 2
Anzahl der Kanäle im Speicher 800
Abb. 1
Abb. 3
Rote Led
ASTRO
43 Q.
FUNKTIONEN DES EINSTECKFUNKEMPFÄNGERS ASTRO 43 : Die Dip-Schalter der Handsender werden nur zur Kodifizierung des persönlich gestalteten Code verwendet, keine
Funktionen sind durch sie möglich
Speicherung eines Funkkanals: Dip-Schalter 5= ON (Speichervorgang der einzelnen Druckknöpfe des Handsenders im Funkempfänger):
- Handsender: das Gehäuse öffnen und den Code durch die innere Dip-Schalter eingeben (Abb.3), den Code aufschreiben und endlich alles wiederzusammensetzen.
- Auf ON einen der Dip-Schalter 1 und 2 des Funkempfängers, der dem Kanal entspricht, der zu speichern ist, stellen: der 1. Kanal wird betätigt, wobei man die Platine einsteckt,
der 2. Kanal wird durch die Anschlüsse an die Klemmeleiste betätigt
(Abb.1)
- Den Handsender Dr
uckknopf, den man kodifizieren will, gedrückt halten, (Abb.2), der Empfänger wird den Signal erlernen und durch ein Blinken der roten Led wird die Speicherung
bestätigt: bei jedem Impulsgabe des Handsenders wird einen Signal gesendet, das der Relaiskontakt des auf dem Empfänger gespeicherten Kanals schliesst.
- Wichtig: wenn diese Operation beendet ist, alle Dip-Schalter auf OFF stellen, die Led des Funkempfängers wird 5 Male zur Bestätigung blinken.
N.B. Um alle Funkkanäle auf die entsprechenden Handsenderdruckknöpfen durch eine einzige Operation zu speichern (1.Druckknopf mit dem 1.Kanal und 2. Druckknopf mit dem
2. Kanal) die Dip-Schalter 1, 2, 3, 4 und 5 = ON stellen, dann wird die Operation durchgeführt, indem man jeden beliebigen Druckknopf drückt, bis wann die Led einmal blinkt.
Wann der Vorgang beendet alle Dip-Schalter auf OFF stellen, die Led des Funkempfängers wird 5 Male zur Bestätigung blinken.
Löschen eines Handsenders: Dip-Schalter 6= ON (der Speicher empfängt kein Signal mehr vom Handsender, jedoch bleibt den Handsender-Code im Speicher)
- Jeden beliebigen Handsender-Druckknopf, der zu löschen ist, (früher gespeichert) drücken (Abb.2): die Led blinkt einmal zur Bestätigung dass die Sendung empfängt wurde.
- Dip-Schalter 6 auf OFF stellen: nur auf diesem Punkt löscht der Empfänger den Handsender und die Led blinkt 6 Male, um die Operation zu bestätigen
- Wichtig: wenn den Vorgang beendet ist, alle Dip-Schalter auf OFF stellen. Um mehrere Handsender zu löschen, den Vorgang wiederholen.
Bistabiler Ausgang: Dip-Schalter 7= ON, (zuerst muss man mindestens einen Handsender-Druckknopf speichern) der erste Impulsgabe vom Handsender betätigt das Relais,
während bei dem zweiten Impulsgabe vom selben Druckknopf das Relais ausgeschaltet wird (Schrittweise-Funktion) .
- Einen der Dip-Schalter 1 und 2 der dem Funkkanal entspricht, welche als bistabiler Modus zu verwenden ist, auf ON stellen und auf denen einen Handsender-Druckknopf bereits
gespeichert wurde.
- Den Handsender-Druckknopf drücken, der als bistabiler Modus zu verwenden ist. (Abb.2)
- Wichtig: wenn die Operation beendet ist,
alle Dip-Schalter auf OFF stellen, die Led des Funkempfängers wird 7 Male zur Bestätigung blinken.
Timer 1: Dip-Schalter 8= ON, (zuerst muss man einen Handsender-Druckknopf speichern, auf denen die Funktion eingesetzt werden muss.):
durch einen Impulsgabe des Handsenders wird der Ausgang des gewählten Kanals die eingestellte Zeit lang betätigt, ist diese Zeit
abgelaufen, schaltet der Ausgang selbst aus.
- Einen der Dip-Schalter 1 und 2 der dem Funkkanal entspricht, welcher als Timer 1 zu verwenden ist, auf ON stellen.
- Den 1. Druckknopf des Handsenders (Abb.2) drücken, so viele Male, als die angeforderte
Minute zu speichern sind. (Max 15 Minute)
- Den 2. Druckknopf des Handsenders (Abb.2) drücken, so viele Male, als die angeforderte
Sekunden zu speichern sind.
NB: Bei jedem Drucken der Druckknöpfe darauf warten, dass die Led auslöscht, als Bestätigung der Zeitspeicherung.
- Wann der Vorgang beendet ist alle Dip-Schalter auf OFF stellen, die Led des Funkempfängers blinkt soviele Male, als die einsgestellte Zeit:
lange Blinken für die Minute, kurze Blinken für die Sekunden. Nach einer kunzen Pause blinkt der Empfänger 8 Male zur Bestätigung.
Wird der Empfänger während der Betätigung des Timers 1 einen Impuls (länger als 3 Sekunden) vom vorher gesetzten
Handsender-Druckknopf empfangen, der Ausgang wird ausgeschaltet.
Timer 2: Dip-Schalter 9= ON, (zuerst muss man mindestens einen Handsender-Druckknopf speichern, auf denen die Funktion eingesetzt
werden muss.): durch eine Impulsgabe des Handsenders wird der Ausgang des gewählten Kanals 200ms lang betätigt, ist diese Zeit
abgelaufen, wird einen zweiten Impuls 200ms lang wieder betätigt.
- Einen der Dip-Schalter 1, 2, 3 oder 4, der dem Funkkanal entspricht, welcher als Timer 2 zu verwenden ist, auf ON stellen.
- Den 1. Druckknopf des Handsenders (Abb.2) drücken, so viele Male, als die angeforderte
Minute zu speichern sind. (Max 15 Minute)
- Den 2. Druckknopf des Handsenders (Abb.2) drücken, so viele Male, als die angeforderte
Sekunden zu speichern sind.
NB:
Bei jedem Drucken der Druckknöpfe darauf warten, dass die Led erlischt, als Bestätigung der Zeitspeicherung.
- Wann der Vorgang beendet ist
alle Dip-Schalter auf OFF stellen, die Led des Funkempfängers blinkt soviele Male, als die einsgestellte Zeit:
lange Blinken für die Minute, kurze Blinken für die Sekunden. Nach einer kunzer Pause blinkt der Empfänger 9 Male zur Bestätigung.
Wird der Empfänger während der Betätigung des Timers 2 einen Impuls (länger als 3 Sekunden) vom vorher gesetzten Handsender-Druckknopf empfangen, sendet er den 2. Impuls
und die Funktion ist damit beendet.
Völliges Löschen des Speichers: Dip-Schalter 10= ON, der Speicher des Empfängers wird völlig gelöscht.
- Jeden beliebigen Hansender-Druckknopf (früher gespeichert)(Abb.2) mindestens
5 Sek. lang drücken, die rote Led des Empfängers bleibt an, bis wann die Operation beendet ist.
- Wichtig: wenn die Operation beendet ist, alle Dip-Schalter auf OFF stellen, die Led des Funkempfängers wird 10 Male zur Bestätigung blinken.
Die Ausgänge in das standard Modus rücksetzen: Dip-Schalter 7= ON - Dip-Schalter 8= ON - Dip-Schalter 9= ON, die einzelnen Kanäle werden im Speicher gehalten (aber
jede vorherige Funktion, wie Bistabile, Timer T1 und Timer T2 wird gelöscht)
- Der Dip-Schalter der dem Funkkanal entspricht, welche in das standard Modus rückzusetzen ist, auf ON stellen.
- Jeden beliebigen Hansender-Druckknopf (früher gespeichert)(Abb.2) mindestens 5 Sek. lang drücken, die rote Led des Empfängers blinkt einmal zur Bestätigung
- Wichtig: wenn die Operation beendet ist,
alle Dip-Schalter auf OFF stellen, die Led des Funkempfängers wird 3 Male zur Bestätigung blinken.
Art. 4329
ZUM EINSTECKEN
zum EINSTECKEN
Selbsterlernung
ON
OFF
OFF
Timer 1
Ausgang-Signal
Impulsgabe
vom Handsender
ON
OFFOFF
Timer 2
Ausgang
von 200ms
Impulsgabe
vom Handsender
Zeichn. 5485
Richtlinie 2003/108/EG
Entsorgung von elektrischen und
elektronischen Materialien
NICHT ZUM HAUSMÜLL WERFEN
UMWEL
TSCHÄDLICHE
MA
TERIALIEN
D
12V
+
-
+
-
ANLEITUNG DES FUNKEMPFÄNGERS
ASTRO 43
ZUM EINSTECKEN,
MIT SELBSTERLERNUNG, MULTIFUNKTIONAL
Antenna
Birio A8 con
cavo RG58
Dip -Switch per la codifica, non
sono abilitati per le funzioni
Dip -Switch per la
codifica, non sono
abilitati per le funzioni
1° Canale e Alimentazione
(ad innesto nel programmatore)
2° Canale
Programmatore
serie ELPRO
Dip -Switch delle funzioni
antenna
RG 58
1
NA
2
3
4
5
NC
C
12345
R1R2
IMPORTANTE: perchè si abbia un'uscita ai
morsetti della radio bisogna che tutti i suoi
Dip-Switch siano in posizione OFF
!
ON
OFF
OFF
Timer 1
Segnale di uscita
Impulso dal
telecomando
ON
OFF
OFF
Timer 2
uscita di 200ms
Impulso dal
telecomando
1° pulsante
2° pulsante
1° pulsante
2° pulsante
3° pulsante
4° pulsante
Fig. 2
12V
Astro 43 Piccolo
1° pulsante
2° pulsante
DIP-SWITCH DELLA SOLA RADIORICEVENTE ASTRO 43 DA INNESTO
Dip 1=ON Attiva il Relè 1 (1° Canale)
Dip 2=ON Attiva il Relè 2 (2° Canale)
Dip 3=libero
Dip 4=libero
Dip 5=ON abilita la memorizzazione dei canali radio
Dip 6=ON abilita la cancellazione di un solo telecomando
Dip 7=ON abilita la funzione Bistabile
Dip 8=ON abilita la funzione Timer T1 (1sec ÷ 15min)
Dip 9=ON abilita la funzione Timer T2 (1sec ÷ 15min)
Dip10=ON abilita la funzione che cancella tutta la memoria
RADIO RICEVENTE 433.92MHz:
scheda radio ad innesto per la
ricezione di un segnale radio a 433.92MHz ad autoapprendimento.
Avvertenze: non esporre la radioricevente a sorgenti
elettromagnetiche o di calore.
Caratteristiche tecniche:
Frequenza di funzionamento 433,92MHz ±75KHz
Valore frequenza intermedia 500 KHz
Massima potenza emissioni parassite 2 nW
Valore impedenza antenna 50 Ohm
Sensibilità 1,5 μV
Alimentazione 24V ca
Assorbimento 20 mA ca
Temperatura di funzionamento -20°C +55°C
Tempo ritardo di sicurezza 150msec
Portata contatto relè 0,5A - 125V ca
Grado di protezione IP53
Portata di ricezione 120 metri
Canali radio Innesto 2
Numero telecomandi in memoria 800
Fig. 1
Fig. 3
Led rosso
ASTRO
43 Q.
FUNZIONI DELLA RADIO RICEVENTE ASTRO 43 M.Q.B. DA INNESTO: I Dip-Switch dei telecomandi servono solo come codifica del codice personale, non sono abilitati alle funzioni
Memorizzazione di un canale radio: Dip-Switch 5= ON (procedura per la memorizzazione dei singoli pulsanti del telecomando sulla radio):
- Sul telecomando: aprirlo completamente e comporre il codice personale mediante il Dip-Switch interno (Fig.3), quindi dopo aver ricordato tale codice richiudere il tutto.
- Posizionare in ON uno dei Dip-Switch 1e 2 della radio corrispondente al canale da memorizzare: il 1° canale è attivato inserendo la schedina, il 2° con i collegamenti alla morsettiera (Fig.1)
- Mantenere premuto un pulsante del telecomando che si vuole memorizzare (Fig.2), la radioricevente apprende il segnale e un lampeggio del led rosso conferma la memorizzazione:
ad ogni impulso del telecomando viene emesso un segnale che chiude il contatto del relè all'uscita del canale memorizzato sulla radioricevente.
- Importante: terminata l'operazione
posizionare in OFF tutti i Dip-Switch, il led della radioricevente emetterà n°5 lampeggi di conferma.
N.B. Per memorizzare tutti i canali radio sui rispettivi pulsanti del telecomando in un unica operazione (1°pulsante con il 1° canale e 2° pulsante con il 2° canale) posizionare i
Dip-Switch 1, 2, 3, 4 e 5 = ON, quindi completare l'operazione premendo un pulsante qualsiasi fino a visualizzare n°1 lampeggio del led.
Terminata l'operazione
posizionare in OFF tutti i Dip-Switch, il led della radioricevente emetterà n°5 lampeggi di conferma.
Cancellazione di un telecomando: Dip-Switch 6= ON (la memoria non riceve più il segnale dal telecomando, tuttavia rimane presente in memoria il codice del telecomando)
- Premere un pulsante qualsiasi del telecomando da cancellare (già memorizzato) (Fig.2):un lampeggio del led mi conferma la trasmissione ricevuta.
- Posizionare in OFF il Dip-Switch 6: solo adesso la radioricevente cancella dalla memoria il telecomando, confermando con n°6 lampeggi l'operazione.
- Importante: terminata l'operazione posizionare in OFF tutti i Dip-Switch. Per cancellare più telecomandi bisogna ripetere l'intera operazione.
Uscita Bistabile: Dip-Switch 7= ON, (è necessario prima memorizzare almeno un pulsante del telecomando) al primo impulso del telecomando si attiva il relè, mentre lo si disattiva
con il secondo impulso dello stesso pulsante (funzione passo-passo).
- Posizionare in ON uno dei Dip-Switch 1 e 2 corrispondente al canale radio da utilizzare in modalità bistabile e sul quale si è gia memorizzato un pulsante del telecomando
- Premere il pulsante del telecomando che si desidera rendere in modalità bistabile (Fig.2)
- Importante: terminata l'operazione
posizionare in OFF tutti i Dip-Switch, il led della radioricevente emetterà n°7 lampeggi di conferma dell'operazione.
Timer 1: Dip-Switch 8= ON, (è necessario prima memorizzare un pulsante del telecomando sul quale si desidera applicare la funzione):
con un impulso del telecomando si attiva l'uscita del canale selezionato per il tempo impostato, trascorso il quale si disattiva da solo.
- Posizionare in ON uno dei Dip-Switch 1 e 2 corrispondente al canale radio da utilizzare in modalità timer 1
- Premere il 1° pulsante del telecomando (Fig.2) per tante volte quanti sono i
minuti da memorizzare (max 15 minuti).
- Premere il 2° pulsante del telecomando (Fig.2) per tante volte quanti sono i secondi da memorizzare.
NB:
Ad ogni pressione dei pulsanti attendere lo spegnimento del led come avvenuta memorizzazione del tempo.
- Terminata l'operazione posizionare in OFF tutti i Dip-Switch, il led della radioricevente emetterà i lampeggi per il tempo impostato:
lampeggi lunghi per i minuti, lampeggi corti per i secondi, dopo una breve pausa la radioricevente emette n°8 lampeggi di conferma.
Se durante il conteggio del timer la radio riceve un impulso dal pulsante abilitatato con il Timer 1 (quest'ultimo superiore i 3 secondi), si disattiva l'uscita.
Timer 2: Dip-Switch 9= ON, (è necessario prima memorizzare un pulsante del telecomando sul quale si desidera applicare la funzione):
con un impulso del telecomando si attiva l'uscita del canale selezionato per una durata di 200ms, trascorso il tempo impostato, si riattiva
un secondo impulso per altri 200ms
- Posizionare in ON uno dei Dip-Switch 1, 2, 3 o 4 corrispondente al canale radio da utilizzare in modalità timer 2
- Premere il 1° pulsante del telecomando (Fig.2) per tante volte quanti sono i minuti da memorizzare (max 15 minuti).
- Premere il 2° pulsante del telecomando (Fig.2) per tante volte quanti sono i
secondi da memorizzare.
NB:
Ad ogni pressione dei pulsanti attendere lo spegnimento del led come avvenuta memorizzazione del tempo.
- Terminata l'operazione posizionare in OFF tutti i Dip-Switch, il led della radioricevente emetterà i lampeggi per il tempo impostato:
lampeggi lunghi per i minuti, lampeggi corti per i secondi, dopo una breve pausa la radioricevente emette n°9 lampeggi di conferma
Se durante il conteggio del timer la radio riceve un impulso dal pulsante abilitato con il Timer 2 (quest'ultimo superiore i 3 secondi), emette il 2° impulso e termina il conteggio.
Cancellazione totale della memoria: Dip-Switch 10= ON, viene cancellata totalmente la memoria della radioricevente.
- Premere un pulsante qualsiasi di un telecomando già memorizzato (Fig.2) per almeno
5 secondi. Il led rosso della radio si accende fino alla conclusione dell'operazione.
- Importante: terminata l'operazione
posizionare in OFF tutti i Dip-Switch, il led della redioricevente emetterà n°10 lampeggi di conferma dell'operazione.
Ripristinare le uscite in modalità Normale: Dip-Switch 7= ON - Dip-Switch 8= ON - Dip-Switch 9= ON, vengono ripristinati i singoli canali in modalita' di semplice memorizzazione
senza la loro cancellazione in memoria (modalità Bistabile, Timer T1 e Timer T2 vengono annullati)
- Posizionare in ON il Dip-Switch corrispondente al canale da ripristinare in modalità normale.
- Premere un pulsante qualsiasi di un telecomando già memorizzato (Fig.2) per almeno
5 secondi. Il led rosso della radio dà un lampeggio di conferma.
- Importante: terminata l'operazione
posizionare in OFF tutti i Dip-Switch, il led della radioricevente emetterà n°3 lampeggi di conferma dell'operazione.
cod. 4329
- INNESTO
ad INNESTO
Autoapprendimento
Dis. 5485
Direttiva 2003/108/CE
Smaltimento dei materiali
elettrici ed elettronici
VIETATO GETTARE NEI RIFIUTI
MATERIALI NOCIVI PER L'AMBIENTE
I
12V
+
-
+
-
ISTRUZIONI DELLA RADIO RICEVENTE
ASTRO 43
AD INNESTO
MULTIFUNZIONALE - AUTOAPPRENDIMENTO

Aerial
Birio A8 with
RG58 cable
Dip -Switches only for encoding,
no function can be made able
by them
Dip -Switches only for
encoding, no function can
be made able by them
1st Channel and power supply
(to be plugged into the control box)
2
nd
Channel
Control panel
ELPRO range
Functions Dip -Switches
aerial
RG 58
1
NO
2
3
4
5
NC
C
12345
R1R2
IMPORTANT: to have an output available
with the radio receiver terminals, all the
Dip-Switches in it must be set on to OFF
!
Button 1
Button 2
Button 1
Button 2
Button 3
Button 4
Pic. 2
12V
Astro 43 Small
Button 1
Button 2
DIP-SWITCHES ONLY IN THE RADIO RECEIVER ASTRO 43 PLUG-IN
Dip 1=ON Operates Relay 1 (Channel 1)
Dip 2=ON Operates Relay 2 (Channel 2)
Dip 3=Blank
Dip 4=Blank
Dip 5=
ON enables memorization of the radio channels
Dip 6=ON enables delete one transmitter only
Dip 7=ON enables the function Bistable
Dip 8=ON enables the function Timer T1 (1sec ÷ 15min)
Dip 9=ON enables the function Timer T2 (1sec ÷ 15min)
Dip10=ON enables the function delete all memory
RADIO RECEIVER 433.92MHz:
self-learning, plug-in radio card
to operate with a 433.92MHz radio signal
Please note: do not e
xpose the receiver to electro-magnetic or
heat sources
Technical specifications:
Working frequency 433.92MHz ±75KHz
Intermediate frequency value 500 KHz
Stray emission max.power 2 nW
Aerial impedance value 50 Ohm
Sensitivity 1.5 μV
Power supply 24V ac
Absorption 20 mA ac
Working temperature -20°C +55°C
Safety delay time 150msec
Relay contact rating 0.5A - 125V ac
IP standards IP53
Distance range 120 metres
Plug-in radio channels 2
Number of transmitters in the memory 800
Pic. 1
Pic. 3
Red Led
ASTRO
43 Q.
FUNCTIONS OF THE RADIO RECEIVER ASTRO 43 PLUG-IN: the Dip-Switches in the transmitters are only to encode the user's code, no function can be made able by them
Memorizing one radio channel: Dip-Switch 5= ON (procedure to memorize the single transmitter buttons in the receiver):
- Transmitter: open the casing and set the user's code by means of the internal Dip-Switches (Pic.3), record it down to prevent forgetting it, and re-assemble the unit.
- Set to ON one of the Dip-Switches 1 and 2 in the receiver corresponding to the channel to memorize: the channel 1 is activated by plugging the receiver in the connector, the
channel 2 is by connecting the terminals (Pic.1)
- Press and hold a transmitter button (Pic.2), the receiver learns the signal and the red led flashes to confirm memorizing:
each pulse with the transmitter emits a signal that closes the output relay contact of the channel memorized in the radio receiver.
- Important: once this operation is finished set all the Dip-switches on to OFF. The receiver led flashes 5 times to confirm.
N.W. In order to match all the radio channels with the respective transmitter buttons by a single operation (button 1 with channel 1 and button 2 with channel 2) set the Dip-Switches
1, 2, 3, 4 and 5 = ON, carry on the memorizing operation as before, by pressing and holding any one button of the transmitter until the led flashes 1 time.
Once the operation is finished
set all the Dip-switches on to OFF. The receiver led flashes 5 times to confirm.
Deleting one transmitter: Dip-Switch 6= ON (the memory does not receive any signal from that transmitter any longer, but the transmitter code remains in the memory)
- Press any one button of the transmitter to be deleted (previously memorized) (Pic.2): the led flashes 1 time to confirm that the signal is received
- Set on to OFF the Dip-Switch 6: only at this stage, the radio receiver deletes the transmitter from the memory, and the led flashes 6 times to confirm the operation as accomplished
- Important: once the operation is finished,
set all the Dip-Switches on to OFF. in order to delete more transmitters, repeat the entire operation
Bistable Output: Dip-Switch 7= ON, (first, it is necessary to memorize at least one transmitter button): the first pulse from the transmitter enables the relay, whereas the second
pulse from the same transmitter button disables it (step-by-step function).
- Set to ON one of the Dip-Switches 1 and 2 corresponding to the radio channel required to be used as bistable mode and to the transmitter button as previously memorized
- Press the transmitter button required to operate on bistable mode (Pic.2)
- Important: once the operation is finished
set all the Dip-Switches to OFF, the led in the receiver flashes 7 times to confirm the accomplished operation
Timer 1: Dip-Switch 8= ON, (first, it is necessary to memorize the transmitter button by means of which the function is carried out):
on pulsing the transmitter button, the output of the selected channel is activated for a time as pre-set, on expiry of which, it is
automatically deactivated
- Set to ON one of the Dip-Switches 1 and 2 corresponding to the radio channel required to be used as mode timer 1
- Press the button 1 of the transmitter (Pic.2) as many times as the minutes required to be memorized (max 15 minutes)
- Press the button 2 of the transmitter (Pic.2) as many times as the seconds required to be memorized
NW:
After each pressing of the buttons, wait for the led to go off as a confirmation that the time has been memorized.
- Once the operation is finished,
set all the Dip-Switches to OFF, the led in the receiver flashes as many times as follows:
long flashes as the minutes, short flashes as the seconds. After a short pause, the receiver led flashes 8 times to confirm.
On operating phase, a pulse to the receiver from the transmitter button on mode Timer 1 (superior to 3 seconds) disables the output and stops the operation.
Timer 2: Dip-Switch 9= ON, (first, select and memorize the transmitter button by means of which this function is carried out):
a pulse from the transmitter activates the selected channel output for 200ms, after the time as pre-set, a second pulse
is released for another 200ms
- Set to ON one of the Dip-Switches 1, 2, 3 or 4 corresponding to the radio channel to be used as mode timer 2
- Press the button 1 of the transmitter (Pic.2) as many times as the
minutes required to be memorized (max 15 minutes)
- Press the button 2 of the transmitter (Pic.2) as many times as the
seconds required to be memorized
NW:
After each pressing of the buttons, wait for the led to go off as a confirmation that the time has been memorized
- Once the operation is finished,
set all the Dip-Switches to OFF, the led in the receiver flashes as many times as follows:
long flashes as the minutes, short flashes as the seconds. After a short pause, the receiver led flashes 9 times to confirm.
On operating phase, a pulse to the receiver from the transmitter button on mode Timer 2 (superior to 3 seconds) gives out the 2nd pulse and stops the operation.
Deleting the total memory: Dip-Switch 10= ON, the memory of the receiver is deleted in total
- Press any one button of the transmitter, provided it is already in the memory (Pic.2), for at least 5 seconds. The red led of the receiver stays on until the operation is finished.
- Important: Once the operation is finished, set all the Dip-Switches to OFF, the led in the receiver flashes 10 times to confirm the operation is accomplished
Set the outputs back to Standard mode: Dip-Switch 7= ON - Dip-Switch 8= ON - Dip-Switch 9= ON, the single channels are kept in the memory (but all previous settings such
as Bistable, Timer T1 and Timer T2 modes are cancelled)
- Set to ON the Dip-Switch corresponding to the channel to be set back to Standard Mode.
- Press any one button of the transmitter, provided it is already in the memory (Pic.2), for at least
5 seconds. The red led in the receiver flashes once to confirm.
- Important:Once the operation is finished, set all the Dip-Switches to OFF, the led in the receiver flashes 3 times to confirm the operation is accomplished.
code 4329
- PLUG-IN
PLUG-IN
Self-learning
ON
OFF
OFF
Timer 1
Signal output
Pulse from the
transmitter
ON
OFFOFF
Timer 2
200ms output
Pulse from the
transmitter
Drwg.
5485
Directive
2003/108/EC
Disposal of electric and
electronic material
DO NOT DISPOSE OF AS NORMAL WASTE.
HARMFUL FOR THE ENVIRONMENT
GB
12V
+
-
+
-
INSTRUCTIONS OF THE RADIO RECEIVER
ASTRO 43
PLUG-IN
SELF-LEARNING - MULTIFUNCTIONS
Antenne
Birio A8 avec
câble RG58
Dips-Switch pour le codage,
ne sont pas habilités pour
les fonctions
Dips-Switch pour le codage,
ne sont pas habilités
pour les fonctions
1° Canal et Alimentation
(enfichable dans le programmateur)
2° Canal
Programmateur
série ELPRO
Dips-Switch des fonctions
antenne
RG 58
1
NO
2
3
4
5
NF
C
12345
R1R2
IMPORTANT: afin qu'il y ait une sortie aux bornes
de la radio, il faut que tous ses Dips-switch
soient en position OFF
!
1° bouton
2° bouton
1° bouton
2° bouton
3° bouton
4° bouton
Fig. 2
12V
Astro 43 Petit
1° bouton
2° bouton
DIPS-SWITCH SEULEMENT DU RECEPTEUR RADIO ASTRO 43 ENFICHABLE
Dip 1 =ON Active le Relais 1 (1° Canal)
Dip 2 = ON Active le Relais 2 (2° Canal)
Dip 3 = libre
Dip 4 = libre
Dip 5 = ON habilite la mémorisation des canaux radio
Dip 6 = ON habilite l'effacement d'une télécommande seulement
Dip 7 = ON habilite la fonction Bistable
Dip 8 = ON habilite la fonction Timer T1 (1sec ÷ 15min)
Dip 9 = ON habilite la fonction Timer T2 (1sec ÷ 15min)
Dip10= ON habilite la fonction qui efface toute la mémoire
RECEPTEUR RADIO 433.92MHz:
carte radio enfichable pour la
réception d'un signal radio à 433.92MHz à autoapprentissage.
Avertissements: pas exposer le récepteur radio à sources
électromagnétiques ou de chaleur.
Données techniques:
Fréquence de fonctionnement 433,92MHz ±75KHz
Valeur fréquence intermédiaire 500 KHz
Puissance max. émissions parasites 2 nW
Valeur impédence antenne 50 Ohm
Sensibilité 1,5 μV
Alimentation 24V ca
Consommation 20 mA ca
Température de fonctionnement -20°C +55°C
Durée retard de sécurité 150m sec
Contact relais 0,5A - 125V ca
Degrée de protection IP53
Portée réception 120 mètres
Canaux radio Enfichable 2
Numéro télécommandes en mémoire 800
Fig. 1
Fig. 3
Led rouge
ASTRO
43 Q.
FONCTIONS DU RECEPTEUR RADIO ASTRO 43 ENFICHABLE: Les Dips-switch des télécommandes sont utiles seulement pour la codification du code personnel, ils ne sont pas
habilités aux fonctions.
Mémorisation d'un canal radio: Dip-Switch 5= ON (procédure pour la mémorisation des boutons individuels de la télécommande sur la radio):
- Sur la télécommande: l'ouvrir complètement et composer le code personnel avec le Dip-Switch interne (Fig.3). Il faut se rappeler ce code. Ensuite, fermer le tout.
- Positionner sur ON un des Dips-switch 1 et 2 de la radio relative au canal à mémoriser: le 1° canal est activé introduisant la carte, le 2° avec les branchements à la bornier (Fig.1).
- Tenir appuyé un bouton de la télécommande qu'on veut mémoriser (Fig.2), le récepteur radio apprend le signal et un clignotement du led rouge confirme la mémorisation: à
chaque impulsion de la télécommande est émis un signal qui ferme le contact du relais à la sortie du canal mémorisé sur le récepteur radio.
- Important: terminée l'opération, positionner sur OFF tous les Dips-switch, le led du récepteur radio emettra n°5 clignotements de confirmation.
N.B. Pour mémoriser tous les canaux radio sur les réspectifs boutons de la télécommande avec une seule opération (1° bouton avec le 1° canal et 2° bouton avec le 2° canal),
positionner les Dips-switch 1, 2, 3, 4 et 5 = ON, ensuite compléter l'opération appuyant n'importe quel bouton jusqu'à visualiser n°1 clignotement du led.
Terminée l'opération,
positionner sur OFF tous les Dips-switch. Le led du récepteur radio emettra n°5 clignotements de confirmation.
Effacement d'une télécommande: Dip-Switch 6= ON (la mémoire ne reçoit plus le signal de la télécommande, de toute façon le code de la télécommande reste dans la mémoire)
- Appuyer n'importe quel bouton de la télécommande à effacer (déjà mémorisée) (Fig.2): un clignotement du led me confirme la transmission reçue.
- Positionner sur OFF le Dip-Switch 6: maintenant, le récepteur radio efface la télécommande de la mémoire. L'opération est confirmée avec n°6 clignotements.
- Important: terminée l'opération,
positionner sur OFF tous les Dips-switch. Pour effacer plusieurs télécommandes, il faut répéter toute l'opération.
Sortie Bistable: Dip-Switch 7= ON, (avant tout, il faut mémoriser au moins un bouton de la télécommande) à la première impulsion de la télécommande, s'active le relais, qui se
désactive avec la deuxième impulsion de la même touche (fonction pas-pas).
- Positionner sur ON un des Dips-switch 1 et 2 rélatif au canal radio qu'il faut utiliser en modalité bistable et sur lequel on a déjà mémorisé un bouton de la télécommande
- Appuyer le bouton de la télécommande qu'on veut en modalité bistable (Fig.2)
- Important: terminée l'opération,
positionner sur OFF tous les Dips-switch, le led du récepteur radio emettra n°7 clignotements pour confirmer l'opération.
Timer 1: Dip-Switch 8= ON, (avant tout, il faut mémoriser le bouton de la télécommande sur lequel on veut appliquer la fonction):
avec une impulsion de la télécommande s'active la sortie du canal seléctionné pour le temps établi, expiré ce temps elle se désactive.
- Positionner sur ON un des Dips-switch 1 et 2 rélatif au canal radio qu'on veut utiliser en modalité timer 1.
- Appuyer le 1° bouton de la télécommande (Fig.2) pour aussi bien fois que les
minutes qu'on doit mémoriser (max 15 minutes)
- Appuyer le 2° bouton de la télécommande (Fig.2) pour aussi bien fois que les
secondes qu'on doit mémoriser
NB:
A chaque pression des boutons, attendre l'extinction du led comme épreuve que la mémorisation du temps a été faite.
- Terminée l'opération, positionner sur OFF tous les Dips-switch. Le led du récepteur radio émettra les clignotements pour le temps établi:
clignotements longs pour les minutes, clignotements courts pour les secondes. Après une petite pause, le récepteur radio émet n°8
clignotements de confirmation.
Si durant l'activation du timer, la radio réçoit une impulsion du bouton habilité avec le Timer 1 (ce dérnier supérieure à 3 sec.), la sortie se désactive.
Timer 2: Dip-Switch 9= ON, (avant tout, il faut mémoriser le bouton de la télécommande sur lequel on veut appliquer la fonction):
avec une impulsion de la télécommande s'active la sortie du canal sélectionné pour une durée de 200ms, après ce temps établi, se
réactive une deuxième impulsion pour 200ms encore.
- Positionner sur ON un des Dips-switch 1, 2, 3 ou 4 rélatif au canal radio qu'on veut utiliser en modalité timer 2
- Appuyer le 1° bouton de la télécommande (Fig.2) pour aussi bien fois que les
minutes qu'on veut mémoriser (max 15 minutes)
- Appuyer le 2° bouton de la télécommande (Fig.2) pour aussi bien fois que les
secondes qu'on veut mémoriser.
NB:
A chaque pression des boutons, il faut attendre l'éxtinction du led pour confirmer la mémorisation du temps.
- Terminée l'opération, positionner sur OFF tous les Dips-switch. Le led du récepteur radio émettra des clignotements pour le temps établi:
clignotements longs pour les minutes, clignotements courts pour les secondes. Après une petite pause le récepteur radio émet n°9 clignotements de confirmation.
Si durant l'activation du timer, la radio réçoit une impulsion du bouton habilité avec le Timer 2 (ce dérnier supérieure à 3 secondes), émet la 2° impulsion et termine la fonction.
Effacement totale de la mémoire: Dip-Switch 10= ON, on efface totalement la mémoire du récepteur radio.
- Appuyer n'importe quel bouton d'une télécommande déjà mémorisée (Fig.2) pour 5 secondes au moins. Le led rouge de la radio s'allume jusqu'à la conclusion de l'opération.
- Important: terminée l'opération,
positionner sur OFF tous les Dip-switch, le led du récepteur radio émettra n. 10 clignotements pour confirmer l'opération.
Rétablir les sorties en modalité Normale: Dip-Switch 7= ON - Dip-Switch 8= ON - Dip-Switch 9= ON, sont rétablis les canaux individuels en modalité de simple mémorisation
sans leur effacement en mémoire (modalité Bistable, Timer T1 et Timer T2 sont annullés)
- Positionner sur ON le Dip-Switch rélatif au canal qu'on veut rétablir en modalité normale.
- Appuyer n'importe quel bouton d'une télécommande déjà mémorisée (Fig.2) pour au moins 5 secondes. Le led rouge de la radio clignote une fois pour confirmer.
- Important: terminée l'operation,
positionner sur OFF tous les Dips-switch, le led du récepteur radio émettra n°3 clignotements pour confirmer l'opération.
art. 4329
-ENFICHABLE
ENFICHABLE
Autoapprentissage
ON
OFF
OFF
Timer 1
Signal de sortie
Impulsion de la
télécommande
ON
OFF
OFF
Timer 2
sortie de 200ms
Impulsion de la
télécommande
Des. 5485
Diréctive 2003/108/CE
Elimination des matériaux
électriques et électroniques
INTERDIT JETER DANS LES DECHETS
MATERIAUX NUISIBLES POUR
L'ENVIRONNEMENT
F
12V
+
-
+
-
INSTRUCTIONS DU RECEPTEUR RADIO
ASTRO 43
ENFICHABLE
A
AUTOAPPRENTISSAGE -
MULTIFONCTION

FUNZIONI DELLA RADIO RICEVENTE ASTRO 43 M.Q.B. DA ESTERNO: I Dip-Switch dei telecomandi servono solo come codifica del codice personale, non sono abilitati alle funzioni
Memorizzazione di un canale radio: Dip-Switch 5= ON (procedura per la memorizzazione dei singoli pulsanti del telecomando sulla radio):
- Sul telecomando: aprirlo completamente e comporre il codice personale mediante il Dip-Switch interno (Fig.3), quindi dopo aver ricordato tale codice richiudere il tutto.
- Posizionare in ON uno dei Dip-Switch 1, 2, 3 o 4 della radio corrispondente al canale da memorizzare: il canale viene attivato inserendo il modulo rele' NA o NC sulla radio (Fig.1)
- Mantenere premuto un pulsante del telecomando che si vuole memorizzare (Fig.2), la radioricevente apprende il segnale e un lampeggio del led rosso conferma la memorizzazione:
ad ogni impulso del telecomando viene emesso un segnale che chiude (o apre se rele' NC) il contatto del relè NA all'uscita del canale memorizzato sulla radioricevente.
- Importante: terminata l'operazione
posizionare in OFF tutti i Dip-Switch, il led della radioricevente emetterà n°5 lampeggi di conferma.
N.B. Per memorizzare tutti i canali radio sui rispettivi pulsanti del telecomando in un unica operazione (1°pulsante con il 1° canale, 2° pulsante con il 2° canale,ecc.) posizionare i
Dip-Switch 1, 2, 3, 4 e 5 = ON, quindi completare l'operazione premendo un pulsante qualsiasi fino a visualizzare n°1 lampeggio del led.
Terminata l'operazione
posizionare in OFF tutti i Dip-Switch, il led della radioricevente emetterà n°5 lampeggi di conferma.
Cancellazione di un telecomando: Dip-Switch 6= ON (la memoria non riceve più il segnale dal telecomando, tuttavia rimane presente in memoria il codice del telecomando)
- Premere un pulsante qualsiasi del telecomando da cancellare (già memorizzato) (Fig.2):un lampeggio del led mi conferma la trasmissione ricevuta
- Posizionare in OFF il Dip-Switch 6: solo adesso la radioricevente cancella dalla memoria il telecomando, confermando con n°6 lampeggi l'operazione
- Importante: terminata l'operazione posizionare in OFF tutti i Dip-Switch. Per cancellare piu' telecomandi bisogna ripetere l'intera operazione
Uscita Bistabile: Dip-Switch 7= ON, (è necessario prima memorizzare almeno un pulsante del telecomando) al primo impulso del telecomando si attiva il relè, mentre lo si disattiva
con il secondo impulso dello stesso pulsante (funzione passo-passo).
- Posizionare in ON uno dei Dip-Switch 1, 2, 3 o 4 corrispondente al canale radio da utilizzare in modalità bistabile e sul quale si è gia memorizzato un pulsante del telecomando
- Premere il pulsante del telecomando che si desidera rendere in modalità bistabile (Fig.2)
- Importante: terminata l'operazione
posizionare in OFF tutti i Dip-Switch, il led della radioricevente emetterà n°7 lampeggi di conferma dell'operazione.
Timer 1: Dip-Switch 8= ON, (è necessario prima memorizzare un pulsante del telecomando sul quale si desidera applicare la funzione):
con un impulso del telecomando si attiva l'uscita del canale selezionato per il tempo impostato, trascorso il quale si disattiva da solo.
- Posizionare in ON uno dei Dip-Switch 1, 2, 3 o 4 corrispondente al canale radio da utilizzare in modalità timer 1
- Premere il 1° pulsante del telecomando (Fig.2) per tante volte quanti sono i minuti da memorizzare (max 15 minuti)
- Premere il 2° pulsante del telecomando (Fig.2) per tante volte quanti sono i
secondi da memorizzare
NB: Ad ogni pressione dei pulsanti attendere lo spegnimento del led come avvenuta memorizzazione del tempo.
- Terminata l'operazione posizionare in OFF tutti i Dip-Switch, il led della radioricevente emetterà i lampeggi per il tempo impostato:
lampeggi lunghi per i minuti, lampeggi corti per i secondi, dopo una breve pausa la radioricevente emette n°8 lampeggi di conferma.
Se durante il conteggio del timer la radio riceve un impulso dal pulsante abilitatato con il Timer 1 (quest'ultimo superiore i 3 secondi), si disattiva l'uscita.
Timer 2: Dip-Switch 9= ON, (è necessario prima memorizzare un pulsante del telecomando sul quale si desidera applicare la funzione):
con un impulso del telecomando si attiva l'uscita del canale selezionato per una durata di 200ms, trascorso il tempo impostato, si riattiva
un secondo impulso per altri 200ms
- Posizionare in ON uno dei Dip-Switch 1, 2, 3 o 4 corrispondente al canale radio da utilizzare in modalità timer 2
- Premere il 1° pulsante del telecomando (Fig.2) per tante volte quanti sono i minuti da memorizzare (max 15 minuti)
- Premere il 2° pulsante del telecomando (Fig.2) per tante volte quanti sono i
secondi da memorizzare
NB: Ad ogni pressione dei pulsanti attendere lo spegnimento del led come avvenuta memorizzazione del tempo.
- Terminata l'operazione posizionare in OFF tutti i Dip-Switch, il led della radioricevente emetterà i lampeggi per il tempo impostato:
lampeggi lunghi per i minuti, lampeggi corti per i secondi, dopo una breve pausa la radioricevente emette n°9 lampeggi di conferma
Se durante il conteggio del timer la radio riceve un impulso dal pulsante abilitato con il Timer 2 (quest'ultimo superiore i 3 secondi), emette il 2° impulso e termina il conteggio.
Cancellazione totale della memoria: Dip-Switch 10= ON, viene cancellata totalmente la memoria della radioricevente.
- Premere un pulsante qualsiasi di un telecomando gia' memorizzato (Fig.2) per almeno 5 secondi. Il led rosso della radio si accende fino alla conclusione dell'operazione.
- Importante: terminata l'operazione
posizionare in OFF tutti i Dip-Switch, il led della redioricevente emetterà n°10 lampeggi di conferma dell'operazione
Ripristinare le uscite in modalità Normale: Dip-Switch 7= ON - Dip-Switch 8= ON - Dip-Switch 9= ON, vengono ripristinati i singoli canali in modalita' di semplice memorizzazione
senza la loro cancellazione in memoria (modalità Bistabile, Timer T1 e Timer T2 vengono annullati)
- Posizionare in ON il Dip-Switch corrispondente al canale da ripristinare in modalita' normale.
- Premere un pulsante qualsiasi di un telecomando gia' memorizzato (Fig.2) per almeno 5 secondi. Il led rosso della radio da un lampeggio di conferma.
- Importante: terminata l'operazione posizionare in OFF tutti i Dip-Switch, il led della radioricevente emetterà n°3 lampeggi di conferma dell'operazione
DIP-SWITCH DELLA SOLA RADIORICEVENTE ASTRO 43 DA ESTERNO
Dip 1= ON Attiva il Relè 1 (1° Canale)
Dip 2= ON Attiva il Relè 2 (2° Canale)
Dip 3= ON Attiva il Relè 3 (3° Canale)
Dip 4= ON Attiva il Relè 4 (4° Canale)
Dip 5= ON abilita la memorizzazione dei canali radio
Dip 6= ON abilita la cancellazione di un solo telecomando
Dip 7= ON abilita la funzione Bistabile
Dip 8= ON abilita la funzione Timer T1 (1sec ÷ 15min)
Dip 9= ON abilita la funzione Timer T2 (1sec ÷ 15min)
Dip10= ON abilita la funzione che cancella tutta la memoria
RADIO RICEVENTE 433.92MHz: scheda radio da esterno per la ricezione
di un segnale radio a 433.92MHz ad autoapprendimento.
Avvertenze: non esporre la radioricevente a sorgenti elettromagnetiche
o di calore.
Caratteristiche tecniche:
Frequenza di funzionamento 433,92MHz ± 75KHz
Valore frequenza intermedia 500 KHz
Massima potenza emissioni parassite 2 nW
Valore impedenza antenna 50 Ohm
Sensibilità 1,5 μV
Alimentazione in CC e CA 12÷24V cc e ca
Assorbimento 20 mA ca
Temperatura di funzionamento -20°C +55°C
Tempo ritardo di sicurezza 150msec
Portata contatto relè 0,5A - 125V ca
Grado di protezione IP53
Portata di ricezione 120 metri
Canali radio Esterno 4
Numero telecomandi in memoria 800
1° Relè (di serie)= abilita 1° Canale
2° Relè= abilita 2° Canale
3° Relè= abilita 3° Canale
4° Relè= abilita 4° Canale
1°
2°
3°
4°
Alimentazione 12V o 24V cc/ca
dal programmatore serie Elpro
Moduli (
non di serie) NA oppure
NC per l'attivazione dei canali radio:
Dip -Switch delle funzioni
IMPORTANTE: perchè si abbia un'uscita ai
morsetti della radio bisogna che tutti i suoi
Dip-Switch siano in posizione OFF
!
Antenna
Birio A8 con
cavo RG58
Moduli NA
antenna RG 58
1234567891011 12
1°
24V
2° 3° 4°
1° pulsante
2° pulsante
1° pulsante
2° pulsante
1° pulsante
2° pulsante
3° pulsante
4° pulsante
Dip -Switch per la codifica,
non sono abilitati per le
funzioni
12V
+
-
+
-
Dip -Switch per la
codifica, non sono
abilitati per le funzioni
Strip per selezionare
l'alimentazione 12V o 24V cc/ca
24V cc/ca
12V cc/ca
ON
OFF
OFF
Timer 1
Segnale di uscita
Impulso dal
telecomando
ON
OFFOFF
Timer 2
uscita di 200ms
Impulso dal
telecomando
Fig. 3
Fig. 2
Fig. 1
12V
Astro 43
91
73
27
ASTRO
43 Q.
Memoria
estraibile
Led rosso
Dis. 5486
I
Direttiva 2003/108/CE
Smaltimento dei materiali
elettrici ed elettronici
VIETATO GETTARE NEI RIFIUTI
MA
TERIALI NOCIVI PER
L'AMBIENTE
I
da ESTERNO
Autoapprendimento
cod. 4327
- ESTERNO
Astro 43 Piccolo
FUNKTIONEN DES FUNKEMPFÄNGERS ASTRO 43 FÜR AUFPUTZMONTAGE:
Die Dip-Schalter der Handsender werden nur zur Kodifizierung des persönlich gestalteten Code
verwendet,
keine Funktionen sind durch sie möglich
Speicherung eines Funkkanals: Dip-Schalter 5= ON (Speichervorgang der einzelnen Druckknöpfe des Handsenders im Funkempfänger):
- Handsender: das Gehäuse öffnen und den Code durch die innere Dip-Schalter eingeben (Abb.3), den Code aufschreiben und endlich alles wiederzusammensetzen.
- Auf ON einen der Dip-Schalter 1, 2, 3 oder 4 des Funkempfängers, der dem Kanal entspricht, der zu speichern ist, stellen: der Kanal wird betätigt, indem man das Relaismodul
NO oder NC auf den Empfänger aufsteckt. (Abb.1)
- Den Handsender Druckknopf, den man kodifizieren will, gedrückt halten, (Abb.2), der Empfänger wird den Signal erlernen und durch ein Blinken der roten Led wird die Speicherung
bestätigt: bei jedem Impulsgabe des Handsenders wird einen Signal gesendet, der den Relaiskontakt NO in der Empfänger-Ausgang, die dem gespeicherten Kanal entspricht,
schliesst (oder öffnet wenn das Relais NC ist).
- Wichtig: wenn diese Operation beendet ist,
alle Dip-Schalter auf OFF stellen, die Led des Funkempfängers wird 5 Male zur Bestätigung blinken.
N.B. Um alle Funkkanäle auf die entsprechenden Handsenderdruckknöpfen durch eine einzige Operation zu speichern (1.Druckknopf mit dem 1.Kanal, 2. Druckknopf mit dem
2. Kanal,etc.) die Dip-Schalter 1, 2, 3, 4 und 5 = ON stellen, dann wird die Operation durchgeführt, indem man jeden beliebigen Druckknopf drückt, bis wann die Led einmal blinkt.
Wann der Vorgang beendet
alle Dip-Schalter auf OFF stellen, die Led des Funkempfängers wird 5 Male zur Bestätigung blinken.
Löschen eines Handsenders: Dip-Schalter 6= ON (der Speicher empfängt kein Signal mehr vom Handsender, jedoch bleibt den Handsender-Code im Speicher)
- Jeden beliebigen Handsender-Druckknopf, der zu löschen ist, (früher gespeichert) drücken (Abb.2): die Led blinkt einmal zur Bestätigung dass die Sendung empfängt wurde.
- Dip-Schalter 6 auf OFF stellen: nur auf diesem Punkt löscht der Empfänger den Handsender und die Led blinkt 6 Male, um die Operation zu bestätigen
- Wichtig: wenn den Vorgang beendet ist, alle Dip-Schalter auf OFF stellen. Um mehrere Handsender zu löschen, den Vorgang wiederholen.
Bistabiler Ausgang: Dip-Schalter 7= ON, (zuerst muss man mindestens einen Handsender-Druckknopf speichern) der erste Impulsgabe vom Handsender betätigt das Relais,
während bei dem zweiten Impulsgabe vom selben Druckknopf das Relais ausgeschaltet wird (Schrittweise-Funktion) .
- Einen der Dip-Schalter 1, 2, 3 oder 4, der dem Funkkanal entspricht, welche als bistabiler Modus zu verwenden ist, auf ON stellen und auf denen einen Handsender-Druckknopf
bereits gespeichert wurde.
- Den Handsender-Druckknopf drücken, der als bistabiler Modus zu verwenden ist. (Abb.2)
- Wichtig: wenn die Operation beendet ist, alle Dip-Schalter auf OFF stellen, die Led des Funkempfängers wird 7 Male zur Bestätigung blinken.
Timer 1: Dip-Schalter 8= ON, (zuerst muss man einen Handsender-Druckknopf speichern, auf denen die Funktion eingesetzt werden muss.):
durch einen Impulsgabe des Handsenders wird der Ausgang des gewählten Kanals die eingestellte Zeit lang betätigt, ist diese Zeit
abgelaufen, schaltet der Ausgang selbst aus.
- Einen der Dip-Schalter 1, 2, 3 oder 4, der dem Funkkanal entspricht, welcher als Timer 1 zu verwenden ist, auf ON stellen.
- Den 1. Druckknopf des Handsenders (Abb.2) drücken, so viele Male, als die angeforderte
Minute zu speichern sind. (Max 15 Minute)
- Den 2. Druckknopf des Handsenders (Abb.2) drücken, so viele Male, als die angeforderte
Sekunden zu speichern sind.
NB:
Bei jedem Drucken der Druckknöpfe darauf warten, dass die Led auslöscht, als Bestätigung der Zeitspeicherung.
- Wann der Vorgang beendet ist alle Dip-Schalter auf OFF stellen, die Led des Funkempfängers blinkt soviele Male, als die einsgestellte Zeit:
lange Blinken für die Minute, kurze Blinken für die Sekunden. Nach einer kunzen Pause blinkt der Empfänger 8 Male zur Bestätigung.
Wird der Empfänger während der Betätigung des Timers 1 einen Impuls (länger als 3 Sekunden) vom vorher gesetzten
Handsender-Druckknopf empfangen, der Ausgang wird ausgeschaltet.
Timer 2: Dip-Schalter 9= ON, (zuerst muss man mindestens einen Handsender-Druckknopf speichern, auf denen die Funktion eingesetzt
werden muss.): durch eine Impulsgabe des Handsenders wird der Ausgang des gewählten Kanals 200ms lang betätigt, ist diese Zeit
abgelaufen, wird einen zweiten Impuls 200ms lang wieder betätigt.
- Einen der Dip-Schalter 1, 2, 3 oder 4, der dem Funkkanal entspricht, welcher als Timer 2 zu verwenden ist, auf ON stellen.
- Den 1. Druckknopf des Handsenders (Abb.2) drücken, so viele Male, als die angeforderte Minute zu speichern sind. (Max 15 Minute)
- Den 2. Druckknopf des Handsenders (Abb.2) drücken, so viele Male, als die angeforderte Sekunden zu speichern sind.
NB: Bei jedem Drucken der Druckknöpfe darauf warten, dass die Led erlischt, als Bestätigung der Zeitspeicherung.
- Wann der Vorgang beendet ist
alle Dip-Schalter auf OFF stellen, die Led des Funkempfängers blinkt soviele Male, als die einsgestellte Zeit:
lange Blinken für die Minute, kurze Blinken für die Sekunden. Nach einer kunzen Pause blinkt der Empfänger 9 Male zur Bestätigung.
Wird der Empfänger während der Betätigung des Timers 2 einen Impuls (länger als 3 Sekunden) vom vorher gesetzten Handsender-Druckknopf empfangen, sendet er den 2. Impuls
und die Funktion ist damit beendet.
Völliges Löschen des Speichers: Dip-Schalter 10= ON, der Speicher des Empfängers wird völlig gelöscht.
- Jeden beliebigen Hansender-Druckknopf (früher gespeichert)(Abb.2) mindestens 5 Sek. lang drücken, die rote Led des Empfängers bleibt an, bis wann die Operation beendet ist.
- Wichtig: wenn die Operation beendet ist, alle Dip-Schalter auf OFF stellen, die Led des Funkempfängers wird 10 Male zur Bestätigung blinken.
Die Ausgänge in das standard Modus rücksetzen: Dip-Schalter 7= ON - Dip-Schalter 8= ON - Dip-Schalter 9= ON, die einzelnen Kanäle werden im Speicher gehalten (aber
jede vorherige Funktion, wie Bistabile, Timer T1 und Timer T2 wird gelöscht)
- Der Dip-Schalter der dem Funkkanal entspricht, welche in das standard Modus rückzusetzen ist, auf ON stellen.
- Jeden beliebigen Hansender-Druckknopf (früher gespeichert)(Abb.2) mindestens 5 Sek. lang drücken, die rote Led des Empfängers blinkt einmal zur Bestätigung
- Wichtig: wenn die Operation beendet ist, alle Dip-Schalter auf OFF stellen, die Led des Funkempfängers wird 3 Male zur Bestätigung blinken.
FUNKEMPFÄNGER 433.92MHz: Funkempfänger für Aufputzmontage
mit Selbsterlernung, wird durch Funksignal zu 433.92MHz betätigt.
ANWEISUNG: den Empfänger von elektromagnetischen oder warmen
Quellen entfernt halten.
Technische Daten:
Funkfrequenz 433,92MHz ± 75KHz
Mittlere Frequenz Wert 500 KHz
Streuausstrahlung Höchstleistung 2 nW
Antennenimpedanz 50 Ohm
Empfindlichkeit 1,5 μV
Stromversorgung mit DC u. AC 12÷24V dc u. ac
Stromaufnahme 20 mA ac
Betriebstemperatur -20°C +55°C
Sicherheitsverzugszeit 150mSec
Belastbarkeit Kontakt Relais 0,5A - 125V ac
Schutzgrad IP53
Empfangsreichweite 120 Meter
Externen Funkkanal 4
Anzahl der Kanäle im Speicher 800
WICHTIG: um einen Ausgang an den
Funkempfänger Klemmen zu haben, müssen
alle Dip-Schalter auf OFF gestellt werden
!
Astro 43 Klein
1. Druckknopf
2. Druckknopf
1. Druckknopf
2. Druckknopf
1. Druckknopf
2. Druckknopf
3. Druckknopf
4. Druckknopf
Dip -Schalter nur für die
Kodifizierung, keine Funktion
ist durch sie möglich
12V
+
-
+
-
Dip -Schalter nur für
die Kodifizierung, keine Funktion
ist durch sie möglich
Abb. 3
Abb. 2
12V
Astro 43
91
73
27
Zeichn. 5486
D
zum AUFPUTZ
Selbsterlernung
Art. 4327
- AUFPUTZ
Richtlinie 2003/108/EG
Entsorgung von elektrischen und
elektronischen Materialien
NICHT ZUM HAUSMÜLL WERFEN
UMWEL
TSCHÄDLICHE
MATERIALIEN
D
DIP-SCHALTER NUR IM AUFPUTZ-FUNKEMPFÄNGER ASTRO 43
Dip 1= ON betätigt Relais 1 (1. Kanal)
Dip 2= ON betätigt Relais 2 (2. Kanal)
Dip 3= ON betätigt Relais 3 (3. Kanal)
Dip 4= ON betätigt Relais 4 (4. Kanal)
Dip 5= ON ermöglicht die Speicherung der Funkkanäle
Dip 6= ON ermöglicht das Löschen von einem Handsender
Dip 7= ON ermöglicht die Bistabile Funktion
Dip 8= ON ermöglicht die Funktion Timer T1 (1Sek. ÷ 15Min)
Dip 9= ON ermöglicht die Funktion Timer T2 (1Sek. ÷ 15Min)
Dip10= ON ermöglicht die Funktion Löschen des ganzen Speichers
ON
OFF
OFF
Timer 1
Ausgang-Signal
Impulsgabe
vom Handsender
ON
OFFOFF
Timer 2
Ausgang
von 200ms
Impulsgabe
vom Handsender
1. Relais (standard)= ermöglicht 1. Kanal
2. Relais= ermöglicht 2. Kanal
3. Relais= ermöglicht 3. Kanal
4. Relais= ermöglicht 4. Kanal
1°
2°
3°
4°
Versorgung 12V oder 24V dc/ac
aus der Steuerung Typ Elpro
Module (
nicht standard) NO oder NC
für die Betätigung der Funkkanäle:
Dip-Schalter der Funktionen
Antenne
Birio A8 mit
Kabel RG58
NO Module
Antenne RG 58
1234567891011 12
1°
24V
2° 3° 4°
Strip zur Auswahl der
Stromversorgung 12V oder 24V dc/ac
24V dc/ac
12V dc/ac
Abb. 1
Astro
herausziehbarer
Speicher
rote Led

FUNCTIONS OF THE RADIO RECEIVER ASTRO 43 EXTERNAL: the Dip-Switches in the transmitters are only to encode the user's code, no function can be made able by them
Memorizing one radio channel: Dip-Switch 5= ON (procedure to memorize the single transmitter buttons in the receiver):
- Transmitter: open the casing and set the user's code by means of the internal Dip-Switches (Pic.3), record it down to prevent forgetting it, and re-assemble the unit.
- Set to ON one of the Dip-Switches 1, 2, 3 or 4 in the receiver corresponding to the channel to memorize: the channel is activated by fitting the relay module, either NO or NC in
the receiver connector (Pic.1)
- Press and hold a transmitter button (Pic.2), the receiver learns the signal and the red led flashes to confirm memorizing:
each pulse with the transmitter emits a signal that closes the relay NO contact (or opens it, if the relay is NC) in the receiver output, corresponding to the memorized channel.
- Important: once this operation is finished
set all the Dip-switches on to OFF. The receiver led flashes 5 times to confirm.
N.W. In order to match all the radio channels with the respective transmitter buttons by a single operation (button 1 with channel 1, button 2 with channel 2, and so on.) set the
Dip-Switches 1, 2, 3, 4 and 5 = ON, carry on the memorizing operation as before, by pressing and holding any one button of the transmitter until the led flashes 1 time.
Once the operation is finished
set all the Dip-switches on to OFF. The receiver led flashes 5 times to confirm.
Deleting one transmitter: Dip-Switch 6= ON (the memory does not receive any signal from that transmitter any longer, but the transmitter code remains in the memory)
- Press any one button of the transmitter to be deleted (previously memorized) (Pic.2): the led flashes 1 time to confirm that the signal is received
- Set on to OFF the Dip-Switch 6: only at this stage, the radio receiver deletes the transmitter from the memory, and the led flashes 6 times to confirm the operation as accomplished
- Important: once the operation is finished,
set all the Dip-Switches on to OFF. in order to delete more transmitters, repeat the entire operation
Bistable Output: Dip-Switch 7= ON, (first, it is necessary to memorize at least one transmitter button): the first pulse from the transmitter enables the relay, whereas the second
pulse from the same transmitter button disables it (step-by-step function).
- Set to ON one of the Dip-Switches 1, 2, 3 or 4 corresponding to the radio channel required to be used as bistable mode and to the transmitter button as previously memorized
- Press the transmitter button required to operate on bistable mode (Pic.2)
- Important: once the operation is finished
set all the Dip-Switches to OFF, the led in the receiver flashes 7 times to confirm the accomplished operation
Timer 1: Dip-Switch 8= ON, (first, it is necessary to memorize the transmitter button by means of which the function is carried out):
on pulsing the transmitter button, the output of the selected channel is activated for a time as pre-set, on expiring of which, it is
automatically deactivated
- Set to ON one of the Dip-Switches 1, 2, 3 or 4 corresponding to the radio channel required to be used as mode timer 1
- Press the button 1 of the transmitter (Pic.2) as many times as the
minutes required to be memorized (max 15 minutes)
- Press the button 2 of the transmitter (Pic.2) as many times as the
seconds required to be memorized
NW:
After each pressing of the buttons, wait for the led to go off as a confirmation that the time has been memorized.
- Once the operation is finished,
set all the Dip-Switches to OFF, the led in the receiver flashes as many times as follows:
long flashes as the minutes, short flashes as the seconds. After a short pause, the receiver led flashes 8 times to confirm.
On operating phase, a pulse to the receiver from the transmitter button on mode Timer 1 (superior to 3 seconds) disables the output and stops the operation.
Timer 2: Dip-Switch 9= ON, (first, select and memorize the transmitter button by means of which this function is carried out):
a pulse from the transmitter activates the selected channel output for 200ms, after the time as pre-set, a second pulse
is released for another 200ms
- Set to ON one of the Dip-Switches 1, 2, 3 or 4 corresponding to the radio channel to be used as mode timer 2
- Press the button 1 of the transmitter (Pic.2) as many times as the
minutes required to be memorized (max 15 minutes)
- Press the button 2 of the transmitter (Pic.2) as many times as the
seconds required to be memorized
NW:
After each pressing of the buttons, wait for the led to go off as a confirmation that the time has been memorized
- Once the operation is finished,
set all the Dip-Switches to OFF, the led in the receiver flashes as many times as follows:
long flashes as the minutes, short flashes as the seconds. After a short pause, the receiver led flashes 9 times to confirm.
On operating phase, a pulse to the receiver from the transmitter button on mode Timer 2 (superior to 3 seconds) gives out the 2nd pulse and stops the operation.
Deleting the total memory: Dip-Switch 10= ON, the memory of the receiver is deleted in total
- Press any one button of the transmitter, provided it is already in the memory (Pic.2), for at least
5 seconds. The red led of the receiver stays on until the operation is finished.
- Important: Once the operation is finished,
set all the Dip-Switches to OFF, the led in the receiver flashes 10 times to confirm the operation is accomplished
Set the outputs back to Standard mode: Dip-Switch 7= ON - Dip-Switch 8= ON - Dip-Switch 9= ON, the single channels are kept in the memory (but all previous settings such
as Bistable, Timer T1 and Timer T2 modes are cancelled)
- Set to ON the Dip-Switch corresponding to the channel to be set back to Standard Mode.
- Press any one button of the transmitter, provided it is already in the memory (Pic.2), for at least
5 seconds. The red led in the receiver flashes once to confirm.
- Important:Once the operation is finished,
set all the Dip-Switches to OFF, the led in the receiver flashes 3 times to confirm the operation is accomplished
DIP-SWITCHES ONLY IN THE RADIO RECEIVER ASTRO 43 EXTERNAL
Dip 1= ON Operates Relay 1 (Channel 1)
Dip 2= ON Operates Relay 2 (Channel 2)
Dip 3= ON Operates Relay 3 (Channel 3)
Dip 4= ON Operates Relay 4 (Channel 4)
Dip 5= ON enables memorization of the radio channels
Dip 6= ON enables delete one transmitter only
Dip 7= ON enables the function Bistable
Dip 8= ON enables the function Timer T1 (1sec ÷ 15min)
Dip 9= ON enables the function Timer T2 (1sec ÷ 15min)
Dip10= ON enables the function delete all memory
RADIO RECEIVER 433.92MHz: self-learning, for external application
to operate with a 433.92MHz radio signal
Please note: do not expose the receiver to electro-magnetic or heat
sources
Technical specifications:
Working frequency 433.92MHz ± 75KHz
Intermediate frequency value 500 KHz
Stray emission max.power 2 nW
Aerial impedance value 50 Ohm
Sensitivity 1.5 μV
DC and AC power supply 12÷24V dc and ac
Absorption 20 mA ac
Working temperature -20°C +55°C
Safety delay time 150msec
Relay contact rating 0.5A - 125V ac
IP standards IP53
Distance range 120 metres
External radio channels 4
Number of transmitters in the memory 800
IMPORTANT: to have an output available with
the radio receiver terminals, all the Dip-Switches
in it must be set on to OFF
!
Astro 43 Small
Button 1
Button 2
Button 1
Button 2
Button 1
Button 2
Button 3
Button 4
Dip -Switches only for
encoding, no function can be
made able by them
12V
+
-
+
-
Dip -Switches only for
encoding, no function can
be made able by them
Pic. 3
Pic. 2
12V
Astro 43
91
73
27
Drwg. 5486
GB
EXTERNAL
Self-learning
code 4327
- EXTERNAL
Directive 2003/108/EC
Disposal of electric and
electronic material
DO NOT DISPOSE OF AS NORMAL
WASTE.
HARMFUL FOR THE ENVIRONMENT
GB
ON
OFF
OFF
Timer 1
Signal output
Pulse from the
transmitter
ON
OFFOFF
Timer 2
200ms output
Pulse from the
transmitter
Relay 1(standard)= enables Channel 1
Relay 2= enables Channel 2
Relay 3= enables Channel 3
Relay 4= enables Channel 4
1°
2°
3°
4°
Power supply 12V or 24V dc/ac
from control panel Elpro range
Modules (
non standard) NO or NC
to enable the radio channels:
Dip -Switches to select functions
Aerial
Birio A8 with
cable RG58
NO modules
aerial RG 58
1234567891011 12
1°
24V
2° 3° 4°
Strip to select power
supply either 12V or 24V dc/ac
24V dc/ac
12V dc/ac
Pic. 1
Astro
Removable
memory
Red led
FONCTIONS DU RECEPTEUR RADIO ASTRO 43 MODULAIRE: Les Dips-switch des télécommandes sont utiles seulement pour la codification du code personnel, ils ne sont
pas habilités aux fonctions.
Mémorisation d'un canal radio: Dip-Switch 5= ON (procédure pour la mémorisation des boutons individuels de la télécommande sur la radio):
- Sur la télécommande: l'ouvrir complètement et composer le code personnel avec le Dip-Switch interne (Fig.3). Il faut se rappeler ce code. Ensuite, fermer le tout.
- Positionner sur ON un des Dips-switch 1, 2, 3 ou 4 de la radio relative au canal à mémoriser: le canal est activé introduisant le module relais NO ou NF sur la radio (Fig.1)
- Tenir appuyé un bouton de la télécommande qu'on veut mémoriser (Fig.2), le récepteur radio apprend le signal et un clignotement du led rouge confirme la mémorisation: à chaque
impulsion de la télécommande est émis un signal qui ferme (ou ouvre si relais NF) le contact du relais NO à la sortie du canal mémorisé sur le récepteur radio.
- Important: terminée l'opération,
positionner sur OFF tous les Dips-switch, le led du récepteur radio emettra n°5 clignotements de confirmation.
N.B. Pour mémoriser tous les canaux radio sur les réspectifs boutons de la télécommande avec une seule opération (1° bouton avec le 1° canal, 2° bouton avec le 2° canal ecc.),
positionner les Dips-switch 1, 2, 3, 4 et 5 = ON, ensuite compléter l'opération appuyant n'importe quel bouton jusqu'à visualiser n°1 clignotement du led.
Terminée l'opération,
positionner sur OFF tous les Dips-switch. Le led du récepteur radio emettra n°5 clignotements de confirmation.
Effacement d'une télécommande: Dip-Switch 6= ON (la mémoire ne reçoit plus le signal de la télécommande, de toute façon le code de la télécommande reste dans la mémoire)
- Appuyer n'importe quel bouton de la télécommande à effacer (déjà mémorisée) (Fig.2): un clignotement du led me confirme la transmission reçue.
- Positionner sur OFF le Dip-Switch 6: maintenant, le récepteur radio efface la télécommande de la mémoire. L'opération est confirmée avec n°6 clignotements.
- Important: terminée l'opération,
positionner sur OFF tous les Dips-switch. Pour effacer plusieurs télécommandes, il faut répéter toute l'opération.
Sortie Bistable: Dip-Switch 7= ON, (avant tout, il faut mémoriser au moins un bouton de la télécommande) à la première impulsion de la télécommande, s'active le relais, qui se
désactive avec la deuxième impulsion de la même touche (fonction pas-pas).
- Positionner sur ON un des Dips-switch 1, 2, 3 ou 4 rélatif au canal radio qu'il faut utiliser en modalité bistable et sur lequel on a déjà mémorisé un bouton de la télécommande
- Appuyer le bouton de la télécommande qu'on veut en modalité bistable (Fig.2)
- Important: terminée l'opération,
positionner sur OFF tous les Dips-switch, le led du récepteur radio emettra n°7 clignotements pour confirmer l'opération.
Timer 1: Dip-Switch 8= ON, (avant tout, il faut mémoriser le bouton de la télécommande sur lequel on veut appliquer la fonction):
avec une impulsion de la télécommande s'active la sortie du canal seléctionné pour le temps établi, expiré ce temps elle se désactive.
- Positionner sur ON un des Dips-switch 1, 2, 3 ou 4 rélatif au canal radio qu'on veut utiliser en modalité timer 1
- Appuyer le 1° bouton de la télécommande (Fig.2) pour aussi bien fois que les
minutes qu'on doit mémoriser (max 15 minutes)
- Appuyer le 2° bouton de la télécommande (Fig.2) pour aussi bien fois que les
secondes qu'on doit mémoriser
NB:
A chaque pression des boutons, attendre l'extinction du led comme épreuve que la mémorisation du temps a été faite.
- Terminée l'opération,
positionner sur OFF tous les Dips-switch. Le led du récepteur radio émettra les clignotements pour le temps établi:
clignotements longs pour les minutes, clignotements courts pour les secondes. Après une petite pause, le récepteur radio émet n°8 clignotements de confirmation.
Si durant l'activation du timer, la radio réçoit une impulsion du bouton habilité avec le Timer 1 (ce dérnier supérieure à 3 sec.), la sortie se désactive.
Timer 2: Dip-Switch 9= ON, (avant tout, il faut mémoriser le bouton de la télécommande sur lequel on veut appliquer la fonction):
avec une impulsion de la télécommande s'active la sortie du canal sélectionné pour une durée de 200ms, après ce temps établi, se
réactive une deuxième impulsion pour 200ms encore.
- Positionner sur ON un des Dips-switch 1, 2, 3 ou 4 rélatif au canal radio qu'on veut utiliser en modalité timer 2
- Appuyer le 1° bouton de la télécommande (Fig.2) pour aussi bien fois que les
minutes qu'on veut mémoriser (max 15 minutes)
- Appuyer le 2° bouton de la télécommande (Fig.2) pour aussi bien fois que les
secondes qu'on veut mémoriser.
NB:
A chaque pression des boutons, il faut attendre l'éxtinction du led pour confirmer la mémorisation du temps.
- Terminée l'opération,
positionner sur OFF tous les Dips-switch. Le led du récepteur radio émettra des clignotements pour le temps établi:
clignotements longs pour les minutes, clignotements courts pour les secondes. Après une petite pause le récepteur radio émet n°9 clignotements de confirmation
Si durant l'activation du timer, la radio réçoit une impulsion du bouton habilité avec le Timer 2 (ce dérnier supérieure à 3 secondes), émet la 2° impulsion et termine la fonction.
Effacement totale de la mémoire: Dip-Switch 10= ON, on efface totalement la mémoire du récepteur radio.
- Appuyer n'importe quel bouton d'une télécommande déjà mémorisée (Fig.2) pour
5 secondes au moins. Le led rouge de la radio s'allume jusqu'à la conclusion de l'opération.
- Important: terminée l'opération,
positionner sur OFF tous les Dips-switch, le led du récepteur radio émettra n. 10 clignotements pour confirmer l'opération.
Rétablir les sorties en modalité Normale: Dip-Switch 7= ON - Dip-Switch 8= ON - Dip-Switch 9= ON, sont rétablis les canaux individuels en modalité de simple mémorisation
sans leur effacement en mémoire (modalité Bistable, Timer T1 et Timer T2 sont annullés)
- Positionner sur ON le Dip-Switch rélatif au canal qu'on veut rétablir en modalité normale.
- Appuyer n'importe quel bouton d'une télécommande déjà mémorisée (Fig.2) pour au moins
5 secondes. Le led rouge de la radio clignote une fois pour confirmer.
- Important: terminée l'operation,
positionner sur OFF tous les Dips-switch, le led du récepteur radio émettra n°3 clignotements pour confirmer l'opération.
DIP-SWITCH SEULEMENT DU RECEPTEUR RADIO ASTRO 43 MODULAIRE
Dip 1=ON Active le Relais 1 (1° Canal)
Dip 2=ON Active le Relais 2 (2° Canal)
Dip 3=ON Active le Relais 3 (3° Canal)
Dip 4=ON Active le Relais 4 (4° Canal)
Dip 5=ON habilite la mémorisation des canaux radio
Dip 6= ON habilite l'effacement d'une télécommande seulement
Dip 7=ON habilite la fonction Bistable
Dip 8=ON habilite la fonction Timer T1 (1sec ÷ 15min)
Dip 9=ON habilite la fonction Timer T2 (1sec ÷ 15min)
Dip10=ON habilite la fonction qui efface toute la mémoire
Des. 5486
F
RECEPTEUR RADIO 433.92MHz: carte radio modulaire pour la réception
d'un signal radio à 433.92MHz à autoapprentissage.
Avertissements: pas exposer le récepteur radio à sources
électromagnétiques ou de chaleur.
Données techniques:
Fréquence de fonctionnement 433,92MHz ± 75KHz
Valeur fréquence intermédiaire 500 KHz
Puissance max. émissions parasites 2 nW
Valeur impédence antenne 50 Ohm
Sensibilité 1,5 μV
Alimentation en CC et CA 12÷24V cc et ca
Consommation 20 mA ca
Température de fonctionnement -20°C +55°C
Durée retard de sécurité 150m sec
Contact relais 0,5A - 125V ca
Degrée de protection IP53
Portée réception 120 mètres
Canaux radio Extérieurs 4
Numéro télécommandes en mémoire 800
1° Relais (de série)= met en service
1° Canal
2° Relais=habilite 2° Canal
3° Relais=habilite 3° Canal
4° Relais=habilite 4° Canal
1°
2°
3°
4°
Alimentation 12V ou 24V cc/ca
du programmateur série Elpro
Modules (
non de série) NO ou NF
pour l'activation des canaux radio:
Dips -Switch des fonctions
IMPORTANT: afin que il y ait une sortie aux
bornes de la radio, il faut que tous ses
Dip-switch soient en position OFF
!
Antenne
Birio A8 avec
câble RG58
Modules NO
antenne RG 58
1234567891011 12
1°
24V
2° 3° 4°
Dips -Switch pour le codage,
ne sont pas habilités pour
les fonctions
12V
+
-
+
-
Dips -Switch pour le codage,
ne sont pas habilités pour
les fonctions
Diréctive 2003/108/CE
Elimination des matériaux
électriques et électroniques
INTERDIT JETER DANS LES DECHETS
MATERIAUX NUISIBLES POUR
L'ENVIRONNEMENT
F
Strip pour sélectionner
l'alimentation 12V ou 24V cc/ca
24V cc/ca
12V cc/ca
ON
OFF
OFF
Timer 1
Signal de sortie
Impulsion de la
télécommande
ON
OFF
OFF
Timer 2
sortie de 200ms
Impulsion de la
télécommande
Fig. 3
Fig. 1
12V
Astro
Mémoire
extractible
Led rouge
pour EXTERIEUR
Autoapprentissage
art. 4327
- EXTERIEUR
Astro 43 Petit
1° bouton
2° bouton
1° bouton
2° bouton
1° bouton
2° bouton
3° bouton
4° bouton
Fig. 2
Astro 43
91
73
27

NOUVELLE RECEPTEUR RADIO
ENFICHABLE ASTRO 43
1 - Dip-switch pour codifier
2 - Ponts 2
ème
canal: pour choisir le
poussoir émetteur de 1 à 4 max.
3 - Ponts 1
ère
canal: pour choisir le
poussoir émetteur de 1 à 4 max.
4 - Borne de raccordement 2
ème
canal
(R 2) contact N.F. et N.O. et antenne
5 - Connecteur enfichable femelle
1
ère
canal (R 1)
6 - Relais pour actionner le 2
ème
canal
7 - Relais pour actionner le 1
ère
canal
8 - Cavalier de contact ponts 1
ère
canal
9 - Cavalier de contact ponts 2
ème
canal
10 - Connecteur enfichable mâle
11 - Programmateur électronique série Elpro
Carte enfichable pour récepteur radio “Astro 43/2 R”
avec oscillateur (SAW) complet de deux modules
relais pour le 1
ère
et 2
ème
canal fréquence
433,92 MHz
Code Art. 4312
NEW PLUG-IN RADIO RECEIVER
CARD ASTRO 43
1 - Dip-switches for secret encoding
2 - Pins for channel 2: any one
transmitter button 1 to 4 can be selected
3 - Pins for channel 1: any one
transmitter button 1 to 4 can be selected
4 - Terminal to connect N.O. - N.C.
channel No.2 (R 2) and aerial
5 - Female plug-on connector channel 1 (R 1)
6 - Relay to activate channel No. 2
7 - Relay to activate channel No. 1
8 - Contact insert pins channel 1
9 - Contact insert pins channel 2
10 - Male plug-on connector
11 - Electronic programmer Elpro series
Plug-in radio receiver card type “Astro 43/2 R”
fitted with (SAW) stabilized oscillator, complete
with two relay modules for channels 1 and 2,
433,92 MHz
Item Code No. 4312
NUOVA SCHEDA RICEVENTE
ASTRO 43 AD INNESTO
1 - Dip-switch per la codifica del codice segreto
2 - Ponticelli 2° canale: scelta da 1 a 4
pulsanti del trasmettitore
3 - Ponticelli 1° canale: scelta da 1 a 4
pulsanti del trasmettitore
4 - Morsetto di collegamento 2° canale
(R 2) contatto N.C.-N.A. e antenna
5 - Connettore ad innesto femmina 1° canale (R 1)
6 - Relé per attivare il 2° canale
7 - Relé per attivare il 1° canale
8 - Inserto di contatto ponticelli 1° canale
9 - Inserto di contatto ponticelli 2° canale
10 - Connettore ad innesto maschio
11 - Programmatore elettronico serie Elpro
Scheda ad innesto radio ricevente “Astro 43/2 R”
con oscillatore stabilizzato (SAW) completa di
due moduli relé per il 1° e 2° canale, frequenza
433,92 MHz
Cod. Art. 4312
Dis. N.
4045
®
I
- ad innesto
- plug-in
- enfichable
43
Astro
SAW
GB F
1
2
3
4
5
6
7
89
10
11
0678
1
2
2
N.C.
C.
N.A.
GND
ANT.
Via Mantova, 177/A - 37053 Cerea (Verona) Italy - Tel. +39 0442 330422 r.a.
Fax +39 0442 331054 - e-mail: info@fadini.net - www.fadini.net
1
1
1
1
2
2
2
2
3
3
3
3
4
4
4
4
1
1
2
3
4
R1
R2
1
2
3
4
5
6
7
8
9
1
0
N.C.
C
N.A.
GND
ANT.
I.T.F
.
ASTRO 43
INNESTO
R2
R1
R2
R1

N.C.
C.
N.A.
GND
ANT.
NIEUWE ONTVANGSTKAART
ASTRO 43 MET KOPPELING
1 - Dip-switch voor de codering van de
geheime code
2 - Geleiderbruggen 2
e
kanaal: keuze
uit 1 tot 4 drukknoppen van de zender
3 - Geleiderbruggen 1
e
kanaal: keuze
uit 1 tot 4 drukknoppen van de zender
4 - Verbindingsklem 2
e
kanaal (R2) normaal
geopend, normaal gesloten contact en antenne
5 - Vrouwtjes-koppelingsconnector
1
e
kanaal (R1)
6 - Relais om het 2
e
kanaal te activeren
7 - Relais om het 1
e
kanaal te activeren
8 - Inzetcontact geleiderbruggen 1
e
kanaal
9 - Inzetcontact geleiderbruggen 2
e
kanaal
10 - Mannetjes-koppelingsconnector
11 - Elektronische programmeereenheid Elpro serie
Koppelingskaart ontvangstradio “Astro 43/2 R”
met gestabiliseerde oscillator (SAW) compleet
met twee relaismodules voor het 1
e
en 2
e
kanaal,
frequentie 433,92 MHz
Art. cod. 4312
NUEVA FICHA RECEPTORA
ASTRO 43 ENCHUFABLE
1 - Dip-switch para codificar la clave secreta
2 - Puentes 2° canal: elección desde 1
hasta 4 pulsadores del transmisor
3 - Puentes 1er canal: elección desde 1
hasta 4 pulsadores del transmisor
4 - Borne de conexión 2° canal (R2)
contacto N.C.-N.A. y antena
5 - Conectador enchufable hembra
1er canal (R1)
6 - Relè para activar el 2° canal
7 - Relè para activar el 1er canal
8 - Pieza de contacto puentes 1er canal
9 - Pieza de contacto puentes 2° canal
10 - Conectador enchufable macho
11 - Programador electrónico serie Elpro
Ficha enchufable para radiorreceptor “Astro
43/2 R” con oscilador estabilizado (SAW),
completa de dos módulo relè para el 1er y 2°
canal, frecuencia 433,92 MHz
Cód. Art. 4312
NEUE EINSTECKPLATINE
FUNKEMPFÄNGER ASTRO 43
1 - Dip-switch zur Kodifizierung des
geheimen Codes
2 - 2. Kanal Anschlüsse: Wahl des
Sendersauslösers von 1 bis 4 max.
3 - 1. Kanal Anschlüsse: Wahl des
Sendersauslösers von 1 bis 4 max.
4 - Klemme 2. Kanal (R2) N.C. und N.O.
Anschluss und Antenne
5 - Einsteckverbinder Mutter des 1.Kanals (R1)
6 - Relais zur Steuerung des 2. Kanals
7 - Relais zur Steuerung des 1. Kanals
8 - Kontaktmodul für den 1. Kanal
9 - Kontaktmodul für den 2. Kanal
10 - Einsteckverbinder Zapfen
11 - Elektronische Steuerung Serie Elpro
Einsteck-Empfänger “Astro 43/2 R” mit
stabilisiertem Oszillator (SAW) komplett mit zwei
Relaismoduln für den 1. und 2. Kanal, Frequenz
433,92 MHz
Art. Nr. 4312
Dis. N.
4045
D
- Einsteckversion
- enchufable
- met koppeling
43
Astro
SAW
E NL
®
1
2
3
4
5
6
7
89
10
11
0678
1
2
2
Via Mantova, 177/A - 37053 Cerea (Verona) Italy - Tel. +39 0442 330422 r.a.
Fax +39 0442 331054 - e-mail: info@fadini.net - www.fadini.net
1
1
1
1
2
2
2
2
3
3
3
3
4
4
4
4
1
1
2
3
4
R1
R2
1
2
3
4
5
6
7
8
9
1
0
N.C.
C
N.A.
GND
ANT.
I.T.F
.
ASTRO 43
INNESTO
R2
R1
R2
R1
1/6