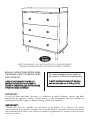
Babyletto Lolly 3-Drawer Changer Dresser Manuel utilisateur
- Taper
- Manuel utilisateur

Lolly 3-Drawer Changer Dresser Assembly Instructions
Commode à langer à trois tiroirs Lolly Manuel d’assemblage
Item# 9023
1
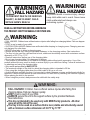
READ ALL INSTRUCTIONS BEFORE USE OF THE CHANGING TABLE, ADD-ON
CHANGING UNIT, OR CHANGING PAD.
WARNING!
!
LISEZ TOUTES LES INSTRUCTIONS AVANT D’UTILISER LA TABLE À LANGER,
L’UNITÉ COMPLÉMENTAIRE OU LE COUSSIN À LANGER.
AVERTISSEMENT!
!
revised 19JUN2020

2
* Tools Needed (not included)
* Outils requis (non inclus)
Phillips screwdriver
Tournevis cruciforme
* You will need two people to assemble
this 3-drawer changer dresser.
* Deux personnes sont nécessaires
pour assembler ce commode à langer
à trois tiroirs .
Thank you for purchasing a Babyletto nursery product! To ensure safe use of your product, please
follow these assembly instructions closely. If you are missing parts or have any questions, please
visit our website at www.babyletto.com/support.
For assembly, use the Allen wrench if it is included in the hardware box. We also recommend using
a Phillips head screwdriver (not included) to complete assembly. Please do not substitute parts or
use power screwdrivers. Due to the nature of our materials, some variation in color, grain, or texture
is to be expected.
We hope you and your growing family enjoy our product.
With thanks,
Babyletto
Nous vous remercions de votre achat d’un produit pour tout-petits Babyletto! Pour assurer une
utilisation sans risque du produit, veuillez suivre attentivement ces directives d’assemblage. Si des
pièces manquent ou si vous avez des questions, veuillez visiter notre site Web à l’adresse
www.babyletto.com/support.
Pour l’assemblage, utilisez la clé Allen si c’est fournie dans la boîte de quincaillerie. Nous vous
recommandons aussi d’utiliser un tournevis à tête cruciforme (non fourni) pour terminer
l’assemblage. Veuillez ne pas remplacer les pièces par des pièces similaires ni utiliser de tournevis
électriques. En raison de la nature de nos matériaux, il faut s’attendre à certaines variations sur le
plan de la couleur, du grain ou de la texture.
Nous espérons que vous et votre famille grandissante aimerez notre produit.
Un grand merci,
Babyletto

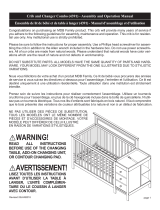
F. Dresser Foot (4)
F. Pied de
commode (4)
A-2. Left Side Panel
A-2. Panneau latéral
gauche
B-2. Right Side Panel
B-2. Panneau latéral
droit
K-1. Drawer bottom (3)
K-1 Fond de tiroir (3)
C-1. Top
C-1. Dessus
E-1. Base
E-1. Base
I-2. Right drawer side (3)
I-2. Côté droit de
tiroir (3)
J-2. Left drawer side (3)
J-2. Côté gauche de
tiroir (3)
G-3. Drawer front (3)
G-3. Façade de tiroir (3)
H-2. Drawer back (3)
H-2. Arrière de tiroir (3)
P-1. Finished Drawer Front (3)
P-1. Façade de tiroir de finition (3)
D. Back panel
D. Panneau arrière
3
PARTS • PIÈCES
Not to Scale/Pas à l'échelle

H1. 1-3/4” Phillips head bolt (4)
H1. Boulon à tête cruciforme
de 4,5 cm (1-3/4 po) (4)
H3. 1-1/4” Phillips head screw (24)
H3. Vis à tête cruciforme de
3,2 cm (1-1/4 po) (24)
H4. Cam bolt (12)
H4. Boulon de came (12)
H5. Cam lock (12)
H5. Verrou
decame (12)
H6. Small wood dowel (10)
H6. Petit goujon
de bois (10)
H7. Large wood dowel (8)
H7. Grand goujon
de bois (8)
E-1
F
F F
F
H10
H7
X4
F
H7
H10. 1-1/4” Knob Bolt (6)
H10. Vis de poignée
de 3,2 cm (1-1/4 po) (6)
H9. Knob (6)
H9. Poignée (6)
H11. 0.8 x 2 cm
wood dowel (6)
H11. 0.8 x 2 cm
Goujon de bois (6)
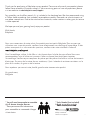
HARDWARE • ACCESSOIRES DE MONTAGE
Bolts in Actual Size/Boulons (taille réelle)
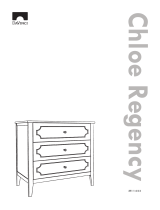
ASSEMBLY INSTRUCTIONS • INSTRUCTIONS D’ASSEMBLAGE
1
4
H12. 3/4” Phillips
headscrew (12)
H12. Vis à tête cruciforme
de 1,9 cm (3/4 po) (12)
H13. 9/16” Phillips
headscrew (12)
H13. Vis à tête cruciforme
de 1,4 cm (9/16 po) (12)

H4
X6
X5
H6
E-1
H4
H4
H6 H6
H6
H4 H4
H6 H4 H4 H6
E-1
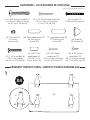
FF
F
H1
X4
H1
H1
H1
H1
2
3
5

E-1
H4
H4
H6 H6
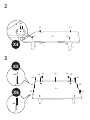
B-2A-2 B-2A-2
E-1
X4
H5H4
D
E-1
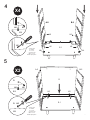
4
5
6
* Rotate H5
clockwise
to secure.
* Tourner H5
dans le sens
horaire pour fixer.
H5
H5
H5
H5
H5
D
E
E-1
X2
H5H4
D
E-1
* Rotate H5
clockwise
to secure.
* Tourner H5
dans le sens
horaire pour fixer.
H5
B-2A-2
H5H5

H4
X6
X5
H6
C-1
H4
H4
H6 H6
H6
H4 H4
H6 H4 H4 H6
C-1
A-2 B-2
C-1
X6
C-1C-1
H4
H5
6
7
7
* Rotate H5
clockwise
to secure.
* Tourner H5
dans le sens
horaire pour fixer.
H5

I-2
J-2
H3
H3
K-1
G-3
G-3
H3
H3
H-2
K-1
H12
H12
H11
H11
H12
H12
P-1
H9
H10
H9
H10
X2
H9
H10
P-1
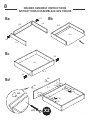
8
8
8a 8b
DRAWER ASSEMBLY INSTRUCTIONS
INSTRUCTIONS D'ASSEMBLAGE DES TIROIRS
8c
8d

9
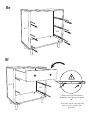
8e
8f
* Make sure that the drawer is
placed on the tabs on the glide
rails.
* S’assurer que le tiroir est bien
placé sur les onglets des
glissières.
A-2
B-2
A-2
B-2

10
X3
9
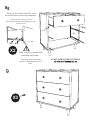
8g
* Screw the 9/16” wood screw (H13) in the
pre-drilled holes on the drawer side panels.
* Visser les vis à bois de 1,4 cm
(9/16 po) (H13) dans les avant-trous des
côtés du tiroir.
DO NOT OVERTIGHTEN THE SCREWS.
NE PAS TROP SERRER LES VIS.
X2
H13 H13
* Make sure that the glide touch
the drawer front panel.
* S'assurer que la glissière
touche le panneau avant du
tiroir.
A-2
B-2

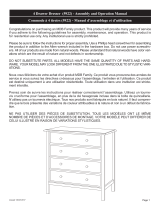
T-4. Bottom panel
T-4. Panneau de fond
T-3. Cross support
T-3. Support transversal
T-2. Side Panel (2)
T-2. Panneau latéral (2)
T-1. Front / Back Panel (2)
T-1. Panneau avant / arrière (2)
TH-2. Cam lock (4)
TH-2. Verrou de
came (4)
TH-1. Cam bolt (4)
TH-1. Boulon de
came (4)
TH-4. 5/8” Flat Head Screw (4)
TH-4. Vis à tête plate
de1,58 cm (5/8 po) (4)
TH-3. Wood Dowel (4)
TH-3. Goujon
de bois (4)
TH-5. Bracket (2)
TH-5. Attaches (2)
TH-6. Safety Strap
TH-6. Sangle de sûreté
TH-7. Small Wood Screw with Washer (2)
TH-7. Petite vis à bois avec rondelle (2)
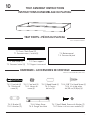
TRAY ASSEMBLY INSTRUCTIONS
INSTRUCTIONS D'ASSEMBLAGE DU PLATEAU
10
TRAY PARTS • PIÈCES DU PLATEAU
Not to Scale/Pas à l'échelle
HARDWARE • ACCESSOIRES DE MONTAGE
Bolts in Actual Size/Boulons (taille réelle)
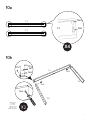
11

12
T-1
TH-3
T-1
X4
T-1 TH-1
TH-1
TH-2
TH-2
TH-2
TH-2
T-1
T-2
T-2
TH-3
10a
10b
* Rotate TH-2
clockwise
to secure.
* Tourner TH-2
dans le sens
horaire pour fixer.

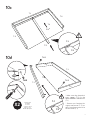
13
T-1
T-2
T-2
Slide
T-4
T-3
T-1
T-3
TH-2
X2
TH-2
T-3
T-3
T-1
TH-2
T-2
T-1
TH-1
TH-3
T-2
T-1
* Make sure that the end of
cross support (T-3) fits the
notch centered in the front rail
(T-1).
* S’assurer que l’extrémité du
support transversal (T-3) est
dans l’encoche au centre de la
bordure avant (T-1).
* Rotate TH-2
clockwise
to secure.
* Tourner TH-2
dans le sens
horaire pour fixer.
10c
10d

X2
TH-5
TH-4
11
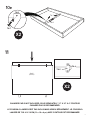
14
(back)
(arrière)
CHANGER PAD IS NOT INCLUDED, SOLD SEPARATELY. 31” X 16” X 4” CONTOUR
CHANGER PAD IS RECOMMENDED.
LE COUSSIN À LANGER N'EST PAS INCLUS MAIS VENDU SÉPARÉMENT. LE COUSSIN À
LANGER DE 79 X 41 X 10 CM (31 x 16 x 4 po) AVEC CONTOUR EST RECOMMANDÉ.
TH-7
TH-6
X2
TH-7
TH-6
10e

12
15
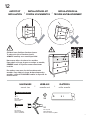
HARDWARE
actual size
HERRAJE
tamaño real
MATÉRIEL
taille actuelle
X2
X 1
X 1
X 1
X 1
For dresser
Para la cómoda
Pour la commode
For drywall
Para tablaroca
Pour une cloison en plâtre
For wall
Para la pared
Pour le mur
Children have died from furniture tipover.
To reduce the risk of furniture tipover,
ALWAYS install tip over restraint provided.
Han muerto niños al volcarse los muebles.
Para reducir el riesgo de que se vuelque un mueble,
SIEMPRE instale la sujeción contra volcamientos
incluida.
Des enfants sont morts lors du basculement de
meubles. Pour réduire le risque de basculement des
meubles, veillez à TOUJOURS installer le dispositif de
retenue fourni.
INSTALACIÓN DEL KIT
CONTRA VOLCAMIENTOS
ANTI-TIP KIT
INSTALLATION
INSTALLATION DE LA
TROUSSE ANTI-BASCULEMENT

16
EN ES FR
Find your wall material and follow
steps to attach the anti-tip kit to your
wall.
Drywall or plaster with available wood
stud:
- Mark the attachment point with a
pencil, 1” to 2” (25-50 mm) below top
of dresser, positioned over a wood
stud.
- Drill 1/8-inch (3 mm) diameter pilot
hole into the wood stud, on the pencil
mark.
- Following the appropriate pictogram
instructions on the following pages,
drive the screw with washer through the
textile strap and tighten screw firmly
into the wood.
Drywall without available wood stud:
- Mark the attachment point with a
pencil, 1” to 2” (25-50 mm) below top
of dresser.
- Drill 3/8-inch (9 mm) diameter hole
through the wall, on the pencil mark.
- Drive the plastic anchor into the hole,
using a hammer if needed.
- Following the appropriate pictogram
instructions on the following pages,
drive the screw with washer through the
textile strap and tighten screw firmly
into the plastic anchor in the wall. Do
not over-tighten.
If your wall material is not listed
here, or if you have any questions,
consult your local hardware store.
Determine el material de la pared y
siga los pasos para instalar el kit
anti-volcamientos en la pared.
Tablaroca o panel de yeso con remache
de madera disponible:
- Marque el punto de sujeción con un
lápiz, 25-50 mm (1-2 pulgada) bajo la
parte superior de la cómoda, posicionado
sobre un remache de madera.
- Taladre un agujero guía de 3 mm
(1/8 pulgada) de diámetro en el
remache de madera, sobre la marca
hecha con el lápiz.
- Siguiendo las instrucciones correspon-
dientes del pictograma en las páginas
siguientes, instale el tornillo con arandela
a través de la tira textil y apriete el
tornillo firmemente en la madera.
Tablaroca sin remache de madera
disponible:
- Marque el punto de sujeción con un
lápiz, 25-50 mm (1-2 pulgada) bajo la
parte superior de la cómoda.
- Taladre un agujero guía de 9 mm
(3/8 pulgada) de diámetro en la
pared, sobre la marca hecha con el
lápiz.
- Instale la fijación de plástico en el
agujero, usando un martillo si es necesario.
- Siguiendo las instrucciones correspon-
dientes del pictograma en las páginas
siguientes, instale el tornillo con arandela
a través de la tira textil y apriete el
tornillo firmemente en la fijación de
plástico en la pared. No apriete en
exceso.
Si no aparece indicado aquí el
material de la pared, o si tiene
alguna pregunta, consulte con su
ferretería local.
Trouvez votre propre matériau mural
et suivez les étapes pour fixer la
trousse anti-basculement à votre mur.
Cloison sèche et en plâtre avec
montants en bois:
- Marquez le point de fixation à l’aide
d’un crayon à une distance de 25 à 50
mm (1 à 2 po) sous le dessus de la
commode, placé sur un montant en bois.
- Percez un avant-trou d’un diamètre
de 3 mm (1/8 po) dans le montant en
bois, sur la marque de crayon.
- Suivez les instructions sous forme de
pictogramme correspondantes figurant
sur les pages suivantes, insérez la vis et
la rondelle dans la sangle de tissu, puis
vissez fermement la vis dans le montant
en bois.
Cloison sèche sans montant en bois:
- Marquez le point de fixation à l’aide
d’un crayon à une distance de 25 à 50
mm (1 à 2 po) sous le dessus de la
commode.
- Percez un avant-trou d’un diamètre
de 9 mm (3/8 po) dans le montant en
bois, sur la marque de crayon.
- Insérez l’ancrage en plastique dans le
trou, à l’aide d’un marteau au besoin.
- Suivez les instructions sous forme de
pictogramme correspondantes figurant
sur les pages suivantes, insérez la vis et
la rondelle dans la sangle de tissu, puis
vissez fermement dans l’ancrage en
plastique du mur. Ne serrez pas
excessivement.
Si le matériau de votre mur ne figure
pas dans la liste ci-dessus, ou si vous
avez des questions, adressez-vous à
votre fournisseur local.

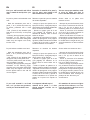
12a
12b
12c
Follow the "Find Your Wall Material"
instructions on the previous page.
Drill a 3/8" (9 mm) hole and insert plastic
anchor into hole (If needed).
Siga las "Instrucciones según el tipo de
material de la pared" en la página
anterior.
Taladre un agujero de 9 mm (3/8
pulgada) e inserte la fijación de plástico
en el agujero (si es necesario).
Trouvez votre matériau mural et suivez
les instructions portant sur le « Type de
matériau du mur » de la page ci-dessus.
Percez un trou de 9 mm (3/8 po) et
insérez l’ancrage en plastique dans le
trou (au besoin).
Mark spot on wall 1-2” (25-50mm)
below the top of the dresser.
Marque el punto en la pared a 25-50 mm
(1-2 pulgada) debajo de la parte
superior de la cómoda.
Marquez le point sur le mur à une
distance de 25 à 50 mm (1 à 2 po) sous
le dessus de la commode.
Fasten strap to back of dresser.
Fije la tira en la parte posterior
de la cómoda.
Fixez la sangle à l’arrière de la
commode.
17

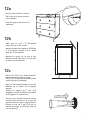
12d
12e
Complete!
¡Listo!
C’est terminé!
Drywall without
available wood stud.
Tablaroca sin remache
de madera disponible.
Cloison sèche sans
montant en bois.
*
*
*
Drywall or plaster with
available wood stud.
Tablaroca o panel de
yeso con remache de
madera disponible.
Cloison sèche et en plâtre
avec montants en bois.
*
*
*
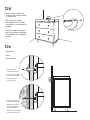
Fasten strap/bracket by
screwing into plastic anchor
or wood stud.
FIje la tira/el soporte
atornillando en la fijación
de plástico o el remache de
madera.
Fixez la sangle/le support
par vissage dans l’ancrage
de plastique ou le montant
en bois.
18

19
Finish
Terminé
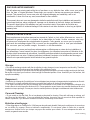
IMPORTANT :
Comme pour tous les meubles de nourrissons et de bébés, il est important de vérifier
périodiquement le serrage des attaches, des vis et des boulons. Les parents doivent procurer un
environnement sécuritaire à leur enfant en vérifiant régulièrement le meuble avant de placer
l’enfant sur celui-ci.
IMPORTANT:
As with all infant and baby furniture, it is important to check fasteners, screws, and bolts
periodically for tightness. Parents should ensure a safe environment for their children by
checking the furniture regularly before placing a child in the product.
The recommended maximum weight of
the occupant is 30 lbs on changing table.
Le poids maximal recommandé de l’occu-
pant de cette table est de 13,6 kg (30 lb).
READ ALL INSTRUCTIONS BEFORE USING
THE PRODUCT. KEEP THE INSTRUCTIONS
FOR FUTURE USE.
LISEZ ATTENTIVEMENT TOUTES LES
INSTRUCTIONS AVANT D’UTILISER CE
PRODUIT. CONSERVER CES INSTRUCTIONS
POUR UN USAGE ULTÉRIEUR.
KEEP THIS MANUAL IN A SAFE PLACE FOR FUTURE REFERENCE.
GARDER CE MANUEL EN LIEU SÛR POUR UN USAGE ULTÉRIEUR.

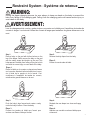
WARNING!
FALL HAZARD
TO PREVENT DEATH OR SERIOUS
INJURY, ALWAYS KEEP CHILD
WITHIN ARM’S REACH.
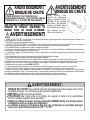
WARNING:
READ ALL INSTRUCTIONS BEFORE ASSEMBLING
THISPRODUCT. KEEP THE MANUAL FOR FUTURE USE.
• FALL HAZARD: Children have suffered serious injuries after falling from changing tables. Falls can happen
quickly.
• STAY in arm’s reach of your child.
• SUFFOCATION HAZARD: Babies have suffocated while sleeping in changing area. Changing area are
not designed for safe sleep.
• NEVER allow baby to sleep in changing area.
• Always secure this tray, using the provided hardware, to the changing surface. See instructions.
• The tray is to be used on a surface that is level, stable and structurally sound with a minimum surface
dimension of 33.75” by 17.75”.
• Read all instructions before use of the changing table.
• Do not use changing table if it is damaged or broken.
• This product is not intended to be used as a changing table without adult supervision. Use of the
product without this may result in death or serious injury to your child from falling. Follow all instructions
on attaching and using the changing table.
• Only use the pad provided by BABYLETTO.
• The maximum weight of the child for which the changing table is intended is 30 lbs.
• Stop using this changing table when the child is able to sit up or roll over.
• As with all infant and baby furniture, it is important to check fasteners, screws, and bolts periodically for
tightness. Parents should ensure a safe environment for their child by checking the furniture regularly
before placing the child in the product.
• When using this product, always secure the child with the safety strip.
WARNING!
FALL HAZARD
To prevent death or serious injury, always
keep child within arm’s reach. Never leave
child unattended and always use
restraining system.
FALL HAZARD: Children have suffered serious injuries after falling from
changing tables. Falls can happen quickly.
STAY in arm’s reach of your child.
ALWAYS secure this unit to the support surface by the provided hardware.
See instructions.
This tray is intended to be used only with MDB Family products. All other
uses are at the risk of the user
The tray is to be used on a surface that is level, stable and structurally sound
with a minimum surface dimension of 33.75” by 17.75”
WARNING:
20
La page est en cours de chargement...
La page est en cours de chargement...
La page est en cours de chargement...
La page est en cours de chargement...
-
 1
1
-
 2
2
-
 3
3
-
 4
4
-
 5
5
-
 6
6
-
 7
7
-
 8
8
-
 9
9
-
 10
10
-
 11
11
-
 12
12
-
 13
13
-
 14
14
-
 15
15
-
 16
16
-
 17
17
-
 18
18
-
 19
19
-
 20
20
-
 21
21
-
 22
22
-
 23
23
-
 24
24


Babyletto Lolly 3-Drawer Changer Dresser Manuel utilisateur
- Taper
- Manuel utilisateur
dans d''autres langues
Documents connexes
-
Babyletto Cali Storage Ottoman in Eco-Performance Fabric Manuel utilisateur
-
-
-
-
-
-
-
-
-
Autres documents
-
DaVinci M5926 Manuel utilisateur
-
franklin ben B14427 Manuel utilisateur
-
 DaVinci Baby F14991 Manuel utilisateur
-
 DaVinci Baby M11423 Manuel utilisateur
-
DaVinci M1991 Manuel utilisateur
-
-
 DaVinci Baby M4355 Manuel utilisateur
-
 DaVinci Baby M4391 Manuel utilisateur
-
 DaVinci Baby M11423 Manuel utilisateur
-
 DaVinci Baby M5922 Manuel utilisateur


