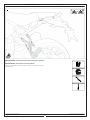
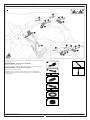
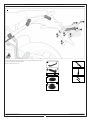
SW-Motech KFT.22.995.72000/S Mounting instructions
- Taper
- Mounting instructions

ANBAUANLEITUNG
mounting instructions • instructions de montage • instrucciones de montaje • istruzioni di montaggio
beinhaltet • contains • contient • contiene • contiene
KFT.22.995.72000/S
AKR.00.011.10000/S
KFT.22.995.30001/B
KFT.00.152.35100
ALK.00.733.10000L/S
ALK.00.733.11000R/S
QLS.00.095.15100

www.akrapovic.com
Installation instructions
Akrapovič Product:
for the
Slip-On
Ducati DesertX
Revision 1.0
EN
02/2023
D250.1.00.0000 C
*508911*

www.akrapovic.com
2 / 14
Congratulations on purchasing the Akrapovič product. The Akrapovič product is made by Akrapovič d.d., Malo
Hudo 8a, 1295 Ivančna Gorica, Slovenia (“Akrapovič”).
Akrapovič product should only be installed by persons skilled in motorcycle exhaust system or other motorcycle
parts installation and performance. The instructions provided in this manual should be followed to ensure
proper installation and safe use of the Akrapovič product. Akrapovič and/or its partners shall not be held liable
for any damage or personal injury (including direct, indirect, or consequential damage) sustained as a result
of improper installation of the Akrapovič product or its use and maintenance contrary to the instructions and
warnings contained herein.
If you have any questions regarding the installation and/or proper use of the Akrapovič product or this manual,
please contact your local Akrapovič partner.
For more information on the Akrapovič product, see the ocial Akrapovič website at:
http://www.akrapovic.com
Your safety is our number one priority. Please ride your motorcycle responsibly, safely and always obey local
trac rules.
All statements made with regard to the product’s compliance are made in respect of the product “as is”. Any
modications of the Akrapovič product or its improper installation, use or maintenance that is not in accordance
with this Installation manual, may result in severe damage to the product and/or motorcycle, as well as personal
injury, and may aect the product’s compliance with the legal requirements, such as product’s air and/or noise
emissions (as an example, the motorcycle may not be suitable for use on public roads any longer), as well as
warranty coverage.
The product may only be used in accordance with relevant laws and regulations, including state and federal,
where applicable.
Damage caused by improper installation, use and maintenance of the Akrapovič product is not covered by the
Akrapovič warranty. Please refer to the enclosed warranty with regard to the terms of our warranty.
Technical specications of Akrapovič products are subject to change without notice.
Please read this entire installation manual carefully prior to installing and using the Akrapovič product.
GENERAL INFORMATION
COPYRIGHT AND OTHER RIGHTS NOTICE
The Akrapovič trademark, including corporate logos and emblems, are subject to copyright as well as trademark
rights of Akrapovič, its licensors, or third persons authorizing Akrapovič to use them.
Any reproduction, technical or other manipulation, translation, or other use of the copyright and/or trademark
rights contained herein is prohibited without the explicit prior written consent of Akrapovič. The same especially
applies to the entire contents of this manual and/or any of its parts, including but not limited to technical
specications, instructions, graphs, photographs, and so on included in this manual.
The shape of the Akrapovič product is protected under a registered Community Design No. RCD 015011323.
Akrapovič takes all copyright and other rights infringement cases under serious consideration. If you have any
reason to believe that your product is not an original Akrapovič product, please contact our local partners or
Akrapovič at [email protected].

3 / 14
YYWWPXXXXX
• THIS MANUAL IS SPECIFIC TO THE MOTORCYCLE INDICATED ON THE COVER PAGE, FOR WHICH IT IS
DESIGNED. INSTALLATION PROCEDURES VARY DEPENDING ON THE TYPE OF MOTORCYCLE. PLEASE
VERIFY THAT THE AKRAPOVIČ PRODUCT AND THIS INSTALLATION MANUAL CORRESPOND TO THE
TYPE OF YOUR MOTORCYCLE.
• FOR EXHAUST SYSTEM ONLY: THE EXHAUST SYSTEM CAN GET EXTREMELY HOT DURING AND AFTER
IT IS USED. MAKE SURE NOT TO TOUCH THE EXHAUST SYSTEM UNTIL IT IS COMPLETELY COOL.
ALLOW THE EXHAUST AND ENGINE TO COOL DOWN BEFORE BEGINNING INSTALLATION OR ANY
OTHER WORK ON THE MOTORCYCLE.
• MAKE SURE THE MOTORCYCLE IS SECURELY POSITIONED TO PREVENT TIPPING OVER AND DAMAGE
TO YOURSELF AND OTHERS, OR THE MOTORCYCLE.
• PLEASE CHECK THE PARTS YOU RECEIVED AGAINST THE PARTS LIST AVAILABLE ON OUR WEBSITE
(PLEASE USE THE QR CODE ON THE FRONT PAGE OR LOOK FOR “SCHEMATIC VIEW” IN THE
RESPECTIVE PRODUCT PAGE ON WWW.AKRAPOVIC.COM). MAKE SURE THAT YOU HAVE ALL THE
PARTS NECESSARY FOR THE INSTALLATION OF YOUR NEW AKRAPOVIČ PRODUCT. IF ANY OF THE
PARTS IS MISSING, PLEASE DO NOT PROCEED WITH UNINSTALLING YOUR STOCK PARTS/ INSTALLING
THE AKRAPOVIČ PRODUCT AND CONTACT THE RETAILER WHERE YOU PURCHASED THE AKRAPOVIČ
PRODUCT.
• ALWAYS CHECK YOUR MOTORCYCLE’S GROUND CLEARANCE. FOR ADVANCED USERS, WE
RECOMMEND YOU CHECK THE MOTORCYCLE SPRING PRELOAD SETTINGS TO OPTIMIZE GROUND
CLEARANCE WHERE POSSIBLE.
• FOR EXHAUST SYSTEM ONLY: EVERY EXHAUST SYSTEM MUFFLER HAS ITS UNIQUE SERIAL NUMBER,
WHICH IDENTIFIES THE AUTHENTICITY OF THE PRODUCT. YOU CAN FIND THE SERIAL NUMBER ON
THE MUFFLER’S INLET PIPE. PLEASE REFER TO THE PICTURE BELOW. PLEASE VERIFY THAT YOUR
EXHAUST SYSTEM IS AN ORIGINAL AKRAPOVIČ PRODUCT. IF YOU HAVE ANY DOUBTS, PLEASE CONTACT
THE RESELLER WHERE YOU PURCHASED THE EXHAUST SYSTEM OR AKRAPOVIČ PARTNERS. THIS
MANUAL, ANY CERTIFICATES AND AKRAPOVIČ WARRANTY APPLY TO ORIGINAL PRODUCTS ONLY.
SAFETY AND COMPLIANCE WARNING, PLEASE READ CAREFULLY
BEFORE REMOVING THE STOCK PARTS AND BEGINNING THE INSTALLATION OF YOUR NEW
AKRAPOVIČ PRODUCT, PLEASE MAKE SURE THAT ALL ITEMS LISTED BELOW ARE VERIFIED:
EXAMPLE OF SERIAL NUMBER POSITION

www.akrapovic.com
4 / 14
NOISE AND EMISSION WARNINGS
General warning
Because of the world-wide distribution of Akrapovič d.d. products, neither Akrapovič d.d. nor any of its subsidiaries
make any representation that the products comply with the air and/or noise emissions laws, or labeling laws, of
any jurisdiction. The purchasers are entirely responsible for informing themselves of the applicable laws where the
products are to be used and to comply with those law.
Although legal compliance of Akrapovič products in a specic country should be determined by the user, you can
nd some basic guidance on compliance of your Akrapovič product with various legal requirements on the product-
related part of our website (please use the QR code on the front page or look for the respective product page on www.
akrapovic.com). For EC and ECE type approvals, please refer to the certicate enclosed to your product.
California laws prohibit the use of any aftermarket part or system that modies, removes or replaces original equipment
catalysts unless the California Air Resources Board has issued an Executive Order regarding such part or system or
unless the part or system is exempted by being used only on racing vehicles on closed courses. Neither Akrapovic d.d.
nor any of their subsidiaries make any representation that any of their parts or systems has received such an Executive
Order or that any of their parts or systems conform with the racing vehicles exemption. The purchasers are entirely
responsible for informing themselves of applicable California laws and to comply with those laws.
Various U.S. states and the U.S. federal government have individual laws regulating the use of aftermarket parts and
systems, especially as those parts and systems modify, remove, or replace original equipment catalysts. Please consult
the appropriate laws in your area before installing any aftermarket part or system on your vehicle to ensure compliance
with all applicable laws. Neither Akrapovic d.d. nor any of their subsidiaries or the sellers of the parts or systems make
any representation that any of their parts or systems comply with any such laws.
USA WARNING
CALIFORNIA WARNING
CAUTION OR IMPORTANT
HAND TIGHTEN
INSTALLATION TIP
LUBRICATION
TOOLS AND PROTECTIVE
EQUIPMENT REQUIRED
TIGHTENING TORQUE
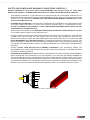
SYMBOLS
The following symbols are used throughout these installation instructions:
Photographs and other illustrations in this manual are symbolic and are intended to help represent individual steps
for proper installation and use, as well as for a general overview. The actual component parts of the Akrapovič
product may not entirely correspond to the photographs and other illustrations.
GENERAL NOTE
USE BOLT SEALANT
USE ANTI-SEIZE LEAD-FREE COPPER PASTE (black tube)
USE ANTI-SEIZING GREASE (white tube)
Apply 3 to 4 small drops of bolt sealant onto the cleaned and degreased threads before tightening the
bolts.
WARNING! Avoid contact with skin, eyes and mucous membranes. Do not inhale fumes. Keep
out of reach of children.
Provides trouble-free and long-lasting protection against seizing, corrosion and rusting of bolts,
threaded ends, nuts, joints, etc. Also protects against vibration, wear and impact.
Prevents seizing, corrosion and excessive wear between the titanium components.
WARNING! Avoid eye contact. Keep out of reach of children.
WARNING! Avoid eye contact. Keep out of reach of children.

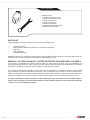
Tools & equipment
5 / 14
The packaging box should contain one or more of the following items:
• Akrapovič product
• Homologation certicate/ compliance documents if applicable
• Warranty
• Fitting material
• Installation Manual
Detailed list of parts can be found on the Akrapovič website (please use the QR code on the front page or look for
“Schematic view” in the respective product page on www.akrapovic.com).
PARTS LIST
• Mechanic gloves
• T-handle 4 mm hexagon wrench
• T-handle 6 mm hexagon wrench
• T-handle Torx 25 wrench
• T-handle Torx 40 wrench
• T-handle Torx 45 wrench
• T- handle swivelling 10 mm wrench
• Combination 13 mm wrench
REMOVAL OF STOCK EXHAUST SYSTEM OR OTHER STOCK MOTORCYCLE PARTS:
The process of uninstalling the original exhaust system or other motorcycle parts, may vary depending on
the existing exhaust system or other motorcycle parts. Please follow the motorcycle manufacturer’s workshop
manual for uninstalling the original exhaust system or other motorcycle parts.
If you for any reason decide otherwise, please note that any information provided in this respect herein should
be considered as general information provided for your convenience only. Akrapovič shall not assume any
liability or responsibility with regard to uninstalling your existing exhaust system or other parts of the motorcycle,
warranty coverage of such exhaust system or other motorcycle parts vehicle or their further tness for use.
In case your Akrapovič exhaust system or other motorcycle parts may not be used on certain roads or
under certain conditions, please keep the stock (or other) exhaust system or other stock parts that you
can use in such circumstances legally.

F 01
F 02
www.akrapovic.com
6 / 14
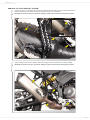
Put the motorcycle on a side stand, we recommend a central racing stand. Make sure, that surface is solid and flat.
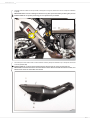
Unscrew marked bolts and carefully remove the heat shields o the motorcycle (F 01 ).
CAUTION: be careful not to injure yourself or damage any part of the motorcycle during this procedure!
1.
2.
Unscrew marked bolt and loosen marked clamps than carefully remove the muer o the motorcycle (F 02).
CAUTION: be careful not to injure yourself or damage any part of the motorcycle during this procedure!
3.
REMOVAL OF STOCK EXHAUST SYSTEM:

F 03
F 04
7 / 14
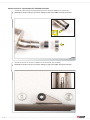
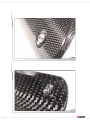
Assemble the bushes from Akrapovič installation kit onto the bracket, as shown (F 04).
CAUTION: be careful not to injure yourself or damage any part of the muer during this procedure!
2.
Assemble the muer’s inlet with the graphite gasket and clamp from Akrapovič installation kit, as shown (F 03).
CAUTION: be careful not to injure yourself or damage any part of the muer during this procedure!
1.
INSTALLATION OF THE AKRAPOVIČ EXHAUST SYSTEM:

F 05
F 06
www.akrapovic.com
8 / 14
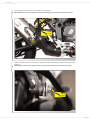
Carefully slide the muer onto the pre muer, hand tighten it using bolt, washer and nut from Akrapovič installation
kit (F 05).
IMPORTANT: make sure not to damage the exhaust or any other part of the motorcycle during this process!
INSTALLATION TIP: for perfect positioning you can reposition the pre muer!
3.
Screw Akrapovič heat shield’s bolts and heat-resistant washers (Akrapovič installation kit) on Akrapovič heat shield
as shown (F 06, 07, 08).
INSTALLATION TIP: screw the heat resistant washers onto the bolts; do not try to push them on!
IMPORTANT
: heat resistant washers should be between carbon-ber heat shield and shield’s brackets, and
between bolts’ heads an carbon-ber heat shield!
4.

F 07
F 08
9 / 14

F 09
F 10
www.akrapovic.com
10 / 14
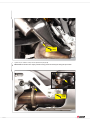
Install and tighten the heat shield onto the muer, as shown (F 09).
IMPORTANT: make sure not to damage any part of the exhaust system or motorcycle during this procedure!
5.
Position the muer in respect to the motorcycle, tighten the muer’s bracket bolt and clamp to the specied torques
(F 10, 11).
IMPORTANT: be careful not to injure yourself and any part of the motorcycle during this procedure!
6.
4.9Nm
3.6ftlb
22Nm
16ftlb

F 11
F 12
11 / 14
Tighten the pre muer’s clamps to the specied torques (F 12).
IMPORTANT: be careful not to injure yourself and any part of the motorcycle during this procedure!
7.
14Nm
10ftlb
9.8Nm
7.2ftlb

www.akrapovic.com
12 / 14
FINAL INSTALLATION:
MAINTENANCE OF THE AKRAPOVIČ PRODUCT:
Clean grease spots o all Akrapovič product’s surfaces, when installation is nished. Cleaning will prevent
spots from burning onto the surface. Do not use aggressive chemical cleaners, because they can damage
the surface or stickers:
Make sure all the nuts and bolts are suciently tightened. In case the Akrapovič product touches the cowling
or other parts, repeat the adjustment of the product or contact your authorized dealer.
Reinstall all dismounted or partially removed stock parts (cowlings, radiator etc); check vehicle manufacturer
workshop manual for correct procedures and tightening torques.
• Titanium surfaces (titanium muer’s outer sleeve, titanium pipes etc): use a soft cloth sprayed with a
multi-purpose spray lubricant (WD-40® or equivalent)*, then wipe with a soft dry cloth.
• Carbon-ber surfaces (carbon-ber outlet cap, carbon-ber muer’s outer sleeve, carbon-ber bracket
etc): use a soft dry cloth sprayed with all purpose foam cleaner, then wipe with a soft dry cloth.
• Painted surfaces (painted outlet cap, painted muer’s outer sleeve, painted bracket etc): use a soft
cloth sprayed with all purpose foam cleaner, then wipe with a soft dry cloth.
• Chrome plated surfaces (chrome plated outlet cap, chrome plated muer’s outer sleeve etc): use a soft
cloth sprayed with all purpose foam cleaner, then wipe with a soft dry cloth.
• Stainless steel surfaces (stainless steel muer’s outer sleeve, stainless steel pipes etc): use a soft
cloth sprayed with a contact cleaner, then wipe with a soft dry cloth.
IMPORTANT: periodically make sure all the bolts and springs are suciently tightened. In case
the product touches the cowling or other parts repeat the adjustment of the product or contact
your authorized dealer!
CAUTION: after running engine for 30 minutes, retighten the bolts of the Akrapovič carbon-ber
heat shield!
IMPORTANT: IT IS NORMAL IF WHITE SMOKE COMES OUT OF THE MUFFLER DURING THE
FIRST 100 KM AFTER REPLACEMENT.
IMPORTANT: A CHANGE IN THE COLOR OF THE EXHAUST SYSTEM IS NORMAL DUE TO THE
HIGH TEMPERATURES.
CAUTION: DO NOT STAND BEHIND THE MUFFLER AT ANY TIME.
IMPORTANT: DO NOT USE AUTOMOTIVE WHEEL CLEANERS OR ANY CLEANING PRODUCTS
WHICH CONTAIN ACIDIC ADDITIVES TO CLEAN AKRAPOVIČ PRODUCTS.
IMPORTANT: WE RECOMMEND HIGH CAUTION WHEN USING POWER / PRESSURE WASHER
FOR CLEANING PAINTED / LACQUERED SURFACES OF THE AKRAPOVIČ PRODUCTS, TO
AVOID PAINT / LACQUER DAMAGE.
IMPORTANT: ALL AKRAPOVIČ PRODUCTS ARE DEVELOPED AND DESIGNED TO BE USED ON
SPECIFIC VEHICLES, FOR THEIR ENTIRE EXPECTED LIFETIME. PLEASE MAKE SURE THAT
END-OF-LIFE AKRAPOVIČ PRODUCT IS DISASSEMBLED TO COMPONENTS SHOWN IN THE
PRODUCT’S SCHEMATIC DIAGRAM AVAILABLE ON THE AKRAPOVIČ WEBSITE AND EACH
COMPONENT SCRAPPED RESPONSIBLY AND ACCORDING TO APPLICABLE LOCAL LAWS
AND REGULATIONS. AKRAPOVIČ DOES NOT ASSUME ANY OBLIGATION OR RESPONSIBILITY
WITH RESPECT TO THE SCRAPPING PROCESS OR PROVIDING INFORMATION RELATED
THERETO.
*WD-40® is a trademark of the WD-40 Company.
1.
2.
3.

13 / 14
Exhaust gas leaks out of the
muer/pipe clamp connections
loosened clamp tighten the clamp to specied
torque
connection is not completely
joined
tap the connection into place and
tighten the clamp to specied
torque
TROUBLESHOOTING:
Problem Possible cause Solution

www.akrapovic.com

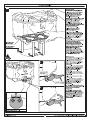
Numéro d‘article: KFT.22.995.30001/B Révision: 00 · Date: 11 - 2022
Support latéral PRO
~ 1 h. FACILE DIFFICILE
FRANÇAIS ·Nous vous remercions d'avoir choisi ce produit haut de gamme de
SW-MOTECH. Visitez notre boutique en ligne pour plus d'informations (par
exemple affectation des modèles). Les documents nécessaires (par exemple
ABE) y sont disponibles en téléchargement.
Veuillez lire et prendre en compte toutes les instructions, les consignes de
sécurité et les avertissements contenus dans ce manuel de montage avant
de monter et d'utiliser le produit afin d'éviter toute blessure ou tout
dommage. Veuillez conserver la notice d'utilisation pour référence.
Ce produit a été développé pour des véhicules en configuration d'usine.
Nous ne sommes pas en mesure d'assurer la compatibilité avec les pièces
de rechange originales ou les pièces de rechange d'autres fabricants.
La présente notice d'installation a été élaborée conformément à nos
connaissances actuelles. Il n'existe aucun droit juridique à l'exactitude des
informations qu'elle contient. Sous réserve d'erreurs et de fautes. Sous
réserve de modifications techniques et conceptuelles. SW-MOTECH détient
les droits d'auteur.
SYMBOLE D'AVERTISSEMENT DE SÉCURITÉ
Ce symbole d'avertissement est utilisé dans ces instructions de montage
pour mettre en garde contre des dangers mortels, de blessures ou d'autres
risques. Les mots DANGER, ATTENTION ou PRUDENCE sont utilisés avec ce
symbole d'avertissement pour transmettre des consignes de sécurité et des
informations importantes concernant le montage et l'utilisation de ce
produit. Ces mots, associés au symbole d'avertissement de sécurité,
signifient :
DANGER :signale une situation dangereuse pouvant entraîner la mort ou
des blessures graves si elle n'est pas évitée !
ATTENTION :signale une situation dangereuse pouvant entraîner la mort ou
des blessures graves si elle n'est pas évitée !
PRUDENCE: Indique une situation dangereuse susceptible d'entraîner des
blessures de gravité réduite ou moyenne si elle se présente !
REMARQUE : Informations importantes, mais qui n'entraînent pas de
risque de décès ou de blessure (dommages matériels uniquement).
REMARQUES GÉNÉRALES
ATTENTION : le montage et/ou l'entretien de ce produit nécessite des
compétences techniques avancées, des outils appropriés et une bonne
compréhension de l'utilisation des outils et des indications de réglage. Pour
votre propre sécurité, SW-MOTECH recommande de confier le montage
et/ou l'entretien à un atelier de réparation de deux-roues qualifié et
certifié.
ATTENTION : si vous décidez de monter vous-même ce produit, lisez
attentivement et intégralement les instructions de montage avant le
montage et l'utilisation et suivez toutes les instructions afin d'éviter des
blessures graves ou mortelles. Lors du montage et de l'utilisation, tenez
également compte de toutes les informations pertinentes du manuel du
véhicule. SI VOUS NE COMPRENEZ PAS UNE PARTIE DE CE MANUEL
D'INSTALLATION OU SI VOUS AVEZ BESOIN D'EXPLICATIONS CONCERNANT
UNE INSTRUCTION, N'ESSAYEZ PAS D'INSTALLER CE PRODUIT SANS
DEMANDER DE L'AIDE À SW-MOTECH !
PRÉPARATION : Veuillez lire attentivement les instructions de montage et
assurez-vous que tous les éléments de la liste de pièces sont présents.
PRUDENCE :veillez à ce que votre véhicule soit bien stable. Éteignez le
moteur et retirez la clé de contact. Laissez refroidir le
moteur/l'échappement si nécessaire. Débranchez la batterie lorsque vous
travaillez sur le système électrique. Utilisez uniquement des outils
appropriés et portez toujours des lunettes de protection et des gants
pendant le montage et l'entretien. Faites-vous aider par une deuxième
personne lors du montage et de l'entretien.
MONTAGE : Toutes les pièces et connexions retirées du véhicule doivent
être réinstallées conformément aux instructions du fabricant du véhicule ou
remplacées par des pièces et du matériel fournis par SW-MOTECH.
ATTENTION Sauf indication contraire, sécurisez tous les filetages avec
du frein filet liquide de force moyenne.
DANGER : Les couples de serrage non définis par SW-MOTECH doivent
être obtenus auprès du constructeur du véhicule ou d'un atelier de
réparation de motos certifié.
CONTRÔLE DU FONCTIONNEMENT :Après le montage, assurez-vous
qu'aucune pièce mobile n'est bloquée et que le fonctionnement du véhicule
n'est pas perturbé. Les câbles et les tuyaux ne doivent pas frotter et/ou être
coincés.
ATTENTION : Effectuez un contrôle de fonctionnement complet avant
de commencer à rouler. Après les 50 premiers kilomètres, puis
régulièrement, vérifiez le couple de serrage de tous les raccords et la
bonne fixation du produit. Les accessoires montés peuvent modifier le
comportement sur la route et la stabilité du véhicule.
INSTRUCTIONS DE MONTAGE · LIRE ET CONSERVER LES INSTRUCTIONS DE MONTAGE!
SW-MOTECH GmbH & Co. KG
Ernteweg 7-10
35282 Rauschenberg
Allemagne
www.sw-motech.com
La traduction du contenu est automatisée.
© SW-MOTECH GmbH & Co. KG
Sous réserve d'erreurs et de modifications
Sous réserve de modifications techniques et de design.
1

Vous trouverez les symboles et leur signification
dans la section MONTAGE. Si le terme OEM apparaît
dans la section MONTAGE, il faut respecter et
appliquer les consignes du fabricant du véhicule.
Si vous avez des questions, notre service clientèle ainsi
que nos distributeurs se tiennent à votre disposition. Vous
trouverez notre numéro de téléphone ainsi que la liste de
nos distributeurs sur notre boutique en ligne :
www.sw-motech.com
Utilisez du frein filet : Indique qu'un filetage doit être
enduit de frein filet liquide. H (HIGH) : haute
résistance ; M (MEDIUM) : force moyenne ; L (LOW) :
faible résistance.
Serrer en respectant les instructions de couple de
serrage : indique le couple de serrage d'une pièce
prescrit par SW-MOTECH ou par le fabricant du véhicule
(OEM).
Ne pas utiliser de frein filet : signifie que l'utilisation
d'un frein filet liquide n'est pas nécessaire à ce
stade.
APERçU DES LéGENDES · LIRE ET CONSERVER LES INSTRUCTIONS DE MONTAGE!
La traduction du contenu est automatisée.
© SW-MOTECH GmbH & Co. KG
Sous réserve d'erreurs et de modifications
Sous réserve de modifications techniques et de design.
2

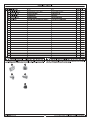
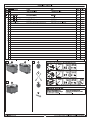
LISTE DES PIèCES · LIRE ET CONSERVER LES INSTRUCTIONS DE MONTAGE!
La traduction du contenu est automatisée.
© SW-MOTECH GmbH & Co. KG
Sous réserve d'erreurs et de modifications
Sous réserve de modifications techniques et de design.
3
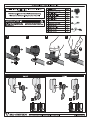
21
KFT.22.822.001.11
2/2
2
M8 x 40; DIN 912
SC.ST.08.040.48.912.109
4/4
3
KFT.05.440.007.11
4/4
4
M8 x 35; DIN 6912
SC.ST.08.035.02.6912.088
4/4
5
ø 8,4; DIN 125
US.ST.084.02.125
4/4
6
Ø 20 / Ø 8,4 / h 14,5
DB.ST.0200.0084.0145.02
4/4
37
KFT.06.525.005.11
1/1
8
M6 x 25; ISO 7380
SC.ST.06.025.02.7380.109
3/3
9
Ø 20 / Ø 6,4 / h 5
DB.ST.0200.0064.0050.02
1/1
10
M6; DIN 6927
MU.ST.06.02.6927.08
3/3
411
KFT.22.995.971.01.11
1/1
12
KFT.22.995.972.01.11
1/1
13
KFT.00.152.SV.8
1/1

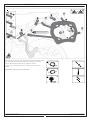
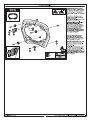
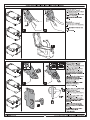
1
AVERTISSEMENT : portez toujours des lunettes et des gants de protection
!
AVERTISSEMENT : utilisez toujours des outils adaptés !
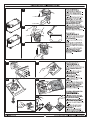
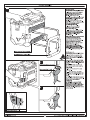
Retirez les vis indiquées des deux côtés du véhicule, et démontez les repose-
pieds passager.
PHASE DE MONTAGE · LIRE ET CONSERVER LES INSTRUCTIONS DE MONTAGE!
La traduction du contenu est automatisée.
© SW-MOTECH GmbH & Co. KG
Sous réserve d'erreurs et de modifications
Sous réserve de modifications techniques et de design.
4

2
1×2
2×4
M 23 Nm
3×4
4×4
M 23 Nm
5×4
6×4
Vissez les plaques de montage (1) aux repose-pieds passager des deux côtés
du véhicule.
AVERTISSEMENT : Utilisez du frein filet liquide !
Ne serrez pas encore les vis (2).
Vissez les plaques de montage (3) des deux côtés de l'arrière du véhicule.
AVERTISSEMENT : Utilisez du frein filet liquide !
Ne serrez pas encore les vis (4).
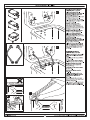
Remarque : Pour monter le support latéral au le porte-bagages SW-
MOTECH,utiliser les entretoises de porte-bagages (*) comme indiqué sur le
schéma détaillé.
PHASE DE MONTAGE · LIRE ET CONSERVER LES INSTRUCTIONS DE MONTAGE!
La traduction du contenu est automatisée.
© SW-MOTECH GmbH & Co. KG
Sous réserve d'erreurs et de modifications
Sous réserve de modifications techniques et de design.
5
La page est en cours de chargement...
La page est en cours de chargement...
La page est en cours de chargement...
La page est en cours de chargement...
La page est en cours de chargement...
La page est en cours de chargement...
La page est en cours de chargement...
La page est en cours de chargement...
La page est en cours de chargement...
La page est en cours de chargement...
La page est en cours de chargement...
La page est en cours de chargement...
La page est en cours de chargement...
La page est en cours de chargement...
La page est en cours de chargement...
La page est en cours de chargement...
La page est en cours de chargement...
La page est en cours de chargement...
La page est en cours de chargement...
La page est en cours de chargement...
La page est en cours de chargement...
-
 1
1
-
 2
2
-
 3
3
-
 4
4
-
 5
5
-
 6
6
-
 7
7
-
 8
8
-
 9
9
-
 10
10
-
 11
11
-
 12
12
-
 13
13
-
 14
14
-
 15
15
-
 16
16
-
 17
17
-
 18
18
-
 19
19
-
 20
20
-
 21
21
-
 22
22
-
 23
23
-
 24
24
-
 25
25
-
 26
26
-
 27
27
-
 28
28
-
 29
29
-
 30
30
-
 31
31
-
 32
32
-
 33
33
-
 34
34
-
 35
35
-
 36
36
-
 37
37
-
 38
38
-
 39
39
-
 40
40
-
 41
41


SW-Motech KFT.22.995.72000/S Mounting instructions
- Taper
- Mounting instructions
dans d''autres langues
- English: SW-Motech KFT.22.995.72000/S
Documents connexes
-
 SW-Motech KFT.23.017.60100/B Mounting instructions
-
 SW-Motech KFT.01.070.70100/B Mounting instructions
-
 SW-Motech KFT.01.070.70100/S Mounting instructions
-
 SW-Motech KFT.01.052.70000/S Mounting instructions
-
 SW-Motech KFT.07.664.72000/B Mounting instructions
-
 SW-Motech KFT.22.995.30100/B Mounting instructions
-
 SW-Motech HDG.00.220.38100/B Mounting instructions
-
 SW-Motech KFT.01.052.65000/B Mounting instructions
-
 SW-Motech KFT.01.070.65100/B Mounting instructions


Autres documents
-
KTM 76905999000 Le manuel du propriétaire
-
-
-
-
-
-
-