La page est en cours de chargement...

TRIM2 S TRIM2 B
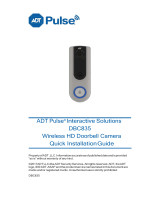
Trim II Pro
Doorbell Camera
HD video.
Two-Way Audio.
TRIM II PRO
Doorbell Camera
On-demand video
View your front door at anytime
Record video
Save videos to your Alarm.com account
Motion sensor
Know if someone is at or near the door
Two-Way Audio
Hear and speak to visitors remotely

Requirements
Power:
10-30VAC, 50/60Hz,0.5A Max or12VDC,0.5 to1.0A wired to in-
home mechanical chime - digital doorbell chime compatibility
requires SkyBell Digital Doorbell Adapter - not included
Wi-Fi:
802.11 b/g/n/ac, 2.4 and 5 GHz
Upload bandwidth:
2 Mbps required
Mounting:
Mounting plate affixes to flat surface and utilizes existing doorbell
wiring
Mobile device:
Alarm.com app compatible with Apple iOS, Android
Specifications
Video camera:
1080p resolution, 180° view
Night vision:
IR up to 16 feet (5 m)
Audio:
Built-in speaker and microphone
Motion sensor:
PIR detects motion up to 10 feet
Dimensions:
1.4 in/3.7 cm wide; 4.8 in/12.2 cm tall
1.1 in/2.9 cm deep, 3.1 oz/87.9 g weight
Environment:
operating temp -40°F/-40°C to 113°F/45°C
Exclusively for systems powered by Alarm.com
*Alarm.com app required. Not compatible with the Sky Bell app.
Sleek design
Install on thin door trims and frames

Answer your door from anywhere.
With the Alarm.com mobile app you get activity alerts and recorded
clips so you can see whofs at your door, day and night. The built-in
Two-Way Audio lets you hear and speak to visitors.
When paired with other Alarm.com smart home products, you can
even unlock the door or turn on lights for visitors - all right from the
app.
Need help? Go to alarm.com/doorbell
Use Alarm.com Doorbell Camera Hardware
Alarm.com’s Doorbell Camera hardware must be used:
• Alarm.com G e n 5 C h i m e Camera
• Alarm.com T r i m I I P r o Doorbell Camera
SkyBell HD consumer hardware is not supported. Slim Line Doorbell
Camera hardware is not supported on the SkyBell platform or other
service provider platforms.
Remove Existing Doorbell Button
Take care to prevent the existing doorbell wires from slipping into the
wall.

Attach the Doorbell Mounting Bracket to the Wall
Feed the existing doorbell wires through the hole in the center of the
bracket. Affix the bracket firmly to the wall by driving the provided
wall screws through the top and bottom holes in the bracket. Failure
to make the bracket flush on the wall could cause a poor power
connection between the bracket and the doorbell camera.
Connect Power Wires to the Mounting Bracket
Loosen the terminal screws and insert the wires beneath the screws.
Do not short (touch together) the wires during this process. Tighten
the screws. The wires must be of approximately equal thickness, and
the screws should be tightened approximately the same amount so
that the screwheads are flush.
If the wires are thick, splice short lengths of additional thinner wire.
The splice joints can be hidden inside the wall, and the thinner wire
can be used to connect to the mounting bracket.
Attach the Doorbell Camera to the Mounting Bracket
Slide the top of the doorbell camera down on to the mounting bracket
and push the front of the doorbell camera toward the wall. Tighten
the set screw located on the bottom of the camera, being careful not
to damage it (power tools should not be used with the set screw).
The camera’s LED should begin to illuminate.
LED COLORS, BUTTON FUNCTIONS AND GENERAL TROUBLESHOOTING
Battery Charging
If the LED is alternating between Red and Blue (HD Edition) or pulsing
Blue(Slim Line), the doorbell camera’s battery is charging. The duration
of the presyncing charge process varies due to differences in existing
doorbell circuits but normally takes less than 30 minutes. See the Power
Information and Troubleshooting section if this state persists.

If the LED is flashing Orange, the doorbell needs to be manually placed into
AP mode. Press and hold the Main Button until the LED begins rapidly flashing
green, then release. The LED will flash green as the Doorbell Camera scans
the Wi-Fi networks in the area. The Doorbell Camera should enter AP Mode
after a couple of minutes and the LED should begin alternating Red and
Green.
Enter AP Mode (Broadcast Syncing Mode)
Press and HOLD the Main Button until the LED begins a GREEN rapid strobe
flash, then release the button. When the LED flashes Green, it means the
Alarm.com Wi-Fi Doorbell Camera is in the process of entering AP Mode.
The LED will alternate Red and Green when the device has entered AP Mode.
Power Cycle
Press and HOLD the Main Button until the LED begins a Blue rapid strobe
flash. The power cycle could take up to 2 minutes.
Note: You can power cycle the Alarm.com T r i m I I P r o
Doorbell Camera when it is in AP Mode (see instructions above).
Press and HOLD the button until the LED flashes Blue.
Factory Reset
Caution: If you initiate a Factory Reset, the Doorbell Camera will need to
be re-connected to Wi-Fi and resynced with the account.
Press and HOLD the button until the LED begins a Yellow rapid strobe flash.
The reset could take up to 2 minutes.
Wi-Fi Connectivity
Online Resources
Visit alarm.com/doorbell for troubleshooting tips, installation videos
and more
CAN ICES-3 (B)/NMB-3(B)

Notes:
The Alarm.com T r i m I I P r o
Doorbell Camera will flash Blue before it flashes Yellow –
do not release during the flashing Blue phase (this will power
cycle the device). You can factory reset the device when it is in AP
Mode (see instructions above). Press and HOLD the Main Button
until the LED flashes Yellow. If a factory reset is performed on a
camera that is already connected to Wi-Fi, the camera will need to be
re-installed to
re-establish its Wi-Fi connection.
Warning:
This device complies with part 15 of the FCC Rules.
Operation is subject to the following two conditions: (1) This
device may not cause harmful interference, and (2) this device
must accept any interference received, including interference
that may cause undesired operation.
FCC warning:
Changes or modifications to this unit not expressly
approved by the party responsible for compliance could
void the user’s authority to operate the equipment.
NOTE: This equipment has been tested and found to comply with
the limits for a Class B digital device, pursuant to Part 15 of the FCC
Rules. These limits are designed to provide reasonable protection
against harmful interference in a residential installation. This
equipment generates, uses and can radiate radio frequency energy
and, if not installed and used in accordance with the instructions,
may cause harmful interference to radio communications.

However, there is no guarantee that interference will not occur in a
particular installation. If this equipment does cause harmful
interference to radio or television reception, which can be determined
by turning the equipment off and on, the user is encouraged to try to
correct the interference by one or more of the following measures:
- Reorient or relocate the receiving antenna.
- Increase the separation between the equipment and receiver.
- Connect the equipment into an outlet on a circuit different from
that to which the receiver is connected.
- Consult the dealer or an experienced radio/TV technician for
help.
“FCC RF Radiation Exposure Statement Caution: To maintain
compliance with the FCC’s RF exposure guidelines, place the product
at least 20cm from nearby persons.”
This device contains licence-exempt transmitter(s)/receiver(s) that
comply with Innovation, Science and Economic Development
Canada’s licence-exempt RSS(s). Operation is subject to the
following two conditions:
1.This device may not cause interference.
2.This device must accept any interference, including interference
that may cause undesired operation of the device.
L’émetteur/récepteur exempt de licence contenu dans le présent
appareil est conforme aux CNR d’Innovation, Sciences et
Développement économique Canada applicables aux appareils radio
exempts de licence. L’exploitation est autorisée aux deux conditions
suivantes:
1.L’appareil ne doit pas produire de brouillage;
2.L’appareil doit accepter tout brouillage radioélectrique subi, même
si le brouillage est susceptible d’en compromettre le fonctionnement.

To maintain compliance with the RF exposure guidelines, place the
product at least 20cm from nearby persons.
Pour rester en conformité avec les consignes d'exposition aux RF,
placez le produit à au moins 20 cm des personnes proches.
/