Lorex N4K2-84WB-DSC Manuel utilisateur

Taper
Manuel utilisateur
2K QHD Video Doorbell
Quick Start Guide
B451AJ Series
lorex.com
En
Welcome!
Thanks for your purchase of the
2K Video Doorbell. Here’s how to
get started.
Welcome!
Contents
Package contents
Section
Overview
Secure the mounting bracket(s)
Status indicator
Connect to the app
Preparation
Wiring the chime
Wiring the doorbell
Connect the doorbell
Lorex Home app overview
Troubleshooting
Frequently asked questions
1
2
3
4
5
6
7
8
9
10
11
12
Package contents
User-supplied tools
Video doorbell
Anchors (x2)
Chime Kit
* See product packaging for conguration details.
Mounting
bracket
Screws (x2)
Wire harness
Horizontal
bracket 15°
Vertical
bracket 5°
USB cable
Wire caps (x3) Pin microSD card
(pre-inserted)*
Extra wires (x2)Backup cable
Drill
15/64” Drill bit
Screwdriver
1
Overview
Front Panel Back Panel
2
Reset hole
Micro-USB port
microSD card slot
Power ports
Bottom View
Camera
Microphone
Call button
Status indicator
Speaker
Warning / night light
Status indicator
3
Solid green
The video doorbell
is operating
correctly.
Solid blue
The video doorbell
is powering on or
the video doorbell
is restarting.
Solid red
The video doorbell
is resetting to
factory default.
Flashing blue
slowly
The video doorbell
is ready to connect.
Flashing blue
rapidly
The video doorbell
has detected
motion.
Flashing blue, red,
and green
A rmware update
is in progress.
Flashing red
The video doorbell
failed to connect to
the network.
Spinning red
The video doorbell
is connected to the
network, but unable to
access the internet.
Flashing green
The talking function
on the video
doorbell is in use.
Spinning green
The calling function
on the video
doorbell is in use.
Connect to the app
4
1. If you already have the app, skip this step. Scan the QR code on the right using your
mobile devices camera. Install the free Lorex Home app from the App Store™ or
Google Play Store™.
2. Tap the Lorex Home icon to launch the app.
3. If you already have an account, skip this step. Tap Sign up, then follow the on
screen prompts to create an account. Record your account details below:
Connect to the Lorex Home app to access the doorbell’s installation videos.
Email:
Account Password:
4. Tap on the icon on the top right of the screen to add a device.
Note: If your mobile device cannot scan the QR code, tap Manually enter Device ID.
5. Scan the device QR code found in the box or on the back of the doorbell.
6. Follow the in-app instructions to complete the installation OR refer to sections 5 through 9 in
this Quick Start Guide for a written description of the installation steps.
+
Scan QR code for
Lorex Home app
Preparation
5
Step 1
Step 2
To prepare for installation:
Before beginning setup, there are some essential preparations to make.
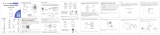
TURN OFF THE POWER RUNNING TO
YOUR EXISTING DOORBELL AND CHIME
BOX AT THE BREAKER (See Figure 1).
Test that power has been disconnected for
both the doorbell and chime box power by
pressing the doorbell. There should be no
chime sound.
Always be careful when handling electrical
wiring. If you’re not comfortable doing it
yourself, then consult a licensed electrician.
Remove your existing doorbell and
disconnect wiring (see Figure 2). Make sure
to bend the power cables so they do not fall
through the hole in the wall.
IMPORTANT: 16-24 VAC is required. If your house does not have this voltage, you will
need a 16-24 VAC doorbell transformer or you can consult with a licensed electrician.
Figure 1
Figure 2
Wiring the chime
6
You must determine the type of doorbell chime you have in your home: electronic or mechanical.
Not sure? If your doorbell chime is a classic *ding-dong* sound, chances are your chime is mechanical.
If your doorbell sounds more like a melody, then your chime is electronic. If you are still not sure, remove
the cover panel of your chime box - if you nd springloaded levers and a physical metal chime, you have a
mechanical chime.
For users with a mechanical chime, follow the extra step below to complete the installation.
1. Remove the cover panel of your doorbell
chime box.
2. Loosen the screws labeled FRONT and
TRANS using a Philips head screwdriver. Do
not remove the screws, and be sure to detach
any connected wiring (see Figure 1).
3. Connect the included chime kit to the green
terminal on the end of the included wire
harness (see Figure 2).
For mechanical chime owners:
Figure 1
Figure 2
Note: You may connect either
wire to either connector.
4. Connect the wiring from the chime kit to
the FRONT and TRANS connectors in
the chime box. Ensure that the existing
wiring stays connected as well (see
Figure 3).
5. Mount the chime kit to the inside of your
chime box, or along the cover plate of the
chime box, using the included
double-sided tape (see Figure 4).
IMPORTANT: Use the included
double-sided tape to ensure the chime kit
and wires are not touching the chimes
or any moving components inside the
chime box, or the doorbell chime will not
sound correctly.
Figure 3
Figure 4
Chime kit
Secure the mounting bracket(s)
7
Use the mounting accessories specied below depending on the mounting location.
Place the mounting bracket to t your
existing doorbell wiring. Then mark the
screw holes according to the mounting
bracket.
IMPORTANT: Ensure that the
arrow on the mounting bracket is always
pointing up.
Step 1: Mark mounting holes
Figure 1
1. Select either the horizontal or vertical bracket according to the direction you want your doorbell to
face (see Figures 2&3).
2. To change the direction of the angle, simply ip the horizontal or vertical bracket upside down.
Whichever direction you choose, make sure the attached mounting bracket is always facing .
15° right
5° down
15° left
5° up
If you want to change the angle of the doorbell for a better view, attach one of the optional angled
brackets to the mounting bracket.
Step 2 (Optional): Attach an angled bracket to the mounting bracket
Option 1: Horizontal bracket
Figure 2 (bottom view)
Option 2: Vertical bracket
Figure 3
OR
3. Insert the four tabs from the horizontal
or vertical bracket into the the mounting
bracket as shown in Figure 4. Make sure to
insert in the desired direction.
4. Press the mounting bracket down. A *click*
sound will indicate that the brackets are
locked in.
Figure 4
Notes:
You can only attach one angled
bracket to the mounting bracket.
If you would like to change the
direction of the angled bracket
after attaching it to the mounting
bracket, gently but rmly pull
them apart.
When installing only the mounting bracket, refer to Figure 5-a. When installing the angled bracket
attached to the mounting bracket, refer to Figure 5-b.
1. For wood, drywall or soft surfaces:
Secure the mounting bracket(s)
to the mounting surface using a
Philips-head screwdriver and the
supplied mounting screws.
2. For concrete, stucco or brick:
Use the supplied 15/64” drillbit to
drill holes where marked. Use the
supplied anchors and screws to
secure the mounting bracket(s) to
the wall.
Step 3: Secure the mounting bracket
Figure 5-a
Notes:
Ensure that the arrow on the
mounting bracket is always pointing
up.
The (optional) angled bracket must
be attached to the mounting bracket
before installation.
Ensure the power cables from the
wall t comfortably through the hole
in the mounting bracket.
Figure 5-b
Wiring the doorbell
8
To wire the doorbell:
1. Loosen the power port screws of the
doorbell with a Philips-head screwdriver.
Figure 2
Figure 1
2. Loop the power wires underneath the
power port screws (see Figure 1).
3. Tighten the power port screws to secure
the power wires (see Figure 2).
Note: Do not fully remove the
power port screws.
To extend short wires (optional):
1. If your existing doorbell wiring is too short,
remove the power port screws completely, then
thread the screws through the supplied extra
wires. Use the supplied wire caps to extend your
wiring (see Figure 3).
2. To attach the wire cap, align the ends of your
existing wiring and extra wires, place the wire
cap over the exposed wiring and twist the wire
nut clockwise to tighten (see Figure 4). Pull on
the wires slightly to make sure that they are
properly fastened inside the wire cap.
3. Ensure there is enough space to t the cable
connectors and wire caps into the hole in your
wall.
Figure 3
Figure 4
Connect the doorbell
9
To attach the doorbell to the bracket:
1. Push the wiring back into the wall.
2. Insert the two tabs from the mounting bracket into the doorbell (see Figure 1).
3. Press the doorbell downwards. A *click* sound will indicate that it is locked in.
1. Insert the supplied pin into the hole at the
bottom of the mounting bracket until the
inner buckle is reached (see Figure 2).
2. Then slide the doorbell up and remove it.
Figure 1
Figure 2
Note - If you need to remove the doorbell from
the bracket:
You may now reconnect power
to the doorbell and chime at the
breaker (see Figure 3).
Wait 5 minutes for the doorbell to fully
power on and press the doorbell’s
button to ensure that the chime is
operating correctly. Check section 11
for troubleshooting if needed.
Figure 3
  • Page 1 1
  • Page 2 2
  • Page 3 3
  • Page 4 4
  • Page 5 5
  • Page 6 6
  • Page 7 7
  • Page 8 8
  • Page 9 9
  • Page 10 10
  • Page 11 11
  • Page 12 12
  • Page 13 13
  • Page 14 14
  • Page 15 15
  • Page 16 16
  • Page 17 17
  • Page 18 18
  • Page 19 19
  • Page 20 20
  • Page 21 21
  • Page 22 22
  • Page 23 23
  • Page 24 24
  • Page 25 25
  • Page 26 26
  • Page 27 27
  • Page 28 28
  • Page 29 29
  • Page 30 30
  • Page 31 31
  • Page 32 32
  • Page 33 33
  • Page 34 34
  • Page 35 35
  • Page 36 36
  • Page 37 37
  • Page 38 38
  • Page 39 39
  • Page 40 40
  • Page 41 41
  • Page 42 42
  • Page 43 43
  • Page 44 44
  • Page 45 45
  • Page 46 46
  • Page 47 47
  • Page 48 48
  • Page 49 49
  • Page 50 50
  • Page 51 51
  • Page 52 52
  • Page 53 53
  • Page 54 54
  • Page 55 55
  • Page 56 56
  • Page 57 57
  • Page 58 58
  • Page 59 59
  • Page 60 60
  • Page 61 61
  • Page 62 62
  • Page 63 63
  • Page 64 64
  • Page 65 65
  • Page 66 66
  • Page 67 67
  • Page 68 68
  • Page 69 69
  • Page 70 70
  • Page 71 71
  • Page 72 72
  • Page 73 73
  • Page 74 74
  • Page 75 75
  • Page 76 76
  • Page 77 77
  • Page 78 78
  • Page 79 79
  • Page 80 80
  • Page 81 81
  • Page 82 82
  • Page 83 83
  • Page 84 84

Lorex N4K2-84WB-DSC Manuel utilisateur

Taper
Manuel utilisateur