Multi-Tech Systems MT5600BL Manuel utilisateur
- Catégorie
- Modems
- Taper
- Manuel utilisateur
Ce manuel convient également à

Model MT5600BA
Model MT5600BL
Data/Fax Modem
User Guide

ii
MultiModemII User Guide
Models MT5600BA and MT5600BL
P/N 88302601 Revision B (7/9/99)
©1999 by Multi-Tech Systems, Inc.
All rights reserved. This publication may not be reproduced, in whole or in part, without prior expressed
written permission from Multi-Tech Systems, Inc.
Multi-Tech Systems, Inc. makes no representations or warranties with respect to the contents hereof and
specifically disclaims any implied warranties of merchantability or fitness for any particular purpose.
Furthermore, Multi-Tech Systems, Inc. reserves the right to revise this publication and to make changes
in the content hereof without obligation of Multi-Tech Systems, Inc. to notify any person or organization
of such revisions or changes.
Record of Revisions
Revision Date Description
B 7/9/99 Manual revised.
Trademarks
MultiModemII, Multi-Tech, and the Multi-Tech logo are trademarks of Multi-Tech Systems, Inc.
Adobe and Acrobat are trademarks of Adobe Systems Incorporated. IBM is a trademark of International
Business Machines Corporation. MNP and Microcom Network Protocol are trademarks of Microcom,
Inc. K56flex is a registered trademark of Rockwell International Corporation and Lucent Technologies
Corporation. Microsoft, Windows, Windows 95, and Windows NT are either registered trademarks or
trademarks of Microsoft Corporation in the United States and/or other countries. All other brand and
product names mentioned in this publication are trademarks or registered trademarks of their respective
companies.
Notice
Though these modems are capable of 56K bps download performance, line impairments, public tele-
phone infrastructure and other external technological factors currently prevent maximum 56K bps
connections.
Multi-Tech Systems, Inc.
2205 Woodale Drive
Mounds View, MN 55112 U.S.A
(612) 785-3500 or (800) 328-9717
Fax (612) 785-9874
Fax-Back Service (612) 717-5888
Technical Support (800) 972-2439
BBS (612) 785-3702 or (800) 392-2432
Internet http://www.multitech.com

iii
FCC Part 15
NOTE: This equipment has been tested and found to comply with the
limits for a Class B digital device, pursuant to Part 15 of the FCC
Rules. These limits are designed to provide reasonable protection
against harmful interference in a residential installation. This equip-
ment generates, uses, and can radiate radio frequency energy, and if
not installed and used in accordance with the instructions, may cause
harmful interference to radio communications. However, there is no
guarantee that interference will not occur in a particular installation. If
this equipment does cause harmful interference to radio or television
reception, which can be determined by turning the equipment off and
on, the user is encouraged to try to correct the interference by one or
more of the following measures:
• Reorient or relocate the receiving antenna.
• Increase the separation between the equipment and receiver.
• Plug the equipment into an outlet on a circuit different from that to
which the receiver is connected.
• Consult the dealer or an experienced radio/TV technician for help.
This device complies with Part 15 of the FCC rules. Operation of this
device is subject to the following conditions: (1) This device may not
cause harmful interference, and (2) this device must accept any inter-
ference that may cause undesired operation.
WARNING: Changes or modifications to this unit not expressly ap-
proved by the party responsible for compliance could void the user’s
authority to operate the equipment.
Industry Canada
This Class B digital apparatus meets all requirements of the Canadian Interfer-
ence-Causing Equipment Regulations.
Cet appareil numerique de la classe B respecte toutes les exigences du
Reglement sur le materiel brouilleur du Canada.

MultiModemII User Guide
iv
Chapter 1: Introduction
Introduction ............................................................................................................................. 2
Product Description................................................................................................................ 2
Features .................................................................................................................................... 2
What Is in Your Modem Package? ....................................................................................... 4
Related Manuals ..................................................................................................................... 4
Chapter 2: Quick Start
Introduction ............................................................................................................................. 6
What You Will Need ..............................................................................................................6
We supply ......................................................................................................................... 6
You supply ....................................................................................................................... 6
Safety Warnings ...................................................................................................................... 6
Step 1: Connect the Modem to Your System ...................................................................... 7
RS232 Connection ............................................................................................................ 7
Dialup Connection .......................................................................................................... 7
Two-Wire Leased Line Connection............................................................................... 8
Four-Wire Leased Line Connection .............................................................................. 8
Phone Connection............................................................................................................ 8
Power Connection ........................................................................................................... 8
Surge Protectors and Lightning ..................................................................................... 8
Power-On Test ................................................................................................................. 8
Step 2: Install the Modem in Windows ............................................................................... 9
Adding the Modem to Windows .................................................................................. 9
Removing Your Old Modem from Windows.............................................................. 9
Step 3: Install and Configure Your Software .................................................................... 10
Step 4: Call the Multi-Tech BBS .......................................................................................... 11
Trio DataComm ............................................................................................................. 11
Windows HyperTerminal ............................................................................................ 12
Windows Terminal ........................................................................................................ 13
Step 5: Send a Fax ................................................................................................................. 14
Trio Fax ........................................................................................................................... 14
Microsoft Fax.................................................................................................................. 14
References .............................................................................................................................. 15
Chapter 3: Using the Front Panel
Introduction ........................................................................................................................... 18
Modem Configuration ......................................................................................................... 18
LED Indicators ...................................................................................................................... 18
Liquid Crystal Display (LCD) ............................................................................................. 19
Option Selection............................................................................................................. 19
Menu Structure .............................................................................................................. 19
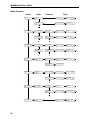
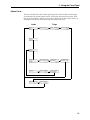
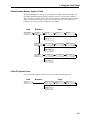
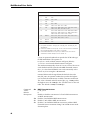
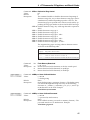
Menu Overview ............................................................................................................. 20
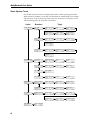
Status Trunk ............................................................................................................ 21
Basic Options Trunk ............................................................................................... 22
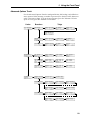
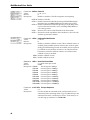
Advanced Options Trunk...................................................................................... 23
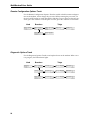
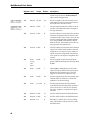
Remote Configuration Options Trunk................................................................. 24
Diagnostic Options Trunk ..................................................................................... 24
Phone Number Memory Options Trunk............................................................. 25
Caller ID Options Trunk ........................................................................................ 25
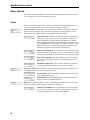
Menu Options ................................................................................................................ 26

Contents
v
Status ........................................................................................................................ 26
Basic Options .......................................................................................................... 27
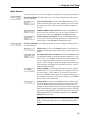
Advanced Options ................................................................................................. 28
Remote Configuration Options ............................................................................ 29
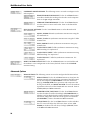
Diagnostic Options ................................................................................................. 30
Phone Number Memory Options ........................................................................ 30
Caller ID Options ................................................................................................... 30
Chapter 4: AT Commands, S-Registers & Result Codes
Introduction ........................................................................................................................... 32
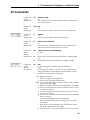
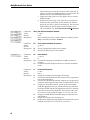
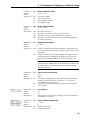
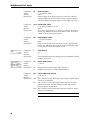
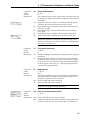
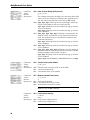
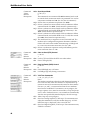
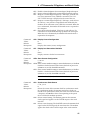
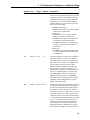
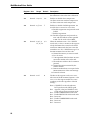
AT Commands ...................................................................................................................... 33
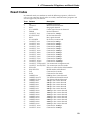
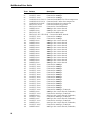
S-Registers.............................................................................................................................. 49
Result Codes .......................................................................................................................... 53
Chapter 5: Remote Configuration
Introduction ........................................................................................................................... 58
Basic Procedure ..................................................................................................................... 58
Setup ....................................................................................................................................... 58
Changing the Remote Configuration Password ....................................................... 58
Changing the Remote Escape Character .................................................................... 59
Chapter 6: Callback Security
Introduction ........................................................................................................................... 62
Setup Procedures .................................................................................................................. 62
Turning Callback Security On and Off....................................................................... 62
Assigning Callback Passwords .................................................................................... 63
Assigning Callback Phone Numbers .......................................................................... 64
Calling Procedure ................................................................................................................. 65
Callback Security Commands............................................................................................. 65
Chapter 7: Leased Line Operation
Introduction ........................................................................................................................... 70
Two-Wire Setup .................................................................................................................... 70
Four-Wire Setup.................................................................................................................... 71
Dial Backup and Leased Line Restoral .............................................................................. 72
Dial Backup and Leased Line Restoral Setup ................................................................... 72
Chapter 8: Solving Problems
Introduction ........................................................................................................................... 76
None of the Indicators Light ............................................................................................... 76
The Modem Does Not Respond to Commands ............................................................... 77
The Modem Dials But Cannot Connect ............................................................................. 78
The Modem Disconnects While Online ............................................................................. 79
The Modem Cannot Connect When Answering .............................................................. 80
File Transfer Is Slower Than It Should Be ......................................................................... 80
Data Is Being Lost ................................................................................................................. 81
There Are Garbage Characters on the Monitor ................................................................ 81
The Modem Doesn’t Work with Caller ID ........................................................................ 81
Fax and Data Software Can’t Run at the Same Time ...................................................... 82

MultiModemII User Guide
vi
Appendix A: Regulatory Compliance
FCC Part 68 Telecom ............................................................................................................ 84
Fax Branding Statement....................................................................................................... 85
Canadian Limitations Notice .............................................................................................. 86
International Modem Restrictions...................................................................................... 86
Commission Decision CTR21.............................................................................................. 86
EMC, Safety, and Terminal Directive Compliance .......................................................... 87
New Zealand Telecom Warning Notice ............................................................................ 87
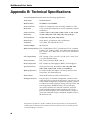
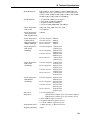
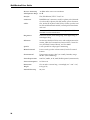
Appendix B: Technical Specifications
.................................................................................. 88
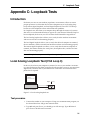
Appendix C: Loopback Tests
Introduction ........................................................................................................................... 91
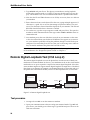
Local Analog Loopback Test (V.54 Loop 3) ...................................................................... 91
Remote Digital Loopback Test (V.54 Loop 2) ................................................................... 92
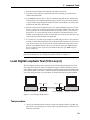
Local Digital Loopback Test (V.54 Loop 2) ....................................................................... 93
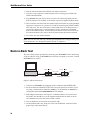
Back-to-Back Test .................................................................................................................. 94
Appendix D: Warranty, Service, and Technical Support
Limited Warranty ................................................................................................................. 96
Service .................................................................................................................................... 96
Technical Support ................................................................................................................. 97
Online Warranty Registration............................................................................................. 97
The Multi-Tech BBS ..............................................................................................................97
To Log on to the Multi-Tech BBS ................................................................................ 97
To Download a File ....................................................................................................... 97
About the Internet ................................................................................................................ 98
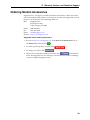
Ordering Modem Accessories ............................................................................................ 99
Appendix E: Upgrading the Modem
Introduction ......................................................................................................................... 100
Upgrade Overview ............................................................................................................. 100
Step 1: Identify the Modem Firmware............................................................................. 100
Step 2: Identify the Current Firmware Version .............................................................. 101
Multi-Tech Web Site .................................................................................................... 101
Multi-Tech BBS ............................................................................................................ 101
Step 3: Download the Upgrade File ................................................................................. 102
Multi-Tech Web Site .................................................................................................... 102
Multi-Tech BBS ............................................................................................................ 102
Step 4: Extract the Upgrade Files...................................................................................... 102
Step 5: Set the Modem to the Factory Defaults .............................................................. 102
Step 6: Upgrade the Modem’s Firmware ........................................................................ 103
Step 7: Restore Your Parameters ...................................................................................... 103
Appendix F: Cable Pinouts
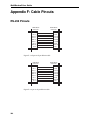
RS-232 Pinouts .................................................................................................................... 104
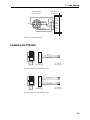
Leased Line Pinouts ........................................................................................................... 105

Contents
vii
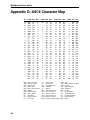
Appendix G: ASCII Character Map
......................................................................................... 106
Index
..................................................................................................................................................................... 107

MultiModemII User Guide
viii

1
Introduction

MultiModemII User Guide
2
Introduction
Congratulations on your purchase of the MultiModemII modem. You have acquired
one of the finest intelligent data/fax modems available today from one of the
world’s oldest modem manufacturers: Multitech Systems, Inc. This user guide will
help you install, configure, test and use your modem.
Product Description
The MultiModemII MT5600BA and MT5600BL modems incorporate new modem
technologies called K56flex
™
and V.90, both of which enable Internet connections at
data rates up to 53K bps* over standard telephone lines. These protocols are able to
send data downstream to your computer at high speeds by taking advantage of the
fact that data on the telephone network normally is converted from digital to analog
only once before it reaches your modem. Upstream transmissions and transmissions
between client modems are limited to data rates of 33.6K bps, as are downstream
transmissions that are converted more than once on the telephone network.
Both models support two-wire leased line operation. The MT5600BL model also
supports four-wire leased line operation with dial backup and automatic leased line
restoral. Please note that, because leased line operation consists of two client mo-
dems connected to each other, the maximum leased line data rate is 33.6K bps.
The MultiModemII offers interactive automatic dialing. You can store four command
lines or telephone numbers of up to 30 characters each in the modem’s nonvolatile
memory. The modem pulse- or tone-dials, and recognizes dial tones and busy sig-
nals for reliable call-progress detection. It can also detect AT&T calling card tones. It
is FCC-registered for connection to telephone networks without notification to the
telephone company.
The MultiModemII front panel includes a liquid crystal display and four buttons
that together can be used to display the current connection status of the modem or
to configure the modem. The MultiModemII also can be configured through stan-
dard AT commands.
Features
General
• Complies with major ITU-T, TIA, and EIA international standards to ensure com-
patibility with other modems.
• Uses DTMF and tone detection to distinguish data and fax calls when used with
software that supports these features.
• Supports serial port speeds to 230.4K bps with compatible serial ports
• Supports Caller ID (North American versions only).
• Displays status and configuration information on a front panel LCD.
*Though this modem is capable of 56K bps download performance, line impairments, public
telephone infrastructure, and other external technological factors currently prevent maxi-
mum 56K bps connections.

1 Introduction
3
Data
• Supports K56flex
TM
and ITU-T V.90 speeds plus 33.6K, 31.2K, 28.8K, 26.4K, 24K,
21.6K, 19.2K, 16.8K, 14.4K, 12K, 9.6K, 7.2K, 4.8K, 2.4K, 1.2K, and 0–300 bps.
Note: Under the 56K bps standards, you can asymmetrically download data from
an ISP at speeds up to 53K bps, but upload only at speeds up to 33.6K bps. Client-
to-client operation, including leased line operation, is also limited to 33.6K bps.
• Supports automatic fallback to slower speeds in noisy line conditions, and fall-
forward to faster speeds as conditions improve.
• Supports ITU-T V.42 LAP-M and MNP Class 3 and 4 error correction.
• Supports ITU-T V.42bis (4-to-1) and MNP 5 (2-to-1) data compression.
• Supports both synchronous and asynchronous data transfer.
• Both models support two-wire leased line operation. The BL model also supports
four-wire leased line operation with dial backup and leased line restoral.
• Supports callback security and remote configuration.
• Automatically disables compression when transferring already-compressed files.
• Can autodial, redial, pulse (rotary) and touch-tone dial.
• Detects dial tones and busy signals for reliable call-progress detection.
• Compatible with the standard AT command set used by most communication
programs.
• Supports the H.324 protocol (videophone ready).
• Supports Plug and Play (PnP).
• Can be flash upgraded.
Fax
• Supports V.17, Class 1, Class 2, and Group 3 fax standards, allowing it to commu-
nicate with other fax modems as well as with fax machines.
• Sends and receives faxes from your computer at 14,400 bps, 9600 bps, 7200 bps,
4800 bps, 2400 bps, or 300 bps.

MultiModemII User Guide
4
What Is in Your Modem Package?
Your modem package has several components. Make sure you have them all before
trying to operate your modem. Your package should include:
• An MT5600BA or MT5600 BL modem
•
A wall mount transformer
•
One (MT5600BA) or three (MT5600BL) modular telephone cables
•
A printed Quick Start Guide
•
This User Guide on disk
•
An installation disk
•
A CD containing Trio data and fax software
If any of these items are missing, please contact Multi-Tech Systems or your dealer/dis-
tributor (see Appendix D for information on contacting Multi-Tech via telephone, fax,
bulletin board service, or the Internet).
Related Manuals
The following manuals are available from the Multi-Tech World Wide Web and FTP
sites.
82076200 MT56XX Fax Class 1 Developer’s Guide
ftp://ftp.multitech.com/manuals/pdf/developers%20kits/5600fax.pdf
82006502 Fax Class 2 Developers’s Kit
ftp://ftp.multitech.com/manuals/pdf/developers%20kits/82006502.pdf

2
Quick Start

MultiModemII User Guide
6
Introduction
We know you are eager to get your MultiModemII up and running, so we’ll show
you step-by-step how to set it up, check it out, and make your first calls.
What You Will Need
Before starting, please make sure you have everything you need:
We supply
An MT5600BA or MT5600 BL modem
A wall mount transformer
One (MT5600BA) or three (MT5600BL) modular telephone cables
Trio communications software
A Quick Start Guide
This User Guide on disk
An installation disk
You supply
A computer with an unused serial port
A shielded RS-232 serial cable with a male DB-25 connector on one end and a
connector to match your computer’s serial port on the other end
A nearby AC power outlet
A nearby telephone line jack
A nearby leased line jack or terminals (optional)
Safety Warnings
• Use this product only with UL- and CUL-listed computers.
• To reduce the risk of fire, use only 26 AWG or larger telephone wiring.
• Never install telephone wiring during a lightning storm.
• Never install a telephone jack in a wet location unless the jack is specifically de-
signed for wet locations.
• Never touch uninsulated telephone wires or terminals unless the telephone line
has been disconnected at the network interface.
• Use caution when installing or modifying telephone lines.
• Avoid using a telephone (other than a cordless type) during an electrical storm;
there is a risk of electrical shock from lightning.
• Do not use a telephone in the vicinity of a gas leak.

2 Quick Start
7
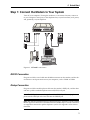
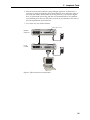
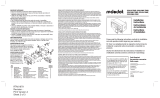
Step 1: Connect the Modem to Your System
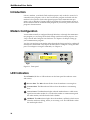
Turn off your computer. Placing the modem in a convenient location, connect it
to your computer’s serial port, to the telephone line, to your leased line, to AC power,
and, optionally, to your telephone.
VOLUME
EIA RS232C
LEASEDLINE
POWER
PHONE
Figure 2-1. MT5600BL connections.
RS232 Connection
Plug one end of the serial cable into the RS232 connector on the modem, and the oth-
er end into a serial port connector on your computer, such as COM1 or COM2.
Dialup Connection
Plug one end of the modular phone cable into the modem’s LINE jack, and the other
end into a public switched telephone network (PSTN) wall jack.
Note: The LINE jack is not interchangeable with the PHONE jack. Do not plug the
phone into the LINE jack or the line cable into the PHONE jack.
Note: The Federal Communications Commission (FCC), Industry Canada, and the
British Approvals Board for Telecommunications (BABT) impose certain restrictions
on equipment connected to public telephone systems. See Appendix A for more in-
formation.

MultiModemII User Guide
8
Two-Wire Leased Line Connection
MT5600BA: Plug one end of a two-wire phone cable into the modem’s LINE jack,
and connect the other end to a leased line wall jack or terminals.
MT5600BL: Plug one end of a two-wire phone cable into the modem’s LEASED jack,
and connect the other end to a leased line wall jack or terminals.
Four-Wire Leased Line Connection
On an MT5600BL only, plug one end of a four-wire phone cable into the modem’s
LEASED jack, and connect the other end to a four-wire leased line wall jack or termi-
nals. For dial backup operation, plug one end of the modular phone cable into the
modem’s LINE jack, and the other end into a PSTN wall jack.
Phone Connection
For voice-only calls, plug a telephone into the modem’s PHONE jack (optional).
Power Connection
Plug the transformer module into an AC power outlet or power strip. Plug the trans-
former module’s cable into the POWER jack on the modem.
Note: Use only the transformer supplied with the modem. Use of any other trans-
former voids the warranty and can damage the modem.
Surge Protectors and Lightning
Power surges and other transient voltages on power lines, such as those caused by
lightning strikes, can damage or destroy your modem. Therefore, we recommend
that you plug the modem into a surge protector rather than directly into a wall out-
let, preferably a surge protector that provides protection against electrical spikes on
the phone line as well as on the power line. Note that not even a surge protector can
guard against damage from a nearby lightning strike. During an electrical storm, it
is safest to unplug your computer equipment from both the power outlet and the
telephone line.
Power-On Test
Test the modem by turning it on (an on/off switch is located on the front panel).
When you apply power, the modem performs a diagnostic self-test, indicated by the
TM indicator lighting for a few seconds, after which the LCD should light. If this
does not happen, check that the power switch is on, the power supply is solidly con-
nected, and the AC outlet is live. If these measures do not work, see Chapter 8,
“Solving Problems.”

2 Quick Start
9
Step 2: Install the Modem in Windows
If you are using Windows 95, Windows 98, Windows NT 4.0, or Windows 2000, you
must install the modem in the operating system. (If you are using another operat-
ing system, such as DOS or Windows 3.x, skip this step and go to step 3.)
Adding the Modem to Windows
1. Click the Start button, point to Settings, and click Control Panel.
2. Double-click the Modems icon. If no modem is currently installed, the Install
New Modem wizard appears. If a modem is already installed, the Modems
Properties sheet appears; click Add to go to the Install New Modem wizard.
3. Click Next in the Install New Modem wizard. Windows searches for your new
modem and asks you to verify its selection.
Note: If Windows cannot find a modem, your modem may be turned off, it may be
plugged into the wrong connector on your computer, or the serial cable may be
faulty. See “None of the LEDs Light When the Modem Is Turned On” and “The
Modem Does Not Respond to Commands” in Chapter 8, “Solving Problems.”
4. If Windows identifies your modem correctly, click Next to install the modem.
After the modem is installed, click Finish to exit.
5. If Windows cannot identify your modem (for instance, if it identifies your mo-
dem as a “Standard Modem”), click Change. A dialog box with a list of manu-
facturers and a list of modems appears.
6. Insert your modem’s setup disk into your floppy drive and click Have Disk.
7. In the Install from Disk dialog box, select the drive the installation disk is in
and click OK.
8. A list of modems appears. Select your modem from the list, and click Next.
9. Windows NT 4.0 only: Select the port the modem is attached to, and click Next.
10. Windows installs and configures the modem.
11. Click Finish to exit.
Removing Your Old Modem from Windows
When your new modem replaces another modem, the old modem installation
remains in Windows, and the old modem is still selected in HyperTerminal and
other Windows applications. Although you can change the application connection
descriptions one at a time, it is easier to force Windows applications to use the new
modem by removing the old modem from Windows.
1. Click the Start button, point to Settings, and click Control Panel.
2. Double-click the Modems icon to open the Modems Properties sheet.
3. In the list box, select the old modem.
4. Click Remove, and then click Close.

MultiModemII User Guide
10
5. The next time you dial a HyperTerminal connection, it will select your new
modem and ask you to confirm the selection.
Step 3: Install and Configure Your Software
Your Multi-Tech modem is controlled by communication software installed on your
computer. If you wish to use software that is already installed, you should reconfig-
ure it for your new modem; otherwise, install the Trio data and fax communications
software provided with the modem.
1. Turn on your computer and run your communications software.
2. Find the dialog box or menu that lets you specify your modem. (In Windows
Terminal select Settings | Modem Commands; in HyperTerminal select File |
Properties | Phone Number; and in Trio select View | Datacomm | Communi-
cations | Setup | Modem | Select from List.
3. Choose your modem from the software’s modem list. If it isn’t listed, choose a
generic modem and modify the settings as necessary.
4. Change the modem initialization string, if necessary. The factory default config-
uration works well for most purposes. To load the factory default configuration,
use AT&F. To load a custom configuration that was saved using the &W com-
mand, use ATZ. Note that the Z command must be in a command string by it-
self. For a Macintosh, the initialization string should include the &D0 command.
If you do not want the modem to always answer the phone, add S0=0 to the
string. To use Caller ID with the modem, add S0=2 to the string (Caller ID infor-
mation is sent between the first and second rings, so the phone must ring at least
twice befor the modem picks up the line). Depending on the software, you
might have to end the string with a carriage return character (^M).
Note: To change the modem’s default configuration, type new commands in the
communication program’s terminal window, adding the &W command to store
them in the modem’s nonvolatile memory. For instance, to create a default
configuration for a Macintosh computer that turns off autoanswer, type
AT&F&D0S0=0&W. The new configuration loads automatically whenever the
modem is turned on or receives the ATZ command.
5. Select the port the modem is connected to (normally COM1 or COM2).
6. Select your serial port speed. This can be labeled “maximum speed,” “DTE
bps,” or “baud rate.” Ideally, if you use data compression, you should set your
serial port baud rate to four times the modem’s maximum transmission speed or
faster; however, few files can be compressed enough to require speeds that high,
and not all serial ports can handle speeds that high. Set the serial port baud rate
to 115,200 bps if your computer has a high speed serial port with a 16550AFN
UART or equivalent and Windows 95 or NT 4.0, or set it to 57,600 bps if it has
Windows 3.1x. If you have an older computer with a 14550 UART, set it to
19,200 bps. Older Macintosh computers can use a serial port baud rate of 57,600
bps; newer ones can use a serial port baud rate of 115,200 bps or 230,400 bps.

2 Quick Start
11
To see what UART your serial port uses if you have Windows 3.1x, in Program
Manager select File | Run, type MSD, and press ENTER. Select COM Ports to see
the UART type. If you have Windows 95 or 98, select Start | Settings | Control
Panel, and double-click on the Modems icon. In the Modems Properties dialog
box, click the Diagnostics tab, click the port the modem is connected to, and
click More Info to see the UART type. Note that both programs will identify a
14550 UART as an 8250A UART. If you have an 80386 or later computer, your
UART is most likely a 14550 or 16550AFN.
7. If the software has an autobaud selection, make sure it is disabled. Autobaud
applies only to older modems, and can cause problems if enabled.
8. If the software allows you to edit the no-connect messages (NO CARRIER,
BUSY, NO ANSWER, NO DIALTONE), make sure there is no space between
DIAL and TONE in NO DIALTONE.
9. Refer to the software manual or online help for other configuration choices; in
most cases you can accept the default values.
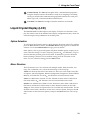
Step 4: Call the Multi-Tech BBS
You can test the modem’s data functions by calling the Multi-Tech bulletin board
system (BBS) and downloading REGISTER.DOC, if you have Microsoft Word 6.0 or
later, or REGISTER.TXT if you do not.
Trio DataComm
1. Click Start; then choose Programs, Trio Applications, and Trio Datafax.
2. Click the DataComm button. Trio DataComm starts.
3. In the Trio Datacomm File menu, click Access Phonebook. The Dialing
Directory opens.
4. In the Dialing Directory, click New Entry. The Edit/Create Host Information
dialog box opens.
5. In the Name box, type Multi-Tech BBS and click OK.
6. In the Primary number box, type 800-392-2432 if you are in North America.
Type 612-785-3702 if you are a local or international user.
7. In the Country box, select the United States.
8. Select Dial First Digit and Dial Prefix as necessary.
9. Click OK to exit the Edit/Create Host Information dialog box.
10. In the Dialing Directory, dial the Multi-Tech BBS by double-clicking its entry.
11. When the BBS welcome screen appears, type your first name, last name, and
password following the prompts. If you are a first-time caller, the BBS asks if
your name is spelled correctly. If you answer Y, a questionnaire appears. You
must complete the questionnaire to use the BBS on your first call.

MultiModemII User Guide
12
12. Press ENTER until the main menu appears. From the main menu you have access to
two areas: the File Menu and News. For help with menu commands, type ?.
13. In the Main Menu, type F and press ENTER to access the File Menu, then type D
and press ENTER to download.
14. At the file name prompt, if you have Microsoft Word 6.0 or later, type register.doc
and press E
NTER. If you do not have Microsoft Word, type register.txt, and then-
press E
NTER.
15. Press E
NTER twice more.
16. To select the Zmodem transfer protocol, type Z and press E
NTER.
17. The download begins automatically. As the file is downloaded, a dialog box re-
ports on the progress of the download. If the download fails, your baud rate
may be set too high. Log off, set the COM port baud rate lower, and call again.
18. To log off the BBS, press ENTER, type G for “good-bye,” and press ENTER twice more.
Windows HyperTerminal
1. Click Start; then choose Programs, Accessories, and HyperTerminal.
2. Start HyperTerminal by double-clicking the Hypertrm icon. HyperTerminal
asks for the name of the connection.
3. Type Multi-Tech BBS in the Name box, and then click OK.
4. In North America, type 800 in the Area code box and 392-2432 in the Phone
number box. Local and international users, type 612 in the Area code box and
785-3702 in the Phone number box.
5. Verify that your modem is selected in the Connect using box, then click OK.
6. In the Connect dialog box, click Dialing Properties.
7. Make any necessary changes in the Where I am and the How I dial from this
location boxes. If you must dial 9 to access an outside line, you should type 9 in
both the local and the long distance boxes unless your phone system has a spe-
cial requirement.
8. Click OK, then click Dial. You will know you have reached a modem by the
harsh sounds of the modem handshake.
9. When the BBS welcome screen appears in the HyperTerminal window, type
your first name, last name, and password following the prompts. If you are a
first-time caller, the BBS asks if your name is spelled correctly. If you answer Y,
a questionnaire appears. You must complete the questionnaire to use the BBS on
your first call.
10. Press ENTER until the main menu appears. From the main menu you have access to
two areas: the File Menu and News. For help with menu commands, type ?.
11. In the Main Menu, type F and press ENTER to access the File Menu, then type D
and press ENTER to download.
12. At the file name prompt, if you have Microsoft Word 6.0 or later, type register.doc
and press ENTER. If you do not have Microsoft Word, type register.txt, and then
press ENTER.
La page charge ...
La page charge ...
La page charge ...
La page charge ...
La page charge ...
La page charge ...
La page charge ...
La page charge ...
La page charge ...
La page charge ...
La page charge ...
La page charge ...
La page charge ...
La page charge ...
La page charge ...
La page charge ...
La page charge ...
La page charge ...
La page charge ...
La page charge ...
La page charge ...
La page charge ...
La page charge ...
La page charge ...
La page charge ...
La page charge ...
La page charge ...
La page charge ...
La page charge ...
La page charge ...
La page charge ...
La page charge ...
La page charge ...
La page charge ...
La page charge ...
La page charge ...
La page charge ...
La page charge ...
La page charge ...
La page charge ...
La page charge ...
La page charge ...
La page charge ...
La page charge ...
La page charge ...
La page charge ...
La page charge ...
La page charge ...
La page charge ...
La page charge ...
La page charge ...
La page charge ...
La page charge ...
La page charge ...
La page charge ...
La page charge ...
La page charge ...
La page charge ...
La page charge ...
La page charge ...
La page charge ...
La page charge ...
La page charge ...
La page charge ...
La page charge ...
La page charge ...
La page charge ...
La page charge ...
La page charge ...
La page charge ...
La page charge ...
La page charge ...
La page charge ...
La page charge ...
La page charge ...
La page charge ...
La page charge ...
La page charge ...
La page charge ...
La page charge ...
La page charge ...
La page charge ...
La page charge ...
La page charge ...
La page charge ...
La page charge ...
La page charge ...
La page charge ...
La page charge ...
La page charge ...
La page charge ...
La page charge ...
La page charge ...
La page charge ...
La page charge ...
La page charge ...
La page charge ...
La page charge ...
-
 1
1
-
 2
2
-
 3
3
-
 4
4
-
 5
5
-
 6
6
-
 7
7
-
 8
8
-
 9
9
-
 10
10
-
 11
11
-
 12
12
-
 13
13
-
 14
14
-
 15
15
-
 16
16
-
 17
17
-
 18
18
-
 19
19
-
 20
20
-
 21
21
-
 22
22
-
 23
23
-
 24
24
-
 25
25
-
 26
26
-
 27
27
-
 28
28
-
 29
29
-
 30
30
-
 31
31
-
 32
32
-
 33
33
-
 34
34
-
 35
35
-
 36
36
-
 37
37
-
 38
38
-
 39
39
-
 40
40
-
 41
41
-
 42
42
-
 43
43
-
 44
44
-
 45
45
-
 46
46
-
 47
47
-
 48
48
-
 49
49
-
 50
50
-
 51
51
-
 52
52
-
 53
53
-
 54
54
-
 55
55
-
 56
56
-
 57
57
-
 58
58
-
 59
59
-
 60
60
-
 61
61
-
 62
62
-
 63
63
-
 64
64
-
 65
65
-
 66
66
-
 67
67
-
 68
68
-
 69
69
-
 70
70
-
 71
71
-
 72
72
-
 73
73
-
 74
74
-
 75
75
-
 76
76
-
 77
77
-
 78
78
-
 79
79
-
 80
80
-
 81
81
-
 82
82
-
 83
83
-
 84
84
-
 85
85
-
 86
86
-
 87
87
-
 88
88
-
 89
89
-
 90
90
-
 91
91
-
 92
92
-
 93
93
-
 94
94
-
 95
95
-
 96
96
-
 97
97
-
 98
98
-
 99
99
-
 100
100
-
 101
101
-
 102
102
-
 103
103
-
 104
104
-
 105
105
-
 106
106
-
 107
107
-
 108
108
-
 109
109
-
 110
110
-
 111
111
-
 112
112
-
 113
113
-
 114
114
-
 115
115
-
 116
116
-
 117
117
-
 118
118


Multi-Tech Systems MT5600BL Manuel utilisateur
- Catégorie
- Modems
- Taper
- Manuel utilisateur
- Ce manuel convient également à
dans d''autres langues
Autres documents
-
 Red Dot S312BRE Mode d'emploi
-
Sixnet Sixnet VT-MODEM-5 Guide d'installation
-
MicroNet SP3010LD Manuel utilisateur
-
Sixnet VT Guide d'installation
-
-
Creative Blaster Modem Getting Started
-
Mettler Toledo LC-RS25 Mode d'emploi
-
 US Robotics Courier 3453B Quick Installation Manual
-
Multi-Tech RJModem MT5656RJ-L-34 spécification
-
 Boundless VGB10 Manuel utilisateur


