Maico HY 230 Mounting Instructions And Directions For Use
- Taper
- Mounting Instructions And Directions For Use

MAICO
Montage- und Gebrauchsanweisung
Hygrostat Instructions de montage et mode d'emploi
HY 230 / HY 230 I Mounting instructions and directions for use
Deutsch Français English
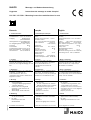
1. Technische Daten
Einstellbereich 20 bis 80% rel. Feuchte
Schaltdifferenz ± 2,5 % rel. Feuchte
Ausgang Relaisausgang
potenzialbehaftet
Wirkungsweise1.C (keine Begrenzer-
Wirkungsweise)
Zul. Umgebungstemp. 0 bis +50°C
Schutzart IP 30
Schutzklasse II
Schaltleistung (induktive Last) 4,0 A
Max. Einschaltstrom 16 A (200ms)
Wechselstrom 230 V, 50/60 Hz
2. Funktion
Der Hygrostat HY 230 / HY 230 I
schaltet den Ventilator bzw. Ent- oder
Befeuchter feuchtigkeitsabhängig ein und
aus.
3. Platzierung
Der Hygrostat soll ca. 1,5 m über dem
Fußboden, vorzugsweise im
Aufenthaltsbereich, aber nicht
unmittelbar neben einem Luftbefeuchter
angebracht werden.
4. Montage
• Abdeckkappe entfernen
• Sockel befestigen
- Geeignetes Befestigungszubehör
bauseitig beistellen.
• Elektrischer Anschluß gemäß
Schaltbild - siehe Rückseite der
Abdeckkappe.
• Abdeckkappe wieder aufsetzen.
5. Bedienung
• Einstellbereich für Wohnräume:
ca. 50 % rel. Feuchte
• HY 230 I
Einstellknopf unter dem
Gehäusedeckel
Schaltbild siehe Rückseite
1. Caractéristique techniques
Plade réglage 20 à 80 % d'humidité
relative
Précision d'enclenchement ± 2,5 %
d'humidité relative
Sortie sortie de relais sous potentiel
Mode d'opération 1.C (aucun
mode limiteur)
Température
ambiante admis. 0 à +50°C
Protection IP 30
Classe de protection II
Puissance de coupure
(charge inductive) 4,0 A
Intensité max.
d'enclenchement 16 A (200ms)
Courant monophasé 230 V, 50/60 Hz
2. Fonction
L'hygrostat HY 230 / HY 230 I
enclenche et déclenche le ventilateur
voire le déshumidificateur ou
l'humidificateur en fonction de
l'humidité.
3. Emplacement
L'hygrostat doit être installé à environ
1,5 m du sol, de préférence dans le
volume de séjour, mais pas à proximité
immédiate d'un humidificateur d'air.
4. Montage
• Retirer le couvercle.
• Fixer le socle.
- La mise à disposition du matériel
adéquat de fixation vous incombant.
• Raccordement électrique selon
schéma de couplage, voir au dos du
couvercle.
• Remettre le couvercle.
5. Mode d'emploi
• Gamme de réglage pour zones
habitables: env. 50 % d'humidité
relative
• HY 230 I
Bouton de réglage sous couvercle.
Schéma de branchement voir au verso.
1. Technical Data
Setting range 20% to 80% relative
humidity
Operating differential ± 2.5 % relative
humidity
Output relay output with potential
Method of operation 1.C (no limiter)
Perm. ambient temperature 0 to +50°C
Protective system IP 30
Safety class II
Making/breaking capacity
(inductive load) 4.0 A
Maximum starting current 16 A (200ms)
Alternating current 230 V, 50/60 Hz
2. Mode of Operation
Depending on the existing humidity the
hygrostat type HY 230 / HY 230 I will
switch on/off the fan, respectively a
dehumidifier or humidifier.
3. Place of Installation
The hygrostat should be installed about
1.5 m above floor level and preferably in
the occupied area, but not in the immediate
vicinity of an air humidifier.
4. Installation
• Remove the cap
• Fix the base.
- Suitable mounting hardware must
be provided by the customer.
• Complete the electrical connection in
accordance with the circuit diagramm
- see back of cap.
• Replace protective cap.
5. Control
• Setting range for living area:
approx. 50 % relative humidity
• HY 230 I
Adjusting knob beneath the cover.
Circuit diagram see overleaf.
79561/02.16

MAICO Elektroapparate-Fabrik GmbH, Postfach 5043, D-78057 Villingen-Schwenningen
Tel. 01805/694-110, Fax 07720/694-239, http://www.maico.de, email: [email protected]
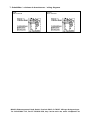
7. Schaltbilder / schémas de branchement / wiring diagrams
HY 230
Art.Nr. 0157.0126
HY 230 I
Art.Nr. 0157.0127
-
 1
1
-
 2
2


Maico HY 230 Mounting Instructions And Directions For Use
- Taper
- Mounting Instructions And Directions For Use
dans d''autres langues
- English: Maico HY 230
- Deutsch: Maico HY 230