Danby DDR4011 Le manuel du propriétaire
- Catégorie
- Déshumidificateurs
- Taper
- Le manuel du propriétaire

Danby Products Limited, Ontario, Canada N1H 6Z9
Danby Products Inc., Findlay, Ohio, USA 45840
Model • Modèle • Modelo
• Owner’s Use and Care Guide
• Guide d’utilisation et d'entretien
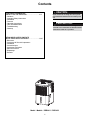
PORTABLE DEHUMIDIFIER
DÉSHUMIDIFICATEUR PORTATIF
DDR2611 / DDR4011
V4.05.12 DM

Contents
CAUTION:
PRECAUTION:
Read and follow all safety rules and operat-
ing instructions before first use of this prod-
uct.
Veuillez lire attentivement les consignes de
sécurité et les instructions d’utilisation avant
l’utilisation initiale de ce produit.
DÉSHUMIDIFICATEUR PORTATIF
Guide d'utilisation et d'entretien ........................
• Bienvenue
• Consignes de Sécurité Importantes
• Installation
• Caractéristiques
• Consignes d’utilisation
• Soins et Entretien
• Dépannage
• Garantie
2-13
PORTABLE DEHUMIDIFIER
Owner’s Use and Care Guide .............................
• Welcome
• Important Safety Information
• Installation
• Features
• Operation Instructions
• Care and Maintenance
• Troubleshooting
• Warranty
Model • Modèle DDR2611 / DDR4011
14-25
1

Welcome
Thank you for choosing a Danby appliance to provide you and your family with all of the “Home Comfort” requirements
of your home, cottage, or office. This Owner’s Use and Care Guide will provide you with valuable information necessary
for the proper care and maintenance of your new appliance. If properly maintained, your Danby appliance will give you
many years of trouble free operation. Please take a few moments to read the instructions thoroughly and familiarize
yourself with all of the operational aspects of this appliance.
For easy reference, may we suggest you attach a copy of your sales slip/receipt to this page, along with the following
information, located on the rear wall of the water tank compartment.
KEEP THESE INSTRUCTIONS FOR FUTURE REFERENCE.
Model Number:
Serial Number:
Date of Purchase:
This information will be necessary if your unit requires servicing and/or for general inquiries. To contact a Customer
Service Representative, call Danby TOLL FREE: 1-800-263-2629
2
CAUTION
Do not leave this unit unattended or operate in an area where peo-
ple or animals may not be able to react quickly. A failed unit may
cause over-heating, resulting in personal injury or property
damage.

Important Safety Information
READ AND FOLLOW ALL SAFETY INSTRUCTIONS
NOTE
FOR YOUR SAFETY: Read these instructions carefully before operating the unit.
The WARNING instructions issued in this manual are not meant to cover
all possible conditions and situations that may occur. It must be under-
stood that common sense, caution, and carefulness are factors that can-
not be built into all appliances. These factors must be supplied by the per-
son(s) installing, maintaining, or operating the appliance. Failure to install,
maintain, and/or operate the equipment according to the manufacturer’s
instructions may result in conditions which can produce bodily injury
and/or property damage. Contact your dealer, service agent, or the manu-
facturer about any problems or conditions you do not fully understand.
For Danby Customer Service call (1-800-263-2629)
3
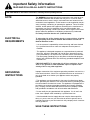
ELECTRICAL
REQUIREMENTS
To reduce the risk of fire, electric shock, or personal injury, all wiring
and grounding must conform with the latest edition of Local and
National Electrical codes.
• It is the customer’s responsibility to have the wiring and fuses checked
by a qualified electrician to make sure adequate electrical power is
available.
• This appliance is designed to operate on a separate branch, polarized,
three-wire, effectively grounded 120 Volt 60 Hertz (alternating current)
circuit protected by a 15 ampere fuse, equivalent fuse or circuit breaker.
The three-prong grounding plug on the power cord should be plugged
directly into a polarized, three slot, effectively grounded receptacle rated
110/120 V.A.C.
FOR YOUR SAFETY: To reduce the risk of fire or explosion, do not
store or use gasoline or other flammable vapors or liquids in the
vicinity of this or any other appliance.
GROUNDING
INSTRUCTIONS
Improper connection of the equipment-grounding conductor can result in a
risk of electrical shock. Check with a qualified electrician or serviceman if
you are in doubt as to whether your appliance outlets are properly
grounded.
• This appliance must be grounded. In the event of malfunction or break-
down, grounding will reduce the risk of electrical shock by providing a path
of least resistance for electrical current. This appliance is equipped with a
cord having an equipment-grounding conductor and 3 prong grounding
plug. The plug must be connected into an outlet that is properly installed
and grounded in accordance with all local codes and ordinances.
• Do not modify the plug provided with this appliance. If it will not fit the
outlet, have a proper outlet installed by a qualified electrician.
• If the household electrical supply does not meet the above specifica-
tions, or it you are not sure your home has an effective ground, have a
qualified electrician or your local electrical utility company check it and cor-
rect any problems.
SAVE THESE INSTRUCTIONS

4
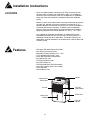
Installation Instructions
LOCATION
• Select a suitable location, making sure you have easy access to an
electrical outlet (avoid the use of extension cords). If it is absolutely
necessary to use an extension cord, use an approved “air conditioner”
heavy duty extension cord ONLY (available at most local hardware
stores).
• Make sure there are no obstructions restricting airflow through the front
air intake grill. Maintain a minimum clearance of at least 20 cm (8”)
between adjacent walls and the back of the unit, to allow for proper air
circulation and maximum efficiency. To obtain maximum operating
efficiency from your dehumidifier, the recommended (room ambient)
operating temperatures should be between 5°C (41°F) - 35°C (95°F).
• It is important to remember the efficiency of a dehumidifier will be
effected/influenced by the rate at which new humid air (moisture) is
allowed to infiltrate the same space/area. To maintain efficiency, the
dehumidifier must be operated in an enclosed area. Keep all doors and
windows closed.
Features
• Soft touch (Electronic)Control Key Pads
• Auto-Sensing Humidity Control
• Adjustable Humidity Settings (35% - 85%)
• 2 Fan Speed Settings (High / Low)
• Delay Start Protection (Compressor)
• Auto-Defrost (De-Icer)
• Full Bucket Indicator Light
• Easy Roll Castors (4)
• Front Mounted Water Tank(Removable)
• Direct Drain Option (Hose not Included)
• Quiet Operation
• Removable Air Filter
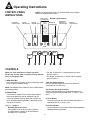
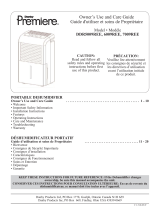
Control Panel
Front Panel
Air Inlet
Water level
Indicator
handle
Air Filter
(Side Panel)
Water Tank
Easy-roll
Castors

5
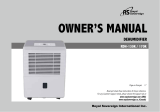
Operating Instructions
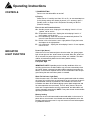
CONTROL PANEL
INSTRUCTIONS
NOTE: The control panel of the unit you purchased may be slightly
different according to the models.
8
1
2
3
45
6
7
Clean filter
indicator light
Low fan
indicator light
High fan
indicator light
Timer on/off
indicator light
Remote signal receptor
Bucket full
indicator light
Continuous
operation on
indicator light
Power on
indicator light
HEAT Normal
on
off
Time
Cont. Power
Full
Turbo
Remote
signal
receptor
Heat
Fan
Timer
Cont.
Power
CONTROLS
When you push the button to change operation
modes, the unit will make a beeping sound to indicate
that it is changing modes.
1) HEAT BUTTON
Press this button to activate the electrical heating mode.
Press it again to stop the funtion.
NOTE: DEHUMIDIFYING model only has no HEAT button
and heating feature.
2) FAN BUTTON
Control the fan speed. Press to select either High or
Normal fan speed. Set the fan control to High for
maximum moisture removal. When the humidity has
been reduced and quiet operation is preferred, set the
fan control to Normal.
3,4) ( + / - ) buttons
Humidity Set Control Pads
The humidity level can be set within a range of
35%RH(Relative Humidity) to 85%RH(Relative
Humidity) in 5% increments.
• For drier air, press the (-) button and set to a lower
percent value(%).
• For damper air, press the (+) button and set a higher
percent value(%).
Timer Set Control Buttons
Use the Up/Down buttons to set the Auto start and
Auto stop time from 0.0 to 24.
Temperature Set Control buttons
Use the Up/Down pads to set the desired temperature
under the electrical heating mode from 17°C(62°F) - 30°C
(86°F).
5) Timer Button
Press to initiate the Auto start and Auto stop feature, in
conjuction with the (+) and (-) keys.
6) Continue Button
Press to activate the continuous dehumidifying operation
and dehumidifying operation.

CONTROLS
Operating Instructions
6
7) POWER BUTTON
Press to turn the dehumidifier on and off.
8) Display
Shows the set % humidity level from 35% to 85% or auto start/stop time
(0~24) during setting, then shows the actual (± 5% accuracy) room %
humidity level in a range of 30% RH(Relative Humidity) to 90%RH
(Relative Humidity).
Error Codes and Protection Codes:
AS - Humidity sensor error--Unplug the unit and plug it back in. If error
repeats, call for service.
ES - Temperature sensor error-- Unplug the unit and plug it back in. If
error repeats, call for service.
P1 - Unit is defrosting-- Allow the unit time to automatically defrost. The
error will clear after the unit self defrosts.
P2 - Bucket is full or the bucket is not in right position--Empty the bucket
and replace in the right position.
E1 - unit malfunction -- Unplug the unit and plug it back in. If error repeats,
call for service.
INDICATOR
LIGHT FUNCTION
Power Light (Green):
When the unit is first connected to an electrical outlet, the (green) power
light will not light until the “on/off” button is pressed. When the “on/off” but-
ton is activated, the power light turns to a state “on” condition. The dehu-
midifier will automatically default to the factory default setting:
Humidity Setting: 60%
Fan Speed: High
IMPORTANT NOTE: Depending on the humidity conditions of the sur-
rounding environment, the dehumidifier may not start automatically when
the “on/off” button is pressed (see dehumidifier operating instructions for
details). In the event of a power failure, the unit will default to the last pro-
gram setting that was used when power is restored.
Water Full Indicator Light (Red):
When the water tank is full and/or incorrectly positioned inside the cabinet,
the (water full) red light turns on and remains on until such time the tank is
emptied and/or correctly re-positioned. This condition will result in the
immediate shut down of the dehumidifying system (both compressor and
fan motor operation are terminated). This is a safety feature. When the
water tank is emptied and/or correctly re-positioned, the dehumidifier will
resume operation automatically. NOTE: It may take several minutes before
operating conditions resume.
Memory Setting:
Each time the unit is disconnected/re-connected and/or in the event of a
power failure, the electronic circuit board automaticallydefaults to the last
program setting that was used. It may take several minutes before operat-
ing conditions resume.

7
Operating Instructions
WATER TANK
OPERATION
IMPORTANT
Never tamper with or attempt to defeat the water level (safety) float
switch system. Proper installation of the water tank is crucial to
maintaining reliable dehumidifier operation.
The water tank holds accumulated condensed water and by means of a
safety switch, controls both the water level and operation of the dehumidi-
fication process- i.e. When the water tank is full and/or accidentally
displaced inside the cabinet, the float switch actuator (inside the tank)
breaks contact with the safety switch. This condition results in the immedi-
ate shut down of the compressor and fan motor system, preventing
moisture from being condensed.
DEHUMIDIFYING
DEHUMIDIFYING is a means of removing moisture from the air. A dehu-
midifier will help to protect your home and valued possessions from dam-
age (swelling) caused by moisture in the air. Essentially a dehumidifier
removes moisture from air as moist air passes over a dehumidifying (evap-
orator) coil. Moisture is condensed on the evaporator coil, drained, and
collected inside an internal (removable) water tank located at the front of
the unit. The exhausted air being returned into the room environment is
elevated several degrees causing the surrounding air temperature to
increase (slightly). This process also contributes to lowering the relative
humidity of the surrounding air.
DEHUMIDIFYING MODE
INSTRUCTIONS
When the unit is first connected to the electrical outlet, the (green) power
light will not light until the “on/off” button is pressed.
When the “on/off” button is activated (pressed), the power light turns to a
state “on” condition and the dehumidifier automatically defaults to:
Display: Current Ambient Room Humidity (RH%)
Humidity Setting:60% RH
Fan Speed: High
IMPORTANT NOTE: Depending on humidity conditions of the surrounding
environment, the dehumidifier may not start automatically under the
default setting (this is an indication that the humidity level of the surround-
ing environment is lower than the “default” setting of 60% RH). Therefore,
it may be necessary to scroll through each of the different dehumidifier
settings 35% - 80% until the “humidstat” (sensor) recognizes conditions
that will allow the unit to operate.
DEHUMIDIFYING MODE SELECTION:
1) To turn the unit on press the ON/OFF button.
2a) Press the humidity “UP” or “DOWN” button to select a desired RH
operating value (35% -85%)
OR
2b) Press the CONTINUOUS button. When CONTINUOUS mode is
selected, the humidistat (sensor) will be by-passed and the
compressor will operate non-stop regardless of humidity conditions.
FAN SPEED SELECTION:
3) Select a fan speed on the keypad. The speed you select is identified by
the (illuminated) indicator light located directly above the selection
made.

Operating Instructions
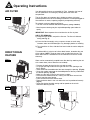
AIR FILTER
8
Your dehumidifer features a removable Air Filter, located at the front of
the unit (behind the air intake grill) directly above the water tank
compartment.
The air filter plays an important role in helping to reduce (minimize)
dust/dirt particles from the surrounding environment. A blocked/clogged air
filter reduces air intake, impacting negatively on operating efficiency.
To maintain maximum operating efficiency:
• The filter must be checked and cleaned regularly (every 2 weeks)
• More frequent cleaning may be required depending upon indoor air
quality.
IMPORTANT: Never operate the unit without the air filter in place.
AIR FILTER REMOVAL:
1) Grasp the filter handle, and pull the filter out. The filter will slide out
easily (see Fig. 2)
2) Clean the filter thoroughly using a vacuum cleaner or wash using
lukewarm water and mild detergent. Dry thoroughly before re-installing.
3) To re-install the air filter, slide the filter back inside the tracks and push
inward.
Fig. 2
DIRECT DRAIN
FEATURE
This dehumidifier is inclusive of a direct drain feature, located at the rear
of the cabinet. NOTE: The drain hose is not included with the unit. The
direct drain feature is intended for use in basements inclusive of a floor
drain only.
Water can be automatically emptied into a floor drain by attaching the unit
with a water hose (24mm diameter not included)
• Remove the water bucket from the unit and set aside.
• Lift up the side flap located on the right side of the unit (looking at the
front). (Fig.3)
• Insert the female threaded end of the hose through the opening. (Fig.4a)
• Screw the garden hose onto the threaded portion of the tray underneath
the bucket opening. (Fig.4b)
• Make sure the hose is secure so there are no leaks.
• Direct the hose toward the drain, making sure that there are no kinks
that will stop the water flowing.
• Place the end of the hose ino the drain.
• Place the bucket back in the unit and make sure its positioned correctly.
(Fig.4c)
• Select the desired humidity setting and fan speed on the unit for
continuous draining to start.
Fig. 3
Fig.4a
Fig.4b
Fig.4c

9
Operating Instructions
USING THE REMOTE
CONTROL
Location of the remote controller.
• Use the remote controller within a distance of 8
meters from the appliance, pointing it towards
thereceiver. Reception is confirmed by a beep.
• Keep the remote controller where its signals can
reach the receiver of the unit. When you select
the timer operation, the remote controller
automatically transmits a signal to the indoor
unit at the specified time. If you keep the remote
controller in a position that hinders proper signal
transmission, a time lag of up to 15 minutes
may occur.
8m
O
N
/
O
F
F
U
P
DO WN
HEA
T
FA
N T
IMER
.
CAUTION
• The unit will not operate if curtains, doors or other materials block
the signals from the remote controller to the unit.
• Prevent any liquid from falling into the remote controller. Do not
expose the remote controller to direct sunlight or heat.
• If the infrared signal receiver on the indoor unit is exposed to
direct sunlight, the air conditioner may not function properly. Use
curtains to prevent the sunlight from falling on the receiver.
• If other electrical appliances react to the remote controller, either
move these appliances or call the service depot.
REMOTE CONTROLLER
SPECIFICATIONS
Model
Rated Voltage
Lowest Voltage of
CPU Emitting Signal
Signal Receiving Range
Environment
RG15G/(C)E
3.0V(Button cell: CR2025)
2.0V
8m
-5°C~ 60°C ( - 41°F ~ 140°F )

Operating Instructions
ON/OFF button
UP/DOWN Buttons
FAN button
CONTINUE Button
TIMER button
Operation starts when
this button is pressed
and stops when the
button is pressed again.
Used to select the fan
speed in two steps:
low and high.
Push this button to
activate the “Auto
Start” or “Auto Stop”
feature, in conjuction with
the up/down buttons.
REMOTE
CONTROLLER
BUTTONS
HEAT button
10
Press this button to activate
the electrical heating mode.
Press it again to stop the
funtion.
NOTE: DEHUMIDIFYING model only has no
HEAT button or heating feature.
Humidity Set Control Buttons
The humidity level can be set within a range
of 35%RH(Relative Humidity) to 85%RH
(RelativeHumidity) in 5% increments.
• For drier air, press the (-) pad and set to a
lower percent value(%).
•For damper air, press the (+) pad and set a
higher percent value(%).
Timer Set Control buttons
Use the Up/Down buttons to set the Auto
start and Auto stop time from 0.0 to 24.
Temperature Set Control buttons
Use the Up/Down buttons to set the desired
temperature under the electrical heating
mode from 17°C(62°F) - 30°C(86°F).
Push this button to
select the continuous
dehumidifying mode
or dehumidifying mode
only.
DEHUMIDIFYING
FUNCTION
Ensure the unit is plugged in and power is
available.
Continuously Dehumidifying operation:
1) Press the ON/OFF button to start the unit.
2) Press the CONTINUE button, the unit will
operate continuously for maximum
dehumidification until the bucket is full.
3) Press the FAN button to select Low or High
fan speed.
NOTE: Under continuous dehumidifying opera-
tion, the humidify level can not be set.
Dehumidifying operation:
1) Press the ON/OFF button to start the unit.
2) Press the CONTINUE button again, the unit
will start the dehumidifying operation.
3) Press the UP or DOWN buttons to set the
desired humidity level in a range of 35% RH
(Relative Humidity) to 85%RH (Relative
Humidity) in 5% increments.
4) Press the FAN button to select Low or High
fan speed.
NOTE: Use the CONTINUE button to select the
Continuously Dehumidifying operation and the
Dehumidifying operation.
1
2
3
4
4

11
Operating Instructions
HEATING OPERATION
(ON SOME MODELS)
Ensure the unit is plugged in and power is
available.
1) Press the ON/OFF button to start the unit.
2) Press the HEAT button the unit will operate in
electrical heating mode.
3) Press the UP/ DOWN buttons to set the
desired temperature. The temperature can be
set within a range of 17°C (62°F) - 30°C (86°F)
in 1°C (1°F) increments.
4) Press the FAN button to select Low or High
fan speed.
NOTE: DEHUMIDIFYING model only has no HEAT
button or heating feature.
2
1
3
3
4
TIMER OPERATION
Pressing the TIMER button can set the Auto-start
and Auto-stop time of the unit.
1) When the unit is on,first press the TIMER
button,the Auto Stop program is initiated.
2) Press or hold the UP or DOWN button to
change the Auto time by 0.5 hour increments,
up to 10 hours (then at 1 hour increments up to
24 hours). The unit control will count down the
time remaining until start.
3) In the 5 seconds after setting auto stop time
press the TIMER button again,the Auto Start
program is initiated.Set the auto start time as
in step 2 above.
4) When the unit is off, press the TIMER
button,the Auto start program is initinated.Set
the auto start time as in step 2 above.
In the 5 seconds after setting auto start time
press the TIMER button again,the Auto Stop
program is initiated.Set the auto stop time
as in step 2 above.
5) Turning the unit ON or OFF at any time or
adjusting the Start/Stop timer setting to 0.0
will cancel the Auto Start/Stop function.
2
2
1
CHANGING THE
BATTERIES ON THE
REMOTE
CR2025
CR 2025
1
2
1
2
+
A
B
The remote controller is powered by
one button cell housed in the rear part
and protected by a cover. Remove the
button cell according to the arrow
marked at the back of the remote
controller.
1. Slightly press “A” position
according to the number 1
arrow direction by your
forefinger.
2. Press “B” position and pull it
according to the number 2
arrow direction by your
thumb.
3. The above step 1 and 2
should be done
simultaneously to slide the
button cell out.
1
2
1
2
+
CAUTION
• Do not use a battery of different type.
• Do not leave the battery in the remote
controller if it is not going to be used
for 2 or 3 months.
• Do not dispose batteries as unsorted
municipal waste. Collection of such
waste separately for special treatment
is necessary.
NOTE: When the batteries are removed, the
remote controller erases all programming.
After inserting new batteries, the remote
controller must be reprogrammed.

Care and Maintenance
CLEAING
STORAGE
When the dehumidifer is not being used for long time periods, please fol-
low these instructions:
1) Disconnect the power cord from the power supply.
2) Empty the water tank and wipe (clean) thoroughly.
3) Clean air filter thoroughly.
4) Re-package the unit in the original carton.
5) Store the unit upright in a dry location.
CAUTION
Before attempting to clean and/or service this unit, always
disconnect the power supply cord from the electrical supply outlet.
1) DO NOT use gasoline, benezene, paint thinner, or any other chemicals
to clean this unit, as these substances will damage/deform both plastic
components and luster finish.
2) Never attempt to clean the unit by pouring water directly over any of the
surface areas, as this will cause deterioration of electrical components
and wiring insulation.
3) Use only a mild dish washing detergent, lukewarm water, and a soft
cloth to wipe the exterior surface of the unit and dry thoroughly.
Troubleshooting
Occasionally a problem may arise that is minor in nature, and a service call may not be neccessary. Use this trou-
bleshooting guide for a possible solution. If the unit continues to operate improperly, call an authorized service depot or
Danby’s Toll Free Number 1-800-263-2629 for assistance.
PROBLEM POSSIBLE CAUSE
1) Unit will not operate. • Check power cord connection.
• Check electrical outlet for blown fuse.
• Check if water tank is full (if yes, empty).
• Check water tank is properly installed.
2) Dehumidifying capacity
(moisture removal) low.
• Air filter is dirty and/or blocked.
• Ambient (room) temperature too low (below 5°C/41°F).
• Poor air flow circulation/obstruction of front grill.
• Relative humidity in surrounding environment very low.
3) Relative Humidity setting not
reached after long period of
operation.
• Check all doors and windows are closed.
• Area/room is too large for the capacity of the
dehumidifier.
PROBLEMS
POSSIBLE CAUSE
12

LIMITED APPLIANCE WARRANTY
This quality product is warranted to be free from manufacturer’s defects in material and workmanship, provided that the unit is used under the normal operating
conditions intended by the manufacturer.
This warranty is available only to the person to whom the unit was originally sold by Danby Products Limited (Canada) or Danby Products Inc. (U.S.A.) (hereafter
“Danby”) or by an authorized distributor of Danby, and is non-transferable.
TERMS OF WARRANTY
Plastic parts, are warranted for thirty (30) days only from purchase date, with no extensions provided.
First Year
During the first twelve (12) months, any functional parts of this product found to be defective, will be repaired or replaced, at warrantor’s
option, at no charge to the ORIGINAL purchaser.
To obtain
It will be the consumer’s responsibility to transport the appliance (at their own expense) to the original retailer (point of purchase) or a
Service
service depot for repair. Contact your dealer from whom your unit was purchased, or contact your nearest authorized Danby service
depot, where service must be performed by a qualified service technician.
If service is performed on the unit by anyone other than an authorized service depot, or the unit is used for commercial application, all
obligations of Danby under this warranty shall be void.
Nothing within this warranty shall imply that Danby will be responsible or liable for any spoilage or damage to food or other contents of this appliance, whether
due to any defect of the appliance, or its use, whether proper or improper.
EXCLUSIONS
Save as herein provided, Danby, there are no other warranties, conditions, representations or guarantees, express or implied, made or intended by Danby or its
authorized distributors and all other warranties, conditions, representations or guarantees, including any warranties, conditions, representations or guarantees
under any Sale of Goods Act or like legislation or statue is hereby expressly excluded. Save as herein provided, Danby shall not be responsible for any damages
to persons or property, including the unit itself, howsoever caused or any consequential damages arising from the malfunction of the unit and by the purchase of
the unit, the purchaser does hereby agree to indemnify and hold harmless Danby from any claim for damages to persons or property caused by the unit.
GENERAL PROVISIONS
No warranty or insurance herein contained or set out shall apply when damage or repair is caused by any of the following:
1) Power failure.
2) Damage in transit or when moving the appliance.
3) Improper power supply such as low voltage, defective house wiring or inadequate fuses.
4) Accident, alteration, abuse or misuse of the appliance such as inadequate air circulation in the room or abnormal operating conditions
(extremely high or low room temperature).
5) Use for commercial or industrial purposes (ie. If the appliance is not installed in a domestic residence).
6) Fire, water damage, theft, war, riot, hostility, acts of God such as hurricanes, floods etc.
7) Service calls resulting in customer education.
8) Improper Installation (ie. Building-in of a free standing appliance or using an appliance outdoors that is not approved for outdoor application).
Proof of purchase date will be required for warranty claims; so, please retain bill of sale. In the event warranty service is required, present this document to our
AUTHORIZED SERVICE DEPOT.
Danby Products Limited
PO Box 1778, Guelph, Ontario, Canada N1H 6Z9
Telephone: (519) 837-0920 FAX: (519) 837-0449
Danby Products Inc
PO Box 669, Findlay, Ohio, U.S.A. 45840
Telephone: (419) 425-8627 FAX: (419) 425-8629
04/09
1-800-263-2629
Warranty Service
Carry-In

BIENVENUE
Merci d’avoir choisi un appareil Danby qui vous fournira ainsi qu’à votre famille, le confort au foyer, à la maison, au
chalet ou au bureau. Ce manuel d’utilisation vous offre des renseignements pratiques pour le soin et l’entretien de
votre nouvel appareil. Un appareil Danby bien entretenu vous fournira plusieurs années de service sans ennui.
Veuillez prendre quelques moments pour lire attentivement toutes les directives pour vous renseigner et vous familiaris-
er avec tous les aspects du fonctionnement de votre appareil.Cet appareil peut être aisément déplacé d’une pièce à
l’autre de la maison et il est installé en quelques minutes seulement.
Pour la référence aisée, nous vous suggérons de joindre une copie de votre reçu de caisse et/ou facture d’achat à cette
page, et d’inscrire les renseignements suivants qui sont trouvés sur la plaque d’identification du fabricant.
Celle-ci est située sur le panneau arrière de l’appareil.
CONSERVER CES INSTRUCTIONS POUR CONSULTATION FUTURE.
Numéro de modèle:
Numéro de série:
Date d’achat:
Ces renseignements seront requis si le service est demandé et/ou si vous désirez obtenir des renseignements
supplémentaires. Pour consulter un Représentant du service à la clientèle, composez le NUMÉRO D’APPEL SANS
FRAIS suivant: (1-800-263-2629)
14
MISE EN GARDE
Ne laissez pas cette unité sans surveillance ou ne fonctionnez pas
dans un espace ou les gens et animaux ne peuvent pas réagir rapi-
dement. Un appareil défaillant peut susciter une surchauffe extrême
résultant à un accident avec blessures personnelles et les damages
de propriété.

REMARQUE
Les instructions de sécurité présentées dans ce manuel ne peuvent cou-
vrir toutes les situations qui pourraient survenir. Chacun doit comprendre
qui l’utilisation adéquate de l’appareil lui-même et qui relèvent uniquement
du comportement de la personne qui installe l’appareil ou l’utilise, ou qui
exécute les opérations d’entretien. Le non-respect des instructions d’in-
stallation, d’utilisation ou d’entretien de l’appareil fournies par le fabricant
peut susciter une sitution pouvant conduire à des dommages matériels
et/ou corporels. L’utilisateur devrait contacter le revendeur ou un agent de
service après-vente du fabricant au sujet de tout problème ou situation qui
n’est pas parfaitement compris. Pour contacter le centre de service-client;
1-800-26-DANBY (1-800-263-2629)
15
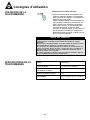
SPECIFICATIONS
ELECTRIQUE
Pour réduire le risque d’incendie, choc électrique ou dommages corporels, il
convient que tout câblage électrique et circuit de liaison à la terre soit con-
forme aux prescription de l’edition la plus récente des codes local et national
réglissant les installations électriques.
• C’est à l’acquéreur qu’incombe la responsabilité de consulter
éventuellement un électricien qualifié qui pourra inspecter le câblage et
les fusibles de la résidence et déterminer si la source d’électricité
disponsible est adéquate pour l’alimentation de l’appareil.
• Cet appareil est conçu pour être alimenté par un circuit 120 volts CA, 60
Hz (circuit indépendant à 3 conducteurs, alimentant une prise de courant
convenablement polarisée et reliée à la terre) protégée par un fusible de
15 ampères (ou disjoncteur ou fusible temporisé équivalent).
• La fiche de branchement à trois broches du cordon d’alimentation doit
être branchée directement sur une prise de courant polarisée de même
configuration et reliée à la terre, conçu pour les circuits 110/120 V CA.
POUR VOTRE SÉCURITÉ: Pour minimiser tout risque d’incendie ou
d’explosion, ne jamais remiser d’essence ou autre produit liquide ou
gazeux inflammable au voisinage de cet appareil ou de tout autre
appareil.
INSTRUCTIONS DE MISE
Á LA TERRE
Le raccordement incorrect à la terre de cet appareil peut susciter un
risque de choc électrique. En cas de doute quant à la qualité de la mise à
la terre de la prise de courant disponsible, consulter un électricien qualifié.
Cet appareil doit être relié à la terre. Advenant une anomalie de fonction-
nement ou une panne, la mise à la terre réduira le risque de choc élec-
trique, parce qu’un itinéraire de moindre résistance sera disponsible pour
le passage du courant électrique. Cet appareil est équipé d’un cordon d’al-
imentation comportant un conducteur de mise à la terre et une fiche de
branchement à trois broches (pour liaison à la terre). La fiche de branche-
ment doit être branchée sur une prise de courant convenablement instal-
lée et reliée à la terre conformément aux prescriptions des codes et
réglements locaux en vigeur.
Ne jamais modifier la fiche de branchement de l’appareil. Si la configura-
tion de la fiche de branchement ne permet pas son branchement sur la
prise de courant, il sera nécessaire de faire installer une prise de courant
adéquate par un électricien qualifié.Si les caractéristiques de la source
d’alimentation électrique de la résidence ne correspondent pas aux spéci-
fications ci-dessus, ou en cas d’incertitude quant à la qualité de la mise à
la terre, demander à unélectricien qualifié ou à la compagnie de distribu-
tion d’électricité d’inspecter l’installation électrique et d’effecteur tout travail
correctif nécessaire.
Consignes de sécurité important
LISEZ TOUTE L'INFORMATION DE SÉCURITÉ AVANT UTILISATION
POUR VOTRE SÉCURITÉ: Lire attentivement ces instructions avant d'utiliser l'appareil.

Installation
L’EMPLACEMENT
• Choisir un emplacement approprié, avec accès facile à une prise de
courant (éviter l’emploi d’une rallonge). S’il est absolument nécessaire
d’utiliser une rallonge pour l’alimentation de l’appareil, utiliser uniquement
une rallonge agréé pour climatiseur (disponible dans la plupart des
magasins de quincaillerie).
• Choisir un emplacement où rien n’entravera la circulation de l’air à
travers la grille d’admission avant. Maintenir une distance de séparation
d’au moins 20cm (8po) entre les murs adjacents et l’arrière de l’appareil,
pour optimiser l’efficacité et la circulation de l’air. L’appareil fonctionne au
niveau d’efficacité maximum lorsque la température ambiante de la pièce
est située entre 5°C (41°F)- 35°C (95°F).
• Il est important de noter que l’efficacité d’un déshumidificateur sera
influencée par la taux de réintroduction d’air humide dans la pièce. Pour
obtenir la meilleure efficacité, il convient de faire fonctionner le
déshumidificateur dans un espace ferme. Fermer toutes les portes et
fenêtres.
Caractéristiques
• Clavier de commande tactile (électronique)
• Auto-détection de l’hygrométrie ambiante
• Réglage selon l’hygrométrie (35% - 85%)
• Ventilateur à 2 vitesses (Haut/Bas)
• Mise en marche temporisée- protection (compresseur)
• Dégivrage automatique
• Témoin « réceptacle plein »
• Roulettes pour déplacement facile (4)
• Réservoir d’eau situé sur l’avant (amovible)
• Option de drainage direct (tuyau pas inclus)
• Functionnement silencieux
• Filtre à air amovible
16
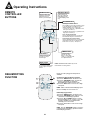
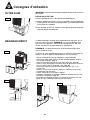
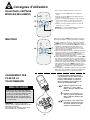
Panneau de
commande
Panneau avant
Entrée d’air
Indicateur du
niveau de l’eau
poignée
Filtre à air
(panneau
latéral)
Réservoir
d’eau
Roulettes à
glissement
facile

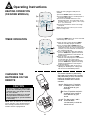
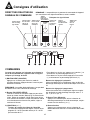
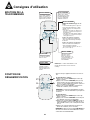
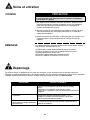
Consignes d’utilisation
DIRECTIVES RELATIVES AU
PANNEAU DE COMMANDE
REMARQUE : Il est possible que le panneau de commande de l’appareil
que vous achetez soit légèrement différent, selon le modèle.
8
1
2
3
45
6
7
Témoin indica-
teur de nettoy-
age du filtre
Témoin indica-
teur de haute
vitesse du
ventilateur
Témoin indica-
teur de haute
vitesse du
ventilateur
Témoin
lumineux
haute vitesse
du ventilateur
Récepteur de signal distant
Témoin indi-
cateur de
réceptacle à
eau plein
Témoin
lumineux de
fonctionnement
continu
Témoin indi-
cateur de
mise en
marche
HEAT Normal
on
off
Time
Cont. Power
Full
Turbo
Récepteur
de signal
distant
Heat
Fan
Timer
Cont.
Power
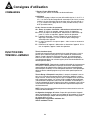
COMMANDES
Lorsque vous appuyez sur le bouton pour changer le
mode de fonctionnement, l’appareil émet un bip pour
indiquer qu’il change de mode.
1) BOUTON HEAT (CHALEUR)
Appuyez sur ce bouton pour activer le mode de
chauffage électrique. Appuyez dessus à nouveau pour
désactiver la fonction.
REMARQUE : Le modèle déshumidificateur n’est pas doté
du bouton HEAT et de la fonction de chauffage.
2) Bouton FAN (VENTILATEUR)
Contrôle la vitesse du ventilateur. Appuyez pour sélec-
tionner la vitesse normale (Normal) ou la vitesse élevée
(High). Réglez le ventilateur à High (Élevé) pour élimin-
er le maximum d’humidité. Lorsque l’humidité est réduite
et un fonctionnement silencieux est préféré, réglez le
ventilateur à Normal.
3,4) BOUTONS ( + / - )
Touches de contrôle de réglage de l’humidité
Le niveau d’humidité peut être réglé à l’intérieur d’une
plage de 85 % d’HR (humidité relative) à 35 % d’HR
par intervalles de 5 %.
• Pour obtenir un air plus sec, appuyez sur la touche (-) et
sélectionnez un pourcentage plus élevé (%).
• Pour obtenir un air plus humide, appuyez sur la touche
(+) et sélectionnez un pourcentage plus élevé (%).
Boutons de réglage de la minuterie
Utilisez les boutons UP et DOWN pour régler le délai de
démarrage automatique et d’arrêt automatique entre 0,0 et
24.
Boutons de réglage de la température
Utilisez les touches UP et DOWN pour régler la tempéra-
ture souhaitée en mode chauffage électrique entre 17 °C
(62 °F) et 30 °C (86 °F).
5) Bouton Timer (Minuterie)
Appuyez sur ce bouton pour activer la fonction de
démarrage automatique et d’arrêt automatique, conjoin-
tement avec les touches (+) et (-).
6) Bouton Continu
Appuyez sur ce bouton pour activer la fonction de
déshumidification continue et la fonction de déshumidifi-
cation.
17

18
FUNCTION DES
TÉMOINS LUMINEUX
Témoin Lumineux (vert):
Quand l'unité est premièrement connectée à une sortie électrique, le (vert) le
pouvoir allume n'allumera pas jusqu'à ce que le bouton de «Marche/Arrêt»
appuyé. Quand le bouton de «Marche/Arrêt» activé, la lumière de pouvoir
tourne à un état « Marche » la condition. Le déshumidificateur automatique-
ment prendra par défaut à la mémoire réglant (voit le Fonction de Mémoire au
dessous pour les détails).
NOTE IMPORTANTE : Dépendre des conditions d'humidité de l'environnement
environnant, le déshumidificateur ne peut pas commencer automatiquement
quand le bouton de «Marche/Arrêt» appuyé (voit les instructions d'opération
d’humidité pour les détails). En cas d'une panne d'électricité, l'unité prendra par
défaut au dernier cadre de programme qui a été utilisé quand le pouvoir est
restauré.
Témoin Rouge « Réceptacle à eau plein »: Lorsque le réceptacle à eau est
plein, ou s’il n’est pas correctement placé à l’intérieur de l’appareil, le témoin
rouge s’illumine; il reste illuminé jusqu’à ce que le réceptacle à eau ait été vidé
et/ou correctement replacé. Ceci suscite l’arrêt immédiat du déshumidificateur
(l’alimentation du compresseur et du moteur du ventilateur est interrompue). Il
s’agit d’un dispositif de sécurité. Après qu’on a vidé le réceptacle à eau et qu’on
l’a correctement repositionné, le déshumidificateur reprend automatiquement
son fonctionnement.
NOTE: Il peut être nécessaire d’attendre plusieurs minutes avant la remise en
marche du déshumidificateur.
Configuration de réglage de l’usine: Chaque fois qu’on branche l’appareil
après l’avoir débranché, ou après une interruption de l’alimentation, le circuit de
commande électronique adopte automatiquement par défaut la configuration
de réglage définie à l’usine.
Réglage delon l’hygrométrie ambiante: 60%
Vitesse ventilateur: Haute
Consignes d’utilisation
COMMANDES
7) Bouton Power (Marche/Arrêt)
Appuyez pour allumer ou éteindre le déshumidificateur.
8) Affichage
Pendant le réglage, indique le niveau d’humidité réglé en % de 35 % à
85 %, ou l’heure de démarrage/d’arrêt automatique (de 0 à 24); ensuite,
indique le niveau d’humidité réel de la pièce (avec une précision de +/-
5 %), à l’intérieur d’une plage de 30 % d’HR (humidité relative) à 90 %
d’HE (humidité relative).
Codes d’erreur et codes de protection
AS - Erreur du capteur d’humidité : débranchez et rebranchez l’ap-
pareil. Si l’erreur se reproduit, appelez l’atelier de réparation.
ES - Erreur du capteur de température : débranchez et rebranchez l’ap-
pareil. Si l’erreur se reproduit, appelez l’atelier de réparation.
P1 - L’appareil décongèle : laissez à l’appareil le temps d’effectuer le
dégivrage automatique. L’erreur se lèvera après le dégivrage
automatique de l’appareil.
P2 - Le seau est plein ou n’est pas en place : videz le seau et remettez-le
à sa place.
E1 - Défaillance de l’appareil : débranchez et rebranchez l’appareil. Si l’er-
reur se reproduit, appelez l’atelier de réparation.

19
RÉCEPTACLE À EAU
IMPORTANT
On ne doit jamais circonvenir l’action du contacteur de sécurité
associé au flotteur dans le réceptacle à eau.
Il est essentiel que le réceptacle à eau soit correctement installé dans l’ap-
pareil pour que le déshumidificateur fonctionne correctement.
L’eau condensée générée par la processus de déshumidification s’accu-
mule dans le réceptacle à eau; un contacteur de sécurité empêche le
fonctionnement de l’appareil lorsque le réceptacle à eau est plein, ou si le
réceptacle à eau a été accidentallement déplacé à l’intérieur de son loge-
ment (action de flotteur dans le réceptacle à eau). L’interruption de l’ali-
mentation lors de l’ouverture du contacteur de sécurité provoque immédi-
atement l’arrêt du compresseur et du moteur du ventilateur, et par con-
séquent l’interruption du processus de déshumidification.
DÉSHUMIDIFICATION
Lors du branchement initial de l’appareil sur la prise de courant, le témoin
d’alimentation vert clignote; il continue à clignoter jusqu’à ce qu’on appuie
sur le bouton de mise en marche ON/OFF; lors de la pression sur le bou-
ton, le témoin vert cesse de clignoter et il reste illuminé en permanence;
l’appareil adopte automatiquement la configuration de fonctionnement
suivante:
Réglage selon l’hygrométrie ambiante:
hygrométrie relative de 60%
Vitesse ventilateur: Haut
NOTE IMPORTANTE: Selon le taux d’hygrométrie de l’environment, l’ap-
pareil peut ne pas semettre en marche automatiquement avec la configu-
ration de réglage adoptée par défaut (ceci indique que le taux d’hy-
grométrie de l’environment est inférieur à 60%). Par conséquent il sera
alors nécessaire de sélectionner successivement chacun des réglages
d’hygrométrie jusqu’à ce que l’humidistat identifie un taux d’hygrométrie
qui permet le fonctionnement de l’appareil.
SÉLECTION DU MODE DE DÉSHUMIDIFICATION:
1) Appuyer sur le bouton ON/OFF pour commander la mise en marche de
l’appareil.
2a) Appuyez la touche d’humidité UP ou DOWN pour sélectionner la
valeur de l’humidité relative désirez (35% - 85%).
OU
2b) Appuyez sur la touche Continu. Quand la mode continu est
sélectionnée le compresseur fonctionne sans arrêt indépendamment
des conditions d’humidité.
VENTILATEUR:
3) Choisissez une vitesse du ventilateur. La mode vitesse sélectionnée est
identifiée par (l’éclairage) l’indicateur lumineux situé au-dessus de la
sélection faite.
Consignes d’utilisation
FILTRE À AIR
Le déshumidificateur comporte un filtre à air amovible, situé à l’avant de
l’appareil (derrière Entrée d’air) directement au-dessus du compartiment
du réceptacle à eau.
La fonction du filtre à air est de minimiser la concentration de
particules de poussière dans l’atmosphère environnante. Un filtre à air obstrué
réduit le débit de circulation d’air, ce qui dégrade l’efficacité de fonctionnement
de l’appareil. On doit inspecter et nettoyer le filtre à intervalles réguiliers (inter-
valle de deux semaines) pour que l’appareil puisse toujours fonctionner au
niveau d’efficacité maximum. Il peut être nécessaire d’augmenter la fréquence
des nettoyages, selon la qualité de l’air à traiter.
La page est en cours de chargement...
La page est en cours de chargement...
La page est en cours de chargement...
La page est en cours de chargement...
La page est en cours de chargement...
La page est en cours de chargement...
La page est en cours de chargement...
-
 1
1
-
 2
2
-
 3
3
-
 4
4
-
 5
5
-
 6
6
-
 7
7
-
 8
8
-
 9
9
-
 10
10
-
 11
11
-
 12
12
-
 13
13
-
 14
14
-
 15
15
-
 16
16
-
 17
17
-
 18
18
-
 19
19
-
 20
20
-
 21
21
-
 22
22
-
 23
23
-
 24
24
-
 25
25
-
 26
26
-
 27
27


Danby DDR4011 Le manuel du propriétaire
- Catégorie
- Déshumidificateurs
- Taper
- Le manuel du propriétaire
dans d''autres langues
- English: Danby DDR4011 Owner's manual
Documents connexes
-
Danby DDR2506 Manuel utilisateur
-
-
-
 Premiere DDR5009REE Manuel utilisateur
-
-
-
Danby Premiere DDR25E Owner's Use And Care Manual
-
-
-

Autres documents
-
Simplicity SDR505R Le manuel du propriétaire
-
Philips DE5205 Manuel utilisateur
-
Westinghouse WSFCKTD2 Manuel utilisateur
-
LANAFORM S1 Manuel utilisateur
-
ALPATEC DH 12 E Manuel utilisateur
-
-
 Royal Sovereign International RDH-170K Le manuel du propriétaire
-
Royal Sovereign RDH-130K/170K Le manuel du propriétaire
-
