
MODEL #RD821024
40 Amp RANGE CORD
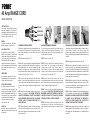
(Pic. 5)(Pic. 4)(Pic. 3)(Pic. 2)(Pic. 1)
SAFETY INSTRUCTIONS:
Do not exceed electrical ratings. Uncoil and extend
before using. Turn appliance to “off” position before
inserting plug. Keep children and pets away. Do not
use if cord is damaged, cut, worn, or frayed. Do not
repair, modify, splice or alter this cord.
WARNING:
Disregarding “Safety Instructions” could damage
appliance, result in fire, or cause fatal shock.
CONSIGNES DE SÉCURITÉ:
Ne jamais dépasser les capacités électriques
indiquées. Dérouler et allonger le cordon d’alimenta-
tion avant chaque utilisation. Avant de brancher la
fiche de connexion, mettre tous les appareils hors
tension. Garder les enfants et les animaux de
compagnie à bonne distance. Ne pas utiliser si le
cordon est endommagé, entaillé ou effiloché. Ne pas
réparer, modifier, épiser ou altérer ce cordon
d’alimentation.
AVERTISSEMENT:
Le non-respect des consignes de sécurité risque
d’endommager l’appareil, ainsi que de causer un
incendie et une éloctrocution mortelle.
INSTRUCCIONES DE SEGURIDAD:
No sobrepase la capacidad eléctrica nominal.
Desenrolle y extienda el cable antes de usarlo. Ponga
el aparato en posición de apagado (OFF) antes de
insertar la clavija. Manténgalo fuera del alcance de
niños y animales. No lo use si el cable está dañado,
cortado, desgastado o deshilachado. No haga
reparaciones, modificaciones, empalmes o
alteraciones en este cable.
PRECAUCIÓN:
No seguir las “instrucciones de seguridad” podría
dañar el aparato, provocar un incendio o causar una
descarga mortal.
STRAIN RELIEF ASSEMBLY INSTRUCTIONS
The strain relief is designed to prevent the cord from placing stress on the
wire connections at the terminal-block. It is very important to follow the
proper assembly instructions below to ensure that the strain relief will
function properly.
STEP 1: Disassemble the strain relief. (Pic. 1)
STEP 2: Find the correct opening in the back of the appliance through which
the power cord and strain relief will fit. Insert both halves of the strain relief
into the opening so that the “ears” are inside of the appliance. The clamp
part with the screws will be on the outside of the appliance. Align both
pieces in this manner. Insert the screws loosely into the proper holes of the
strain relief in order to hold it in place. (Pic. 2 & 3)
STEP 3: Feed the power supply cord through the strain relief into the
appliance. For 4-wire cords pay particular attention to the wire colors and
connect the ring terminals to the terminal-block inside the appliance exactly
in accordance with the appliance manufacturer’s assembly instructions.
(Pic. 4)
STEP 4: Ensure that the ring terminals are tightly secured to the proper
terminals on the terminal-block. ALL INDIVIDUAL WIRES MUST BE
CONNECTED TO THE TERMINAL-BLOCK IN STRICT ACCORDANCE WITH
THE APPLIANCE MANUFACTURER’S INSTRUCTIONS. IF YOU HAVE ANY
QUESTIONS, CONTACT THE APPLIANCE MANUFACTURER OR A
LICENSED ELECTRICIAN.
STEP 5: Allow a small amount of extra wire (slack) between the appliance
and the strain relief and then tighten the screws on the strain relief. The
screws should be tightened so that the top and bottom halves of the strain
relief are touching. (Pic. 5)
DIRECTIVES D’ASSEMBLAGE DU SERRE-CÂBLE
Le serre-câble est conçu pour empêcher un cordon électrique d’exercer une
tension sur les fils de raccordement au bloc de branchement. Il est très
important de suivre correctement les directives d’assemblage pour que le
serre-câble fonctionne efficacement.
ÉTAPE 1: Démonter le serre-câble. (#1)
ÉTAPE 2: À l’arrière de l’appareil, repérer l’ouverture pour faire passer le
cordon électrique. Insérer les deux moitiés du serre-câble dans cette
ouverture pour que les «oreilles» soient à l’intérieur de l’appareil. Les
parties à serrer avec les vis seront à l’extérieur de l’appareil. Aligner les
deux pièces. Insérer les vis dans les trous du serre-câble et les visser juste
assez pour retenir le serre-câble en place. (#2,3)
ÉTAPE 3: Passer le cordon électrique à travers le serre-câble. Faire
particulièrement attention aux couleurs des fils et relier les cosses à anneau
au bloc de branchement à l’intérieur de l’appareil en suivant exactement les
directives d’assemblage du fabricant de l’appareil. (#4)
ÉTAPE 4: S’assurer que les cosses à anneau sont bien fixées aux bornes du
bloc de branchement. CHAQUE FIL DOIT ÊTRE CONNECTÉ AU BLOC DE
BRANCHEMENT EN RESPECTANT STRICTEMENT LES DIRECTIVES DU
FABRICANT DE L’APPAREIL. POUR TOUTE QUESTION, S’ADRESSER AU
FABRICANT DE L’APPAREIL OU À UN ÉLECTRICIEN AGRÉÉ.
ÉTAPE 5: Laisser un léger excédent de fil entre l’appareil et le serre-câble
puis resserrer les vis sur le serre-câble. Les vis devraient être serrées de
manière que les moitiés supérieure et inférieure du serre-câble se touchent.
(#5)
INSTRUCCIONES DE INSTALACIÓN DE LA MORDAZA DE RETENCIÓN
La mordaza de retención se instala para evitar que, al tirar del cordón, se
aflojen o dañen las conexiones de los cables en la bornera. Para
asegurarse de que la mordaza de retención cumpla eficientemente con su
función, es importante seguir estrictamente las siguientes instrucciones de
instalación.
PASO 1: Desarmar la mordaza de retención del cordón. (#1)
PASO 2: Buscar en la parte de atrás del artefacto el orificio por el cual
pasará el cordón eléctrico y en el cual se instalará la mordaza. Introducir en
el orificio las dos mitades de la mordaza de retención, de manera tal que
las orejas queden del lado interno y la abrazadera con los tornillos del lado
externo. Alinear ambas partes e introducir los tornillos (sin ajustarlos) para
mantener la mordaza en esa posición. (#2,3)
PASO 3: Introducir en el artefacto el cordón eléctrico, haciéndolo pasar por
la mordaza de retención. Siguiendo la codificación en colores de los cables
y las instrucciones del fabricante, conectar los terminales del cordón a la
bornera de conexiones en el interior del artefacto. (#4)
PASO 4: Verificar que los terminales del cordón estén firmemente conecta-
dos a los terminales de la bornera del artefacto. LAS CONEXIONES
INDIVIDUALES A LA BORNERA SE DEBEN EFECTUAR ESTRICTAMENTE
DE ACUERDO CON LAS INSTRUCCIONES DEL FABRICANTE DEL
ARTEFACTO. SI TUVIERA CUALQUIER DUDA, CONSULTE CON EL
FABRICANTE O CON UN ELECTRICISTA PROFESIONAL.
PASO 5: Dejar un pequeño tramo extra de cordón (suelto) en el interior del
artefacto y ajustar los tornillos de la mordaza de retención. Los tornillos se
deben ajustar hasta que ambas mitades de la mordaza queden en
contacto. (#5)
HOT (BLACK)
GROUND (GREEN)
NEUTRAL (WHITE)
HOT (RED)
-
 1
1

dans d''autres langues
- English: Prime RD821024 User manual
- español: Prime RD821024 Manual de usuario
