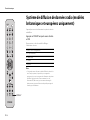
Yamaha B370D Le manuel du propriétaire
- Catégorie
- Récepteurs multimédia de voiture
- Taper
- Le manuel du propriétaire


2 En
Table of Contents
PRECAUTIONS ....................................................................................... 3
Introduction .......................................................................................... 7
About this manual ....................................................................................................................................... 7
Trademarks ....................................................................................................................................................... 7
Accessories ....................................................................................................................................................... 7
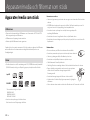
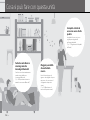
What you can do with this unit .......................................................... 8
Parts name ............................................................................................. 9
Front panel ....................................................................................................................................................... 9
Rear panel ...................................................................................................................................................... 10
Front panel display ................................................................................................................................... 11
Remote control ........................................................................................................................................... 12
Preparations ........................................................................................ 13
Connecting speakers .............................................................................................................................. 13
Connecting the antenna ...................................................................................................................... 14
Turning on the power ............................................................................................................................ 15
Using the sleep timer .............................................................................................................................. 15
Listening to music .............................................................................. 16
Listening to CDs ......................................................................................................................................... 16
Playing music on USB memory devices ...................................................................................... 17
Playing music via Bluetooth® connection ................................................................................. 18
Listening to DAB stations (CRX-B370D only) ............................................................................ 19
Listening to FM radio stations ........................................................................................................... 22
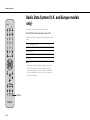
Radio Data System (U.K. and Europe models only) .............................................................. 24
Playing music from external devices ............................................................................................ 25
More on playback .............................................................................. 26
Shuffle/Repeat playback ....................................................................................................................... 26
Playback information ............................................................................................................................... 27
Adjusting sound quality ........................................................................................................................ 27
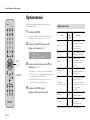
Option menu ................................................................................................................................................ 28
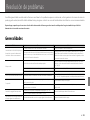
Troubleshooting ................................................................................ 29
General ............................................................................................................................................................. 29
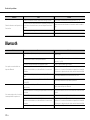
Bluetooth ........................................................................................................................................................ 30
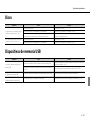
Disc ..................................................................................................................................................................... 31
USB memory devices ............................................................................................................................... 31
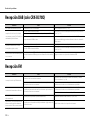
DAB reception (CRX-B370D only) .................................................................................................... 32
FM reception ................................................................................................................................................ 32
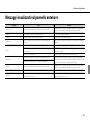
Messages in the front panel display ............................................................................................... 33
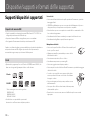
Supported devices/media and file formats .................................. 34
Supported devices/media ................................................................................................................... 34
File format ...................................................................................................................................................... 35
Specifications ..................................................................................... 36

En 3
PRECAUTIONS
PLEASE READ CAREFULLY BEFORE USE. BE SURE TO
FOLLOW THESE INSTRUCTIONS.
The precautions listed below are to prevent risk of harm to the
user and others, as well as to prevent property damage, and to
help the user use this unit properly and safely. Be sure to follow
these instructions.
After reading this manual, be sure to keep it in a safe place where it can be
referenced at any time.
WARNING
This content indicates “risk of serious injury or death.”
Laser
• Do not remove the cover for repair. This unit uses a laser. Laser light entering your eyes
may cause visual impairment. Request inspections or repairs from the dealer where you
purchased the unit or from qualified Yamaha service personnel.
• Do not look into the laser source. If there is nothing to block it, this unit emits a visible laser.
Avoid looking at the laser directly. Laser light entering your eyes may cause visual
impairment. When the plug is inserted into the AC outlet, do not place your eyes near
openings of the disk tray or other openings, and do not try to look inside the unit.
Power supply/power cord
• Do not do anything that could damage the power cord.
- Do not place it near a heater.
- Do not bend it excessively or alter it.
- Do not scratch it.
- Do not place it under a heavy object.
Using the power cord with the core of the cord exposed could cause electric shocks or a
fire.
• Never charge this unit if it is wet. Failure to observe this may cause electric shocks or a
terminal circuit shortage and cause a fire or malfunctions.
• Do not touch the power plug or cord if there is a chance of lightning. Failure to observe this
may cause electric shocks.
• Use this unit with the power supply voltage printed on it. Failure to connect to an
appropriate AC outlet may cause a fire, electric shocks, or malfunctions.
• Check the electric plug periodically and remove any dirt or dust which may have
accumulated on it. Failure to observe this may cause a fire or electric shocks.
• When setting up the unit, make sure that the AC outlet you are using is easily accessible. If
some trouble or malfunction occurs, immediately turn off the power switch and disconnect
the plug from the AC outlet. Even when the power switch is turned off, as long as the power
cord is not unplugged from the wall AC outlet, the unit will not be disconnected from the
power source.
• If you hear thunder or suspect approaching lightning, quickly turn off the power switch and
pull the power plug from the AC outlet. Failure to observe this may cause a fire or
malfunctions.
• If not using the unit for long periods of time, be sure to pull the power plug from the AC
outlet. Failure to observe this may cause a fire or malfunctions.
Do not disassemble
• Do not disassemble or modify this unit. Failure to observe this may cause a fire, electric
shocks, injury, or malfunctions. If you notice any irregularities, be sure to request an
inspection or repair from the dealer where you purchased the unit or from qualified Yamaha
service personnel.
Water warning
• Do not expose the unit to rain, use it near water or in damp or wet conditions, or place on it
any containers (such as vases, bottles or glasses) containing liquids which might spill into
any openings or places where water may drop. A liquid such as water getting into the unit
may cause a fire, electric shocks, or malfunctions. If any liquid such as water seeps into the
device, turn off the power immediately and unplug the power cord from the AC outlet. Then,
request an inspection from the dealer where you purchased the unit or from qualified
Yamaha service personnel.
• Never insert or remove an electric plug with wet hands. Do not handle this unit with wet
hands. Failure to observe this may cause electric shocks or malfunctions.
Fire warning
• Do not place any burning items or open flames near the unit, since they may cause a fire.
• Be sure to request inspections or repairs from the dealer where you
purchased the unit or from qualified Yamaha service personnel.
• Yamaha cannot be held responsible for injury to you or damage of the
products caused by improper use or modifications to the unit.
• This product is for ordinary homes. Do not use for applications
requiring high reliability, such as managing lives, health care or high-
value assets.

4 En
Maintenance and care
• Do not use aerosols or spray-type chemicals that contain combustible gas for cleaning or
lubrication. The combustible gas will remain inside the unit, which may cause explosion or
fire.
Battery use
• Do not disassemble a battery. If the contents of the battery get on your hands or in your
eyes, it can cause blindness or chemical burns.
• Do not dispose of batteries in fire. Doing so may result in the battery bursting, causing a fire
or injury.
• Do not attempt to recharge batteries that are not intended to be charged. Charging could
cause the battery to burst or leak, which can cause blindness, chemical burns, or injury.
• If the batteries do leak, avoid contact with the leaked fluid. If the battery fluid should come in
contact with your eyes, mouth, or skin, wash immediately with water and consult a doctor.
Battery fluid is corrosive and may possibly cause loss of sight or chemical burns.
Wireless unit
• Do not use this unit near medical devices or inside medical facilities. Radio waves from this
unit may affect electro-medical devices.
• Do not use this unit within 15 cm (6 in) of persons with a heart pacemaker implant or a
defibrillator implant. Radio waves from this unit may affect electro-medical devices, such as
a heart pacemaker implant or defibrillator implant.
If you notice any abnormality
• If any of the following abnormalities occur, immediately turn off the power and disconnect
the power plug.
- The power cord/plug is damaged.
- An unusual smell or smoke is emitted from the unit.
- Foreign material gets into the interior of the unit.
- There is a loss of sound during use.
- There is a crack or damage in the unit.
Continued use could cause electric shocks, a fire, or malfunctions. Immediately request an
inspection or repair from the dealer where you purchased the unit or from qualified Yamaha
service personnel.
• Be careful not to drop or apply strong impact to this unit. If you suspect the unit may have
been damaged due to dropping or impact, immediately turn off the power and pull the power
plug from the AC outlet. Failure to observe this may cause electric shocks, a fire, or
malfunctions. Immediately request an inspection from the dealer where you purchased the
unit or from qualified Yamaha service personnel.
CAUTION
This content indicates “risk of injury.”
Power supply/power cord
• Do not use an AC outlet where the power plug fits loosely when inserted. Failure to observe
this may cause a fire, electric shocks, or burns.
• When removing the electric plug from the unit or an AC outlet, always hold the plug itself
and not the cord. Pulling by the cord can damage it and cause electric shocks or a fire.
• Insert the power plug firmly all the way into the AC outlet. Using the unit when it is not
plugged in sufficiently can cause dust to accumulate on the plug, causing a fire or burns.
Installation
• Do not place the unit in an unstable position where it might accidentally drop or fall over and
cause injuries.
• Do not block this unit's ventilation holes (cooling slits). This unit has ventilation holes on the
side to prevent the internal temperature from becoming too high. Failure to observe this
may trap heat inside the unit, causing a fire or malfunctions.
• When installing this unit:
- Do not cover it with any cloth.
- Do not install it on a carpet or rug.
- Make sure the top surface faces up; do not install on its sides or upside down.
- Do not use the device in a confined, poorly-ventilated location.
Failure to observe the above may trap heat inside the unit, causing a fire or malfunctions.
Ensure that there is adequate space around the unit: at least 5 cm (2 in) on top, 5 cm (2 in)
on the sides, and 5 cm (2 in) on the rear.
• Do not install the unit in places where it may come into contact with corrosive gases or salt
air or places that have excessive smoke or steam. Doing so may result in malfunction.
• Before moving this unit, be sure to turn off the power switch and disconnect all connection
cables. Failure to observe this may damage the cables or cause you to trip and fall.
• For proper installation of the outdoor antenna, make sure to have it done by the dealer from
where you purchased the unit or by qualified service personnel. Failure to observe this may
cause the installation to fall and result in injury. Installation requires special skills and
experience.
Hearing loss
• Do not use the unit for a long period of time at a high or uncomfortable volume level, since
this can cause permanent hearing loss. If you experience any hearing loss or ringing in the
ears, consult a physician.
• Before connecting the unit to other devices, turn off the power for all devices. Also, before
turning the power of all devices on or off, make sure that all volume levels are set to the
minimum. Failing to do so may result in hearing loss, electric shock, or device damage.
• When turning on the AC power in your audio system, always turn on the unit LAST, to avoid
hearing loss and speaker damage. When turning the power off, the unit should be turned off

En 5
FIRST for the same reason. Failure to observe the above may cause hearing impairment or
speaker damage.
Maintenance
• Remove the power plug from the AC outlet before cleaning the unit. Failure to observe this
may cause electric shocks.
Handling caution
• Do not insert your hand or fingers into disk slot of this unit. Failure to observe this may
cause injury.
• Do not insert foreign materials such as metal or paper into disk slot of this unit. Failure to
observe this may cause a fire, electric shocks, or malfunctions. If foreign material gets into
the unit, immediately shut off the power and pull the power plug from the AC outlet and
request an inspection from the dealer where you purchased the unit or from qualified
Yamaha service personnel.
• Do not do the following:
- stand on or sit on the equipment.
- put heavy items on top of the equipment.
- place the equipment in a stack.
- apply unreasonable force to buttons, switches, input/output terminals, etc.
• Avoid pulling the connected cables to prevent injuries or damage to the unit by causing it to
fall.
• Do not operate the unit if the sound is distorting. Prolonged use in this condition could
cause overheating and result in fire.
Battery use
• Always replace all batteries at the same time. Do not use new batteries together with old
ones. Using new ones with old ones could cause a fire, burns, or inflammation due to fluid
leaks.
• Do not use batteries other than specified batteries. Doing so cause fire, burns, or
inflammation due to leakage.
• Do not mix battery types, such as alkaline batteries with manganese batteries, or batteries
from different makers, or different types of batteries from the same maker, since this can
cause a fire, burns, or inflammation due to fluid leaks.
• Keep batteries away from children. A child could accidentally swallow a battery. Failure to
observe this may also cause inflammation due to battery fluid leaks.
• Do not put in a pocket or bag, carry, or store batteries together with pieces of metal. The
battery could short, burst, or leak, causing a fire or injury.
• Always make sure all batteries are inserted in conformity with the +/- polarity markings.
Failure to do so might result in a fire, burns, or inflammation due to fluid leaks.
• When the batteries run out, or if the unit is not to be used for a long time remove the
batteries from the unit to prevent possible leakage of the battery fluid.
• When storing or discarding batteries, insulate the terminal area by applying tape, or some
other protection. Mixing them with other batteries or metal objects can cause a fire, burns,
or inflammation due to fluid.
NOTICE
Indicates points that you must observe in order to prevent
product failure, damage or malfunction and data loss.
Power supply/power cord
• If not using the unit for a long period of time, be sure to pull the power plug from the outlet.
Even if the [z](Standby/On) switch has been turned off (the screen display is off), a minute
current is still flowing.
Installation
• Do not use this unit in the vicinity of other electronic equipment, such as a TV, radio, or
mobile phone. Failure to observe this may cause this unit or the TV or radio to produce
noise.
• Do not use this unit in a location that is exposed to direct sunlight that becomes extremely
hot, such as near a heater, or extremely cold, or that is subject to excessive dust or
vibration. Failure to observe this may cause the unit's panel to become deformed, the
internal components to malfunction, or for operation to become unstable.
• Install this unit as far away from other electronic equipment as possible.
Digital signals from this unit may interfere with other electronic equipment.
• If using a wireless function, avoid installing this unit near metal walls or desks, microwave
ovens, or other wireless network devices.
Obstructions could shorten the transmission distance.
Connections
• If connecting external units, be sure to thoroughly read the manual for each unit and
connect them in accordance with the instructions.
Failure to properly handle a unit in accordance with the instructions could cause
malfunctions.
• Do not connect this unit to industrial units.
Digital audio interface standards for consumer use and industrial use are different. This unit
has been designed to connect to a consumer-use digital audio interface. Connections to an
industrial-use digital audio interface could not only cause this unit to malfunction, but could
also damage the speakers.

6 En
Handling
• Do not place vinyl, plastic, or rubber products on this unit. Failure to observe this may cause
discoloration or deformation in the panel of this unit.
• If the ambient temperature changes drastically (such as during unit transportation or under
rapid heating or cooling) and there is a chance condensation may have formed in the unit,
leave the unit for several hours without turning on the power until it is completely dry before
use. Using the unit while there is condensation can cause malfunctions.
Maintenance
• When cleaning the unit, use a dry, soft cloth. Using chemicals such as benzine or thinner,
cleaning agents, or chemical scrubbing cloths can cause discoloration or deformation.
Batteries
• Be sure to discard used batteries in accordance with local regulations.
About content in this manual
• The illustrations and screens in this manual are for instructional purposes only.
• The company names and product names in this manual are the trademarks or registered
trademarks of their respective companies.
• Software may be revised and updated without prior notice.
(weee_battery_eu_en_02)
LASER SAFETY
This unit employs a laser. Due to possible eye injury, only a qualifi ed service person should remove
the cover or attempt to service this device.
DANGER
This unit emits visible laser radiation when open. Avoid direct eye exposure to beam.
When this unit is plugged into the wall outlet, do not place your eyes close to the opening of the disc
tray and other openings to look into inside.
CAUTION
Use of controls or adjustments or performance of procedures other than those specified herein may
result in hazardous radiation exposure.
The laser component in this product is capable of emitting radiation exceeding the limit for Class 1.
The model number, serial number, power requirements, etc., may be found on or near the
name plate, which is at the rear of the unit. You should note this serial number in the space
provided below and retain this manual as a permanent record of your purchase to aid
identification in the event of theft.
Model No.
Serial No.
(rear_en_01)
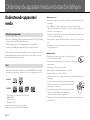
Information for users on collection and disposal of old equipment and used
batteries:
These symbols on the products, packaging, and/or accompanying documents
mean that used electrical and electronic products and batteries should not be
mixed with general household waste.
For proper treatment, recovery and recycling of old products and used
batteries, please take them to applicable collection points, in accordance with
your national legislation.
By disposing of these products and batteries correctly, you will help to save
valuable resources and prevent any potential negative effects on human
health and the environment which could otherwise arise from inappropriate
waste handling.
For more information about collection and recycling of old products and
batteries, please contact your local municipality, your waste disposal service
or the point of sale where you purchased the items.
For business users in the European Union:
If you wish to discard electrical and electronic equipment, please contact your
dealer or supplier for further information.
Information on Disposal in other Countries outside the European Union:
These symbols are only valid in the European Union. If you wish to discard
these items, please contact your local authorities or dealer and ask for the
correct method of disposal.
Note for the battery symbol (bottom two symbol examples):
This symbol might be used in combination with a chemical symbol. In this case
it complies with the requirement set by the EU Battery Directive for the
chemical involved.

En 7
Introduction
Confirm the package contents and useful points of this manual.
About this manual
• Instructions and illustrations used in this manual refer to the CRX-B370D, unless
otherwise specified.
• How to operate this unit is described mainly using the remote control.
• Illustrations may differ from actual item depicted.
• Symbols:
Caution Indicates information that should be read before use to prevent failure
or physical damage.
Note Indicates precautions and supplementary information that should be
read before using the unit.
& References another page or pages that provide additional information.
Trademarks
The Bluetooth® word mark and logos are registered trademarks owned by Bluetooth SIG, Inc. and
any use of such marks by Yamaha Corporation is under license. Other trademarks and trade
names are those of their respective owners.
(For CRX-B370D)
The unit supports DAB/DAB+ tuning.
Yamaha Eco-Label is a mark that certifies products of high environmental performance.
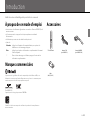
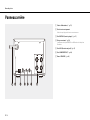
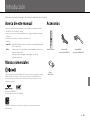
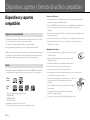
Accessories
Remote control FM antenna
(for CRX-B370)
Batteries (x 2)
(AA, R6, UM-3)
DAB/FM antenna
(for CRX-B370D)

8 En
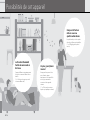
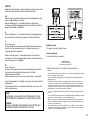
What you can do with this unit
Greater music
enjoyment
The unit is equipped with a
digital optical input jack and a
stereo mini-jack that enable
connection to external devices.
(& p. 25 Playing music from
external devices)
Bluetooth makes it easy
to operate remotely
The unit turns on automatically when
a Bluetooth connection is established.
(& p. 18 Playing music via Bluetooth®
connection)
Compact and easy to
use with high quality
sound
Sound quality can be adjusted to
suit individual preferences.
(& p. 27 Adjusting sound quality)

En 9
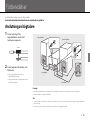
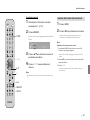
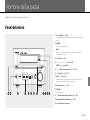
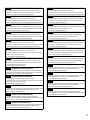
Parts name
Familiarize yourself with all parts and their functions.
Front panel
A B094 85 6 7321
1 z (Power) (& p. 15)
The front panel display turns on when the unit is turned on.
2 PHONES
Connect headphones to this jack.
Note
When headphones are connected, there is no sound from the
speakers or subwoofer.
3 USB jack (& p. 17)
4 f/h, j/g (& p. 16, 17)
PRESET
<
/
>
(& p. 20, 22)
5 a/d (Play/pause) (& p. 16, 17)
6 s (Stop) (& p. 16, 17)
7 INPUT (& p. 16, 17)
Change the input source. (The selected input source is shown in the
front panel display.)
8 Disc tray (& p. 16)
9 VOLUME
Adjust the volume.
0 = (Open/close the disc tray) (& p. 16)
A Front panel display (& p. 11)
B Remote control sensor

10 En
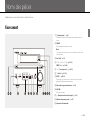
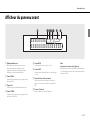
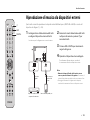
Parts name
Rear panel
SPEAKERS
RL
DIGITAL IN DAB/FM
75Ω UNBAL.
AUX IN
SUBWOOFER
OUT
6Ω MIN./SPEAKER
+
–
71 3 4 5 62
1 Power cord (& p. 15)
2 Service only jack
Use when the unit requires maintenances.
3 DIGITAL IN jack (optical input) (& p. 25)
4 Antenna jack (& p. 14)
CRX-B370 jack positioning differs from that shown in the illustration.
5 AUX IN jack (mini jack input) (& p. 25)
6 SUBWOOFER OUT jack (& p. 13)
7 SPEAKERS terminals (& p. 13)

En 11
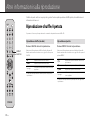
Parts name
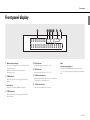
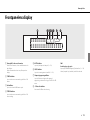
Front panel display
1 Multi information display
Show various information, such as music information and
the radio frequency.
Characters shown in the front panel display are
alphanumerics only.
2 TUNED indicator
Glows when the unit is receiving a signal from an FM
station.
3 2nd indicator
Glows when a secondary DAB station is played.
4 STEREO indicator
Glows when the unit is receiving a signal from an FM
stereo broadcast.
5 MUTE indicator
Glows when the sound is muted (& p. 12).
6 SLEEP indicator
Glows when the sleep timer is set (& p. 15).
7 Shuffle/repeat indicator
Glows when the shuffle or repeat function is enabled for
songs in a CD or USB memory device.
8 $ Bluetooth indicator
Show the status of Bluetooth connection.
Note
Changing display brightness
Each press of the DIMMER button on the remote control
(& p. 12) changes the brightness: bright (default), mid dim, or
dim.
aaaaaaaa
aaaaaaaaaaaaaaaa
TUNED 2nd
STEREO
MUTE
SLEEP
ALL
1
vx
$
1 2 345 6 7 8

12 En
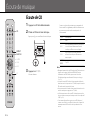
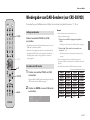
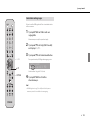
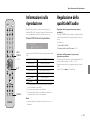
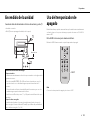
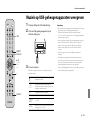
Parts name
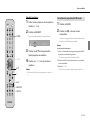
Remote control
1 Infrared signal transmitter
2 OPEN/CLOSE = (Open/close the disc tray)
(& p. 16)
3 Input source buttons
Switch the input source.
4 Numeric buttons (& p. 16)
5 SHUFFLE (& p. 26)
6 BASS, TREBLE (& p. 27)
7 Audio control, cursor control buttons (& p. 16,
17)
8 OPTION (& p. 28)
9 VOLUME +/–
Adjust the volume.
0 TUNER/PRESET (& p. 20, 22)
A SLEEP (& p. 15)
B DIMMER (& p. 11)
C z (Power) (& p. 15)
D REPEAT (& p. 26)
E MUTE
Turn mute on or off.
F DISPLAY (& p. 27)
Installing batteries
Check the “+” and “-” of the batteries and insert them in the
correct directions.
Note
Change both batteries when the operation range of the
remote control decreases.
1
C
D
E
F
2
3
4
5
6
7
8
9
0
A
B

En 13
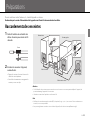
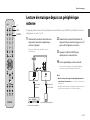
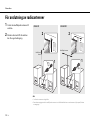
Preparations
Connect speakers, the antenna, etc. and turn the unit on.
Do not connect the power cord of the unit until you have finished connecting all cables.
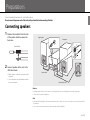
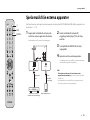
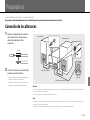
Connecting speakers
1 Remove the insulation from the ends
of the speaker cables to expose the
bare wires.
2 Connect speakers to the unit, as the
illustration shows.
• Prepare speakers, subwoofer and speaker cables
separately.
• See documentation provided with the speakers
for more information.
Caution
• If the bare speaker wires touch each other or any metal part of the unit, it could damage the unit and/or the speakers.
• Use speakers of at least 6 Ω impedance.
Note
• Make sure that left and right (L, R) connections and polarity (red: +, black: -) are correct. If connections are incorrect, the sound will
be unnatural.
• You can also connect a subwoofer to the unit (it must have a built-in amplifier).
15 mm (5/8 in.)
1
3
2
SUBWOOFER
OUT
Right speaker
Left speaker
Subwoofer
Monaural pin cable
Speaker cable

14 En
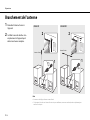
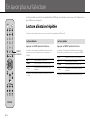
Preparations
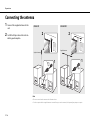
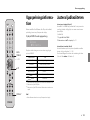
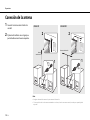
Connecting the antenna
1 Connect the supplied antenna to the
unit.
2 Install it with pins where the unit can
obtain good reception.
Note
• Be sure to stretch out the antenna as the illustration shows.
• If radio reception with the supplied antenna is not satisfactory, an outdoor antenna (sold separately) may improve reception.
ANTENNA
FM75Ω
UNBAL.
DAB/FM
75ΩUNBAL.
Supplied antenna
2
1
Supplied antenna
2
1
CRX-B370 CRX-B370D

En 15
Preparations
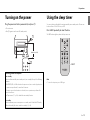
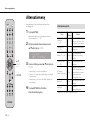
Turning on the power
Plug the power cord into a power outlet, and press z.
• The unit turns on.
• Press z again to turn the unit off (standby mode).
Using the sleep timer
You can set the time after which the unit automatically enters standby mode. The time can
be selected from 120/90/60/30 min., or OFF.
Press SLEEP repeatedly to select the time.
The SLEEP indicator lights up when the sleep timer is set.
Note
• To cancel the sleep timer, press SLEEP again.
Reducing power consumption
Auto standby
The unit will automatically enter standby mode (auto standby) if in any of the following
situations:
• BLUETOOTH, CD, or USB is selected as the input source, but no audio is played, and no
operations are performed, for more than 20 minutes.
• An input source other than above is selected, but no operations are performed for
more than 8 hours.
See “Option menu” (& p. 28) to disable the auto standby function.
Eco standby
The unit minimizes power consumption in eco standby mode. Disable the BT Standby
(Bluetooth standby) function to enable eco standby (& p. 28).
1
2
Within 6 m (20 ft)
SLEEP

16 En
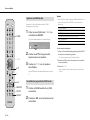
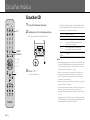
Listening to music
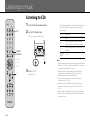
Listening to CDs
1 Press CD on the remote control.
2 Set a CD in the disc tray.
Press = to open/close the disc tray.
3 Press a/d.
Playback starts.
Use the following buttons to control audio playback. A song
can also be selected using the numeric buttons on the
remote control.
Note
• This unit allows playback of audio CDs, and data CDs in which MP3/
WMA files are recorded. For details on playable CDs, see “Supported
devices/media and file formats” (& p. 34).
• When CD playback is stopped, playback will resume from the
beginning of the song last played. Pressing s (stop) while
playback is stopped will clear resume playback.
• You can cancel the song number selected with the numeric
buttons by pressing s (stop).
• Music files stored on a data CD can be played using the same
operations used to play music stored on a USB memory device
(& p. 17).
• If you turn off the unit with CD selected as the input source and a
CD set in it, the unit automatically plays back the set CD next time
you turn on the unit.
a/d Play/pause
s Stop
f
Skip to the beginning of the song being
played back. Press and hold to fast rewind.
g
Skip to the next song. Press and hold to fast
forward.
SHUFFLE/
REPEAT
& p. 26
SHUFFLE
g
s
f
REPEAT
CD
a
/
d

En 17
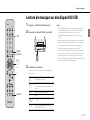
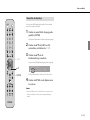
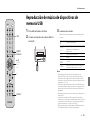
Listening to music
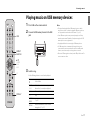
Playing music on USB memory devices
1 Press USB on the remote control.
2 Connect a USB memory device to the USB
jack.
3 Select a song.
Use the following buttons to control audio playback.
Note
• This unit allows playback from USB memory devices on which
music files are saved. For details on playable USB memory devices,
see “Supported devices/media and file formats” (& p. 34).
• Some USB memory devices may not work properly even if they
meet the requirements. Playability of and power supply to all USB
memory devices are not guaranteed.
• Stop playback before disconnecting the USB memory device.
• A USB memory device is automatically charged as long as it is
connected to the unit except when the unit is in standby mode.
However, some devices may not charge when connected.
• Connect a USB storage device directly to the USB jack of the unit. Do
not use extension cables.
q
w
Select a folder.
a/d,
g
Confirm the selected item and proceed to
the next level, or start/pause playback.
f Return to the previous item.
s Stop
SHUFFLE/
REPEAT
& p. 26
DISPLAY
Display information about the content
being played (& p. 27).
SHUFFLE
g
q
/
w
a
/
d
s
f
REPEAT
USB
DISPLAY

18 En
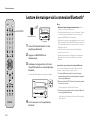
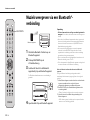
Listening to music
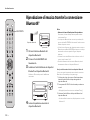
Playing music via Bluetooth® connection
1 Enable the Bluetooth function on your
Bluetooth device.
2 Press BLUETOOTH on the remote control.
3 Select this unit from the Bluetooth device
list on your Bluetooth device.
The $ indicator glows when a connection is established.
4 Play music using your Bluetooth device.
Note
• Decrease the volume of the unit before playback. Otherwise,
playback volume may be too loud.
• If a Bluetooth device has been connected before, the unit will
connect to the last connected device when BLUETOOTH on the
remote control is pressed.
• If the unit is connected to another device via Bluetooth connection,
press and hold BLUETOOTH at least three seconds to terminate that
connection before connecting to the target device.
• If a passkey is required during the Bluetooth connection, enter the
number “0000.”
• See documentation provided with your Bluetooth device for more
information on Bluetooth connection.
Unable to connect the unit to a Bluetooth device
If a Bluetooth connection was not established after following the
instructions shown at left, try the following.
1 If the Bluetooth device has been connected to the unit before,
delete the unit from the list of devices registered with your
Bluetooth device.
2 Press and hold BLUETOOTH on the remote control for at least
three seconds.
- “Pairing” will be shown in the front panel display.
3 Select this unit from the Bluetooth device list on your Bluetooth
device.
- The $ will glow in the front panel display when a connection is
established.
Bluetooth device
This unit
$
BLUETOOTH

En 19
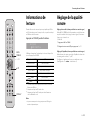
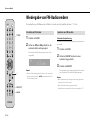
Listening to music
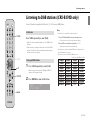
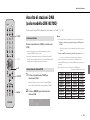
Listening to DAB stations (CRX-B370D only)
Connect the antenna supplied with the unit (& p. 14) to receive DAB stations.
Press TUNER repeatedly to select [DAB].
• Initial scan starts automatically when you select [DAB] for the
first time.
• When scanning is completed, the number of receivable DAB
stations is shown in the front panel display momentarily, and
the first station stored is played.
1 Press TUNER repeatedly to select [DAB].
When the unit cannot receive the DAB signal, “Off Air” is
shown in the front panel display.
2 Press ee /rr to select a DAB station.
Note
• Initial scan is also available from the option menu.
1 Press OPTION when DAB is selected as the input source.
- The option menu is shown in the front panel display.
2 Press q/w to select [Initial Scan] and press a/d.
- Initial scan starts and finishes automatically.
• If an initial scan is performed, stored DAB station information and
preset DAB stations are cleared.
• This unit can receive only Band III DAB frequencies.
Frequency in MHz/Channel label
Initial scan
Tuning in DAB stations
DAB
STATION1
TUNED 2nd
STEREO
OPTION
q/w
TUNER
a
/
d
ee
/rr

20 En
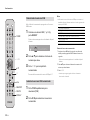
Listening to music
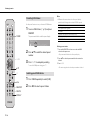
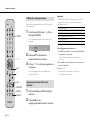
Use the preset function to store your favorite 30 DAB stations.
1 Tune in a DAB station (& p. 19) and press
MEMORY.
The preset number flashes in the front panel display.
2 Press q/w to select the desired preset
number.
3 Press a/d to complete presetting.
To cancel the DAB preset setting, press s.
1 Press TUNER repeatedly to select [DAB].
2 Press e/r to select a preset station.
Note
• DAB station information shown in the front panel display is
switched in the following order each time DISPLAY is pressed.
Deleting a preset station
1 Press and hold DELETE for at least two seconds with DAB
selected as the input source.
- The preset number flashes in the front panel display.
2 Press q/w to select the preset number for the station to be
deleted.
3 Press a/d.
- The station assigned to the selected preset number is deleted.
Presetting DAB stations
Selecting preset DAB stations
Memory
DAB01 Station1
STATION (default)
DLS (Dynamic Label Segment)
ENSEMBLE
CHANNEL/FREQ (Channel label and frequency)
SIG.Q. (signal quality)
AUDIO FORMAT
MEMORY
DELETE
TUNER
s
DISPLAY
q/w
a
/
d
e
/r
La page charge ...
La page charge ...
La page charge ...
La page charge ...
La page charge ...
La page charge ...
La page charge ...
La page charge ...
La page charge ...
La page charge ...
La page charge ...
La page charge ...
La page charge ...
La page charge ...
La page charge ...
La page charge ...
La page charge ...
La page charge ...
La page charge ...
La page charge ...
La page charge ...
La page charge ...
La page charge ...
La page charge ...
La page charge ...
La page charge ...
La page charge ...
La page charge ...
La page charge ...
La page charge ...
La page charge ...
La page charge ...
La page charge ...
La page charge ...
La page charge ...
La page charge ...
La page charge ...
La page charge ...
La page charge ...
La page charge ...
La page charge ...
La page charge ...
La page charge ...
La page charge ...
La page charge ...
La page charge ...
La page charge ...
La page charge ...
La page charge ...
La page charge ...
La page charge ...
La page charge ...
La page charge ...
La page charge ...
La page charge ...
La page charge ...
La page charge ...
La page charge ...
La page charge ...
La page charge ...
La page charge ...
La page charge ...
La page charge ...
La page charge ...
La page charge ...
La page charge ...
La page charge ...
La page charge ...
La page charge ...
La page charge ...
La page charge ...
La page charge ...
La page charge ...
La page charge ...
La page charge ...
La page charge ...
La page charge ...
La page charge ...
La page charge ...
La page charge ...
La page charge ...
La page charge ...
La page charge ...
La page charge ...
La page charge ...
La page charge ...
La page charge ...
La page charge ...
La page charge ...
La page charge ...
La page charge ...
La page charge ...
La page charge ...
La page charge ...
La page charge ...
La page charge ...
La page charge ...
La page charge ...
La page charge ...
La page charge ...
La page charge ...
La page charge ...
La page charge ...
La page charge ...
La page charge ...
La page charge ...
La page charge ...
La page charge ...
La page charge ...
La page charge ...
La page charge ...
La page charge ...
La page charge ...
La page charge ...
La page charge ...
La page charge ...
La page charge ...
La page charge ...
La page charge ...
La page charge ...
La page charge ...
La page charge ...
La page charge ...
La page charge ...
La page charge ...
La page charge ...
La page charge ...
La page charge ...
La page charge ...
La page charge ...
La page charge ...
La page charge ...
La page charge ...
La page charge ...
La page charge ...
La page charge ...
La page charge ...
La page charge ...
La page charge ...
La page charge ...
La page charge ...
La page charge ...
La page charge ...
La page charge ...
La page charge ...
La page charge ...
La page charge ...
La page charge ...
La page charge ...
La page charge ...
La page charge ...
La page charge ...
La page charge ...
La page charge ...
La page charge ...
La page charge ...
La page charge ...
La page charge ...
La page charge ...
La page charge ...
La page charge ...
La page charge ...
La page charge ...
La page charge ...
La page charge ...
La page charge ...
La page charge ...
La page charge ...
La page charge ...
La page charge ...
La page charge ...
La page charge ...
La page charge ...
La page charge ...
La page charge ...
La page charge ...
La page charge ...
La page charge ...
La page charge ...
La page charge ...
La page charge ...
La page charge ...
La page charge ...
La page charge ...
La page charge ...
La page charge ...
La page charge ...
La page charge ...
La page charge ...
La page charge ...
La page charge ...
La page charge ...
La page charge ...
La page charge ...
La page charge ...
La page charge ...
La page charge ...
La page charge ...
La page charge ...
La page charge ...
La page charge ...
La page charge ...
La page charge ...
La page charge ...
La page charge ...
La page charge ...
La page charge ...
La page charge ...
La page charge ...
La page charge ...
La page charge ...
La page charge ...
La page charge ...
La page charge ...
La page charge ...
La page charge ...
La page charge ...
La page charge ...
La page charge ...
La page charge ...
La page charge ...
La page charge ...
La page charge ...
La page charge ...
La page charge ...
La page charge ...
La page charge ...
La page charge ...
La page charge ...
La page charge ...
La page charge ...
La page charge ...
La page charge ...
La page charge ...
La page charge ...
La page charge ...
-
 1
1
-
 2
2
-
 3
3
-
 4
4
-
 5
5
-
 6
6
-
 7
7
-
 8
8
-
 9
9
-
 10
10
-
 11
11
-
 12
12
-
 13
13
-
 14
14
-
 15
15
-
 16
16
-
 17
17
-
 18
18
-
 19
19
-
 20
20
-
 21
21
-
 22
22
-
 23
23
-
 24
24
-
 25
25
-
 26
26
-
 27
27
-
 28
28
-
 29
29
-
 30
30
-
 31
31
-
 32
32
-
 33
33
-
 34
34
-
 35
35
-
 36
36
-
 37
37
-
 38
38
-
 39
39
-
 40
40
-
 41
41
-
 42
42
-
 43
43
-
 44
44
-
 45
45
-
 46
46
-
 47
47
-
 48
48
-
 49
49
-
 50
50
-
 51
51
-
 52
52
-
 53
53
-
 54
54
-
 55
55
-
 56
56
-
 57
57
-
 58
58
-
 59
59
-
 60
60
-
 61
61
-
 62
62
-
 63
63
-
 64
64
-
 65
65
-
 66
66
-
 67
67
-
 68
68
-
 69
69
-
 70
70
-
 71
71
-
 72
72
-
 73
73
-
 74
74
-
 75
75
-
 76
76
-
 77
77
-
 78
78
-
 79
79
-
 80
80
-
 81
81
-
 82
82
-
 83
83
-
 84
84
-
 85
85
-
 86
86
-
 87
87
-
 88
88
-
 89
89
-
 90
90
-
 91
91
-
 92
92
-
 93
93
-
 94
94
-
 95
95
-
 96
96
-
 97
97
-
 98
98
-
 99
99
-
 100
100
-
 101
101
-
 102
102
-
 103
103
-
 104
104
-
 105
105
-
 106
106
-
 107
107
-
 108
108
-
 109
109
-
 110
110
-
 111
111
-
 112
112
-
 113
113
-
 114
114
-
 115
115
-
 116
116
-
 117
117
-
 118
118
-
 119
119
-
 120
120
-
 121
121
-
 122
122
-
 123
123
-
 124
124
-
 125
125
-
 126
126
-
 127
127
-
 128
128
-
 129
129
-
 130
130
-
 131
131
-
 132
132
-
 133
133
-
 134
134
-
 135
135
-
 136
136
-
 137
137
-
 138
138
-
 139
139
-
 140
140
-
 141
141
-
 142
142
-
 143
143
-
 144
144
-
 145
145
-
 146
146
-
 147
147
-
 148
148
-
 149
149
-
 150
150
-
 151
151
-
 152
152
-
 153
153
-
 154
154
-
 155
155
-
 156
156
-
 157
157
-
 158
158
-
 159
159
-
 160
160
-
 161
161
-
 162
162
-
 163
163
-
 164
164
-
 165
165
-
 166
166
-
 167
167
-
 168
168
-
 169
169
-
 170
170
-
 171
171
-
 172
172
-
 173
173
-
 174
174
-
 175
175
-
 176
176
-
 177
177
-
 178
178
-
 179
179
-
 180
180
-
 181
181
-
 182
182
-
 183
183
-
 184
184
-
 185
185
-
 186
186
-
 187
187
-
 188
188
-
 189
189
-
 190
190
-
 191
191
-
 192
192
-
 193
193
-
 194
194
-
 195
195
-
 196
196
-
 197
197
-
 198
198
-
 199
199
-
 200
200
-
 201
201
-
 202
202
-
 203
203
-
 204
204
-
 205
205
-
 206
206
-
 207
207
-
 208
208
-
 209
209
-
 210
210
-
 211
211
-
 212
212
-
 213
213
-
 214
214
-
 215
215
-
 216
216
-
 217
217
-
 218
218
-
 219
219
-
 220
220
-
 221
221
-
 222
222
-
 223
223
-
 224
224
-
 225
225
-
 226
226
-
 227
227
-
 228
228
-
 229
229
-
 230
230
-
 231
231
-
 232
232
-
 233
233
-
 234
234
-
 235
235
-
 236
236
-
 237
237
-
 238
238
-
 239
239
-
 240
240
-
 241
241
-
 242
242
-
 243
243
-
 244
244
-
 245
245
-
 246
246
-
 247
247
-
 248
248
-
 249
249
-
 250
250
-
 251
251
-
 252
252
-
 253
253
-
 254
254
-
 255
255
-
 256
256


Yamaha B370D Le manuel du propriétaire
- Catégorie
- Récepteurs multimédia de voiture
- Taper
- Le manuel du propriétaire
dans d''autres langues
- italiano: Yamaha B370D Manuale del proprietario
- English: Yamaha B370D Owner's manual
- Deutsch: Yamaha B370D Bedienungsanleitung
- Nederlands: Yamaha B370D de handleiding
- svenska: Yamaha B370D Bruksanvisning
- Türkçe: Yamaha B370D El kitabı
- suomi: Yamaha B370D Omistajan opas
Documents connexes
-
Yamaha B370D Le manuel du propriétaire
-
-
Yamaha YH-L700A Mode d'emploi
-
Yamaha N470D Le manuel du propriétaire
-
Yamaha R-N303D Le manuel du propriétaire
-
Yamaha R-N803D Le manuel du propriétaire
-
Yamaha RX-A680 Manuel utilisateur
-
Yamaha RX-V485 Guide de démarrage rapide
-
-
Yamaha RX-A3080 Mode d'emploi